
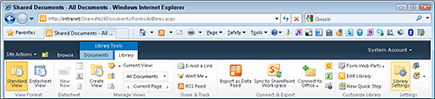
Figure 10-1: Click the Library Settings button to change your library’s configuration.
Chapter 10
Configuring Libraries and Lists
In This Chapter
![]() Finding list settings
Finding list settings
![]() Configuring General settings for lists and libraries
Configuring General settings for lists and libraries
![]() Setting unique permissions at the library/list and document level
Setting unique permissions at the library/list and document level
I introduce document libraries and lists in Chapters 2 and 3, respectively. In the next chapter, I show you how to create your own custom lists. In this chapter, I show you how to control when documents are visible to others, who can edit another user’s list items, and even how to limit site visitors’ access to a specific library. These are all examples of configuration options in a library or list.
SharePoint 2010 has expanded on the library/list configuration options available previously. I remember learning all the new 2007 settings that I now use every day! Validation settings, Ratings settings, and Forms settings (for lists) are some of the new configuration options in 2010.
You need to be a site owner to perform the configuration options that I describe in this chapter. Don’t let all that control go to your head, however. Sometimes having a document library that’s configured too tightly can make your users find creative ways to get around the restrictions, if they don’t deem them beneficial! On the other hand, a well-planned configuration for document management can help your team avoid embarrassing errors and time-consuming corrections while creating and maintaining documents and lists.
 You need to have the Manage Lists permission to manage lists, which is usually conferred to the site’s designer. See Chapter 13 for more about managing permissions and for details on how to get this permission.
Accessing List Settings
To view or change the configuration settings of your library or list, use the Library Settings or List Settings page. This page is the hub where you can find all the options for configuring and customizing your list or library to meet your business requirements. You can find shortcuts to many of these options on the ribbon.
Follow these steps to access the Library/List Settings page:
1. Navigate to your library/list by clicking the list’s or library’s name on the Quick Launch toolbar (if it shows in the Quick Launch).
You can also locate the list by clicking the View All Site Content link on the Quick Launch toolbar or choosing Site Actions⇒View All Site Content.
2. On the Ribbon, click the Library or List tab under the Library (or List) Tools tab.
Locate the Settings section, which should be on the far right with the Library Settings, Create Column, Library Permissions, and Edit Form Web Parts icons.
3. Click the Library (or List) Settings button, as shown in Figure 10-1.
The Library or List Settings page appears. (You may have already accessed this page when completing the steps in other chapters in this book.)
The Library (or List) Settings page is divided into several sections. Each section contains many configuration choices, as shown in Figure 10-2. I suggest you spend some time browsing this page. Some of the sections you see include
• List Information: Displays the library (or list) name, web address, and description.
You can change the list’s name and description by clicking the Title, Description, and Navigation link in the General Settings column.
The web address is set to the list’s default view. Change the default view by scrolling down to the Views section of the Library (or List) Settings page.
When you link to a list or library, use the root of the web address. That way, you can change the default view any time you want without needing to change any links that target the list. For example, to create a link to the Shared Documents library, you would use the following:
http://intranet/Shared Documents
Figure 10-2: The Library/List Settings page.
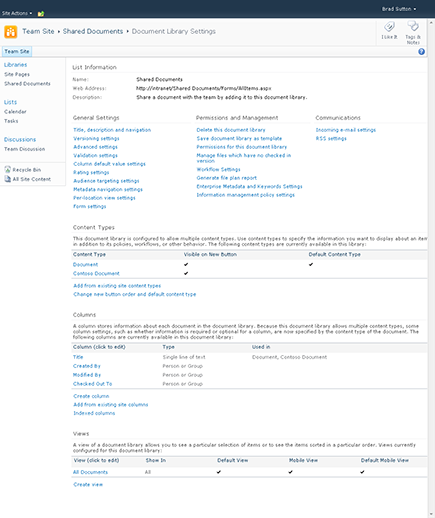
• General Settings: Includes Title and Description as well as Versioning, Advanced, and Rating settings. See Table 10-1 for a complete list of General settings.
• Permissions and Management: Includes saving the library/list as a template as well as Permission and Workflow settings. See Table 10-2 for a complete list of Permissions and Management settings.
• Communications: Configure RSS and incoming e-mail settings for the library or list.
• Content Types: If you have configured your library/list to allow for content types, a Content Types section appears. Use this section to associate content types with your list or library. With content types, you can reuse columns across sites as well as across lists and libraries. See Chapter 25 for a more thorough discussion of content types.
• Columns: View, add, and modify columns for the library or list.
See Chapter 11 to review column types. You can create your own column for that list only, add a site column from the preconfigured SharePoint site columns, or create a new site column of your choosing that can be added to multiple lists.
• Views: Display and modify the library/list views. You can also create new views.
Many site owners never change the default settings options; some simply change the title or delete the list. For others, this level of optional setting detail is what they want to know first! Microsoft supplies descriptions on the how and/or why to use the settings on each of the individual settings pages; however, this chapter may become one of the most dog-eared chapters in the book because there are so many options to remember!
Configuring the General Settings
The General Settings area of the library/list has been expanded in SharePoint 2010 to include multiple new settings, including Validation, Column Default Value (for libraries), Rating, Metadata Navigation, Per-Location View, and Form. See Table 10-1 for an overview to see what you can do with each of these options.
Table 10-1 General Settings Configuration Options
|
Setting Name |
What You Can Accomplish |
|
Title, Description, and Navigation |
Just like it sounds! (See the section, “Changing the title, description, and navigation,” later in this chapter.) |
|
Versioning |
Configure item approval, versioning (major and minor), and require check-out. |
|
Advanced |
A plethora of options including allowing for content types, search visibility, allowing for folders, or datasheet view. |
|
Validation |
Allows you to create formulas that compare two or more columns in your library or list. |
|
Column Default Value |
Add or edit default values for columns indicated in the library or list Validation settings. |
|
Rating |
A Yes or No option that allows items in the library or list to be rated. |
|
Audience Targeting |
A Yes or No option that allows the library or list to use audience targeting. Enabling audience targeting creates a Targeting column for this list. Some Web Parts can use this data to filter list contents based on whether the user is in the audience. |
|
Metadata Navigation |
Allows for a dynamic filtering of the library or list in the Navigation Tree View. Filtering can include content types, choice columns, or managed metadata fields. |
|
Per-Location View |
Allows you to set the default view that appears when a user browses to a specific location in the list or library. When used with metadata navigation, you can set views for each level in the metadata hierarchy. |
|
Form |
Available for lists only. You need InfoPath 2010 to utilize these settings. |
Changing the title, description, and navigation
The Title, Description and Navigation Settings page is a simple, self-descriptive settings page. Most of these options are what you configure when you first create the library or list, including whether the list appears on the Quick Launch toolbar.
 Changing the title does not change the web address (URL) of the library/list. If having the title match the URL is important, or less confusing, to your team, consider recreating a new library or list with the desired title and deleting the old list. Of course, this works better early in the process, before you upload documents or create list items!
If you already have many items in your library or list, you can copy documents from one library to another, or export an existing list to Excel and re-import into a new list. However, this shouldn’t be taken lightly. Some column configuration settings, such as a Choice column, need to be recreated along with all the library/list settings I discuss in this chapter. If you’re unsure what you want to name a library or list when you create it, take some time to consider your terminology before creating the library or list.
Versioning settings
The Versioning Settings area contains probably some of the most sought after settings in any library or list. Versioning settings cover most of the document management or content management choices. So your new document/content management mantra is approval, versioning, and check out. I can say it in my sleep. By default, Approval, Versioning, or Check Out requirement settings are not turned on in a team site.
If you want to have these options enabled when your sites are configured, consider using a publishing site instead.
Before selecting these options, make sure you know the business processes of your team. If documents are thoroughly vetted and approved outside the SharePoint process, you may not want or need Approval settings or Check Out enforced. If your documents are images, you may or may not want to apply versioning if the versions don’t matter to you and you would not need to revert to an older version.
Consider using multiple document libraries and apply different settings based on need. For example, if you have 100 documents in a library and really only need versioning and approval on 5 of those documents, perhaps they can be placed in a library with extra configuration.
Versioning can be one of the most misunderstood features of SharePoint document management. Versioning is a helpful protection mechanism because you can revert to a previous version of the document, if necessary. Versions in SharePoint are copies of the same document at different intervals during editing. If you require users to view different versions of a document, maybe for choosing between the two, you need to include a designation in the name (such as v1.0 in the tip below) or an additional Metadata column.
I suggest adding the Versions column to your views so that users can quickly see the version of the document. Otherwise, you end up with users appending versioning information to the document’s name or title, such as Employee Handbook v1.0, Employee Handbook v2.0, or my favorite, Client_Proposal_Final_v3.0_FINAL.
Follow these steps to apply or modify Versioning settings:
1. Click the Versioning Settings link in the Library/List Settings Page.
The sections of the Versioning Settings page include Content Approval, Document Version History, Draft Item Security, and Require Check Out (libraries only).
2. Choose whether to require item approval in the Content Approval section by selecting the Yes or No radio button.
If you selected Yes in answer to Require Content Approval for Submitted Items?, individuals with the Approve Items permissions can always see draft items.
Items that aren’t approved yet (meaning they are draft versions) aren’t visible to site members or visitors. You can designate who you want to view drafts in the Draft Item Security section. See Chapter 19 for details on content approval.
3. In the Document Version History section, select a radio button to indicate whether to use No Versioning, Create Major Versions, Create Major and Minor (Draft) Versions, or (optional) specify the Number of Versions to keep by selecting the appropriate check box and entering a number.
The default for a list/library is No Versioning. You can select Major Versions (1.0, 2.0. 3.0, and so on) or Major and Minor Versions (1.0, 1.2. 1.3, 2.0, and so on). Selecting either of the last two options enables you to designate a limit for the number of versions of each type by entering a number up to 10,000.
4. Choose who can see draft items by selecting a Draft Item Security radio button in the Draft Item Security section.
This section is disabled unless you allow for minor (draft) versions or require content approval of your documents or list items. Here are the three options for who can see draft items — Any User Who Can Read Items, Only Users Who Can Edit Items, or Only Users Who Can Approve (and the Author).
5. Determine whether to require check out for users editing documents by selecting the Yes or No radio button.
Although it can sometimes be a hassle (I have plenty of coworkers who forget they checked out a document, sometimes months ago!), requiring check out is another good safety mechanism that makes sure the other users don’t see a document in mid-modification, or have multiple users editing at the same time (last save wins).
Consider adding the Checked Out To column to your views so that users can quickly see who has an item checked out.
6. Click OK or Cancel.
If you click OK, your Versioning settings are applied. Go try them out!
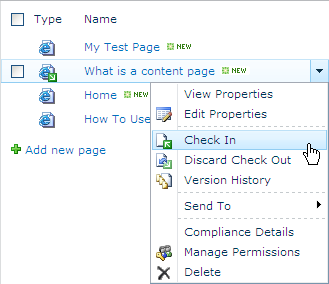
As I discuss in Chapter 2, an Edit menu appears next to a document’s or item’s title in the library/list view (see Figure 10-3). This drop-down list allows a document’s editor to check out/check in the document, approve, set off a workflow, and so forth. This menu is contextual — if approval isn’t set on the library or list, Approve doesn’t appear on the menu. If a document is checked out, the option to Discard Check Out appears.
Figure 10-3: A document’s edit menu.
In most cases, team members navigate to the site using a browser to work with lists. However, think about how your team interacts with documents. They may be navigating to a library or a List View Web Part using the browser, but they may also be linking from a bookmark, or opening the document directly from the editing application (such as Word, Excel, or PowerPoint). Although current versions of Office support and interact with SharePoint library settings, users may not know where to find these commands.
 Avoid frustration by taking a little time to review the settings and options with your team. Training on these document editing and management options is one of my number one recommendations for SharePoint collaboration success, especially for teams with many members/contributors.
Advanced settings
Advanced settings include many powerful configuration options for libraries and lists:
![]() Content Types: Allows you to add and remove content types associated with the list or library. See Chapter 25 for details on creating your own content types.
Content Types: Allows you to add and remove content types associated with the list or library. See Chapter 25 for details on creating your own content types.
![]() Document Template (library only): Allows you to specify the default template, such as a Word or PowerPoint template, that is used when someone clicks the New button to create a new document.
Document Template (library only): Allows you to specify the default template, such as a Word or PowerPoint template, that is used when someone clicks the New button to create a new document.
You can also associate document templates with content types. So you can use multiple content types with a library to associate multiple document templates.
![]() Opening Documents in the Browser (library only): Allows you to determine the behavior of the browser when someone clicks on a document to open it. If you don’t want to use the Office Web Apps, disable the opening of documents in the browser. This also allows users to send direct links to the documents if necessary.
Opening Documents in the Browser (library only): Allows you to determine the behavior of the browser when someone clicks on a document to open it. If you don’t want to use the Office Web Apps, disable the opening of documents in the browser. This also allows users to send direct links to the documents if necessary.
![]() Custom Send to Destination (library only): This is a great option that lets you add your own web address to the Send To menu on a document’s Edit menu. Your SharePoint administrator can also add global addresses that appear in the Send To menu in every document library. The Send To command sends a copy of your file to another location, such as another team site where you want to share the document.
Custom Send to Destination (library only): This is a great option that lets you add your own web address to the Send To menu on a document’s Edit menu. Your SharePoint administrator can also add global addresses that appear in the Send To menu in every document library. The Send To command sends a copy of your file to another location, such as another team site where you want to share the document.
![]() Folders: Indicates whether users can create new folders in the library. I like to turn this off so people don’t go folder crazy. You can always turn it on so you can create folders when necessary and then turn it back off.
Folders: Indicates whether users can create new folders in the library. I like to turn this off so people don’t go folder crazy. You can always turn it on so you can create folders when necessary and then turn it back off.
![]() Search: Specifies whether items in the list or library should appear in search results.
Search: Specifies whether items in the list or library should appear in search results.
![]() Offline Client Availability: Allows you to specify whether users of desktop client software, such as Word and Excel, can browse to the library.
Offline Client Availability: Allows you to specify whether users of desktop client software, such as Word and Excel, can browse to the library.
![]() Site Assets Library (library only): Allows you to designate the library as a Site Assets library, which makes it easier for users to browse to the library to find multimedia files.
Site Assets Library (library only): Allows you to designate the library as a Site Assets library, which makes it easier for users to browse to the library to find multimedia files.
![]() Datasheet: Allows you to specify whether users can edit the items in the list or library using the datasheet view.
Datasheet: Allows you to specify whether users can edit the items in the list or library using the datasheet view.
![]() Dialogs: By default, list and library forms launch in a dialog box. This option lets you specify that forms should open in the browser window as a page instead of a dialog box.
Dialogs: By default, list and library forms launch in a dialog box. This option lets you specify that forms should open in the browser window as a page instead of a dialog box.
In addition, list advanced settings include item-level permissions and attachments.
Follow these steps to apply or modify Advanced settings:
1. Click the Advanced Settings link in the Library/List Settings page.
The Advanced Settings page appears, as shown in Figure 10-4.
2. Choose whether to enable management of content types by selecting the Yes or No radio button.
If you select Yes, after applying, your Library/List Settings page will contain a new section for Content Types. The default is No.
3. Change the document template (library only) by specifying a template URL.
Libraries have a default template for new documents. Remember, you can create a new document in a library as well as upload documents that have been created previously. For example, the document template for a document library is the default Word template. You could change this to an Excel or PowerPoint template. You could also change it to a custom template you created in one of these applications.
Figure 10-4: Configuring Advanced settings.

If you’re working with content types, you can enable a different template for each document type. For example, your library may house contracts and have three content types for different contracts, all with a different template available off the New button.
If you opt for a different document template, upload the template to the Forms folder in document library and change the Template URL in the Document Template section of the Advanced settings.
4. Choose when to open documents in the browser (library only), the client application, or as the server default by selecting a radio button option in the Opening Documents in the Browser section.
If the client application is unavailable, the document opens in the browser.
5. Add a Custom Send to Destination (library only) by entering the name that should display on the Send to menu, and the URL destination.
Similar to Windows commands (for example, Send to Desktop), you can create an option to appear on the Edit menu for documents in this library to be sent to another SharePoint destination. Supply a short name to appear on the contextual menu and a URL for the destination in the Destination Name and URL text boxes.
6. Select whether folders can be created in this library/list by selecting the Yes or No radio button in the Folders section.
Selecting Yes or No determines whether the New Folder command is available on the New menu. The default is Yes.
I usually disable folders unless I have a good reason to use them. In my opinion, the only good reason to use folders is when you have a set of documents that require unique permissions but must remain in the same document library. If you leave folders enabled, people will use them.
7. Determine the search visibility for this library by selecting the Yes or No radio button in the Search section.
Selecting No for the Search option can keep the items in the library or lists from being presented in search results, even if the site or library is included in Search settings. The default is Yes.
8. Enable offline client availability by selecting the Yes or No radio button in the Offline Client Availability section.
The Offline Client Availability option determines whether items in the library/list can be downloaded to offline client applications, such as SharePoint Workspace and Outlook. The default is Yes.
9. Add library/list location to the Site Assets library (library only) by selecting the Yes or No radio button in the Site Assets Library section.
This new Site Assets Library option specifies whether this library appears as a default location when uploading images or other files to a wiki page. This can be especially beneficial for document libraries that contain images or a picture library. This keeps wiki editors from searching all over for the images they should be using. The default is No.
10. Determine whether library/list can be viewed in datasheet view by selecting the Yes or No radio button in the Datasheet section.
This option determines whether the datasheet can be used to bulk-edit data on this library or list. The default is Yes.
11. Indicate whether forms should launch in a modal dialog box by selecting the Yes or No radio button in the Dialogs section.
Modal dialog boxes get old pretty quickly, so I suggest you select the No option on this page quite often.
12. Click OK or Cancel.
If you click OK, your selections are applied.
Other advanced configuration settings available in a list (not library) include a Yes/No option for allowing attachments for a list item (default is Yes) and item-level permissions. The default for item-level permissions in a list is for all members (contributors) to be able to read and modify all items. You can adjust these settings for users to either read only their own items and/or edit only their own items.
Validation settings
Validation settings are new to SharePoint 2010, as is validation for columns that I describe in Chapter 11. Validation is a formula or statement that must evaluate to TRUE before the data can be saved. The difference between the two is that column validation compares only the data in that single column to some test, such as
= [Discount] < = .50
This means that the discount entered must be less than 50 percent.
Validation settings in the library/list level compare two or more columns to evaluate to TRUE. You can set a rule that [Discount] < [Cost] so customers don’t get an item for free (or get money back!) because they buy an item with a discount.
To use Validation settings, follow these steps:
1. Click the Validation Settings link in the Library/List Settings page.
The Validation Settings page has two sections, Formula and User Message. The Formula section is the test your comparison of the columns must pass for the item to be valid. The User Message section is what the user receives if the test fails. Users can then adjust their values until the test passes.
2. Create a formula for the validation by entering it in the Formula field.
The formula needs to compare (or validate) two columns in your library or list. The Library (or List) Settings page provides an example and a link to learning more about the proper syntax.
A selection list of columns in your library/list is available for use in your formula.
3. In the User Message text box, enter a message to be shown to users who enter an invalid list item.
4. Click OK or Cancel.
If you click OK, your validation is applied to your list.
Validations aren’t retroactive. They apply only to new and modified entries on the specified columns.
Rating settings
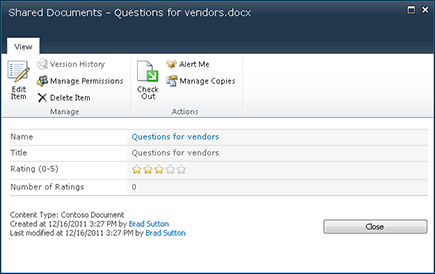
Rating settings is a simple Yes/No option to allow the items in the library/list to be rated by users. The Rating feature is a much requested feature. When enabled on your list or library, a Rating field appears, as shown in Figure 10-5.
Figure 10-5: Rating a document.
Audience Targeting settings
This setting includes one section with a Yes/No option to enable Audience Targeting for the library/list. Selecting Yes creates a Targeting column for this library/list. Certain Web Parts, such as the Content Query Web Part, can use this column to filter list contents based on the user’s inclusion in a specific audience.
Audience Targeting isn’t the same thing as permissions. A user can still access content even if they aren’t included in an audience. Audience targeting is simply a way to filter the presentation of content to certain groups of people.
The Metadata Navigation Settings page
This new SharePoint 2010 configuration option adds navigation options to the Site Hierarchy Tree View. This Metadata Navigation Settings page has three sections:
![]() Configure Navigation Hierarchy: The ability to select hierarchy fields that appear under the list in the Tree View. Options include content types, choice fields, and managed metadata fields. Folders is a default selection that can be removed.
Configure Navigation Hierarchy: The ability to select hierarchy fields that appear under the list in the Tree View. Options include content types, choice fields, and managed metadata fields. Folders is a default selection that can be removed.
![]() Configure Key Filters: Select from available Key Filter columns to use as filter input controls on the list views.
Configure Key Filters: Select from available Key Filter columns to use as filter input controls on the list views.
![]() Automatically Manage Indices for Metadata-Driven Navigation: Settings related to the indexing of the library/list.
Automatically Manage Indices for Metadata-Driven Navigation: Settings related to the indexing of the library/list.
These settings give your users another way to filter and navigate to list items. Figure 10-6 shows a screenshot of a library that’s using metadata navigation.
Figure 10-6: Use metadata to filter lists.
Per-Location Views settings
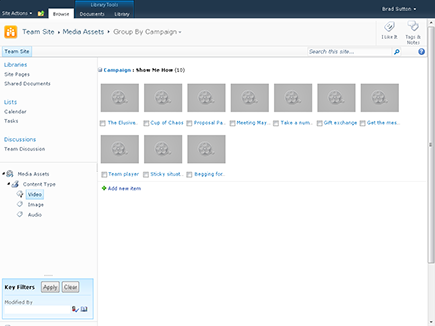
Per-Location Views work hand-in-hand with Metadata Navigation to allow you to specify which views are visible at a selected location. Location is a bit misleading in this context. It refers to the hierarchical location within the library’s metadata navigation. Folders are also considered a location, so you can specify which views are available when a user navigates to a specific folder. Figure 10-7 shows an example where the Group By Campaign view is selected for the Audio metadata filter in the library. When a user clicks Audio in the library’s metadata navigation, they will see the GroupedByCampaign view.
Form settings
This option is available only for lists. If InfoPath 2010 is installed on your machine, you can opt to allow customization of the list form using InfoPath by selecting the Customize the current form using Microsoft InfoPath radio button.
Figure 10-7: Specify the default view for a location.

Permissions and Management Options
Are you tired yet?! I know all these options can seem daunting, but the good thing is that applying the configurations is easy and located all in one spot. The hard part is deciding what you can do, and hopefully this chapter helps with that!
Permissions and Management options can seem a lot more straightforward than some of the General Settings options. I can remember when I first started using SharePoint, I struggled with the fact that deleting a list was buried in settings and that it was actually easier to delete a site! I now appreciate that the Delete option is in a location that makes you think about whether you want to delete the list (and that’s a good thing!).
I don’t detail every settings option in the Permissions and Management category. See Table 10-2 for an overview of the settings. In the following section, I discuss the Permission for This List setting.
Table 10-2 Permissions and Management Options
|
Setting Name |
What You Can Accomplish |
|
Delete This Document Library (or List) |
Just like it sounds! |
|
Save Document Library (or List) as a Template |
A way to reuse the library or list columns and settings (with or without content) in your site (or collection). |
|
Permissions for This Library (or List) |
An option that allows for different permissions for the library or list versus the entire site. |
|
Workflow |
Allows you to enable workflow and specific Workflow settings for this library or list only. For more information about workflows, see Chapter 12. |
|
Generate File Plan Report |
A troubleshooting option that generates a spreadsheet listing the available permissions, content types, and policy settings of the library. |
|
Enterprise Metadata and Keywords Settings |
Adds a managed keywords column to the list/library and lets you treat those keywords as social tags if desired. |
|
Information Management Policy |
Settings to be used in conjunction with a Records Center site or for in place records management. |
Permissions for the This Document Library (or List) setting
To create unique permissions for the library/list (rather than inheriting the site-level permissions), follow these steps:
1. Choose the Permission for This Document Library (or List) link from the Customize page.
You see a message bar below the Ribbon that tells you that the library/list is inheriting from the parent site. You can stop inheriting to apply unique permissions. If you’ve already broken inheritance on the list, you can revert to inheriting from the parent again.
2. Click the Stop Inheriting link.
The users and groups that have access to the parent (in this case, the site) become available to delete or modify. Make sure that you leave owners with the ability to edit the list!
Think through this process carefully. Breaking inheritance often causes confusion for both users and site owners. Users who can access everything on a site can be baffled when they’re denied access to a certain library or list. Site owners who may have at first liked the idea of granular permissions are suddenly stuck hunting down what’s causing access problems. Consider using a subsite with different permissions to contain exclusive libraries or lists.
3. Use the Permissions Tools tab on the ribbon to modify permissions by clicking the option buttons.
One of the common scenarios in this situation is the need to remove certain entire site groups, for example, visitors (readers), and add specific users to the list.
..................Content has been hidden....................
You can't read the all page of ebook, please click here login for view all page.