
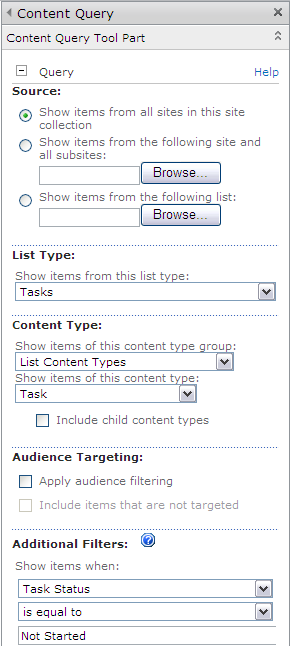
Figure 21-1: Set the query options for your rollup.
Chapter 21
Rolling Up Content to the Home Page
In This Chapter
![]() Publishing Web Parts to the home page
Publishing Web Parts to the home page
![]() Showing the site hierarchy
Showing the site hierarchy
![]() Using a Data Form Web Part to create content from scratch
Using a Data Form Web Part to create content from scratch
I like to think of this as the “How to Get Your Data Out of SharePoint” chapter. Getting your stuff into SharePoint is pretty easy. You create a site, upload some files, enter a few tasks, and you’re on your way. Things get tricky when you want to start displaying your content outside the current site.
In this chapter, I show you how to publish Web Parts, publish content to a page, display a site’s hierarchy, create custom displays, and use the Data Form Web Part.
Publishing Web Parts
SharePoint’s publishing sites provide three very important Web Parts that display content:
![]() The Content Query Web Part allows you to display content from anywhere in your site collection; it’s useful for rolling up content to a home page or creating an archive view of content.
The Content Query Web Part allows you to display content from anywhere in your site collection; it’s useful for rolling up content to a home page or creating an archive view of content.
![]() The Summary Link Web Part allows you to manually select and order which items appear in the Web Part.
The Summary Link Web Part allows you to manually select and order which items appear in the Web Part.
![]() The Table of Contents Web Part lists the site’s hierarchy and is useful for creating sitemaps.
The Table of Contents Web Part lists the site’s hierarchy and is useful for creating sitemaps.
 You don’t need a publishing site to use these Web Parts. However, your site needs to have the SharePoint Server Publishing Infrastructure site collection feature activated.
Rolling up content
The Content Query Web Part is commonly used to display a list of news articles on a site’s landing page (the first page visitors usually arrive at). Say you have three people creating new articles in your site. You can use the Content Query Web Part to automatically display a list of these articles on your department’s landing page.
Follow these steps to use the Content Query Web Part:
1. Insert the Content Query Web Part into your page and edit the Web Part’s properties.
The Content Query Web Part is located in the Content Rollup section.
See Chapter 9 for details on inserting Web Parts into a page.
2. In the Query section of the Web Part, select the options that will return the items you want to see in the Web Part.
The Query section provides many options, as shown in Figure 21-1, including
• Source: Select the location in your site hierarchy where you want to query items. If you want to display items regardless of where they appear in your site hierarchy, select the Show Items from All Sites in This Site Collection radio button and select the List Type, Content Type Group, and Content Type you want to display. For example, if you want to roll up all project tasks, use your Tasks List Type and List Content Type Group and Task Content Type.
• List Type: Select the kind of list that stores your items from the drop-down list.
• Content Type: Select the content type group and content type you want to use for query from the drop-down lists.
• Audience Targeting: If you want the Web Part to honor any audience targeting settings on the items, select the Apply Audience Filtering check box.
• Additional Filters: Include any additional fields on which you want to filter by selecting from the drop-down lists. The list of available fields is determined by the list type and the content type.
For example, to display all tasks that aren’t started, choose Task Status, Is Equal To, and Not Started from the drop-down lists (refer to Figure 21-1).
You can configure more query options for the Content Query Web Part with SharePoint Designer 2010.
 Behind the scenes, this Web Part generates a query with SharePoint’s query language, CAML (Collaborative Application Markup Language). You can write your own custom CAML query to use instead of selecting the options; you can find sites that tell you more about CAML by searching for “CAML syntax” in your favorite search engine.
3. In the Presentation section of the Web Part, select the options that will display your items.
Your options, as shown in Figure 21-2, include
Figure 21-2: Set the Presentation options for your rollup.

• Grouping and Sorting: Select the columns by which you want to group results in the Group Items By drop-down list. You can also choose to group results by site by selecting the Site option in the Group Items By drop-down list. You can select a column to sort by and limit the number of items displayed by choosing the Sort Items By drop-down list and selecting the Limit the Number of Items to Display check box, respectively, and then entering a number in the Item Limit field.
• Styles: Select the group style and item style you want to use to display your items from the Group Style and Item Style drop-down lists.
These styles determine what information appears. For example, Title and Description displays the item’s title field, linked to the document or item, along with the description.
These styles are XSL templates, not CSS styles. You can create your own XSL templates using SharePoint Designer 2010.
• Fields to Display: Specify the fields that you want to map to the item style you select by typing them in the Fields to Display text boxes.
In the case of most documents and articles, the Comments field is the default description field. For items, you have to decide which field you want to use. For example, the Tasks content type uses the Body field. I know this because I look at the Tasks Site content type. Enter the field name Body in the Description field and the value of that field appears in the Web Part.
• Feed: Indicate whether you want an RSS feed to be generated for the results of this query by selecting the Enable Feed for This Web Part check box.
4. Click OK.
Your query appears in the Web Part, as shown Figure 21-3.
Figure 21-3: The query results for a Web Part.

You can export a Content Query Web Part, rename it, and upload it to your site’s Web Part gallery for reuse in other places.
Displaying a site’s hierarchy
The Table of Contents Web Part is used frequently to display a sitemap or provide navigation for a subsite. No surprise: The Table of Contents Web Part is in the Navigation category when you insert it on a page.
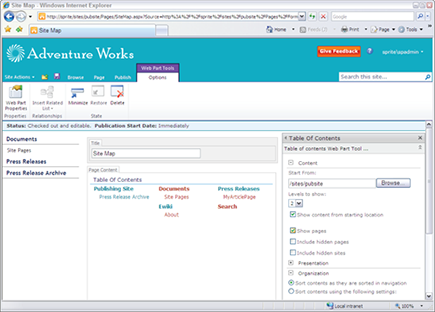
The Table of Contents Web Part has three main sections in the configuration pane, as shown in Figure 21-4:
![]() Content: Use this section to select where in the site hierarchy the Web Part displays. Enter the path to the page where you want to Table of Contents to begin in the Start From field. You can choose how many levels to display in the Table of Contents by using the Levels to Show drop-down list.
Content: Use this section to select where in the site hierarchy the Web Part displays. Enter the path to the page where you want to Table of Contents to begin in the Start From field. You can choose how many levels to display in the Table of Contents by using the Levels to Show drop-down list.
![]() Presentation: This section controls how the items display. You can choose to display everything in a single column or multiple columns and select how the header is styled by selecting an option from the Header Style drop-down list.
Presentation: This section controls how the items display. You can choose to display everything in a single column or multiple columns and select how the header is styled by selecting an option from the Header Style drop-down list.
![]() Organization: Decide how you want the items sorted by selecting either the Sort Contents as They Are Sorted in Navigation or the Sort Contents Using the Following Settings radio button. If you choose the latter option, select applicable options from the Sort Sites By, Sort Pages By, and Sort Direction drop-down lists.
Organization: Decide how you want the items sorted by selecting either the Sort Contents as They Are Sorted in Navigation or the Sort Contents Using the Following Settings radio button. If you choose the latter option, select applicable options from the Sort Sites By, Sort Pages By, and Sort Direction drop-down lists.
Figure 21-4: Choose options for the Table of Contents Web Part.
Creating custom displays with the Summary Link Web Part
Although the Content Query and Table of Contents Web Parts let you configure a query to display items, the Summary Link Web Part allows you to manually select the items that you want to display. These items can link to pages in the site or to external sites.
Like the Table of Contents Web Part, the Summary Link Web Part is in the Navigation category. Unlike the Table of Contents and Content Query Web Parts, the Summary Link Web Part doesn’t have special configuration items in the web tool pane. Instead, you add items directly to the Web Part and then manually select how you want them presented and ordered.
Summary Link can also be added to a page layout as a field control. This approach stores your links with the page, instead of inside the Web Part. I usually use Summary Link as a control unless I need to create a reusable Web Part.
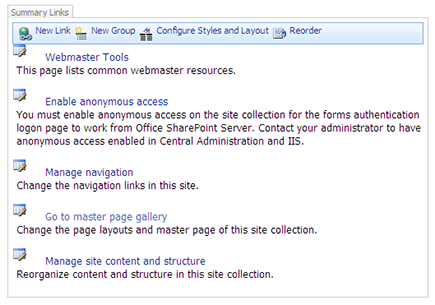
The Summary Link Web Part has a toolbar along the top, as shown in Figure 21-5, with these four options:
![]() New Link: Click this button to link to a new item in the Web Part. You can link to a page, item, or person. You can also link to content outside SharePoint.
New Link: Click this button to link to a new item in the Web Part. You can link to a page, item, or person. You can also link to content outside SharePoint.
![]() New Group: Create a new group that you can use to group the links you add to the Web Part.
New Group: Create a new group that you can use to group the links you add to the Web Part.
![]() Configure Styles and Layout: Select the default style that’s applied to new links or change the style on all links you already entered into the Web Part.
Configure Styles and Layout: Select the default style that’s applied to new links or change the style on all links you already entered into the Web Part.
![]() Reorder: Move the items in the Web Part up or down to change the order.
Reorder: Move the items in the Web Part up or down to change the order.
Figure 21-5: The Summary Links toolbar.

The home page of publishing sites uses a Summary Link Web Part to display a list of tasks that one should perform. Somebody at Microsoft manually entered these Summary Links to provide you with a list of shortcuts to tasks commonly used in a publishing site. The steps here describe how to add a new Summary Link Web Part:
1. Insert the Summary Link Web Part on a page.
The Summary Links Web Part is located in the Content Rollup section. See Chapter 9 for details on inserting Web Parts into a page.
You can also edit the default home page of a publishing site.
2. Click the New Link button on the Summary Links toolbar on the Web Part itself.
The New Link dialog box is displayed.
3. In the New Link dialog box, as shown in Figure 21-6, enter the title and a description you want to display for the new Summary Link Web Part in the Title and Description fields, respectively.
Figure 21-6: Enter a new Summary Link Web Part.
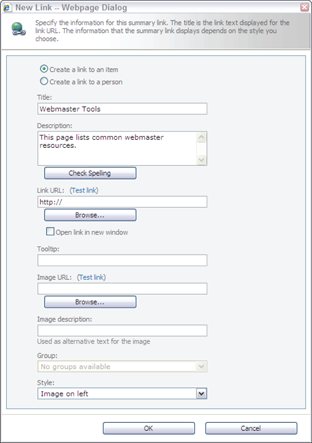
4. Enter a hyperlink in the Link URL field or click the Browse button to browse to the item you want to select.
The Browse button launches an asset picker that you can use to visually select the item. You can find out more about the asset picker in this book’s online bonus content. See this book’s Introduction for more on how to access the online bonus content.
5. (Optional) Select an image to associate with the link by entering the path to the image in the Image URL field or by clicking the Browse button and browsing to the image.
6. Click OK.
The link appears in the list, as shown in Figure 21-7.
Figure 21-7: A Summary Link Web Part on the page.
Starting from Scratch
Sometimes, you may want to create a simple one-off Web Part that isn’t tied to any of the styles provided by the Content Query Web Part. In those cases, you might want to use the Data Form Web Part. (You may not have worked with the Data Form Web Part before because it requires SharePoint Designer.)
This Web Part is often referred to as the Swiss Army Knife of Web Parts because it’s extremely versatile; I use it all the time. In fact, most of the “custom” Web Parts that I create are actually Data Form Web Parts.
I always use a Web Part page when I’m working with the Data Form Web Part. When I have the Web Part configured the way I want, I export it into the page where I intend to use it.
Even if your company doesn’t allow you to connect to their production SharePoint farm with SharePoint Designer, you can still use the Data Form Web Part. You can configure the Web Part with another instance of SharePoint, say, on your laptop or in a lab, and then import the Web Part into your production site.
To insert a Data Form Web Part, follow these steps:
1. Open a new Web Part page in SharePoint Designer 2010.
You can either create your Web Part page in the browser and open it in SharePoint Designer, or you can use SharePoint Designer to create the new Web Part page for you. I usually choose the former because I like to have control over what and where I’m creating it.
2. Click the Design tab to view your Web Part page in Design mode.
3. On the Insert tab, click the Data View button and choose Empty Data View.
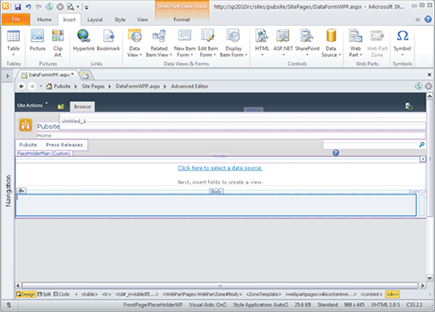
SharePoint Designer inserts a new Web Part on the page, and a new set of tabs appears in the Ribbon, as shown in Figure 21-8.
Figure 21-8: Inserting a Data Form Web Part.
After you insert the Web Part, your next steps are to select the data source, add your columns, and apply sorting, filtering, and conditional formatting as desired.
To select your data source:
1. Inside the Web Part, click the Click Here to Select a Data Source link.
The data sources picker appears.
2. Select the list or library you want to display in your Web Part and click OK.
The Data Source Details pane appears.
3. Ctrl-click the columns you want to appear in your Web Part.
4. Click the Insert Selected Fields As drop-down list and then choose an option to display the content.
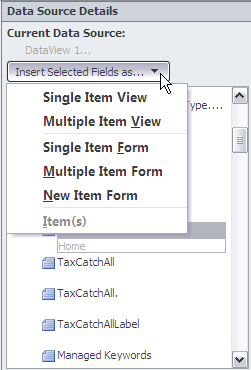
You have several options, as shown in Figure 21-9:
• Single Item View or Multiple Item View: Inserts the selected fields so that the Web Part displays one item at a time or several rows at once, respectively.
• Single Item Form or Multiple Item Form: Displays a data entry form using the field(s) you select.
• New Item Form: Displays a form for entering new items into your data source.
Figure 21-9: Display items in a Data Form Web Part.
You can create very complex data sources that query other sites and even join two lists. SharePoint uses its own query language, CAML. SharePoint Designer generates the CAML query for you, but you can also insert your own query.
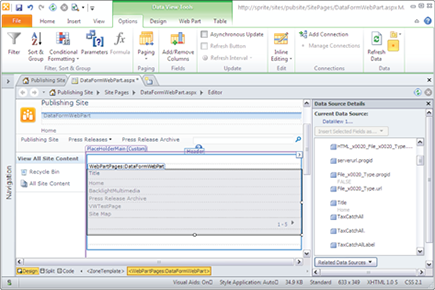
Figure 21-10 shows a Data Form Web Part with Multiple Item View selected. When you have your data source inserted, the Ribbon activates the commands you can use, which you can also see in Figure 21-10.
Figure 21-10: Work with data in a Data Form Web Part.
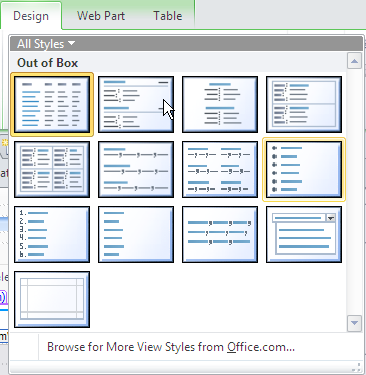
Use the Design tab on the Ribbon to change the layout of the items in your Web Part. SharePoint Designer provides several built-in formats, as shown in Figure 21-11.
Many of these formatting options also apply to the views you create for lists and libraries. For example, you can use conditional formatting with a list view.
Figure 21-11: Change the display of your data.
When the Data Form Web Part queries SharePoint, the data is returned as an XML document. XML documents have their own set of languages, XSL and XPath, that can be used to filter the data and display it exactly as you want. By viewing your Data Form Web Part in Code view using the View tab on the Ribbon in SharePoint Designer, you can view the XSL generated by SharePoint Designer. You can edit this XSL to display your data virtually any way you please.
..................Content has been hidden....................
You can't read the all page of ebook, please click here login for view all page.