
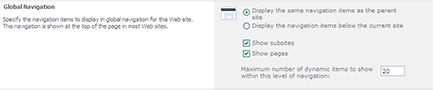
Figure 22-1: Global navigation settings.
Chapter 22
Configuring Site Navigation
In This Chapter
![]() Configuring global and current navigation
Configuring global and current navigation
![]() Adding static headers and links in navigation
Adding static headers and links in navigation
![]() Creating your own custom navigation menus
Creating your own custom navigation menus
Publishing sites have the same display options as team sites. Both kinds of site use the Top Link bar for navigation across the top and the Quick Launch toolbar for navigating within the site. Both sites can optionally display a Tree View and use breadcrumbs.
One of the big differences between the two is that publishing sites are intended to use the site hierarchy as the site’s navigation scheme. Using this approach, the site’s navigation is displayed dynamically based on the sites and pages that exist in the site.
In reality, most people want more control over what displays in their site’s navigation. They also aren’t always interested in having the site’s hierarchy match exactly to the navigation scheme.
In this chapter, I walk you through how to configure dynamic navigation based on your site hierarchy, show you how to configure static navigation, and discuss some additional navigation options.
 The underlying controls used by team sites and publishing sites are the same. The data sources used by the navigation menus in publishing sites are optimized to work with portals and public web sites.
Configuring Dynamic Navigation
The navigation options in a publishing site allow you to manage both the top navigation and the site’s Quick Launch navigation in one page. SharePoint lets you manage the two major kinds of navigation found on most web sites:
![]() Primary navigation is what your site visitors use to reach the main areas in your site, no matter where they are in your site. It’s usually positioned somewhere in the top of the page and is consistent across every page in your site. SharePoint calls this your global navigation.
Primary navigation is what your site visitors use to reach the main areas in your site, no matter where they are in your site. It’s usually positioned somewhere in the top of the page and is consistent across every page in your site. SharePoint calls this your global navigation.
![]() Contextual navigation is usually found in the body of the page, usually on the left or right, and is used to access the pages within each major area of your site. This navigation is considered contextual because the navigation items change depending on where the visitor is in the site. SharePoint calls this your current navigation.
Contextual navigation is usually found in the body of the page, usually on the left or right, and is used to access the pages within each major area of your site. This navigation is considered contextual because the navigation items change depending on where the visitor is in the site. SharePoint calls this your current navigation.
SharePoint provides two navigation menus that correspond with your global and current navigation. The Top Link bar is the global navigation menu that’s usually present at the top of publishing pages. The Quick Launch menu provides the current navigation that appears along the left of most pages.
Both the Top Link bar and the Quick Launch menu are provided by the same navigation control — SharePoint’s AspMenu control. This is a very powerful control that has a lot of settings.
SharePoint’s publishing site assumes that you want your global and current navigation menus created dynamically based on your site hierarchy. Toward that end, configuring navigation in a publishing site requires two things:
![]() A site hierarchy that matches your navigation requirements. In other words, you have subsites for the major items in your global navigation and pages for the items below. Any time you want to create a new grouping of pages in the navigation menu, you have to create a new subsite.
A site hierarchy that matches your navigation requirements. In other words, you have subsites for the major items in your global navigation and pages for the items below. Any time you want to create a new grouping of pages in the navigation menu, you have to create a new subsite.
This often leads to extensive nesting of sites, which I recommend you avoid. This is one reason that people start looking for alternative approaches to navigation.
![]() The ability to think in terms of the current site you’re setting navigation options for, its parent site, its sibling sites, and any children sites that may exist. This can be extremely confusing to people, which is one reason why I see many people abandon dynamic navigation. It’s too hard to keep track of what’s happening where.
The ability to think in terms of the current site you’re setting navigation options for, its parent site, its sibling sites, and any children sites that may exist. This can be extremely confusing to people, which is one reason why I see many people abandon dynamic navigation. It’s too hard to keep track of what’s happening where.
Configuring global navigation
In most publishing sites, you want all pages and sites to display the same navigation settings. SharePoint can dynamically display all subsites and pages within a subsite in your global navigation. Pages display in a drop-down list.
Each site in your publishing site can have its own global configuration settings. So you need to perform the following steps for each site. The settings you make in a subsite, such as whether to display pages, impacts navigation for the entire site, not just what the visitor sees when they’re on that site. Follow these steps:
1. Browse to the publishing site or subsite you want to configure global navigation for and then choose Site Actions⇒Modify Navigation.
The Site Navigation Settings page appears.
2. In a parent site, such as the top-level site, use the Global Settings section to indicate whether you want to display navigation items that are below the parent site.
Select the Show Subsites options to display each subsite in the global navigation. To show the pages that have been created in the parent site, select Show Pages.
 Scroll down to the Navigation Editing and Sorting section of the page to get a sneak peek at your global navigation hierarchy.
3. In a child site, use the Global Settings section to determine whether the subsite will display the same global navigation items as its parent site.
Select the Show Subsites and Show Pages options to display subsites and pages on the current site and any other site (parent or child) that opts to display navigation for the site you are configuring. Figure 22-1 shows the global navigation options for a child site.
 A child site can be a parent site to another site.
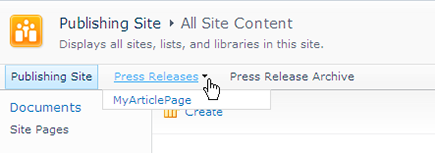
For example, all publishing sites include a Press Releases subsite. If you enable Show Subsites and Show Pages, the top-level home site will also display any pages and subsites of the Press Releases navigation option. Figure 22-2 shows the Press Releases navigation menu from the parent site when the Show Pages option is selected.
Figure 22-2: Press Releases displays its pages.
4. Click OK to save your global navigation settings.
I usually use two browser windows when configuring navigation. I use one browser window to configure the navigation and another to view the changes I made.
Figure 22-3 shows the global navigation menu for a typical publishing site. This site’s parent site is configured to show subsites and pages. The subsite, Press Releases, is configured to show pages. Table 22-1 summarizes typical global navigation settings.
Figure 22-3: Global navigation settings for a parent site.
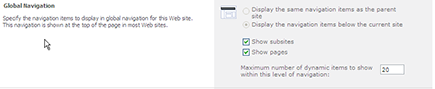
Table 22-1 Typical Global Navigation Settings
|
Appears in Global Navigation |
When You Select This Option |
|
Subsites automatically appear in the global navigation as soon as they’re created. |
Select the Show Subsites check box in each site in your hierarchy. If this option isn’t selected in the parent site, no subsites appear in your global navigation. |
|
Pages automatically appear in the global navigation as soon as they’re approved. |
Select the Show Pages check box in each site in the hierarchy. If this option is selected in the parent site, the parent’s sites pages appear as siblings to any subsites in the global navigation. |
|
All sites have the same global navigation. |
Make sure that in each site’s global navigation settings, you select the Display the Same Navigation Items as the Parent option. |
Configuring current navigation
Configuring current navigation settings for each site is similar to global navigation. You have the same options to automatically show pages and subsites. As shown in Figure 22-4, you have these options to determine what items appear in the site’s current navigation:
Figure 22-4: Current navigation options.

![]() Display the Same Navigation Items as the Parent Site: This option displays the current navigation items using the settings of the parent site.
Display the Same Navigation Items as the Parent Site: This option displays the current navigation items using the settings of the parent site.
![]() Display the Current Site, the Navigation Items below the Current Site, and the Current Site’s Siblings: This is the show-everything option. This option shows navigation items from the current site, parent site, sibling sites, and any children sites.
Display the Current Site, the Navigation Items below the Current Site, and the Current Site’s Siblings: This is the show-everything option. This option shows navigation items from the current site, parent site, sibling sites, and any children sites.
![]() Display Only the Navigation Items below the Current Site: This option doesn’t show any sibling or parent navigation items or items from the current site; only items from child sites display.
Display Only the Navigation Items below the Current Site: This option doesn’t show any sibling or parent navigation items or items from the current site; only items from child sites display.
Choosing the Show Pages and Show Subsites options makes navigation items show for pages and subsites in the current navigation of parent sites, sibling sites, and child sites any time those sites opt to show the navigation to the site you’re configuring.
Configuring Static Navigation
Most clients I work with don’t want pages and subsites showing automatically in their navigation. They usually want a static menu that doesn’t change anytime someone decides to publish an article page.
You accomplish this by deselecting the Show Pages and Show Subsites options in the navigation settings for each site. You can then manually enter whatever navigation you want to appear in the global and current navigation for each site.
To manually configure your navigation items:
1. Browse to the site you want to configure and then choose Site Settings⇒Modify Navigation.
2. Scroll down to the Navigation Editing and Sorting section.
This section shows a hierarchy of your global and current navigation items, as shown in Figure 22-5. The items you see here depend on the settings you make in the global navigation and current navigation settings of the page. For example, if you select the Show Subsites in Global Navigation option, you see subsites listed in this section of the page.
Figure 22-5: View the navigation hierarchy.

3. To add a new navigation to your global or current navigation, click the place in the hierarchy where you want to add the item.
4. Click the Add Heading button to add a new heading, or click the Add Link button to add a new link.
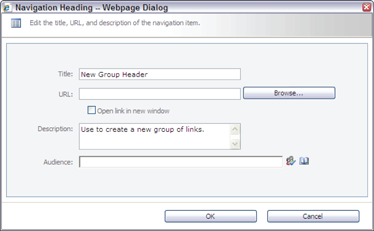
Figure 22-6 shows the Add Heading dialog box. The Add Link dialog box looks exactly the same. A heading doesn’t require a web address or URL. That is, you can use a heading to contain links without requiring that the heading point to anything in the browser.
5. Enter the details for the navigation item.
You have these options:
• Title: The text you enter in this field appears in the navigation menu.
• URL: Enter the page where the item links to. This is an optional field for headings.
• Open Link in New Window: Select this check box to open the link in a new window.
• Description: The text you enter in this field displays as a ToolTip when someone hovers over the navigation item.
• Audience: Use this text box to filter the navigation item so that only members of the selected audience can see the navigation item.
Figure 22-6: Adding a new heading to your current navigation.
Get creative about adding navigation items. I often add static links to the current navigation for common tasks that people need to perform, such as managing a group’s membership.
6. Click OK to save your heading or link.
The heading appears in the site’s navigation hierarchy, as shown in Figure 22-7. Use the Move Up or Move Down buttons to reposition the item in the hierarchy.
Figure 22-7: Your item appears in the navigation hierarchy.

7. Repeat Steps 3–6 to add more links and headings to your navigation hierarchy.
8. Use the Hide and Edit buttons to make additional changes to the hierarchy.
Click the Hide button to mark items in the hierarchy that shouldn’t appear in the site’s navigation. Click the Edit button to modify the title, description, link, or audience for a navigation item.
9. Click OK to save your navigation settings.
Looking at Alternative Ways to Generate a Navigation Menu
I’d be naïve to expect that you only need to use two kinds of site navigation. In reality, webmasters and site visitors expect lots of ways to get to content. In Chapter 21, I discuss the rollup Web Parts. These Web Parts are often used to provide the additional navigation options that you want to see inside your web pages, not just in the header and along the side.
One such Web Part, the Table of Contents Web Part, can be used to create a sitemap. A considered best practice is to provide a sitemap, and the Table of Contents Web Part dynamically generates it for you.
You can use a custom master page or page layout to control where the site’s navigation menu appears on the page. For example, if you want the current navigation on the right instead of the left, you can move it in the master page. (See Chapter 20 for more about altering page layouts.)
In many cases, however, people want more control over the site navigation than SharePoint allows. Publishing sites provide great options for dynamically displaying the navigation based on the site’s hierarchy. But what if you want to display two global navigation menus? What if you want to display navigation from a list?
Here are several options available:
![]() Use a rollup Web Part, such as a Content Query Web Part or Data Form Web Part. These Web Parts can be used to query lists and libraries and present the results any way you want. You can effectively create your own navigation menu using this option. These Web Parts work fine in a master page or page layouts.
Use a rollup Web Part, such as a Content Query Web Part or Data Form Web Part. These Web Parts can be used to query lists and libraries and present the results any way you want. You can effectively create your own navigation menu using this option. These Web Parts work fine in a master page or page layouts.
![]() Manually enter your navigation options in the master page or page layout. I often see master pages with manually entered footer navigation. Why isn’t there a place in SharePoint to enter your footer navigation items? I don’t know the answer, but most people enter those items directly in the master page because they usually don’t change very often.
Manually enter your navigation options in the master page or page layout. I often see master pages with manually entered footer navigation. Why isn’t there a place in SharePoint to enter your footer navigation items? I don’t know the answer, but most people enter those items directly in the master page because they usually don’t change very often.
![]() Use an XML file to drive your navigation menu. This approach can use SharePoint’s standard navigation menu, AspMenu, to display navigation items using an XML file as a data source.
Use an XML file to drive your navigation menu. This approach can use SharePoint’s standard navigation menu, AspMenu, to display navigation items using an XML file as a data source.
The last option starts to get a little techie, but is actually accessible to any power user who’s been granted the rights to use SharePoint Designer. One of the nice things about using SharePoint’s AspMenu navigation menu is that it already understands how to do flyouts and menu styling, so you aren’t rolling your own navigation like you are with some of the other options. You’re just providing an alternative data source instead of using SharePoint’s publishing site hierarchy data source.
The following steps walk you through the process of using an XML file to drive your navigation menu:
1. In SharePoint Designer 2010, create a new XML file by choosing File⇒All Files (see Figure 22-8).
Figure 22-8: Add a new XML file to your site.
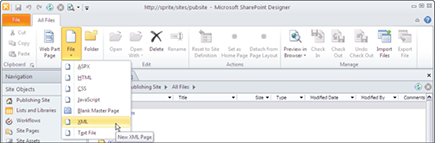
You can move this file to a document library where it can be version-controlled.
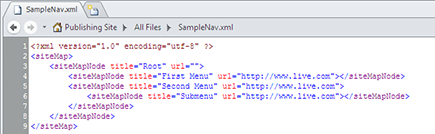
2. Enter your navigation items into the file.
Your file needs to follow the sitemap convention for navigation menus, which nests sitemap nodes inside one another (see Figure 22-9).
Figure 22-9: A sample sitemap file.
3. Open the Web Part page, page layout, or master page in SharePoint Designer 2010 where you want to create your new navigation menu.
I suggest testing this in a Web Part page first, and then moving it into a page layout or master page after you test it.
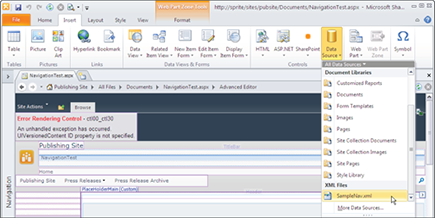
4. Drag and drop the data source for your XML file onto your page:
a. In Design view, click the location in your file where you want to insert the data source and then click the Insert tab on the Ribbon.
b. Click the Data Source button in the Controls group and select the XML file, as shown in Figure 22-10.
SharePoint Designer inserts the data source control into the page.
Figure 22-10: Insert the XML data source in your page.
5. Right-click the data source and choose Properties from the contextual menu. Set the XPath property on your data source to the following value:
/siteMap/siteMapNode/siteMapNode
This ensures that the root nodes in your file don’t display in the navigation control.
6. Drag and drop an AspMenu control onto your page from the toolbox.
The AspMenu control is in the SharePoint Server Controls group of the Ribbon.
You may find it’s easier to copy and paste the AspMenu control from the publishing master page than inserting the control from the toolbox. If you do that, make sure you give the menu a unique ID, such as MyCustomMenu.
7. Configure the properties for the AspMenu control as follows:
a. Set the DataSourceID property on the AspMenu control to match the data source you created in Step 4.
b. Set the StaticDisplayLevels property to 1.
c. Insert a DataBindings element to map the items in your XML file to the menu.
Figure 22-11 shows the final markup for the control.
8. Save your settings and refresh the page.
Figure 22-12 shows the menu on a Web Part page.
Figure 22-11: Markup for AspMenu using an XML data source.
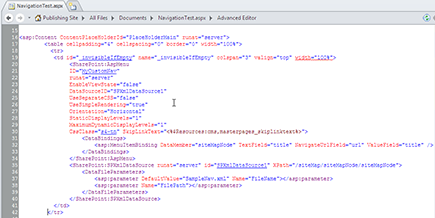
Figure 22-12: A SharePoint menu displaying custom navigation items.

The example I just walked you through is only one way you can use an alternative data source to drive a navigation menu in SharePoint. I like to extend this approach by dynamically generating the sitemap file from items entered into a list. In Chapter 21, I touch on a way to generate the XML from a SharePoint list. When you have the XML, you can use an XSL template to transform it into the sitemap convention required by the AspMenu navigation menu.
SharePoint’s navigation model is inherited directly from ASP.NET. Nothing is new or magical about how SharePoint handles site navigation. That means you have lots of options for customizing the navigation menus in SharePoint. In most cases, you either create a new navigation provider or a new data source while using one of the existing navigation menus to display the results.
..................Content has been hidden....................
You can't read the all page of ebook, please click here login for view all page.