
Figure 3-1: Use the Site Actions menu to access the Create page.
Chapter 3
Working with Lists
In This Chapter
![]() Creating new SharePoint lists
Creating new SharePoint lists
![]() Adding, editing, and viewing list items
Adding, editing, and viewing list items
![]() Adding Web Parts to default list forms
Adding Web Parts to default list forms
![]() Working with overlays and group calendars
Working with overlays and group calendars
SharePoint 2010 provides many kinds of lists that you can use to track information. A list is similar to an Excel spreadsheet or a table in an Access database. Unlike a spreadsheet that is blank when you first create it, SharePoint provides several predefined lists. These lists have columns and forms that make it possible for you to track everything from contacts to tasks.
SharePoint provides three basic kinds of lists:
![]() Communications lists are used to track announcements, contacts, and discussion boards.
Communications lists are used to track announcements, contacts, and discussion boards.
![]() Tracking lists are used to track information such as links, calendars, tasks, issues, and surveys.
Tracking lists are used to track information such as links, calendars, tasks, issues, and surveys.
![]() Custom lists provide a starting template that you can build on to create a list with the exact columns you need.
Custom lists provide a starting template that you can build on to create a list with the exact columns you need.
This chapter discusses communications and tracking lists, and Chapter 4 covers custom lists.
The types of lists you can create with SharePoint 2010 depend on the product edition that your company has installed. You may have more or fewer options.
 Libraries are a special kind of SharePoint list. They’re a list that is used to store files in addition to tracking items. The items that you track in a library are the files themselves. Everything you know about lists also applies to libraries.
Getting to Know SharePoint’s Lists
Determining which type of SharePoint list to use can be confusing at first. Do you need a Contact list or a custom list? Although all lists perform the same basic function of tracking information, some lists offer additional columns or menu commands that are unique to that kind of list.
I know some people who always start with a custom list because they figure they know exactly what they want their list to look like. However, with that approach, you never get an understanding of the features and limitations of the other list types. Don’t be afraid to create lists, use them for a while, and then discard them. This process is prototyping, and professionals do it all the time. There’s no one “right” list.
All the lists in SharePoint 2010 use the Ribbon to display access to all list commands; check the “Using the Ribbon to manage lists” section for more.
In Table 3-1, I provide a comparison of some of the SharePoint list types. This is by no means an exhaustive list. The list types in the table appear in the same order they are shown when you create a new list.
Table 3-1 Comparison of SharePoint’s List Types
|
Type of List |
When to Use It |
What Makes It Special |
|
Announcements |
To display brief announcements on your site’s home page. |
You can enter expiration dates for announcements. |
|
Contacts |
To track contacts, especially if you want to use Outlook for data entry. |
You can remove columns that you don’t need. |
|
Discussion Board |
To create a discussion forum where people can post messages and reply to them. |
Evaluate third-party add-ons if you want a robust discussion forum. |
|
Links |
To track hyperlinks. |
Uses a Hyperlink column that automatically formats entered text as HTML anchor links. |
|
Calendar |
To track calendar items. |
Can synchronize with Outlook and knows how to handle recurring events. |
|
Tasks |
To track tasks. |
Can synchronize with Outlook; Tasks lists can be grouped with summary tasks. |
|
Project Tasks |
To track work items for a project. |
Can display as a Gantt chart. Many people consider this SharePoint’s Project Lite offering. |
|
Issue Tracking |
To track trouble tickets. |
Works well with issues that have three states — open, closed, and resolved. |
|
Survey |
To take a poll. |
Allows you to create a set of questions that users must walk through. |
|
Custom |
To create a list with columns that you define. |
Allows you to create a list specific to your content and can for example act on certain content in special ways. |
|
KPI (Key Performance Indicator) |
To display graphical status indicators. |
Lets you evaluate selected business data against specified goals and display that information in various formats such as scorecards and dashboards. |
|
Import Spreadsheet |
To create a list based on an existing spreadsheet. |
Lets you use an existing Excel spreadsheet as the basis of the list; can help avoid rework and repeated effort entering data. |
|
External |
To create a list based on a data source outside SharePoint. |
Lets you display data from other (non-SharePoint) databases or Web services. |
The lists in Table 3-1 are intended primarily for tracking information for a team, such as a department calendar or a project issues log. The lists here just scratch the surface of what you can do with lists in SharePoint. Lists can be used similar to how tables are used in databases to store the data for an application.
 Although lists have columns and rows like a database table, they aren’t database tables. In fact, the lists from your team site are stored in a single table in SharePoint’s content database.
Creating a new list
A SharePoint 2010 team site has a few lists created for you — Announcements, Tasks, and Discussion Board. You usually want to create your own list to match the needs of your team.
To create a new list in your team site, you need to have the Manage Lists permission. This permission is usually granted with the Hierarchy Managers SharePoint group. (See Chapter 13 for more details on managing permissions.)
Regardless of the kind of list you want to create, the steps are the same. These steps are the same for creating new libraries also. To create a new list in your SharePoint 2010 team site, follow these steps:
1. In your SharePoint site, choose Site Actions⇒More Options. (See Figure 3-1.)
The Create page appears.
You can also access the Create page by clicking the Create button from the View All Site Content page.
Figure 3-1 shows the Site Actions menu that is typically seen in a team site. Other kinds of SharePoint sites will have different menu options.
2. On the Create page, click the List link in the Filter By section.
A list of icons appears for each kind of list you can create in SharePoint. Click a list category to further filter to display.
3. Click the icon for the kind of list you want to create.
For example, click the Announcements icon to create a new list to store announcements.
4. Type a name for your list in the text box that appears, as shown in Figure 3-2.
I recommend creating your list names without any spaces. The list name is used as part of the Web address. You can change the list name to a friendlier name after the list is created.
5. Click the Create button.
SharePoint creates the list and displays it in the browser.
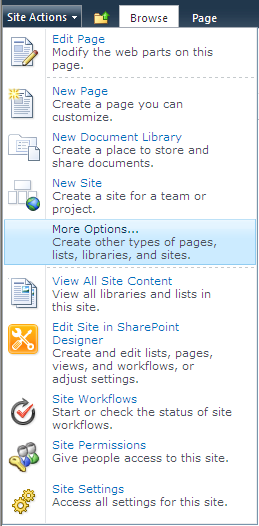
Figure 3-2: Create a new Announcements list.

If you set the list’s Web address in Step 5 of the preceding list, you may want to change the list’s name to something friendlier after the list is created. With the list you created open in the browser, do the following:
1. Click the List tab in the SharePoint Ribbon.
2. In the Settings group, click the List Settings button that appears on the far right of the Ribbon.
The List Settings page appears.
3. Under General Settings, click the Title, Description and Navigation link.
4. In the List General Settings page that appears, update the name and description (you can leave Navigation alone).
The Name field changes the caption used for the list, but the Web address remains the same.
5. If you want to add or remove the list from the site’s left navigation pane, you can change your selection to the question, Display This List On the Quick Launch?
6. Click the Save button to update your list.
The name, description, and navigation of your list updates to match your changes. Because the Web address doesn’t change, any links to your list will continue to work.
Instead of using a SharePoint predefined list template, sometimes you have a very specific set of columns you want to track in your list. That’s when a custom list comes in handy. Because creating custom lists requires you to add new columns to your list, I cover that topic in Chapter 11.
Using the Ribbon to manage lists
All SharePoint lists display the Ribbon at the top of the list. You can use the SharePoint Ribbon to access the common tasks used for working with lists. These include creating new items, editing existing items, and viewing items. Additional tasks include deleting items and viewing an item’s version history. You can also use the Ribbon’s List tab to make configuration changes to the list, such as changing which columns appear in the list. I explain how to do this in Chapter 11.
The menu commands you see in the Ribbon depend on the kind of list you’re viewing. Usually the Ribbon displays list commands in one of two tabs under List Tools, as shown in Figure 3-3:
![]() Items displays all the commands you need for working with items. I discuss several of these options in the following section.
Items displays all the commands you need for working with items. I discuss several of these options in the following section.
![]() List displays commands for managing and customizing the entire list, such as creating views and exporting the list to Excel.
List displays commands for managing and customizing the entire list, such as creating views and exporting the list to Excel.
Figure 3-3: Use the Ribbon to manage your list.

A more thorough explanation of list and library commands can be found in Chapter 10.
Entering Data in SharePoint Lists
Some primary tasks you perform in SharePoint are entering, editing, and viewing your data in a SharePoint list. The kind of list you’re using doesn’t matter; the steps for performing the tasks are the same.
To perform the tasks that I describe in this section, you must have the Add Items, Edit Items, and View Items permissions. These permissions are usually granted with the Contributor permissions level, which is usually granted via the Site Members SharePoint group.
I am often asked how to configure a list so that contributors can only see their own entries and can’t edit other people’s items. SharePoint has a setting called Item-Level Permissions that can achieve this goal. See Chapter 10 for a more thorough discussion.
Follow these steps to add, edit, or view list data, such as a Tasks list in your SharePoint 2010 team site:
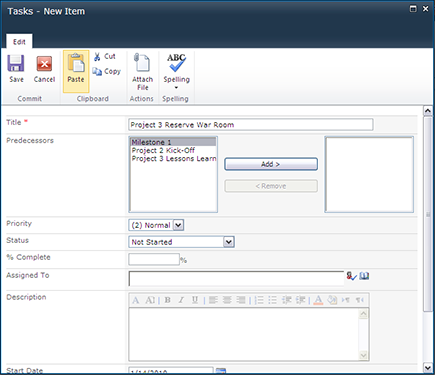
1. Browse to your Tasks lists either by clicking the Tasks link in the left navigation pane of the team site or by entering the Web address in the browser.
2. In the Ribbon, click the Items tab, and then click the New Item button to add a new item to the list.
The New Item form appears in a dialog box, as shown in Figure 3-4.
3. Click the Save button to add your item to the list.
The item appears in the list.
Figure 3-4: Add news tasks to your list.
4. To select an item in the list to edit or view, select the check box for the row you want to edit or view.
The row is highlighted, as shown in Figure 3-5.
Figure 3-5: Select an item to edit or view.

5. To edit the item, click the Edit Item button in the Items tab of the Ribbon.
The Edit Item window appears. Make your changes to the item in the window and click the Save button. The updates are saved to the list.
You can also use the Edit menu to edit a list item, as I describe in Chapter 2. Figure 3-6 shows the additional menu items that allow you to manage permissions, set alerts, or check compliance policies on the item you’re viewing.
6. To view an item in the list, select the row you want to view and click the View Item button.
The Display Form window allows you to view the values for a list, but also access additional commands for working with the list item.
Figure 3-6: View an item to access more menu commands.

You can also edit list items using an inline form, which makes it easy to edit items without opening each item individually. See Chapter 4 for details.
Customizing List Forms
When you add, edit, and view items in your SharePoint list, the items display in a set of Web forms. Each list automatically creates one list form for each of these tasks — a New Form, Edit Form, and Display Form. You can edit these forms in the browser to add additional Web Parts to the form when it’s displayed.
To customize list forms with the browser:
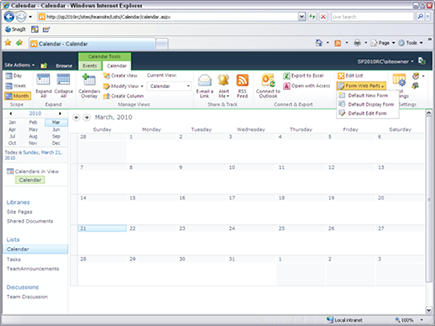
1. In the list where you want to customize forms, click the List tab in the Ribbon and then click the Form Web Parts button in the Customize List group.
A drop-down list appears.
2. Click the Web Part that corresponds to the list form you want to edit — Default New Form, Default Display Form, or Default Edit Form, as shown in Figure 3-7.
Figure 3-7: Select a list form to customize.
3. In the Ribbon, add Web Parts to the form or modify the Web Part for the list form.
I discuss working with Web Parts in detail in Chapter 9.
4. To save your changes, click the Page tab of the Ribbon and then click the Stop Editing button.
You can use SharePoint Designer 2010 to make more extensive changes to list forms.
Sharing Group Calendars
SharePoint 2010 adds new functionality to calendar lists that allows you to display calendars from Exchange or multiple team sites. For example, you can use one SharePoint calendar as a master calendar to rollup events from other SharePoint calendars. You can also view your Exchange calendar on a SharePoint 2010 calendar.
This new functionality is called calendar overlays, and it’s enabled by default in SharePoint 2010 calendars. There are two kinds of calendars you can overlay: another SharePoint calendar view or your Exchange calendar. That’s right, astute reader, I said calendar view, not just calendar. So any list that is capable of displaying as a calendar can be used, such as a task list. The following steps walk you through how to overlay one SharePoint calendar onto another SharePoint calendar:
1. In your SharePoint 2010 team site, click the Calendar link in the left navigation.
2. Click the Calendar Ribbon.
3. In the Manage Views section, click the Calendar Overlays button. The Calendar Overlay Settings page appears.
4. Click the New Calendar button to add your first calendar overlay.
5. In the Calendar Name field, type a descriptive name for the calendar overlay, such as Project Tasks.
Leave the default value for type of calendar as SharePoint.
6. In the Web URL field of the Calendar Overlay Settings section, type or paste the URL to the team site that hosts the SharePoint calendar you want to overlay, as Figure 3-8 shows.
7. Click the Resolve button. SharePoint populates the names of available calendars.
8. In the List and List View drop-down boxes, select the name of the list and the view within that list you want to display and click the OK button to save your changes.
You are returned to the Calendar Overlay Settings page.
To add an Exchange calendar, repeat steps 1 through 5 and then do the following:
1. Select the type of calendar as Exchange in the Name and Type section.
2. In the Calendar Overlay Settings section, click the Find button. SharePoint will attempt to automatically populate the URLs for Outlook Web Access and Exchange Web Services.
You can type the values in manually using the following format:
https://demo2010b.contoso.com/owa/
https://demo2010b.contoso.com/EWS/Exchange.asmx
Replace the value demo2010b.contoso.com with your Exchange server name.
3. Click the OK button to save your changes. Click the OK button again to return to the Calendar.
Figure 3-8: Overlay a SharePoint calendar onto another a calendar.

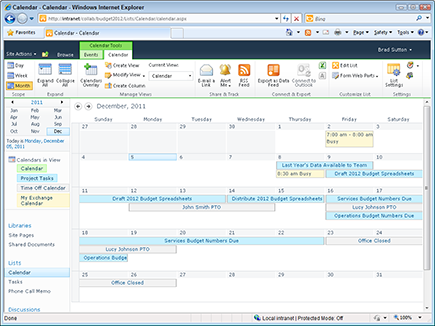
Figure 3-9 shows a calendar with three calendars:
![]() Project Tasks is a calendar view of a task list.
Project Tasks is a calendar view of a task list.
![]() Time Off Calendar is a SharePoint calendar. Note that calendars can come from a different a site, such as a HR portal.
Time Off Calendar is a SharePoint calendar. Note that calendars can come from a different a site, such as a HR portal.
![]() My Exchange Calendar displays the Exchange calendar of the user viewing the page.
My Exchange Calendar displays the Exchange calendar of the user viewing the page.
Another new feature in SharePoint calendars is group scheduling. In previous versions of SharePoint, you could use calendars to keep track of meetings, but you couldn’t actually schedule the meeting. SharePoint 2010 calendars can schedule people and resources, such as conference rooms and projectors.
Group scheduling is not enabled by default and requires at least Design permission. To enable group scheduling on an existing calendar:
1. From the home page of your team site, click Site Actions ⇒ Site Settings.
2. On the Site Settings page, click the Manage Site Features link in the Site Actions section of the page.
3. Locate the feature named Group Work Lists and click the Activate button.
Figure 3-9: A SharePoint calendar with three overlay calendars.
This feature allows you to manage resources such as shared conference lines and projectors.
4. Click the Calendar link in the left navigation of your team site.
5. In the Calendar Ribbon, click the List Settings button.
6. On the List Settings page, click the Title, Description, and Navigation link.
7. Under Group Calendar options, click Yes next to Use This Calendar to Share Member’s Schedule.
This option enables group scheduling of people in the calendar.
8. Click Yes next to Use This Calendar for Resource Reservation.
This option enables scheduling of resources in the calendar.
9. Click the Save button.
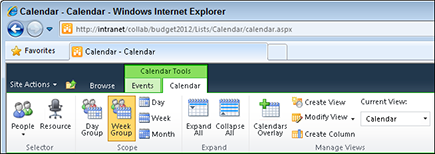
Enabling these options add two new sections to the Calendar Ribbon, as Figure 3-10 shows:
![]() Selector allows you to add people or resources to the group calendar.
Selector allows you to add people or resources to the group calendar.
![]() Scope allows you to switch between the calendar’s regular day, week, and month views and the group schedule view.
Scope allows you to switch between the calendar’s regular day, week, and month views and the group schedule view.
Figure 3-10: New group calendar options on the Ribbon.
 When you enable group scheduling, the calendar’s default content type is changed from Event to Schedule. As a result, any calendar items you enter prior to enabling group scheduling will not be visible in the default calendar view. You can either edit the existing items and change their content type from Event to Schedule, or delete the items and enter them again.
I think group calendars are most useful for scheduling resources rather than people. The group calendars don’t synchronize with people’s Exchange calendars, so it’s quite feasible that someone wouldn’t know they had been scheduled using a SharePoint calendar.
Of course resources can also be scheduled in Exchange, but in my experience not all resources make their way into Exchange. Shared conference lines are a good example.
To schedule resources, you have to add them to your site’s Resources list:
1. In your team site, click Site Actions ⇒ View All Site Content.
2. Scroll down to the Lists section and click the Resources link.
If you don’t see the Resources link, the Group Work Lists feature isn’t activated.
3. In the Items Ribbon, click the New Item button to open the new item form.
4. Type a name for the resource, such as Sales Conference Bridge, in the Name field. Optionally you can use the Description field to add notes about the resource.
5. Click the Save button.
To schedule resources:
1. Click the Calendar link in the left navigation of your team site.
Or navigate to any SharePoint calendar where you have enabled group and resource scheduling.
2. In the Events tab, click the New Event button.
3. In the New Item form, enter a name for the scheduled event in the Title field, such as Call with New Prospect.
4. Use the Start Time and End Time fields to schedule the event.
5. In the Attendees field, list any people you want to invite.
 This event will not appear in anyone’s Exchange calendar. So either manually invite them through Outlook, or create an alert for the person.
6. In the Resources list, add the resources you want to reserve.
7. Click the Check button to see if the resource is double booked.
You can see any existing reservations in the Free/Busy section, as Figure 3-11 shows.
8. Finish scheduling the event using the options for All Day Event and Recurrence.
9. Click the Save button to save the event.
You can use group calendars to compare the calendars of several people and resource reservations. This view is helpful when you are trying to find an open time to schedule a meeting or see how team member’s schedules compare to project task dates.
Figure 3-11: View scheduling conflicts in the Free/Busy section.

To compare schedules of people and resources:
1. Click the Calendar link in the left navigation of your team site.
Or navigate to any SharePoint calendar where you have enabled group and resource scheduling.
2. Click the Add Resources link in the default calendar view.
Alternatively, click the Resource button on the Calendar Ribbon.
3. Select the resource you want to compare from the dialog box.
4. In the Add Person field, type the name of any person you want to add to the schedule comparison.
As you add people, busy times from their Exchange calendar also appear.
5. Repeat steps 4 and 5 until you have all the people and resources you want to view.
Note that any overlay calendars also appear in the comparison view.
Figure 3-12 shows a calendar comparing several resources and people in a single day view.
Unfortunately, it is not possible to save this view. It is reset to showing only your calendar when you refresh the screen.
Figure 3-12: Use group calendars to compare schedules of people and resources.

..................Content has been hidden....................
You can't read the all page of ebook, please click here login for view all page.