
Figure 23-1: The SharePoint Online Administration Center.
Chapter 23
Creating a Public Web Site in SharePoint Online
In This Chapter
![]() Creating a public website in SharePoint Online
Creating a public website in SharePoint Online
![]() Using your own vanity domain name
Using your own vanity domain name
![]() Adding and editing pages
Adding and editing pages
![]() Changing the look and feel of your site
Changing the look and feel of your site
SharePoint Online allows you to create two different types of site collections — a Private Site Collection and a Public Website. The first one allows you to create a site in much the same way that you can on your regular SharePoint server, whereas the second one is something new and different.
A Public Website site collection is still SharePoint behind the scenes, but it looks and behaves quite differently than your typical SharePoint site. In an effort to really narrow down the capabilities of SharePoint so that you can easily create that web presence for your company, Microsoft created a new experience for SharePoint Online that is not really available in the product that you can install on your own server. Although mainly aimed at small businesses and individuals to create a place on the web to advertise their services, the Public Website option is a quick and easy way for any sized business to get online.
 You can only have one public website in your Office 365 subscription because it’s meant for your company’s online presence, but you can create as many as 300 private site collections.
Creating Your New Web Site
Whether you’re just creating a pilot project to test out SharePoint Online or you’re ready to take up residence in the cloud, you’ve decided to get a site going that the world can see.
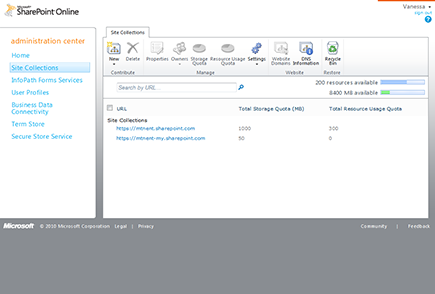
The first thing you need to do is browse to the SharePoint Online Administration Center, as shown in Figure 23-1. You can jump to this page from the main Office 365 Admin page by clicking on the Manage link below SharePoint Online.

To quickly get to the SharePoint Online Administration Center, add —admin.sharepoint.com onto the first part of your Office 365 URL. For example, if your URL for your Office 365 domain is creativecafe.onmicrosoft.com, browse to creativecafe-admin.sharepoint.com to start managing SharePoint.
Also, to quickly get to the Office 365 Admin page, navigate to http://portal.microsoftonline.com/Admin. If you haven’t logged on in awhile, you may get prompted to enter your credentials first before seeing the Admin page.
After you click Manage Site Collections, you’ll see some navigation links on the left and a Site Collections section in the main part of the page, as shown in Figure 23-2. This is where you create, edit, delete and generally manage both your Public Website and your Private site collections.
Figure 23-2: Managing site collections in SharePoint Online.
To create a new public website, follow these steps:
1. Click the New button and select Public Website.
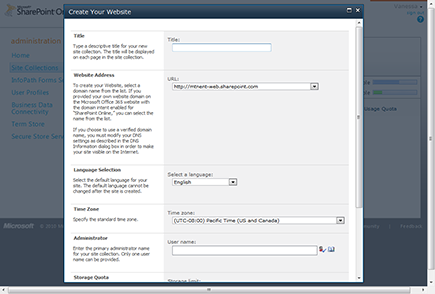
2. A pop-up page is displayed, as shown in Figure 23-3, that enables you to specify a number of different options.
Don’t worry about the website address for now. I talk about that in the next section.
3. Give your site a title, choose an Administrator for the site, and specify the site’s storage quota.
4. Change any other settings, such as the Language, Time Zone and Resource Usage Quote, and then click OK to create your site.
Figure 23-3: Specifying the properties of your new site.
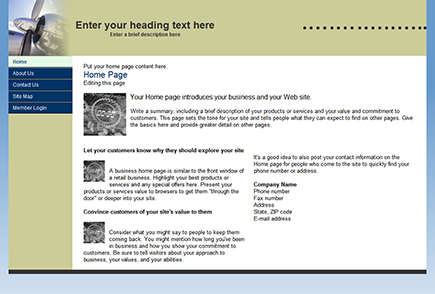
When your site is created, you can click on the link in the Site Collections page to view properties of your public site, and then click the link on this pop-up page to actually view the site. As shown in Figure 23-4, the site looks very different from any regular SharePoint site you’ve seen.
Figure 23-4: The default public website for SharePoint Online.
If you need to delete your public website for any reason, keep in mind that it takes a while for the public name to be removed from DNS. Microsoft says to allow 72 hours, but it usually happens with a day. During that time, you will not be able to create a new public website.
Using a Vanity Domain Name
If you registered a domain name with Go Daddy or some other Internet registrar, you can use that name instead of the one Microsoft gives you. You can do this when you create your public site or you can change your domain name after creating it, but first you have to register your domain name with Office 365. To do that, follow these steps:
1. Browse to the Office 365 Admin page (http://portal.microsoft online.co/Admin).
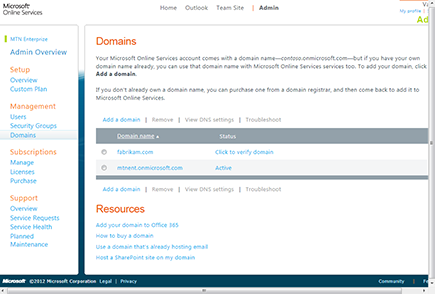
2. On the left hand navigation, click Domains in the Management section.
You’ll see a page similar to Figure 23-5.
3. Click the Add a Domain link.
4. On the Specify Domain page, type the domain name that you registered and want to use as your SharePoint public website, and then click Next.
5. On the Verify domain page, you’ll need to verify that you are the owner of the domain name. Different registrars have different ways of doing this, so look for your registrar in the instructions drop-down list and continue with the verification process after you have determined what you need to do.
6. When you are finished with Step 5, go back to the SharePoint Online Administration Center and, on the Site Collections page, either create your public website or select the one you previously created, and click the Website Domains button in the toolbar.
7. In the New URL drop-down list on this page, you should find your new domain name. Select it and click OK.
If you do not see your new domain name yet, you may need to wait for DNS to switch your record from the previous location to Office 365. This usually happens within a day, but can take up to 72 hours.
Figure 23-5: Managing your Office 365 domains.
Updating and Adding Web Pages
If you’ve got some experience with updating and adding pages to a regular SharePoint site, you’ll find yourself in familiar — but not exactly the same — territory when doing the same thing in your public website. If you’ve never done this type of stuff in SharePoint before, relax: It’s pretty easy and straightforward.
What you get with your new site
Wondering what you get in your SharePoint Online public website? There are four libraries contained in the default site:
![]() Web Pages
Web Pages
![]() Images
Images
![]() Documents
Documents
![]() Templates
Templates
All but the first library is empty, and the Web Pages library contains the following pages:
![]() About Us
About Us
![]() Contact Us
Contact Us
![]() Home
Home
![]() Site Map
Site Map
Adding a new page
You get to the list of libraries and the pages by clicking on the Member Login link on the left side of the home page. This automatically takes you to the Web Pages library. Here you can add a new page by clicking on the Pages toolbar and clicking the New Page button, as shown in Figure 23-6.
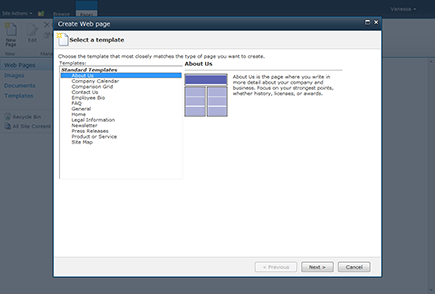
After clicking New Page, you’re presented with a list of templates to choose from, as shown in Figure 23-7. This is convenient for quickly getting the layout and design right for the purpose of the page.
Figure 23-6: The Web Pages library, where all your pages are stored.
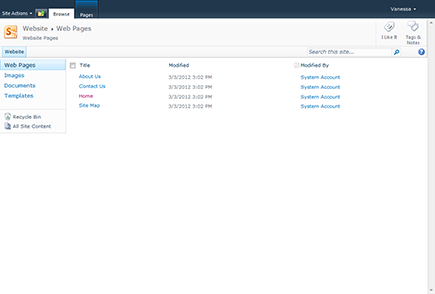
Figure 23-7: Creating new pages from templates.
Clicking Next brings up a new page where you can specify the title of the page, the web address, and how it shows up in the navigation across the site. Experiment with a few pages to figure out how to use the different templates and what the different options mean.
Editing your pages
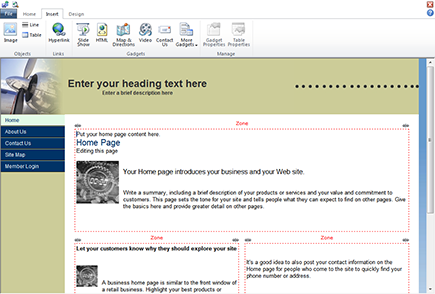
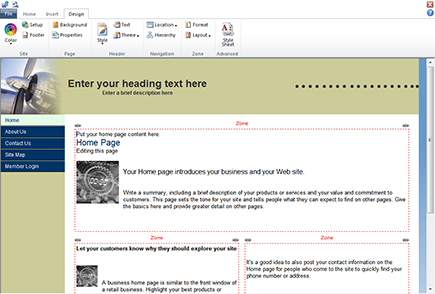
To edit any existing pages, browse to the Web Pages library and click on a page. This displays your page in Edit mode, where you’ll see dashes around some of the page content and some new buttons in the toolbar, as shown in Figure 23-8.
You’ll see in the toolbar a series of buttons that are familiar with any document editing tool, and they work exactly the same. You can choose a different font, size, or color, and you have buttons to take you to a live preview of your changes in the View button. You also have a way to navigate to the other pages in your site by using the Go To button.
On the Insert tab, you’ll see a series of buttons that allow you to insert common web page items, such as hyperlinks, maps, and videos, and you can even edit the HTML directly by using the HTML button.
Figure 23-8: Editing a Public Website page.
I discuss the final tab, Design, in the next section, “Changing the Site’s Look and Feel,” because it allows you to change your whole site.
Keep in mind that you’re using the Site Designer tool to customize your pages and your site. Many features of SharePoint are simply not available on the public website. It’s a “What you see is what you get” (WYSIWYG) environment, literally, so don’t spend too much time hunting for menus, features, and other stuff that you’re used to seeing in a normal SharePoint site. Lastly, you cannot edit the site with SharePoint Designer 2010.
Updating Page Properties
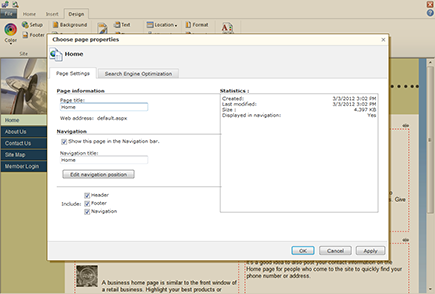
After you are done with creating your pages, you may want to change some options for the site pages, such as the title of the page or how people can navigate to it. You can also specify how search engines will index your page. These options are included on the Page Properties page, as shown in Figure 23-9, that you can access by selecting the page and clicking Properties on the toolbar.
Figure 23-9: Changing a page’s properties and adding search terms.
Changing the Site’s Look and Feel
The final tab of the toolbar is the Design tab. This tab allows you to apply colors, backgrounds, styles, themes, and even muck around with the style sheet. By clicking on the Setup button, you can even change width and alignment of pages across your site.
As you can see in Figure 23-10, there are six sections on the Design toolbar. The Site section includes options for site-wide settings, such as color and the footer of your site. The Setup button, in addition to controlling the page width and alignment, allows you to include a Bing search bar on your site and to remove the Member Login link.
The Page section allows you to set a background image for the page and to edit the page properties just like you saw earlier, but it’s also available here while you’re editing the page.
Figure 23-10: Changing the design of your entire site using the Design tab.
The Header section allows you to specify a style for the header, the text, and the theme. You can also change the logo of the page and choose from a large selection of industry-based themes.
The Navigation options allow you to shuffle the pages you’ve created and change the navigation to display across the top, down the left, or both.
The Zone section options allow you to change the basic layout of the page and is really handy for reshuffling the content that you have without needing to copy and paste from one zone to the next. You can also change the width of each zone manually by clicking the resize icons above the top corners of the zones.
Lastly, the Advanced section allows you to specify a custom style sheet for the site. If you’re not familiar with style sheets, this option is best left unexplored. For you intrepid web developers out there, good luck!
..................Content has been hidden....................
You can't read the all page of ebook, please click here login for view all page.