
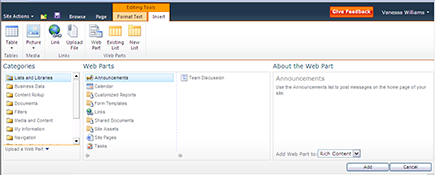
Figure 9-1: Inserting a Web Part in a Web Part page.
Chapter 9
Working with Web Parts
In This Chapter
![]() Adding Web Parts to your web pages
Adding Web Parts to your web pages
![]() Picking the right Web Part
Picking the right Web Part
![]() Changing the way your Web Part acts
Changing the way your Web Part acts
![]() Using one Web Part to filter another
Using one Web Part to filter another
Web Parts are reusable components that display content on web pages in SharePoint. They are a fundamental part of the team site experience, so make it a point to get comfortable with them and know what your options are.
In this chapter, I introduce you to Web Parts and show you how to use them on your web pages.
Adding a Web Part to Your Page
A Web Part is an individual component of content that can be placed on a SharePoint page, in either a zone in a Web Part page or in Rich Content areas of the Wiki Content home page. Web Parts can be moved, added and deleted, framed by borders and titles, and closed and reopened depending on your need.
In a team site, you may place List View Web Parts on your home page for your users to read and access items from your libraries/lists, such as announcements, documents, links, calendars, and contacts. You can add text for additional instructions and images to enhance the collaboration experience.
As I mention earlier (more times than you have probably wanted to hear), the Web Parts based on your libraries and lists are List View Web Parts. Over the versions of SharePoint, the number and complexity of Web Parts has grown considerably.
Some of these Web Parts can be used only if certain functionality is enabled in your site, such as Business Data Sources to use the Business Data Web Parts. Other categories of Web Parts, such as Content Rollup Web Parts, provide the ability to feed data from lower-level sites to a site higher in the hierarchy, such as the home page of an intranet.
SharePoint 2010 has a new interface for selecting and inserting Web Parts. The Web Part section of the Ribbon on the Page tab first shows a list of Web Part categories and then all the parts contained in that category. When the Web Part name is highlighted, you can see a description as well as an example of each in the About the Web Part section before inserting it.
Follow these steps to insert a Web Part:
1. Make sure you’re in Edit mode of either the Wiki Content page or the Web Part page (choose Site Actions⇒Edit Page).
In a Wiki Content page, insert Web Parts into one of the Rich Content containers in the layout. In a Web Part page, insert Web Parts into one of the zones on the page.
2. In a Web Part page, click in a zone. In a Wiki Content page, click in a Rich Content zone.
The Insert tab appears on the Ribbon.
Because a Web Part page can contain only Web Parts, the Insert tab buttons for text and images actually insert a Content Editor Web Part or an Image View Web Part, respectively, for those selections.
3a. To insert a Web Part, click the Web Part button on the Insert tab.
Categories of Web Parts appear in a list box on the far left. As you pick a category, the Web Parts contained in that category appear in the adjoining list box. As you highlight a Web Part name, a description and example appear in the About the Web Part section in the top right.
3b. In Office 365, click the More Web Parts button on the Insert tab.
A dialog box displays your choices of Web Parts.
4a. After you decide on a Web Part, you can add it to the page. Either select the area from the dropdown and then click the Add button as shown in Figure 9-1, or drag the Web Part name into the zone or Rich Content area you want to place it in.
You can also use the Add button under About the Web Part section to insert the Web Part into the zone or Rich Content section your cursor is in.
In a Web Part page, the About the Web Part section contains a drop-down list containing the names of all the zones on the page. You can select the zone and then click the Add button. In any case, the Web Part is placed on the page.
4b. In Office 365, click the Add button in the dialog box to add the web part to your page.
It’s not possible to drag and drop the Web Part.
5. Modify the Web Part properties by clicking the Edit drop-down list (in the far right of the Web Part title) and choosing Edit Web Part.
By clicking on the Web Part, additional configuration options may appear in the Ribbon.
 Web Parts can be moved in a Web Part page or a Wiki Content page simply by dragging them from one zone or area to another.
Choosing the Right Web Part
The SharePoint 2010 gallery contains more than 75 Web Parts as well as List View Web Parts created for any libraries/lists you’ve made. In addition, your company may create custom Web Parts or purchase them from third-party vendors.
Besides purchasing or creating additional Web Parts, your company may also choose to not supply you with every Web Part that I describe in the following list. Companies may also modify some Web Parts, such as the Content Editor Web Part, to disallow certain styles or JavaScript content.
With so many choices, how do you decide which Web Part to use? If you’re like me, I’m sure you’ll find your favorites. I think about Web Parts as being either specialized or generalized in what they do. I tend to use the more general Web Parts, but in a lot of web sites, I want to control how it appears. When I’m using an internal team site, I tend to use the specialized Web Parts in which I have to think about fewer configuration items.
This list describes the set of the general Web Parts, along with what they do and when you might use them:
![]() Content Rollup Web Parts: These include the RSS Viewer Web Part and the XML Viewer Web Part, which are useful for displaying RSS and XML, respectively. Because more and more content is available in RSS and XML formats, these Web Parts are especially useful. You use an XSL template to tell the Web Part how to display the RSS or XML content on your web page.
Content Rollup Web Parts: These include the RSS Viewer Web Part and the XML Viewer Web Part, which are useful for displaying RSS and XML, respectively. Because more and more content is available in RSS and XML formats, these Web Parts are especially useful. You use an XSL template to tell the Web Part how to display the RSS or XML content on your web page.
Another very useful Web Part is the Data Form Web Part. Unfortunately, you can only access it with SharePoint Designer, but it’s extremely versatile; in fact, it’s often referred to as the Swiss Army Knife Web Part. If you need to do something custom (or even interesting) without writing custom code, you can do some very interesting things with the Data Form Web Part.
Team sites with the publishing features enabled can take advantage of additional Content Rollup Web Parts, including the Content Query Web Part, which is similar to the Data Form Web Part but is accessible from the browser.
![]() Filter Web Parts: These Web Parts provide numerous ways to filter the information displayed on the page. For example, you can add the Choice filter to a page and then connect it to a List View Web Part so that the list is filtered by the value selected by the user. Your filter options include filtering by the current user who’s visiting the page, date, good old-fashioned text values, or a query string. A query string is a value that you pass into the page by using a question mark, such as
Filter Web Parts: These Web Parts provide numerous ways to filter the information displayed on the page. For example, you can add the Choice filter to a page and then connect it to a List View Web Part so that the list is filtered by the value selected by the user. Your filter options include filtering by the current user who’s visiting the page, date, good old-fashioned text values, or a query string. A query string is a value that you pass into the page by using a question mark, such as mypage.aspx?filter=somevalue.
![]() Media and Content Web Parts: These Web Parts work well when your content needs are simple. Use the Media Web Part to display Windows Media Player on your web page. The Image Viewer Web Part lets you link to an image and display it on your page. If your company has Silverlight applications, they can be played using the Silverlight Web Part. The Content Editor Web Part is a perennial favorite because it allows you to enter almost any HTML, CSS, or JavaScript you want on your page.
Media and Content Web Parts: These Web Parts work well when your content needs are simple. Use the Media Web Part to display Windows Media Player on your web page. The Image Viewer Web Part lets you link to an image and display it on your page. If your company has Silverlight applications, they can be played using the Silverlight Web Part. The Content Editor Web Part is a perennial favorite because it allows you to enter almost any HTML, CSS, or JavaScript you want on your page.
 Some of these Web Parts, especially the Content Editor Web Part, can really make it difficult to manage a site’s content long-term. Imagine you have a team site with ten web pages. On each web page, you’ve placed three Content Editor Web Parts. That’s 30 individual components you have to touch every time you need to change content. Because of the long-term maintenance headaches, I tend to avoid the Content Editor Web Part. Instead, I use publishing fields and Content Rollup Web Parts. These Web Parts allow me to manage my content in lists and library without touching each place their content is presented. See Part IV for more about managing pages and content.
![]() Search and Business Data Web Parts: Although these Web Parts may seem specialized, they are actually quite powerful. You can use the Search Web Parts to create a custom search results page that is scoped to the content you want to filter. The Business Data Web Parts allow you to display data from external data sources. See Part IV for more information on both these kinds of Web Parts.
Search and Business Data Web Parts: Although these Web Parts may seem specialized, they are actually quite powerful. You can use the Search Web Parts to create a custom search results page that is scoped to the content you want to filter. The Business Data Web Parts allow you to display data from external data sources. See Part IV for more information on both these kinds of Web Parts.
SharePoint also provides many specialized Web Parts that are meant to be used in a certain context or to return a certain set of content. Some of these include
![]() Lists and Libraries: These Web Parts displays items from the lists and libraries on your team site. You can use list views to filter, sort, and group the information presented in the Web Part.
Lists and Libraries: These Web Parts displays items from the lists and libraries on your team site. You can use list views to filter, sort, and group the information presented in the Web Part.
![]() Outlook Web App: If your company uses Exchange Server 2003 or higher for e-mail, you can use these Web Parts to display your inbox, calendar, and other folders on a web page in SharePoint.
Outlook Web App: If your company uses Exchange Server 2003 or higher for e-mail, you can use these Web Parts to display your inbox, calendar, and other folders on a web page in SharePoint.
 Your company needs to provide you with a web address for Exchange that’s configured to use Windows Integrated Authentication.
![]() Office Client: SharePoint 2010 has a lot of integration points with Office clients, and these Web Parts are a testament to that. Here you find Web Parts that let you interact with Excel spreadsheets, Visio models, and Access databases. The cool factor isn’t so much that you can interact with your Office files; it’s that SharePoint publishes the output to your web page so that other people can interact with your Office files.
Office Client: SharePoint 2010 has a lot of integration points with Office clients, and these Web Parts are a testament to that. Here you find Web Parts that let you interact with Excel spreadsheets, Visio models, and Access databases. The cool factor isn’t so much that you can interact with your Office files; it’s that SharePoint publishes the output to your web page so that other people can interact with your Office files.
The Office Client Web Parts are present only if you’re licensed to use the Enterprise Edition of SharePoint. Many large companies take a two-tiered approach to SharePoint where only certain users get Enterprise licenses. If you need these Web Parts, ask for a license upgrade. Individual users can be upgraded without upgrading the licensing for the entire company.
![]() Social Collaboration: These Web Parts are kinda boring, but one really cool one is here — the Note Board. Dropping this Web Part on your page adds a Social Commenting box so that folks can add comments right inside your web page. Social commenting is part of SharePoint’s new social networking features, which I discuss in Part III.
Social Collaboration: These Web Parts are kinda boring, but one really cool one is here — the Note Board. Dropping this Web Part on your page adds a Social Commenting box so that folks can add comments right inside your web page. Social commenting is part of SharePoint’s new social networking features, which I discuss in Part III.
Any configuration or content that you put inside a Web Part isn’t version-controlled. In other words, each time you change the Web Part, you write over any previous configuration or content. That’s another reason I caution against using the Content Editor Web Parts. Store your content in lists and libraries where the content is subject to version control and retention policies rather than placing it directly in the web page. You can export your Web Part’s configuration using the Export on the Web Part’s menu.
Content that you place inside a Rich Content control on a wiki page is version-controlled if versioning is enabled in your library.
Changing Web Part Properties
After you select and insert a Web Part into your page, you may want to modify its properties to fit your needs. The number and type of properties you can modify are based on what type of Web Part you use.
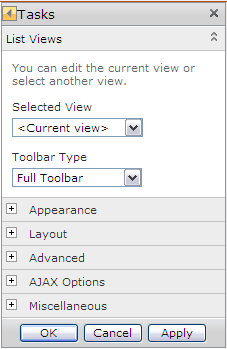
When you select the Edit Web Part command by clicking the Web Part menu (in the far right of the Web Part title), SharePoint opens the Web Part tool pane. In some Web Parts, SharePoint creates a link to this tool pane as part of the placeholder text. Following is a list of properties in the tool pane common to List View Web Parts:
![]() Selected View: The options in the Selected View drop-down list are dependent on the type of library or list, and/or other views you may have created.
Selected View: The options in the Selected View drop-down list are dependent on the type of library or list, and/or other views you may have created.
The current view is simply what’s showing currently. Unlike views that I describe in Chapter 4, you change view properties on-the-fly using the Edit the Current View link of the tool pane. Your changes are now part of the current view. If you use the Edit in Current View link, you can’t revert to a past view.
The Edit the Current View options are, for the most part, identical to what you see when you create a view in the library or list. Make sure you look at Styles and Item limits when creating a view for a Web Part because these options are overlooked frequently.
If the changes you need to make to the view are simple and few, the Edit the Current View link is handy. If you need to consistently apply the same view selections for this Web Part, create a view in the library or list you can apply so that you don’t lose the options you chose.
![]() Toolbar Type: Depending on the library or list, this drop-down list allows you the options of Full Toolbar, Summary Toolbar, No Toolbar, or Show Toolbar.
Toolbar Type: Depending on the library or list, this drop-down list allows you the options of Full Toolbar, Summary Toolbar, No Toolbar, or Show Toolbar.
For example, in a document library, choosing Full Toolbar enables users to upload the document, check it out, and so forth.
The Summary toolbar is somewhat of a misnomer; it adds a link at the bottom of the list for users to add a new document (item).
![]() Appearance: The Appearance section allows you to title the Web Part, fix the height and width as necessary, and determine the chrome type. Chrome is another word for the Web Part surround; for example, title and border options.
Appearance: The Appearance section allows you to title the Web Part, fix the height and width as necessary, and determine the chrome type. Chrome is another word for the Web Part surround; for example, title and border options.
![]() Layout: In the Layout section, you can change the zone location of the Web Part as well as hide it without closing it.
Layout: In the Layout section, you can change the zone location of the Web Part as well as hide it without closing it.
![]() Advanced: This section contains many of the options you use to allow users with permissions to modify Web Parts, such as Allow Minimize or Allow Close.
Advanced: This section contains many of the options you use to allow users with permissions to modify Web Parts, such as Allow Minimize or Allow Close.
![]() Ajax Options: This section is new to SharePoint 2010 and gives the owner/admin the choice of enabling asynchronous behaviors. This means that the data in the Web Part is sent to the page without causing the web page to refresh.
Ajax Options: This section is new to SharePoint 2010 and gives the owner/admin the choice of enabling asynchronous behaviors. This means that the data in the Web Part is sent to the page without causing the web page to refresh.
![]() Miscellaneous: Miscellaneous options including sample data, XSL link, and some caching properties.
Miscellaneous: Miscellaneous options including sample data, XSL link, and some caching properties.
Editing Web Part properties is pretty straightforward. Again, experimenting is key. The most commonly used sections are located at the top of the tool pane: Selected View, Toolbar, and Appearance. Many users don’t realize how much they can enhance the user experience with the Web Part by the using the options available.
To open the Web Part tool pane and modify Web Part properties, follow these steps:
1. Click the Web Part menu on the Web Part and choose Edit Web Part.
The Tool pane opens. You see several of the categories of properties that I describe in the preceding list. You may need to select the plus sign to open certain sections.
You don’t need to be in page Edit mode to modify a Web Part. If the title bar is visible and you have the proper permissions, you see the Edit drop-down list even when the page isn’t in Edit mode.
2. Adjust properties as desired (see Figure 9-2).
Make your selections based on the categories and options that I describe in the preceding list or other options available per the specific Web Part.
3. Click the Apply button to apply your current changes before modifying others, or click OK to finish modifying.
Your changes are visible in the Web Part.
You have two options for removing a Web Part from your page — minimizing or deleting. Closing a Web Part leaves the Web Part on the page so you can enable it again for future use. Deleting the Web Part removes the Web Part from your page (but doesn’t delete it from SharePoint).
Figure 9-2: Change your Web Part’s configuration.
To close or delete a Web Part from your page, click the Web Part menu, as I describe in the preceding list, and choose Close or Delete.
Every now and then a Web Part misbehaves and prevents your page from opening. If you edit the properties of your page, you find a link to the Web Part Maintenance page. Use this link to close or delete Web Parts that are preventing your page from opening.
Connecting Web Parts
One cool thing you can do with Web Parts is connect them to each other. This allows you to use one Web Part to filter the values of another Web Part. This is a very powerful feature that allows you to create useful, data-driven web pages in your team site.
Follow this process to connect two Web Parts:
1. Add both the Web Parts you want to connect to your web page.
For example, you can add two List View Web Parts to your page, and use one List View Web Part to filter the other. If you have an Enterprise license for SharePoint 2010, be sure to check out the cool filter Web Parts designed for filtering other Web Parts using a date or free-form text field.
If you use a Lookup column to create a relationship between two lists, you can bypass these steps by clicking the Insert Related List button on the Web Part Tools tab in the Ribbon.
2. Save your page (choose Page⇒Stop Editing).
I find that if you don’t save your page first, sometimes you can’t connect.
3. Click the Edit button on the Page tab of the Ribbon to place your page in Edit mode.
4. Place a check mark in the upper-right corner of the Web Part you want to use as the filter.
5. On the Ribbon, click the Web Part Tools Options tab and then click Web Part Properties button.
The tool pane appears.
6. Click the drop-down arrow on the filtering Web Part, choose Connections⇒Send Row of Data To, and then choose the name of the Web Part you want to filter, as shown in Figure 9-3.
The Choose Connection dialog box appears. The Choose Connection tab displays the connection type that you selected in this step.
7. Click the Configure Connection tab and then choose the field name you want to filter on from the Consumer Field Name drop-down list.
This is the field that has the set of values you want to match from your filtering Web Part. In this example of filtering a Customer list Web Part with a Sales Territory list Filter Web Part, I chose the SalesTerritory field, as shown in Figure 9-4.
8. Click the Finish button.
The connection is established. As you select values in one Web Part, the connected Web Part is filtered accordingly, as shown in Figure 9-5.
Figure 9-3: Choosing which Web Part to filter.
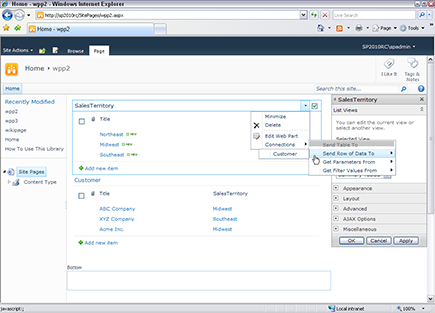
Figure 9-4: Select the field that contains your filter values.

Figure 9-5: A filtered Web Part.

Starting from Scratch
Sometimes, you may want to create a simple (or complex) one-off Web Part. In those cases, you might want to use the Data Form Web Part. (You may not have worked with the Data Form Web Part before because it requires SharePoint Designer.)
This Web Part is often referred to as the Swiss Army Knife of Web Parts because it’s extremely versatile; I use it all the time. In fact, most of the “custom” Web Parts that I create are actually Data Form Web Parts.
I always use a Web Part page when I’m working with the Data Form Web Part. When I have the Web Part configured the way I want, I export it into the page where I intend to use the Web Part.
Even if your company doesn’t allow you to connect to their production SharePoint farm with SharePoint Designer, you can still use the Data Form Web Part. You can configure the Web Part with another instance of SharePoint, say, on your laptop or in a lab, and then import the Web Part into your production site.
To insert a Data Form Web Part, follow these steps:
1. Open a new Web Part page in SharePoint Designer 2010.
You can either create your Web Part page in the browser and open it in SharePoint Designer, or you can use SharePoint Designer to create the new Web Part page for you. I usually choose the former because I like to have control over what and where I’m creating it.
2. Click the Design tab to view your Web Part page in Design mode.
3. On the Insert tab, click the Data View button and choose Empty Data View.
SharePoint Designer inserts a new Web Part on the page, and a new set of tabs appears in the Ribbon, as shown in Figure 9-6.
After you insert the Web Part, your next steps are to select the data source, add your columns, and apply sorting, filtering, and conditional formatting as desired.
To select your data source:
1. Inside the Web Part, click the Click Here to Select a Data Source link.
The data sources picker appears.
2. Select the list or library you want to display in your Web Part and click OK.
The Data Source Details pane appears.
3. Ctrl-click the columns you want to appear in your Web Part.
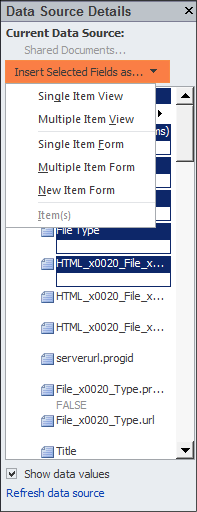
4. Click the Insert Selected Fields As drop-down list and then choose an option to display the content.
You have several options, as shown in Figure 9-7:
• Single Item View or Multiple Item View: Inserts the selected fields so that the Web Part displays one item at a time or several rows at once, respectively.
• Single Item Form or Multiple Item Form: Displays a data entry form using the field(s) you select.
• New Item Form: Displays a form for entering new items into your data source.
Figure 9-6: Inserting a Data Form Web Part.
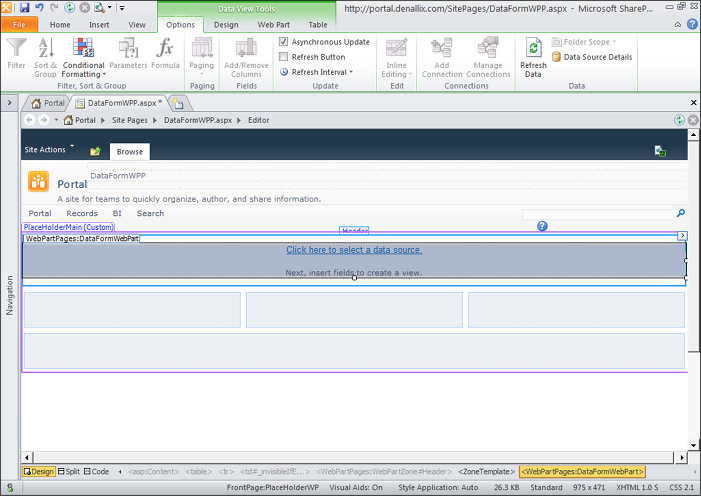
Figure 9-7: Display items in a Data Form Web Part.
You can create very complex data sources that query other sites and even join two lists. SharePoint uses its own query language, CAML. SharePoint Designer generates the CAML query for you, but you can also insert your own query.
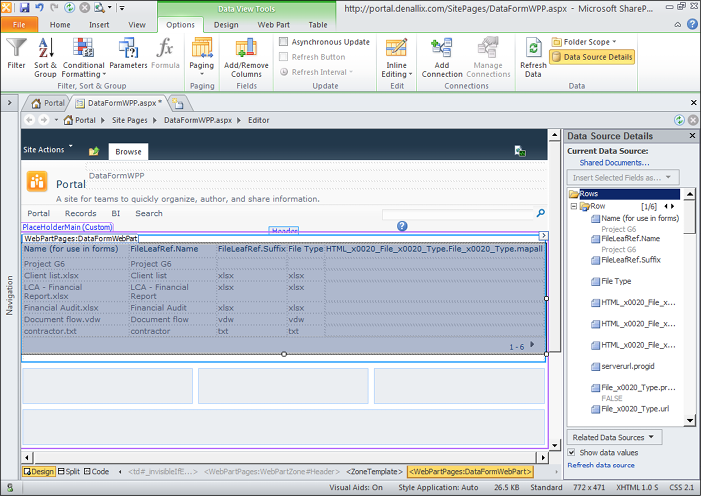
Figure 9-8 shows a Data Form Web Part with Multiple Item View selected. When you have your data source inserted, the Ribbon activates the commands you can use, which you can also see in Figure 9-8.
Figure 9-8: Work with data in a Data Form Web Part.
Use the Design tab on the Ribbon to change the layout of the items in your Web Part. SharePoint Designer provides several built-in formats, as shown in Figure 9-9.
Many of these formatting options also apply to the views you create for lists and libraries. For example, you can use conditional formatting with a list view.
Figure 9-9: Change the display of your data.

When the Data Form Web Part queries SharePoint, the data is returned as an XML document. XML documents have their own set of languages, XSL and XPath, that can be used to filter the data and display it exactly as you want. By viewing your Data Form Web Part in Code View using the View tab on the Ribbon in SharePoint Designer, you can view the XSL generated by SharePoint Designer. You can edit this XSL to display your data virtually any way you please.
..................Content has been hidden....................
You can't read the all page of ebook, please click here login for view all page.