
Figure 19-1: The Draft Item Security settings are available.
Chapter 19
Approving Content for Publication
In This Chapter
![]() Choosing between moderation options
Choosing between moderation options
![]() Enabling Content Approval
Enabling Content Approval
![]() Enabling Approval workflow
Enabling Approval workflow
Trust, but verify: Sometimes you want to let folks create a document library or list items but you don’t want those items unleashed on an unsuspecting world before someone approves them. SharePoint has a few ways to help you enact and enforce content governance policies to define what gets published and under what conditions, how many revisions are retained, and how they’re secured and tracked. Depending on the complexity of your approval process, you can use the standard Content Approval option, or you can create a more sophisticated — and custom — approval workflow.
In this chapter, I help you decide which process to use, and I walk you through using both processes.
Deciding Whether to Use Content Approval or Approval Workflows
Before you apply Content Approval or an approval workflow, make a few governance decisions:
![]() Which lists and libraries contain (or will contain) content that will require approval? This isn’t the time to turn loose your inner control freak; your goal is to apply the minimum level of content governance necessary to achieve your approval goals.
Which lists and libraries contain (or will contain) content that will require approval? This isn’t the time to turn loose your inner control freak; your goal is to apply the minimum level of content governance necessary to achieve your approval goals.
![]() What kind of approval process do you need? Is the approval just a thumbs-up or thumbs-down process that Approvers can track and manage? If so, Content Approval will probably make you very happy. Or do you need a way for Reviewers to provide feedback and a way to track tasks associated with the reviews? In that case, you need an approval workflow.
What kind of approval process do you need? Is the approval just a thumbs-up or thumbs-down process that Approvers can track and manage? If so, Content Approval will probably make you very happy. Or do you need a way for Reviewers to provide feedback and a way to track tasks associated with the reviews? In that case, you need an approval workflow.
![]() Who needs to know about items that need approval? Do you want Approvers to be notified when something needs their approval? If so, you need an approval workflow, with or without Content Approval.
Who needs to know about items that need approval? Do you want Approvers to be notified when something needs their approval? If so, you need an approval workflow, with or without Content Approval.
![]() Do you want the process to start automatically or do you want a manual trigger? If you want a manual trigger, you need an approval workflow.
Do you want the process to start automatically or do you want a manual trigger? If you want a manual trigger, you need an approval workflow.
Everything in Moderation: Choosing the Content Approval Option
Content Approval is approval-light; it’s a publishing function that you turn on or off at the list or library level and it has just a handful of configuration settings. Content Approval — or moderation — doesn’t include item routing or notifications, and it doesn’t facilitate reviews and commenting. Content Approval helps to ensure that drafts and new uploaded content don’t get published to your list or library until someone with some authority says it’s okay, and the Content Approval process controls who can see those things in the meantime.
Content Approval also can specify (in the case of documents) whether items must be checked out before they can be edited. And Content Approval can hide draft documents from everyone except the item author and those users with Approve permissions on the list or library (contrast this with draft item security on libraries without Content Approval enabled in which you can limit views only to users with library-level Read permissions or users with library-level Edit permissions). I sometimes use Content Approval on libraries in which my team stores documents that are intended for clients, if I want to review the documents before the client sees them.
This is a subtle distinction, but specifying that only the item author and users with Approve permissions can view items means that the author can check in an item without exposing it to the view of other readers or editors until it’s formally published and approved. I find this useful in cases when I have multiple authorized contributors to a library and I want to keep them from seeing each others’ work until someone (the Approver) says it’s okay. This also gives me a way to let authors work on drafts without readers looking over their shoulders (few things are more frustrating than editorial feedback on something you’re still working on!).
Turning on Content Approval
By default, Content Approval is turned off and (usually) any user with Read access can see Draft items in most libraries. Sites created with the publishing site template, however, already have Content Approval turned on in the Pages library.
To turn on and configure Content Approval, follow these steps:
1. Access Content Approval by going to your Library or List Settings page in your list or library and clicking the Versioning Settings link.
The Versioning Settings page appears.
You see options to retain versions, specify who can see drafts, and — in document libraries — document check-out options.
2. Enable Content Approval by selecting the Yes radio button below Require Content Approval for Submitted Items.
Notice that the options below Who Should See Draft Items in This Document Library? become available, as shown in Figure 19-1.
You need to decide whether readers, editors, or only authors and Approvers can see drafts. I usually enable Content Approval partly because I don’t want to expose items to just anyone before they meet some level of credibility or done-ness as indicated by the Good Housekeeping SharePoint Approval. So I select the Only Users Who Can Approve Items (And the Author of the Item) option.

3. Verify the Document Version History settings in the Document Version History section.
You can specify versions without turning on Content Approval. I skip a detailed discussion of Document Version History settings here; it’s pretty boring anyway.
4. Click a Draft Item Security option in the Draft Item Security section.
 The security referred to by draft item security — Read, Edit, and Approve — maps to SharePoint’s Visitors, Members, and Approvers groups. (See Chapter 13 for details on managing security groups.)
5. Click a check-out option in the Require Check Out section.
Flip to Chapter 2 if you aren’t sure which option to choose.
6. Click OK to save your changes.
You return to the Library or List Settings page from whence you came. The items created in (or changed in) the list or library are subject to approval (unless of course you disable Content Approval later).
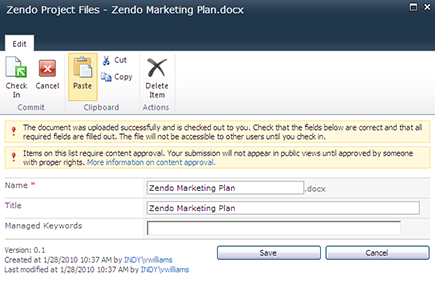
 If Content Approval is active, when users add an item to the list or library, they see a note that items require Content Approval in the item properties window (see Figure 19-2). The item appears in Draft status in the list or library view until it’s checked in for the first time, and then it changes to Pending until it’s approved.
Figure 19-2: A docu- ment’s properties with an approval note.
Identifying Approvers
You need to specify who the Approvers include, generally by adding users to the created Approvers group. (See Chapter 13 for information about groups and permissions.)
Oh, and by the way, Content Approval isn’t just about Big Brother — or, if it’s me, nosy Big Sister — checking someone else’s work. I may want to ensure that things can be checked in and versioned, but that they aren’t displayed to Readers until they’re formally approved. In these cases, I set the same person or people both to create and to approve items.
Casting an approving eye
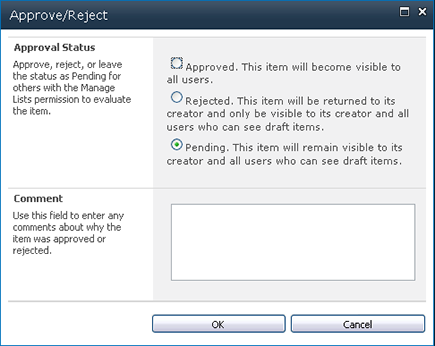
In a library that has Approval turned on, when a new document is created and a major version is published, the Approval status is marked Pending and designated Approvers can approve, pend, or reject the item either from the list view by choosing Approve/Reject from the Edit menu, or by using the View Document Properties window. In either case, when you select Approve/Reject, you’re presented with the aptly named Approve/Reject window, as shown in Figure 19-3, with the Pending option selected by default. At this point, you can leave a comment in the Comment text box but leave the item as Pending, or you can select the Approve or the Reject option to approve or reject the item with or without comment. (Rejecting without comment is pretty poor form, though.) The action, name of the person who took it, and timestamp are recorded in the item’s Version History.
Figure 19-3: The Approve/Reject window.
You can get a quick view of all your items that are in a Pending status by choosing Site Actions⇒Site Content Reports, and then choosing Pending Approval from the View drop-down list (see Figure 19-4).
Figure 19-4: View documents with Pending Approval in the Site Content Report.

Unless alerts are enabled on the list/library or the item itself, the item originator won’t know you’ve taken an action until the next time that person is in the list/library and checks the Approval status on the item. I recommend using alerts with Content Approval unless you have some alternative process whereby Approvers make it part of their daily routine to check for pending items.
Disapproval: Not just for stern parents
Everyone wants approval, but sometimes you don’t get it. Sometimes an Approver rejects an item. When this happens, the item is changed to Rejected status and then it’s visible only to the author and anyone with permission to manage the list.
 When you first enable Content Approval on a library, all items are approved automatically.
Getting alerts on approval/rejection status
When an item is marked Pending with Content Approval turned on (and no associated approval workflow), that item just sits there, marinating in its own Pending status until someone notices and either approves or denies it. When the list/library I’m managing sees a lot of traffic, I rely on the Approvers to check for Pending items because they’re working in the list/library all the time anyway. But another way to make sure Approvers get the heads-up is to set alerts (see Chapter 5).
If you turn off Content Approval, be aware that Pending and Rejected items, which were hidden from public view, are now viewable. I recommend resolving all Draft, Pending, and Rejected items before disabling Content Approval; it’s a dirty trick to reveal someone’s draft to the world when she isn’t expecting it!
Configuring Approval Workflows
Approval workflows can layer additional functions on top of Content Approval, or approval workflows can go it alone.
Approval workflow by itself doesn’t affect who can see Draft items, and unlike Content Approval, doesn’t control Item permissions. Approval workflow does create a task and an e-mail notification for each Approver when the workflow is initiated; for example, it can be useful for getting the attention of people who review documents but who otherwise don’t spend a lot of time in the list/library.
In fact, because the notification and task include a link to the Pending item, an approval workflow is a good way to get the input of users who otherwise won’t go to SharePoint. And approval workflow facilitates an exchange between the Approver and the author of the content by allowing the Approver to provide feedback on the document (better to have dubbed it Review workflow).
There are three components of using Approval workflow: Configuring the workflow for the list/library, initiating the workflow for a document or list item, and responding to the workflow.
Approval workflow options
Think of a workflow as a business process that you automate. Say you have a business process for reviewing and approving real estate contracts. This process may include someone drafting the contract, e-mailing a copy to someone who reviews it and then e-mailing it to someone else for approval. The approval workflows in SharePoint provide all these options so you can automate the routing of the document from the person drafting it to the document’s reviews and approvers.
You can select options for how you want the Approval workflow to work when you associate the workflow with your library, which I describe how to do in the next section.
The following list describes the options available for approval workflows:
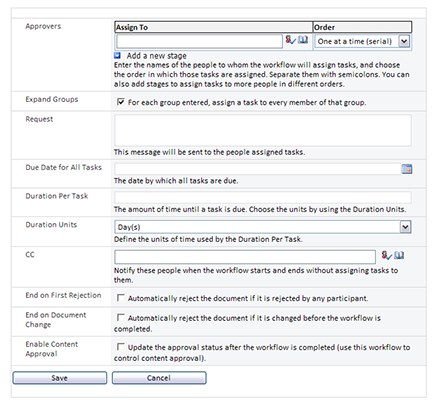
![]() Approvers (Assign To): Individuals and groups to whom the Approval tasks will be assigned. If you have multiple Approvers, you can also specify the order in which they’re assigned the item. The Approval status doesn’t change from Pending to Approved until all Approvers have approved the item.
Approvers (Assign To): Individuals and groups to whom the Approval tasks will be assigned. If you have multiple Approvers, you can also specify the order in which they’re assigned the item. The Approval status doesn’t change from Pending to Approved until all Approvers have approved the item.
Unless you have the Cancel on Rejection option enabled, if an Approver rejects an item, the approval continues to the next Approver and isn’t cancelled as you might expect.
![]() Approvers (Order): Specifies whether the Approvers will be assigned the Approval tasks all at once or whether when one person approves, the next person is assigned the task, and so on.
Approvers (Order): Specifies whether the Approvers will be assigned the Approval tasks all at once or whether when one person approves, the next person is assigned the task, and so on.
Go with the standard — arrange Approvers in ascending order of importance so you don’t bother the director until the managers have approved.
![]() Add a New Stage: Allows you to add a stage to the approval process. Don’t get carried away here because you have to manage all those stages.
Add a New Stage: Allows you to add a stage to the approval process. Don’t get carried away here because you have to manage all those stages.
![]() Expand Groups: If selected, assigns an Approval task to each individual in each Approver group, rather than assigning a single task to the entire group. If you’ve also specified an order, all Approvers in the expanded group are treated as one Approver, and they’re assigned the approval when the group is.
Expand Groups: If selected, assigns an Approval task to each individual in each Approver group, rather than assigning a single task to the entire group. If you’ve also specified an order, all Approvers in the expanded group are treated as one Approver, and they’re assigned the approval when the group is.
![]() Notification Message: The message that’s sent to each member of each Approval group. All Approvers get the same notification message, and I recommend saying, “Please.”
Notification Message: The message that’s sent to each member of each Approval group. All Approvers get the same notification message, and I recommend saying, “Please.”
![]() Due Date for All Tasks: A date by which all tasks not completed are considered overdue; this overrides the Duration for Serial Tasks/Duration Units values.
Due Date for All Tasks: A date by which all tasks not completed are considered overdue; this overrides the Duration for Serial Tasks/Duration Units values.
![]() Duration for Serial Tasks: A number which, with the Duration Units field, determines how long each serial task can be active before being marked Overdue.
Duration for Serial Tasks: A number which, with the Duration Units field, determines how long each serial task can be active before being marked Overdue.
![]() Duration Units: With the Duration for Serial Tasks option, determines how long a serial task can be active before being marked Overdue.
Duration Units: With the Duration for Serial Tasks option, determines how long a serial task can be active before being marked Overdue.
![]() CC: Notifies specified people when the workflow is started but doesn’t assign tasks to them (unless they’re also in the Approvers group).
CC: Notifies specified people when the workflow is started but doesn’t assign tasks to them (unless they’re also in the Approvers group).
![]() Cancel on Rejection: Cancels the entire workflow if one Approver marks the item rejected. The item moves to Rejected status, and the item author is notified.
Cancel on Rejection: Cancels the entire workflow if one Approver marks the item rejected. The item moves to Rejected status, and the item author is notified.
In any case, if Cancel on Rejection is selected, when one Approver rejects the item, this halts the Approval workflow for this round, until the item is resubmitted. I recommend listing the tougher critics as earlier Approvers to reduce the number of times you have to request approval from someone who’s already given it.
![]() Cancel on Change: Cancels the workflow if the item is changed while the workflow is running.
Cancel on Change: Cancels the workflow if the item is changed while the workflow is running.
If you work in a regulated industry and are requesting approval of regulated items, I highly recommend enabling this option.
![]() Enable Content Approval: For the most reliable results, configure your Approval workflow before turning on Content Approval.
Enable Content Approval: For the most reliable results, configure your Approval workflow before turning on Content Approval.
Need more options? You can create your own workflows or customize the approval workflows provided by SharePoint using SharePoint Designer 2010 or Visual Studio 2010.
Setting up an Approval workflow
Approval workflow is one of several workflow templates in SharePoint 2010. To set an approval workflow, follow these steps:
1. Access the Library Settings page using the Ribbon in your library.
2. In the Permissions and Management settings options, click the Workflow Settings link.
The Add a Workflow page is displayed, as shown in Figure 19-5.
3. Click the Approval - SharePoint 2010 template option in the Select a Workflow Template list.
4. Enter a name in the Type a Unique Name for This Workflow text box.
I recommend choosing a name that describes the step in your business process this workflow fulfills. In my experiences, most business processes can have several approval steps, so calling it The Approval Workflow isn’t meaningful.
For example, if your approval workflow is actually a review workflow, call it the Author Review Workflow. If you need to add a second approval workflow, you could call it the Regulatory Editorial Review Workflow.
5. Use the Select a Task List drop-down list to choose a task list.
I recommend going with the default — Workflow Tasks — unless you have a special reason for wanting to track this workflow in a list by itself.
Figure 19-5: The Add a Workflow page.
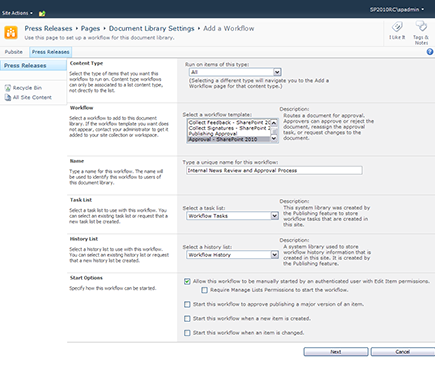
6. Use the Select a History List drop-down list to choose a history list.
Again, I suggest accepting the default, which is Workflow History.
7. Select a Start option by selecting the appropriate check box.
Decide how you want the workflow to be triggered. If you want the workflow to start manually, select the check box Allow This Workflow to Be Manually Started by an Authenticated User with Edit Item Permissions.
Note: You can have only one workflow that’s triggered by publishing in a library.
8. Click the Next button.
The Page Approval page appears, as shown in Figure 19-6. See the options I discuss in the “Approval workflow options” section, earlier in this chapter, and then specify the appropriate options.
9. Click the Save button
Figure 19-6: The Page Approval page.
 .
.
By default, Content Approval is enabled on publishing portals. This can be confusing because when Content Approval is enabled, a document doesn’t become visible to others until it’s published. I’ve seen a few “It’s right there,” “No, it isn’t,” “Yes, it is!” exchanges that were a result of someone not realizing this and failing to check in and publish their document. To determine whether Publishing workflow is enabled on your library, open the document library and click the Properties icon for any document. If Workflows is an option, you’re all set.
If you have an alert enabled on a library/list, and approval is also turned on for that library/list, you may not receive a notification until a new or changed item is approved and published.
If you just need approvals, the Approval workflow may be overkill. Consider turning off workflow and just keeping approvals, with or without versioning. Items that require approval will quietly sit there (like my dog Rosie by the kitchen at dinnertime) waiting for someone to take notice.
Initiating a workflow
Configuring your library to use a workflow only solves part of the problem. If you don’t have your library configured to kick-off automatically, someone must manually start the workflow.
Manually initiate a workflow by following these steps:
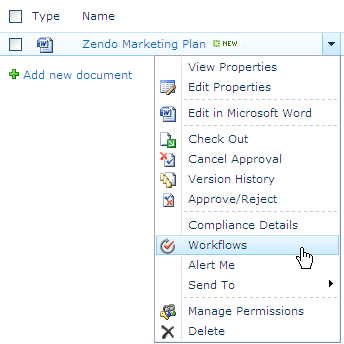
1. Browse to the item you want approved, click the drop-down list (see Figure 19-7), and choose Workflows.
You see the Workflows page for that library or list.
Figure 19-7: Choose Workflows from the drop-down list.
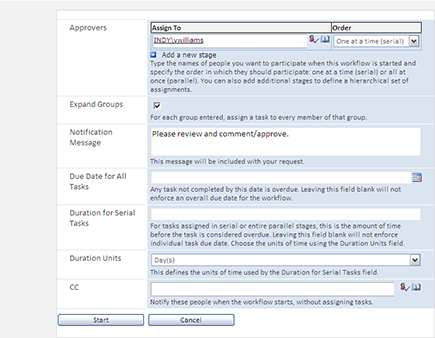
2. Under Start a New Workflow, select the Approval workflow you want to initiate.
The form to initiate the workflow displays, populated with the default values specified during the workflow configuration; you can accept the defaults or change them (see Figure 19-8).
The forms you see in Figures 19-6 and 19-8 are part of the workflow. You can customize these forms or create entirely new forms to meet your business process needs using InfoPath 2010, SharePoint Designer 2010, and Visual Studio 2010. The combination of tools you need depends on how sophisticated you need your workflow to be.
3. Click the Start button.
A Workflow task is created in the specified task list and is assigned to the first Approver. If e-mail alerts are enabled, an e-mail is sent to that person with a link to the item, instructions, and a link to the associated task. The Requestor also receives an e-mail indicating that the task has been started as well as a link to the item and the workflow status page.
Figure 19-8: Accept or change the workflow options.
Approving an item
If you’re an Approver on an item, follow these steps to respond to an approval request:
1. Review the item using the link in the e-mail request or by accessing the item directly in the library.
2. Enter comments in the Your Comments text box.
3. Click a button to indicate what you want to do with this item (see Figure 19-9):
• Click the Approve button to approve the item. If you approve the item and there are no other Approvers, the task is marked Completed and the outcome is Approved. If there are other Approvers, the task is assigned to the next Approver on the list, if any, and the Requestor is notified. The task version history is updated.
• Click the Reject button to reject it. If you reject the item, the task is marked Completed and the outcome is Rejected.
• Click the Cancel button to back out of this task.
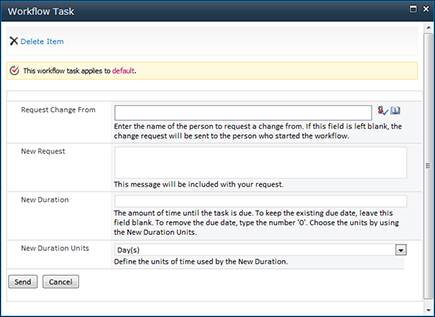
• Click the Request Change button to indicate that further edits are needed. The Workflow Task window displays, as shown in Figure 19-10. Enter the name of the person whom you want to make the change in the Request Change From text box, a description of your request in the Your Request text box, the task duration (if any) in the Duration for Serial Tasks, and select a time unit from the Duration Units drop-down list, and then click the Send button. A new task is created for the person you specified, and your task status is marked Completed.
• Click the Reassign Task button to ask someone else to approve the item. If you reassign the task, you’re prompted to enter the name of the person to whom it should be reassigned. A new task is created and your task is marked Complete but the status is Delegated.
The Requestor is notified each time the task is updated.
Figure 19-9: Task details for an Approver.
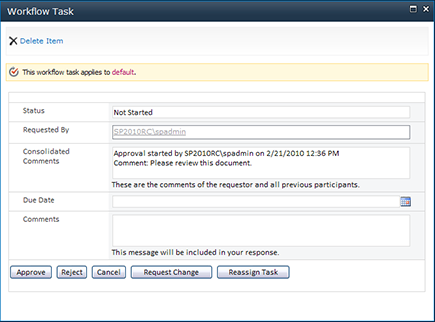
Figure 19-10: Request the author to make changes.
Don’t confuse status with outcome. Status merely indicates whether the workflow task is Active or Complete. Outcome is what tells you whether the item really passed muster and was approved. Whether the item was approved or rejected, the task status is marked as Complete when the last Approver has approved or rejected it. However, the task outcome indicates whether the item was approved or rejected.
You can also respond to an approval request by accessing the items using Site Actions⇒Site Content and Structure, locating the item in the site hierarchy, and then using the item’s context menu to select an Approval option. Alternatively, you can also edit the task from Outlook or from the SharePoint task list.
Checking the status of an Approval workflow
Requestors and Reviewers can check the status of an Approval workflow as follows:
1. Navigate to the site for which you want to check the status of one or more Approval workflows.
2. Choose Site Actions⇒View Site Content Reports.
The Site Content and Structure page appears, as shown in Figure 19-11.
Figure 19-11: The Site Content and Structure page.
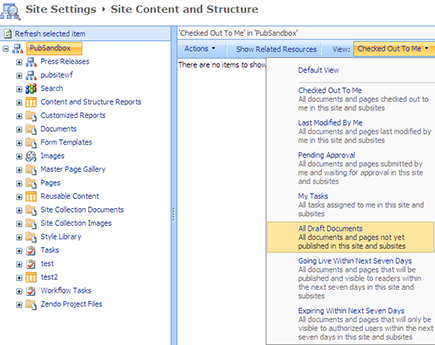
3. To view the status of items specific to you, select an item from the View drop-down list:
• For Requestors, choosing Pending Approval displays all items that you’ve submitted for approval and aren’t completed yet.
• For Approvers, choosing My Tasks displays all tasks, including Approval workflow tasks, assigned to you.
4. To view all tasks (your own as well as those assigned to other people), click Workflow Tasks in the navigation pane on the left and then choose All Tasks from the View drop-down list.
The Workflow Tasks – All Tasks page appears.
5. Click any task to view its details.
A light touch with Content Approval and Approval workflow can help facilitate reviews, support governance policies, and help you track and retain information about whether content has passed the right checkpoints before being formalized. Experiment with them alone or in combination until you hit on the process that works.
..................Content has been hidden....................
You can't read the all page of ebook, please click here login for view all page.