Chapter 12
Taking Control of Your Profile and Content
IN THIS CHAPTER
![]() Understanding your personal SharePoint space
Understanding your personal SharePoint space
![]() Wrangling digital content with OneDrive for Business
Wrangling digital content with OneDrive for Business
![]() Staying up to date and keeping track of your favorite sites
Staying up to date and keeping track of your favorite sites
![]() Customizing your SharePoint profile
Customizing your SharePoint profile
Throughout this book, you can read about SharePoint sites and how they can be used with teams and organizations. SharePoint also provides individualized benefits designed specifically for you. In particular, you can customize your own individual space and take control of your SharePoint experience.
In this chapter, you explore how your personal SharePoint space works. You find out about some pretty cool apps and explore how to work with these apps using only your web browser. You discover how to aggregate news and create a blog, sync and organize documents with OneDrive for Business, and add and follow specific sites. You also explore and set up your personal profile.
Organizing Your Personal Content with OneDrive
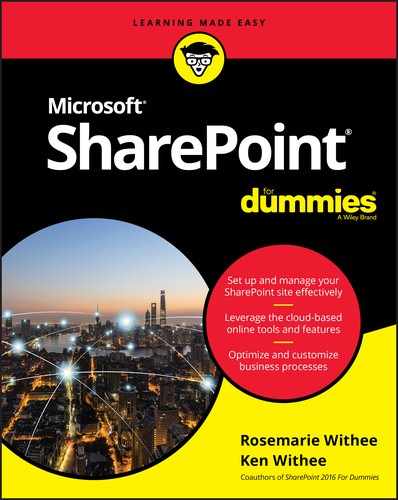
Your personal cloud storage location, also known as OneDrive, is where you store and organize your documents. You access OneDrive by clicking on the waffle icon (officially called the app launcher) in the upper-left corner of your screen and then choosing OneDrive, as shown in Figure 12-1.

FIGURE 12-1: Accessing your OneDrive site.
When you land on your OneDrive site, the heading, OneDrive, appears at the top of your browser, and your personal site loads, as shown in Figure 12-2. Congratulations, you are now working in your own personal SharePoint storage location! This is your own personal domain, and everything here is private unless you choose to share it with others.
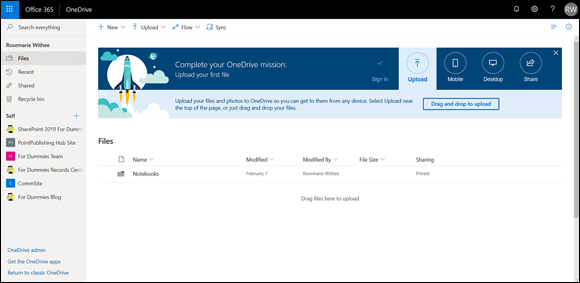
FIGURE 12-2: The personal SharePoint storage location called OneDrive.
 There are some slight differences between OneDrive in SharePoint Online and OneDrive in SharePoint On-Premises. One example is the action link (New, Upload, Sync, Share, More). It is found below the status bar at the top in the Online version, but in the On-Premises version, it is found below the Documents heading.
OneDrive includes a number of features right out of the gate that you access in the left-hand navigation tools. You have an app called Files in which you can store documents. You can also use the left navigation to view recent files and see the files you have shared with others. You also have a Recycle Bin for anything you deleted that you want to recover.
Saving stuff with OneDrive
Your personal storage location, known as OneDrive, is designed as a place to store, organize, and share your documents, such as a carpool list you’re working on or a potluck spreadsheet. You might also be working on business documents that don’t really fit into any specific app in SharePoint. Your OneDrive is the catch-all place you can store it.
Think of your OneDrive as your personal Documents folder on your computer. The difference is that the personal Documents folder on your computer is only on that single computer. If you’re using a different computer, you can’t access those documents. In addition, if your computer crashes and you have not backed up your Documents folder, then those files are lost. OneDrive is designed to be a secure and safe place to store all your documents. What if your device crashes or is stolen? With your documents stored in OneDrive, you just log in again from a different device and continue working on your documents.
 Your OneDrive files are only secure and backed up if your IT team sets up the infrastructure that way. If you’re using SharePoint Online, then you can be assured that Microsoft is doing this for you. If your local IT team is running SharePoint for you, then check with them to make sure they backup and secure your OneDrive documents.
Your OneDrive is designed to live in the cloud and to be accessible by any device you happen to be working on. For example, if you start a document at work and then have to stop working on it when you leave to pick up your kids, you can log in and continue working on the document when you get home. And if you later have to take your mother-in-law to the doctor, and you take your tablet with you, you can log in from your tablet while you’re waiting in the doctor’s office. Finally, if you drop off your mother-in-law and make a quick stop at the grocery store, and you get an email on your smartphone asking about a detail in the document you have been working on, you can connect to your OneDrive on your smartphone and view the document so you can respond to the inquiry. Being this connected isn’t always the best way to spend your off-time, but OneDrive enables you to decide when and where you want to work. The idea behind OneDrive is that when you need your documents, you can access them as long as you can connect to the Internet.
The OneDrive discussed in this chapter is called OneDrive for Business, and it is designed for organizations and is part of SharePoint. A consumer version of OneDrive is also available at https://onedrive.live.com, but it is not part of SharePoint. It is a completely separate offering designed for general consumers, not organizations and business. When using the consumer version, your files are stored in the cloud on Microsoft servers. The consumer version of OneDrive is similar to other cloud storage services such as Dropbox and Google Drive.
Creating or uploading documents in your OneDrive
When you first land on your OneDrive page, you are presented with a notice letting you know that OneDrive for Business is a place to store, sync, and share your documents. You can add documents to OneDrive by following these steps:
Navigate to your OneDrive page by clicking the waffle icon in the top-left corner of your screen and choosing OneDrive rom the menu (refer to Figure 12-1).
If you are using SharePoint Online, you won’t have any trouble finding OneDrive because Microsoft has already set it up for you. If you are using SharePoint On-Premises, you will only find the waffle icon and the OneDrive app in the waffle icon if your administrator has set it up for you. If you don’t see the waffle icon, or if you don’t see the OneDrive app in the waffle icon, then contact your administrator to get things set up.Click the New link at the top of the page and select the type of document you want to create, as shown in Figure 12-3.
If you are using SharePoint Online, you already have the Office document types (Word, Excel, PowerPoint, and OneNote) integrated with your OneDrive site because Microsoft has already set it up for you. If you are using SharePoint On-Premises, you will only see these document types if they have been set up. If the integration has not been set up, you will see a dialog box that lets you choose to upload an existing file already.
- The blank document opens, ready for you to add content.
- On the other hand, if you want to upload an existing document, click the Upload button instead of the New button (Step 2), browse to the document you want to add to OneDrive, and click OK to add the file.
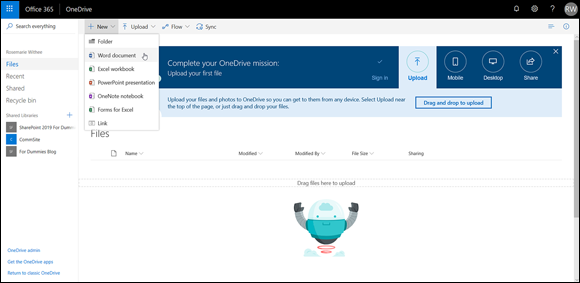
FIGURE 12-3: Creating a new document in OneDrive.
You can choose to overwrite the document if a document with the same name already exists. If versioning is turned on, a new version of the document will be created and the existing document will be the previous version. If versioning is turned off, then overwriting will result in the loss of the existing document with the same name.
The OneDrive site contains a number of views. You can see all the documents you have recently worked on and all of the documents that are shared with you. You access these views by clicking the links in the left navigation pane (refer to Figure 12-2).
Expressing Yourself with Your Profile
People are central to any business, no matter how big or small. Without people, a business wouldn’t run. How people interact with each other creates the culture of a business, and part of that culture is how people figure out who does what job, who knows who, who knows what, and how someone might be able to help you do your job better. That culture, to some extent, can be reflected in SharePoint user profiles, and the better the user profile, the more likely you’re going to get your job done more effectively. And, the more likely others are going to be able to find you easily when they need to.
You access and configure your personal profile by clicking your name icon in the top-right corner of the screen and selecting My Profile. Your email, name, and contact information is automatically pulled in when you set up your Office 365 user account. In addition, you can upload your picture and enter information about yourself, such as things people should ask you about, your past projects, skills, schools you attended, your birthday, and your interests. You can also add entries to your personal blog and keep track of your recent documents and email attachments. Finally, your profile is where you set up your specific language and region information.
Creating a holistic profile experience
The first part of creating your profile is to take a look at what properties are there by default. Many of the basic properties come from Office 365 and Active Directory, but depending on how SharePoint was set up, you could also see information from other systems as well. The properties that typically show up in user profiles include your name, title, department, manager, and some contact information such as your work phone.
You can update other properties on your Profile page, such as About Me, your picture, your location, your home phone, your skills, interests, and projects you’ve worked on in the past. All this extra information creates a much better sense of who you are than just the basic information about who you work for and where you are.
After browsing around your profile and the different sections of it, you may think of properties in the Outlook address book that should be in SharePoint profiles. Ask your SharePoint administrator to get those properties into SharePoint. This task is done in SharePoint Central Administration for SharePoint On-Premises or in the SharePoint Online administration area of Office 365.
Filling in your profile information
It seems like practically everyone in the world is familiar with social networking sites such as Facebook, Twitter, and LinkedIn, and Microsoft has taken some cues to extend that social networking functionality into SharePoint. It all starts with sharing some information about yourself so that other people in your organization can find you and read a little about you. That’s where the basic profile information comes into play.
Along with the really basic information that comes preset with your profile, you also see About Me, Picture, recent content, and your personal blog, as shown in Figure 12-4 (note the blog is at the bottom of the screen and not shown in the screenshot). These items are shared with everyone, unlike some of the extra information we cover next.
FIGURE 12-4: Your Profile page.
To edit your profile, click the Update Profile button and fill in the profile information, as shown in Figure 12-5.
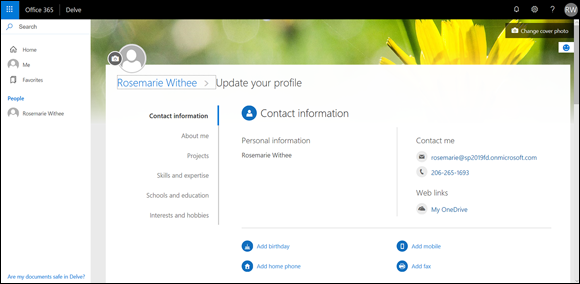
FIGURE 12-5: Updating your profile information.
 The information you share in the profile fields should be what you want people to know about you as it relates to what you do at your company. There’s really no need to share your love of pet rats (unless your business caters to owners of pet rats). Rather, share a little bit about where you came from, what you like to work on, and when you started at the company — keep it simple and useful for others.
Put in what you’re really good at, work-wise, and things that people might want to know more about you if they knew you had the same interests or a particular knowledge of something they need to know more about. But again, keep it business-related, because this information is shared with everyone.
For your picture, we recommend one of you in business attire rather than the one of you sunburned and on the beach. Remember, the picture you share here shows up in SharePoint, attached to documents you’ve created, or when you show up in search results. A picture is really helpful, for example, if you work in a large organization, and even a small- to medium-sized organization where people don’t work in the same location. Maybe all the employees of your company are so distributed that they don’t all get together but once every year or two, so being able to place a face with a name can help bridge that gap of unfamiliarity. (We’ve been in many situations where the voice doesn’t go at all with the eventual face when we met them in person — a profile picture helps to alleviate some of that awkwardness.)
For administrators and managers, remember that if one person in the organization updates her profile, it’s a start, but it’s really not that useful. If everyone does, it becomes a great place to get to know who you work with, what motivates people, and what they’re good at. Your challenge is to come up with a contest or some type of incentive program for getting employees to fill out their profiles. Filling in the rest of your profile is up to you.
If you are using SharePoint Online, you will find that the About Me page is actually part of a new app called Delve. Delve is an exciting new app that is built into SharePoint Online. It is designed to help you take control of the digital mountain that overloads the modern world. We take a look at Delve in the next section.
Tracking Your Favorite Sites
The number of sites being used throughout your organization can be overwhelming. You might be a user on sites for sales, human resources, various departments, carpools, child care, product development, and so on. As SharePoint gains momentum in your organization, the number of sites you might participate in will grow quickly. The Delve app is designed to help you solve this site overload issue. You access the Delve app by clicking Delve in the waffle icon. (If you don’t see it right away, then click the All Apps and scroll to find it.) The Delve app loads and a navigation reminder appears at the top of the page that says Delve. You can also access the Delve app by clicking the Favorites link on your Profile page.
As with many things in SharePoint, there are multiple ways to achieve the same outcome. Delve is what powers the Favorites functionality you will find within your Profile page. You can access the favorites functionality through Delve directly or by going through your Profile page. Whatever is easiest to remember. Just don’t get in an argument with someone on how to do something in SharePoint since you both might be right!
The Favorites page is shown in Figure 12-6.

FIGURE 12-6: The landing page for the Favorites page of the Delve app.
To help you keep track of your sites, the Delve app aggregates all the sites you follow. In addition to keeping track of your sites, the Delve app allows you to create new sites and even suggests sites you might be interested in following based on the sites you currently follow. In other words, the Delve app is a one-stop sites shop and a sites dashboard.
To follow a site or document, click the bookmark icon at the bottom of the site or page. It looks like a bookmark flag. You can see an example at the bottom of Figure 12-6.
Reaching Out with a Blog
You can share information within your company in many ways. You can send an email, publish a document to your portal, or maybe go old-school and leave a hard copy on everyone’s desk.
But nothing really compares to a good blog. It’s a bit like reading a book with really short chapters. As shown in Figure 12-7, your Profile page has a link to your own personal blog.
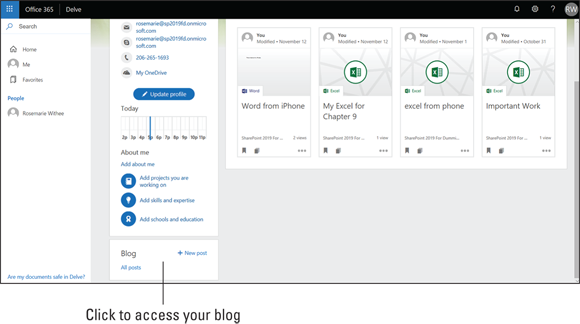
FIGURE 12-7: Access your blog from your Profile page.
Your blog is provisioned when you first click the link on your Profile page to create a new blog entry. The direct URL to your blog is configured based on how SharePoint was set up. An example is
https://sp2019fd.sharepoint.com/portals/hub/personal/rosemarie
Your blog posts show up on the Profile page of anyone following you.
As shown in Figure 12-8, your blog site uses the new concept of adding content to a SharePoint page dynamically. You can give it a title, add images, and add content just by typing in the relevant areas or clicking the plus sign to add components.
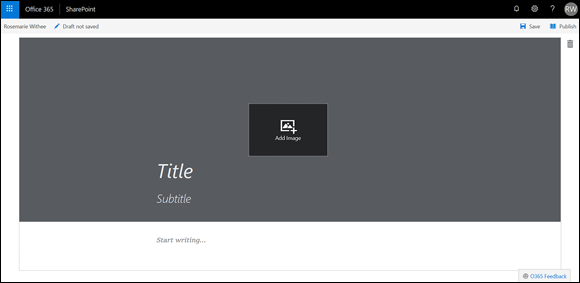
FIGURE 12-8: Your personal blog in SharePoint.
When you are ready to publish your blog entry, click the Publish button. Your blog entry is then live and ready for members of your organization to see. If you have used popular blog building tools such as WordPress, you will already be familiar with the blog functionality of SharePoint. It is just as easy!
So what is so special about a blog? Nothing, really, except for the content you create in it. Blogging is not for everyone, but if you feel like sharing your thoughts with your colleagues, and you know that you can post at least a few times a month, your blog might be compelling to your coworkers.
Writing in your blog is a great way to communicate what you’re working on, your ideas about the latest company initiative, or what’s going on in your life that you think others may find interesting. The topic of your blog can be about a single thing or can range from the Amazon to Zambia. It doesn’t really matter (unless you start violating some company blogging policies), but what matters to your readers is that you create posts that are interesting to read and you’re updating your blog on a somewhat regular basis.