Chapter 17
Realizing You Are a SharePoint Administrator
IN THIS CHAPTER
![]() Getting familiar with the settings for your site
Getting familiar with the settings for your site
![]() Accessing the Site Settings page
Accessing the Site Settings page
![]() Getting a handle on the Look and Feel section
Getting a handle on the Look and Feel section
![]() Changing the site logo and the look of your site
Changing the site logo and the look of your site
It used to be that website administration was done by the same web developer geeks that created the site. This made life simple for the information worker. If something was wrong with the site, call IT! If something needed to be changed, call IT! If a new site needed to be created and developed, call IT!
SharePoint has shifted the paradigm of website administration. No longer do you need to involve IT in your website administration. This relieves the pressure on IT and also empowers you to take control of your own site. Didn’t Uncle Ben in Spider-Man say, “with great power comes great responsibility”? Well, the same is true with SharePoint. If you are a site administrator, you have great power at your fingertips. Just be prepared; the website users will now come to you instead of IT. No need to fear, though; SharePoint makes website administration straightforward. Everything is done using your web browser from a centralized settings page called Site Settings. Yes, you use SharePoint to administer SharePoint. How convenient!
In this chapter, you go through the settings available for a SharePoint site. You find out how to find the Site Settings page and gain familiarity with the many different settings categories. Next, you discover SharePoint features. You see how a feature works and which features are active by default. You also find out how to activate and deactivate features and explore some of the most common and helpful ones. Finally, you find out how to change the look and feel of a SharePoint site. You see how themes are used for colors and fonts and how composed looks are used.
Changing Your Site’s Basic Information
Some of the first things you might want to change on a SharePoint site are the title of the site, the description, and the logo. With these simple changes, your site looks professional and unique to your team or organization. You can then get on with the productivity benefits that SharePoint has to offer.
SharePoint team sites contain a site icon in the upper-left corner. The default image in a team site is a gray square with a couple of letters from the SharePoint site’s title. SharePoint has a setting that allows you to change this image.
 In the past, you had to worry about the exact size of your logo. SharePoint dramatically simplifies the process by letting you choose a logo image from your computer or from a Library app somewhere on your SharePoint site. SharePoint then automatically resizes the image to the optimal size for the logo.
To change a site’s basic information:
Navigate to the Home page of your site and then click the Settings gear icon and choosing Site Information.
The Site Information appears on the right side of the page.
- Click the Change button to choose a different logo image.
Browse your computer for the image you want to use as a logo.
When you browse and select an image, SharePoint automatically uploads it to your SharePoint site for you.
Edit the title as desired and type a short description of the image in the Enter a Description (Used as Alternative Text for the Picture) text box.
Alternative text is important for accessibility software such as screen readers.
You can also change the site’s privacy settings on this screen
Click Save to commit your changes.
You see your new logo and title in the header area.
Finding Site Settings
Thankfully, finding the Site Settings page is as easy as a few clicks of the mouse. Click the Settings gear icon and choose Site Contents, then click the Site Settings tab, as shown in Figure 17-1.
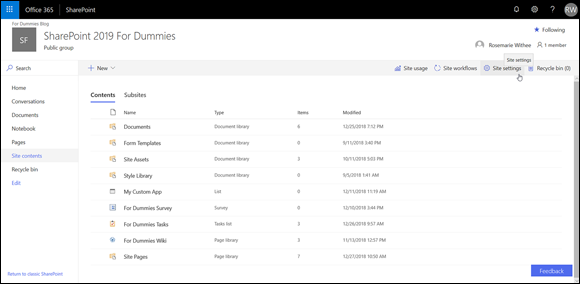
FIGURE 17-1: Opening the Site Settings page.
When the Site Settings page loads, you see a number of links all grouped into various categories, as shown in Figure 17-2. The Site Settings page can be daunting and overwhelming. Don’t worry, though. As you administer a SharePoint site, you will become familiar with all the various settings pages and become an expert before you know it.
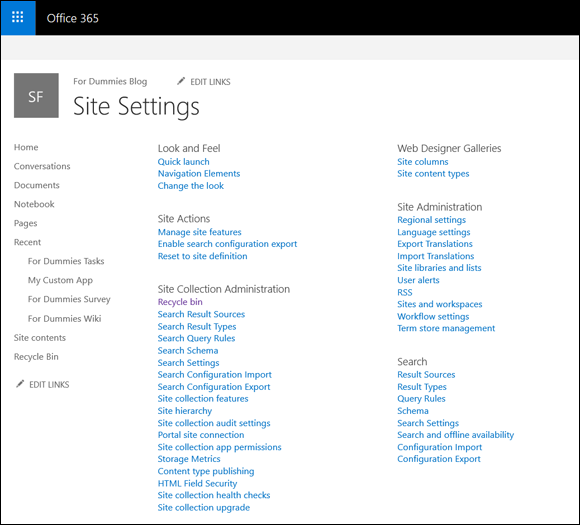
FIGURE 17-2: The Site Settings page in SharePoint.
Different settings links appear and disappear, depending on your particular permissions and the type of site you are administering. For example, if you’re a site collection administrator, then you see the Site Collection Administrators section. If you’re not, then you won’t see the links or even the entire Site Collection Administration section.
If you read about a settings page but can’t find it, chances are you don’t have permissions or you are working with a site that does not have that particular setting. This can occur, for example, if the publishing feature is activated or not. In general, SharePoint shifts around links and names depending on how the site is set up.
Digging into Site Settings
The Site Settings page for a site based on the Team Site template contains six settings categories: Look and Feel, Site Actions, Site Collection Administration, Web Designer Galleries, Site Administration, and Search.
Look and Feel
The Look and Feel section of the Site Settings page includes links for managing things like the left navigation pane, known as the Quick Launch, navigational elements, and the look and feel of the site. You can easily change a number of things to customize your site and make it your own.
 The Look and Feel section of the Site Settings page is a perfect lesson in SharePoint frustration. The links that appear in this section depend on whether you have the SharePoint Server Publishing feature activated. Not knowing this could cause you frustration because you may read about a settings link, but when you look at your own SharePoint site, that link is nowhere to be found. To make matters worse, the links are different depending on whether SharePoint Server Publishing is activated at the site collection level or the site level. For example, you could have SharePoint Server Publishing activated at the site collection level but not activated at the site level. You will still see the Navigation link in the Look and Feel section, as opposed to the Top Link bar and Quick Launch navigation links that appear if the publishing feature was deactivated at the site collection level. (We cover activating and deactivating SharePoint features later in this chapter.)
The Look and Feel section contains the following setting links (when the SharePoint Server Publishing feature is not active at the site collection or site level):
- Quick Launch enables you to configure the navigation on the left side of the page. You can add headings, links, and change the order.
- Navigation Elements enables you to turn the Quick Launch menu on and off and also the Tree View.
- Change the Look is where you choose the colors and design of the site. There are some exciting and outrageous looks such as Sea Monster and Immerse. The looks available to choose from are in the Composed Looks gallery (see the later section, “Web Designer Galleries”).
When you activate the SharePoint Server Publishing Infrastructure feature at the site collection and site level, the Tree View and Top Link bar setting links disappear and are replaced with a single Navigation link. In addition, the following settings links appear in the Look and Feel section:
- Design Manager is a web-based tool that you can use to create your own SharePoint site designs. The tool is wizard based and walks you through uploading design files, editing your master page, changing page layouts, and publishing and packaging your design.
- Device Channels enables you to specify certain characteristics of your site based on the device used to view the site. A channel can be optimized for the device to display the site in a specific way. For example, you can set up a channel for smartphones (such as an iPhone or Android). You could set up a different channel for the iPad or Surface tablets. And finally, you can set up a channel for laptops and desktop browsers.
- Image Renditions lets you set the default behavior for how images and videos render on the site. You can set the width and height for how images are displayed on a page.
- Import Design Package enables you to import a design package developed by a third party or in-house designer.
- Navigation enables you to manage navigation links and also change how the navigation behaves. You can configure global navigation (top of page) and also current navigation (left side of page). The Navigation settings page also enables you to change the sorting order of the navigational links and show and hide the ribbon.
- Master Page is where you choose which master page the site uses and which master page the system uses. The system master page is for pages used by the system, such as when you view an app.
- Page Layouts and Site Templates enables you to control which page layouts and site templates are available for users of the site. All the page layouts are contained in a gallery (see the later section, “Web Designer Galleries”). This settings page enables you to limit the page layouts and site templates that users of the site can use.
- Welcome Page is the landing page for a publishing site. You can use this settings page to determine which page should be used for the landing page.
- Top Link bar enables you to configure navigation at the top of the page.
- Tree View is where you enable or disable the Quick Launch (left navigation) or turn on a special type of navigation on the left side that shows a tree of the site’s content.
We cover changing the look and feel of your site later in this chapter and cover setting up navigation in Chapter 18.
The Look and Feel category, with the SharePoint Server Publishing feature activated, is shown in Figure 17-3.

FIGURE 17-3: The Site Settings page in SharePoint with the SharePoint Server Publishing feature activated.
To activate the SharePoint Server Publishing feature in Site Collection Features, we first had to activate the SharePoint Server Enterprise Site Collection features (which also adds some links to the Site Settings page). This is a great example of how complicated SharePoint can quickly get once you leave the safety of the default behaviors. If you try to activate one feature that relies on another you might just receive an error that appears random, like we did. The only reason we knew to activate the Enterprise features first was based on experience and trial and error. This is why we claim that you never really know SharePoint. We still learn new things about it every day.
The term feature can be a bit confusing in SharePoint. You often hear people talk about functionality in terms of features. The term has a double meaning in SharePoint. The first meaning of feature is in the traditional sense, so you could say web-based administration is a feature of SharePoint. The second meaning is technical and specifically means a package of code that can be activated and deactivated (turned on and off).
Site Actions
The Site Actions section of the Site Settings page sis where you manage the SharePoint features for the site. You can activate or deactivate particular features using the Manage Site Features link. This is important because some features show up only when certain features are active. For example, the Save Site as Template link and the Enable Search Configuration Export option show up when the SharePoint Server Publishing Feature is not active and disappear when it is active. In addition, you can reset the site to its original template definition or delete the site completely. (We cover activating and deactivating SharePoint features later in this chapter.)
Site Collection Administration
A site collection is a container for multiple sites. SharePoint allows organizations to delegate different levels of administration. For example, you might be a site collection administrator, and there might be an administrator for each site. This delegation of duty is important for offloading the work required to keep a large number of websites running smoothly.
The Site Collection Administration section of the Site Settings page is used to administer the overall site collection. The result is that any changes made to these settings pages affect all sites in the site collection. In addition, you can activate or deactivate a feature here to make it available or remove it from all the sites in the collection. The next step up in administration from site collection administrator is SharePoint farm administrator. A SharePoint farm administrator uses a tool called Central Administration, and the changes they make at the farm level affect all site collections in the SharePoint farm.
In order to see this section, you must be a site collection administrator.
There are a lot of links to settings pages in the Site Collection Administration section. Most of the links are similar in nature to the Site Administration section but affect all sites in the collection and not just the current site. Keep in mind that having a feature active or not causes links to appear or disappear. For example, activating the SharePoint Server Publishing Feature alters this settings page.
Web Designer Galleries
A common theme throughout SharePoint is reusability. When you spend the time to develop something, you want to be able to use it over and over again. In SharePoint, reusability takes the form of things like data containers, templates, layouts, and solutions. The Web Designer Galleries section is where you manage all these reusable components. The components are stored in galleries and are designed to hold the pieces you use when designing your websites. With that in mind, Web Designer Galleries is such a perfect name. (What a nice break from other horribly named technology and acronyms like XSLT, HTML, and CSS.)
The Web Designer Galleries section of the Site Settings page includes the following links:
- Site Columns is a gallery that contains columns you can use throughout the site. For example, you might create a column called Product Name that you could add to any app in the site. SharePoint ships with a number of existing site columns.
- Site Content Types is a gallery that stores site content types (which are a collection of columns) so that you can use them throughout the site. For example, say you want to store all the information about a product. A product might contain many different data fields (called site columns) such as Product Name, Product Description, Product Bar Code, Product ID, and probably a lot more. You could create the site column for each data field and then group all of the data fields together into a content type. Now, rather than adding each data field to every app throughout the site, you can simply add the content type when you want to work with a product, and all the columns come along with it. SharePoint ships with a number of content types out of the box. The content types are grouped into categories for easy reference.
- Web Parts is the gallery where all Web Parts (both out of the box and third-party) are stored. Web Parts are functional components that can be added to pages. (Web Parts are covered in Chapter 6.)
- List Templates is the gallery where an app saved as a template is stored. (List Templates is a bit of a naming snafu. In SharePoint, all lists and libraries are called apps, so this gallery would more aptly be named App Templates.) Each app based on a list has a link on the List Settings page. Under the Permissions and Management section is the Save List as Template link. When you save a list app as a template, it is then stored in the List Templates gallery. You can then take the template and upload it to this gallery on a different SharePoint site. After it’s uploaded, you see a new app type on the Your Apps page, and you can then create apps based on the uploaded template. This is handy when you spend a lot of time building a list app just the way you want it and need to transfer it to another location.
- Master Pages is the gallery that contains all the master pages and page layouts. A master page is a template type page that provides a consistent look and feel throughout every page in the site. For example, notice how in every out-of-the-box SharePoint site, the navigation is on the left, there is a header at the top, and the pages are in the middle? That is all due to the master page that ships with SharePoint. (Creating custom master pages for your organization is best left to developers — master pages are a lot of work and can quickly turn into a nightmare project. SharePoint also requires the master page to contain certain things and behave in a certain way.) A page layout is a similar concept to a master page but is designed to be a template for a single page.
- Themes is the gallery that holds SharePoint themes. A theme is a collection of colors and fonts. When you apply a theme, your SharePoint site magically changes. A number of themes ship with SharePoint, and you can also have a web developer build your own custom themes.
- Solutions is a gallery that stores custom SharePoint solutions. A SharePoint solution is a bunch of custom-developed functionality all packaged together. The entire package is called a Web Solution Package (WSP). A SharePoint solution might be developed by your in-house developers or purchased from a third party. For example, the company Portal Integrators has developed a number of SharePoint solutions for clients all over the world. When they send the final product to a client, they send them the WSP. One of these solutions is geared towards Human Resources. If you purchase it, you get a WSP with all sorts of SharePoint functionality designed for Human Resources. Upload the WSP to this gallery, and your Human Resources department now loves SharePoint.
- Composed Looks is a gallery that has to do with the look and feel of your site. A composed look is relatively new in SharePoint; it expands on the idea of themes and adds a background image and a master page. A number of composed looks ship with SharePoint. To give you a sneak peek, SharePoint ships with composed looks called Sea Monster, Breeze, and Immerse. You can look forward to spicing up your SharePoint site, if you so desire.
Site Administration
The Site Administration section of the Site Settings page is where you manage options that are specific to this individual site. The changes you make in this section won’t affect other sites in the same site collection container. This is different than the Web Designer Galleries section of the Site Settings page, which includes components that are used throughout the site collection. So if you upload a solution, it will be available to other sites in the site collection.
 It’s easy to get confused about which site the Site Administration page affects. This is especially true if you manage multiple sites or are a site collection administrator. When working with the Site Administration settings, make sure you are on the correct site.
The Site Administration section contains a large number of settings, so many that we can’t cover them all in this book. We encourage you to explore these settings. Among the settings in the Site Administration section are Regional Settings, User Alerts, Workflow Settings, Term Store Management, Popularity Trends, and even Translation Status (which is only available when SharePoint Server Publishing Feature is active).
Refer to Figure 17-2 to see the Site Administration category without the Publishing Infrastructure activated and Figure 17-3 for the same section with the Publishing Infrastructure activated. This is an important concept in SharePoint. Like a magician, SharePoint often changes shape depending on the features you have activated.
Search
The Search section of the Site Settings page is where you manage all the search functionality for your site. Search can be an incredibly powerful productivity tool. It’s worth spending the time to discover the capabilities of SharePoint search.
The Search section contains the following links:
- Result Sources is a settings page where you define where SharePoint search should look for content. You can set sources to local SharePoint content, remote SharePoint content, Exchange, or any other external system that supports the OpenSearch protocol.
- Result Types is where you define how a result will look based on the type of content displayed. For example, you might want the results of a person to look different from the results of an Excel or Word file. A number of prepackaged types ship with SharePoint, and you can also define your own. For example, you might want all your products to display in a search result in a particular way. You might want the picture on the left and a description and price on the bottom. You might then want a link to the product page and also a link to the product documentation. You define this with a custom search result that uses a custom template. Building these isn’t simple, but it is possible with the right technical resources.
- Query Rules is a place where you can promote important content into search results. This is valuable because most people are looking for common content. The search engine doesn’t know the difference between an actual marketing template and a hundred other documents that might include the words marketing template. Using the query rules, you can let SharePoint know that the actual marketing template is what people are looking for when they search the term and that it should be displayed at the top. You can also show additional blocks of search results based on a search that you might think someone is trying to find. For example, if someone searches for sales decks, they might really mean sales PowerPoint documents. Query rules are very powerful, and it’s worth taking the time to figure out the capabilities to provide the best search experience.
- Schema is where you can manage properties and map the properties that the search engine uses when searching. A property is a piece of data about the thing that you search for. For example, if you search for a person, you might create a property to hold the person’s department. The search engine can then reference that property when you look for a person in a particular department. Managing properties is only available to site collection administrators.
- Search Settings is where you define the general search settings for the site. You can point the search results to a special site called a Search Center or a specific custom page you have developed to show search results. In addition, you can configure navigation for moving between search and the rest of the site.
- Searchable Columns is a where you define which columns you want the search engine to reference when you search. You can use this settings page to let SharePoint know it should use a particular column of metadata when searching for content. The Searchable Columns link is available only when the SharePoint Server Publishing Feature is active.
- Search and Offline Availability allows you to ban the site content from appearing in search results, set fine-grained search permissions, and even allow items from the site to be downloaded to offline clients.
- Configuration Import lets you import a search configuration file. A search configuration file can contain all the settings and details that you have already spent the time to set up. You definitely wouldn’t want to go through the entire exercise on every site, so you can use configuration files to move settings between sites.
- Configuration Export is used to export a search configuration file after you have everything set up just how you want it. You can then use the Configuration Import setting to import on the new site.
SharePoint search is a very broad topic and it takes some time to get familiar with its capabilities. It is well worth the effort, however, because search can greatly improve your organization’s productivity. (We discuss SharePoint search in more detail in Chapter 22.)
Getting a High-Level View of SharePoint Features
We have to admit that SharePoint features took us a long time to really understand. The reason is that a feature can do anything in SharePoint. A feature is just a collection of code that alters SharePoint in some manner. For example, say you want to write some code that adds a new item to the drop-down list that appears when you click the Settings gear icon. SharePoint lets you do this in code. Now, how do you deploy it to SharePoint? How do you let site administrators turn it on and off? The answer is that you package that code up in a SharePoint feature. When the feature is installed, an administrator can activate (turn on) or deactivate (turn off) the feature. The result is that your custom item appears in the Settings drop-down list when the feature is activated and disappears from the drop-down list when the feature is deactivated.
SharePoint ships with a number of features out of the box. In fact, features can be a major source of frustration. Take the earlier example of a feature that makes an item appear on a menu when the feature is activated. The way you reach navigation in SharePoint (covered in Chapter 18) depends on whether a particular SharePoint feature is activated. That feature is the SharePoint Server Publishing Infrastructure feature. This feature does a lot of things when you activate it, including altering the settings links for navigation. Before you activate the feature, the navigation links on the Site Settings page in the Look and Feel section are displayed as Quick Launch and Top Link bar. When you activate the SharePoint Server Publishing Infrastructure feature, it removes those two links and adds one called Navigation.
You will find that the answer to a SharePoint question is often that it depends on which features are activated!
Turning Features On and Off
You turn features on and off by activating and deactivating them. Features are activated at two different levels. The first is a site collection; the second is a site. Features activated at the site collection level affect all sites contained within the site collection. Features activated at the site level only affect that particular site.
When a feature is active (turned on), a blue Active status indicator appears next to the feature on the right side of the page. See the Access App row in Figure 17-4 and note the Active button in the status column. When a feature is inactive (turned off) the status column is empty, as shown in the second row (Announcement Tiles Feature) in Figure 17-4.
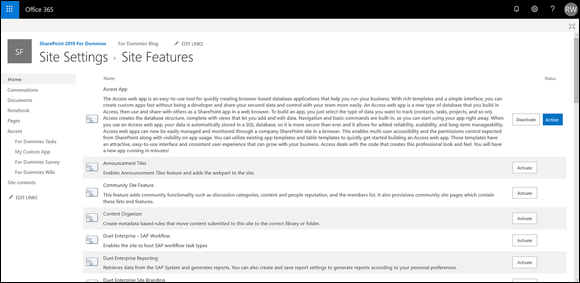
FIGURE 17-4: Active and inactive SharePoint features.
To view a listing of all features for a particular site:
Click the Settings gear icon, choose Site Contents, and then click the Site Settings button.
The Site Settings page appears.
In the Site Actions section, click the Manage Site Features link.
A listing of all the features for this particular site is displayed. Each feature includes an icon, name, description, Activate/Deactivate button, and status column.
To view a listing of all features for a particular site collection:
Click the Settings gear icon, choose Site Contents, and then click the Site Settings button.
The Site Settings page appears.
In the Site Collection Administration section, click the Site Collection Features link.
A listing of all the features for this particular site collection is displayed. Each feature includes an icon, name, description, Activate/Deactivate button, and status column.
If you don’t see the Site Collection Administration section on the Site Settings page, then you do not have Site Collection Administrator permissions.
It’s easy to get turned around when working with SharePoint features. For example, if you are in a subsite and go to the Site Settings page for that subsite, you don’t see all the settings links in the Site Collection Administration section. You instead see a link that takes you to the settings page for the site collection. When you click that link, the Site Settings page reloads for the site collection, and you see all the Site Collection Settings links. (A site collection is also a site.) So if you then click the Manage Site Features link, you are actually managing the features scoped for only the site collection site and not the subsite where you originally started.
Exploring Common Features
Exploring all the features that ship with SharePoint could fill a book unto itself. Each feature on the settings page includes a name and description. We wish we could tell you that they are all straightforward, but they are not. Some features are massive and complicated and others are simple. For example, the SharePoint Server Publishing Infrastructure feature can do a mind-boggling number of things. Conversely, the Site Feed feature simply enables the use of site feeds on a site.
A couple of the most common features are the SharePoint Server Standard Site features and the SharePoint Server Enterprise Site features. These features include functionality for the different editions of SharePoint Server (Standard and Enterprise). The Standard Edition features include functionality such as user profiles and search, and the Enterprise Edition features include functionality such as Visio Services, Access Services, and Excel Services.
If you’re looking for functionality such as Excel Services, and you can’t find it, then check to make sure the SharePoint Server Enterprise Site feature is activated for your site.
Extending SharePoint with Features
Microsoft ships a ton of features with SharePoint, but the product can always be extended further. If your organization has a dedicated development team, they can build features specific for your organization. For example, a company might use in-house developers to create custom SharePoint features for different groups within the company. For example, some features could provide functionality for the sales department, others for human resources, and still others for engineers. Each team in the company can then choose whether to activate or deactivate the features based on whether they need the specific features for their relevant workload on the SharePoint site.
Alternatively, third-party companies also develop features to extend SharePoint for a particular audience. After installing a third-party feature, it shows up right alongside the features that Microsoft ships with SharePoint.
Changing the Look and Feel of Your Site
Changing the look and feel of a site can be very powerful. The standard SharePoint colors work just fine, but perhaps you want to change the color palette for a holiday or to match your team’s color scheme. SharePoint provides some very powerful features for changing the look and feel of your site. You don’t need web designers or any specialized technical skills.
Usability experts have a lot to say about the look and feel of a site. After users are familiar with the look and feel of a site, it’s best not to change it. Creating change when it isn’t required causes a productivity loss. However, it can be a good idea to spice things up a bit by changing some of the colors for a holiday or special day. You just shouldn’t go too crazy (unless you want your users to do the same).
A composed look in SharePoint is a collection of colors, fonts, and layouts that all come together to display your site with a certain look and feel. SharePoint comes with several predefined looks, and your organization may have added others to coordinate the look and feel of other sites.
To change the look of your site, follow these steps:
Click the Settings gear icon, choose Site Contents, and then click the Site Settings button.
Alternatively, in the Look and Feel section of the Site Settings page, click the Change the Look link.
The Change the Look page appears, as shown in Figure 17-5, with a preview of many different site looks. Some examples include Sea Monster, Lime, Nature, City, Orbit, Immerse, and Wood. Each preview pane shows you a sample of the site look.
To try out a look, simply click the preview image.
The preview image is enlarged and settings are displayed so you can change the background image, the color palette, the site layout, and the font combinations used in the site, as shown in Figure 17-6.
Click the Try It Out link in the top-right corner of the page to see what your actual site will look like.
SharePoint does some work and shows your site with the new look in place. The top of the page lets you decide whether to keep the site (by clicking Yes, Keep It) or to revert to the original settings and make more changes (by clicking No, Not Quite There), as shown in Figure 17-7.
When you’re satisfied with the new look of your site, click Yes, Keep It.
Your site loads with the new look and feel.
If you want to go back to the original look of a SharePoint site, you can always change back to the Office look.
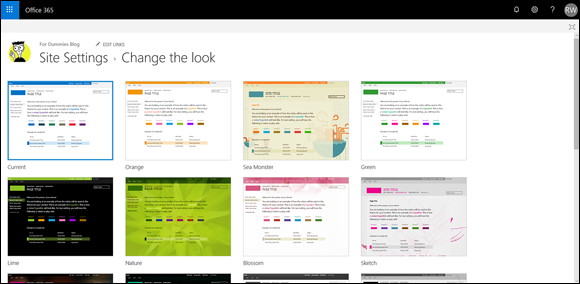
FIGURE 17-5: The Change the Look settings page.

FIGURE 17-6: Changing settings on a particular look.
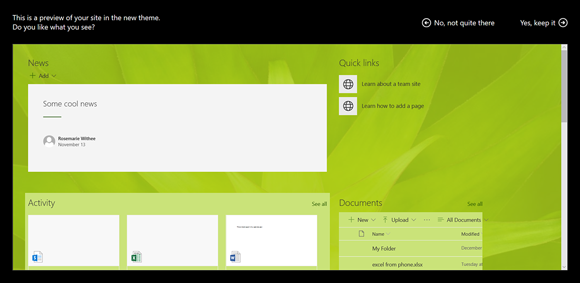
FIGURE 17-7: Previewing a particular look for your site.
A note on fonts
The most common fonts used in web design used to be of two families — ones with serifs (the strokes that extend from letters), such as Times New Roman, and sans-serif (those without strokes from the letters), such as Arial and Verdana. You couldn’t guarantee what fonts users had on their computers, so those fonts were a safe default. They're also recognized as fonts with good readability. (For those reading this book that can’t wait to pick Gigi, Jokerman, or Curlz MT, and you know who you are, you may want to hold up and read the “A word on usability” section, later in this chapter.)
The best practice when we first learned to design websites was that serif fonts were good for paragraph text and sans-serif fonts were good for very large and very small text (like headings and footer notes). The trend today for many sites is to use only sans-serif fonts, or in the case of SharePoint, the Segoe UI Light and Segoe UI fonts.
Many companies have a large amount of font styles available on employee computers, especially as the options in Microsoft Office have grown. However, if your users don’t have the font you selected, the browser will convert to a default font.
When you’re customizing a look (as we describe earlier in this chapter in “Changing the Look and Feel of Your Site”), you can choose different font combinations. The font combinations have been matched for each packaged site look.
A trend in Microsoft technology is the use of Segoe UI fonts. The Segoe font family is used across all Microsoft products such as Windows 10, the new Surface tablet and Surface Book, and of course Office.
The default look of a SharePoint site uses the Segoe font family.
A word on usability
We suppose the reason you have a SharePoint site is that you and your team are using it, and a big part of using a site is being able to read it. The following common checkpoints for websites might apply to your site look choices or perhaps your content on the team site pages as well:
Make sure there is a strong contrast between the background colors and the text. Dark text on a white background is generally considered the easiest to read. The second best is very light text on a very dark background.
One area of SharePoint that this has been a problem with in the past is the Quick Launch menu or left navigation area, where the contrast between the background and links isn’t distinct enough. Be careful with your selections. Even if red and green are holiday colors, red text on a green background isn't very readable.
- Choose a font that’s simple and easy to read. No matter that the Chiller font looks cool at Halloween, a whole page of Chiller will have your users running for the door, or at the very least not reading your site.
- Use only a few colors. Even though it seems like the theme palette has a lot of color options, many of them are similar in hue. Using the entire rainbow makes it hard for your users to focus on what’s important.
- Make link colors obvious. If the text is black and links are navy blue or brown, it becomes difficult to identify them.
- Make the followed (or visited) link color different enough from the unvisited link color. A red hyperlink that changes to maroon when visited may not be enough of a visual cue to users that they’ve followed that link.
Microsoft took the liberty of helping you choose decent combinations when it created the out-of-the-box looks. Some of the looks are downright scary, though. Don’t believe me? Try changing your site to the Sea Monster look and see how your users run away, or maybe run to you, screaming.
The benefits of composed looks
Composed looks are a big step up from previous versions of SharePoint. Composed looks allow you to change the background image, colors, site layout, and fonts. Best of all, composed looks can dramatically change the look and feel of your site with just a few clicks of the mouse. You don’t need to worry about breaking SharePoint by fiddling with a master page.
Whenever a discussion of branding occurs, you should take note to pose a major question. Can you achieve what you need with an out-of-the-box composed look, or do you need to create a completely custom look? If you need a completely custom composed look, then be prepared to bring in web designers and developers. Depending on your needs, a custom look can be a considerable investment and involves creating custom master pages, CSS files, and themes.
The Composed Looks link is found on the Site Settings page in the Web Designer Galleries section.
Checking Out SharePoint Metrics
Once you have a site set up, the next thing you might want to keep an eye on is its usage. A new feature of SharePoint allows you to see statistics about the site such as when people are using the site by date and by time of the day.
To access Site Usage, click the Settings gear icon and then choose Site Usage. The metrics for the site appear and you can click around and find out all sorts of things about how people are using the SharePoint site.