
6 Shooting Techniques
Art vs. “In Your Face”
In 1995, the first year of the X Games, action sports were still extreme sports, and the all-too-common wide-angle-lens/in-your-face MTV approach of shooting seemed to make a lot of sense. But that was well over a decade ago. Since that time, photography has progressed a great deal, just as action sports have.
Many videographers out there think of themselves as so much more than just cameramen. They take pride in their own artistic style and approach to filming action sports. It is in this pride and creativity that a whole new breed of action filmmaking has been born.
When you begin to look at the frame of your shot as an extension of who you are, you’ll find your personal style. Just as every great motion picture filmmaker has a distinct style of filmmaking, so can you. Whether you want to shoot grungy, in-your-face dramatic shots, or poetic, natural, artistic shots, it’s entirely up to you. But I promise that you will find a great deal of satisfaction from learning and understanding both approaches.
Artistic shots usually have two goals: first, they find a way to maintain the focus on and respect for the athlete or trick being performed; second, they capture the environment in a unique and clever fashion. Artistic shots can include soft-focus use, foreground elements, background elements, and interesting composition, as discussed in Chapter 5. But they can go a step further from just using the in-camera settings and basic framing options that you have; they can come in large part from camera placement. By thinking outside the box when you arrive at a location, you might find interesting angles that speak to you or speak well of the location.
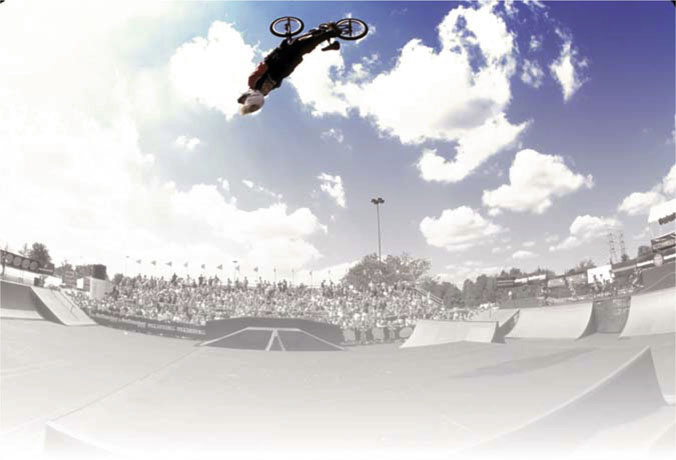
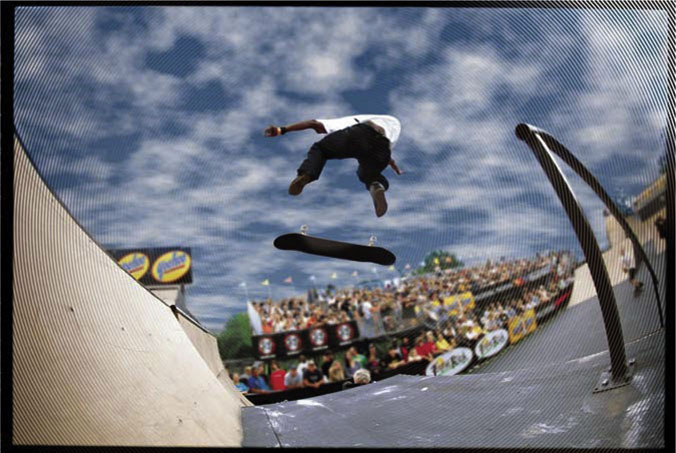
Figure 6-1 An “at the lens” action shot, Vans Cup Tahoe.
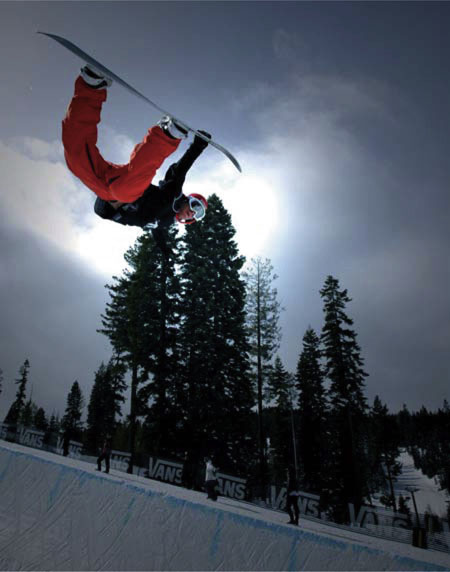
Photo by Dave Mead, Windowseat Pictures.
Figure 6-2 An artistic lock-off shot.
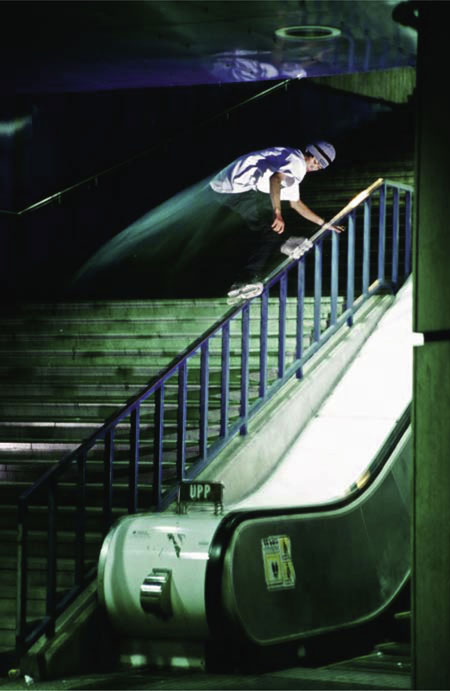
Courtesy Chris Mitchell.
I was shooting by a subway stop outside San Juan, Puerto Rico, one summer, doing a road-trip section for a video. The goal of the segment was to capture the local flavor and emotion of the trip. We found a unique set of stairs with a handrail under a large concrete covering in which numerous homeless people were sleeping. A sad location to be in, but it was true; it was real. I framed some homeless dwellings on the left side of the scene, with the handrail on the right, all the while shooting through the bars of a fence. Now granted, you could have just looked at it and thought it felt like a cool shot, so why not do it? But more than that, the scene helped to tell the story of where we were, and emotionally what this part of town represented. The literal and metaphorical distance that shooting through the fence created was right in line with how we all felt about the unfortunate homeless plight of the area. The section wound up being edited with a good deal of slow motion and lifestyle footage to really encapsulate what we saw and where we were. In the end, the goal is to capture the best action-sports shots possible for your project, but if you can do it with a unique eye, then all the better.
Figure 6-3 End-of-day surf in Maui, Hawaii.
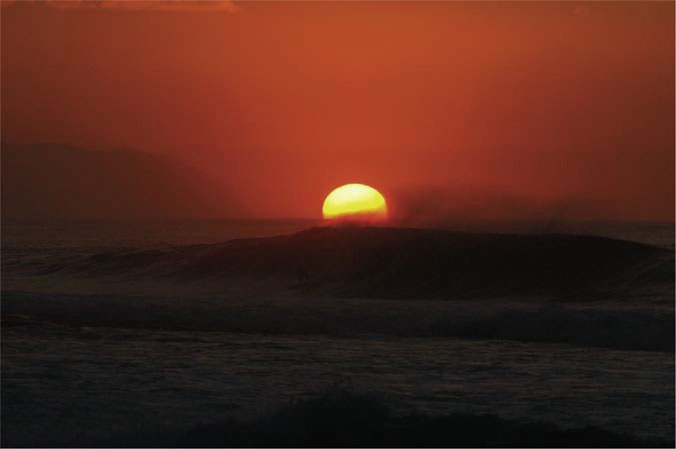
Photo by Dave Mead. Courtesy Windowseat Pictures.
Shooting from a unique perspective and finding your style doesn’t always happen overnight. Sometimes it can take years to find what feels right to you, to discover your visual signature. If you were shooting with a wide or fish-eye lens, then perhaps getting right under the trick and finding a crazy, up-close angle is what you want; or maybe a lock-off angle by the landing would look interesting; or perhaps you’ll allow the athlete to do their trick, land, and roll out of frame without panning or trying to stay with them. If you’re filming a session in a downtown urban area, then maybe try shooting from across the street, through passing cars. These interesting frames can add so much more to the footage and give your camerawork that unique style that’ll make it stand out and start to truly become yours.
Followcam
Followcam is the act of tracking with and shooting your subject from behind, in front, or alongside, through any means of movement — usually a skateboard, snowboard, or in-line skates. In the film business, the technique is usually referred to as ‘chasing’ the subject and can be done from an ATV, modified camera car, or even by foot, using expensive but smooth Steadicam rigs. Major sporting events have adapted the technique through the use of cable and wire systems that suspend cameras over the sports venue. From football events to the X Games, cable rigs are used more and more often today. Even in film, this kind of technology has grown in popularity with high-end equipment made by Spydercam, a unique company with rigs that allow for almost any type of camera to travel at very high speed over roads, land, and buildings in any direction. A Spydercam setup is an amazing rig that is capable of some truly unique shots.
In action sports, the money for these kinds of systems isn’t always available, nor is it always necessary. Although commercials often use the latest technology, the more grounded projects such as videos and documentaries find this equipment bulky, overpriced, and too intrusive.
The absolute most basic standard technique of shooting most action-sports projects is to simply follow the athlete on the same device they’re riding. Many talented filmmakers who are great athletes themselves now shoot film and video for a living, so the followcam comes very naturally and easily.
The key to a solid followcam starts with these three things. First, know what you’re doing. This sounds overly simple, but it’s true. You need to be so comfortable on your wheels or board that the riding part comes naturally — and even then, remember how quickly your environment can jump up and bite. Half of your attention or more may be going to the shot you’re getting, so just keep a strong sense of your surroundings. I tend to focus 25 percent of my energy on my feet, 25 percent on what the athlete is doing, and the remaining 50 percent on the shot I’m getting.
Second, be fluid. The followcam goal is to provide a compelling and interesting angle of the athlete, not to draw attention to you as the cameraman. This means that there is no better capture of a trick than the smooth, floating shot that you hardly notice happening. If you have trouble holding the camera steady as you go, think of every joint on your body as a shock absorber. Starting with your knees and hips, stay bent, loose, and be fluid. I keep my arm half bent so that even my elbow can absorb most of the bumps. If you ever get to see a Steadicam in action, imagine yourself as one when you operate: floating smoothly as the ground changes beneath you.
If you have a tendency to get low blood sugar and have trouble holding your hand out and still, then remember to eat before you go shooting. I always bring a Snickers or protein bar with me in case I get hungry. There’s nothing more frustrating than trying to shoot with an unsteady hand.
The third and final key to a successful followcam shot is to know your athlete and what he or she plans to do. Followcam shots work best at close distance, in part because the long lens adds too much shake to move fast with it, and in part because the nature of the shot is to show movement — and nothing looks faster than when it’s moving by up close. So if you’re following an athlete, make sure you know their line and what they plans to do. If it’s a hard trick, remember that they may bail right in front of you at any time. I was shooting pro BMX rider Rick Thorne, downtown L.A. on a dark night. Because in-line skates are perhaps the best way to keep up with most athletes and jump almost any obstacle, I was on skates as Rick was cranking through the city — off curbs, over dividers, and hitting stair sets and wall rides. I was shooting a digital-video (DV) camera with a 0.7X wide lens so I wouldn’t have to be too close to him — when he decided to hit a metallic architectural wall. The problem was that the nighttime dew on the metal made it superslick, and Rick’s wall ride quickly ended as his tires slid out. He simply jumped off the bike and ran out of it, but I had nowhere to go but over. I jumped last minute and got a peg in my shin, but cleared the bike otherwise. It was a solid reminder of how “on your toes” followcam shooting requires you to be.
Figure 6-4 Profile of a Steadicam and operator.

Figure 6-5 Followcam operator on skis.
Courtesy Windowseat Pictures.
After shooting followcam for more than 75 action-sports events, I’ve had my share of close calls and even a couple of collisions. On street, it’s crucial to keep enough distance from the riders to always have an out. If they fall to their left or if their board goes right, be ready to move. On ramp, it’s a whole other ball game.
Figure 6-6 Staying focused during followcam shots.
If you’ve ever ridden ramps with more than one person, you know that your options are pretty limited as to where you can go. The whole back-and-forth part will keep the two of you in rather close proximity for the duration of the run. When you followcam ramp skating, you can no longer think of it as followcam; it’s basically a doubles run. However, the key to shooting a single trick versus an entire run is very different. For one trick, you can drop in behind an athlete. As long as you know which way he or she will be turning, you can go to the opposite side and simply get out or sit down as the athlete does the trick. Basic moving-camera shots from the deck of the ramp and the bottom are also great angles to get while maintaining a certain amount of safety.
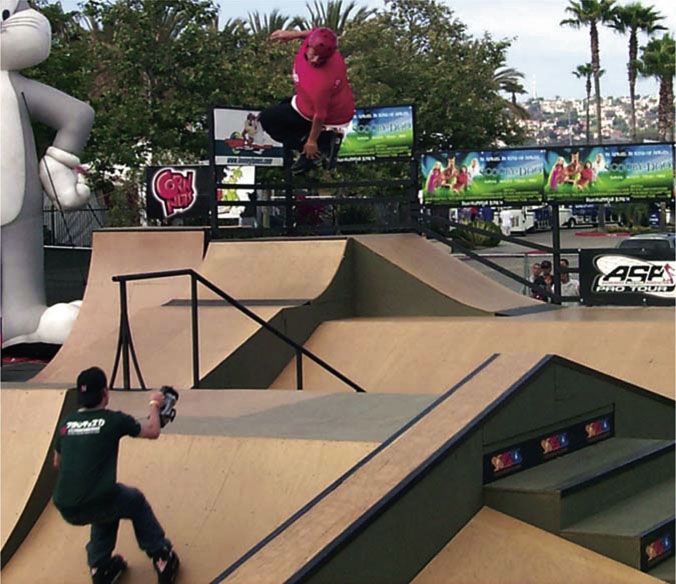
Figure 6-7 Shooting Shaun White from the deck of a ramp.
When it comes time to shoot an entire run, I approach it as follows: first, I think about how well I know the athlete and their bag of tricks. Many athletes are predictable in what they do, so by watching them ride as you shoot, you can tell what they’re setting up for, and subsequently where they’re going to go. In addition, if you know the person, it’s always easier to ask about getting in the ramp with him or her for a run, which naturally can make any athlete nervous. My next step is usually to ask them what they plan to do before they drop in. Although many athletes will not plan every run, if you’re filming in the ramp with them, chances are they’ll make an exception. I often break down the tricks into three basic categories, each with its own three basic options. Table 6-1 lists some sample tricks and the categories into which they fall.
Table 6-1 Sample tricks and the important element for planning followcam
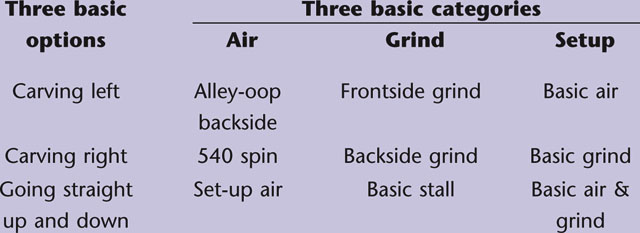
These categories allow me to simplify a run in my head and to more easily remember the line. Because most athletes vary a little on tricks from run to run, there’s no need to plan out how high or far they will go — not to mention that you’ll be able to judge distance based on their speed after coming out of the last trick. Next, if their run seems complicated, intense, or simply contains an element you’re unsure of, ask the athlete if he or she can run it once without you. That way, you can see it play out, and plan your followcam line. As the athlete drops in for the practice run, imagine every step of where you’ll be for each move. From wall to wall, it’s important to plan what you will do. If they plan on going for some risky or huge tricks in their “live” run, then, for the practice run, they can always just do basic moves as long as the general motion is the same (such as a carving air in place of carving 540). The final steps are to make sure you remember every aspect of the line before dropping in — and to make sure you have an out. It’s very normal and likely with some athletes that they will mess up the line when the camera starts rolling, so don’t just keep the shooting plan in your head — keep alternate plans and exit routes running too.
You can shoot followcam with anything from a cell phone to a 35mm film camera. But the easiest is always a camera with a handle on top. You’ll also want to shoot with a wide-angle or fish-eye lens, and keep the LCD screen shut most of the time, going by feel almost entirely. This can take a serious amount of practice, but the result can be some of the most dynamic and compelling footage you’ll ever see in a ramp. Try shooting a basic line without watching the LCD; as you do it, focus on what portion of the body you are aiming the camera at. Now watch the footage back and see if you were pointing too far up, down, right or left. If you thought that you were aiming at the waist, but you wound up shooting all head and no feet, then try it again — only this time, aim at their knees. Shoot, review, and retry until you find the right formula for you and your camera … then remember it.
Most three-chip DV and high-definition-video (HDV) cameras are the perfect size for followcam. The real challenge comes when you start using film cameras or ENG (electronic news gathering)–sized cameras. These weigh enough so that the agile movements that are often needed are now more difficult. These cameras are able to shoot followcam, but they add a layer of complexity.
When action-sports videos — particularly skateboarding, BMX, and in-line skating — became a guiding light of what was cool in their respective sports, corporate entities such as ESPN, NBC, and OLN (now known as Versus) began to catch on that followcam was a prominent part of the lifestyle. Even though, in the past, all X Games and Gravity Games events had been shot with ENG-styled operators, these companies now began to ask themselves the same question we all ask ourselves eventually: How can I increase the quality and production value of my shoot? In their case, the answer was simple: bring in the standard followcam skate video shots for the street and park course events.
In 2002, for the first time in history, followcam was brought in to the events. In the past, the concern had been staying clear of the athletes during competition runs and making sure all sports and riders were okay with it. It’s one thing to be followed through a skate park by a friend; it’s another to have someone behind you during a potential gold medal run. Thankfully, most athletes are now accustomed to followcam, and virtually none opted out during their prelims or even during the finals.
There is one more grand challenge that you may encounter if you plan to shoot multiple sports. Although almost all pro athletes get along exceptionally well, there used to be a real stigma between sports at an amateur level. This posed an issue for ESPN, and even for some riders who were concerned with their image. For me, I have been skateboarding since I was 12, but there is no better way to safely shoot a pro on a fast park course than with in-line skates. Just like shooting Rick Thorne on the streets of LA, the ability to follow even Freestyle BMX athletes over ramps and through a fast course is amazing on skates; no other device can get those kinds of consistent park and ramp shots. Eventually, ESPN gave skateboarding a more street-oriented course, so I began shooting followcam on a skateboard. However, if you’re shooting at your local park and you plan to capture some scenes while you’re using another sports device, I recommend feeling out the riders first to make sure they’re okay with it. Get static shots first as they get comfortable with you and the shoot, then break out the board or skates when you know they’re cool with it.
Camera Settings, Lighting, and Filters
From followcam to other on-the-move shooting styles, there are a few key elements to making sure you’re always getting the shot. The first is a basic trick every cameraman should know: the Z-scan. With action sports moving so fast on the ground, and the cameramen who shoot them keeping up while also maintaining equipment and a wealth of camera settings, it’s all too easy to bump a button, flip a switch, or roll a dial while you’re going. So here is a great way to avoid getting your shot, only to realize that your white balance got flipped.
Almost all of the information on your LCD and viewfinder is in the top or bottom row of the screen. This means that you can make a single fast scan of the information on a regular basis, in the shape of the letter Z, starting top left and moving across, then cutting down and over to the lower left, and continuing across the bottom left to right. This is a common trick used by the pros to make sure that they are regularly scanning their settings. Once you establish it as a standard, Z-scanning will become a routine pattern of your shooting that will help guarantee that nothing is off. The most common mistake can come from shooting a mixture of settings (for example, 24p and 30p) throughout the day. It’s almost impossible to tell the difference visually as you’re shooting, so this becomes an ideal place for Z-scanning to prevent mistakes.
There are wide ranges of tricks you can do to achieve certain looks within the camera as well. From filters to lighting, you can make your shots appear brighter, warmer, colder — even softer. The one thing you cannot easily change in post, however, is the lighting. So remember that what you get on the day for lighting may very well be what you have to stick with.
If you plan to light a scene, such as a single trick or just an interview, the most common and basic lighting setup is the three-point technique. For this, you set up a primary light, called a key light, to one side of the camera and subject so that it lights this side well, while casting only a small shadow on the opposite side. The second light is called a fill light. This light sits on the opposite side, and is used to fill in any shadows created by the key. It’s generally a softer and dimmer light than the first. If you have two of the same lights, consider moving the fill farther away or adding some diffusion (see Table 6-2). The third and final light is your backlight. This is placed behind your subject, and provides definition and highlights to your subject’s outline; this will help separate subject from background. Notice the natural backlight of the sun in Figure 6-8, helping to separate the skater from the buildings and crowd behind him.
Table 6-2 Popular filters and their primary uses
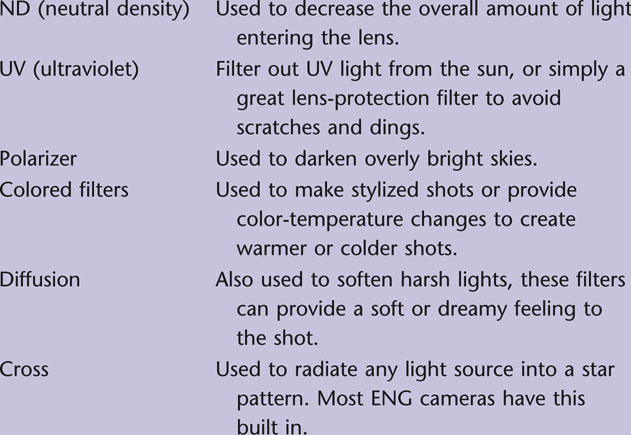
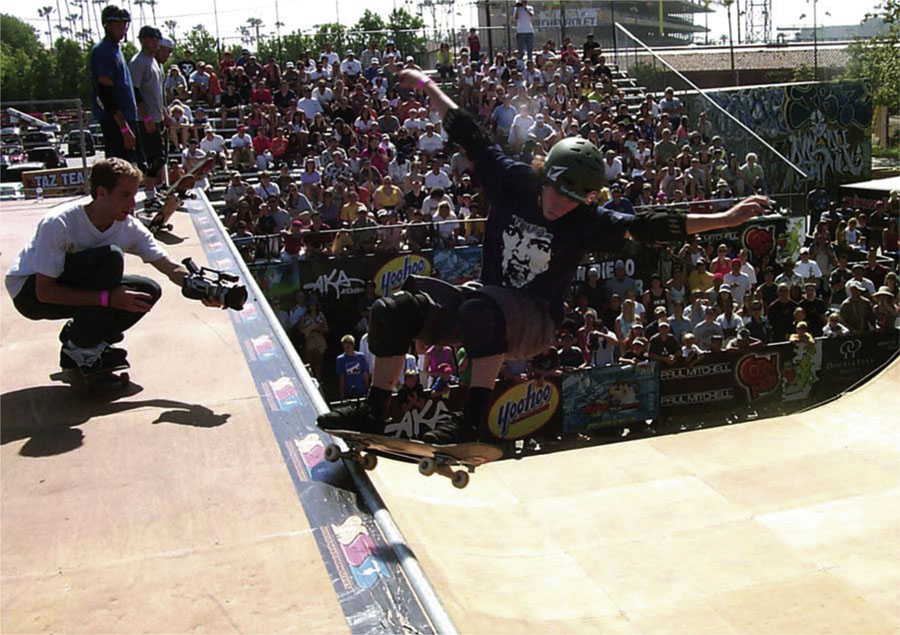
Figure 6-8 Shooting by feel at the Vans Downtown Showdown.

Courtesy Windowseat Pictures.
Figure 6-9 Followcam during competition runs.
Courtesy ASA Entertainment.
Instead of using the three-point-lighting technique, you can illuminate with as little as a single onboard light for your camera, or as many as five, seven, or even more lights. I’ve seen interviews done with a key, two fills, two backlights for each side, two lights for the actual background, and then a small eye light just above the camera to help make the subject’s eyes pop.
When you get into lighting, you’ll also have to match the color temperature (more on this in the following section, White Balance). Lights can be operated with two principle color temperatures — tungsten and daylight — so make sure you match up your scene accordingly. You can even go so far as to cover windows that have sun spilling in. You do this by using diffusion — CTB (color temperature blue) or CTO (color temperature orange) — to affect the color temperature of the light or just to achieve that perfect look.
If you have the time and money, a light meter can also be of great use to help establish how much light each source is giving off; you will be better able to set your exposure properly this way. If, on the other hand, your budget is low and you can’t even afford lights, then a simple bounce board or reflector can come in very handy. Often called a three-in-one or a five-in-one, these pop-out reflectors offer gold, silver, white, and semitransparent surfaces that you can use to diffuse or bounce light from the sun or any other source. When you’re on the road alone, they’re great assets: small, cheap, and easy to operate. If you can’t get a professional bounce, then try using a piece of poster board from a local store. Any solid white surface (preferably with some shine) will provide reflection for your light source. I recently had to shoot an interview on the road in bright daylight. By putting the sun on the side of my subject as the “key light,” then using a bounce on the other side to fill in the shadows, I was able to keep the subject well lit without being blinded by the sun or backlit by it.
If you ever find yourself in a situation with only an onboard camera light, there are a few options. In the daytime, you can simply shoot under a tree or just in the shade. At nighttime and indoors, you’re going to need some source of light. Incandescent bulbs from lamps can work (referred to as practicals); just remember to switch your white-balance setting over to 3200 K (Kelvin). You’ll want to avoid fluorescents if possible — they don’t look flattering in real life, and they certainly don’t on camera. Overhead lights will create shadows or bags under the eyes. Typically, one of the most important things in lighting is to make sure you can see your subject’s eyes. If they’re wearing a baseball hat, as most action-sports athletes do, then you’ll either have to ask them to remove it, flip it backward, raise it up a little — or, alternatively, you can lower your key light enough to keep the hat’s shadow on the subject’s forehead, but off his or her eyes.
Onboard lights can cause the same problem as overheads: they cast a key light from above a person’s eye line. It’s not terrible, but it isn’t the most flattering lighting you can do. A simple way around this is to either shoot them from below eye level so that the light is also pointing upward, or remove your light and have someone hold it, slightly off to one side and down. It may not sound like much, but in the right circumstance, the difference can be significant.
Figure 6-10 Standard onboard camera lighting.
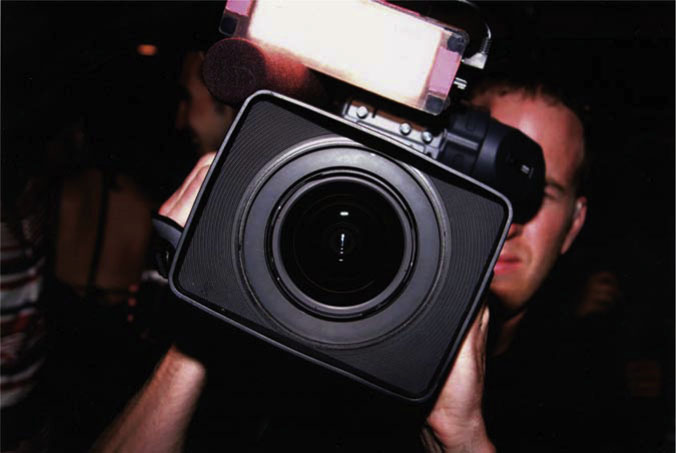
Figure 6-11 Single onboard light kept below subject’s eye line.
Photo by Dave Mead, Windowseat Pictures.
Finally, you may want to consider bringing a professional with you for full lighting setups. Called a gaffer, this person is well versed in all types of lighting equipment, arrangements, and even power requirements. A worst-case scenario might be your arriving on scene, lighting, bringing in your subject, then getting ready to roll — just as a fuse blows because too many lights were plugged into the same outlet.
Basic filters can thread onto the front element of your lens and create everything from colored effects to having no noticeable lighting effect at all. Although it technically isn’t even a filter, many people like to use a clear, or UV, filter as an added level of protection for their lens. If you’re shooting with the camera’s standard lens, and not a wide-angle lens or a fish-eye, then a UV or clear piece of glass can help to guard against incoming skateboards or flying debris from a dirt bike.
Polarizers are one of the least expensive yet most helpful lenses to carry with you when shooting exterior daylight shots. They rotate 360 degrees, cutting out a portion of light (polarized light) that is entering your lens. By rotating the glass, you will be able to see the change in the cloud-on-sky contrast of a polarized image versus one that is not polarized. If, for example, you’re shooting a lock-off of an athlete doing a trick outdoors beneath a very bright sky, this lens can be really helpful in balancing out the brightness.
Figure 6-12 The effects of a circular polarizer.
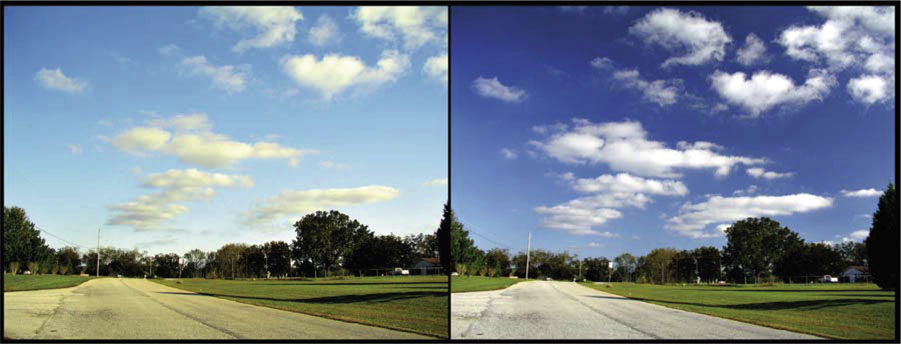
Courtesy Piccolo Namek, Wikimedia Commons.
Figure 6-13 Action shot with a polarizing filter.
Courtesy ASA Entertainment.
There is an ongoing argument regarding colored filters and diffusion for digital cameras in that most NLE (nonlinear editing) systems will now allow you to do a healthy amount of color correction in post. Final Cut Pro HD does pretty serious color correction now, therefore negating the necessity of these types of filters during the shoot. Many cinematographers will argue that the look of what you capture with filters during a shoot is in fact unique and cannot be replicated in post, but for most action-sports shooters, the time and cost of these filters isn’t worth it in the field.
If you do want to play around, though, here’s a cheap way to experiment. Diffusion filters can provide a very cool, dreamy, or ethereal look to the shot. Try taking a clear filter that you don’t mind risking, and smear some petroleum jelly around the outer edges of it. If you do so smoothly, you’ll end up with a very soft focus ring around your shot. Next, try smearing a very thin layer of the jelly over the entire filter. You’ve basically created a diffusion filter. This look can be great for dream sequences or artistic shots. Just keep in mind that as with all filters, once you shoot it, there’s no going back in post to what the unfiltered image really looked like.
I remember speaking with Oscar-winning cinematographer Dean Semler for a documentary project, and he said that when he was shooting The Alamo with Billy Bob Thornton, they had huge scoping land shots that required lighting. There wasn’t any easy way to hide the lights, nor was there a way to light the landscape from outside their massive wide shots. So the filmmakers would occasionally just leave the lights in the shot, knowing that digital technologies would allow them to remove the lights later (called painting them out).
The lesson learned here is that in post, with enough time or money, you can almost always make a shot look the way you want it. So sometimes you are better off not altering your shots too much in camera.
The only built-in filter included with most DV and HDV cameras is the neutral-density (ND) filter This is the most important one for your camera because it will allow you to cut out large amounts of light entering the lens, and therefore adjust your iris and shutter-speed settings to your creative preference. ND filters are essentially gray filters that can cut down or cut out light of every wavelength and color. One great use of the ND filter can be to lower your shutter speed below 24, so that it is open for longer than necessary, creating a unique ghosting or blurring effect. With the shutter open for so long, you’ll be letting in too much light, so now kick on a single or double ND filter to compensate for it to find that perfect exposure (even close down the iris if necessary).
The resulting shot can be manipulated in several ways. For example, you can followcam a subject through the city at night and create very artistic, stylized motion-blur shots. Not only will the athlete begin to blur, but all of the passing cars and city lights will stream away from you. Another great shot is to slow the shutter a lot, and then lock off the camera on a tripod so that it has absolutely no movement. With a wide locked-off frame and a slow shutter, everything static, including the ramp or rail and surrounding environment, will appear crystal clear, while your subject grinds, slides, or flies through the frame in a moderate to extreme blur (depending upon your settings). Pretty much anytime you use a very slow shutter and lock off your camera, you’ll get an interesting mixture of blurred and sharp elements. Figure 6-14 shows a shot I took coming into Los Angeles at night from a 737. The wing of the plane was static beause I had locked off the camera.
Figure 6-14 Slow shutter of Los Angeles city lights from a 737.

White Balance
White balance is a key factor in shooting all video. This is defined as setting what the camera sees as true white. Because every type of light has a different color temperature, always measured in Kelvin (K), it is important to set the camera to the appropriate color temperature (called white-balancing the camera). This will make sure that what you’re shooting comes off with appropriate color or skin tone. Color temperatures can range from as low as 1800 K to as high as 16000 K (see Table 6-3). The high end of this range is far outside of normal use because even daylight peaks at around 6000 K.
Table 6-3 Primary color temperatures

Most prosumer cameras will come with standard white-balance presets and allow for at least one customizable setting. There are two principle types of light you’ll need to understand: tungsten and daylight. The first is typically used indoors in standard home and office lighting fixtures, as well as in most skate parks. The second type is the color temperature of actual daylight. Both settings are usually presets on your camera, and are often referred to as Indoor versus Outdoor, or 3200 versus 5600.
A problem may arise if you choose to shoot in a mixed-lighting environment, such as a skate park with 3200 K tungsten lights as well as windows letting in 5600 K daylight. Depending on which light source is brighter, you’ll have to either choose a preset or take a custom reading to find a balance. If you choose a preset — which I don’t recommend — you’ll end up with either a very cold blue light spilling in from outdoors or a very warm, almost red light coming from the inside. I usually opt for the blue spill because the opposite can result in skin tones appearing lobster red … never a good idea.
The second option is the custom preset. To do this, you’ll first need to make sure that your camera has this feature; then you’ll need to find a place at your location that has an appropriate balance of light from both sources. In mixed light, hold up an all-white piece of paper (or even a white T-shirt), and make sure that you are seeing only white through the lens, nothing else. Hit the white-balance button and wait a moment for the camera to read the light and process it. Once finished and set, the paper should appear closer to true white, and the environment and human skin tones will look better as well. This can be tricky, however, if the spill is not even throughout the room, so a few tries in various areas will sometimes be necessary.
You may also use your white balance in place of filters. If you’re shooting outdoor action sports on a cool, overcast day, but you want the image to look warm and sunny, try this little trick. Take off the preset 5600 Daylight setting and go custom. Next, find a light blue surface such as a T-shirt or wall that you can frame up and use to white-balance the camera. Using this surface to white-balance is essentially telling the camera that what it sees is supposed to be pure white. To compensate for the blue hue, the camera will automatically add orange, or “warmth,” to the picture. The result will be a much warmer-looking frame for you to shoot in, which will in turn help to create the feeling of a sunny day. Just don’t shoot the sky!
Figure 6-15 3200 K tungsten/indoor white balance with blue daylight spill.
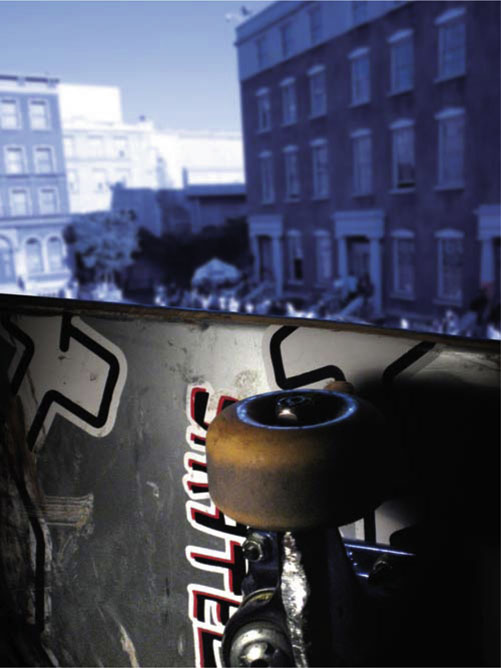
Figure 6-16 An overcast cool day with warming filters.
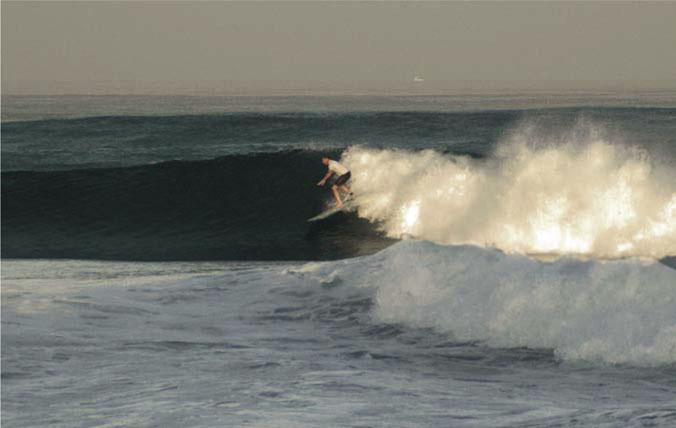
Photo by Dave Mead.
Basic Tricks and Unique Angles
Okay, so you understand most of your camera settings and options. Now it’s time to play with various angles. Because most action-sports videos are either documentaries or music-driven montage projects, there are very few issues with continuity and camera-placement rules. Even so, it is important to understand a few of these basic rules when shooting. Let me start out by saying that all rules in film and video production are simply guidelines. No matter who you are or what you’re shooting, remember that these rules were established because they work 99 out of 100 times — but for that one time that they don’t work, the rules must be disregarded. Filmmaking on any level is a creative endeavor, and your vision is the only thing you must be true to, not the “rules” of filmmaking.
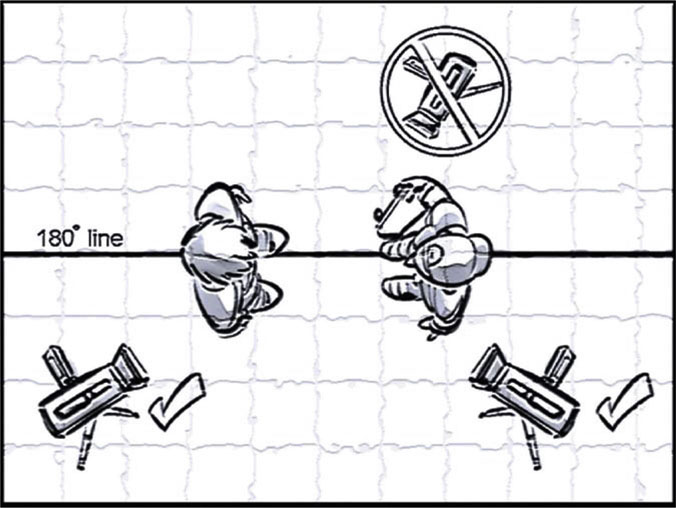
Having said that, the first basic precept is the 180-degree rule. This is an imaginary line that is established with your first shot in any scene in which one or more subjects are positioned in any one direction. The idea is that if you cross the line in your next shot — say, to the other side of your subjects — there will be a continuity break because your subjects will now be looking or facing in the opposite direction. If you are shooting more than one athlete talking, perhaps a guy and a girl, and the guy is on the left in every shot, then, when you jump the line, the guy will appear to be on the right, and thus looking in the wrong direction. This can be jarring or confusing to your audience.
In skating, if an athlete grinds a handrail right to left in a wide shot, and then you cover it in a close-up but from the other side, the athlete will suddenly appear to be going left to right. In montages, this can be a technique to create an intense feeling. The confusing or jarring emotion that a viewer will get from jumping the 180 line can be a useful tool if the mood calls for it. It’s a serious attention grabber, which might be the goal for a montage of an incredible trick.
Another basic rule is to always make sure you cover scenes and shots from various distances, focal lengths, and positions that are all different enough from each other that it won’t be too jarring. Say, for example, that you shoot a trick straight on and then decide to shoot another take of that trick. You plan to cut to the second take from the first take, but you move only slightly left or right of the original shot (less than 30 degrees). The result is that you’ll wind up with a jump cut between the two shots (more on editing in Chapter 9, Postproduction).
Illustration 6-1 An example of the 180-degree line and where your camera can go.
A favorite angle of mine is the Dutch angle. This is basically done with the camera canted slightly to one side, creating an off-axis shot. The Dutch angle originated in the 1930s in German films. The German word Deutsch actually means “German,” and was adapted to today’s “Dutch” when referring to that style of shot. It can make for a very interesting angle for establishing shots and any frame that contains a great deal of straight lines in it, such as the sides of buildings. I would recommend, however, that you avoid Dutch angles of grinds, airs, and any trick in which you are panning or tilting with the athlete. The reason here is critical to understand, and is based largely on what you are shooting. Many ENG-style operators shoot Dutch angles of action sports as a means to add excitement to the scene. This is naturally ingrained in their shooting style because regular news shots can often use a little spice (consider a flat, static shot of a street sign versus starting off Dutch, then whip-panning to the sign). Dutch shots can be great if it’s a news piece for the media or other mainstream audience that might appreciate the added camera “spice” more than the trick itself, but most action-sports videos avoid the Dutch shot because it can be such a distraction from the trick itself. Let’s say Bob Burnquist is doing a McTwist (an inverted 540 on a ramp), and as you pan with him up the ramp, you decide to Dutch the camera while he spins. There’s a good chance it’ll either look like he’s spinning off axis, or perhaps not even going inverted at all. Most enthusiasts therefore prefer to see the trick clearly on video, and enjoy it for what it is alone. So if you’re making a core action-sports video, use Dutch angles only when the shot is a wide lock-off or for artistic shots — but rarely during close-up or medium panning and tilting shots.
Illustration 6-2 Avoid a jump cut by placing the camera at least 30 degrees away.
If you’ve ever shot a vert ramp from the side or bottom, you’ll notice that sometimes the tops of the walls do not appear to actually reach a vertical point. They may appear angled, or just under vert, based on the angle you’re shooting from. One trick you can use to help excite your shot slightly is to Dutch down a little opposite the wall of the ramp, helping to bring it back to vertical. Because you’re looking up at an off angle anyway, the Dutch in this case will be hardly noticeable or distracting. Instead, it’ll help to make the stunt look as difficult as it truly is. While we’re here, I think it’s also critical to mention the importance of these low-angle shots. All too often, we see huge stunts in the media or action-sports tricks on TV that are shot from sweeping overhead angles. However, low angles make tricks and stunts look bigger. Just like the classic Hollywood hero shot of Will Smith or any other actor rising to vanquish the villain, when you get your camera down low, and shoot up at your subject, you’ll create an empowering and even heroic feel. This feel will translate into tricks of all sizes, making them appear bigger and more impressive. If you’re shooting an FMX (Freestyle Motocross) rider clearing a 100-foot gap, try getting low near the center of the jump, maybe even far from it, and just making that jump look as enormous as it actually is.
Figure 6-17 A Dutch lock-off shot of a handrail.

Courtesy ASA Entertainment.
If you’re going for straightforward standard action-sports video, and you’ve seen your share of videos, then of course you can always imitate and do what’s come before you. However, I’d encourage you to push the limits of what’s out there. Consider what might be new and different, and yet still cool. It’s key in all progressive industries to do just that: progress. And all too often, the sports progress without the video creators who capture the athletes themselves progressing. There is something to be said for the fish-eye lens, a standard shot that captures most of the latest stunts. However, it’s the rare video that pushes that boundary with clever camera use (such as the Girl/Chocolate Yeah Right! video) and becomes a standout among the rest. Maybe you wind up shooting some old-school Super8 film of tricks, or perhaps you plan to link together every shot in the video with camera movement. Whatever your idea, just have one, and stick to it. Video makers will try to tell you what’s the right way and what’s the wrong way to shoot an action-sports video. At the end of the day, remember that the only rule — the only thing that you need to be true to — is your vision.