In this chapter
In the 1980s, only big corporations and universities had Internet connections, and then, a single 64Kbps connection was probably shared by hundreds of users. Now, accessing the Internet is as much a daily requirement as the morning paper. We expect to have instant access from any keyboard we can get our fingers on, and personally, I get grumpy using anything less than a 400Kbps connection. That's progress, I suppose.
Because you now have your computers all tied together with a nifty local area network (LAN), it seems silly that each user should have to use a modem to gain Internet access individually. No worries: You have a host of options for shared Internet connections. You can use a high-speed connection to serve the entire LAN, or you can share a modem connection made from one designated Windows XP computer. Either way, shared access makes online life simpler and safer for everyone on the network.
A shared Internet connection can actually provide better protection against hackers than an individual connection. In this chapter, I'll show you why. I'll also cover your Internet connection options, and will discuss the pros and cons of each.
TIP
You should also read Chapter 21, “Network Security,” for more details on protecting your network from hacking.
You're probably familiar with using a modem to connect your own PC to an Internet service provider and thence to the Internet. When you're connecting an entire network of computers, the process is a little more involved. We'll address five main issues, starting with the physical connection itself. We'll discuss the pros and cons of each of the most common and reasonable alternatives.
Of the several connection technologies, each has advantages and disadvantages in reliability, speed, and cost.
Speed is everything on the Internet now, and the need for raw speed will become even more important in the future. Remember that everyone on your LAN will be sharing a single connection, so you have to consider the speed requirements for the applications you'll be using over the network and multiply that requirement by the number of simultaneous users you'll want to support at that speed. If you have eight users checking email and occasionally browsing the Web, your speed requirements might be met by a single modem, but if you have just two users who want to use voice and videoconferencing at the same time, you might need a very high-speed connection indeed.
If you can get it, high-speed DSL, cable, or satellite service will provide a much better experience than a dial-up setup. It costs a bit more per month, but if you take into the account that one shared broadband connection can replace several dial-up accounts and free up several phone lines, it might turn out to be the least expensive alternative as well as the most fun.
When you're using a single computer, you use its analog modem or a broadband cable, DSL, or satellite modem to connect to your ISP as needed. When you share your Internet connection on a network, you'll either designate one computer running Windows XP to make the connection, or you'll use an inexpensive hardware device called a connection sharing router or residential gateway to serve as a bridge between your network and a dial-up, cable, or DSL modem. Whichever method you choose, the designated computer or router will automatically set up the connection any time it's needed by anybody on your network.
As an overview, Figure 19.1 shows six ways you can hook up your LAN to an Internet service provider. They are
Microsoft Internet Connection Sharing (ICS) with an analog or ISDN dial-up connection. In this scenario, the built-in software in Windows automatically dials your ISP from one computer whenever anyone on the LAN wants to connect to the Internet. This is called demand-dialing. (By the way, the modem doesn't have to be an external one; it could be an internal modem. I just wanted it to show up in the figure.)
ICS with a broadband DSL or cable modem. The computer that hosts the shared connection uses a second LAN adapter to connect to a broadband modem. This type of connection might be always-on, or, if your ISP uses a connection-based setup called PPPoE, Windows will establish the link whenever anyone wants to use the Internet.
Note
→ To learn more about PPPoE, see “Configuring a High-Speed Connection,” p. 298.
Connection sharing router with a broadband, analog, or IDSN modem. You can use a small hardware device that costs somewhere in the range of $20–$100 to do the same job as Internet Connection Sharing. The advantage of this is that you don't have to leave a particular Windows XP computer turned on for other users to reach the Internet. It is also more secure because a separate device is shielding Windows from the Internet.
Cable service with multiple, directly connected computers. This is the setup that most cable Internet providers recommend for a home with more than one computer, but it is a bad idea! You can't use this method and also use file and printer sharing. Use schemes B, C, or E instead. See “Special Notes for Cable Service” later in this chapter for more information.
Cable service with multiple, directly connected computers, and a separate LAN for file and printer sharing. If you don't use connection sharing (schemes B or C), this is the only safe way to share files and printers and also have an “unfiltered” broadband Internet connection.
Routed service with a router. Some ISPs provide routed Internet service through DSL, cable, Frame Relay, or other technologies. There's usually an extra charge for this type of service, as it provides a separate public IP address to each computer on the LAN. This has some advantages that I'll discuss later, but it also incurs a risk of exposing your network to hackers, unless you're vigilant in setting it up.

I discussed the pros and cons of dial-up, ISDN, and broadband connections themselves in Chapter 8, “Internet and TCP/IP Connection Options,” so I won't repeat that discussion. Here, I'll discuss the costs and benefits of these six connection-sharing strategies.
NOTE
Although I really prefer using the shared connection strategies—the first three schemes in Figure 19.1—they have a drawback: It's more difficult to enable incoming access to your computer. In particular, it makes it hard to reach your computer with Remote Desktop, and can be difficult for someone to work with you using Remote Assistance. I'll show you how to make them work at the end of the chapter, under “Making Services Available.”
Now, let's look at the issues involved in having a single ISP connection serve multiple computers.
Connecting a LAN to the Internet requires you to delve into some issues about how computers are identified on your LAN and on the Internet. You'll find some background on this topic in Chapter 15 under “IP Name Services and Routing.” In this chapter, we'll focus on how your LAN relates to the Internet as a whole.
As I discussed in Chapter 15 each computer on your LAN uses a unique network identification number called an IP address that is used to route data to the correct computer. As long as the data stays on your LAN, it doesn't matter what numbers are used; your LAN is essentially a private affair. On LANs with no shared Internet connection, in fact, Windows just makes up random IP address numbers for each computer and that's good enough.
When you connect to the Internet, though, those random numbers can't be used to direct data to you; public IP addresses have to be assigned to you by your ISP so that other computers on the Internet can properly route data to your ISP and then to you.
Now, when you establish a solo dial-up connection from your computer to the Internet, this isn't a big problem. When you dial up, your ISP assigns your connection a temporary public IP address. Any computer on the entire Internet can send data to you using this number. When you want to connect a LAN, though, it's not quite as easy. There are two approaches:
You can get a valid public IP address for each of your computers, so they can each participate in the Internet at large
You can use one public IP address and share it among all the users of your LAN
The first approach is called routed Internet service, because your ISP assigns a fixed block of IP addresses for your LAN—one for each of your computers—and routes all data for these addresses to your site. The second approach uses a technique called Network Address Translation or NAT, in which all of the computers on your LAN share one IP address and connection.
Microsoft's Internet Connection Sharing system and the popular devices called residential gateways or connection sharing routers use Network Address Translation to carry out all Internet connections using one public IP address. The computer or device running the NAT service mediates all connections between computers on your LAN and the Internet (see Figure 19.2).

Figure 19.2. A NAT device or program carries on all Internet communications using one IP address. NAT keeps track of outgoing data from your LAN to determine where to send responses from the outside.
To explain NAT, it's helpful to make an analogy to postal mail service. Normally, mail is delivered to each house according to its address, and the mail delivery person stops at each separate house on a given block. This is analogous to routed Internet service where each of your computers has its own public IP address. Data is routed to your LAN, and then delivered to each computer independently.
NAT works more like a large commercial office building, where there's one address for many people. Mail is delivered to the mail room, which sorts it out and delivers it internally to the correct recipient. With NAT, you are assigned one public IP address, and all communication between your LAN and the Internet uses this address. The NAT service takes care of changing or translating the IP addresses in data packets from the private, internal IP addresses used on your LAN to the one public address used on the Internet.
Using NAT has several significant consequences:
You can hook up as many computers on your LAN as you wish. Your ISP won't care, or even know, that more than one computer is using the connection. You will save money because you only need to pay for a single-user connection.
You can assign IP addresses inside your LAN however you wish. In fact, all of the NAT setups I've seen provide DHCP, an automatic IP address service, so that there's virtually no manual configuration needed on the computers you add to your LAN.
If you want to host a Web site, VPN, or other service on your LAN and make it available from the Internet, you'll have some additional setup work to do. When you contact a remote Web site, NAT knows to send the returned data back to you, but when an unsolicited request comes from outside, NAT has to be told where to send the incoming connection. I'll discuss this later in the chapter.
NAT serves as an additional firewall to protect your LAN from probing by Internet hackers. Incoming requests, to read your shared folders for example, are simply ignored if you haven't specifically set up your connection sharing service to forward requests to a particular computer.
Some network services can't be made to work with NAT. For example, you might not be able to use audio and video chat with Windows Messenger and NetMeeting. These programs expect that the IP address of the computer on which they're running is a public address. Windows Internet Connection Sharing and some hardware sharing routers can work around this problem using the Universal Plug and Play protocol, which I'll discuss later in the chapter.
A hardware connection sharing router may provide you with better security than Windows Internet Connection Sharing, because as special purpose devices, their software is simpler and less likely to be buggy than Windows. Also, when used with Windows Firewall, you have two separate lines of defense against hackers rather than just one.
Starting with Windows 98, Microsoft has provided a NAT service through its Internet Connection Sharing feature. In addition, Windows XP Service Pack 2 introduced Windows Firewall, an additional security feature that prevents outside people from accessing your LAN. I'll talk more about Windows Firewall in Chapter 21.
Given the choice between Microsoft's Internet Connection Sharing (ICS) service and an external hardware router, I recommend that you use a router, for two reasons:
First, to use ICS, you have to leave one of your Windows computers turned on so that other computers can reach the Internet. Connection sharing routers have to be left on too, but they consume very little power compared to what a PC sucks up.
More importantly, connection sharing routers provide better security than Windows. These little boxes have very little going on inside them, so it's more likely that any security flaws have been noticed and fixed. Windows, on the other hand, is hugely complex, and Microsoft finds security flaws at the rate of one or two a week. If you use ICS and host a Web site on the connection-sharing computer, you're inviting outside people to run complex software on the same computer that's protecting your network. If they find a way to circumvent NAT or the Windows Firewall, they're already inside your computer. With the hardware router, they have to break through the router, and then break into Windows.
I won't go so far as to say that you shouldn't trust ICS, and I will show you how to hook up your LAN using all of the methods I described earlier. I'll just put in as my final word on this issue that I use DSL/cable sharing routers at my own home and office.
If you decide to use a router, look at the products made by Linksys, D-Link, SMC, and Netgear. You can find them at computer stores, office supply stores, and online (check www.buy.com), and on sale you can pick one up for $20 or less. Wireless versions that include an 802.11g Wireless networking base station as well as a hub for wired Ethernet connections don't cost that much more—I'm looking at the ads in my Sunday paper right now and see prices ranging from $40 to $60.
There are also more advanced (and expensive) versions that include additional features like a built-in print server or VPN (virtual private networking) service. For example, the D-Link DI-713P Wireless Broadband Router provides NAT (connection sharing), a 3-port switching Ethernet hub, a print server, and a wireless access point all in one box. But, while combination devices may be less expensive when you look at the total cost of getting separate devices, separate units give you more flexibility in where you locate the devices, and if one device fails, you don't lose all of the functions at once.
If you want to host your own public Web or email servers on your LAN, or if you want to reach your LAN through Remote Desktop or a VPN connection, you need to have an always-on connection so that the network can always be reached from the outside. A demand-dialing modem connection is not a good choice for this use because the connection is established only when you try to reach out. Many years ago it was cost effective to use a permanently connected dial-up service, but it's no longer cost-effective. Broadband is really the only way to go. Routed Internet service is a big advantage here because each computer gets a fixed, public, always-on IP address, but you can get by with a shared connection too.
You'll probably also want to be able to reach your Web site or computers by typing in a standard domain name like www.mysitename.com. For this, you need to register a domain name, and you need Domain Name Service (DNS) to give the Internet the means of finding your computer's public IP address. You can have your ISP provide domain name service, but it will probably cost you an extra $5 to $20 a month. You also might check out the free public DNS services hosted by www.dyndns.org and others (do a Google search for “free DNS service” and check out the sponsored links).
Whether you use NAT or a routed Internet service, it's best if you can get your ISP to assign you a permanent, or static, IP address so that your computers' IP addresses don't change from day to day as a dial-up connection's does. This way your DNS information can be set up once, and it will work as long as you keep your ISP. Static IP addressing is not available with every connection technology or ISP, though, so you have to ask when shopping for your service provider.
If you have dial-up, cable, or non-static DSL service, you'll have to get “dynamic DNS” service, since your network's public IP address will change every time your connection is reestablished. Check out www.dyndns.org for more information about dynamic DNS, or do a Google search for “free dns service” and check the sponsored links.
The next two sections discuss issues important to business users. If you're setting up an Internet for your home, you can skip ahead to “Getting Your Service Installed,” later in the chapter.
My enthusiasm notwithstanding, cable and DSL Internet service are based on new technologies, and the businesses delivering them are new and growing extremely rapidly. I can tell you from direct experience that they can give you a painful, bumpy ride. Some DSL ISPs (two of mine, for example) have already gone bankrupt and stranded their customers.
Customer support ranges from okay to incredibly bad, installation appointments are routinely missed, and even billing can be a terrible mess. Ask a provider for a service level agreement (a guaranteed percentage of uptime and throughput), and the likely reply will be hysterical laughter. If your business truly depends on your Internet connection for survival, DSL and cable are probably not for you.
It will cost lots more in the short term to set up Frame Relay or dedicated ISDN service, but if you lose business when your connection fails, you probably can't afford the risks that come with consumer-class DSL and cable Internet access. If you do want to use cable or DSL, it's worth paying extra for “business class” service. For instance, I've used XO Communications Business DSL for several years, and have been very happy with the service.
I talked about dial-up, DSL, cable, ISDN, wireless, and satellite Internet connectivity in Chapter 8. For serious business use, Frame Relay is one more option to consider. Frame Relay is an older technology that was primarily designed for private, dedicated, long-distance connections for the corporate world. It's connected using hardware very similar to DSL, but it requires its own dedicated telephone line from your office to the phone company and some expensive equipment.
Although installing and setting up frame relay Internet hardware is tough, after the equipment is in, it just plugs into your LAN and virtually no setup is involved with Windows itself. (In Figure 19.1 it falls into the last category, Routed Service.)
Frame relay connections are extremely reliable and run at data rates similar to DSL, but have a severe disadvantage in price. Table 19.1 compares the costs for 128Kbps Frame Relay to DSL service.
Table 19.1. 128Kbps Frame Relay Versus 128Kbps DSL
128Kbps Frame Relay | 128Kbps DSL | |
|---|---|---|
Installation by telephone company | $1,000 | $0–100 |
Setup by ISP | $400 | 0 |
Required hardware (modem and so on) | $1,200–1,800 | $0–400 |
Monthly data line fee | $325 | $40 |
Monthly Internet service provider fee | $400 | $10 |
It's pricey, but frame relay users might expect service interruptions of no more than three minutes per month versus perhaps three hours per month with DSL service. If this sounds worthwhile to you, you should contact a telecommunications consultant or a networking pro for more information.
If you're setting up a wireless network, you must enable WEP or WPA encryption to protect your network from unexpected use by random strangers. People connecting to your wireless network appear to Windows to be part of your own LAN, and are trusted accordingly.
If you really want to provide free access to your broadband connection as a public service, provide it using a second, unsecured wireless router plugged into your network, as shown in Figure 19.3. Use a different channel number and SSID from the ones set up for your own wireless LAN. Set up filtering in this router to prevent Windows file sharing queries from penetrating into your own network. See “Scheme F—Routed Service Using a Router” later in this chapter for the list of ports that you must block.

Figure 19.3. If you want to provide unsecured, free wireless Internet access to strangers, use a second wireless router in order to protect your own LAN.
(And remember that someone might use your connection to send spam or attack other networks. If the FBI knocks on your door some day, don't say I didn't warn you.)
Although some cable Internet providers can provide you with multiple IP addresses so you can connect multiple computers directly to your cable modem. I strongly urge you not to use this type of service. There are two reasons for this.
First, when you order more than one IP address on cable service, some providers assign IP addresses that have different IP subnet addresses. This is like giving you telephone extensions with different area codes, and it makes it very difficult to use Microsoft Networking (file sharing) on your LAN.
More importantly, this type of setup requires you to connect your cable modem directly to your LAN, without any firewall protection between the Internet and your computers. You would have to disable file and printer sharing on each computer. If you didn't, you would expose all of your computers to a severe security risk.
CAUTION
Do not connect a cable modem directly to your LAN. Anyone on the Internet would be able to read and change your shared files and folders, and could possibly infect your computer with viruses and other nasty software.
Now, if you don't care about file and printer sharing, this isn't a big loss. But, if you do want the full advantage of having a LAN in your home or office, there are three ways to solve this dilemma.
You could set up two separate networks, one to connect each computer to the cable modem, and the other to connect the computers for file sharing (see Figure 19.1-E). With Ethernet network adapters costing as little as $5 each, this isn't a bad solution. You would have to take great care to configure the two networks correctly. I'll discuss this shortly.
You could install two network adapters in one computer, one going to the cable modem and the other to your LAN, and use Windows Internet Connection Sharing, as shown in Figure 19.1-B.
You could install an inexpensive cable/DSL sharing router to provide the connection, as in Figure 19.1-C.
Some cable ISPs don't want you to use a router, but I think it provides superior protection against hacking, and that needs to be your first priority. You can always pay your ISP for the extra computers and use just the one, safe connection to provide service to your other computers.
If you are ordering ISDN service, you should know what kind of ISDN modem or router you will be using before you order an ISDN line from the phone company. ISDN provisioning is complex, and most telephone companies can determine the options you need if you tell them the brand of equipment you're using. Also, your ISDN equipment manual may list a special “quick order” code to give your telephone company. You will probably order “2B+D, Data and voice, 64K data” service with no special call functions.
When your ISDN line is installed, be sure to ask the installer for the following information:
Switch type
SPID (Service Profile Identifiers) numbers
Directory numbers
You'll need these when you install your ISDN modem.
You waited weeks for installation day, and the installer finally came. Now all you can think of is all those bits, just waiting to blast their way onto your network. Hang on; we're almost done.
You now need to set up your network's TCP/IP software to let your computers talk through the Internet connection in a coordinated way. This step depends not so much on the connection type you chose but on the sharing system and the IP address system you'll use.
In the following sections, I'll describe how to set up each of the connection schemes diagrammed in Figure 19.1. If you're still in the planning stages for your network, you might want to read all of the sections to see what's involved; this may help you decide what configuration you want to use. If your LAN is already set up and your Internet service is ready to go now, just skip ahead to the appropriate section.
This section shows how to set up the Internet connection method illustrated in Figure 19.1-A.
The Internet Connection Sharing feature provided with Windows XP can share modem, ISDN or broadband connections that require a sign-on procedure. The connection is made automatically whenever any user on the network tries to access the Internet; this is called demand-dialing. The following section describes how to set it up.
To set up a shared connection, first install and test your modem and ISP information on the computer that will be used to share the connection. To do this, set up a standard dial-up connection using the procedure described in Chapter 8. Be sure that you can access the Internet properly by viewing at least one Web page. When you know this is working, you're ready to set up Internet Connection Sharing. You can do this with the Network Setup Wizard, or set it up manually. To use the wizard, follow these steps:
Click Start, My Computer, select My Network Places, and then select Set Up a Home or Small Office Network.
In the Network Setup Wizard, click Next twice. Select the first choice, This Computer Connects Directly to the Internet, and then click Next.
In the list of network connections, select the listing for the connection to your ISP as shown in Figure 19.4 and click Next. (Your display will not look exactly like the one in the figure, as it will list the dial-up connections you've defined.)
Complete the rest of the Network Setup Wizard as described in Chapter 8. If you have an existing LAN, be sure to enter the same Workgroup name you used originally, as the Wizard wants to change the setting to MSHOME every time you run it.
If you have older Windows 95 or 98 computers on your network, you might want to create a diskette with the Network Setup Wizard for these computers by following the instructions you'll encounter in the wizard.
When the wizard completes, restart your computer.
Log on again, and try to view any Web page (such as www.google.com). Your computer should automatically dial your ISP. If the Web page appears, proceed to step 7. If it doesn't, you'll have to resolve the problem before continuing.
When the sharing computer can connect properly, repeat these steps on your other computers, except for one detail: When you run the wizard, select This Computer Connects to the Internet Through Another Computer on My Network or Through a Residential Gateway.
Connection sharing is now set up. You might want to walk through the manual process described next, just to confirm that all of the settings were made correctly. Otherwise you may skip ahead to the section titled “Configuring the Rest of the Network.”
If you don't want to or can't use the Network Setup Wizard on the connection-sharing computer, you can use the manual configuration process described next. Here is the procedure:
Click Start, My Computer, and select My Network Places. Select View Network Connections. Right-click the icon for the connection to your ISP, and select Properties.
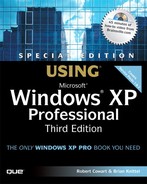
Choose the Advanced tab. Check all the boxes, as shown in Figure 19.5.
Select the Options tab. Uncheck Prompt for Name And Password and Prompt for Phone Number. This will let the connection start up without user intervention.
If you want a dedicated, always-on 24/7 connection, make these settings: Check Redial if Line Is Dropped, set the number of Redial Attempts to 99, Time Between Redial Attempts to 10 Seconds, and Idle Time Before Hanging Up to Never. Be aware that if you pay per-minute charges, this may result in an astounding phone bill!
Usually, though, you'll want a demand-dialing connection. Make these settings: Uncheck Redial if Line Is Dropped. Set the number of Redial Attempts to 10, the Time Between Redial Attempts to 10 Seconds, and Idle Time Before Hanging Up to 10 Minutes. (I recommend using 10 minutes; you can increase it later if you find that the line disconnects too frequently while you're working.)
Select the Networking tab. In the list of Components used by the connection, be sure that only Internet Protocol (TCP/IP) and QoS Packet Scheduler are checked, as shown in Figure 19.6. This will prevent file sharing from being exposed to the Internet. The Firewall will do that too, but it doesn't hurt to be extra safe.
Click OK. Windows then warns you that it is changing the network address of your LAN adapter to 192.168.0.1. This is now the IP address for this computer on your LAN.

I suggest restarting your computer and confirming that your computer connects to your ISP when you try to view a Web page. Then, proceed by configuring the other computers on your LAN.
When the shared connection is set up, configuring the rest of your LAN should be easy. The computer sharing its Internet connection is now running the Internet Connection Sharing service, which makes it
A DHCP server, which parcels out IP addresses and setup information
The network gateway, which forwards to the Internet any network traffic that isn't directed at local computers
A DNS server, which assists the other computers in converting domain names into IP addresses
Its IP address is 192.168.0.1 and all your other computers simply refer to it for network services.
To configure the other computers on the network, you can use the Network Setup Wizard, or configure manually. First, I'll give the steps for using the wizard. On each of your other computers (all except the connections-sharing computer), follow these steps:
Open My Computer from the Start Menu, and select My Network Places. Select Set Up a Home or Small Office Network. If you are setting up older Windows 95/98/2000 computers that don't have a Network Setup Wizard, you can use the diskette you prepared when you setup connection sharing.
When the wizard starts, click Next twice. Select This Computer Connects to the Internet Through Another Computer as the connection method, and then select Next.
Complete the rest of the Network Setup Wizard as described in Chapter 16, under “Give This Computer a Description and Name.” If you have an existing LAN, be sure to enter the same Workgroup name you used originally, because the wizard wants to change the setting to MSHOME every time you run it.
When the wizard finishes, you might want to restart your computer. Then, you should be able to open Internet Explorer and view a Web site. When you try, the connection-sharing computer should dial out.
NOTE
When you're using a shared dial-up connection, it takes a while for the dialer to go through its paces if the connection wasn't already up, and before it can finish you might get an error from Internet Explorer saying it can't open the page. If this happens, just wait a few seconds and click Refresh to try again.
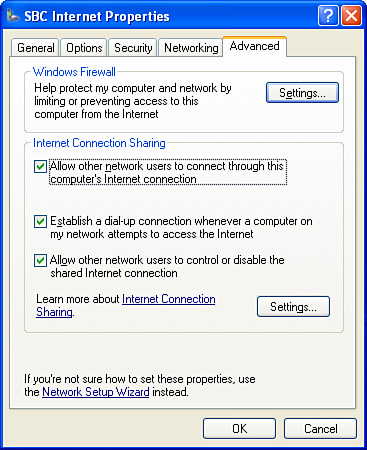
If you are using Microsoft Internet Connection Sharing, or a connection sharing router that supports Universal Plug and Play (UPnP), the Network Connections window of all of the other computers on your network should have an icon that represents the shared Internet connection, as shown in Figure 19.7. Normally, Windows will automatically establish and drop the shared connection as needed. If necessary you can right-click this icon to control the connection manually (unless the owner of the shared connection disabled the remote-control feature on the shared connection's Advanced properties page).
Figure 19.7. The other computers on your network can control the shared connection from their Network Connections window.
If you're a networking hotshot and want to configure other computers manually, you can use this procedure:
Open My Network Places and select View Network Connections. Open Local Area Connection's Properties. On versions of Windows other than XP, you may have to use different selections to get to your network adapter's settings; check online help or your copy of the corresponding Special Edition Using book.
Select Internet Protocol (TCP/IP), and then select Properties.
Check Obtain an IP Address Automatically and Obtain DNS Server Address Automatically.
Click OK. The computer should reconfigure itself with a new IP address obtained from the computer with the shared dial-up connection.
Now test the shared connection from a computer on your LAN by trying to browse a Web page.
This section shows how to set up the Internet connection method illustrated in Figure 19.1-B.
The procedure for configuring a shared high-speed cable or DSL Internet connection with Microsoft ICS is very similar to that for setting up a shared dial-up connection. To prepare, be sure to install and test your DSL or cable connection on the computer you'll use to host the shared connection, as described in Chapter 8. It's essential that you have this working before you proceed to set up your LAN and the shared connection.
TIP
If your broadband service uses a LAN adapter rather than USB to connect your computer to the DSL or cable modem, you'll be installing two LAN adapters in this computer: one for the LAN, and one for the modem. I suggest that you install them one at a time. Install the one that you'll use for your broadband connection first. View the adapter's icon in Network Connections, right-click it, and rename it “DSL Connection” or “Internet Connection,” or some other name that indicates what it's used for, as shown in Figure 19.8. Configure and test the Internet connection. Then, install the network adapter that you'll use to connect to your LAN. Rename this connection “LAN Connection” or leave it as “Local Area Connection.” This will help you later on in the setup process when you need to know which connection goes to your ISP.

Verify that the broadband Internet connection is not connected to Windows file and printer sharing. To do this, follow these steps:
Open the Network Connections window by clicking Start, My Network Places, and selecting View Network Connections.
Right-click the icon that corresponds to your broadband connection and select Properties. Be sure that only QoS Packet Scheduler and Internet Protocol (TCP/IP) are checked, as shown in Figure 19.6.
When your broadband connection is configured correctly and is working, follow these steps:
Click Start, My Computer. Select My Network Places, then select Set Up a Home or Small Office Network.
In the Network Setup Wizard, click Next twice. Select This Computer Connects Directly to the Internet as the connection method, and then click Next.
In the list of network connections, select the listing for the connection to your ISP as shown in Figure 19.9 and click Next. (Now you see why it's helpful to have renamed the connection icons. Also, note that your list of connections might not look exactly like mine.)
Complete the rest of the Network Setup Wizard as described in Chapter 8. If you have an existing LAN, be sure to enter the same Workgroup name you used originally, because the wizard wants to change the setting to MSHOME every time you run it.
If you have older Windows 9x or Me computers on your network, you might want to create a diskette with the Network Setup Wizard for these computers by following the instructions you'll encounter in the wizard.
When the wizard completes, you might want to restart your computer.
Log on again, and try to view any web page (such as www.google.com). If it appears, proceed to step 7. If it doesn't, you'll have to resolve the problem before proceeding. You should check the appropriate connection icon to be sure it's still configured correctly for your ISP.
When the sharing computer can connect properly, repeat these steps on your other computers, except for one detail: when you run the wizard, select This Computer Connects to the Internet Through Another Computer on My Network or Through a Residential Gateway.

When Connection Sharing has been set up, follow the instructions under “Configuring the Rest of the Network” in the section immediately preceding this one.
Because it's so important with these always-on broadband connections that Windows Firewall is actually working, I suggest that you view the icons in Network Connections to be sure that at least the broadband connection icon has the word “Firewalled” next to it, as shown in Figure 19.10. If it doesn't, use the following manual configuration steps to set it up.

If you want to confirm that the wizard did its job properly, or if you want to configure Connection Sharing manually, rather than using the wizard, you can follow these steps on the computer with the broadband connection:
Locate the icon for the adapter that goes to your broadband modem in Network Connections. Right-click it and select Properties.
Choose the Advanced tab. Check all of the boxes, as shown in Figure 19.5.
Select the General tab. In the list of Components used by the connection, be sure that only Internet Protocol (TCP/IP) and QoS Packet Scheduler are checked. (This will prevent file sharing from being exposed to the Internet. Windows Firewall will do that too, but it doesn't hurt to be extra safe.)
Click OK. Windows then warns you that it is changing the network address of your LAN adapter to
192.168.0.1. This is now the IP address for this computer on your LAN.Select Change Windows Firewall Settings in the Network Tasks list. Be sure that Windows Firewall is On, and that Don't Allow Exceptions is unchecked.
I suggest restarting your computer and confirming that your computer connects to your ISP when you try to view a Web page. Now, skip back to the section titled “Configuring the Rest of the Network” on page xxx.
This section shows how to set up the Internet connection method illustrated in Figure 19.1-C.
Your router's manufacturer will provide instructions for installing and configuring it. If you're using cable or DSL Internet service, you'll connect your broadband modem to the router using a short Ethernet patch cable. If you're using a dial-up or ISDN account, you'll need to set up the router and a modem. Then, you'll connect the router to your LAN using one of the two methods shown in Figure 19.11.

If you connect your router to a separate hub, be sure that the “Link” indicators come on at both the hub and the router. If they don't you might need to switch the hub end of the cable from a regular port to an uplink port or vice versa.
You'll then configure the router, telling it how to contact your ISP, and what range of IP addresses to serve up to your LAN. Every device will use a different procedure, but I can show you the basic steps used by the Linksys Cable/DSL Sharing Routers that I have been so happy with.
The procedure will go something like this: When the router is attached to your network, you'll set up one of your computers' LAN adapter to obtain its IP address information automatically. Then you will use Internet Explorer to connect to the router by viewing http://192.168.1.1. (The address may be different for your router.) A password is required; on my router the factory default value was admin. (On some routers you have to enter both a username and a password.)
You'll fill in your ISP's IP and sign-on information, if any, on a Web page similar to the one shown in Figure 19.12.
You might need to enter a static IP address, if one was assigned to you by your ISP. If your ISP uses DHCP to assign IP addresses dynamically, the router may need to be assigned the host and domain name expected by your provider. This is common with cable Internet setups.
If your ISP uses PPPoE to establish a connection, you'll need to enable PPPoE and enter your logon and password. Most DSL service works this way. If your DSL provider does use PPPoE, you should enable the router's auto-sign-on feature, and you can optionally set up a “keep-alive” value that will tell the modem to periodically send network traffic even if you don't, in order to keep your connection active all the time. (This might violate your service agreement with the DSL provider—better check before you do this.)
If you use cable Internet service and your ISP didn't provide you with a special host name that you had to give to your computer, your ISP probably identifies you by your network adapter's MAC (hardware) address. You'll probably find that your Internet connection won't work when you set up the router. One of your router's setup pages should show you its MAC address. You can either call your ISP's customer service line and tell them that this is your new adapter's MAC address, or, you can configure the router to “clone” your computer's MAC address, that is, copy the address from the computer you originally used to set up your cable connection. Your router's setup manual will tell you how to do this.
CAUTION
Be sure to change the factory-supplied password of your router after you install it. (And write the password down somewhere in the router's manual.) Also, be sure to disable outside (Internet) access to the router's management screens.
As you are configuring your router, you may wish to enable Universal Plug and Play (UPnP). I'll discuss this later in this chapter.
You may also opt for even better hacker protection by having your router filter (block) Microsoft file and printer sharing data. This is usually done on an advanced set up screen labeled Filtering. See “Scheme F—Routed Service Using a Router” later in this chapter for the list of ports that you must block.
When the router has been set up, go to each of your computers and follow the instructions under “Configuring the Rest of the Network,” on page 752. You can configure all of the computers manually, or you can use the Network Setup Wizard. If you use the wizard, select My Computer Connects Through Another Computer or a Residential Gateway. If you set up the computers manually, select Obtain an IP Address Automatically and Obtain DNS Information Automatically.
If you use a hardware connection sharing router, you may want to consider enabling a feature called Universal Plug and Play (UPnP). UPnP provides a way for software running on your computer to communicate with the router. Here's what UPnP can do:
It provides a means for the router to tell software on your computer that it is separated from the Internet by Network Address Translation. Some software—Remote Assistance and the video and audio parts of Windows Messenger in particular—ask the computer on the other end of the connection to establish a connection back to your IP address. On a network with a shared connection, however, the IP address that the computer sees is not the public IP address that the shared Internet connection uses. UPnP lets software like Remote Assistance find out what its public IP address is. It also provides a way for the router to suggest alternate port numbers if several computers on the network want to provide the same service (for example, if several users send Remote Assistance requests).
It provides a means for software running on the network to tell the router to forward expected incoming connections to the correct computer. Remote Assistance and Windows Messenger again are two good examples. When the computer on the other end of the connection starts sending data, the router would not know to send it to your computer. UPnP lets UPnP-aware application programs automatically set up forwarding in the router.
UPnP provides a means for other types of as-yet-undeveloped hardware devices to announce their presence on the network, so that Windows can automatically take advantage of the services they provide.
UPnP has a downside, however—it has no built-in security mechanism, so any program on any computer on your network could potentially take control of the router and open “holes” for incoming connections. (I am confident that we will soon see computer viruses and Trojan Horses that take advantage of this.) However, Windows Firewall will still provide some protection and will warn you if an undesired program attempts to receive incoming network connections, so this is not yet a serious problem. If you use Remote Assistance or Windows Messenger, the benefits that UPnP provides outweigh the risks.
To use UPnP, you must enable the feature in your router. It's usually disabled by default. If your router doesn't currently support UPnP, you may have to download and install a firmware upgrade from the manufacturer. Most routers now do support UPnP.
By default, Windows XP provides support for detecting UPnP enabled routers. If you have a UPnP router or Windows Internet Connection Sharing running on your network, the Network Connections screen should display an icon for the router as shown in Figure 19.13.

Figure 19.13. If your router supports UPnP, an Internet Gateway icon should appear in Network Connections.
NOTE
If the icon doesn't appear, click Advanced, Optional Networking Components, select Networking Services, and click Details. Be sure that Internet Gateway Device Discovery and Control Client is checked. While you're here, check UPnP User Interface as well—this enables support for future UPnP devices.
Then, on the task list, click Change Windows Firewall Settings. View the Exceptions tab and be sure that UPnP Framework is checked.
If you right-click the Internet Connection icon and select Status, you'll see a dialog similar to the one shown in Figure 19.14, displaying the status of the router's connection. If your Internet service uses a connection-based system like PPPoE or standard dial-up service via a modem, this dialog may display a buttons that let you connect to and disconnect from your ISP.
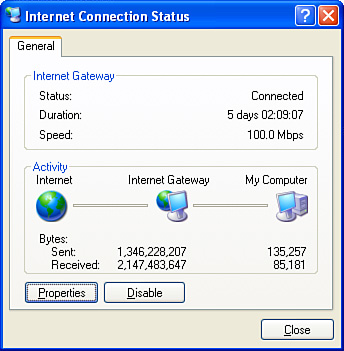
Click Properties and then Settings to display a list of network services for which the router is forwarding incoming connections to computers on your network. This list shows only forwarding settings made via UPnP. Services forwarded by the setup screens on your router, a process discussed later in this chapter under “Making Services Available,” do not appear here and new settings need not be made here—they may disappear when the router is reset.
This section shows how to set up the Internet connection method illustrated in Figure 19.1-D. As I mentioned earlier in the chapter, you cannot safely use file and printer sharing with this setup. You would only use this setup if you don't want file and printer sharing at all, and just want to have several computers with Internet access.
Here is the procedure to follow:
If your computers do not already have LAN adapters, install a network adapter in each of your computers. Configure the adapters as instructed by your ISP. In most cases, you won't need to make any adjustments to the default settings.
Connect your computers and your cable modem to an Ethernet hub. Chapter 16 provides details on installing network wiring.
On each computer, run the Network Setup Wizard. Click Next twice.
On the Select a Connection Method screen, select Other and click Next. Select the first choice, This Computer Connects to the Internet Directly or Through a Network Hub. Click Next.
If your ISP has given you a specific name to use with each computer, enter it in the Computer Name field. Otherwise, provide your own name and click Next.
Leave the workgroup name set to MSHOME and click Next.
Select Turn Off File and Printer Sharing and click Next.
Confirm the settings and click Next. Select Just Finish the Wizard and click Next.
When the wizard finishes, don't have it restart your computer right away. Instead, open the Network Connections window, right-click the Local Area Connection icon, and uncheck the Client and Sharing items, as shown in Figure 19.6. Click OK, and then restart Windows.
If you later decide that you want to use file and printer sharing, do not simply enable the Client and Sharing items. Instead, set up a shared connection using schemes B or C, or install a second LAN as described in the next section.
This section shows how to set up the Internet connection method illustrated in Figure 19.1-E. If you want to have file and printer sharing and have multiple computers on a cable Internet connection but for some reason do not want to use a connection sharing setup, you must set up a second, private network for file sharing that is physically separate from the network used for the Internet connection.
To do this, set up and test the LAN for the cable service as described in the previous section. Then, on each of the computers that is to participate to file and printer sharing, perform the following steps:
View the Network Connections screen, right-click the icon that corresponds to the network adapter, and select Rename. Change the name to “Internet Connection.”
Shut down the computer and install a second network adapter. Connect this adapter to a separate network hub.
Run the Network Setup Wizard again. Make the same choices, except this time turn on file and printer sharing.
On the Network Connections window, right-click the Internet Connection icon, select Properties, and be sure that it is still configured as shown in Figure 19.5.
Right-click the Local Area Connection icon (which corresponds to your new, second network), select Properties, and be sure that all of the component items are checked.
You also might want to assign each computer a static IP address. To do this, select Internet Protocol and click Properties. Click Use The Following IP address. For the first computer, enter
192.168.0.1. Set the Network Mask to255.255.255.0and leave the Default Gateway address blank. Leave the DNS setting on automatic. For the second computer, enter address192.168.0.2, and so on.In the Network Tasks list, select Change Windows Firewall Settings. Be sure the firewall is set On.
On the Exceptions tab, check File and Printer Sharing. Click OK to close the dialog.
Now, file and printer sharing will use your second, private LAN while the first LAN is used only for Internet service.
This section shows how to set up the Internet connection method illustrated in Figure 19.1-F.
Some Internet service providers will sell you service that provides multiple, fixed IP addresses. This is the case for all frame relay service, and in some cases, higher-priced business-class DSL service. You should really have a good reason for going this way, beyond just wanting to connect multiple computers—it's not as secure as a single shared connection. Good reasons might be that you want the reliability of frame-relay service, or you need fixed IP addresses in order to host Web, email, or other Internet-based services on several different computers.
For this type of service, if you are using a cable, DSL, satellite, or Frame Relay modem with a built-in router, your ISP will help you configure your network. In this setup, you will be provided with a fixed set of IP addresses, which you'll have to parcel out to your computers. Your ISP should help you install all of this, but I can give you some pointers.
First of all, it is absolutely essential that your router be set up to protect your network. You must ensure that at least these three items are taken care of:
The router must be set up with filters to prevent Microsoft file sharing service (NetBIOS and NetBT) packets from entering or leaving your LAN. In technical terms, the router must be set up to block TCP and UDP on port 137, UDP on port 138, and TCP on ports 139 and 445. It should “drop” rather than “reject” packets, if possible. This helps prevent hackers from discovering that these services are present but blocked. Better to let them think they're not there at all.
Be absolutely sure to change your router's administrative password from the factory default value to something hard to guess, with uppercase letters, lowercase letters, numbers, and punctuation. Don't let your ISP talk you out of this, but you should let them know what the new password is so they can get into the router from their end if need be.
Disable SNMP access, or change the SNMP read and read-write “community names” to something other than the default. Again, use something with letters, numbers, and punctuation.
CAUTION
If your router is not properly configured to filter out NetBIOS traffic, your network will be exposed to hackers. This is absolutely unacceptable. If you're in doubt, have your ISP help you configure the router. Also, after setting things up, visit http://www.grc.com and use the “Shields Up!” pages there to be sure your computers are properly protected.
For more information about network security please see Chapter 21.
Second, you'll need to manually set up a fixed IP address for each computer that is to host a service reachable from the “outside.” You can make address settings manually in all of your computers, or just the ones that are hosting services, with your router providing DHCP service to configure the other computers.
Make a list showing the name of each computer that is to get a static IP address, and the IP address you want to assign. You'll also have to manually enter the network mask, gateway IP address, and DNS server addresses supplied by your ISP, on each of these computers.
Follow these steps on each computer that is to get manual settings:
View My Network Places and select View Network Connections.
Right-click the Local Area Connection icon and select Properties.
Select the General tab, select Internet Protocol (TCP/IP), and then click Properties.
Enter an IP address and other assigned information. Figure 19.15 shows an example; you'll have to use the information provided by your ISP.

Finally, be sure to run the Network Setup Wizard on every one of your computers, however configured. When asked to choose a connection method, select Other, and on the next page, choose This Computer Connects to the Internet Directly or Through a Network Hub.
The wizard will give you some grief about the security risk involved in your Internet setup and will enable Windows Firewall on your LAN adapter. Don't let it disable File and Printer sharing—leave it turned on.
You might want to make some internal network services available to the outside world through your Internet connection. You would want to do this if
You want to host a Web server using Internet Information Services
You want to enable incoming VPN access to your LAN so you can securely connect from home or afield
You want to enable incoming Remote Desktop access to your computer, or have someone help you through Remote Assistance
If you have set up routed Internet service with a router (as in the fourth setup in Figure 19.1), you don't have to worry about this because your network connection is wide open and doesn't use Network Address Translation. As long as the outside users know the IP address of the computer hosting your service—or its DNS name if you have set up DNS service—you're on the air already.
Otherwise, you have either Windows Firewall, Network Address Translation, or both in the way of incoming access. In order to make specific services accessible, you'll need to follow one of the sets of specific instructions in the next few sections, depending on the type of Internet connection setup you've used. Skip ahead to the appropriate section.
When you are using Microsoft's Internet Connection Sharing feature, your network is protected from outside access. This is a good thing when it blocks attempts by hackers to get to your shared files and folders. It also blocks access to some of the neat services you might want the outside world to have access to: Virtual Private Networking, Remote Desktop, Remote Assistance, Web and FTP service, and so on.
There are two steps needed to provide outside access to a given service provided by a computer on your network. First, the connection sharing system (ICS) must be told which computer on your network is to receive incoming connection requests for a particular service. Then, on the computer that provides the service, Windows Firewall must be told to let these requests through.
Some services, such as Remote Assistance and Windows Messenger, use the Universal Plug and Play (UPnP) protocol to automatically perform this setup work, by communicating with the computer that is sharing its connection. So, when you are using ICS to share your network connection, these services will simply work.
However, most server-type functions, for instance Remote Desktop and Internet Information Services, require manual setup. On the computer that is providing the service itself, you must tell Windows Firewall to allow incoming connections to the service by following these steps:
Open the Windows Firewall screen by viewing Network Connections and clicking Change Windows Firewall Settings.
View the Exceptions page. See if the service this computer is providing is already listed and checked. If so you can proceed to configure the computer that is sharing its Internet connection.
If the service isn't already listed, click Add Port, enter the service name and port number, and select TCP or UDP, as shown in Figure 19.16. Common service numbers and protocols are listed in Table 19.2.(For the FTP and DNS services you would have to make two entries.)
Table 19.2. Common Services and Port Numbers
Protocol
Port
Associated Service
TCP
20 and 21
FTP—. File Transfer Protocol
TCP
23
Telnet
TCP
25
SMTP—. Simple Mail Transfer Protocol
TCP and UDP
53
DNS—. Domain Name Service
TCP
80
HTTP—. World Wide Web
TCP
110
POP3—. Post Office Protocol
TCP
3389
Remote Desktop
TCP and UDP
5631
5632
Symantec PCAnywhere
Click Change Scope and select Any Computer (Including Those on the Internet). Click OK, and then OK again.

Then, you must instruct the computer that is sharing its Internet connection to forward incoming requests to the designated computer. On the computer that physically connects to the Internet, follow these steps:
Click Start, select My Network Places, and then select View Network Connections.
Right-click the icon for the shared Internet connection and select Properties. View the Advanced tab, and under Internet Connection Sharing, click Settings.
On the Advanced Settings dialog, view the Services tab (shown in Figure 19.17).
Check the Service entry for each service for which you want to permit access and for which you have servers on your LAN. The most common ones to select are Remote Desktop, and FTP Server and Web Server, if you have set up IIS.
When you select a check box, a dialog appears, as shown in Figure 19.18.
Enter the IP address of the computer that is hosting this service, if your LAN uses fixed IP addresses. If your LAN uses automatically assigned addresses from Internet Connection Sharing, you can enter the computer's name and the software will locate the correct computer.
If you want to use an incoming VPN connection, you must set it up on the computer that hosts the Internet Connection Sharing or Firewall service. You can't forward VPN connections to other computers.
If the service you want to use isn't listed, you'll need to find out what TCP and/or UDP ports the service communicates with. You'll have to search through the service software's documentation or the Internet to find these port values. For example, Symantec PCAnywhere uses TCP Port 5631 and UDP Port 5632.
To add an unlisted service, click Add. Enter the name of the service, the IP address or host name of the computer which is running this service, and the port number, as shown in Figure 19.19. Generally, you'll want to use the same number for the port number the public sees (external port) and the port number used on the LAN (internal port). Check TCP or UDP, and then click OK.
In the PCAnywhere example I'm using, after creating an entry for TCP Port 5631, I'll have to add a second entry to forward UDP Port 5632.

When you've enabled the desired services, incoming requests using the selected service ports will be forwarded to the appropriate computer on your LAN. Windows Firewall will know to let these services through.
CAUTION
With the exception of incoming VPN connection service, I suggest that you don't run any other services on the computer that manages your Firewall and/or Internet Connection Sharing, especially IIS. There's too great a risk that a security flaw in the service might let hackers compromise the Firewall.
TIP
If you're not sure which port a given service uses, you can use the Firewall's logging feature to find out what ports are used. To do this, open the Advanced Settings page again, click Settings, and view the Security Logging tab. Check Log Dropped Packets and click OK. Then attempt to connect to the sharing computer from outside on the Internet using the service of interest. View the log file (by default, c:windowspfirewall.log). The eighth column in this file lists the “destination port” that you tried to use. This is the port your service needs to have forwarded.
If you use a connection-sharing router on your LAN, you'll need to follow a somewhat different procedure to enable outside access to services on your network.
You must still open the Windows firewall on the computer(s) providing services, as described in the first four-step procedure in the previous section.
Then you must use a manufacturer-specific procedure to set up forwarding for services you want to expose to the Internet.
One difficulty with these devices is that you must forward services by IP address, not by computer name, and normally, you set up computers to obtain their IP addresses automatically. This makes the computers moving targets, as their IP address could change from day to day.
So, you'll have to make special arrangements for the computers on your LAN that you want to use to host services. On your router's setup screens, make a note of the range of IP addresses that it will hand out to computers requesting automatic configuration. Most routers have a place to enter a starting IP address and a maximum number of addresses. For instance, the starting number might be 2, with a limit of 100 addresses. For each computer that is going to be providing an outside service, pick a number between 2 and 254 that is not in the range of addresses handed out by the router, and use that as the last number in the computer's IP address.
To configure the computer's network address, follow these steps:
View its Network Connections window, right-click the icon that corresponds to its network adapter, and select Properties.
Select Internet Protocol and click Properties.
Check Use the Following IP Address.
Enter the selected IP address. For the first three numbers, use the same numbers set up in the router (usually
192.168.0or192.168.1), and follow it with the fixed number you selected for this computer. The final result might be something like192.168.0.250.For the network mask enter
255.255.255.0.For the Default Gateway, enter
192.168.0.1or192.168.1.1, again using the same first three numbers set up on the router.Leave the DNS setting on automatic.
Click OK, then OK to close the dialogs.
Then you need to use the router's setup screens to set up forwarding to this computer. There are two ways you can set up forwarding. One is appropriate for services that use standard, well-known TCP or UDP protocol ports (like a Web server or Remote Desktop), and the other is appropriate for access to services that use non-standard protocols (like Microsoft VPN connections).
For standard services with a known TCP or UDP port number, view the Forwarding setup page on your router's internal configuration screen. Enter the appropriate port number, protocol type, and target IP address. For example, Figure 19.20 shows a router set up to forward a whole slew of services into computers on my LAN. Table 19.3 shows what is being forwarded here. Of course, your gateway router might use different configuration screens—you'll have to check its documentation for examples appropriate for your setup.

Table 19.3. Services Being Forwarded in Figure 19.20
Port | Service |
|---|---|
20–21 | FTP (file transfer protocol) |
25 | SMTP (simple mail transfer protocol) |
53 | DNS (domain name service) |
80 | HTTP (web server) |
110 | POP3 (mailbox server) |
3389 | Remote Desktop |
5631–5632 | Symantec PC Anywhere |
TIP
You can set up Remote Desktop forwarding to more than one computer by a making a separate entry for each computer. Each must have a different “external” port number. For example, I use port number 3389 for the first computer, 3390 for the second, and so on. The “internal” port number must be 3389 in each case. Then, when I use the Remote Desktop Client to connect to my network from the Internet, I enter the URL mycompany.com:3389 to get to the first computer, mycompany.com:3390 to get to the second, and so on.
For services that use TCP/UDP in unpredictable ways, you'll have to use another approach to forwarding on your LAN. Some services, such as Remote Assistance and Windows Messenger, communicate their private, internal IP address to the computer on the other end of the connection, and when the other computer tries to send data to this private address, it fails. To use these services with a hardware router, you must enable Universal Plug and Play (UPnP) as described earlier in the chapter.
Other services use network protocols other than TCP and UDP, and most routers can't be set up to forward them. Incoming Microsoft VPN connections fall into this category. Some routers have built-in support for Microsoft's PPTP protocol, which is the basis of Virtual Private Networking. If yours has this support, your router's manual will tell you how to forward VPN connections to a host computer.
Otherwise, to support non-standard services of this sort, you'll have to tell the router to forward all unrecognized incoming data to one designated computer. This in effect exposes that computer to the Internet, so it's a fairly significant security risk. In fact, most routers call this targeted computer a “DMZ host,” referring to the notorious Korean no-man's-land called the Demilitarized Zone and the peculiar danger one would face standing in it.
To enable a DMZ host, you'll want to use a fixed IP address on the designated computer, as described in the previous section. Use your router's configuration screen to specify this selected IP address as the DMZ host. The configuration screen for my particular router is shown in Figure 19.21; yours may differ.
Now, designating a DMZ host means that this computer is now fully exposed to the Internet, so you must protect it with a firewall of some sort. You can enable Windows Firewall on this computer's LAN Connection, but you must also block access to Windows File and Printer sharing. You could disable these services on this computer by disconnecting them from the network adapter as shown in Figure 19.5. You should also set up filtering in your router to block ports 137 through 139 and 445. Figure 19.22 shows how this is done on my Linksys router; your router might use a different method.

When I attempt to view an Internet page from a LAN computer, my Web browser doesn't get past “Looking up host www.somewhere.com.”
A delay of 30 seconds or so is normal while the dial-up connection is established when you first start using the Internet.
If the connection doesn't progress after 30 seconds, be sure of the following: The sharing computer was turned on when you booted up your computer, the sharing computer is logged in, and your computer is set to obtain its IP address automatically.
Try to make the connection from the sharing computer to be sure the modem is connecting properly. If it's not, see the “Troubleshooting” section at the end of Chapter 8 to diagnose the dial-up connection problem.
When I attempt to view an Internet page from a LAN computer, my Web browser doesn't get past “Looking up host www.somewhere.com.”
Be sure that the sharing computer was turned on when you booted up your computer, that the connection to the DSL or cable modem is the one marked as “shared,” and that your computer is set to obtain its IP address automatically.
Try to view Web pages from the sharing computer to be sure the high-speed connection is functioning. If it's not, see the “Troubleshooting” section at the end of Chapter 14, “Troubleshooting Your Internet Connection,” to diagnose the Internet connectivity problem.
If you are using a connection-sharing router, view the router's built-in “Status” Web page (usually by viewing http://192.168.0.1 or http://192.168.1.1 with Internet Explorer). See if the router has been able to connect to your ISP. You may have entered an incorrect password, or for cable systems, you may need to “clone” the MAC address of the computer that originally used to set up the Internet connection.
When I attempt to view a Web page on a network with a shared connection, no Internet connection is established.
If you are using a modem to establish the shared connection, listen to the modem to see whether it's trying to establish the connection. If it is, you might just need to wait a bit and try to view the page again. Sometimes, Internet Explorer gives an error message before the modem has had enough time to make the connection.
If the modem is making a connection but Web browsing still fails, the dial-up connection on the shared computer might not be set up with a saved password. On that computer, open My Network Places, select View Network Connections, and attempt to make the connection manually. Be sure that you've checked Save This User Name and Password and selected Anyone Who Uses This Computer.
If the modem isn't attempting to make the connection at all, run the Network Setup Wizard again on the sharing computer.
If you're using a high-speed connection such as DSL or cable, you can make an adjustment to your computer's networking software to get the best speed from your new connection.
Internet TCP/IP software sends data in chunks called packets, which are sent in a stream from, say, a Web server to your computer. The receiving computer sends acknowledgments every so often to indicate that the data has been received correctly or to indicate that something was lost or garbled during transmission.
A server sends only a limited amount of data before it expects to receive an acknowledgment. If the limit is reached before an acknowledgment is received, the sender has to stop and wait for one.
Ideally, for the fastest possible transfers, the sender should never have to stop sending because acknowledgments for data sent earlier should arrive before this limit has been reached. Then the sender can go on sending, again hoping that the data will be acknowledged before the limit is reached.
For cable and DSL modems, the data rate is so high and the cross-country travel times so long that a considerable amount of data can be “in flight” before an acknowledgment could possibly be returned. So, to get the maximum use of your DSL or cable connection, you must tell Windows to make the limit larger than normal for a LAN connection.
This limit, called the receive window, should be larger than the data rate times the roundtrip time for data traveling back and forth between the two computers. This number is the maximum amount of data “in flight.” A typical round trip time is .100 seconds for interstate Internet traffic, so for various data rates, the receive window should be at least
At 100Kbps * 0.100 sec /bits per byte | = 1.2KB |
500Kbps | 6KB |
1.5Mbps | 19KB |
4Mbps | 75KB |
The default value used by Windows 9x, NT, and 2000 is only about 4KB! This means that Windows sends or lets a remote server send only 4KB and then sits and waits while your high-speed connection sits idle.
Windows 2000 and XP slowly boost the window size all by themselves during long file transfers, but when you're browsing Web pages with lots of small graphic images, they never get a chance to boost the window size enough for you to realize the full potential of your fast connection.
The maximum window size that you can specify in Windows 2000 and XP is greater than 64KB, but 64KB is a practical maximum for DSL or cable service. To set the receive window, you must use the Registry Editor, which is described in Chapter 32, “The Registry.” You must add a Registry value to a key that contains TCP/IP software parameters.
CAUTION
Before adding a Registry value, be sure to read Chapter 32, with its dire warnings about the risks of editing the Registry and its urgings for you to back up the Registry before making a change of this sort.
To set the receive window in Windows XP and 2000, do the following:
Open Registry key HKEY_LOCAL_MACHINESystemCurrentControlSetServicesTcpipParameters.
Select Edit, New, DWORD value, and name it
GlobalMaxTCPWindowSize. Set its value to 20000 (hexadecimal). See Figure 19.23 to see this entry in the Registry Editor.

You must restart your computer for the setting to take effect.