In this chapter
Note
→ If you're only upgrading to SP2 and have already installed XP, be sure to check Appendixes A and B, which cover SP2 upgrades.
This chapter describes the variety of installation options available for Windows XP Professional. Even if your system is already installed, you might be interested in reading through this chapter for some helpful information about dual-booting various operating systems and working with multiple formats of disk partitions (FAT, FAT32, and NTFS). For information on partitions, see the “Disk Partitioning Tips” later this chapter.
Due to improvements and standardization in user interfaces and to Microsoft-imposed installation procedures for Windows programs, setup of application programs nowadays is typically a piece of cake and self-explanatory. Likewise, installation of all newer Windows versions has grown increasingly automated. Installing Windows XP is usually a fairly simple process, but it will take an hour or more to complete.
This chapter covers the installation issues you will need to ponder under different scenarios. I'll walk you through a typical installation, but if you've installed any Windows product since Windows 98 you shouldn't be surprised by anything. I'll also describe the basic decision tree you'll have to mull over before committing to Windows XP and the path you'll follow to get it up and running. Along the way, I'll discuss why you might make one choice over another and what to do when the process goes awry.
There are two primary installation scenarios: clean installation or upgrade installation. A clean installation is performed onto a new/formatted empty hard drive or to overwrite an existing OS. An upgrade installation retains existing settings and applications. In addition to the type of installation to perform, you must also address the issues of multi-booting and selecting a file system.
I'll tell you what to expect when upgrading. Look for the section that applies to you. Also, check the general discussions about dual-booting and upgrading your file system because they apply in all cases. You'll find a more in-depth discussion of multi-booting in Chapter 31, “Multibooting Windows XP with Other Operating Systems.”
NOTE
In addition to this chapter, you should also read two informative text files found on the Windows XP CD. The first is the file Read1st.txt, which you'll find on the root directory of the CD. This file contains last-minute installation information Microsoft didn't publish until it released the final version of Windows XP. The second is the file PRO1.txt, which is found in the SETUPTXT folder of the CD. This file contains detailed release notes covering topics such as installation, customization, and startup.
As mentioned in Chapter 1, “Introducing Windows XP Professional,” Windows XP also supports installation capabilities attractive to the IS professional, such as push installations and automated installations that require no user intervention. For more information about these kinds of sophisticated deployment processes and automated installation tools, you should seek the aid of Microsoft's Windows XP Resource Kit. There, you'll find instructions for creating automated installation scripts. I've provided a short overview of automated installations at the end of this chapter.
Let's talk about installing Windows XP. The next major question you must ask is whether to upgrade from an existing operating system or install fresh. Windows XP Professional supports upgrading from the following operating systems:
Windows 98, OSR2, Second Edition (SE), Millennium Edition (Me)
Windows NT 4.0 Workstation (with Service Packs)
Windows 2000 Professional (with Service Packs)
If your system is running any other OS not included in this list (such as Windows 95, Windows NT Server, Windows 2000 Server, or even Windows 3.x), you must perform a clean install. Clean installs do not retain any settings or applications. All settings must be re-configured and all applications must be re-installed after the clean installation of Windows XP is complete.
Most Windows veterans know by now that doing a fresh installation is usually the most beneficial approach in the long run, even though it means more work up front installing applications and reentering personal settings, remote access and networking details, and so forth. You probably have some seat-of-the-pants experiences with Windows operating systems becoming polluted over time by wacko applications that mysteriously trash the Registry or erase or overwrite important files, like .DLL files, that Windows needs to operate properly.
With a clean installation, such worries are forgotten. It's like selling off that lemon of a car you've been wrestling with for the last five years. And yes, you'll lose lots of settings that are annoying to input again, such as Internet dial-up and TCP/IP settings, email accounts, address books, and so forth. You should attempt to back up as much important data as you can, such as your address books, email, personal documents, and so on, before performing a clean installation over an existing OS. Windows XP is somewhat self-healing. Because system files and DLLs are protected against trampling, you're going to have a more sturdy system in the long run anyway. If your system is acting a little wonky already anyway (unexpected crashes, for example), it's better to do a clean installation. A clean installation will reformat your boot partition (that's the one where Windows lives) and will just edit your system partition (that's the one that boots the system and displays the boot menu). In those cases where the boot and system partitions are the same, the partition will be reformatted.
When you choose to upgrade over an existing operating system, you also run the possibility that some applications won't work properly afterward because they aren't fully compatible with Windows XP. Fortunately, Windows XP is even more backward-compatible than Windows 2000, especially with its Windows Compatibility Mode.
NOTE
Windows Compatibility Mode is a nifty feature that enables Windows XP to support a wider range of software products than Windows 95 and Windows NT combined. A compatibility mode is simply a designation for a software platform emulation environment. In other words, when an application is launched with compatibility mode enabled, a virtual machine representing that application's native environment (Windows 95, Windows 98, Windows NT, or Windows 2000) is created in such a way that the application is fooled into thinking that it is the only application present on the computer system running its preferred OS. More details on working with applications is discussed in Chapter 23, “Tweaking the GUI.” By the way, for DOS executables the Properties dialog box is much different than for those of Windows executables. To learn more about tweaking the DOS environment, see “Configuring the Program Environment” in Chapter 25.
Table 3.1 compares performing a clean installation versus upgrading your existing Windows installation.
Table 3.1. Clean Installation Versus Upgrading
Perform a New Installation When You Can Answer “Yes” to Any of the Following: | Consider Upgrading When You Can Answer “Yes” to All the Following: |
|---|---|
You've just purchased a new hard disk or reformatted it. | Your current operating system supports upgrading. |
The operating system you have on your computer isn't among those on the upgrade list. | You want to fully replace your previous Windows operating system with Windows XP. |
Your computer has an operating system already, but you're ready to kill it and startfresh with Windows XP. | You want to keep your existing files and preferences. |
You want to create a dual-boot configuration with Windows XP and your current system. (Note that Microsoft recommends using two partitions to do so.) | You're ready to chance that in some rare cases, applications or hardware won't immediately work as they did under the old operating system. |
NOTE
In any case, installing a “new” or “clean” version of Windows XP does not mean that the drive on which you are installing XP will be reformatted. The XP installer won't format the drive unless you direct it to do so. You can place a new or clean Windows XP installation on a drive (in this case, we'll assume it's the C: drive) even if the C: drive already has Windows 98 installed on it. To do this, install XP in a different directory. When the XP installation is complete, delete Windows 98, because running two operating systems in the same partition is not recommended. Ideally, however, if you plan to keep your original operating system intact, you'll want to install XP into another partition.
In addition to the upgrade/fresh installation issue, you also must consider the dual or multi-boot issue. Dual-booting is a scheme that lets you keep your old operating system and install Windows XP as a clean installation. Windows XP can be installed onto any hard disk volume or partition within a computer; it is not limited or restricted to drive C as is Windows 9x. Thus, by adding a new hard drive and installing Windows XP onto it, you'll retain your original, pre-existing OS. When you boot up, you are given a choice of operating system to start.
NOTE
Notice in this book that we use the term “dual-booting” often. This usually refers to having only two OSes on the same system. We use this term since most multiple OS scenarios employ only two OSes. But we could have just as easily substituted the term “multi-booting” to include those systems with two or more OSes. So, when you see “dual-booting” don't limit your thinking to only two OSes.
Windows XP officially supports dual-booting with any Microsoft Windows operating systems as well as MS-DOS and OS/2. You can multi-boot almost any OS that uses FAT or NTFS file systems on the boot drive. That includes Linux (notice that Microsoft doesn't tout that feature loudly?). With the aid of third-party partition managers, you are able to multi-boot Windows XP with any OS in existence.
NOTE
Third-party partition or multi-boot managers include PartitionMagic from Power Quest (http://www.symantec.com/partitionmagic/) and System Commander from V Communications (www.v-com.com).
There are lots of reasons for setting up a dual- or multi-booting computer, especially if you are in the business of testing computers or you run a wide variety of software and hardware on your computers. Personally, of the five computers in my office, four of them are dual-booting. The following are a few thoughts about dual-booting that you might want to consider before making the decision:
I multi-boot on a couple of my machines because I run lots of Windows tools, hardware-specific programs like video editing programs, CD-writers or rewriters, and so on. Also, I'm always testing new programs. No matter how much I would prefer to run just a single operating system, sometimes I need to run other versions of Windows to get a driver or some application to work. So, it makes sense for me to multi-boot.
If you're a gamer, chances are you need MS-DOS, Windows 9x, or Windows 2000 just to get certain games to run or even some joysticks or control devices. Most games will function under Windows XP, but you may discover a few cases where things are not exactly as you'd expect. If you can't live without a game, then create a multi-boot system including the alternate OS needed for your game-du-jour. For the full scoop on compatibility with your favorite games, check with some gaming magazines or the makers of the games in question. Configuring game controllers is covered in Chapter 24, “Configuration via Control Panel Applets.”
If you're regularly testing or running lots of different kinds of software and own an abundance of hardware, or you're a new hardware junkie like me, being stuck with just a single operating system is like being in jail. Choose to multi-boot, even though this choice can cause some headaches, as described in the following section.
If you have doubts about compatibility with your hardware or software and don't want to jeopardize your existing operating system, use a dual-boot arrangement for a while and see what you think. If you become confident that XP is going to work for you, you can either perform an upgrade installation over your existing operating system or move over into using XP only. (That is, you can migrate your data and applications into your XP setup.) If you decide to upgrade over your old OS rather than migrate into the clean XP, you can then remove the clean XP test system to free up disk space. If you decide XP doesn't cut the mustard, you can remove it. Regardless of how you do the eventual upgrade, this kind of approach gives you the time to test things out. You'll eventually end up with a single OS in the long run, one you're happy with.
TIP
There is an alternative to dual- or multi-booting that makes installing multiple OSes on your computer easier, although not quite as quick or responsive. A program called Virtual PC lets you install and run multiple operating systems at the same time. One host operating system runs the secondary operating systems within it. For example, you could have Windows Me be the host to run Windows XP. You boot up Windows Me, run the Virtual PC program, and then tell Virtual PC to boot up Windows XP. You end up having Windows Me and Windows XP running at the same time. It's pretty impressive. Use of virtual computers is covered in Chapter 31.
Dual or multi-booting isn't always as simple or attractive as it might seem at first. You must understand the limitations and requirements of making your computer a home for more than one operating system. Operating systems are, for the most part, egotistical and stingy. They don't always coexist on the same computer peaceably. Therefore, you should be aware of a few points before deciding to dual-boot your machine:
You must reinstall many applications, particularly ones that make Registry entries, such as Office, or ones that put portions of themselves (for example, DLL files) in the operating system directory. You must run the Setup routines for each such program once for each operating system. Your applications should still work in both environments, and contrary to what you might think, you don't have to duplicate all the files on disk if you install them into the same directories under each operating system. Still, you must go through the process of installation again.
Some applications that run in both environments just don't behave properly or cooperate as you would hope. This is especially true of ones that share the same data files or futz with the Registry. If a program itself tweaks the Registry or alerts your data files to what operating system has been working with it, and then you reboot in the other operating system (each operating system has its own Registry files, remember), unexpected incompatibilities can crop up.
Any application that relies on the operating systems' rights settings, user identities, or multiple profiles will likely not interrelate properly between the operating systems. As you probably know, Windows XP, Windows 98/SE/Me, Windows NT, and Windows 2000 can be set up with multiple-user settings stored on the same machine. Applications that take advantage of these settings often store individual settings in the Registry and in folders such as Windowsprofiles or C:Windowsapplication data or, in the case of Windows 2000 and Windows XP, C:Documents and Settings. In any case, because applications sometimes look to the operating system for information about a user's individual settings, whether it's gleaned from the Registry or user-specific folders such as the Desktop folder, things can go mighty awry if you're hoping to run certain applications under either operating system, and you're not a bit crafty. One way to live with this situation is to focus on using one operating system and use the other only when some application or hardware refuses to run in your primary OS.
Upgrading to Windows XP pulls in all (or as much as possible) of the preexisting settings, such as email accounts, LAN settings and dial-up connections, machine user accounts, and so on. If you dual-boot, you have to create them from scratch for the new operating system.
Security is a biggie. Is security an issue for you? Do you need to keep prying eyes at bay? Unless you're going to set up a separate partition or drive with NTFS and encryption on it, you're increasing the chances of security breaches by dual-booting. Drive, volume, partition, and file security are minimal under any OS using FAT16 or FAT32 partitions (including Windows 9x/Me), since these can be altered by anyone who can boot the system in DOS or a DOS-based operating system. If you want to dual-boot and still have some decent security, then you should install Windows XP on a second drive, formatted in NTFS; alternatively, you can create an NTFS partition on your main drive and install into it. Use the NTFS partition for your Windows XP files and encrypt sensitive data files. When installing, you are given the option of converting to NTFS. (Encryption can be performed after Windows XP is installed.)
Note
→ To learn more details about file and folder encryption, see “Encryption,” p. 1128.
The only Microsoft operating systems that read NTFS partitions are Windows NT, Windows 2000, and Windows XP. If you want to multi-boot and gain the advantages of NTFS, remember that you can't access any data files on the NTFS partitions when you're running DOS, Windows 3.x, or Windows 9x/SE/Me. (Linux, however, can read and write to NTFS partitions.)
If, after reading the pros and cons, you think you want to set up a dual-boot system, consider the following precautions in addition to those listed previously. This part is going to take a little studying, so put on your thinking cap.
Although it's possible to install multiple OSes into the same partition on your hard drive, don't do it. However, many of the Windows operating systems, specifically Windows 95 and 98/SE/Me as well as Windows 2000 and Windows XP share similar common directory names (such as Windows, Program Files, and Documents and Settings). Installing a new OS into the same partition as an existing OS runs the risk of overwriting important files. This is true, even if you select to use a different primary folder name. I highly recommend installing each OS into its own partition (with the possible exception of DOS). You make this choice when installing Windows XP through the “advanced” options during the initial phase of setup. Most other OSes (especially Windows NT and Windows 2000) offer similar options.
Microsoft doesn't suggest mixing file systems in dual-boot arrangements because it complicates matters. To quote the documentation, “…such a configuration introduces additional complexity into the choice of file systems.” Microsoft's warning is probably just an admonition against burdening the operating system and your applications with multiple file systems and multiple operating systems on the same machine. Admittedly, mixing them does complicate things. If you want to play it safe, go with the lowest common denominator of file systems for the operating systems you're installing. Typically, it is FAT or FAT32. (See the “Choosing a File System: FAT, FAT32, or NTFS?” section later in this chapter.)
Installation order is important in some cases. To set up a dual-boot configuration between MS-DOS/Windows 3.x or Windows 95 with Windows XP, you should install Windows XP last. Otherwise, important files needed to start Windows XP could be overwritten by the other operating systems. For dual-booting between Windows 98/SE/Me, Windows NT, Windows 2000, and Windows XP, installation order is irrelevant.
To set up a dual-boot configuration between MS-DOS/Windows 3.x or Windows 95 with Windows XP, the primary partition (that is, the one you boot from) must be formatted as FAT. If you're dual-booting Windows 95 OSR2, Windows 98, Windows NT, or Windows 2000 with Windows XP, the primary partition must be FAT or FAT32, not NTFS. These two rules make sense because, without third-party drivers, Windows 9x/SE/Me can't read or exist with NTFS, and Windows 95 can't read either NTFS or FAT32.
There is more than one version of NTFS. Windows XP and Windows 2000 both use NTFS v5. Windows NT 4.0 right out of the box uses NTFS v4. But Windows NT 4.0 can be upgraded to use NTFS v5 by installing Service Pack 4. This becomes important when you attempt to dual-boot with Windows NT 4.0 (without Service Pack 4) and Window XP. The NT OS will be unable to access files on the Windows XP NTFS formatted partitions. Your only options are to apply SP4 to NT or use FAT.
You can install Windows XP on a compressed drive if that drive was compressed using the NTFS disk compression utility, but not if made with DoubleSpace or DriveSpace or some other disk compressor such as Stacker. If you're going to dual-boot with Windows 9x, remember that Windows XP Professional won't see the compressed DoubleSpace and DriveSpace partitions, and any NTFS partitions, compressed or not, will be invisible to Windows 9x without third-party drivers.
Sometimes an operating system reconfigures your hardware through software settings. Suppose you install some new hardware and run Windows 98. That operating system will detect it and might do some software setting on the hardware that works with Windows 98 but which conflicts with Windows XP. This problem should be rare because most hardware these days is Plug and Play-compatible and should be configurable on-the-fly as the operating system boots up. But be aware of the possibility. A good example is that two operating systems might have different video display drivers for the same video adapter, causing you to have to manually adjust the screen size and orientation when you switch between them.
You must follow some weird rules when dual-booting Windows NT (3 or 4) and Windows XP. Mostly, they have bearing on which file systems you can use. For folks testing Windows XP while keeping the tried and true Windows NT 4 around, they can pose a bit of an annoyance. Here's the list:
You should upgrade to at least NT 4.0 Service Pack 4 if you want to dual-boot with Windows XP sharing NTFS partitions. Upgrade first and then install Windows XP; or your NT 4 system will not boot.
Computers dual-booting Windows NT and Windows XP must have different computer names under each boot configuration if the computers are connected to an NT domain. Otherwise, the domain controller is given conflicting information about the workstation, and it deals with these two types of workstations in slightly different ways (for example, security tokens).
NOTE
Dual-booting with Windows 2000 does not encounter these issues since it shares the same version of NTFS that Windows XP uses. For more detailed information about configuring your computer to dual-boot, see Chapter 31, which is devoted to this topic.
The next major consideration on the pre-installation agenda is determining what type of file system you intend to use. The rules and regulations discussed in the preceding section might have narrowed down this choice for you. Still, you'll likely want to read about the pros and cons of the various file-keeping schemes in use on Windows XP machines and consider a few details on how they influence your installation.
NOTE
Windows XP doesn't know about compressed drives such as those created with DriveSpace or DoubleSpace. You have to decompress them before installing to Windows XP. Decompressing is a real pain if your disk space is totally packed (because as your files decompress, they fill up even more space on an already cramped drive). You might have to decompress in stages, moving data off the hard disk to backup media or another drive.
As mentioned in the preceding sections on dual-booting Windows XP and a second operating system, it's a good idea to think about what file system you're going to use, preferably before installing Windows XP. Although you can use utilities in Windows XP and external utilities such as PartitionMagic to convert partitions between file systems after the fact, forethought and advance partition preparation are the better path. Let's do a little review of file systems you can use and advantages of each.
A file system is a scheme by which data files and directories (folders) are stored and retrieved on a floppy disk or hard disk. Tape and other media have file systems as well, but here I'm talking only about hard disks. Windows XP supports three file systems: the NT File System (NTFS) or one of the file allocation table file systems (FAT or FAT32).
In the beginning, there was FAT, and it was good. FAT is the system that DOS uses; it's been around for a long time, since the early '80s. FAT stands for File Allocation Table. A file allocation table is basically a table of contents of the disk that the operating system uses to look up the location of a file, even if the file is broken up in pieces (sectors) scattered across the disk's surface. The FAT scheme brought relatively simple, reliable, and efficient floppy and small hard disk storage to the PC. It's also the scheme that, unlike the Macintosh file system, brought the confining 8.3 file-naming convention that many of us learned to live with and hate. For example, myletter.doc is an example of the longest-possible 8.3 filename.
When NT 3.x appeared, it included NTFS as an acknowledgment of the shortcomings of the FAT system, including a hard drive partition size limit of 2 gigabytes (GB). NTFS provided long filenames, more security and fault tolerance, better disk compression, support for hard disks up to 2 terabytes (that's big), and support for advanced multiple-disk arrangements such as striping and mirroring (RAID). Also, as drives become larger, efficiency of disk storage doesn't fall off under NTFS as it does with FAT.
Windows 95 brought long filenames to FAT through some sleight of hand, but still the system was not good at dealing with the newer large drives and wasted a bunch of space on them when it stored tiny files. So, to both provide good backward compatibility with FAT disks and still offer support for large drives, Windows 95 OSR2 and Windows 98 both included a new file system called FAT32. Essentially a beefed up FAT file system, FAT32 isn't as robust as NTFS, and it's not compatible with NTFS. The FAT32 system eliminated the 2GB upper limit on partition size support (it also can run as high as 2TB) and increased effective storage capacity by lowering the cluster size on large drives. NT 4 can't read or work with FAT32, nor can DOS and Windows 3.x. However, both Windows 2000 and Windows XP support FAT32.
NOTE
Clusters are the smallest amount of space that can be used to store information on a hard disk. On smallish drives, the cluster size is also pretty small, so storing dinky files that are only, say, 1KB in size is pretty efficient (there is little wasted space). But on today's huge drives, under the FAT scheme, the cluster would necessarily be much larger (this is a limitation of the FAT system, not the drive). You end up donating serious amounts of space to no good cause. The bottom line is that FAT32 and NTFS get you more bang for your hard disk buck, because lowering the cluster size allows for more efficient use of space, especially on larger drives.
The bottom line? As with Windows NT and Windows 2000, NTFS is the recommended file system for use with Windows XP. NTFS v5 has all the basic capabilities of FAT as well as all the advantages of FAT32 file systems. The weird thing is that now you have to think about three different file systems when considering dual-booting. When you consider that you have at least nine Microsoft operating systems to choose from and three file systems, the combinations get complex. Therefore, understanding the limitations of each is important.
TIP
You can convert an existing partition to NTFS during setup, but if you want to wait, you can convert it later by using a command-line utility called convert.exe (see “Convert” in Chapter 29). Another approach is to use PartitionMagic, which is discussed later in this chapter.
One of the prime points to remember is that if you're dual-booting, only Windows NT, Windows 2000, and Windows XP systems can read NTFS partitions. If you don't care about accessing the NTFS partition from, say, Windows 98, this is not a big deal. It simply does not appear in Windows Explorer and is not available from your applications. This is the main reason Microsoft doesn't want you to mix file systems; it simply confuses people.
When you're running partitions larger than 32GB, you should really format them as NTFS. If you choose to use FAT, anything over 2GB should be formatted FAT32.
NOTE
File systems are terribly complex and a subject far beyond what I can cover in a Windows book. For the most part, you don't need to know more than what is presented here, unless you are naturally inclined to learn everything you can about complex topics (don't worry, you are not alone). In that case, I recommend that you pick up a copy of Upgrading and Repairing PCs, 16th Edition, by Scott Mueller (also published by Que).
In case you don't know, disk partitioning is a scheme by which you can have a single hard disk look like multiple hard disks to the operating system. If you partition a disk into, say, two partitions, the operating system displays disks C and D rather than just C. You split up the space on the drive between the partitions based on your needs.
One of the most notable needs for disk partitioning was to accommodate operating systems that imposed limitations on the size of partitions. As hard disks grew in size, partitioning was required in order to use the entire disk. Because FAT had a limitation of 2GB, users relied on partitioning or other software driver schemes to get around this imposed top end. Another common reason for partitioning is for running dissimilar operating systems, ones that cannot read from or write to a common file system. Because each partition can have its own disk format, this could often circumambulate such requirements. One partition could be FAT, another NTFS, and another HPFS (for OS/2), and so on. Any hard disk can contain up to four primary partitions.
Only primary partitions can be marked active. An active primary partition is where the computer's BIOS looks for a bootable operating system when powered on. In addition to primary partitions, there are extended partitions. A system can have up to four primary partitions or a maximum of three primary partitions and a single extended partition. The extended partition is a bit different than a primary partition. First, extended partitions cannot be marked active. Second, extended partitions must be divided into logical drives. Only primary partitions and logical drives can be formatted and assigned a drive letter. The total number of primary partitions plus logical drives cannot exceed 32 for a single hard drive.
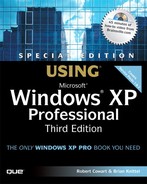
For examples of these issues, see Figure 3.1. Disk 0 has a single primary partition (C), and an extended partition. The extended partition contains two logical drives (D and G) and 1.86GB of free space. The extended partition is highlighted with a thick border; that's how you distinguish it from primary partitions. This extended partition could contain another 29 logical drives before reaching the 32 division maximum per drive. Disk 1 consists of a single primary partition (F) and 15.11GB of free space. This free space could be used to create up to 3 additional primary partitions, or up to 2 additional primary partitions and an extended partition containing logical drives. Drive 2 consists of a single primary partition (E).
In most cases, you'll rarely need to divide a drive into more than 4 sections. And then, that may only occur when you need to divide a large drive into FAT partitions (because each partition cannot be larger than 2GB). The tools you use to create partitions will manage the division classification for you. If you use FDISK, you'll be a bit more aware of the presence of extended partitions and logical drives. If you use the Windows NT, Windows 2000, or Windows XP drive tools (such as the Disk Management tool) you'll see extended partitions and logical drives labeled, but the OS manages when these need to be created.
Some people use partitions for dividing up their data rather than for accommodating different file systems. You might want a partition to organize information—for example, one for backup data, one for documents and data files, one for applications only, or for the operating system only. Then you can more easily design your backup strategy.
NOTE
When you do a new installation of Windows XP, the Setup program looks around and automatically selects an appropriate disk partition as the destination based on size and format. You can override the choice by clicking the Advanced Options button during Setup, though.
If you're going to dual-boot, you should install on a separate partition. Either create one or use one that is already present. The reason for using a separate partition for each operating system is to prevent Setup from overwriting important files belonging to the other operating system. If you have unpartitioned (different from unused) space on your disk, Setup can create a partition during installation.
If you intend to dual-boot Windows 9x and Windows XP, Windows 9x should be on the first partition. In general computer terms, this means the boot drive. In Windows NT speak, this is the system partition.
Note
→ If you're considering creating a system that is bootable in more than one operating system, see “Dual-Booting Versus Single Booting,” p. 81.
The exact options you have during Setup change depending on your existing hard disk configuration. You might have as many as four options when partitioning your hard disk:
If you have adequate unpartitioned space, you can create a new Windows XP partition in that space and install Windows XP in it.
If the hard disk is unpartitioned (no partitions at all—freshly formatted) you can create and size the Windows XP partition.
If the disk does have an existing partition, but you don't care what's in it, Setup lets you delete the partition and create a new one of your chosen format for installing Windows XP. Beware, though; deleting an existing partition destroys every file on the partition.
If the existing partition is large enough, it's actually possible to put Windows XP on it. Contrary to what the Microsoft documentation says, installing on an existing partition doesn't overwrite all data on that partition. If you choose a directory separate from the existing operating system (for example, install into C:winxp), Setup leaves any existing C:windows directory alone. But don't forget, the Program Files and Documents and Settings folders may be altered by the new OS so that the pre-existing OS can't access the data stored there. Things can get kind of funky with other possible file collisions, too. You can dual-boot, but you might have to reinstall your applications. The better approach is to play it safe and create a new partition to install into.
TIP
Don't even try to install Windows XP on a partition that is less than 3GB. Although Windows XP only requires 1.5GB (only!), I think creating a 3GB partition is more reasonable. If you are upgrading you'll need an extra 300MB to store the recovery files. You'll want (and need) the additional free space later for future additions and modifications to the operating system.
This section lists a few ridiculous warnings and limitations—ridiculous because these steps are not required if you use PartitionMagic. Due to limitations of Setup and Microsoft's supplied disk tools (FDISK, for example), you should be aware of these issues. First, most conversions between file systems are multi-step processes involving backing up and then restoring the partitions after reformatting.
For example, although converting to NTFS during installation is easy, if you change your mind and want to revert to FAT, you have to back up all your files on the NTFS partition, reformat the partition as FAT (which erases all the files), and then restore the files from backup. The same is true of converting a FAT partition to FAT32. One workaround is to use the FAT32 converter in Windows 98 or 95 OSR2. Each of these operating systems has a tool that performs such a conversion quite easily.
Second, you can't restore an NTFS v4 (file system from NT 4) partition after you convert it to NTFS v5 (file system from Windows XP, Windows 2000, and Windows NT 4.0 SP4+). There's no easy way out on that score. There is support for NTFS v5 file formats via tools like PartitionMagic to do this, though.
As part of the installation procedure, you are asked details about your network connection (assuming you're going to run the computer in question on a local area network; if it's not, just skip over this part).
You must supply the following information:
Is the computer going to join a domain or a workgroup? You can answer Workgroup if you don't know and later change to a domain. Ask someone who knows. If you select the Domain option, you'll have to ask your network administrator to create a new computer account to allow you to join that domain or to edit your existing account to reflect the new computer name.
Note
→ To learn more information about networking settings, see “Setting Your Computer Identification,” p. 598, and “Adding Network Clients, Services, and Protocols,” p. 592.
NOTE
A computer account is a specific type of account that a Windows NT, Windows 2000 Server, or .NET Server administrator makes to allow a given computer to join the domain. In a domain, both computers and users have accounts on the server. A domain client is a system that is a member of a centrally controlled and secured network environment.
Are you already part of a network? If so, collect the following information, scribble it down on a piece of paper, and keep the paper handy:
Name of your computer
Name of the workgroup or domain
IP address (if your network doesn't have a DHCP server)
Okay, so you're ready to do the installation. Need I say it? If you're upgrading from a previous version, Setup is supposed to let you back out and restore your system to its previous state if you panic in the middle. I've actually backed out of Setup a few times successfully, but that doesn't mean it will always work. Setup does lots of stuff to your operating system and hard disk files, and particularly if it bombs halfway through the process, things could get sticky. So ask yourself, “Do I have important data on my computer?” If so, back it up before you start your installation. Can you afford the downtime incurred should you need to reinstall your applications and operating system? If not, back them up, too.
Windows XP does bring a new feature to the table when you are upgrading from Windows 9x/SE/Me. This new feature is the ability to uninstall Windows XP and return to the previous OS. During the initial stages of the upgrade installation, a complete backup of the existing 9x OS is created (about 300MB of stuff). This backup is performed automatically to protect users. There are advanced command-line startup options that can be used to disable this activity, but if you are smart enough to figure out how to do that, you are smart enough to make your own backup. Plus, this backup feature not only allows you to roll back but it protects you during installation. If the upgrade install fails, the system will return to the previous OS automatically. After about 60 days or so, you will be prompted whether to retain or delete this backup archive of the previous OS. This backup procedure consumes about 300MB of space, so if your destination partition does not have around 1GB of free space the Setup routine will terminate before even getting started. This backup protection is only used for Windows 9x/SE/Me; it is not available for upgrades from Windows NT or Windows 2000.
If you must back up data only and don't care about reinstalling your applications or operating system (this backup approach is easier, of course), you can use some backup program or you can simply copy the files onto other drives using Windows Explorer or some other utility. How you back up your files depends on your current operating system. If you're running Windows 9x/SE/Me/NT/2000, one obvious approach is to employ the Windows Backup program (by choosing Start, Programs, Accessories, System Tools, Backup). You might have to install it if it's not there. To do so, open the Control Panel, choose Add/Remove Programs, and then select Windows Setup. Remember, in Windows NT, you need a tape drive installed for the Backup tool to work. All other Windows versions of Backup can store the backup files to any writable media. If you're in doubt about the use of the Backup program, check the Windows Help system.
Note
→ To learn more details about backup strategies, see “Backup Tools and Strategies,” p. 1142.
Okay, enough for the safety speech. You are old enough to know whether you put on your parachute before you jump out of the plane.
The three basic types of clean installation procedures are as follows:
Install on a brand new disk or computer system
Erase the disk, format it, and install
Install into a new directory for dual-booting (see the multi-boot discussion earlier in this chapter)
If you intend to use either of the first two methods, make sure you are equipped to boot your computer from the CD-ROM. Most of today's breeds of computers support booting from the CD-ROM drive. Doing so might require changing the drive boot order in the BIOS or CMOS, but try it first without. With no floppy disk inserted and a clean hard disk, the CD-ROM drive should be tried next. The Windows XP CD-ROM is bootable and should run the Setup program automatically.
The Windows XP setup procedure can also be launched using the five setup boot floppies. On an older computer, you might have to ensure you can boot into DOS from a floppy. People preparing to set up Windows on older computers often overlook this point. They wipe the hard disk and then boot up with a floppy only to find the CD-ROM drive isn't recognized, so they can't run the Setup program on the CD. If you have the boot floppy for Windows XP, your CD-ROM drive will mostly likely be recognized upon booting, assuming your CD-ROM drive is among those supported. If you have misplaced your floppies or they were not included with your Windows XP CD, check out the “Making Replacement Startup Floppies” section later this chapter.
Note
→ If you can't get DOS to recognize your CD-ROM drive, see “My Existing OS Won't Recognize the CD-ROM Drive” in the “Troubleshooting” section at the end of this chapter.
NOTE
Remember to check Chapter 2, “Getting Your Hardware and Software Ready for Windows XP,” to ensure that your hardware components meet the minimum requirements to run Windows XP.
Installation takes 60–90 minutes depending on the speed of your machine. Refer to the following sections if you have questions about the steps of the process. The process is fairly similar for each category of installation, with the addition of the software compatibility report when you're upgrading from an older operating system.
If you're installing into an empty partition, and you can boot an operating system that is supported for the purpose of Setup (Windows 9x/SE/Me/NT/2000), just boot up, insert the CD, and choose Install Windows XP from the resulting dialog box. Then, you can follow the installation step-by-step procedure below.
If Windows doesn't automatically detect the CD when you insert it, you must run the Setup program, setup.exe, manually from the Start, Run dialog box. Once the Setup routine has started, you can follow the installation step-by-step procedure below.
Another method of kick-starting the installation of Windows XP can be performed from any OS which has access to the CD. If the OS is a non-Windows non-32-bit OS, then execute i386winnt.exe. If the existing OS is a 32-bit Windows OS, then execute i386winnt32.exe. If you are able to use the winnt32 launch tool, you can follow the typical installation step-by-step procedure below.
If your computer has a blank hard disk, or your current operating system isn't supported, the process is different. You will need to start the installation by using Setup floppy disks or by booting from the Windows XP CD (this approach works only if your computer is newer, and you can boot from the CD-ROM drive). Setup automatically runs if you boot from the CD-ROM.
Note
→ If you need to create Setup floppy disks, see the “Making Startup Floppies” section later in this chapter.
Yet another setup initiation method involves the network. To initiate a network installation, you must have a network share of the distribution CD or a copy of the CD on a hard drive. The destination system must have network access and the user account must have at least read access to the installation files. Setup is initiated by executing winnt or winnt32 from the network share (the same 16-bit and 32-bit rules apply). For example, from the Start, Run command type a path of \<servername><sharename>i386winnt. Setup will recognize an over-the-network installation and will automatically copy all files from the network share to the local system before the first reboot.
If you used the winnt launch tool, used the boot floppies to initiate setup, or were able to start from a bootable CD your installation varies from the typical installation step-by-step procedure as follows:
A text-only step wizard is launched.
Verify that the displayed path is the correct location of the Windows XP source files. Press Enter.
Setup copies numerous files to the hard drive of the computer; this may take a few minutes. Once complete, the system reboots.
Once the system reboots, the Setup Wizard continues.
Jump to step 15 of the following typical installation step-by-step procedure to continue.
The typical clean installation step-by-step procedure is as follows:
The Windows Setup Wizard appears. Using the Installation Type pull-down list, select New Installation. (Note: Upgrading is discussed later in this chapter.)
Click Next. The License Agreement page appears.
NOTE
Corporate attorneys know that people don't read these software agreements. I've even heard reports of software in which the agreements make you promise not to write a review of the software without alerting the manufacturer first. I'm sure some interesting, precedent-setting cases will occur in upcoming years.
Read the agreement then select the I Accept This Agreement radio button.
Click Next. The Your Product Key page appears.
Type in your 25-digit Product Key.
Click Next. The Setup Options page appears.
Click the Advanced Options button.
Verify that the path for the location of the source files is correct (it should be <cd-rom drive letter>:i386, or if you are installing over a network this would be \<servername><sharename>i386).
If you wish, change the name of the main Windows directory.
To force Setup to duplicate all necessary files to the hard drive before initiating the installation procedure, mark the Copy all installation files from the Setup CD check box.
NOTE
Copying all the Setup files to the hard disk has two advantages. First, you can save yourself some time because the file copying and decompressing process is faster from the hard disk than from a CD-ROM drive. Second, the next time Windows XP needs access to Setup files (when you add new hardware, for example), you won't have to insert the CD-ROM. Just browse to the correct directory. Copying the more than 6,000 files (yes, that's thousand, amounting to about 450MB) from the CD takes about 15 minutes on a reasonably fast system.
To be able to select the partition to install Windows XP into (that is, other than drive C), mark the I Want to Choose the Install Drive Letter and Partition During Setup check box.
Click OK. Click Next. The Performing Dynamic Update page appears.
If your system has Internet access on the pre-existing OS, you can optionally select to download the latest setup files for Windows XP at this time. Mark the Yes radio button. If your system does not currently have Internet access, select No, click Next, and then skip to step 15.
Click Next. The setup routine attempts to contact the Microsoft download site and retrieve any new Setup files. Once this is completed, the setup routine reboots the system automatically.
Once the system reboots, the Welcome to Setup text-only screen prompts you to install Windows XP, repair an existing installation, or exit Setup. Press Enter to continue with setup.
Your drives will be examined and the partition manager is displayed. This tool is used to select the installation partition for Windows XP. If the partition already exists, use the arrow keys to select it, and then skip to step 25.
TIP
If you want to install Windows XP into a separate partition, make sure the partition is preexisting or that you have some unpartitioned space on your hard drive. Sorry to state the obvious, but Setup doesn't let you change the size of existing partitions on-the-fly, even though it does convert from FAT to NTFS and does create NTFS partitions from an unpartitioned space.
If you have a large hard disk all in one partition (typical with today's cheap drives as they come from the factory) and want to split it, use a utility program such as FDISK, NT's Disk Administrator tool, 2000's Computer Management tool, or PartitionMagic (I highly recommend PartitionMagic). If you want to install into an NTFS partition, remember that FDISK can't create NTFS partitions. As a workaround, you either have to convert the target partition to NTFS during or after Setup or use a utility such as PartitionMagic that can make or convert FAT partitions to NTFS. Note that the NTFS partition does not have to be formatted in advance of your running Setup; as long as it exists as a partition, Setup will offer to format it for you.
The main advantage of having multiple partitions on a hard disk these days is to support different file system formats. You can use FAT or FAT32 on one partition to run DOS or Windows 9x, for example, and use an NTFS partition for Windows XP.
TIP
FDISK is often the tool of choice for ex-DOS users when managing drive partitions. This tool works great as long as you are working with all primary partitions or only FAT, FAT32, and OS/2's HPFS. FDISK is not even able to recognize NTFS-formatted extended partitions. So, if you need to delete such a partition, you either need to have access to a Windows NT, Windows 2000, or Windows XP OS on the same system as the hard drive in question, and boot into the setup routines of one of these three OSes to use the text-based partition configuration tool, or use a third party tool. I've already mentioned PartitionMagic, but there is another tool you may want to look at: DELPART. DELPART is a DOS based tool from Windows NT 3.51; you can find it floating around the Internet with a quick search on “delpart”. This tool can delete any and all partitions on a hard drive, thus making way for easy re-partitioning and new OS installation. This is a tool I always keep handy.
If an existing partition must be deleted to create unpartitioned space where you want to install Windows XP, go on to step 18. Otherwise, skip to step 21.
Use the arrow keys to select the partition to delete, and then press D.
If the selected partition is a system partition, you must press Enter to confirm the deletion of a system partition.
Press L to confirm deletion of the partition. (Yes, this is a valid extra step to make sure you are aware that you are deleting a partition.)
To create a new partition out of unpartitioned space, use the arrow keys to select the unpartitioned space, and then press C.
Type in the size of the partition you wish to create out of the unpartitioned space. The default size listed is the maximum size that can be created. Once you have typed in a number, press Enter.
Use the arrow keys to select the newly created partition.
Press Enter to install Windows XP into the selected partition.
Select the file system to format the partition. If the partition is already properly formatted with NTFS v5, another option of “Leave the current file system intact (no changes)” is available. If this option is available, select it and press Enter. Then skip to step 28.
Use the arrow keys to select the NTFS file system (not the one with (Quick) next to it).
NOTE
By the way, the Quick options for both NTFS and FAT are only there when you are converting or over-formatting a partition which already has been formatted. It's a way to save time, especially if you are formatting a 2GB or larger drive. I recommend staying away from the Quick format and letting the Setup Wizard perform a full format on the destination partition. It will take a little longer, but it will ensure a properly formatted drive.
Note
→ If you want to know more information about deciding whether you should change file systems, see “Choosing a File System: FAT, FAT32, or NTFS?” p. 86. Also, Chapters 29 and 31 contain additional information about file systems and formats.
Press Enter to initiate formatting. The progress of the formatting action is displayed.
When formatting is complete, files are copied to the destination partition. This can take 10 minutes.
When the file copy procedure completes, the system automatically reboots.
After it's rebooted, Setup launches a basic Windows GUI environment. After performing numerous operations (this could take about 10 minutes or more), the Setup Wizard appears displaying the Regional and Language Options page. The defaults are for English and a US keyboard; if you require other settings click on the Customize or Details buttons to change them.
Note
→ If the Windows installer crashes during the installation, see “Windows Crashes During Installation” in the “Troubleshooting” section at the end of this chapter.
Click Next. The Personalize Your Software page appears.
Type in your name and a company name if appropriate.
Click Next. The Computer Name and Administrator Password page appears.
Type in a meaningful computer name for this system in the Computer name field, such as
wxp-181. WXP-181 in my naming convention tells me that the system is running Windows XP and has an IP address of 172.16.1.181. All of the systems on my network use the same first three values in the four part IP address.NOTE
Choose a computer name that is unique. It must differ from any other computer, workgroup, or domain names on the network. You'll probably want to enter your name or a name of your own choosing, though Setup supplies some cryptic name for you. You might want to coordinate naming your computer with your LAN administrator, if you have one.
Type in and confirm a password for the administrator account.
CAUTION
You definitely should assign a password for the administrator account. If you leave this field blank, anyone can get into the system settings by just entering
Administratoras the username and pressing Enter with no password.An Administrator account is set up automatically during each installation, just as in NT/2000. The Administrator account is assigned full rights, allowing the administrator to create user passwords, set up new accounts, and mess with all the computer's settings as a manager. When you specify a password for the administrator, enter it, write it down somewhere safe, and remember it!
Click Next. If you have a modem present on your system, the Modem Dialing Information page appears. Type in your area code, and then click Next.
The Date and Time Settings page appears. Set the date and time and select a time zone.
Click Next. If a network interface is detected, the system installs networking components, and then the Networking Settings page appears. If no network interface is installed in your system, skip to step 46.
If you are connected to a Microsoft network which uses DHCP to assign TCP/IP address configuration settings for clients, select the Typical settings radio button, click Next, and then skip to step 46. DHCP or Dynamic Host Configuration Protocol is a networking service operating from a Windows Server system which can provide clients with IP configuration upon bootup.
If you are connected to a network of any other configuration, select the Custom settings radio button, and then click Next.
NOTE
Select the Custom settings option if you want to manually configure network clients, services, and protocols. But do so only if you're an expert in these matters and know that the typical settings won't cut it. You'll probably be fine with the default settings, and you can change them later if not.
The Networking Components page appears. To alter the TCP/IP settings on this system, click to select the Internet Protocol (TCP/IP) item from the list of components, and then click the Properties button.
The Internet Protocol (TCP/IP) Properties dialog box appears. Select the Use the Following IP Address radio button. Fill in the IP address, subnet mask, and default gateway (if available).
If you need to use DNS, select the Use the Following DNS Server Addresses radio button and fill in the IP addresses of one or two DNS servers.
Click OK. You are returned to the Networking Components page.
Click Next. The Workgroup or Computer Domain page appears.
NOTE
During Setup, you must join either a workgroup or a domain. If your system is a standalone system, you must join a workgroup. If your system is the first or only system within a workgroup, providing a name in the field on the Workgroup or Computer Domain page will create the workgroup. Being a member of a workgroup offers you nothing as a standalone system, but it is still a requirement of setup.
A workgroup is a more casual collection of connected computers than is a domain. Any computer can join a workgroup. To join a workgroup on the LAN, you just supply the workgroup name. All computers set for the same workgroup name can share files, printers, and other resources. The Setup program suggests a name, but if you already have a workgroup in your office, use that name.
A domain is a collection of computers that an administrator creates. Domains offer more security and control than workgroups do. Ask your system administrator if you don't know the domain settings. He or she has to create a computer account for you before you can join the domain. If you're upgrading from Windows NT, your existing computer account is used to identify you. If you have the right privileges already, you can create the account during the Setup process, but you have to enter the username and password that match the entry in the domain controller (server) for the preexisting account. A wizard for Network Identification will walk you through joining a domain. If you run into trouble joining a domain (the network server doesn't allow it), join a workgroup first, and join the domain later.
If this system is not on a network or is a member of a non-domain network, select the No radio button and provide a name of a workgroup. The default name of Workgroup is often sufficient.
If this system is to be a member of a domain, select the Yes radio button and provide the name of the domain.
Click Next.
If you selected to join a domain, you will be prompted for the name and password of an administrator level account within the domain. Provide this information and click OK.
Setup will proceed with installing the OS using the settings you've just provided. This may take 20 minutes or more.
If any issues or problems were encountered during the installation, a pop-up dialog box appears. If you want to view the log file of errors now click Yes. If not, click No. You can always view this information by reading the setuperr.log file later with any text editor, such as Notepad or WordPad.
At this point, the Setup process is complete and the system needs to be rebooted. This may occur automatically or you may be prompted to confirm the reboot.
Window XP is booted, but there are still several steps remaining before you can gain access.
The Welcome to Microsoft Windows XP screen appears, accompanied by an animated wizard. You must wait until it is through “talking” to you. Then, click Next.
Setup checks your system for Internet connectivity. No matter what Setup determines, you must indicate whether the system gains Internet access through a local network (the Yes radio button) or must establish a dial-up connection (the No radio button). I assume you have a cable modem or a connection over a network, so select Yes.
Click Next. The Ready to Activate Windows screen appears.
Unless you have a specific reason not to, select the Yes, Activate Windows Over the Internet Now radio button.
NOTE
In an effort to curb software piracy, Microsoft has implemented a new scheme to prevent unauthorized installations of Windows XP. After installing Windows XP, you must activate it within 30 days. When you activate Windows XP, your product key is filed into a database along with hardware identifiers from your computer. Activation prevents the same product key from being used numerous times. Microsoft claims the hardware identifiers cannot be used to trace a specific computer and that the activation process is fully anonymous. If you fail to activate within the time limit, the system fails to function until activation is completed.
Activation can occur over the telephone if you do not have an Internet connection. The phone numbers to call are listed on the activation screen and in the readme file on the distribution CD.
If you choose to skip activation during setup, an activation command is added to the top of the All Programs list within the Start menu.
Click Next. The Ready to register with Microsoft screen appears.
Unless you want to offer private information to Microsoft, select the No, Not At This Time radio button.
NOTE
Registration is a separate and distinct process from activation. Activation is mandatory for a functioning OS past the 30-day grace period. Registration is voluntary. You should register if you want to get junk snail mail and email from Microsoft, because Microsoft uses this information to focus product marketing.
Click Next. The Will You Be Sharing This Computer with Other Users screen appears.
If you want to maintain unique user accounts for each person who will use this system, select Yes. If you select no, Windows XP is configured to log in automatically with the administrator account each time the computer boots. If you select No, skip to step 64.
NOTE
Selecting not to create unique user accounts for each person does not mean you cannot switch to this in the future. However, if you select No, you must initially log in to the system with the Administrator account. Once you've logged on, you can create other local user accounts or configure the system to log on to a domain and use domain user accounts. Network logon is discussed in Part IV. See Chapter 28 for details on creating user accounts.
Click Next. The Who Will Use This Computer? screen appears.
Type in the names of up to six users for this system, one in each field.
Click Next. The Thank You! page appears; click Finish.
The Windows XP Welcome screen appears with the names of the user accounts created in step 63 listed in a column on the right ready for logon. If you selected No in step 61, you'll be automatically logged on as the administrator and presented the Windows XP desktop.
The final step necessary to complete the installation of Windows XP is to log in. If you don't already know how to log in to Windows XP, jump over to Chapter 4 and check out the “Logging into Windows XP” section.
Note
→ If Windows refuses to boot after the installation is complete, see “Windows XP Fails to Boot After Installation” in the “Troubleshooting” section at the end of this chapter.
NOTE
It is likely that after the final reboot, you will see a Help Protect Your PC dialog box announcing the Windows XP Security Center settings. There are three reasons this dialog is triggered: Windows Firewall isn't turned on; Automatic Updates are not turned on; no anti-virus software is installed.
The dialog will encourage you to set up automatic updates and to install an anti-virus program if it doesn't detect one. Since presumably you just did a clean install, it wouldn't find anti-virus software since no such program comes built into XP. But if you were doing an upgrade to SP2 (see Appendix A for coverage of that issue), or an upgrade from another operating system and you already had anti-virus software installed (and one which XP recognizes), you won't be prompted to act on that score. (See Chapter 24 for coverage of the Security Center.)
If you're upgrading rather than performing a clean installation, the process is a bit different. Setup checks on the advisability of upgrading and asks a few more questions. This section provides a few points concerning the upgrade or dual-boot with preexisting operating systems. The steps included here are for upgrading over Windows 98 SE. Similar steps apply to the other operating systems.
CAUTION
Let me add an additional note about network connections when you're upgrading. If you're upgrading a Windows 9x/SE/Me/NT/2000 system that's a member of a Windows NT or Windows 2000 domain, you must check a few things in advance, or you'll end up wasting some time. Ideally, you should make sure the Windows 9x machine is connected to the domain and working properly because the user profile for the upgraded workstation needs to be stored on the domain controller.
If the domain isn't available during setup, the user's preferences are placed in a local user account on the workstation computer, and you have to copy the profile to the domain profile after joining the domain. So, to avoid that situation, follow these steps:
Ensure that the computer's workgroup is set to the domain you participate in by choosing Start, Settings, Control Panel, Network (on Windows 9x/SE/Me systems). Then select the Identification tab, and verify the workgroup.
Create a computer account on the domain server if it doesn't exist already. The computer must have access to the domain during setup.
Upgrade the system to Windows XP.
If you don't follow these steps, you'll have to copy the profile to the domain later. To do so, choose Control Panel, System, User Profiles, Copy.
To begin the upgrade process, follow these steps:
Start the Setup program as discussed in the clean install section. The Windows Setup Wizard appears. Using the Installation Type pull-down list, select Upgrade.
Click Next. The License Agreement page appears.
Read the agreement then select the I Accept This Agreement radio button.
Click Next. The Your Product Key page appears.
Type in your 25-digit Product Key.
Click Next. The Performing Dynamic Update page appears.
If your system has Internet access from the pre-existing OS, you can optionally select to download the latest setup files for Windows XP at this time. Mark the Yes radio button. If your system does not currently have Internet access, select No, click Next, and then skip to step 9.
Click Next. The Setup routine will attempt to contact the Microsoft download site and retrieve new Setup files.
The Provide Compatible Names page may appear. If you have local names which conflict with existing network names, you'll be prompted to change them. This dialog box automatically provides alternative names by adding a dash and a number to the end of the duplicate. Click Next to accept the suggested changes. You can alter a name change by selecting it in the list and clicking the Change button.
The Network Connection Status page appears. Select the appropriate radio button that matches the network connectivity of this system. The options are: This Computer Is Offline; It Connects Directly to a Local Area network; and It connects to a remote network through a Modem or Other Connection. The default selection represents the status that setup detected from your existing OS. I assume you have direct LAN connection (the middle radio button); select it, and then click Next. If your system is offline or connected through a modem or some other connection, you might see other setup wizard screens prompting for related configuration details.
The Join a Domain page appears. If the current OS is a member of a domain, the default setting of this page will be Yes, Use This Domain with the name of the domain in the text field. If no domain is used by the existing OS, the No, Skip This Step option is selected. You can change the default on this page and even define a different domain to join. I assume you will accept the default of the same domain as the current OS. Click Next.
If a computer account is not already present in the domain for the new OS, Setup prompts you whether to create an account. Click Yes. You must provide the username and password of an Administrative level user account in the domain, and then click OK. You'll need to confirm that the provided user account has permissions to create new computer accounts in the domain; click Yes.
After you supply your product key, Setup creates an upgrade report summarizing everything that might not work with Windows XP and giving you a chance to access update files that hardware or software vendors might have available (check their Web sites). If you don't have upgrade files for the listed items, you might skate by anyway.
The upgrade report is a pretty spiffy HTML-based dialog box that details what might not work anymore if you go ahead with the installation. It has a link to the Windows XP Hardware Compatibility List (HCL) for easily checking to see whether the Brand X video card you just bought really won't work or if the compatibility test was just out of date. Do check the list, assuming your computer is on the Internet.
Although your list might be long, it might not be catastrophic news. Most of the stuff my systems showed didn't end up causing problems. For example, I know that the video card I have is supported, as is the Epson printer. Both were listed as potentially problematic. Most of the other things such as shares, Recycle Bin, backup files, and DOS startup file issues were no big deal. The new operating system takes care of most of these issues, mostly due to Plug and Play and good hardware detection during Setup. Plus, I probably did have some old junk in my AUTOEXEC.BAT and CONFIG.SYS files that's no longer valuable. The DOS exceptions were Sound Blaster drivers that DOS-based games used—the kinds of things that most Windows XP users are not going to worry about.
If you see anything listed about your video card, disk controller, sound card, or tape backup, you might want to check on those items a little more closely and download a driver update pack from the manufacturer before you update. Basically, you should take seriously anything that might suggest incompatibility that will prevent basic operation or bootability of the system, and you can acknowledge but not sweat the rest.
TIP
If you just want to run the upgrade report and not execute the complete Setup program, insert the installation CD in the CD-ROM drive, or connect over the LAN to the CD. If the Welcome to Microsoft Windows XP splash screen appears, click Check System Compatibility, and then Check My System Automatically. Follow the wizard's prompts to perform an upgrade or XP compatibility test. If the splash screen does not appear or you are working from DOS, issue the following command:
winnt32 /checkupgradeonly
This command generates just the report.
You can just follow the rest of the instructions as they come up on the screen. Your computer might have to restart several times in the process. If the computer seems to be stuck, wait several minutes to ensure it's really stopped functioning properly. Then reboot it. Windows XP uses an “intelligent” Setup feature that should restart where it left off. Eventually, after much spinning of the hard disks, the system will boot up into Windows XP. But before you are granted access to the new system, there are still the issues of activation, registration, and user accounts to deal with. Jump to step 54 in the typical clean installation step-by-step (earlier in this chapter), to complete the installation procedure.
Note
→ If Windows refuses to boot after the installation is complete, see “Windows XP Fails to Boot After Installation” in the “Troubleshooting” section at the end of this chapter.
Windows XP Setup can be launched from floppy disks but not by default. Unlike Windows 2000, the Setup CD-ROM does not contain the utility program needed to create setup floppy disks. You can download the utility, makeboot.exe, from the Microsoft Web site at http://support.microsoft.com/default.aspx?scid=kb;EN-US;q310994. Or perhaps more simply, searching the www.support.microsoft.com knowledge base for 310994 yields the same result in case that URL isn't available.
After you've downloaded the appropriate file for your version and language of Windows XP, simply double-click it to begin the diskette creation process. You will need to have six 3 1/2 inch empty, formatted floppy disks ready. You might want to label the first disk Windows XP Setup Boot Disk and the remaining disks Windows XP Setup Disk #2 through #6.
Once you have created your Windows XP Setup disks, you can use them to perform a clean installation of Windows XP only; you cannot use them for performing upgrade installations. The setup disks will load the drivers required to allow you to gain access to your non-bootable CD-ROM so that you can commence the installation of Windows XP.
I tried to install Windows XP, but it crashes while installing.
The trick with any Windows Setup is to get it to complete without crashing or freaking out about some setting you try to make during the process. Hold off doing anything fancy—stuff like network settings, screen savers, video display settings, and so on—until well after you have finished the installation. Just get through the installation as simply as possible, and then poke around and tweak up your settings later.
Note
→ To learn more details about recovering a trashed installation of Windows XP, see “The Recovery Console,” p. 1279.
Windows Setup is intelligent. It keeps tabs on where in the process things stalled. Simply restarting Setup should result in it picking up where it left off. This, at least, is some consolation. Next time around, keep it simple, and get by with as few settings as possible. Just make the necessary ones. Sometimes a machine will hang when you're playing with the Regional settings, language, or something you can easily change later. Also, avoid the Advanced settings if you don't need them.
At a certain stage, Setup switches from character-based screens to graphical screens (GUI mode). If, at this point, Setup crashes, your video display card might not be compatible with Windows XP. Make sure you checked your system's innards against the Hardware Compatibility List. Also, ensure that you meet the minimum requirements in terms of RAM and hard disk space. Most of the causes of installation problems are directly related to non-HCL compliant hardware.
I can't get my existing OS to recognize my CD-ROM drive, so I can't install Windows XP.
The following are a few other workarounds for those weird occasions when you just can't get DOS to recognize your CD-ROM drive:
Create the Setup floppy disks needed to start the installation. See the section “Making Startup Floppies,” earlier in this chapter.
Create an Emergency Startup Disk (ESD) from Windows 98. As of Windows 98, popular CD-ROM drivers are dumped on the ESDs when you create them by choosing Control Panel, Add/Remove Programs, Startup Disk.
Use an old DOS startup disk with installable device drivers for the CD-ROM drive on it as stipulated in the AUTOEXEC.BAT and CONFIG.SYS files on the floppy. Creating such a disk typically takes a little knowledge of MSCDEX command-line arguments, and you need the driver supplied with the CD-ROM drive.
Using your existing operating system or a floppy disk with network client software on it, connect to the network and run Setup from a remote CD-ROM drive. This process can take some work if you have to boot in DOS, however. You must know lots of network settings and use the command line to get them going. Your network administrator might have to tell you the exact path of the
setupcommand. You're looking for the file winnt.exe or winnt32.exe from the i386 directory of the distribution files.Another solution is to copy all the appropriate CD-ROM files to your hard disk one way or another (even lap-linking between two computers is an approach I've used successfully). You need all the files in the root directory of the CD and everything in the I386 folder. When files are on the hard disk, switch to the folder you stored the file in, and run winnt.exe or winnt32.exe.
I got through the installation, but Windows XP won't boot now.
You can take several steps when an installation doesn't seem to have worked out. As I mentioned in the first troubleshooting tip, you can try to determine when Setup failed. If, by observation, you can determine the point at which it failed, you might be able to avoid whatever it was you did the first time around. Restart Setup, and see whether reinstalling will help.
While you're installing again, note that Setup asks whether you want to load any SCSI drivers at a certain point. At about this point, you can opt not to install support for power management. Try opting out of the power management. You can install it later by choosing Control Panel, Add New Hardware. Sometimes power management can cause problems on a machine that doesn't support it correctly, or doesn't support it at all.
Another tip has to do with the hard drive not being detected after installation. This is a pretty obscure problem, but it can happen. How it appears, and the solution are thus: You successfully run the initial phase of the XP install process, but the system can't boot the drive. You might even have noticed that it took a long time to detect it during XP installation. The solution is to jumper the drive as Cable Select (instead of Master). Then you'll be able to boot properly from the drive.
If you intend to install Windows XP on a bevy of computers, answering all of its installation questions repeatedly can prove an exercise in inefficiency. Instead, you can create a special script to automate the process. The Setup Manager Wizard helps you design the script, or you can base yours on the example supplied on the Windows XP CD.
The script you create is called an answer file, and it is used to install Windows XP in so-called unattended mode. In this mode, nobody needs to interact with the computer during installation. The script simply supplies the answers that you would normally have to enter from the keyboard, such as acceptance of the license agreement, workgroup and computer name, network details, and so on. The script can fully automate or only partially automate the Setup process. For example, you might want to supply defaults for the user but let him or her change them. A script can additionally stipulate the creation of special folders, execution of programs upon completion of Setup, location of Setup files, and more.
Of course, creating answer files makes sense only when you're installing Windows XP on multiple computers with a hardware complement that you know will install Windows XP properly; otherwise, you can waste even more time trying to troubleshoot what happened in your absence that caused a failed or broken installation. As you know, sometimes unexpected developments occur during Setup that might require intervention. The Setup routine is fairly successful at detecting hardware when doing installations, so it's worth a try if you're deploying a large number of machines. In most cases, the time spent creating an answer file for automated unattended setup will become cost effective when you must install three or more systems.
Performing unattended setups is a fairly advanced topic. I would need to devote several chapters to it in order to give it reasonable coverage. Instead of listing step-by-step information here, I prefer to point you to the best reference available on the subject—namely Microsoft itself. The Windows XP Resource Kit has complete and exhaustive information about automating installation. Plus, if you check out the text, html, and Word doc files on the distribution CD (don't forget to check the support subdirectory), you'll find a fairly useful description there too.
In addition to the script-based answer file method of installation automation, there is another type of automated install for Windows XP. IntelliMirror for Windows XP (available on the Windows XP Server product) has a tool called RIS or Remote Installation Services. This is a nifty tool that can create clones of existing systems or create new systems from the original distribution files. Clients are installed over the network. The clients are booted using a special NIC or a RIS boot disk. The system image is pushed to the client over the network. The whole process of RIS can be automated so no human interaction is required between powering on the client and logging in after the install completes. RIS is another level of complexity beyond the answer file installation method. Deployment of RIS usually becomes cost effective for 30 or so systems. Complete details about RIS and installing Windows XP is found in the Windows XP and Windows Server 2003 Resource Kits.