In this chapter
Windows XP is rife with system management and administrative utility programs—so many, in fact, that you can easily become overwhelmed by the number of tools and the multitudinous paths for reaching those tools. As writers who have pounded on Windows systems since the days of version 1.1, my co-author and I can easily report that the mandate of effectively discussing the administrator tools for Windows XP was a bit daunting, even to us.
If you're the kind of user who likes to pop the hood, see what's inside, and do a little tinkering, or if you're an administrator who has the job of managing computers in a corporation, this is the chapter for you. You'll want to read through the descriptions of the various tools covered here and learn a bit about how to use them.
So far, you've learned about the basic Control Panel utilities and many of the configuration and maintenance tools and applets. Dividing the tools into clearly delineated chapters was somewhat difficult, as many do not fall neatly into a category. The following is how it all shook out in the end:
Chapter 23, “Tweaking the GUI,” discusses most of the user environment alteration tools, most of which are display or formatting oriented Control Panel applets.
Chapter 24, “Configuration via Control Panel Applets,” discusses a majority of the Control Panel applets not already covered in Chapter 23.
Chapter 25, “Maintaining and Optimizing System Performance,” discusses a number of primarily hardware-related tools.
This chapter discusses the balance of the computer management tools, some of which are very powerful, especially the Microsoft Management Console (MMC), which is a highly customizable toolbox you can build for your own sleuthing purposes. If you did not find a tool you were looking for by skimming the other chapters, it is likely here. See the “Microsoft Management Console (MMC)” section in this chapter or the Windows XP Resource Kit for more information on this tool interface.
If you're a Windows 9x or NT maven, some tools that you are likely familiar with in those interfaces have changed names and locations in Windows XP. But, if you are stepping over from Windows 2000, you'll find things reassuringly familiar. Most of the system-level control tools, with the exception of the System applet, are Microsoft Management Console (MMC) tools.
Table 27.1 describes each of the system management tools. With the exception of the Recovery tool (which is described in Chapter 29, “Managing the Hard Disk”), each of these tools is discussed later in this chapter.
Table 27.1. System Management Tools
Tool | Description |
|---|---|
Task Manager | A tool for killing crashed applications, listing currently running processes, and checking system performance. |
Computer Management | A subset of Microsoft Management Console, for extensive control of the local machine. |
Windows Update | Online tool for ensuring your system is running the latest software additions and bug fixes. |
Scheduled Tasks | |
File Signature Verification tool | A tool that prevents critical system files from being altered. |
System File Checker | A command-line executable that verifies system file versions are aligned properly. |
System Monitor | (a.k.a. Performance) A tool that creates a graphical and/or numeric display of essential system information, such as memory usage, status of the hard disk usage, CPU activity, and network traffic. This tool is discussed in Chapter 25, “Maintaining and Optimizing System Performance.” |
Event Viewer | |
Recovery Console | A tool that attempts to recover a broken or otherwise nonbooting system. This tool is discussed in Chapter 29, “Managing the Hard Disk.” |
System applet | This applet offers access to controls for system name, network membership, hardware management, system restoration, automatic updates, working remotely, and more. |
Local Security Policy | Defines Group Policy for the local system. This item is discussed in Chapter 21, “Network Security.” |
Services | Manages how services are launched within the XP environment. |
System Tools | A section of the Start menu used to access several tools: Files and Settings Transfer Wizard, Backup, Disk Cleanup, Disk Defragmenter, System Restore, Activate Windows, and System Information. |
System Information | This tool provides a detailed view into the configuration and status of the systems hardware and software. |
Accessibility | This section of the Start menu contains tools for the visual and mobility impaired. |
These tools are scattered throughout the Windows XP environment. To stick to some semblance of order, we will try to discuss these tools in the following order based on their location or execute/access point: Control Panel applets, Administrative Tools, Start menu items, and then Run command/Command Prompt utilities. However, most of these tools can be accessed through more than one of these means.
Scheduled Tasks is found in the Control Panel and in the Start menu (All Programs, Accessories, System Tools, and Scheduled Tasks). Using the Scheduled Tasks, you can set up any program or script (or even open a document) to be run automatically at predetermined times. This utility is very useful for running system maintenance programs or your own scripts and programs when you can't be around to execute them manually.
TIP
You could even use the Scheduled Tasks to run a script that starts or stops a specific system service. The net command can be used to start and stop services using simple syntax:
net start "service name here"
or
net stop "service name here"
Most folks don't even need to think about this capability, but if you are a software developer and use a special debugging or testing service, this capability might be handy to start it up when you log in. Remember that there is no “when I log off” scheduler entry, so you can't automate shutting off the process when someone logs out.
You also can cause a specific script or program to run (1) when the system boots, (2) when a user (any user) logs on, or (3) when the system is idle. Why is this different from putting the script or program in the Startup group for All Users? Well, the Scheduled Tasks lets you specify the security context to use for this login task. For example, whenever a user logs on, you can have the Scheduled Tasks run a program with Administrative privileges to record information in a protected file. Using the Scheduled Tasks this way is similar to using the Run As option. (See Chapter 28, “Managing Users,” for more details about Run As.)
NOTE
When the Scheduled Tasks runs a task as a different user, the logged-on user cannot see or interact with the program. Be sure that scheduled tasks can operate without user input and exit cleanly when they've done their work. And keep in mind that once an application or service is running, even if it was launched through a scheduled task, it still will affect system performance as if you ran it manually.
After you declare tasks to run, the Scheduled Tasks sits in the background, checking the computer's system clock, and when a predetermined time for a task rolls around, the Scheduled Tasks runs it as though executed from the specified user.
After you've defined a task to be executed, the Scheduled Tasks service automatically will launch at startup each time the computer boots. The Scheduled Tasks service does not significantly affect system performance. The service is required to monitor the time and other system events that are defined as triggers to launch applications, scripts, and so on. The Scheduled Task service cannot be configured to load based on the logged-on user because it is a systemwide service. Even if a user without scheduled tasks is logged in, a scheduled task from another user can execute in the background.
NOTE
Obviously, the computer has to be alive to run a task, so if you expect to do a disk cleanup at 4 a.m., be sure you've left the computer on. If you turn on the system at 4:01 a.m., you missed the execution. The scheduler will not inform you of missed launchings; you'll have to view the information in the Last Run Time column within the Scheduled Tasks window to figure it out for yourself.
TIP
If you upgraded from Windows 98/SE/Me/NT/2000 and had automated tasks assigned there, they should have been converted or imported to the Windows XP Scheduled Tasks automatically.
To assign tasks to the Scheduled Tasks, follow these steps:
Run the Scheduled Tasks by choosing Start, All Programs, Accessories, System Tools, Scheduled Tasks. If you have any scheduled tasks, they appear in the list already.
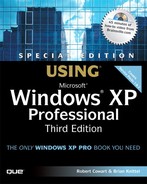
Click Add Scheduled Task to invoke a wizard that walks you though adding a new task. Click Next to see a list of programs (see Figure 27.1). If the program isn't listed in the resulting list, click the Browse button to find it. (For system-related applications, the most likely browse locations are in the windows or windowssystem32 folders. For programs you've installed, try the Program Files subfolders.)
Click Next, and choose how often you want the program to run (see Figure 27.2). Click Next again, and then specify applicable time options, such as time of day, as required.
Click Next, and you are prompted to enter the user's name and password so that the task can be executed as though the user (typically, you) were there to run it. (It may already be entered for you, using the current user's name, preceded by the computer name.) After a username and password are set, another user cannot cancel or delete the task unless that user has the correct permissions. If you are working with a user account without a password, don't type in anything in the password field.
Click Next. If you want to set advanced options such as idle time, what to do if the computer is running on batteries, and what to do after the task completes, mark Open Advanced Properties for This Task When I Click Finish.
Click Finish to close the wizard. The task is then added to the list and will execute at the preassigned time.

If you chose to open the task's advanced properties upon clicking Finish, its dialog box now opens. To open this same dialog box manually, open the Scheduled Tasks applet, right-click the task in question, and choose Properties. The three tabs on this dialog box enable you to modify it as follows:
From the Task tab on the Properties dialog, you can disable the task temporarily, without having to delete it, by clearing the Enabled check box. As of SP2, there is a new check box on the Task tab of the advanced properties dialog: Run Only If Logged On. If you don't want this task to run unless you have logged in to the computer, check this box.
Use the Schedule tab to change the task's timing. You can change the scheduled time using the options present, or use the Advanced button to access more advanced scheduling options. There is also a check box that allows you to enable multiple schedules for the task.
When you're finished, click OK to save any changes made to the properties sheet. Now that you've established a task, though, there are still more issues to consider.
If you want to remove a task from the Scheduled Tasks list, right-click it, and choose Delete. Choosing Delete here doesn't remove the executed application from your hard disk, it just removes the task from the list of tasks to be executed.
To use controls that affect all tasks in the Scheduled Tasks applet, use the commands on the Advanced menu from the main Scheduled Tasks window's menu bar. You'll see a number of useful items there, as shown in Table 27.2.
Table 27.2. Advanced Settings for the Scheduled Tasks
Option | Description |
|---|---|
Stop Using Scheduled Tasks | This option turns off the scheduler, preventing it from running any added tasks. The scheduler won't start automatically the next time you start Windows XP. To reactivate it, you have to open the Scheduled Tasks and choose Start Usin Scheduled Tasks. |
Pause Scheduled Tasks | This option temporarily suspends added tasks in the task list. This capability is useful if you are running a program whose operation could be slowed down or otherwise influenced by a scheduled task. To resume the schedules for all tasks, choose Advanced, Continue Scheduled Tasks. If a task's execution time is now past, it will run at the next scheduled time. |
Notify Me of Missed Tasks | If a task can't complete for some reason, a dialog box pops up, letting you know what was missed. For example, if the computer was turned off when a task should have been run, you'll be told of this situation when you boot up next. |
AT Service Account | The Scheduled Tasks runs any commands scheduled using the |
View Log | This option brings up a text file in Notepad, listing tasks completed, date, and other information about the tasks. Note that some tasks listed in the log might not appear in the Scheduled Tasks list. This omission can result from system tasks initiated by other services such as synchronization (such as Web page subscriptions and offlin folders). For coverage of these issues, see Chapter 9, “Browsing the World Wide Web with Internet Explorer,” and Chapter 18, “Windows Unplugged: Remote and Mobile Networking.” |
TIP
You can run one of your tasks immediately by right-clicking the task in question and choosing Run. You also can reach Scheduled Tasks tasks through the Explorer by going to the windows asks folder.
TIP
After installing SP2, some users have complained that the only way they could get Scheduled Tasks working again was to open each individual scheduled task, then uncheck Only If Logged On. Then choose OK or Apply. Then they had to recheck Run Only If Logged On. You must do this with each and every scheduled task listed to get them all to work again.
You can view scheduled tasks on a remote computer by opening My Network Places, opening the computer in question, and then opening the Scheduled Tasks folder. You need administrative privileges if you want to view the settings on a remote machine. If you want to edit remote settings, the requirements are greater; you can edit tasks on a remote computer running Windows 95 or later, Windows NT 4.0, Windows 2000, or Windows XP only if that remote computer has remote Registry software installed and shares the x$ share, where x is the hard disk on which the Scheduled Tasks folder resides. That is, it must be shared with an “Administrative Share.”
Unlike under Windows 2000, Windows XP tasks do not have task-level ACLs. However, if the user account defined as the “run as” account does not have access to the executable, the task will not be able to run.
NOTE
If you are familiar with the old at command-line utility from Windows NT, you'll be happy to know that it still works in Windows XP. Commands scheduled with at appear in the Scheduled Tasks's list, as well as the list of commands that at displays. It's one and the same list. However, if you modify the command within Scheduled Tasks, it will no longer appear in the list displayed by at. at is the command-line tool used to schedule tasks on a Windows NT system. The at command is still supported by Windows XP (as it was under Windows 2000). You can see the correct syntax for this command-line tool by entering at ? at a command prompt. at stands for “at time” and was originally found on Unix systems. AT commands will only for 72 hours.
The System applet offers a wide range of functions through its multi-tabbed interface. You access the System applet through the Control Panel. When the Control Panel is in Classic view, double-click on the System icon to open the System applet. When the Control Panel is in Category view, open the Performance and Maintenance category, and then click on the System icon. Let's take a look at each tab and the options on each.
The General tab (see Figure 27.3) displays the system OS version, registration details, and basic computer info (CPU type, speed, and RAM).

The Computer Name tab is the same interface as is accessed through the Network Identification command of the Network Connections applet's Advanced menu. This interface is used to change the computer name and manage domain and workgroup membership. The Network ID button launches a wizard that guides you through configuring the computer for standalone use, workgroup membership, or domain membership. The Change button opens the Computer Name Changes dialog box where the computer name and domain or workgroup membership is defined with simple radio buttons and text fields. Altering network configuration is discussed in greater detail in Chapter 17, “Using a Windows XP Network.”
NOTE
Adding a system to an existing domain will require that you know the name and password of an administrator account in that domain OR that a computer account for the client has already been defined in the domain. For more information on this, see Part IV, “Networking.”
The Hardware tab has four buttons. The Device Manager button launches the Device Manager; this is also discussed in Chapter 24. The Hardware Profiles button opens the Hardware Profiles dialog box where hardware profiles are managed. This is discussed in Chapter 25. The Windows Update button brings up a dialog box asking you if and when XP should go on to the Net to look for drivers in the event that you connect new hardware to your system. The Driver Signing button opens the Driver Signing Options dialog box.
Driver Signing is a security feature that aids in preventing malicious rogue or Trojan horse drivers from being installed onto a mission-critical system. By enabling driver signing, you can configure a system to refuse all device drivers except those that are “signed” by Microsoft or other MS-approved vendors. This dialog box offers three settings: Ignore, Warn, and Block. Ignore allows the installation of any driver. Warn prompts you each time you attempt to install a non-signed driver. Block only allows signed drivers to be installed.
The default setting of Driver Signing is Warn. Keep in mind that this safety feature is designed from the Microsoft perspective. In their eyes, the only legitimate and safe drivers are those that have been approved by their labs. In many cases, drivers that Microsoft has not preapproved are perfectly safe and legitimate. However, ignore this security at your own risk. If you don't trust the vendor or fully trust the distribution method, don't install unsigned drivers.
The Advanced tab of the System applet has five buttons. Three of these buttons are labeled Settings and are contained within sections titled Performance, User Profiles, and Startup and Recovery. The other two buttons are below these sections; they are labeled Environment Variables and Error Reporting.
The Settings button under the Performance heading opens the Performance Options dialog box. The Visual Effects tab of this dialog box is discussed in Chapter 23. The Advanced tab of this dialog box is used to set memory usage parameters and is discussed in Chapter 25.
The Data Execution Prevention (DEP) tab is new as of SP2, and is used for settings that prevent malicious applications from executing programs in protected areas of RAM. Protected areas of RAM, supposedly reserved for the operating system and other programs that are running, can potentially be invaded by malware, which then tries to load and execute itself in the legitimate memory space. This new SP2 feature prevents this from happening, if it's turned on.
There are two levels of DEP: hardware and software. To use hardware DEP, your CPU has to have “execution protection” capability. You can check to see if yours does by reading the DEP tab page. Hardware DEP works by virtue of the CPU tracking where the operating system and legitimate programs are operating in RAM and blocking other programs from trying to load and execute in those address blocks. If a detection occurs, the offending program is simply shut down.
If your CPU doesn't support DEP, XP does its best to do DEP in software, if turned on from the DEP tab. Software DEP isn't turned on by default, because some programs won't run properly with it turned on. This isn't as complete a form of protection, but it's better than nothing.
Normally, only Windows programs and services are monitored by DEP. If you want to be extra safe, choose the second option, Turn on DEP for All Programs and Services Except Those I Select.
As stated, however, the problem with software DEP is that some legit programs might not run with it turned on. When DEP shuts down a program, the first thing to do is run a virus check on your computer. Do a complete sweep. If some threat is detected, remove the offensive program. If nothing is detected, try running the offending program again. If DEP closes it again, you have three choices:
If available, purchase an updated, DEP-compatible version of the program.
Set up an exception list to run the program by clicking Add (on the DEP tab) and adding the program.
Don't use the program.
If you take the second course of action, it's a good idea to check frequently for an updated version of the program and, after you update it, to turn on DEP for that program again by highlighting it in the DEP tab and clicking Remove.
The Settings button under the User Profiles heading opens the User Profiles dialog box. This interface is used to manage local and roaming profiles stored on the local computer. This is discussed in Chapter 28.
The Settings button under the Startup and Recovery heading opens the Startup and Recovery dialog box. This interface is used to configure multibooting actions and how system failures are handled. This is discussed in Chapter 31 and 33.
The Environment Variables button opens the Environment Variables dialog box. This interface is used to define user and system variables. These include TEMP and TMP, which point to storage locations where Windows can create temporary files. In most cases you should not edit the system variables. There are some application installations that may require this activity, but specific details should be included in that application's installation instructions.
TIP
If the storage volume where your main Windows directory resides is becoming full, you can perform three operations to improve performance and keep the risk of insufficient drive space to a minimum. First, move the paging file to a different volume on a different hard drive (see Chapter 25 for details on this). Second, define the TEMP and TMP variables to point to a Temp folder you create on a different volume on a different hard drive. Third, through Internet Options, define a location for the temporary Internet files within the alternate Temp folder. After rebooting, the new locations will be in use. However, you may need to delete the old files from the previous temporary file locations (typically Documents and Settings<username>Local SettingsTemp and Documents and Settings<username>Local SettingsTemporary Internet Files).
The Error Reporting button opens the Error Reporting dialog box. On this interface you can define whether Windows XP automatically reports system problems to Microsoft. This information is submitted anonymously and is used to help Microsoft fine-tune the system and to create fixes and patches. It is enabled by default. You can select just to submit OS related issues or to include (all or some) program issues as well.
The System Restore tab is used to track and reverse damaging changes made to your system, and it enables you to set the defined space usage for the System Restore feature. This feature is discussed in Chapter 33. The System Restore command is also found in the Start menu under All Programs, Accessories, and System Tools.
The Automatic Updates tab defines how Windows XP handles critical Windows Update downloadable modules. Windows Update is an online OS fixing and patching tool. This feature has grown more and more comprehensive over the years and as of XP SP2 incorporates more “push” technology than it did when XP was first released. This move is mostly in response to the continued onslaught of viruses and other hacking strategies that destabilize Windows machines. Windows Update can now not only push new system updates and security patches for the operating system, but also less-critical software such as device drivers and updates to Microsoft Office (if Office is installed on the target computer).
If you're wondering whether Automatic Updates is the same as Windows Update, the answer is well, sort of. Automatic Updates is actually a subset of Windows Update. Windows Update is a Web site you visit, poke about on, and interact with. From the site you can see what's available for your machine and then choose what you want to download. As the name implies, Automatic Updates handle some of that for you, eliminating the need to visit the Windows Update site manually or make decisions about what to download. Automatic Updates deliver only highest-priority updates, in hopes of keeping more Windows systems up to date and operating smoothly. If you want to download optional updates (fun stuff, or lower-priority items), you still need to visit the Windows Update Web site, even if Automatic Updates is turned on.
NOTE
The Windows Update technology is very rich. Among other things, systems administrators can use it to control updating many machines across a network using a “Windows Update Services server.” Outside of a corporate setting, though, most users will simply use Microsoft's online update server via its Internet Web site.
Upon installing a post-SP2 version of XP or upon upgrading to SP2, you're prompted to confirm settings for Automatic Updates. Microsoft does its level best to push you into allowing it to keep your system up to date automatically. You'll see a dialog strongly recommending that you leave automatic updates turned on (the default). If you do so, information about your computer will be uploaded to Microsoft's Windows Update database. Then, security patches, critical updates, Office updates, drivers, and operating system service packs will all automatically be downloaded and installed to your computer. If you choose to deactivate this feature, you're going to be bugged incessantly about it, anyway, so why fight a good thing? We believe this is good thinking on Microsoft's part.
NOTE
Windows does not use your name, address, email address, or any information that can be used to identify you or contact you.
In Windows XP Home Edition, you have to be logged on as an administrator to install components or modify Automatic Updates settings. If your computer is connected to a network, network policy settings might also prevent you from completing this procedure.
Allowing Windows to download and install updates automatically keeps you up-to-date without having to remember to initiate an update check. It doesn't matter whether you use a dial-up or broadband connection. Microsoft has developed efficient means to ensure that your other downloads aren't slowed, through the use of small patch download sizes, and a new compression scheme called delta patching. Under the previous scheme, Windows Update examined your system, determined which patches you needed, and downloaded all of them, en toto. The problem is, such downloads are often quite large. The new Windows Update downloads just the files you need, or just the parts of the files you need, thereby keeping the downloads as small and fast moving as possible. The system is made additionally efficient by ensuring the system downloads and installs the most crucial updates before less-important patches. So when the next virus outbreak hits, Windows users will immediately be protected. To additionally make the most of your connect time, if you disconnect from the Internet before your updates are finished, nothing is lost. The download process will continue the next time you connect to the Internet.
Microsoft states that security updates will be published every month, unless there is more radical threat, in which case it will release an update as soon as possible.
Of course, it's possible that an update could damage your system. Microsoft can't control all the variables that might appear on John Q. Public's system, and updates, although they often fix bugs, can introduce new ones.
If this should happen, you can always roll back a system to its state before the update (see “Using Rollback to Uninstall a Windows Update,” later in this chapter), or use the System Restore feature (see Chapter 30), so using automatic updates is not necessarily a poor choice.
As you see from the dialog box in Figure 27.4, there are three levels of manual updating. The default settings are as you see in the figure. That is, every day at 3 a.m., updates will be automatically downloaded and installed. This is the recommended setting. If the computer isn't on at that time, downloads will occur when you first turn on your computer and connect to the Net. You can choose a specific day of the week, and a different time, should you like.

NOTE
If you need to accept an End User License Agreement (EULA) before an update can be installed, you'll be prompted to do so. It's possible that some updates will require a reboot, too. If the download happens at the predetermined time (for example, 3 a.m.), and a reboot is needed, the computer will reboot at that hour. This could be a problem if you need to have the computer available as full-time server or you're using a remote control program from afar, because after booting, the computer might require user login for a given remote app to be functional.
If you want to choose when to install updates (because you can't reboot or be distracted for whatever reason), choose the second option. Downloads happen in the background, but you won't know about it. You'll see a balloon pop up from the system tray indicating that there are updates ready to install. Just click on the balloon and you'll be told what to do.
Some users prefer to at least know whether an update is being performed, so they choose Notify Me But Don't Automatically Download or Install Updates. This way they can more likely correlate some strange new system behavior with an update that just took place.
When would you use the third option, to turn off updates altogether? In general, I'd rule that out as an intelligent option, with two exceptions:
If you have a computer that is almost always off the Net or a LAN and is “mission critical” (has to be up and running), and rarely if ever has new software (including email) added to it, this is a potential candidate. Once I get such a dedicated system running, I haven't much interest in tempting fate with software or system upgrades.
If you're running and maintaining PCs in a corporate setting. These PCs are connected to the Net and probably on a corporate network. You want to rigorously test updates before you install them across the corporation's PCs, because Microsoft patches and updates can sometimes break your applications' features in subtle ways.
To use the Windows Update site manually
Click Start, Help and Support Center.
Then choose Keep Your Computer Up to Date with Windows Update.
A Web page will appear. Click Scan for updates.
A list of possible updates for your computer appears. Sift through the list and click Add to select the update of your choice and add it to the collection of updates you want to install. You can also read a full description of each item by clicking the Read More link.
When you have selected all the updates you want, click Review and Install Updates, and then click Install Now.
You can hide an update if you want to get it off the screen. Click Hide Update. If you want to see hidden updates again, click Restore Hidden Updates. Sometimes hiding a critical update doesn't really stick. You'll be reminded about such an update later, and prompted to install it.
The Remote tab controls whether Remote Assistance and Remote Desktop are enabled. Remote Assistance allows you to grant dual control over your desktop with another computer over a network or the Internet. When enabled, the other client can see your desktop, conduct a real-time chat with you, and even use their mouse and keyboard to make changes and operate your system. Remote Assistance was designed to allow a system administrator, tech support specialist, instructor, or even a knowledgeable computer buddy to aid end-users with tasks without having to leave their workspace.
Remote Desktop allows you to access your current desktop or logon environment from a remote system. This allows an employee to access their work system from their home computer and have full access to their files and applications.
Both of these features are discussed in the following sections.
Remote Assistance works through the exchange of time-sensitive invitation scripts via e-mail. To initiate an invitation
Click the Start menu, All Programs, and then Remote Assistance.
The Remote Assistance help page opens (see Figure 27.5).
Click Invite someone to help you. The invite page opens (see Figure 27.6).
NOTE
Remote Assistance requires a compatible OS on the remote system (currently only Windows XP is compatible), with either Windows Messenger Service or a MAPI-compliant email utility (such as Microsoft Outlook or Outlook Express). Remote Assistance also requires that both systems have Internet access.
If you have MSN Messenger installed and a contact list defined, you can select an invitee from Messenger. Or, you can provide an email address to send an invitation. Since Outlook Express (OE) is installed by default and MSN Messenger is not, we'll use OE.
Type in an email address to send a Remote Assistance initiation, and then click Invite this person. The email invitation page opens.
Provide a From name and a message to include in the email invitation. Then click Continue.
Define the invitations expiration period in minutes, hours, or days.
Select whether to require a password to connect, and then provide the password. Click Send invitation.
A warning prompt appears, stating that another application is attempting to send an email message on your behalf, click Send.


When the invitation appears in the invitee's inbox, they only need to execute the attachment.
CAUTION
Microsoft warns to only execute attachments from people you trust or from whom you are expecting an attachment. It is very easy to create a malicious utility masquerading as a valid Remote Assistance invitation.
When it's executed, you'll be prompted for a password (if required) and whether you want to initiate a Remote Assistance connection. Once you click Yes, the connection attempt commences. If a connection is started, the invitor is prompted whether to allow the connection to continue. After clicking Yes, the Remote Assistance floating tool window appears on the original system (Figure 27.7) and the Remote Assistance remote desktop utility (Figure 27.8) appears on the invited system.

Figure 27.7. The Remote Assistance floating tool window as it appears on the original or host system.

Figure 27.8. The Remote Assistance remote desktop utility as it appears on the invited or remote system. Notice that the host's desktop can be seen in the background of the invitee's screen.
From either system, you can send chat text, stop the session, transmit a file, initiate voice chat, or disconnect the session. From the remote system, you can request full control of the original desktop and control it with the remote system's mouse and keyboard. This is a great tool for walking someone through a complex task or training them on software usage.
Remote Assistance should only be used when both systems are connected by a fairly high-bandwidth link, such as over a 10+MB LAN or via ISDN, DSL, or Cable modem Internet link. It will work over slow modem connections, but you are more likely to experience significant performance delays and disconnects. The faster the connection, the more responsive the remote assistance will be and the higher resolution the remote visuals. Unless blocked by a firewall, proxy, or other security screen between the two systems, Remote Assistance can link two systems on a LAN or over the Internet.
Remote Desktop is basically a remote control feature built right into Windows XP. It enables a remote system to connect to the session as a host client. The host client is the system where user sessions are paused (such as via Fast Switching) for remote connection. Remote systems establish connections via an IIS subcomponent—Remote Desktop Web Connection—which must be installed on the IIS server in the same network as the host client.
An additional benefit of Remote Desktop is that, when your host system is configured, you can use either Remote Desktop or a valid Terminal Services client on a remote system to connect to your host.
Configuring a network to support Remote Desktop is a bit of a challenge. Consult the Windows XP Resource Kit for exhaustive details on the installation and configuration of this amazing feature.
Fortunately, the use of Remote Desktop is quite simple. However, there is one caveat: You must plan ahead for Remote Desktop to work. You must leave an active logon session running to which Remote Desktop will connect from your remote system. It is not possible to connect into a system with Remote Desktop without an active session. To set up Remote Desktop, follow these easy steps:
Log on to the host system.
Use the Start, Log Off command, and then click Switch User (remember, switching users is not the same as logging off).
Log on to the remote system.
Launch Internet Explorer.
Open the URL
http://<servername>/tsweb/where<servername>is the name or IP address of the IIS server on the network.You might be prompted to provide logon credentials for the domain or IIS server system. In most cases, you must provide them in the form
<domainname><username>or<systemname><username>.After logon, you are presented with the Remote Desktop Web Connection screen where you must provide the computer name or IP address of the host client and what sized screen to open (options include 640x480, 800x600, 1024x768, and Full Screen). Click Connect.
When connected, you'll have complete control over the host client session from the remote system. Once properly configured, this could be an extremely versatile tool for telecommuters.
Remote Assistance and Remote Desktop offer useful features that are new to the Microsoft Windows product. However, they are poor imitations of full-featured third-party products such as PCAnywhere, Carbon Copy, and Timbuktu. If you are on a tight budget, these new Windows XP features might be of some use. However, if you need true versatility, security, and a broader range of control over remote control types of access, grab a true remote control product.
The Administrative Tools are a collection of system control and configuration utilities which Microsoft deemed powerful and technical enough to separate into its own category from the Control Panel applets. The Administrative Tools include Component Services, Computer Management, ODBC Sources, Event Viewer, Local Security Policy, Performance, and Services. Each of these is discussed in the following sections (with the exception of Component Services and ODBC Sources which are not discussed in this book; please consult the Windows XP Resource Kit for details on these items). These two tools are fairly complex and are used by program developers and network database integrators. In most cases, these controls are beyond what most end users or administrators will need or use.
In addition to the Task Manager and Control Panel, another tool named Computer Management (Figure 27.9) is probably the most likely candidate for configuring and administering your PC. To get to it, open the Control Panel (in Category view), select Performance and Maintenance, then Administrative Tools, and finally, double-click Computer Management. A simpler method is to right-click your My Computer icon (on your desktop or in your Start menu) and select Manage from the pop-up menu.

Figure 27.9. The Computer Management utility from Administrative Tools. The Shared Folders node is selected.
NOTE
The Computer Management utility is just one of many MMC (Microsoft Management Center) tools. The MMC is a powerful programming infrastructure for creating system control utilities. You can even create your own custom tool sets using MMC consoles. The MMC is discussed in the “Microsoft Management Console (MMC)” section later in this chapter as well as in the Windows XP Resource Kit.
Computer Management provides easy access to the following tasks:
Managing local users and groups
Managing shared devices and drives
Checking system event logs containing information such as logon times and application errors
Seeing which remote users are logged in to the system
Viewing currently running system services, starting and stopping them, and setting automatic startup times for them
Managing server applications and services such as the Indexing service and IIS
The Computer Management tool looks similar to the familiar Windows Explorer. It uses a two-pane view, with the console tree (for navigation and tool selection) in the left pane and details of the active item shown the right pane.
Items in the tree are called nodes (akin to folders in Explorer). The three nodes in Computer Management are as follows:
System Tools
Storage
Services and Applications
As you would expect, you can conduct administrative chores by selecting a tool in the console tree and then clicking items in the right pane. When you select an item in the right pane, toolbar and menu options change as appropriate for that item, typically displaying attributes of the item or tool you selected. For example, the System Information branch can show you which IRQs are assigned already, and the Local Users and Groups branch can display the names and properties of all the users on the machine.
In previous versions of Windows NT, you had to hunt around through Control Panel applets to discover properties and settings that are now conveniently grouped together in Computer Management. I'll be honest; things are still a little confusing just because some of the properties available from Computer Management can also be reached via the Control Panel. An example is the Device Manager, which can be reached from the System applet in the Control Panel as well as the System Tools node in Computer Management. It's the same tool, and having multiple paths to the same destination is nothing new in Windows.
TIP
You must be assigned Administrator privileges to fully utilize the Computer Management tools. If you have lesser privileges, you'll have limited access to system properties and are locked out of making certain administrative changes to the system.
Explore with the interface to uncover all that is available from these three “little” nodes in the left pane. However, avoid making any changes or modifications (where possible) unless you know what affects your alterations will have. You'll be surprised. Open each node by clicking the boxed + (plus) sign. If you choose View, Details, some helpful information about various items in the right pane is displayed along with the items.
By default, you manage the local computer. To manage a remote computer (assuming you have permission), right-click the topmost item in the tree (Computer Management), and choose Connect to Another Computer.
Also by default, the view is set to Basic. To gain access to more advanced settings in the console, choose View, Advanced.
A few points about each node are listed in the following sections.
This node includes five subnodes:
Event Viewer—. Used to view the event details contained in the Application, Security, and System logs. This tool is discussed later as an Administrative Tools utility in its own right.
Shared Folders—. Used to manage shared folders and remote users accessing shared folders.
Local Users and Groups—. Used to manage local user accounts and groups. This tool is discussed in Chapter 28.
Performance Logs and Alerts—. Used to define logs and alerts related to system performance. This tool is identical to that accessed through the Performance tool (a.k.a. System Monitor interface). This tool is discussed in Chapter 25.
Device Manager—. Used to troubleshoot device problems and configure device and drivers settings. This is identical to the Device Manager accessed through the System applet. This tool is discussed in Chapter 24.
The Shared Folders node (refer to Figure 27.9) amounts to what used to be NetWatcher in previous Windows versions. The three folders under the Shared Folders node are as follows:
Shares—. Allows you to manage the properties of each shared resource. For example, you can alter the access rights for a shared resource so that certain users have read-only access. You can also change share permissions for a resource in the Properties dialog box of any shared resource by right-clicking the resource and clicking Properties.
Sessions—. Allows you to see which users are connected to a share and optionally disconnect them.
Open Files—. Allows you to see which files and resources are open on a share. You also can close files that are open.
This node includes three subnodes:
Removable Storage
Disk Defragmenter
Disk Management
The Removable Storage is used to check the physical location of removable storage devices (such as CD-ROM, DVD-ROM, JAZ, Zip, tapes, and optical disks), check the existence of media pools (typically robot-controlled multidisk gadgets), and check properties of offline media. This node also provides a means for labeling, cataloging, and tracking all your removable media; controls library drives, slots, and doors; and provides drive-cleaning operations.
This node can work together with data management or backup programs like the one supplied with Windows XP (the Backup program is covered in Chapter 29, “Managing the Hard Disk”), conveying information about storage properties.
The Disk Defragmenter node runs the disk defragmenter program. This is the same tool with a slightly different interface as the Disk Defragmenter on the Tools tab of a drive's Properties dialog box.
The Disk Management node runs Disk Management (known as Disk Administrator under Windows NT). This tool is used to define new drives as Basic or Dynamic, create/delete/manage partitions and volumes, format, assign drive letters, and so on.
All three of these nodal tools are discussed in Chapter 29.
Through the Services and Application node, you can view and manage the properties of any server service or application that is installed on the computer, such as the file indexing service, and IIS (Internet Information Server). If this were Windows Server 2003, you'd also have access to networking services such as DNS (domain name service) and DHCP (Domain Host Configuration Protocol).
TIP
Sometimes you might want to incorporate a list of displayed items into another document. You can export the list as a text file for this purpose. To do so, display the list in question, with the columns arranged as you like. Then choose Action, Export List. You can name the file in the resulting Save As dialog box.
The Event Viewer is an administrative application used to view the log files which record hardware, software, and system problems and security events. You can think of an event as any occurrence of significance to the operating system. Logs are very useful because, like a seismograph in earthquake country or a black box in an airplane, they provide a historical record of when events occurred. For example, you can see when services were started, stopped, paused, and resumed; or when hardware failed to start properly; when a user attempts to access protected files; or an attempt to remove a printer over which he or she doesn't have control. The logs report the level of danger to the system, as you can see in Figure 27.10. For a shortcut to the Event Viewer, you can choose Start, Control Panel (in Category view), Performance and Maintenance, Administrative Tools, Event Viewer.

As you know, Windows XP has an intelligent internal security design. So, as you might expect, numerous more subtle events than those described here can generate messages internal to the operating system that are not directly reported to the user. Events such as applications being run, drivers being loaded, or files being copied between directories are common examples. Though kept out of sight, these events are monitored and recorded in log files available for later examination by the system administrator. Many events are stored in the log by default. Others are optional and can be set within dialog boxes pertaining to specific operations.
Windows XP generates three primary logs (files), though others are possible. These logs are explained in Table 27.3.
Table 27.3. Windows Log Files
Now that you have a basic understanding, let's consider the Event Viewer. The Event Viewer is an application that displays each of the log files. Aside from simply displaying a log file, the Event Viewer also lets you do the following:
Apply sorting, searching, and filtering that make it easier to look for specific events
Control settings that affect future log entries, such as maximum log size and the time old entries should be deleted
Clear all log entries to start a log from scratch
Archive logs on disk for later examination and load those files when needed
NOTE
Only a user with Administrative privileges can work with the security log. Other users can view the application and system logs, however. By default, security logging is turned off. You can use Group Policy to enable security logging. The administrator can also set auditing policies in the Registry that cause the system to halt when the security log is full.
The following steps explain how you can use the Event Viewer to open the three available logs and more easily view specific events:
Open the Event Viewer program in Administrative Tools via the Control Panel. When you run it, the basic Event Viewer window comes up. (The meaning of each column is explained in the following section.)
Choose the log you want to view by clicking it in the left pane.
Just as with the File Manager, changes to the log that occur while you're examining it are not always immediately reflected. Press F5 to update the log if you suspect that some system activity has occurred while you've been running the program.
Normally, the list is sorted with the most recent events at the top of the list. You can reverse this order if you want by choosing View, Oldest First.
You can optionally filter out events that you don't want to wade through. For example, you can show events that occurred only during certain times of the day, events pertaining to a specific user or event ID, or only a certain event type (such as only errors or warnings). Just choose View, Filter, and fill in the dialog box. (The options are explained in the section titled “Filtering Events.”)
You might want to search for a specific event. To do so, choose View, Find, and enter the relevant information in the resulting dialog box.
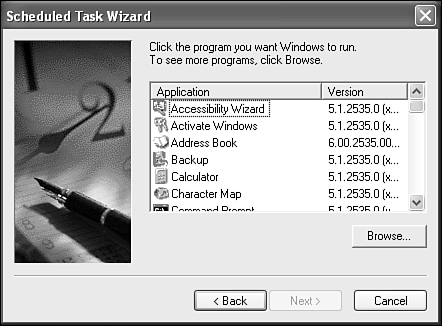
If you want to see more information about an event, double-click it. Another dialog box then appears, listing details. An example is shown in Figure 27.11.
Details of your security log won't make much sense if you're not a programmer. Even then, the messages are cryptic. The system and application logs offer more in the way of understandable English. Most useful is information about drivers failing to load (often leading you to IRQ and port conflict resolutions).
By default, the local computer's log is displayed. If you want to examine a networked computer's log, just right-click over the Event Viewer (local) node and select Connect to another computer from the pop-up menu.
Careful monitoring of event logs can help you predict and identify the sources of system problems. For example, if log warnings show that a disk driver can read or write to a sector only after several retries, this information could be a foreshadowing that the hard disk sector may die eventually. Logs can also confirm problems with software. If a program crashes, a program event log can provide a record of activity leading up to the event. When a program does crash, you often see a system message informing you that a log entry is being made.
Essentially, each log file consists of a database table with eight columns, which are described in Table 27.4.
Table 27.4. Deciphering Event Logs
Column Name | Meaning |
|---|---|
Type | Indicates the type of event. The five types of events are described in Table 27.5. |
Date | Reports the date the event was logged (according to the system clock). |
Time | Reports the time that the event occurred. |
Source | Lists the name of the application software or device driver that reported the problem. |
Category | Shows the general classification this event falls under. Each of the three logs has different categories of events. |
Event | Lists an event number. Event numbers are assigned to events based on a coding system Microsoft has designed. The event ID matches a message file. The message is displayed in the details box for the event. |
User | Indicates the specific user for whom the event applies. Many events are related to a specific user. |
Computer | Specifies the computer where the event happened. |
Table 27.5. Event Types
Type of Event | Meaning |
|---|---|
Error | Indicates serious trouble of some sort, such as the device driver not loading, IRQ or other hardware conflicts, missing network cards, and so forth. |
Warning | Indicates non-serious trouble, but worthy of attention soon, such as being low on hard disk space (which could bring down the system). |
Information | Indicates a non-serious situation. Typically, these notices concern successful operations achieved by applications, drivers, or services. For example, when a network driver loads successfully, an Information event is logged. |
Success Audit | Indicates success of a procedure. |
Failure Audit | Similar to a success audit but reversed; indicates that failed attempts are logged. Failures typically occur because the user making the attempt doesn't have the correct privileges. |
As mentioned in Table 27.4, five different icons characterize an event type, as shown in Table 27.5.
One way of seeing several similar events you're interested in (for example, to see how many times the same event occurred) is to click the relevant column head in the Event Viewer. Clicking the head sorts the listing according to the column's data. As in Windows Explorer and other Windows programs, the column sorter toggles between ascending and descending order.
A more powerful approach for culling out the items you're interested in is to use filtering. When logs get quite large or if you have a server that supports a high density of workstation activity, this approach might be the most effective technique for ferreting out what you need to examine. The System Properties dialog box you use for filtering is shown in Figure 27.12.

Figure 27.12. On the Filter tab of the System Properties dialog box, you can limit the listing to specific conditions.
After you set up a filter, don't be alarmed if all your entries suddenly seem to have disappeared; they're probably just being filtered. Check the View menu, and you'll see the Filter option selected. Choose it again to eliminate the filter.
You can stipulate a few settings that affect how log entries are recorded. These settings are most useful in managing the size of your logs so that they don't eat up too much disk space. There are potentially so many loggable events that even a typical day on a busy network server could produce far larger log files than you would want to wade through, or that you would want to devote disk space to.
To view or change options for a log file, right-click the log file in question, and choose Properties. Then click the General tab to see the dialog box shown in Figure 27.13.

If you don't archive the log (see the next section), then you should probably have the log “wrap” around after it reaches the maximum log size. The Overwrite Events as Needed option ensures that, when the log fills up, a new event takes the place of the oldest preexisting log entry.
If you really want to ensure that you get to see the log entries, choose the Do Not Overwrite Events option. After the maximum size is reached, subsequent events are not written, and thus lost. If so, you have to use the Action, Clear All Events command to make room for new entries.
A final option in the Event Viewer lets you create archives of log files and to reload those files for later examination. As a rule, archiving log files isn't of much use unless you're running a very secure operation in which extensive background records of system or network usage are mandated by the government or the corporation where you work. Most likely, in such a secure operation, you'll be doing regular tape or other forms of backup, which might include backups of the log files anyway. In this case, this regimen might meet your security requirements, depending on your tape rotation scheme. If it doesn't, you can archive your event logs. Archiving is a relatively simple process.
You can store archives as text files, comma-delimited files (text files with a comma between each field for use in database or spreadsheet programs that can import this format), or binary files with the .EVT extension. Only the .EVT files retain all the property information for each event. If you want to reload the file for later use, save it as an .EVT file.
TIP
One case to be made for archiving is this: Logs can be useful in isolating network or machine failures. By keeping copies of past logs, you have something to compare with current versions that list new failures. By comparing logs, you can perhaps notice how and when the errors began to accumulate. Generally speaking, a network failure starts simple and then increases in frequency until a catastrophic failure occurs. Old logs can help here.
Note that the file created by the archiving process isn't affected by any filtering active at the time. That is, all events in the log are written into the archive file. The Action, Save Log File As command can save the log as a .EVT, .TXT, or .CSV file. The Action, Export List command can save into .TXT or .CSV as plain text or Unicode text.
NOTE
After you save, the log is archived, but the current log isn't cleared. Its contents are unaffected. If your log is full, you have to clear it manually.
To recall an archived log for later examination, open it using the Open Log File command from the Action menu.
As you learned in Chapters 1 and 2, Windows XP is highly modular. Many of the inner housekeeping chores of the operating system are broken down into services that can be added, removed, started, and stopped at any time, without requiring a reboot. A typical Windows XP system has 80 or more services running at any one time. You can view which services are running by using the Services tool. Use this tool to start and stop services. Figure 27.14 shows a typical Services listing. To start, stop, pause, or restart a service, you can use the context menu or the VCR-like buttons on the toolbar. For deeper control of a service, such as to declare what automatic recovery steps should be taken in the case of the service crashing, which hardware profiles it should run in, and more, open its Properties dialog box.

Figure 27.14. While you're checking the status of services, you can start, stop, and pause system services from this screen.
Within the Properties dialog box, you'll find controls to set a service's startup type (automatic, manual, or disabled), start/stop/pause/resume buttons, and a startup parameters field. You also can set the account under which the service is executed (Log On tab), define how a service recovers from failures (for example, restart, run a program, or reboot the system) (Recovery tab), and view a list of service, program, and driver dependencies (Dependencies tab).
The System Tools section of the Start menu (All Programs, Accessories, System Tools) includes several interesting tools. Most of these are discussed in other chapters (such as Chapter 28, “Managing Users” [Files and Settings Transfer Wizard], and Chapter 29, “Managing the Hard Disk” [Backup, Disk Cleanup, Disk Defragmenter, and System Restore]). But, two tools from this menu are discussed in the following sections: Activate Windows and System Information.
You might recall from Chapter 3, I discussed the issue of Windows activation. If you failed to activate your system during installation, for whatever reason, you can use this tool to activate Windows XP. Keep in mind that you have 30 days to activate your system after the installation before it will no longer function. Also remember that if you try to activate the same copy of Windows XP on multiple computers, Microsoft's storm troopers may come a knockin' at your e-door.
Just be sure to have Internet access when you start this tool if you want to activate online. You can also activate over the phone. This wizard will walk you through the simple but necessary process of activating Windows XP. It will even provide you with the phone number to call if you don't have Internet access for online activation.
System Information is a simple but elegant tool. Opening this tool reveals a complex hierarchy of four folders, which in turn lead to a zillion lower folders containing an exact blueprint of your system, hardware, system components, and software environment. (You might have additional nodes in your system because some software you install may add nodes of their own.)
This tool is the first place I go whenever I have to install new hardware, especially when it's a legacy device that requires manual configuration of its system resources. Even for PnP devices, you may discover that they are not infinitely configurable. Instead, many devices have only three or four system resource combination sets (these include IRQ, memory address space, I/O, DMA, and so on). If your system does not have available resources to match one of these sets, the device will not function. If a device is limited to certain configuration sets, this will be detailed in the user manual and will appear as options on the Resource tab of the device's Properties dialog box.
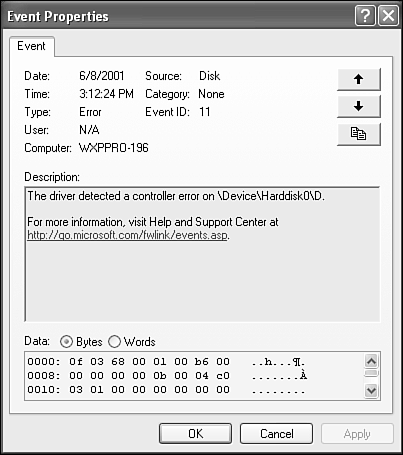
The top level, labeled “System Summary,” shows you basic information about your computer, operating system revision number, CPU, RAM, virtual memory, pagefile size, BIOS revision, and so on (see Figure 27.15).
Four nodes appear in the right pane of this figure:
Hardware Resources displays hardware-specific settings, such as DMA, IRQs, I/O addresses, and memory addresses. The Conflicts/Sharing node identifies devices that are sharing resources or are in conflict. This information can help you identify problems with a device. Some IRQs can be shared between devices successfully.
The Components node provides a truly powerful view of all the major devices in your system. Open any subfolder and click an item. In a few seconds, information pertaining to the item is displayed, such as drive IDs, modem settings, and video display settings. In some cases, you can also see driver details. Check the folder called Problem Devices to see a list of all devices not loading or initializing properly.
The Software Environment node is like a super Task Manager. It displays details of 12 categories of software settings. You can see the system drivers, certified drivers, environmental variables, print jobs, network connections, running tasks, loaded modules, services, program groups, startup programs, OLE registration, and Windows error reporting.
TIP
Ever wonder why some darned program starts up when you boot, even though it's not in your Startup group? It's probably hiding the Software Environment, Startup Programs folder. Travel down the path from System Information, Software Environment, Startup Programs, and take a look. I just checked mine and found RealTray and RealJukeboxSystray there. Hey, I don't want these things slowing down my bootup process. Office Startup is there, too. Unfortunately, you can't remove these startup utilities by right-clicking and choosing Delete. You have to use their related Setup programs. For example, to disable RealJukeboxSystray, I had to right-click its icon in the system tray and choose Disable Start Center.
There also is a helpful tool within Help and Support that can be used to enable or disable startup items. It's called the System Configuration Utility. To get to it, open Help and Support, click Use Tools to View Your Computer Information and Diagnose Problems under the Pick a Task section, scroll down in the Tools menu, and then click System Configuration Utility. Then click Open System Configuration Utility in the right pane, and then select the Startup tab.
The Accessibility section of the Start menu (All Programs, Accessories, Accessibility) includes several tools to ease, simplify, improve, or enable computer interaction for those users who are visually, audibly, or mobility impaired. These tools are in addition to the system settings available through the Accessibility Options applet in the Control Panel.
The Accessibility wizard is a great tool to help you quickly configure the system so it is at its most beneficial to you, no matter what disability affects you. This wizard walks you step-by-step through a decision making tree to determine fonts, screen size, colors, sounds, mouse actions, keyboard responsiveness, and so on. The results from this wizard make changes to the environment. These are the same changes you could manually adjust through the Accessibility Options applet in the Control Panel.
The Magnifier is a desktop looking glass that magnifies portions of the display by two times or more. When launched, a view window is created at the top of the desktop. The Magnifier can follow the mouse cursor, or focus on keyboard activities for text editing. This tool is a must for those with a slight visual impairment who need just a bit of magnification to read displayed text.
The Narrator is a text-to-speech program design to aid computer usage for the visually impaired. The Narrator will read aloud English text from most programs. Just highlight the text and then press Ctrl+Shift+Spacebar. It can also be set to read screen events (that is, read everything on the active window) and typed characters. The voice is the same controlled through the Speech applet. It's a bit coarse, but you can understand it.
The On-Screen Keyboard is just that, a point-and-click keyboard. It is designed to aid those with mobility impairments whose computer control is restricted to a joystick-type mouse. With just a mouse, the On-Screen Keyboard can be used to “type” out text or perform key-sequences.
The Utility Manager is used to manage the three accessibility tools (Magnifier, Narrator, and On-Screen Keyboard). These tools can be set to launch at login, at desktop lock, or when Utility Manager is launched.
These tools provide basic functionality for those with visual or mobility impairments. However, Microsoft warns that these tools should only be used as stop-gap measures. Those needing consistent aid in interacting with their computers should employ a dedicated specialty solution. Microsoft maintains a Web site with information on accessibility solutions at http://www.microsoft.com/enable/.
Windows Update serves to synchronize your operating system files with the newest developments for it at Microsoft. These can include free programs, security updates, bug fixes, drivers, or other extensions to the operating system. Using the Internet and Web technologies for updating your operating system means you don't have to wait for the next release of the operating system or install service packs to get interim updates.
The Windows Update command is found in several places, including the top of the All Programs section of the Start menu and on the Tools menu of Internet Explorer. Manually launching Windows Update gives you the ability to selectively download offered updates. However, you can easily configure Windows XP to download all relevant updates automatically. This setting is made on the Automatic Updates tab of the System applet (see the discussion earlier this chapter).
NOTE
Another Start menu item in the same category as Windows Update is Windows Catalog. This tool opens an Internet Explorer window to the Windows Catalog Web site. This site maintains a database of products made for Windows, including applications, devices, and complete PCs.
Microsoft is very keen on having you visiting the update Web site regularly. To do so, you can simply connect to the Net, and choose Start, All Programs, Windows Update. A typical page at the Web site looks like the one shown in Figure 27.16. The look of the pages and the list of updates obviously change from week to week, so what you see there might differ slightly from what you see here.

The ActiveX components that run when you visit the site scan your computer to determine what updates have been made in the past and which ones are outstanding. According to Microsoft, no corporate espionage or personal eavesdropping ensues during the process of system analysis. This is accomplished by downloading a master list of available updates and allowing a client-side component to determine which items are applicable to your system. Other than making requests for the master list of updates and for downloading the selected updates, no information is sent to Microsoft.
The first time you run it, the update tool creates a database of consummated updates on your computer. This information allows the installer to do the following:
More quickly determine which updates you haven't installed the next time you visit the site
Remove items you no longer want
Roll back the system to its previous state in case an update causes troubles
Look for a History button on the Web page (not the History button on the Internet Explorer toolbar, obviously) to see what you installed and when.
If you notice unruly system behavior after updating drivers, patches, or system files from Windows Update, you'll probably want to roll back your system to its previous state. You can remove such items by using the Update site. Look for instructions about uninstalling items there. You might have to display past updates by clicking the View Installation History button on the Web page. Then you can scroll down to the update and click Uninstall.
If you don't have Web access, are you sunk? No. Good thing, because you could conceivably make an update only to find it kills your networking or Web access. Some items, such as standalone programs, can be removed via the Control Panel's Add/Remove Programs applet, so check there to remove something such as FrontPage Express or non-Microsoft applications. Of course, you can't use this approach to roll back system files, patches, or drivers. To do that, you can use System Restore capability of Windows XP. Please see Chapter 33 for details.
The Task Manager is one tool you're bound to frequent, perhaps more than any other. Whenever an application crashes, you believe you're running some suspect process that you want to kill, or you want to check on the state of system resources (for example, RAM usage), you can use the Task Manager. Even as nothing more than an educational tool, the Task Manager is informative.
The Task Manager is always available, with a simple press of the “three-finger salute” (Ctrl+Alt+Del), and up pops the Task Manager (see Figure 27.17). Note that this is different from Windows NT and Windows 2000 where the Windows Security dialog box appeared following this keystroke pattern. You can also launch the Task Manager by pressing Ctrl+Shift+Esc or right-clicking over an empty area on the Taskbar and selecting Task Manager from the pop-up menu.

Figure 27.17. The Task Manager shows you which applications and processes are running and lets you terminate hung programs. It also indicates some important aspects of system performance.
The Task Manager of Windows XP has five tabs, two more than that of Windows NT and Windows 2000. Plus, there is a new menu—Shut Down. The Shut Down menu performs many of the same operations that the Windows Security dialog box performed under Windows NT/2000 when you pressed Ctrl+Alt+Del. This menu offers quick access to Stand By, Hibernate, Turn Off, Restart, Log Off current user, and Switch User. You'll note that all of these functions can also be accessed through the Start menu's Log Off and Turn Off Computer commands.
The other menus of File, Options, View, Windows, and Help all contain the items you've become accustomed to. These menus are somewhat context sensitive, meaning they have different elements depending on which tab is selected. You are smart enough to figure out what most of these commands do, so take the time to explore each menu from each tab. However, I will point out a few interesting commands when appropriate.
You can click the Applications tab of the Task Manager to see a list of the programs currently running on the computer. Not a lot of information is displayed, only the application name and the status (running or not responding). However, this tab does provide a more complete report than you'll get by glancing at the taskbar buttons or via the dialog box you see if you press Alt+Tab.
You can sort the list by clicking the column heads. If an application has multiple documents open, the application appears only once in the list, probably with the name of the document that is foremost at the time (has the focus). Some applications don't comply with this single-document interface (SDI) approach, listing each new document as a separate application. Some examples of non-SDI applications are MS Office programs such as Word, Excel, and PowerPoint.
From this list, you can kill a hung application. If an application has hung, it is probably reported in the list as Not responding (although this is not always true). Click the End Task button to terminate the task. If a document is open and unsaved, and if, for some unexpected reason, the program responds gracefully to Windows's attempt to shut it down (which is unlikely), you might see a dialog asking whether you want to save. More likely, Windows XP will just ask for confirmation to kill the application.
TIP
Before you give an application its last rites, pause for a bit. In general, it's not a good idea to kill an application if you can avoid doing so. Terminating an application can cause instability in the operating system (even though it shouldn't in most cases because of the kernel design). Or at the least, you can lose data. Try “jiggling” the application in various ways, in hopes of being able to close it gracefully first. Switch to it and back a few times. Give it a little time. Maybe even do some work in another application for a few minutes, or take a trip to the water cooler. Try pressing Esc while the application is open.
When executing some macros in Word, for example, I noticed that one of my macros hangs for no apparent reason. It seems to crash Word. So, I killed it from the Task Manager, losing some work. I later realized the solution was to press Esc, which terminated the macro. Having slow network connections and attempting to link to nonexistent Web pages, printers, or removable media can also cause apparent hangs. Try opening a drive door, removing a network cable, or performing some other trick to break a loop a program might be in before resorting to killing the program from the Task Manager. This is especially true if you've been working on a document and you might potentially lose data.
Some applications will so intensely perform calculations that the Task Manager will list them as Not Responding. If you suspect this, give the program five minutes or so to complete its thinking, I've learned the hard way to be patient with some applications.
Notice that you can also switch to an application in the list or run a new one. Just double-click the application you want to switch to (or click Switch To). Similarly, to run a new application, click New Task, and enter the executable name or use the Browse dialog box to find it. This dialog is no different from the Start, Run dialog box, even though its name is different.
Whereas the Application tab displays only the full-fledged applications you're running, the Processes tab shows all running processes, including programs (for example, Photoshop), services (for example, Event Log), or subsystems (for example, wowexec.exe for running Windows 3.x applications). In addition to just listing active processes, Windows XP displays the user or security context (that is, the user, service, or system object under which the process is executing) for each process—a great new feature not present in previous OSes. Also by default, the percentage of CPU utilization and memory utilization in bytes is listed. You can change the displayed information through the View, Columns command.
Almost any listed process can be terminated by selecting it and then clicking the End Process button. There are some system-level processes which even you as administrator don't have sufficient privileges to kill. You might also discover at times that an application will fail to be killed, typically due to a programming error or a memory glitch. In those cases, you should reboot the system. You might find that sometimes a hung application also will prevent a normal shutdown. If your attempt to reboot fails, you'll have to resort to manually turning the power off and then back on. Hopefully, you saved often and didn't lose too much work.
TIP
At the bottom of the Processes tab is a check box labeled Show processes from all users. If you've switched users, you can see not just the processes under your user account and those of the system, but also those of other active users. Plus, once displayed, you can also terminate them using the End Process button.
By studying the entries in the process list, you can learn some interesting facts about the operating system. For starters, you might be shocked to see just how many separate processes the operating system has to multitask just to keep going (see Figure 27.18). Notice that the highlighted process is ntvdm (NT Virtual DOS Machine); also, notice that wowexec.exe is running in it and is indented a bit (it appears just above ntvdm). The processes running along with the wowexec (three instances of Alarm, listed below wowexec) are also indented. All Windows 3.x processes run in the same VDM (by default), with wowexec.exe (WOW means “Windows on Windows”) being the process that emulates Windows 3.x. Terminating the ntvdm or wowexec process will terminate all three Windows 3.x applications.
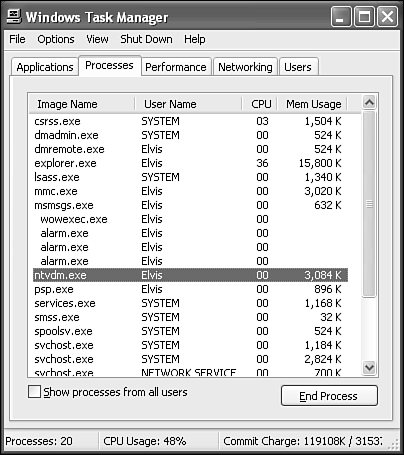
Figure 27.18. Examining running processes. Notice the wowexec.exe process, which is the Windows 3.x subsystem, and the three Windows 3.x programs.
For more details on managing DOS and Windows 3.x environments, please jump to Chapter 25, “Maintaining and Optimizing System Performance.”
If the true identity of some of the processes is something you're dedicated to uncovering, check the Services snap-in described later in this chapter. Many of the entries in the processes list are system services, the bulk of which load during bootup.
In the beginning, all tasks are created equal. Well, most of them, at least. All of the processes under your user account's security context will have Normal priority by default. Most kernel or system processes will have High priority. You might want to increase or decrease the priority of a process, though changing the priority typically isn't necessary. To do so, right-click the task and choose the new priority through the Set Priority sub-menu.
Avoid altering the priority of any task listed with a username of SYSTEM. This indicates the process is in use by the kernel. Altering the execution priority of such processes can render your system nonfunctional. Fortunately, process priority settings are not preserved across a reboot, so if you do change something and the system stops responding, you can reboot and return to normal. In some cases, raising the priority of an application can improve its performance. However, increase the priority in single steps instead of automatically setting it to the maximum. Throwing another top-priority application into the mix of kernel-level activities can render the system dead too.
There are six priority levels you can assign to processes: Realtime, High, AboveNormal, Normal, BelowNormal, and Low. Realtime is restricted for use by administrators. You should keep away from High since it can interfere with essential OS operations (especially if you have several user processes set to High). More details about process priorities is discussed in Chapter 25, “Maintaining and Optimizing System Performance.”
The Performance tab of the Task Manager indicates important conditions of your operating system. It shows a dynamic overview of your computer's performance, including CPU usage; memory usage; and totals of handles, threads, and processes (see Figure 27.19).

Figure 27.19. The Performance tab displays some interesting statistics and a chart of CPU and page file usage over time.
From the Performance tab, the View menu includes CPU History and Show Kernel Times. The former command is used to show different graphs for each CPU (only useful on multiple CPU systems). The latter command sets the display to show kernel activity in red and user activity in green on the CPU and Page file usage graphs. You should also notice that paging file usage is shown instead of memory usage.
Although CPU usage is interesting, the most important of these numbers is memory usage. You can easily check in the Physical Memory area to see how much memory is installed in your system, how much is available for use by applications before disk caching begins, and how much the system is using for caching.
NOTE
System cache is the total current swap and RAM area allocated for system operations. When your computer has to go to a disk cache to access information it significantly slows down overall system performance, which is why having more system RAM is almost always better.
The Kernel Memory area reports the memory in use strictly by the operating system for running the operating system internals. Nonpaged kernel memory is available only to the operating system. This memory is in physical RAM and can't be paged out to the hard disk because the operating system always needs fast access to it, and it needs to be highly protected. Paged memory can be used by other programs when necessary. Commit memory is memory allocated to programs and the system. Because virtual memory increases the amount of actual memory available, the Commit Peak memory can exceed the maximum physical memory.
In the Totals section, you can see the number of handles, threads, and processes. Threads are discussed in more detail in Chapter 2. Handles are tokens or pointers that let the operating system uniquely identify a resource, such as a file or Registry key, so that a program can access it.
Most of these size reports are of use only to programmers. However, the charts can offer strong, telltale signs of system overstressing. If you see, for example, that your page file usage is consistently nearing the top of its range, you are running too many programs. If the CPU is topped out most of the time, you also could be in trouble. Perhaps you have a background task running that is consuming way too much CPU time. An example could be a background program doing statistical analysis or data gathering.
The Networking tab (see Figure 27.20) displays a bandwidth consumption history graph. As network operations occur, this graph will plot the levels of usage. The View menu includes a Network Adapter History submenu. This submenu offers the ability to include bytes sent (red), bytes received (yellow), and bytes total (green) on the graph (shown by default). At the bottom of this tab, a list of all network connections along with details is displayed. The Columns command from the View menu is used to add or remove data columns from this display. This tab can give you a quick heads up if you suspect a network slowdown.
The Users tab shows a list of all active users on this system or connected via the network. From here you can disconnect a network user, log a local user off, or send a user a text message. The Users tab will only be visible if you are not participating in a Windows 2000/Windows Server 2003 Active Directory–based network, or have not disabled Fast User Switching if participating in a workgroup.
We are all familiar with the problem of an operating system becoming suspiciously unstable after the installation of a new application or a driver or after a system crash. Microsoft has been painfully aware of this problem for some time, and many a technician (whether a Microsoft employee or not) has been forced to instruct a PC user to “reinstall Windows” as the only solution. We all know how much fun that is. If you think Windows operating systems sometimes seem like a house of cards stacked level upon level, waiting for a single *.DLL or other system file to fail, well, you're right. This kind of vulnerability is wholly unacceptable in mission-critical settings, so Microsoft had to come up with preventive measures.
NOTE
Windows XP also supports a new side-by-side DLL feature. This automatic feature keeps track of the DLL versions used by installed applications. If a system update or an application install attempts to change the version of a DLL that is needed by a service or application, XP automatically places a copy of these necessary DLLs in the WindowsWinSxS folder. Each time an application is launched, XP checks its list to see what version of each required DLL is needed and loads those DLLs into that application's virtual machine. No more “DLL hell.” This feature is completely automatic and invisible to the user.
Windows has means for setting up options that prevent the often-unintentional destabilization of the operating system from applications or driver installations or, in the worst case, the introduction of viruses that intentionally alter or overwrite system files. Windows XP's Security Manager and file system work in symphony to help protect critical system files and drivers. Several areas of system functionality help prevent damage from the installation of untested drivers or from modification of system executables such as dynamic link libraries (DLLs). They are as follows:
Windows File Protection service—. This service is a function of the operating system that continually monitors protected system files, standing guard against attack.
System File Signature Verification tool—. You can use this command-line executable to check the signatures on your essential system components.
System File Checker tool—. You can use this command-line executable to verify that system file versions align properly.
The essential (and automatic) portion of this trio is the first one. Windows XP's file protection system is enabled by default, and it prevents the replacement of the protected system. Windows File Protection runs in the background and protects all files installed by the Windows XP setup program—.SYS, .DLL, .OCX, .TTF, .FON, and .EXE files. If one is replaced or altered, by default, a dialog box alerts you that a program is attempting to alter a system file.
In Chapter 25, you learned about setting up the three levels of overwrite protection for Windows File Protection: ignoring, warning, or preventing modification of all system files. Here, I'll talk a bit about a standalone utility supplied with Windows XP that you can use to scan for modified files that may have slipped through the detection process.
To verify that system files have a digital signature, follow these steps:
Choose Start, Run, and then enter
sigverifto launch the File Signature Verification tool.Normally, the program searches for any system files not signed, and when you close the program, the results are saved in SIGVERIF.TXT. If you want to search for nonsystem files as well or append to an existing log of found items, click the Advanced button and set up the log file's name, append option, and other related options.
Back in the File Signature Verification dialog, choose Start. The tool then checks to see which system files are digitally signed and displays its findings. Typically, you see the message displayed stating that files have been scanned and verified as digitally signed. Otherwise, you'll see a list of files that have not been digitally signed. If you have logging enabled, these search results are also written to SIGVERIF.TXT in the <system root>Windows directory (by default).
Another program, closely related to the File Signature Verification tool, is the System File Checker. This tool looks for protected system files and verifies that their version numbers link up with the operating system and that they haven't been replaced or trashed accidentally. The System File Checker is a command-line program that you set up using a keyboard-entered command. It then runs the next time you boot.
If the System File Checker discovers that a protected file has been overwritten, it retrieves the correct version of the file from the <systemroot>system32dllcache folder and then replaces the incorrect file. It uses the following syntax for program execution:
sfc [/scanonce] [/scanboot] [/cancel] [/quiet]
The details for these parameters are as follows:
/scanonce
The preceding syntax scans all protected system files once.
/scanboot
The preceding command scans all protected system files every time the computer is restarted.
/cancel
The preceding command cancels all pending scans of protected system files.
/quiet
This command replaces all incorrect file versions without prompting the user.
NOTE
What if something or someone has trashed the system32dllcache folder? No problem. The sfc /scanonce or sfc /scanboot commands repair the contents of dllcache if it's unreadable.
Windows File Protection, if turned on, normally prevents any kind of intrusion that might result in a corrupted file, at least from an outside source such as a third-party program installation. If all is working as planned, you don't have to worry about running this program or the File Signature Verification program with any regularity. If you want to play it super safe, though, protecting also against microscopic bit loss on the hard disk or crafty hacking, you can use the /scanboot option to check each time you boot. The verification process doesn't take very long to complete.
As mentioned previously, the Computer Management tool actually is a subset of something much larger and more extensible—the Microsoft Management Console (MMC). I suppose what happened is that Microsoft finally understood that PC administrators were frustrated by the myriad convoluted means for managing their computers. Managing local or remote machines by hopping around between Control Panel applets, Explorer Properties sheets, and icons such as Network Neighborhood just didn't cut the mustard. Administrators and power users wanted one unified tool, a so-called single-seat solution for computer management. They also demanded the capability to construct personalized toolkits to delegate specific administrative tasks to users or groups without jeopardizing the health of the system by giving away the farm.
The Microsoft Management Console does just this. It's a highly extensible tool interface based on modules called snap-ins that perform specialized services. In turn, snap-ins also can be made up of additional extension snap-ins.
When a customized set of snap-ins and extensions is put together, you can save it as an MMC console for later use. Consoles are saved as .MSC files that are small and easily transportable because, basically, they're just a list of objects and properties. So, you can create an MMC console for, say, co-workers, and email it to them, post it on the Web, or make it available in a shared folder on the LAN. Consoles can be exclusively assigned to a specific user or group of users using system policy settings. Because MMC files are editable, you can change them after the fact, adding or removing snap-ins and extensions at will.
Putting together your own MMC consoles is as easy as pie. As when you build a Web page or a brochure, you can start with an existing template of tools and then add or remove snap-ins and extensions. Microsoft supplies a broad selection of tools for futzing with the operating system, and other snap-ins are available from third parties.
The following steps show you how to create a personalized console:
To open the base Microsoft Management Console application, choose Start, Run and enter
mmc. The empty console is nonfunctional until you add some snap-ins. Also, the menu commands apply to the entire console because no individual snap-ins are yet loaded.Choose Console, Add/Remove Snap-in. On the resulting Add/Remove Snap-in dialog box, click the Standalone tab. Choose the insertion point for the snap-in from the drop-down list. Use Console Root because there probably isn't another choice, anyway.
Click the Add button. You see a list of standalone snap-ins, as shown in Figure 27.21.
For this example, suppose you want to add Computer Management to your console. Click it, and then click Add. A dialog box comes up asking whether changes you make with this console will apply to the local computer or a remote one. Typically, you choose local. Then, click Finish.
When you return to the Add/Remove Snap-in dialog box (which might require closing the Add Standalone Snap-in dialog box), click the Extensions tab. Now you get to choose the details of the standalone snap-in that you want available in your console. This step is similar to clicking the Details button when you do a custom installation of programs such as Office.
Check the extensions you want included in your console. Uncheck the ones you don't want included.
Repeat the process to add and set the details for other snap-ins. For example, you might want to add Certificates Management to your console.
TIP
You can open a second console window by right-clicking a service in the left pane and then choosing New Window from Here. Then choose Window, Tile Horizontally to arrange the windows.
To save your console, choose Console, Save, and save it in the usual fashion. It is given an .MSC extension. You can later run it by double-clicking it.
In summary, understand that the Microsoft Management Console is a powerful tool, complex enough to write an entire book about. For more information about the Microsoft Management Console, check the following site:
http://www.microsoft.com/windows2000/technologies/management/mmc/
My Task Manager seems stuck. It doesn't reflect newly opened or closed applications.
You might have this problem if you've paused the Task Manager. Choose View, Update Speed, and then choose any setting other than Paused. Another approach, if you want to keep it paused, is to choose View, Refresh Now.
My Task Manager doesn't drop into the background when I click another program.
Like some Help files, the Task Manager has an Always on Top option. Choose Options, and turn off this setting.
I'm seeing Windows Update in the wrong language. Why?
You're probably having this problem because of settings in Windows and Internet Explorer. But let's start at the beginning. The first thing to know is that every copy of Windows has a language tag associated with it. If you're running an English version of Windows XP, then Windows Update is only going to offer to download English-based add-ins for the operating system.
Now with that said, yes, you can change the language in which you view the Windows Update pages. If you have the wrong Regional settings in Windows and/or in Internet Explorer, you might be dishing up Greek or Italian when you want English. Here's the order in which Windows Update checks for your language preference:
Language tag of your copy of Windows and Internet Explorer
Your system's Regional Settings
Internet Explorer's auxiliary language preferences setting
The catch is that Internet Explorer has a feature called Accept Language, which supersedes the Windows Regional Settings. If you are viewing Windows Update (which is available in multiple languages), Internet Explorer looks to the list of languages in your language preference settings to determine which language to display. This list is prioritized, so if you have Greek as the first language and English as the second, Windows Update is displayed in Greek.
To see the Windows Update site in a different language, you can adjust your Internet Explorer's language preference settings as shown here. Note that changes here affect other multilanguage sites that you view.
In Windows Update, I can't view update details, installation history details, or troubleshooting articles.
This is probably because you have a pop-up blocker set either in IE or another program. That prevents Windows Update's site from opening new browser windows from links that you click. To change Pop-up Blocker settings (available only for Internet Explorer 6):
In Internet Explorer, on the Tools menu, point to Pop-up Blocker, and then click Pop-up Blocker Settings. Then do one of the following:
To allow pop-up windows only when using Windows Update, under Address of Web Site to Allow, type (or copy and paste) this URL: https://windowsupdate.microsoft.com and then click Add.
To allow new browser windows to open when using any secured (
https://) Web sites, in the Filter Level list, click Low: Allow Pop-ups from Secure Sites.
If you use other pop-up blocking software, find out whether you can change your settings just for links that you click within a Web site. If not, you might need to allow pop-ups while using Windows Update.
Also, make sure you're not using a browser other Internet Explorer. Due to the extensive use of ActiveX controls, Windows Update may not run reliably on other browsers.
My Scheduled Tasks doesn't seem to activate correctly. What's the problem?
You can check several things when a Scheduled Tasks job doesn't activate correctly. Here's the rundown; check these steps in order:
Open the Scheduled Tasks window, and then open the properties for the task. Make sure the task is actually enabled via the Enabled check box on the Task tab.
On the Schedule tab, verify that the schedule is set correctly.
Check the permissions for all the items involved in running the task, such as scripts, executables, and so on. Make sure the permissions for those items match those of the user account assigned to the task.
If a user whose account a task is set to run in is not logged on at the time the task is scheduled to run, the task runs but is not visible. Check the task log file to see whether the task was running but you didn't know it.
Some commands hang, waiting for user input, unless launched with command-line arguments. Research the command or executable you are trying to run. Check the Help file for the program or issue the command from a command prompt window, followed by
/?,-?, or just?to see a display of options.Check or ask your administrator to check that Scheduled Tasks service is turned on (by choosing My Computer, Manage).
Check the Status column in the Scheduled Tasks window, and look for the task in question. (Use the Details view.) Table 27.6 describes the status types.
Table 27.6. Scheduled Task Status Types
No events are showing in my security log.
By default, security logging is turned off in Windows XP. Therefore, no security events are monitored or recorded, and your security log is devoid of entries even if you do have the administrative rights required to view them. See Chapter 21 for details on auditing and the recording or logging of security events into the Security log.
The following tricks are two of my personal favorites. The first is helpful if you frequently work with a laptop computer and want to add a serial mouse without closing all your applications and rebooting.
The second tip is especially helpful if you want to deter workgroup users from using the Windows Update feature without first checking with the system administrator.
Due to the cramped or otherwise uncomfortable position I have to assume to use my laptop keyboard, I very often plug in an external, ergonomic keyboard with a trackpad on it. Then I can sit back in my chair, keyboard on my lap, or even stand the computer up sideways. In any case, I don't always want to power down and then reboot just to plug in the keyboard and mouse.
Now, if the mouse and keyboard were USB devices, this wouldn't be a problem because USB supports hot docking. Keyboards, mouse devices, graphics tablets, and many other external devices such as cameras, printers, scanners, and PDAs are available in a USB-enabled version, but that doesn't mean you own them.
My keyboard plugs into the PS/2 port, which is no problem. Although making PS/2 connections with a computer turned on is not advisable (it can blow the driver chip for the port), I do it anyway, and on my Dell 7000, it hasn't posed a problem. The keyboard is immediately recognized and works fine. But the rub is that the trackpad, which connects to the serial port (a second PS/2 port for a mouse is not available on my machine), isn't recognized. Connecting the mouse doesn't result in anything at all, functionally. For a while, I resorted to rebooting Windows XP. Hibernating or suspending didn't force a hardware redetection. Another approach was to run Add/Remove Hardware, but that's a pain because it takes too long.
I discovered that the Device Manager can scan hardware and see whether anything new is lying around, without its driver. After I had installed the trackpad software, it was part of the Device Manager's list for the computer. But when the mouse is sensed as unplugged, the operating system marks it as not functioning (with an exclamation mark in the Device Manager). To get it going again, no reboot is necessary. I just had to do the following:
Reconnect the mouse.
Get to the Device Manager (you can do so from Control Panel, System, Hardware tab).
Click somewhere on the computer's tree, such as the top level, the icon showing the computer name. (This step is imperative, or the next step isn't possible.)
Choose Action, Scan for Hardware Changes.
Wait about 10 seconds while Windows does its thing. Now the external mouse should work.
As good an idea as Windows Update is, unauthorized use of it could be annoying to a system administrator. Corporate system administrators who are responsible for hundreds of PCs need to control what goes on their machines, especially in the way of core operating system updates. It is possible to remove the Windows Update icons that appear in the Start menu, and even prevent the users from accessing the Windows Update site (http://windowsupdate.microsoft.com) from anywhere within Windows.
By using the Windows XP Microsoft Management Console's snap-in called Local Computer Policy, you can disable Windows Update on the Start menu. Although you can modify and configure MMC to view policies in many ways, the most generic way to configure a new console root is as follows:
Choose Start, Run. Then enter MMC and click OK.
From the console, choose Add/Remove Snap-in.
Choose Add, Choose Group Policy. Then click Add, Close, and finally OK.
Navigate down by expanding the Local Computer Policy by expanding User Configuration, and then expand Administrative Templates, then select Start Menu and Taskbar.
Double-click Remove Links to Windows Update.
Click OK.
Click File, Exit. If prompted to save settings to the Console, click No.