In this appendix
Windows XP is part of Microsoft's “New Technology” or NT family of operating systems, along with Windows NT, Windows 2000 Professional, and the various flavors of Windows 2000 Server, and Windows Server 2003. These operating systems were designed from the ground up for stability, reliability, and security, and to keep them in tip-top shape, Microsoft releases a constant stream of software updates called Critical Updates, Recommended Updates, and Hotfixes:
Critical Updates are just that: Fixes for bugs that are so severe or involve such serious security risks that you really have to install them. As you know, XP can automatically download and install these, or at least download and offer to install them, so you don't miss out. You can also find a list of Critical Updates by visiting the Windows Update Web site.
Recommended Updates are not security fixes, but are updates to accessory programs like Messenger and Media Player, new desktop themes and the like. Recommended Updates are also listed on the Windows Update Web site.
Hotfixes are bug fixes that affect a small enough group of users that Microsoft doesn't send them out to everyone. Instead, you have to hunt for them by researching the Knowledge Base at support.microsoft.com, or hear about them from Microsoft's Tech Support department. They're not widely advertised because (a) if you're running into a serious-enough problem, you'll go looking for the solution, and (b) Hotfixes tend to be released in a hurry without extensive testing, so they sometimes cause new problems of their own. Hotfix users tend to be corporate IT people whose job it is to stay on top of these things.
Periodically—it's supposed to be every 12 months but in practice it's less often—Microsoft gathers all of the Critical Updates, Recommended Updates, and Hotfixes, tests them extensively, and releases them as a Service Pack. Service Packs, then, represent a complete, cumulative set of fixes and additions made since the initial release of an operating system. Service Packs can be obtained on CD-ROM media, or can be downloaded from Microsoft's Web site.
If you're used to Windows 95, 98, and Me, where you were basically left twisting slowly in the wind when it came to bug fixes, this is a really big deal. You have a real operating system now, and you are going to get the kind of support you should have been getting all along.
Service Pack 2, or SP2, contains not only fixes for hundreds of bugs and security issues, but also many new features mostly centered on improving security (see Appendix B for the details). Don't let the “hundreds of bugs” worry you—in a collection of programs as large as XP, there are bound to be thousands of bugs. Luckily, most of them are very, very obscure, and affect only a few users with specific hardware and software combinations.
NOTE
At the time this was written, SP2 was not available for Windows XP 64-bit Edition.
However, if you are running one of the 32-bit versions of Windows XP (Home Edition, Professional, Tablet, or Media Center) on an AMD 64-bit (Opteron) processor, you can install SP2. Be sure to read the notes on the new “NX” option in Appendix B.
You might wonder whether you really need to install Service Packs, since you probably install the Critical Updates that XP downloads and informs you of from time to time. The answer is emphatically yes, for two reasons. First, Service Packs fix those annoying but minor bugs that you may not even realize are there—that odd crash every other week, or that weird sound that Media Player makes once in while. Second, application programs will eventually appear that require a certain Service Pack level in order to run correctly. Windows evolves, so you need to keep up. Those two reasons alone are enough to warrant installing any service pack, but Service Pack 2 is extraordinarily important because of the many Internet-related security issues it addresses.
Here are some other things that you should know about Service Packs:
They're cumulative, so, for example, Service Pack 2 includes all the changes in Service Pack 1. If you skipped a previous service pack, you can still install a newer one without missing anything.
If you use Add/Remove Programs to install optional Windows components after installing a service pack, you don't have to install the Service Pack again, as you did with Windows NT and 2000. Windows Setup may still ask you to insert the Service Pack media, or it may need to download updated files, but it won't mess you up by installing out-of-date components.
Starting about the same time that Microsoft releases a Service Pack to the public, new computers purchased from major vendors should come with the service pack preinstalled. (At least, it should be an option. If you're buying a new computer, ask for the latest version). To check the current service pack level of your Windows XP computer, open Windows Explorer and select Help, About Windows. Or, type
winverat the command prompt. Compare that to current Service Pack level listed at windowsupdate.microsoft.com.While this appendix describes the procedure for obtaining and installing Service Pack 2, it's very likely that the procedure will be similar for subsequent service packs as well.
NOTE
In a corporate environment, your IT department will most likely control the installation of service packs. If this is the case for you, you might want to just skip ahead to Appendix B to read about the changes that come with SP2.
Now, let's talk about how to install the Service Pack on your computer.
Windows XP Service Pack 2 (SP2) comes in four different flavors. The four means of installing SP2 are summarized here and explained in detail throughout the rest of this appendix.
Automatic Updates—. If your computer was set up to automatically download critical updates from Microsoft, and you spend enough time connected to the Internet, Service Pack 2 will be downloaded automatically. All of the required service pack files will have already been downloaded by the time you get the notification to install them. I'll discuss the installation procedure shortly. (On a corporate network, your network manager may have disabled this option.)
Windows Update—. If the Automatic Updates feature was not enabled, you can install Service Pack 2 from the standard Windows Update Web page. Windows Update will download from Microsoft just those service pack components needed for your computer, saving some download time over the “standalone” method. However, if you have more than one or two computers to update, you'll save time by using the Standalone version.
Standalone—. The standalone version is the traditional Service Pack format. It's a compressed file that, for SP2, weighs in at nearly 275MB, and contains all of the updated files needed to add SP2 to any version of Windows XP. If you have two or more computers to update, the standalone method is the one to use. While it's bulky and contains updated components that your particular computers may not need, it's still faster to download this one large file than to have several computers download the Windows Update version independently. You can download the SP2 setup file from www.microsoft.com/technet.
If you have a slow Internet connection, you can order the standalone version on a free setup CD from Microsoft at www.microsoft.com/windowsxp/sp2, or you can likely obtain one at a computer store or from a friend.
TIP
If you download the standalone service pack file, its default name will be something like WindowsXP-KB835935-SP2-ENU.exe. I recommend that you save it with a more presentable name like XPSP2.EXE, unless you have to keep track of several SP versions in different languages. Save the file in a shared network folder, or burn it onto a CD.
You can either expand the Service Pack onto a shared network folder for faster, easier installation onto several computers, or you can carry the Service Pack CD from one computer to another. The standalone Service Pack can also be used to “slipstream” Windows XP installation media—that is, to update a set of Windows XP setup files so that future installations onto new computers will start out with SP2 already present.
Integrated—. The integrated version is a full, fresh installation version of Windows XP that has SP2 already included into its code. This can either be a new installation CD-ROM acquired from Microsoft or an OEM, or a “slipstreamed” installation CD-ROM or network share that you have created yourself. Installing an integrated version performs a full, clean installation of Windows XP SP2 without the need to subsequently install the Service Pack. However, it can't be used to upgrade an existing XP setup.
Regardless of which update method you choose, you should first perform the following steps:
If you use Fast User Switching, be sure all users are logged off. Then, log on as a Computer Administrator. Close any applications that are running.
Update your Automated System Recovery disk.
We recommend that you perform a full backup of the files that you keep on your computer.
Note
→ To learn more about the Windows Backup utility or the Automated System Recovery Utility, see “Backup Tools and Strategies,” p. 1142.
Check the Web sites of the manufacturers of your computer, your application software, and your antispyware and antivirus packages for updates or special instructions regarding SP2. Some programs may need to be updated to work with SP2.
If you suspect that your computer may have viruses, spyware, adware, or other pestilential software, take steps to remove it before installing SP2. These programs can cause serious networking and Internet connection problems after installing SP2, and without a functioning Internet connection you may not be able to download the necessary clean-up tools.
Disable any real-time virus scanners, because they can slow down and possibly interfere with the installation. You should disconnect from the Internet first, if you do this. (And be sure to reenable the virus scanners after you install SP2.)
You will need 1100MB of free space on your hard drive if installing pre-expanded files from a network folder, or 1600 MB of free space if installing directly from a CD-ROM or downloaded file. (Microsoft Knowledge Base article 837783 gives a detailed description of the disk space requirements.)
Then, use one of the update procedures described in the next several sections.
If your computer is set up to receive Automatic Updates, Windows will automatically download the Service Pack files while you're connected to the Internet. However, even if you've configured Automatic Updates to automatically install the updates it receives, it will never install a full Service Pack without your permission.
After following the preparation steps in the previous section, follow these steps:
Log on as a Computer Administrator and close any running applications.
When the Express Updates icon appears in the Notification Area on the task bar, double-click it and ask to view the update details. If Service Pack 2 is listed, the files have already been downloaded. Follow the screen's instructions to tell Windows to perform the installation.
The Windows XP Service Pack 2 Setup Wizard appears reminding you to perform a backup. Click Next to continue.
On the License Agreement page, click I Agree, and then click Next to continue. The wizard will work awhile as it inspects your Windows installation.
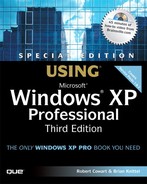
On the Select Options page (see Figure A.1), you will be asked where to store the system files that SP2 is replacing, so that if necessary you can uninstall the SP2 upgrade at a later time. You can leave this set to the default folder WINDOWS$NTServicePackUninstall$, or you can select another location to hold the archive folder. For example, if disk space is tight, you can put it on a drive with more space. (You can delete the 300MB of archived files later, using the procedure at the end of this appendix). After making your selection, click Next to continue.
The Updating Your System page appears. During this phase of the upgrade, Windows will inspect your current Windows XP files, archive your current Windows files, and lastly, install the SP2 files. This phase can take a long time.
After some time, you will be presented with a summary page informing you that the installation of SP2 has been completed. Restart your computer to complete the installation of SP2.
Now, skip ahead to the section titled “After Installing SP2,” later in this appendix.
If you have a single computer to update, you can use Windows Update. Here is the procedure:
Log on as a Computer Administrator and close any running applications.
Check to see if the Express Updates icon appears in the Notification Area on the taskbar. If it does, double-click it and ask to view the update details. If Service Pack 2 is listed, the files have already been downloaded and all you have to do is let Windows complete the installation by following the procedure in the previous section.
Open Internet Explorer and visit windowsupdate.microsoft.com. You may be asked to install the latest version of the Windows Update software. If a pop-up appears asking you to do this, click Yes.
Select a Custom install. From the list of available critical updates, select the Service Pack 2 Express Install. Windows will download the Service Pack installer and components.
From this point, follow steps 3 through 7 in the previous section, “Installing via Automatic Updates.”
As I mentioned previously, if you have only one or two computers to update, the Automatic Updates or Windows Update will save you time by downloading only the necessary files. However, if you have a slow Internet connection or you have many computers to update, it's worth getting the standalone update package on a CD or via download.
The standalone upgrade is the most robust of the three versions of SP2. You can use the standalone SP2 package in three different ways:
To upgrade a copy of Windows XP by running the Service Pack program directly.
To upgrade a copy of Windows XP using pre-expanded files stored in a shared network folder.
To create a slipstreamed Windows XP SP2 installation source that can be used to deploy new installation via RIS or with a CD-ROM.
The following three sections describe the procedures.
Most home and small office users will want to install SP2 locally. You can use either a CD-ROM–based installation kit, or a service pack .EXE file downloaded from Microsoft. The procedure is identical once you've determined the location of the service pack setup file. Proceed as outlined here:
Log on as a Computer Administrator and close any running applications.
If you are using a Microsoft-supplied CD, insert the CD, and the setup program should automatically start up. If it doesn't, or if you are using a downloaded service pack file, locate and double-click the service pack's .EXE file in Windows Explorer, or start the installation program from the command line.
From this point, you can follow steps 3 through 7 in the section titled “Installing via Automatic Updates,” earlier in this appendix.
Installing SP2 from a network file share is the best option when you have several computers to upgrade—you'll save a lot of time by expanding the service pack files just once. This option works equally well at home, in a small office or in a corporate domain network environment. Here is the procedure to prepare the installation file set:
Choose a file server or computer to host the service pack setup files. On that computer, create and share a folder to hold the installation files. Name the shared folder
xpsp2. Make a note of the full path to this folder.Locate the Service pack's .EXE file, and make a note of the full path to and name of this file. This could be something like d
:xpsp2.exe, if you are using a Microsoft-supplied CD-ROM, or c:downloadsWindowsXP-KB835935-SP2-ENU.exe, if you downloaded the file from Microsoft's Web site.Open a command prompt window. Type that full pathname followed by
/x, as in this example:d:xpsp2.exe /x
You will be prompted to specify the location to store the extracted files to, as illustrated in Figure A.2. Enter the local or network path of the shared folder that you created in step 1, and click OK.
Ensure that the network folder has NTFS and/or share permissions that let network users read but not modify the files.

Now, at each computer that you want to update with the Service Pack, including the one that is hosting the files, browse to the shared network folder you created in the previous steps and run the program i386updateupdate.exe. You can do this using Windows Explorer or from the command line. The command line command would be something like this:
\servernamexpsp2i386updateupdate
with the actual name of the computer that is sharing the xpsp2 folder in place of servername.
The rest of the procedure is identical to steps 3 through 7 in “Installing via Automatic Updates,” earlier in this appendix.
As with all Service Packs, Windows XP SP2 can be installed from the command line, using switches to modify the behavior of the setup process. The full list of command line options is
xpsp2.exe /f /l /n /q /integrate:folder /u /z /norestart /forcerestart
or for the already-expanded version
update.exe /f /l /n /q /integrate:folder /u /z /norestart /forcerestart
These options are described in Table A.1.
Table A.1. Command Line Options for Service Pack Installation
NOTE
The switches described in Table A.1 work with either the XPSP2.EXE self extracting archive (which expands the service pack files) or the update.exe file (which actually performs the service pack installation).
You can precede the switches in Table A.1 with either a slash (/) or a dash (-); it makes no difference to the setup routine. Additionally, the switches are not case sensitive.
In addition to the switches listed in Table A.1, there are two additional switches that can be used only with the XPSP2.EXE program. These are listed in table A.2.
Installing Windows XP with SP2 using Integrated installation media can be done via one of two ways: either using a CD-ROM that you have created via slipstreaming or acquired from a vendor, or by making use of the Remote Installation Service of Windows 2000 Server.
This procedure can be used on an existing Windows XP computer, as well as a new computer with a blank hard drive. However, this is a “clean install,” with only the default user accounts and no installed applications. It's not a way to upgrade an existing XP installation.
The process to install from an integrated-setup CD-ROM is the same as installing Windows XP from the CD-ROM as discussed in Chapter 3. For information about deploying Windows XP using RIS, visit www.microsoft.com/technet and search for “RIS”, or see Chapter 2 of the Windows XP Professional Resource Kit.
When you restart Windows after installing the service pack, you will be shown two new screens. The first (Figure A.3) appears before the logon screen, and encourages you to enable Automatic Updates. Unless you are in a corporate environment that manages critical updates in a different way (and in this case you probably won't even have the opportunity to make this choice), you should definitely enable automatic downloading of critical updates.

The choice of whether to have them automatically installed after being downloaded is up to you:
If you leave your computer on all the time, you leave the default settings in place, and Windows will install downloaded updates automatically at 3 a.m. This will ensure that updates will always be installed as soon as they are available, reducing the window of opportunity for hackers to exploit whatever new bugs have been found. (By the way, Windows will never automatically install a full service pack. You will always be given the opportunity to permit or defer the service pack upgrade.)
If you don't usually leave your computer on all night, tell Windows to download but not install the updates. You will have to remember to log on as a Computer Administrator periodically—at least once a week—so that Windows can notify you when new updates are ready to install.
To change the automatic installation time, or to disable automatic installation, you will need to change the default settings.
Note
→ To learn how to make changes to the Automatic Updates settings, see “Setting Automatic Updates,” p. 1022.
The first time you log on after installing SP2, log on as a Computer Administrator. Windows will display the new Security Center screen (see Figure A.4). This screen shows at a glance whether Automatic Updates are enabled, whether the Windows Firewall is enabled (and it will be enabled at this point, just after installing the Service Pack, unless you are on a corporate network that uses Group Policy to disable it), and whether or not you have antivirus software that is installed, enabled, and up-to-date.

If you have antivirus software that you disabled before installing the Service Pack, re-enable it now. If the Security Center still indicates that it is disabled, then your virus software needs to be updated to work with SP2. Visit the manufacturer's website for an update.
If you don't have antivirus software, Windows is going to pester you with a pop-up balloon at least once a day until you get some, or until you disable the warning. We recommend that you do get a good antivirus program, and that you configure it to update itself at frequent intervals—out-of-date antivirus software is as bad as none at all.
NOTE
If you don't have antivirus software and you are absolutely sure that you don't want to get it, here's how to disable the annoying daily pop-up warning: Open the Windows Security Center (get there through the Control Panel if it's not already open), and under Resources click Change The Way Security Center Alerts Me. Uncheck Virus Protection, and then click OK.
If you later do install an antivirus package, be sure to re-check this box, so that Windows can periodically check to be sure that your antivirus package is up-to-date.
If you choose to disable Windows Firewall or Automatic Updates, you will get frequent warnings about it. You can use this same technique to disable those warnings.
Now, the Service Pack installation procedure is complete. At this point you might want to make another full backup (onto a different tape or disk file!) and another Automated System Recovery disk. Also, check out Appendix B for a discussion of the changes in SP2.
And, you might still have to deal with some issues with network software.
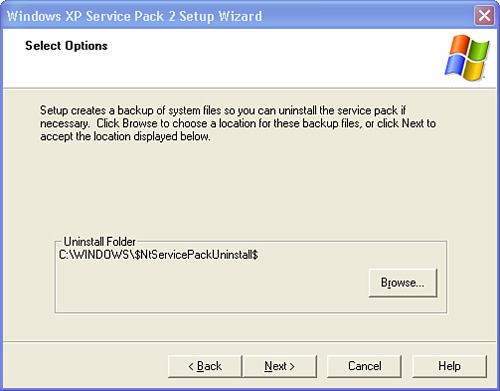
Service Pack 2 differs from all previous Windows service packs in that it changes network security settings to very restrictive values. The new Windows Firewall is automatically enabled, for starters. You may see the effects of this immediately, if you have automatic-startup programs that want to be able to receive network connections from other computers. AOL Instant Messenger and Windows Messenger are such programs. A pop-up dialog similar to the one shown in Figure A.5 may appear.
Figure A.5. Windows Firewall may pop up a warning that a program wants to receive network connections.
If this happens, check the name and publisher of the program very carefully. This kind of warning can come from legitimate software such as Windows Messenger, in which case you should click Unblock to let the program do its job. However, the warnings could also come as a result of a Trojan Horse (virus) program that had infected your computer prior to installing the service pack. In this case click Keep Blocking, and find out what the program is.
TIP
You can open a Command Prompt window and type the command netstat -ab | more to get a list of all programs that are listening for incoming network connections. (This may take a long time.) This may help you or your network manager find out what type of network service the program is trying to provide.
Note
→ To learn more about Windows Firewall, see “Configuring Windows Firewall,” p. 840.
For the most part, this kind of pop-up warning does not appear if a system service wants to receive network connections. If you had a service like a mail server, Internet Information Services, or another Web server installed before installing SP2, these services will no longer be reachable by other users on your network or the Internet. If you had a Web server or other network services installed, you must manually make entries to “open” the Firewall so other users can reach the services.
Note
→ To learn more about opening the firewall for network services, see “Making Services Available,” p. 765.
Some services, such as Remote Assistance and Remote Desktop, automatically add themselves to the Firewall list, so you should not need to make entries for these programs. (Remote Desktop, however, will open the wrong port if you've changed its listening port number from the default value of 3389; in this case you will have to manually add an entry for port 3390. See Chapter 18 for details).
Finally, many enterprise applications based on Windows's COM or COM+ networking services may stop working after SP2 is installed, due to tightened network security. Your IT department will have to update this software or reconfigure your computer. Microsoft's TechNet website (www.microsoft.com/technet) contains extensive information on this issue. It's written for software developers and network managers rather than end-users.
If you run into problems after installing the service pack, you might want to check this nice index of Microsoft
NOTE
Knowledge Base articles pertaining to SP2: http://bink.nu/files/sp2kbs.htm.
Should Service Pack 2 not be to your liking, or if serious and unresolvable problems arise after installing it, you can easily uninstall SP2 from the Add or Remove Programs applet of the Control Panel. To remove SP2, proceed as follows:
Open the Add or Remove Programs applet by clicking Start, Settings, Control Panel, Add or Remove Programs.
Highlight the “Windows XP Service Pack 2” entry and click Remove.
When Windows asks you to confirm that you want to remove the service pack, click Yes. Follow the remaining prompts to finish the process. You may see a dialog box displaying a list of applications that you have installed since installing SP2. These applications may not function properly after the removal of SP2, and thus may require reinstallation.
If after testing SP2, you don't want to keep the option of uninstalling it, you can recover about 300MB of disk space by deleting the archived files.
To do this, follow these steps:
Log on as a Computer Administrator.
Open Windows Explorer. Click Tools, Folder Options, and select the View tab. Under Advanced Settings, be sure that Show Hidden Files and Folders is selected. If it isn't, select it. Click OK to close the dialog.
Click View, Details.
Browse to the Windows folder, usually C:WINDOWS. You should see a folder named $NtServicePackUninstall$. Right-click it and select Delete.
Open the Control Panel, and open Add or Remove Programs. Highlight Windows XP Service Pack 2 and click Remove.
If Windows asks you if you really want to remove the Service Pack, click No! Bad news: the “uninstall” folder is still present. You may have deleted the folder from an inactive Windows folder; find and delete the correct uninstall folder before proceeding.
What you are hoping to see is the message “An error occurred while trying to remove Windows XP Service Pack 2.” Click Yes to remove the entry from the Add or Remove Programs list.
Empty the Recycle Bin to recover the disk space.