In this chapter
As most experienced Windows users know, the Control Panel is the central location for making systemwide modifications to everything from accessibility options to user profiles. Microsoft has moved some features around in Windows XP from where you might expect them from your experience with Windows 2000, NT, 98, and so on. Most of these movements have resulted in new or expanded applets in the Control Panel. So, before throwing up your hands in frustration, check there (and Table 24.1 in the next section). The Help system also has a “Where is it now?” feature, which will help you locate seemingly vanished items.
Not all the settings the Control Panel handles are pivotal to effective or reliable operation of the system. In fact, many of the adjustments you can make from the Control Panel applets are interface improvements rather than related to system reliability and functionality. For example, the Display applet, among other things, can be used to make Windows a little easier to use or tolerate. Other applets are more imperative, such as applets for setting user rights, installing new hardware, or running system diagnostics.
The preference settings you make via the Control Panel applets are stored in the Registry. Some are systemwide, whereas others are made on a per-user basis and go into effect when you log in. Many Control Panel applets can be accessed through other utilities. For example, Printers and Faxes can be added to your Start menu, the Display applet can be accessed by right-clicking the desktop and clicking Properties, Folder Options can be accessed through the Tools menu of My Computer and Windows Explorer, and Internet Options can be accessed through Internet Explorer's Tools menu. Although the paths may be multifarious, the results are the same; you usually end up running a Control Panel extension (files with .CPL extensions) to do your bidding.
Keep in mind that you must have high-level permissions to modify many of the settings in the Control Panel. User-level settings such as display appearances are not a big deal. However, systemwide settings such as addition and removal of hardware are governed by the security monitor, and you must have the requisite permissions to successfully make modifications.
TIP
As you learned in Chapter 4, “Using the Windows XP Interface,” you can opt to “expand” the Control Panel, making the applets appear in a fly-out window (by choosing Start, Control Panel), thus allowing you to avoid opening the whole Control Panel as a window. Using this fly-out window is worthwhile if you use the Control Panel a lot. To make this your default setting, right-click the Start menu and select Properties. In the dialog box that appears, click Customize, select the Advanced Tab, and then select the Display As a Menu radio button under Control Panel in the list of Start menu items.
If you use a particular applet a lot, you can drag it into the Start menu or the Quick Launch bar for even faster access.
Not all the Control Panel settings are discussed in detail in this chapter. Because a few of the Control Panel options pertain to other topics, such as networking or printing, or fall under the umbrella of system management, performance tweaking, or system applications, you'll find them in later chapters. Table 24.2, in the next section, lists each applet and where to look in this book for coverage of those not discussed here. Also, I won't bore you by covering each and every option in the dialog boxes. Many of the settings are intuitively obvious.
Table 24.2. Network and Internet Connections Category View
Task | Applet | Tab/Wizard |
|---|---|---|
Internet Options | Connection | |
Create a connection to the network at your workplace | Network Connections | New Connection |
Set up or change your home or small office network | Network Connections | Network Setup |
Change Windows Firewall Settings | Windows Firewall | General |
One of the most common ways to access the Control Panel is to click Start, Control Panel. But there are several other ways, such as using the Control Panel link in the Other Places quick access menu or, in Windows Explorer folder view, clicking on the Control Panel sub-element of My Computer. If you have opted to expand the Control Panel in your Start menu, you can still right-click over the Control Panel name and select Open from the pop-up menu to open the regular Control Panel window.
No matter how you get there, the Control Panel in Windows XP is displayed by default in Category view. Category view organizes the most commonly accessed functions of Control Panel applets into groups. In Windows XP, the Category view is the default method of navigating the Control Panel applets. If you are new to configuring a Windows OS, the Category view offers a natural language guide to finding the right location to make an intended change. Within each category is a list of tasks and related Control Panel icons. As you can see from Figure 24.1, this view is much different from the Control Panel that appeared in previous versions of Windows (which is now referred to as the Classic view).


Figure 24.1. The Control Panel in the default Category view (top), and in the Classic view (bottom).
Selecting a task or its icon in Category view takes you to another Control Panel screen containing either a more specific breakdown of tasks you can select or a screen where the configuration setting described by the selected task must be performed (see Figure 24.2).

If you need to make a change within the category but the task is not listed in the task list, you can open one of the offered Control Panel icons to open the applet and find the correct tab for your desired setting change.
There are 10 categories in the Category view. Tables 24.1 through 24.8 list the tasks for each category and the applet tab or application the task opens. Table 24.9 lists the Control Panel icons displayed within or related to a category.
NOTE
The Add or Remove Programs category does not display a task list, instead it opens the Add or Remove Programs applet directly. The User Accounts category opens the multi-function task User Accounts utility. Please see Chapter 29, “Managing the Hard Disk,” for a discussion of this tool.
Table 24.4. Performance and Maintenance Category View
Task | Applet | Tab |
|---|---|---|
System | General | |
Adjust visual effects | Performance Options | Visual Effects |
Free up space on your hard disk | Disk Cleanup | (application) |
Back up your data | Backup or Restore Wizard | (application) |
Rearrange items on your hard disk to make programs run faster | Disk Defragmenter | (application) |
Table 24.9. Control Panel Icons Within Categories
Category Wizard | Related Applets |
|---|---|
Appearance and Themes | Taskbar and Start menu, Folder Options, Display |
Network and Internet Connections | Network Connections, Internet Options |
Add or Remove Programs | Add or Remove Programs |
Sounds, Speech, and Audio Devices | Sounds and Audio Devices, Speech |
Performance and Maintenance | Administrative Tools, Scheduled Tasks, Power Options, System |
Printers and Other Hardware | Printers and Faxes, Scanners and Cameras, Game Controllers, Mouse, Keyboard, Phone and Modem Options |
User Accounts | User Accounts |
Date, Time, Language, and Regional Options | Regional and Language Options, Date and Time |
Accessibility Options | Accessibility Options |
Security Center | Security Center |
As you can see, the Category view offers an alternate route to the Control Panel applets and several other useful utilities. Windows XP defaults to Category view, so it is important to be familiar with how to navigate through this new mechanism.
For those who prefer the old Control Panel display, Windows XP does offer a Classic view where all of the applets are displayed as they were in previous versions of Windows (refer to Figure 24.1). To access the Classic view, click on the Switch to Classic View command in the Quick List to the left the categories within the Control Panel. Then, to return to the Category view, click on the Switch to Category View command in the Quick List.
As you can see, Windows XP often offers multiple means to access a control, setting, application, or display of information. Understanding by what means Windows XP provides these paths by default (such as with Category view of the Control Panel) and the alternates (such as the Classic view of the Control Panel or direct access through an object's Properties), will aid you in extracting the most productivity out of the OS as possible.
Working with the Control Panel in Category view may simplify access to common configuration controls. However, not all of the controls for Windows XP can be accessed through Category view (at least not directly). So, in order to provide an exhaustive discussion of the applets, this chapter focuses on reviewing each applet as listed in the Classic view. If you want to use the Category view, refer to the tables we just presented.
Table 24.10 shows a list of all the standard Control Panel applets and what they accomplish. Your Control Panel may include other applets which are installed by other products from Microsoft and third parties. Following the table, I'll cover each of the included applets (the ones not covered in other chapters) in alphabetical order.
Table 24.10. Control Panel Applets
Applet | Description |
|---|---|
Accessibility Options | Sets keyboard, mouse, sound, display, and other options for increasing ease of use by those who are visually, aurally, or motor impaired. |
Add Hardware | Installs or troubleshoots a wide variety of hardware devices such as sound, video, CD-ROM, hard and floppy disk controllers, SCSI controllers, display adapters, keyboard, mouse, and ports. Installation of printers is covered in Chapter 6, “Printing and Faxing.” |
Add or Remove Programs | Adds, removes, or modifies applications or Windows XP components from Microsoft or a third-party. It supports remote application installation over the LAN. |
Administrative Tools | Provides shortcuts to the administrative tools—Component Services, Computer Management, ODBC settings, Event Viewer, Local Security Policy, Performance, and Services. Administrative Tools is covered in Chapter 27, “System Utilities.” Component Services are not covered in this book. |
Date and Time | Sets the current date, time, and time zone for the computer. It can also synchronize system time with an Internet time server. |
Display | Sets colors of various parts of Windows display elements, as well as other display-related adjustments, such as desktop background, screen saver, display driver, screen color depth and resolution, refresh rate, energy-saving modes, and color schemes or themes. The Display applet is covered in detail in Chapter 23, “Tweaking the GUI.” |
Folder Options | Sets systemwide folder view options, file associations, and offline files. The Folder Options applet is covered in detail in Chapter 23. |
Fonts | Adds and deletes typefaces, and displays examples of system installed typefaces for screen display and printer output. Fonts are covered in Chapter 26, “Font Management.” |
Game Controllers | Adds, removes, and configures game controller hardware, such as joysticks and gamepads. |
Internet Options | Sets Internet Explorer options. Internet Options are covered in Chapter 9, “Browsing the World Wide Web with Internet Explorer.” |
Keyboard | Sets key repeat rate, cursor blink rate, language of your keyboard, keyboard type, and drivers, and includes keyboard troubleshooting wizards. |
Mouse | Alters mouse properties such as motion speed, double-click, button orientation, cursor shapes, and other proprietary settings dependent on your mouse driver. |
Network Connections | Manages all network connections, including LAN, dial-up WAN, and VPN. Networking components (clients, services, and protocols) are configured. These connections are covered throughout Part IV, “Networking.” |
Phone and Modem Options | Adds, removes, and sets the properties of the modem(s) connected to your system. Using this applet, you can declare dialing rules (long-distance numbers, call waiting, credit card calling, and so on). You also can add and remove telephony drivers. Installing and configuring a modem are covered in Chapter 8, “Internet and TCP/IP Connection Options.” The other features of this applet are discussed here. |
Power Options | Provides options for setting the Advanced Power Management (APM) and Advanced Configuration and Power Management (ACPM) functions. Using this applet, you can set timeouts for monitor, hard disk, system standby, and hibernation. The Power Options applet is covered in detail in Chapter 23. |
Printers and Faxes | Adds, modifies, removes, and manages printer and fax devices. Using this applet, you can manage the print queue for each printer and enable direct faxing from applications. The Printers and Faxes applet is covered in Chapter 6. |
Regional and Language Options | Sets how Windows displays times, dates, numbers, and currency through region/country settings and language preferences. |
Scanners and Cameras | Adds, removes, sets properties for, and troubleshoots scanners and digital cameras. |
Scheduled Tasks | Sets up automatic execution of applications, utilities, disk cleanup, and so on. Task scheduling is covered in Chapter 27. |
Security Center | (New applet as of XP Service Pack 2.) A central location for control of Windows Firewall, Automatic Updates, and anti-virus program (if you have one installed). Firewall is covered in Chapter 21. Automatic Updates are covered in Chapter 27. |
Sound and Audio Devices | |
Speech | |
System | Examines and changes your identification (workgroup name, domain name, computer name), installed devices, amount of RAM, type of processor, and so on. Using this applet, you can add, disable, and remove specific devices using the Device Manager; set up hardware profiles; set up user profiles; optimize some parameters of system performance; set environment variables; and set emergency startup options. The use of the System applet is rather complex and thus is partially covered in this chapter and partially in Chapter 27. |
Taskbar and Start Menu | Sets the properties for the taskbar and Start menu. This was covered in Chapters 4 and 23. |
Users Accounts | Adds, deletes, or alters users. Using this applet, you can assign groups, manage passwords, and set logon mode. Passwords and security are covered in Chapter 28, “Managing Users.” |
Windows Firewall | Use this applet to turn on, turn off, and fine-tune the firewall that protects your computer from uninvited invasion from the Internet. See “Security Center,” later in this chapter, as well as firewall discussion in Chapter 21, “Network Security.” |
Wireless Network Setup | This applet make setting up a wireless network much easier than before SP2. See Chapter 18, “Windows Unplugged: Remote and Mobile Networking.” |
TIP
Windows NT 4 and 9x included a PCMCIA applet in the Control Panel. That applet was dropped in Windows 2000 and was not included in Windows XP. It didn't do much anyway, other than let you control whether PC cards beeped when installed and removed. If your system has PC card slot services installed, the system tray contains an icon for PC card control and for starting and stopping PC card devices. See Chapter 25, “Maintaining and Optimizing System Performance,” for details.
NOTE
Many Control Panel dialog boxes have a question mark button in their upper-right corners. You can click this button and then click an item in the dialog box that you have a question about. Windows then shows some relevant explanation about the item.
In those dialog boxes where no question mark appears in the title bar, click F1 to open the Help system. The Help window will include information relevant to the applet in use.
Microsoft has made a point of increasing computer accessibility for people who are physically challenged in one way or another. Over the last half decade, Microsoft has increasingly included accessibility options in its operating systems, with features that allow many handicapped people to use Windows without major machine or software modifications.
Many people have difficulty seeing characters on the screen, and others have trouble typing on the keyboard or controlling the mouse. People who are partially paralyzed or who have muscle-coordination problems have been at a disadvantage with computers for a long time. Now, with these accessibility options, the playing field is being leveled at least somewhat. Even if you are not disabled, some of the Accessibility options may prove useful for you.
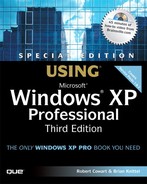
Accessibility options are broken down into several categories, with their respective tabs: Keyboard, Sounds, Display, Mouse, and a few others on the General tab.
The keyboard settings deal with such problems as accidentally repeating keys or pressing combinations of keys. These options fall into three categories: Sticky keys, Filter keys, and Toggle keys.
Sticky keys are settings that, in effect, stay “down” when you press them once. They are good for controlling the function of the Alt, Ctrl, and Shift keys if you have trouble pressing two keys at the same time. To use them, set the Sticky keys option on; then choose the sub-options as you see fit. For some users, the shortcut of pressing the Shift key five times is a good way to activate Sticky keys. If you turn on this activation method, note that pressing the Shift key five times again turns off Sticky keys. This trick isn't explained clearly in the dialogs. Also, if you choose the Press Modifier Key Twice to Lock option, that means you press, for example, Shift twice to lock it. You can then press Shift twice again to unlock it.
Filter keys let you “filter” (remove) accidental repeated keystrokes in case you have trouble pressing a key cleanly once and letting it up. This feature prevents you from typing multiple keystrokes. The shortcut key for turning on this feature works like the one for Sticky keys; it's a toggle.
TIP
Filter keys, when activated, can make it seem that your keyboard has ceased working unless you are very deliberate with keypresses. You have to press a key and keep it down for several seconds for the key to register. If you activate this setting and want to turn it off, the easiest solution is to use the mouse to run or switch to the Control Panel (via the taskbar), run the Accessibility Options applet, turn off Filter Keys, and click Apply or OK.
The Toggle keys option, when turned on, sounds a high-pitched tone when Caps Lock, Scroll Lock, and Num Lock keys are activated and a low-pitched tone when they're turned off again.
Each of these three keyboard features can be used independently or together. Note that a slowdown in performance occurs at the keyboard if sounds are used, because the sound is generated by playing a WAV file that briefly eats up your system resources. Processing of keypresses doesn't commence until after the keyboard sound finishes, which can result in jerky performance.
When Sticky keys or Filter keys are turned on, a symbol appears in the system tray. The Sticky keys feature is indicated by the three small boxes, representative of the Ctrl, Alt, and Shift keys. The Filter keys feature is represented by the stopwatch, which is representative of the different key timing that goes into effect when the option is enabled.
The two Accessibility sound settings—Sound Sentry and ShowSounds—are for those with hearing impairments. Instead of playing a sound when an error message or other event that causes a sound occurs, some type of visual display appears onscreen.
With Sound Sentry, a portion of the normal Windows screen blinks, typically the window or application that is generating the error. With ShowSounds turned on, a text caption or special icon will pop up over a window or dialog box when a sound is played. The information in the pop-up window will inform you of the sound played and whether the audio clue as a warning, error, and so on.
If you choose Sound Sentry, you have a choice of the visual warning to use. The options are offered in a pull-down list which includes: Flash active caption bar, Flash active windows, and Flash desktop. Typically, you'll want the window of the application or at least its title bar to flash. Don't make the desktop flash because it won't indicate which program is producing the warning.
Special display settings in the Accessibility Options applet increase the screen contrast by altering the display scheme. Using this applet really is just an easy way to set the display color scheme and font selection for easier reading, just as you could do from the Display applet, as discussed in Chapter 23. The big plus of setting the contrast here is that you can quickly call it up with a shortcut key combination when you need it. Just press Left-Alt, Left-Shift, Prnt Scrn, and the settings go into effect. I have found this feature useful for when my eyes are tired or in imperfect lighting situations. Figure 24.3 shows the effect it had while I was writing this chapter.
TIP
You get to select which predefined color scheme (both Windows provided and ones you've created through the Display applet) will be used as the high contrast scheme. It's easier to observe the look of the schemes using the Display applet than in the Accessibility Options applet. Do it there, and then decide which one you like best. Then come back to the Accessibility dialog and make your choice.
Using the Mouse Settings tab, you can control the mouse with the keypad, in case you have problems controlling your mouse's movements. This feature can bail you out in case your mouse dies for some reason, too, or if you simply don't like using the mouse. As is covered in Chapter 4, you can execute many Windows and Windows application commands using the keyboard shortcut keys. But sometimes an application still responds only to mouse movements and clicks. Graphics programs are a case in point. When you use this Accessibility option, your arrow keys do double duty, acting like pointer control keys.
To use this option, simply turn on Mouse Keys from the dialog box, and apply the change. Then, to activate the keys, press Left-Alt, Left-Shift, and Num Lock at the same time. The system tray should show a new icon. If the icon has a red line through it, Mouse keys are disabled, so press the Num Lock key to enable them.
Now you can move the pointer around the screen using the arrow keys on the numeric number pad. If you're using a laptop, you'll have to consult its manual to determine how to activate the numeric keypad. The normal arrow keys won't cut it.
Click the Settings button if you need to adjust the speed settings for the arrow keys. Turn on the Ctrl and Shift options for speeding up or slowing down the mouse, assuming you can press two keys simultaneously. This setting really speeds things up.
If you adjust the configuration on the Settings dialog box, you have to click OK and then click Apply before the changes register. Then you can go back and adjust as necessary.
The final Accessibility tab is General, which is divided into four sections, each of which is described in Table 24.11.
Table 24.11. Other Accessibility Settings
The Add Hardware applet is used to install new devices as well as troubleshoot hardware-related problems. The ability to disable or remove hardware devices has been relegated to the Device Manager (see the System Applet later this chapter).
In general, Windows XP detects new hardware during bootup. If drivers are not located automatically (typically only for non–Plug-and-Play devices), you'll be prompted for a location to search (such as floppy, CD, or the Windows Update site). Once drivers are located, they are installed and the device is activated. In some cases, you'll be prompted to reboot the system for the new hardware to be fully functional. Sorry, even under Windows XP, hardware level device drivers often require a reboot. Think of it as changing a rung on the ladder you are climbing; it's always a good idea to step off of it while the repair is being made.
The Add Hardware applet is for use when the manufacturer does not supply an installation tool and when the installed device is not automatically detected during bootup. If you meet these criteria, you can use the Add Hardware applet to install the device drivers for your new equipment.
When you first launch the applet, it attempts to locate new hardware by performing a system scan for yet unidentified devices. If none are found, you'll be asked if the hardware has already been installed or is it still outside the computer (in other words, not installed). If you select that the hardware is not yet installed, the wizard informs you that you must install the hardware to continue with the installation. I always knew Microsoft could develop a sense of humor.
TIP
The System applet is used to fine-tune device settings (such as IRQ and port) and updating devices and drivers. The Add Hardware applet is only for adding hardware. Also, note that there are other locations throughout Windows for installing some devices, such as printers—which can be installed from the Printers folder—or modems—which can be installed from Phone and Modem Options—even though the effect is the same as using this applet.
It's always a very good idea to read the manufacturer supplied manual for installation and operational procedures. If none were provided, check the vendor's Web site. If you still can't find any guides for installation, go ahead and try the Add Hardware applet.
It's always a good idea to save your work and stop any applications when performing driver installations or upgrades, or when making configuration changes to hardware. It is possible for a new driver to crash the system, but under Windows XP this is a rare occurrence.
For non-Plug and Play hardware or for Plug and Play stuff that, for some reason, isn't detected or doesn't install automatically, you need to run the applet. The typical scenario is as follows:
Launch the Add Hardware applet.
Click Next. A search is performed for new hardware.
If none are found, you are asked whether the hardware is already installed. If not, you'll be asked to install the hardware in order to proceed.
A list of installed hardware is presented. To install new equipment, scroll down and select Add a new hardware device. Otherwise, select an existing item to troubleshoot. Click Next.
If you elected to troubleshoot an existing item, you'll see a status report and a message stating that clicking Finish will launch the troubleshooter for this device.
If you selected the Add a New Hardware Device item, you'll be asked where the system should search again for the device, or you may manually select the device from a list.
There is only a slight chance that the second automated search will detect the new device. In most cases, you'll have to proceed with the manual method.
The manual installation method requests that you select a general type of hardware or the Show All Devices item. Click Next.
A list of manufacturers and device models is displayed. If your product is listed, select it, and then click Next. Otherwise, click the Have Disk button.
The Have Disk button opens a dialog box where you provide the path to the new device drivers.
From this point you'll need to follow the prompts as they appear, because each type of device has different requirements. Some need no additional settings while others require the defining of ports, IRQs, and so on. You may also be prompted to provide the Windows XP distribution CD, so keep it handy.
TIP
In some cases, you are given the option of adjusting settings after the hardware is installed and possibly adjusting your hardware to match. (Some legacy cards have hardware settings [via dip switches or jumpers] or software adjustments that can be made to them to control the I/O port, DMA address, and so forth.) You may be told which settings to use in order to avoid conflicts with other hardware in the system.
If, for some reason, you don't want to use the settings the wizard suggests, you can manually set your own. You can do so using the Device Manager (from the System applet). See “System: Device Manager” later in this chapter for coverage of the Device Manager.
CAUTION
In general, be cautious about configuring resource settings manually. When you change settings manually, the settings become fixed, and Windows XP's built-in device contention resolution is less likely to work. Also, if you install too many devices with manually configured settings, you might not be able to install new Plug and Play devices because no more settings are available. In the worst-case scenario, the system might not even boot if conflicts occur with primary hardware devices such as hard disk controllers or video cards. If you decide to use manual configuration, make sure you know what you're doing, and have in hand the specs for the hardware in question.
When the wizard detects a conflict, you are alerted upon finishing the wizard. You then have the option of bailing or continuing despite the conflict. You could also back up and choose a different model of hardware, one you think is compatible with what you're attempting to install.
As you know, many programs come with their own installation (Setup) programs that handle all the details of installation, such as file copying, making Registry additions, making file associations, and adding items to the Start menus. An ever-growing number of applications even provide their own uninstall routine, which appears as a unique icon within their Start menu folder. You'll rarely add programs through the Add or Remove Programs applet. Most of what you'll use this applet for is to remove applications or portions thereof when a dedicated tool is not provided by the vendor.
You've probably noticed that not all programs show up in the Add or Remove Programs applet. They don't appear because only programs complying with the 32-bit Windows API standard for installation get their filenames and locations recorded in the system database, allowing them to be reliably erased without adversely affecting the operation of Windows. Many older or less-sophisticated applications simply install in their own way and don't bother registering with the operating system.
Most modern applications are written in compliance with the Microsoft Windows standards for installation and removal. Thus, you see them in your installed applications list in the Add or Remove Programs applet. This list is mainly the result of the PC software industry's response to kvetching from users and critics about tenacious programs that are hard to root out after they're installed. Some ambitious programs spread themselves out all over your hard disk like oil on your garage floor with no easy way of reversing the process. Users complained about the loss of precious disk space, unexplained system slowdowns, and so forth.
This problem was the inspiration for such programs as Uninstaller, CleanSweep, and other utilities that monitor and keep a database of the files a program installs; they wipe out these files effectively when you decide to remove the program, also returning any modified Windows settings to their previous state with any luck. This process is better relegated to those writing the operating system, I feel, and Microsoft rightly set up standards for installation and removal of applications, overseen by this applet. Even if an application isn't installed via the Add or Remove Programs applet per se, if well behaved, it should still make itself known to the operating system and register changes it makes, enabling you to make changes and/or uninstall it from there.
TIP
Never attempt to remove an application from your system by deleting its files from the Program Files folders (or wherever). Actually, never may be too strong. Removal through manual deletion should only be as a last resort. Always attempt to use the Add or Remove Programs applet or the uninstall utility from the application first. For tips on manually removing programs, see “Program Doesn't Show Up” under the “Troubleshooting” section at the end of this chapter.
What's more, the built-in uninstaller lets you make changes to applications, such as adding or removing suboptions (assuming the application supports that feature).
Use of the uninstall feature of the applet is simple:
Run the Add or Remove Programs applet from the Control Panel.
Check the list of installed applications. A typical list appears in Figure 24.4. Note that you can sort the applications by some interesting criteria in the sort box, such as frequency of use. (That one helps weed out stuff you almost never use.)
Select the program you want to change or uninstall.
Click the Change/Remove button.
Answer any warnings about removing an application as appropriate.
TIP
Obviously, removing an application can't easily be reversed by, say, restoring files from the Recycle Bin because settings from the Start menu and possibly the Registry are deleted.
Some applications (for example, Microsoft Office) prompt you to insert the program CD when you attempt to change or remove the app. These prompts can be annoying, but what can you do? The setup, change, and uninstall programs for some large suites are stored on their CDs, not on your hard disk. So, just insert the disc when prompted.
NOTE
Incidentally, Add or Remove Programs can only be run by users with Administrator credentials on their local computer. Although some applications can be installed or removed by non-administrators, most do require administrative privilege.
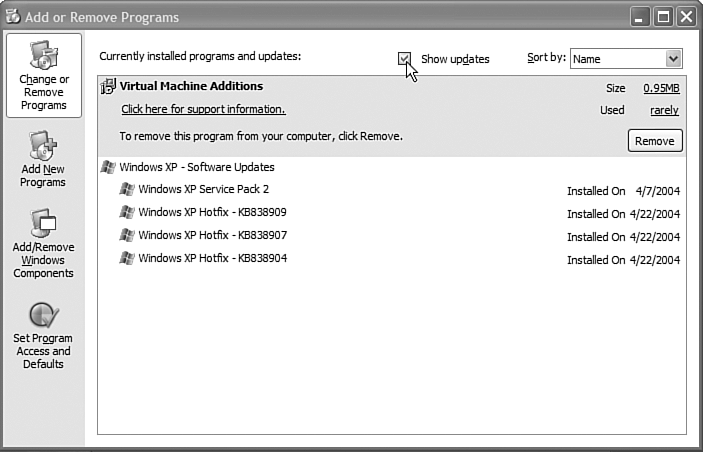
As of Service Pack 2 (SP2), this applet evolved to provide a means for you to select whether or not updates, such as security updates downloaded from the Microsoft Web site, are displayed in the Currently Installed Programs list. This applies to the operating system as well as to applications whose vendors provide you with removable updates.
A new Show Updates check box appears above the list, which enables you toggle between showing or hiding installed updates. This is helpful because, pre SP2, the list of installed programs was overwhelmed by the list of installed updates. The new option to filter out the updates from the list and only show installed programs makes this list easier for users to read.
By default, Change and Remove Programs will not show installed updates to Windows. To see the updates that have been installed, you can select the Show Updates check box at the top of the list.
As you know, installation of new programs is usually as simple as inserting a CD into the drive. The autorun program on most application CDs does the rest. Or, when it doesn't, you can run the Setup file on the disk, and the rest is automatic. Ditto for programs you download off the Net. Still, you can install from the Add or Remove Programs applet if you want or if the program's instructions suggest it. This part of the applet provides a front end for running an application's Setup program. Big Whoop. But, what launching a setup through the applet does is gather uninstall data for applications that otherwise don't properly register with the OS for uninstallation. Here's what you do:
Click Add New Programs in the left panel of the opened Add or Remove Programs applet.
Choose the source:
CD or Floppy—. Choose this option for CD, floppy, or hard disk folder. You have to browse through your hard disk to get to the right folder.
Windows Update—. This option runs Internet Explorer, connects to the Microsoft site, and runs Windows Update just as though you had started that process from the Start menu. Don't choose this option unless you're trying to update your Windows installation.
The wizard is looking for any file named setup.exe or install. If it finds this file on the CD or floppy, just choose the desired file, and follow the instructions you see. If the setup program you're looking for isn't called setup.exe or install, then you have a little more work to do. Change the Files of Type drop-down list to Program Files or All Files, and poke around a bit more. But make sure you choose a file that's actually a setup file. If you point to a regular old application, it will just run normally. Nothing weird will happen; you just won't be installing anything.
Click Finish to complete the task and make the new software's installation or setup procedure run. Instructions vary depending on the program. If your program's setup routine isn't compatible with the applet, you are advised of this fact. After installation, the new program appears in the list of removable programs only if it's compatible with Windows XP's install/remove scheme.
As you learned in Chapter 1, “Introducing Windows XP Professional,” an administrator of a Windows 2000 or Windows Server 2003 domain can “publish” or “push” applications to workstations. When an application is published over the LAN, it usually is automatic. In other words, the software is installed without the knowledge of the user or the necessity for user input. However, some applications can be marked as optional instead of mandatory. An optional application can be installed over the network from Add New Programs.
When you choose Add New Programs, you have another option, showing applications that are available on the network.
Next, open the box called Category, which you use to narrow down the class of application you want to install. (The system administrator makes up the categories.) When you select such an application for installation, note that the administrator who set it up for publishing may have turned off the possibility for you to make installation choices such as which portions, add-ins, or other options to install.
The capability for a server system to push applications to clients is part of IntelliMirror. For more information on IntelliMirror and pushing applications to client systems, please consult the Windows XP Resource Kit and documentation on Windows 2000 Server or Windows Server 2003.
NOTE
In the case of “pushed” (or assigned) applications, when you log on to the machine or network, the applications assigned to you are added to your machine across the network automatically. In fact, if you accidentally or intentionally delete the application from your computer, it reinstalls itself.
In addition to managing add-on products and applications through the Add or Remove Programs applet, the components of Windows XP itself are installed and removed here. Clicking the Add/Remove Windows Components button opens the Windows Components Wizard dialog box (Figure 24.5). From here, you can install additional Windows XP components by marking their check boxes. Plus, you can remove existing components by clearing their check boxes. However, be careful since there are often many sub-levels of selections. Click on the name of an item, not its check box, and then click the Details button to view its sub-components. Marking or clearing a top-level item will install or remove all of its subcomponents.

After you've made your selections and clicked Next, the system will install or remove components based on your instructions. You may be prompted for the Windows XP distribution CD, so be prepared.
This new feature in Windows XP, added with Service Pack 1, enables you to choose your own default middleware applications. For more on how to do this, see the section “Department of Justice Consent Decree Compliance” in Appendix B.
Date and Time is a simple applet you're sure to have used in the past to adjust the system date and time. That is, it adjusts the hardware clock in the computer, which is maintained by a battery on the motherboard. The system date and time are used for myriad purposes, including date- and time-stamping the files you create and modify, stamping email, controlling the scheduler program for automatic application running, and so on.
NOTE
The Date and Time applet doesn't change the format of the date and time, only the actual date and time stored on your computer's clock. To change formats, see the description of the Regional applet later in this chapter.
When you're a member of a Microsoft network domain, you should never need to set the clock. It is kept synchronized to the domain controller (a Windows 2000, Windows NT, or Windows Server 2003). Many network services, including authentication protocols and replication, require exact or close synchronization of all systems within the network.
If your system is part of a workgroup or just a standalone, you can sync your clocks with an Internet time server. The Date and Time applet includes a new third tab for doing just that. However, this capability is not available on domain clients. The ability to sync with an Internet time server through the Date and Time applet is reserved for workgroup members, standalone systems, and domain controllers.
The Date and Time applet can also be accessed by double-clicking on the clock on the taskbar or right-clicking over the clock and selecting Adjust Date/Time. To set the date and time, follow these steps:
Run the Date/Time applet.
Alter the time and date by typing in the corrections or by clicking the arrows. The trick is to click directly on the hours, minutes, seconds, or AM/PM area first, and then use the little arrows to the right of them to set the correct value. So, to adjust the a.m. or p.m., click AM or PM, and then click the little up or down arrow. After setting the month and year, you can click the day in the displayed calendar.
Click the Time Zone tab to adjust the zone. Why? It's good practice to have your time zone set correctly for programs such as client managers, faxing programs, time synchronizing programs, or phone dialing programs. They may need to figure out where you are in relation to others and what the time differential is. Also, if you want your computer's clock to be adjusted automatically when daylight saving time changes, make sure the Automatically Adjust Clock for Daylight Saving Changes check box is selected.
Click the Internet Time tab. On this tab you can enable clock synchronization with an Internet time server. Two known time servers are provided in the pull-down list, but you can type in others. If you want to force a sync, click the Update Now button.
Click OK to save changes and close the applet.
When Internet synchronization is enabled, your clock is reset to match the time servers once each week. Internet synchronization should only be configured on systems with an active Internet connection. Clock synchronization will not initiate a dial-up connection. Plus, if there is a firewall or proxy server between your client and the Internet, the clock synchronization packets may be blocked.
TIP
You can also adjust the time and date using the TIME and DATE commands from a DOS command prompt. For example, open a DOS box (click Start, All Programs, Accessories, Command Prompt), type time, and press Enter. This command displays the current time and a prompt to enter the new time, as shown here:
The current time is: 21:39:31.78
Enter the new time:
Enter the new time or press Enter to leave the time as it is. The same process applies to the date. Type date and press Enter. The current date is displayed with a prompt to enter the new date, as shown here:
The current date is: Thu 11/04/2001
Enter the new date: (mm-dd-yy)
If you're serious about playing games on your computer, you need a game controller (and often more than one); that means something more than a mouse. Typical controllers include joysticks, flightsticks, gamepads, driving wheels, and other hardware devices designed specifically for the games of your choice. If you're an extreme gamer, the type of controller you need can vary greatly with the types of games you play. High-tech gaming these days requires high-tech controls. Game controllers have reached the point at which serious flight simulator enthusiasts hook up a flightstick, throttle, and separate rudder foot pedals to more accurately simulate the flying experience. Sports gamers usually go for handheld digital gamepads for fast response times. And fans of racing games just aren't getting the full experience without a force feedback steering wheel with its own set of foot pedals for the gas and break (and possibly even a clutch).
This book doesn't cover gaming to any extent, but if you are a gamer, and you buy a game controller, it likely comes with an installation program. If not, Windows XP may detect it automatically or you may need to run the Add Hardware applet. If that doesn't seem to work, you can try adding it through the Game Controllers applet. In most cases, USB devices have no-brainer installations. Just plug it in and you are good to go.
For the last several years, heavy gamers have opted for Windows 95 and 98 as their platforms because of their more extensive support for games. The kinds of direct hardware access and the display driver optimizations that games expect have traditionally been unsupported on the NT platform. The DirectX support on Windows 9x has been superior in this regard.
With Windows 2000, the NT platform began to change this legacy. As a result, options such as game controller settings in the Control Panel have appeared. There has been some migration to the Windows 2000 platform for gaming, but Windows XP is even more gamer friendly and promises a solid following.
As of SP-2 Windows XP supports DirectX 9.0c, including accelerated video card and sound card drivers that provide better playback for different types of games, full-color graphics and video, and 3D animation. DirectX automatically determines the hardware capabilities of your computer and then sets your programs' parameters to match. This allows multimedia applications to run on any Windows-based computer and at the same time ensures that the multimedia applications take full advantage of high-performance hardware.
Low-level functions of DirectX are supported by the components that make up the DirectX Foundation layer—namely the following:
DirectDraw
Direct3D
DirectSound
DirectMusic
DirectInput
DirectPlay
DirectShow
Of particular interest to gamers are DirectDraw (which provides extremely fast, direct access to the accelerated hardware capabilities of a computer's video adapter), DirectInput (for quick processing of game controller input), Direct3D (which supports advanced, real-time, three-dimensional graphics), and DirectPlay (which supports game connections over a modem, the Internet, or a LAN).
TIP
When you upgrade to Windows XP, the system doesn't always automatically set up previously installed game devices. You need to manually add your devices through the Control Panel.
NOTE
If you want to optimize your computer for gaming or want to build one from the ground up, I suggest you pick up a copy of Maximum PC's Guide to Building a Dream PC, published by Que. This book will walk you through the building, configuring, and optimizing of a high-powered gaming PC that can squeeze every drop of performance from Windows, DirectX, and DirectSound.
After you install a game controller, you can click the Advanced button if you need to alter the controller ID and/or the port to which it's connected. Each game controller should be assigned a different ID. You can share the same game port for a number of controllers by disconnecting one and connecting another. You might be prompted to remove a game controller from the list before a new one can be connected, however, depending on the kind of controller and the port to which it's connected.
For a custom controller (one not listed in the Add list), click Add, and then click Custom. Fill in the settings for controller type, axes, and number of buttons; then give the controller a name.
To choose from a list of brand-name controllers, click Add Other, and choose a manufacturer and model. (Some of the devices that show up in this list aren't game controllers, but many are.) If you have a disk for your game port or game controllers, click Have Disk, insert the diskette if necessary, or browse to the appropriate folder location.
The Keyboard applet (see Figure 24.6) lets you fine-tune the way the keyboard behaves, check the keyboard driver, and perform some keyboard troubleshooting. The Input Locales tab has been removed from this applet; to change your language settings, you must use the Regional and Language Options applet (later in this chapter.)

The main attractions here are the repeat rate, the repeat delay, and the cursor blink rate. By altering the key-repeat delay (the time after pressing a key before it starts to repeat) and the repeat speed, you can calm down an ill-behaved keyboard or improve usability for someone with a mobility impairment. Altering the delay before the repeat sets in might be helpful if you use applications that require extensive use of, say, the PgUp and PgDn, Enter, or the arrow keys (perhaps in a point-of-sale situation).
You also might want to change the cursor blink rate if the standard blinking cursor annoys you for some reason. You can even stop it altogether (the setting is “none”). I prefer a nonblinking one myself.
The defaults for these keyboard settings are adequate for most users and keyboards.
With each passing year, it seems that the mouse, trackpad, roller, graphics tablet, or pointing stick has become more and more the means through which users interact with the computer. I remember when the mouse was an option. Nowadays, you can barely shut down a computer without a mouse, much less use it effectively.
Obviously, then, the mouse being a major means of interface with your computer, it behooves you to optimize its functioning. The Control Panel's Mouse applet (located under the Printers and Other Hardware option in the Control Panel) lets you do just that, with many aspects of your mouse's operation being adjustable (see Figure 24.7):
Left/right button reversal
Double-click speed
ClickLock
Look of the pointers
Pointer scheme
Pointer speed
Enhance pointer precision
Snap to the default button of dialog boxes
Display pointer trails and length
Hide pointer while typing
Show location of pointer when Ctrl is pressed
Set wheel scroll to number of lines or screen at a time
Troubleshooting
Access device properties (same controls as through Device Manager)

Figure 24.7. Setting mouse properties can help you get your work done more efficiently, though the defaults usually work fine without modification.
The options vary based on pointing device type, and sometimes you are supplied with even fancier options if your pointing device comes with a custom driver. For example, the Synaptics touchpads let you scroll a window by sliding your finger down the right side of the trackpad.
Poor lefties never get a fair shake in life, what with all the right-handed scissors and tools around. Well, they get one here (except for some types of weird, ergonomically shaped mouse devices that don't work well in the left hand). If you're left handed, you can move the mouse to the left side of the keyboard and then reverse the function of the buttons on the Buttons tab of the Mouse applet. Right-clicks then become left-clicks. Of course, DOS programs don't know squat about this mouse setting, but for Windows and Windows programs, the button reverse will work.
On the same tab, you can set the double-click speed. A middle-range setting is appropriate for most folks. Double-click the folder icon to try out the new double-click speed. The folder opens or closes if the double-click registered. If you're not faring well, try adjusting the slider, and then try again. You don't have to click Apply to test the slider settings. Just moving the slider instantly affects the mouse's double-click speed.
If all else fails and you just can't find a double-click speed to suit your needs or abilities, forget double-clicks altogether. Instead, click on an icon or any selectable object in the Windows XP environment. A single click usually will highlight the option. Think of this as getting the object's attention. Then, press Enter on the keyboard to launch, open, or execute the selected object.
As you know, the pointer cursor changes based on the task at hand. For example, when you're editing text, it becomes an I-beam. You can customize your cursors for the fun of it or to increase visibility. You can even install animated cursors to amuse yourself while you wait for some process to complete. Just as with icons and screen savers, the Web is littered with Windows cursors, in case you would like to collect a few thousand. Windows XP comes with enough to keep me happy, organized into schemes. You can change individual cursors or change a set of them in one fell swoop by using the cursor schemes.
Like color schemes and sound schemes, cursor schemes are collections of cursor shapes. When you select a scheme, all the cursors in the scheme go into effect at once. You can choose from about 20 canned schemes.
NOTE
Use one of the Extra Large cursor schemes if you have trouble seeing the pointer. Also, some of the schemes change the pointer into things that don't resemble pointers and can make selecting or clicking small objects difficult because the pointer's hotspot is difficult to locate. Sometimes the cursor is very distracting and can obscure the very item you want to select or click.
You can change individual cursors in a scheme, if you like. To change a cursor assignment, click a cursor in the list. Then click Browse. The default location is … windowscursors. Animated cursors move for you in the Browse box (a thoughtful feature). After you custom tailor a set of cursors to your liking, you can save the scheme for later recall. Click Save As, and name it.
TIP
In the olden days of Windows, if you used DOS programs that required the mouse, they required DOS mouse drivers. If the DOS mouse driver and the Windows mouse driver's speed settings were different, using the mouse could be annoying because your body would learn hand-eye coordination with one environment that didn't match the other. Some DOS mouse drivers let you adjust the speed in that environment, so you could match the two. In Windows XP, DOS-environment mouse support is provided by Windows. As my co-author Brian says, DOS support under Windows XP is one of the marvels of the modern world because it is so well thought out and extensive.
TIP
If you use an external serial mouse on your laptop, it might not wake up after your laptop goes into a suspended state. For example, if you close the lid to a laptop running Windows XP, it will probably go into Standby or Hibernate, depending on your laptop and Windows settings. When you wake it up, your external mouse might not wake up along with it because the mouse driver may not know to reinitialize the mouse. Here's a way around that problem, short of rebooting: Choose Control Panel, System, Hardware, Device Manager. Next, click Computer. Then choose Action, Scan for Hardware Changes to do a search for new hardware. Because the mouse was not initialized, it fell off the list of current hardware. Doing the scan finds it and reinitializes it. The mouse should now work.
The Phone and Modem Options applet lets you add, remove, and set the properties of the modems connected to your system. You can also declare dialing rules (long-distance numbers, call waiting, credit card calls, and so on), and add and remove telephony drivers.
Windows XP has a telephony interface, essentially an API that provides the means (hooks) for communications applications to work through the operating system. In fact, this interface is called TAPI. Through TAPI, the operating system provides a standard way for communications applications to access COM ports and devices such as modems and telephone sets when handling data, fax, and voice transmissions.
TAPI empowers applications to make, answer, and hang up calls; put calls on hold; perform call transfer; record voice mail; and make conference calls. Fully TAPI-compliant applications should be able to work with conventional telephone lines, PBX and Centrex systems, and with specialized services such as cellular, ISDN, and DSL.
Much like the way process contention is handled by TCP/IP for network transmission or by the process scheduler for CPU usage, TAPI allows multiple communications to request the same resources, without a data collision occurring. The advantage to the end user is that you don't have to shut down a program that's waiting for incoming calls before you use a different program to send a fax, for example. Nor do you have to keep entering modem, phone number, dialing options, and COM port settings into each new communications program installed. These settings, just like printer settings, are stored in the system and are available for every communications program, such as HyperTerminal or dial-up connections through Network Connections.
The Phone and Modems applet in the Control Panel offers a central location for altering some TAPI settings, as well as for installing and configuring modems and telephone devices. Installing and configuring a modem were covered in Chapter 8, “Internet and TCP/IP Connection Options,” so I'll dispense with the basics of modem installation here. Refer to that chapter if you're hooking up a new modem.
TIP
You can use cell phones for data communications, for example, from a laptop in the field. Remember two points, though. The phone must be set to run in analog mode. Also, in the best of circumstances, you will get only 9600bps throughput because of limitations in the cellular transmission channel.
To set up cellular communications, you need a modem that is compatible with the cell phone you have and a cable designed specifically for connecting your model of phone to that modem. I use a standard Motorola “flip phone” with a Megahertz cellular-ready modem. With this combo, not much fiddling is required, but I made sure before I purchased the modem that it would work with my make and model phone.
As for settings, I did drop down the transfer rate to 9600 baud, and because my phone is analog/digital, I have to force it into analog mode for each call. This extra step is a bit of an annoyance, but I'll survive. Then I connect the cell phone to the modem, power up the phone, and initiate the dialing sequence. With any luck, I get on the Internet. Don't forget the per-minute cost of cellular connections! The charges can add up. If you do a lot of on-the-road connecting, check out one of the wireless connection options such as Ricochet's or Hughes's service, which are typically offered at a reasonable flat rate for a full 24x7 connection.
TIP
Windows XP supports modem aggregation, which is also called PPP multilink dialing. It essentially allows you to group modems together to increase the connection bandwidth. This process is a little tricky and requires multiple phone lines and multiple ISP accounts to work, as well as an ISP that supports synchronization of multiple modems.
In general, your default TAPI and modem properties will probably work fine and won't need to be changed. If you do need to change them, remember that changes affect all applications that use the modem whose properties you modify. To change the modem properties after installation is complete, open the Control Panel, and double-click the Phone and Modem Options icon.
On the Dialing Rules tab of the Phone and Modem Options dialog, you can set up your dialing locations and rules pertaining to those locations, such as phone number prefixes for outside lines, calling card access codes, and so on. If you move around (road-warrior style), you can add some new locations to the default one that's already set up for you as the current user.
You can either edit or add a dialing location from this tab. Table 24.12 describes the settings.
Table 24.12. Setting Dialing Rules for Each Location
On the Area Code Rules tab, you can set details about the use of an area code, specifically the use of the 1 prefix for certain exchanges. If you have to dial 1 (but no area code) for certain areas, you can add those prefixes here.
Click New to create a new rule, and fill in the resulting dialog box.
You might not need to worry about calling cards at all if you travel using an ISP that has many points of presence. The larger ISPs such as Mindspring, CompuServe, and AOL have local dial-up numbers from most major cities. Some also have 800 numbers that you can use when connecting phones from remote locations. If you need to bill your connection to a telephone company (or long-distance service) calling card, though, you set those options on the Calling Card tab.
TIP
If you use more than one calling card, you can create a different location for each one. Telephony programs, such as Phone Dialer or the Send Fax Wizard, normally let you change the location before dialing.
As you probably know from using a calling card for voice calls, to place and charge a call with a calling card, you dial a special string of numbers that includes a carrier access code, your account number, and the number you're calling. In some cases, you have to call a service provider, enter your account number, and wait for a second dial tone before you can actually enter the number you want to call.
To assign a calling card, follow these steps:
Click the location you are assigning it to on the Dialing Rules tab of the Phone and Modem Options dialog.
Click Edit.
Fill in the general information and any area code rules.
Click the Calling Card tab.
Choose the card type you have. If it's not listed, click New and fill in the resulting dialog box, using the ? (question mark) button for assistance. If your service is one of the presets, all the necessary settings, such as pauses and dialing codes, are made for you.
Enter your Account Number and Personal ID Number (PIN) if necessary. Not all calling card options require them, so these options may be grayed out.
If you get into editing the calling card rules for a location, you're in pretty deep. There's not enough room here to walk you through a description of every setting and how the dialog box works, but I can give you a few tips. For more details, consult the Windows XP Resource Kit.
Basically, you can set up and edit a sequence of events, like a script, in the Edit Calling Card dialog. You can not only change the sequence of events, but you can also enter any specific numbers or other codes. When you make the call, the events progress from the top of the box to the bottom. You can set up a script for each kind of call: local, long distance, and international.
You can use the Edit Calling Card dialog box when you have to fine-tune a calling card's dialing script. Do so only if the presets for your calling card service don't already work. The six buttons below the steps list insert new steps into the script.
Some services require you to wait for a “bing” tone before continuing with the dialing. If the tone your carrier plays isn't detected by your modem, try experimenting with different pause lengths instead. You typically are allowed a few seconds to enter the remainder of the sequence, so the pause amount may not be critical as long as you have waited for the bing.
If a connection isn't working, and you're fine-tuning these events, it sometimes helps to lift the receiver of a phone on the same line and listen (or turn on the modem's speaker), monitoring the sounds. You'll be better able to figure out where a sequence is bombing out.
So much for dialing rules. The second tab in the Phone and Modem Options dialog—Modems—is for setting modem properties. Accessing a modem's properties opens the same dialog box as when accessing a device's properties through the Device Manager. Typically, you don't need to change your modem properties, so unless you're having difficulty, remember this old adage: If it ain't broke, don't fix it.
To alter a modem's properties, follow these steps:
TIP
Notice that you can add and remove modems from this Properties dialog box, too, although you can do so just as easily from the Add Hardware applet.
You can dig pretty deeply into the tabs on a modem's Properties dialog box, especially the Advanced one. As per usual Microsoft strategy on its communications stuff, if you're used to pre-Windows XP dialogs, you'll find things have shifted around, and you'll have to do a little hunting. Table 24.13 lists a few notes about some of the more salient settings.
Table 24.13. Modem Properties Settings
You can click the Diagnostics tab in the original Modem Properties dialog box to make it active. The Diagnostics tab asks the modem to identify itself. It can further test the modem's capability to respond to the standard AT command set, display the contents of its internal registers, and display its settings. Click Query Modem to make it so. The results of the diagnostics query will make sense only if you compare them to the expected results in the modem's manual. If things don't look square, you should look for troubleshooting information in the manual or contact the vendor for modem-specific repair options.
The Regional and Language Options settings affect the way Windows displays times, dates, numbers, and currency. When you install Windows, chances are good that the Regional settings are already set for your locale. This will certainly be true if you purchase a computer with Windows XP preinstalled on it, from a vender in your country or area.
Running this applet from the Control Panel displays the dialog box you see in Figure 24.8.

Figure 24.8. Making changes to the Regional settings affects the display of date, time, and currency in Windows applications that use the internal Windows settings for such functions.
To change the settings, simply click the appropriate tab, and then click the drop-down list box for the setting in question. Examples of the current settings are shown in each section, so you don't need to change them unless they look wrong. The predefined standards are organized by language, then by country. If you can't find a standard to your liking, you can always create a customized format.
Using the Scanners and Cameras applet, you can add, remove, set properties for, and troubleshoot your connection to scanners and digital cameras. As scanners and digital cameras become as omnipresent as the trusty printer, provisions are being made to assist in the transfer of documents and images from them into the computer. Especially with the advent of the digital still camera, many new convenient methods for facilitating the transfer of captured images are being made available. This is a must if the digital camera is to become as prevalent as the standard film camera.
The Scanners and Cameras applet is used to install scanners, digital still cameras, digital video cameras, and image-capturing devices.
After a device is installed, Scanners and Cameras can link it to a program on your computer. For example, when you press Scan on your scanner, you can have the scanned picture automatically open in the program you want.
With some cameras and scanners, you can create linked events that execute when you do something on the camera or the scanner. Typically, this means pressing a button on the scanner or camera.
In the best of all worlds, detection of your scanner or camera will occur automatically as Windows Plug and Play detection notices the device. But as you know, sometimes running the Add Hardware wizard is required to force a search. To do that, use this applet to install a scanner device like this:
Run the Scanners and Cameras applet, and click Add an imaging device. (Ideally, you should hook up the device before doing so.) Follow the wizard, and choose the make and model if necessary.
Choose the port the device is connected to. You can use the option Automatic Port Select if you don't intend to be consistent with which port you use for this connection, or you don't want to bother guessing which port it's on.
When an item is installed, the drivers are added to the boot list at startup, and appropriate features in the operating system are modified for gaining access to the device.
You can check and test a scanner or camera by selecting it and clicking the Properties button. The Properties dialog for the device appears. Here, you can alter the port number if you need to and check other settings as applicable. If color profiles are available for the device, you can add or remove them using the Color Management tab.
How you acquire images from the device into the computer varies depending on the product. Some cameras use a USB connection, some use a serial cable, and some use FireWire, while others use PC Card memory sticks or even high-density floppies.
When the physical connection is made, it's a matter of triggering the correct “event” to initiate communication between the system and the digital imaging device for image transfer. To link a program to a scanner or digital camera event, follow these steps:
Open the Scanners and Cameras applet.
Click the scanner or camera you want to use, click Properties, and then click the Events tab.
In Scanner Events or Camera Events, click the event you want to link to a program.
In Send to This Application, click the program you want to receive the image from the scanner or camera. If the Events tab isn't displayed, you're out of luck; the feature isn't available for the selected scanner or digital camera. Also, at this point, most applications don't support linking to scanners and digital cameras using this new technique. It may take some time for software makers to incorporate it, just as it took awhile for TWAIN to be supported by the PC industry at large. Also, note that linking is available only with the programs that appear in Send to This Application.
With the onslaught of spam and malicious viruses and other code, Microsoft realized that XP users needed a single place to turn to for monitoring and controlling their systems' security. True, XP already incorporated an Internet firewall and the Windows Update technology. And true also, various anti-viral programs such as Norton and McAfee were available from third parties. The problem is that too many users got lost poking around Windows to make adjustments to each of these services. Many purchased third-party firewalls, not knowing one was built into XP. (Admittedly, however, Norton's and Zone Alarm's firewalls have more features.) The Security Center applet was added as an antidote for this shortfall. When opened from Control Panel, it appears as shown in Figure 24.9.

Figure 24.9. The Security Center provides central access to firewall, Windows updates, and virus protection settings.
Notice that handy links are also provided for other security concerns such as Internet security (usually only reachable from the Internet Options applet, or the Tools menu in Internet Explorer), and there's a link also to the System applet. As we mentioned earlier in this chapter, you'll find coverage of Firewall and Auto Updates in other chapters. Virus protection is not provided by Microsoft with XP. Maybe in the future it will be, in Microsoft's inimitable style of co-opting other non-MS technologies. In the meantime, click on the Recommendations button should you desire anti-viral protection. You'll be led by the hand to sites where purchasing of third-party applications will be made easy for you. Once you install an anti-virus program, you most likely can alter its settings through this control panel interface. As the dialog box states, however, not all programs will be recognized by Windows. If yours isn't, then you'll have to resort to the anti-virus program interface to make adjustments.
The Sounds and Audio Devices applet is your stopping place when it comes to adjustments to your sound system and the sounds the computer makes to alert you of errors, new mail, and so on.
NOTE
As you might know, you adjust the volume of your computer speakers (and other inputs and outputs) by choosing Start, All Programs, Accessories, Entertainment, Volume Control. Alternatively, you can simply double-click the little speaker next to the clock in the system tray. By single-clicking the same little speaker, you can quickly adjust the master volume control. The Volume Controls are covered in Chapter 5, “Using the Simple Supplied Applications.”
There's a bunch of fun to be had from this applet, should you like to twiddle with your sounds. Most of what people do with this applet is change the goofy sounds their computers make in response to specific events.
If your computer had a sound card (or motherboard-based sound chipset) when you installed Windows XP, it's likely Windows established a default set of rather boring sounds for your system, most of which you've probably grown tired of already. Aside from making life more interesting, having different sounds for different types of events is also more informative. You know when you've made an error as opposed to when an application is acknowledging your actions, for example.
The sounds the system uses are stored on disk in the .WAV format. You can create, purchase, or download just about any sound you can think of from the Internet. I downloaded the sound of Homer Simpson saying “Doh!” and the theme from the original TV show Star Trek the other day, for example.
Note
→ You can use the Sound Recorder accessory program to create your own WAV files, if you care to. To learn more about it, see “Volume Control,” p. 178.
The Volume tab is used to set the master volume. This is the same master volume control which appears in the Volume Control tool and when you single-click the speaker in the system tray. Clicking the Advanced button opens the Volume Control tool so you can access all of the input and output audio controls.
Also on this tab are speaker controls. If you have a special speaker system, such as surround sound or 3-D audio, these controls help you fine-tune your settings.
The Sounds tab is used to associate Windows events with sounds. Windows XP comes with tons of sound files, a big improvement over the measly assemblage of WAV files supplied with some earlier versions of Windows. In fact, just as with the color schemes, you can create and save sound schemes by using the Control Panel's Display applet (covered in Chapter 23); you can set up and save personalized schemes to suit your mood. Microsoft supplies a fairly rich variety of sounds for your auditory pleasure.
Despite the diverse selection, I still use a few of the sounds I've put together using the Sound Recorder. I have one, for example, that says “New Mail” when I receive email. Sometimes I didn't notice the generic “boop” sound when new mail arrived, so I changed it.
If you want to get fancy, you can record from a CD or tape recorder rather than from a microphone. This way, you can sample bits and pieces from your favorite artists by popping the audio CD into the computer and tapping directly into it rather than by sticking a microphone up in front of your boom box and accidentally recording the telephone when it rings. Just check out the Volume Control applet, and figure out which slider on the mixer panel controls the input volume of the CD. Then use the Sound Recorder applet to make the recording. I have a few good ones, such as James Brown's incomparable “Ow!” for an error message sound.
TIP
You should make sure that WAV files you intend for system sounds aren't too large. Sound files can be super large, especially if they are recorded in 16-bit stereo. As a rule, you should keep the size to a minimum for system sounds because it takes a few seconds for a larger sound to load and play.
You assign sounds to specific Windows “events” like this:
Open the Control Panel, and run the Sounds and Audio Devices applet. Select the Sounds tab, as shown in Figure 24.10.
The Program Events section lists the events that can have sounds associated with them. Several classes of events are listed on a typical computer, such as Windows, NetMeeting, Windows Explorer, and so on. As you purchase and install new programs in the future, those programs may add their own events to your list. An event with a speaker icon next to it already has a sound associated with it. You can click it and then click the play button (the one with the triangle pointing right, just like the play button on a VCR or stereo) to hear the sound. The sound file that's associated with the event is listed in the Sounds box.
Click any event for which you want to assign a sound or change the assigned sound.
Open the drop-down Sounds list, and choose the WAV file you want to use for that event. Some of the event names may not make sense to you, such as Asterisk, Critical Stop, or Exclamation. These names are for the various classes of dialog boxes that Windows XP displays from time to time. The sounds you're most likely to hear often will be Default Beep, Menu Command, New Mail Notification, Question, Open Program, Close Program, Minimize, Maximize, and Close program. You might want to start by assigning sounds to them and then add others as you feel like it.
Repeat these steps for each item you want to assign or reassign a sound to. Then click OK to close the dialog box.

TIP
The default folder for sounds is windowsmedia. If you have a WAV file stored in another folder and want to assign it to an event, use the Browse button to locate it. You don't have to move your sound files to the windowsmedia folder for it to work. However, if you're planning on reassigning sounds regularly, you'll find that the process is easier if you move your WAV files into the media folder first.
At the top of the list of available sounds is an option called <none>, which has the obvious effect: No sound will occur for that event. Assigning all events to <none> effectively silences your laptop for use in a library or other silent setting. You can also silence all sounds easily by choosing the No Sounds sound scheme as explained next.
In the same way that the Display Properties page lets you save color schemes, the Sounds and Audio Devices applet lets you save sound schemes. You can set up goofy sounds for your humorous moods and somber ones for those gloomy days. I often tire of a sound scheme, so I have a few setups that I can easily switch to. The ones supplied with Windows XP are pretty decent, actually, and considering the amount of work required to set up your own schemes, you'll probably make out best just trying a scheme to see if you like it. To choose an existing sound scheme, just use the Sound scheme pull-down list and select one.
You can set up your own sound schemes by assigning or reassigning individual sounds, as I've already explained. But unless you save the scheme with the Save As button, it'll be lost the next time you change to a new one. So, the moral is that after you get your favorite sounds assigned to system events, save the scheme. Then you can call it up any time you like.
On both the Audio and Voice tabs, you can declare the default hardware you want to use for audio playback, recording, MIDI playback, voice playback, and voice recording. Most systems offer minimal choices in these departments because typical computers have only a single sound system. You might find something strange in the sound playback and recording settings, such as the option to use your modem for these purposes (if your modem has voice messaging capability). Don't bother trying to use your modem for voice messaging unless you have multiple sound cards in the computer.
The Advanced buttons for these categories could be useful, however, depending on your sound system's chipset. Some offer options to adjust bass and treble; expanded stereo (sort of a wider sound based on adjustment of the “phase” of the signal going to the amplifier); sample-rate conversion options; equalization optimization based on the kind of speakers you have; and hardware acceleration (use full acceleration if you're a gamer because it affects DirectSound used in some games).
The Use Only Default Devices option determines which sound card or cards your programs will use. If you use programs that require a specific type of sound card, and that sound card is selected as a default device on this tab, select this check box. That way, if for some reason your preferred devices aren't available, the program doesn't bomb or freak out by trying to use a sound card that Windows thinks is a reasonable replacement. For any situation I've been in, leaving the check box cleared has never been a problem.
The Hardware tab of the Sounds and Audio Devices Properties dialog simply lists all the sound, video, DVD, and other multimedia hardware items currently installed. You can check their properties and current status, as well as troubleshoot them. You can get to the same properties dialog boxes offered here via the Device Manager, but this tab limits the device list only to multimedia-related hardware.
The Speech applet is used to configure the voice that you'll hear whenever the text-to-speech translation feature is used. Now, the voice offered is still too jerky and coarse for my taste. I remember my first voice-enabled computer game “Parsec” for the TI; that was more than 20 years ago. And the voice it used is just about the same as what is offered here in Windows XP. I can't wait until the sultry voice of the Star Trek: The Next Generation computer becomes the standard.
The Microsoft SAM voice is limited in its configurability. But, Windows XP will accept third-party voices which may offer greater end-user control.
Currently, text-to-speech or TTS is only available through Microsoft Office. To use it, you must enable the Speak Text command in the Language bar under Options. Once enabled, highlight the section of the document you want read to you, then issue the Speak Text command from the Language bar.
The System applet is covered in Chapter 27, “System Utilities,” but we wanted to mention an important element accessed through the System applet here—the Device Manager. The Device Manager is accessed from the System applet's Hardware tab by clicking on its name-sake button. When launched, you are presented with a category list of the devices installed in the system (see Figure 24.11). When there are no problems, the display is a bit bland. To see the individual devices, expand any of the listed categories. Then, to access a device's Properties dialog box, just double-click on it.

The Device Manager serves several functions, the foremost of which is to aid in the resolution of hardware problems. When any device fails to function as expected it will be highlighted with a yellow triangle or a red stop sign. The yellow triangle indicates a warning or a possible problem. A red stop sign indicates a device conflict or other serious error. When the Device Manager is launched and a device has an outstanding issue, its category will be expanded so you can easily see the warning or error icon.
When a device's Properties dialog box is opened, the General tab displays basic information about the device, plus details on the device's current status. In most cases, the status report will point out exactly what is preventing the device from functioning normally. You may be able to correct the issue on your own, or if you need help or guidance, click the Troubleshoot button for a wizard. You'll be amazed how useful these wizards are! Merlin would be proud.
Depending on the device, there can be many other tabs in addition to the General tab. In most cases, you'll see a Driver tab, and almost as frequently you'll see a Resources tab. The Driver tab offers details about the currently installed driver for this device and enables you to update, roll back, or uninstall the driver.
Device driver roll back is a new feature to the Windows product line. Roll back will remove the current driver and restore the previous driver (assuming there was one). The ability to remove the current or newly installed driver to return to the previously used driver is often a lifesaver. I can't remember how many times I've had to remove a new driver, then had to go through the process of re-installing the hardware just to get the old driver back. The Roll Back Driver button now performs this operation with a simple click. No muss, no fuss.
Note
→ For more information on Device Driver rollback, see “Device Driver Rollback,” p. 1179.
The Resources tab specifies the system resources to which the device is assigned. These include IRQ, I/O ranges, DMA, and more. On PnP devices, you can switch the settings from automatic to either a predefined configuration set or a fully customized setting. On legacy cards, you may need to alter the physical device settings (such as dip switches or jumpers) first, and then set the Resources tab to match. For some PnP cards, the settings on the Resources page are read-only. Meaning you must use a vendor-supplied configuration utility to change the settings away from automatic control.
As for any other tabs that may appear in a device's Properties dialog box, be sure to consult the respective user manual.
From the main Device Manager view, you can perform a few helpful actions:
Change views between devices by type, devices by connection, resources by type, and resources by connection
Force a scan for hardware changes
Update the driver for the selected device
Disable the device in the current hardware profile
Uninstall the device from the system
Eject or unplug a device
NOTE
A hardware profile is similar to a user profile except it focuses on the presence or absence of devices. Hardware profiles are typically used on portable systems that have interchangeable PC card devices or which use a docking station or other transient external devices. Each hardware profile contains active device drivers for a specific set of devices. Upon bootup, the system attempts to match the located device set with a known hardware profile. Hardware profiles are discussed in Chapter 25, “Maintaining and Optimizing System Performance.”
A program I'm trying to kill doesn't show up in the Add or Remove Programs applet. How can I remove it?
This often is the case with programs that don't announce themselves thoroughly to Windows as they are being installed. You have to find the program on the hard disk and eliminate it using the Windows Explorer. Finding a program is often as simple as browsing to the Program Files folder, opening it, and looking around for a folder holding the program in question. Often, deleting the folder is all you have to do. Look for an “uninstall” application there first because it will do a more complete job of removal than just killing the folder, most likely, because some stray DLLs and other support files may be scattered about, not to mention shortcuts in your Start menus that you'll want axed.
As a second (and possibly quicker) means of discovering the location of an unlisted program, you can use its Start menu shortcut to lead you to the application's source. Open the Start menu, and click your way to the application. When you see it, right-click it. Now choose Properties from the context menu. Then click Find Target to go directly to the folder where the program resides. Then you can start your dirty work.
If you're trying to kill a program that seems to start up all on its own when you boot up, choose Start, Programs, Startup. Anything in this group autoexecutes upon bootup. Right-click the offending item, and choose Delete. This trick doesn't remove the program from your hard disk, but it prevents the program from starting at boot time.
I don't see a battery icon in the system tray. My laptop seems to be brain dead about batteries and power conservation.
Be sure APM is enabled for the computer via the Power Options applet in the Control Panel. Also, make sure the computer complies with APM (check your BIOS settings).
My modem isn't connecting for some reason.
More often than not, modem problems are caused by incorrect phone numbers and/or a bad phone line connection. Assuming Windows detected and installed your modem, don't get esoteric in your troubleshooting. Just as you're most likely to find a lost item where you think it should be, it's the silly things that keep modems from working—a bad or incompletely inserted phone wire, bad wall jack, or splitter; or a phone number that's missing an area code (or has an unnecessary area code) being dialed. Another typical goof is to specify an external access number (typically 9), which might be necessary at the office but not on the road. Check the properties for the dial-up networking connection you're trying to use. Also, of course, double-check the user ID and password. You might be dialing in and physically connecting just fine, but the remote server is kicking you off because of incorrect user ID or password.
Finally, recall that a number of troubleshooters are built into Windows XP. One of them is for modems. Choose Start, Help, and in the right pane, click Troubleshooting.
My camera or scanner doesn't show up.
Sometimes starting with the obvious is easiest. Does the device have power? Is your scanner or camera plugged in and turned on? Check the power cables and the data connection. Does the camera have a good power source? Digital cameras eat up batteries at a ravenous rate. Either use fresh batteries or an external power source. (I recommend getting nickel-metal hydride batteries for digital cameras. They work much longer than normal alkalines or Ni-Cad batteries.) If the connection is an infrared one, make sure the camera and computer IR sensor are lined up properly.
Some devices don't connect correctly unless they're turned on. See your device documentation if you need more information.
As per my usual admonition, check your cables! Make sure you have the correct type of cable plugged into the correct ports on both the device and your computer. See your scanner or camera documentation for more information. Your device may be connected to a port that is disabled. A serial port, for example, is often disabled to allow an internal modem to work.
Next, check to see whether the driver for your device is installed. Virtually all cameras and scanners are Plug and Play these days, so Windows XP should install the drivers for them automatically. However, you might need to install drivers for some devices manually. See the section in this chapter covering the Scanners and Cameras applet for details on installing a driver. If that doesn't help, and the device is listed as installed (in Control Panel, Scanners and Cameras), try removing it and reinstalling it via that applet and then reinstalling it (by clicking Remove and then Add).
Why is the mouse pointer still on the screen while I'm in DOS?
Lots of folks still run DOS programs, even under Windows 9x, NT, 2000, and now XP. Most DOS programs are keyboard driven and don't require a mouse. Normally, however, when you run DOS programs in a window, the mouse pointer sits annoyingly on the screen, even though it's useless.
You can hide the mouse pointer when running an MS-DOS program, assuming you don't need it. To hide it, right-click the title bar of the MS-DOS window to display the menu, and then click Hide Mouse Pointer. (If the program switches between character-based and graphics modes, you might need to hide the mouse pointer again.) When the mouse pointer is hidden, you can't see it inside or outside the program's window. To display the mouse pointer, press Alt+Spacebar, and choose Display Mouse Pointer from the resulting menu.