In this chapter
Inevitably, the only time you'll ever have a problem with your computer system is the exact moment when it's not convenient. Or more specifically, the moment when any delay would be severely detrimental to the continuation of your job or life. Fortunately, Windows XP has benefited from the failures of its preceding OSes and as a result is more stable than any other Microsoft OS.
That is not to say that Windows XP will never experience a failure. However, the frequency of such failures is greatly reduced and in many cases Windows XP can self-heal.
In this chapter, I discuss many of the fault-tolerant features of Windows XP, along with specific tools you can employ to resolve problems.
Windows XP is chock full of helpful troubleshooting information. In many locations throughout the user experience, you'll see a button labeled “Troubleshooter.” This button is most common when viewing the Properties dialog box of a device. This button launches a troubleshooting wizard that walks you through common resolution techniques for the problems you are encountering. You also can locate troubleshooting links within the Help and Support Center. Just search on a topic and look for the link to launch the troubleshooting wizard.
While I'm discussing device Properties dialog boxes, I should also mention that you can gain access to these (among a few others, such as Computer Management for drives and Phone and Modem options for modems) through the Device Manager. Within the Device Manager you can look for devices with problems by looking for the yellow exclamation point or the red stop sign over the device's icon. See Chapter 30's section titled “System: Device Manager.”
Windows XP offers several alternate boot methods which can be used to bypass a problem or boot into a reduced environment so you can solve the problem. If you can't boot the system, this is the time to start considering the boot options. For example, if you've recently installed a new device driver that caused a serious system failure (you can't boot), you can use a boot option to boot without that driver (this is called the “Last Known Good Configuration,” to be exact).
TIP
If you can boot, but you're being plagued by other strange system anomalies, read the “System Restore” section later in this chapter. It might be a better choice for a simple repair. If you can boot, but a device isn't working after having just installed a new driver, check the section on “Driver Rollback,” in Chapter 30.
The boot options of Windows XP are accessed during the early stages of system startup. If you have more than one OS on your system, the boot menu will be displayed. You'll have until the counter reaches zero to press F8. If you have only Windows XP Pro on your computer, you'll see a message about pressing F8 after the computer's own Power-On Self Test and the display of the graphical booting screen. You'll have only a few seconds, so keep your finger over the F8 button and press it when the message appears. Pressing F8 at the correct moment reveals the Advanced Options Menu which contains several boot options. These options are listed in Table 33.1.
Table 33.1. Safe Mode Startup Options
After you've made a selection from the Advanced Options Menu, you are returned to the boot menu (Unless Reboot or Start Normally is chosen, of course). Notice your selected option is listed in blue at the bottom of the screen. From this point, you can select an OS from the list and continue with booting based on your selections.
TIP
If a symptom does not reappear when you start in Safe mode, you can eliminate the default settings and minimum device drivers as possible causes.
Using Safe mode, you can start your system with a minimal set of device drivers and services. For example, if newly installed device drivers or software is preventing your computer from starting, you might be able to start your computer in Safe mode and then remove the software or device drivers from your system. Safe mode does not work in all circumstances, especially if your system files are corrupted or missing, or your hard disk is damaged or has failed.
In general, if you've just performed some operation that caused a system failure, the best first reboot action is to use the Last Known Good Configuration. If that fails to resolve the issue, use Safe Mode. If the problem is specific to the video drivers (or suspect that it is), you might want to use Enable VGA Mode instead of Safe Mode. If you've just recently changed video drivers or the video card itself, you may want to use the Enable VGA mode if things don't act normally during the reboot.
When you are able to access the system through Safe Mode, you need to resolve the issue causing the boot problem. In most cases, this will require you to reverse your last system alteration, application install, driver update, and so on. If your system stops booting properly and you did not make any changes, then you should probably call Microsoft tech support. They may be able to help track down the culprit and get things back on track.
If none of these boot options results in a repaired system or offers you the ability to boot the system, you'll need to move on to the Recovery Console.
The Recovery Console feature provides you with a command-line interface that enables you to repair system problems via a limited set of commands. For example, you could use the Recovery Console to enable and disable services, repair a corrupted master boot record, or copy system files from a floppy disk or a CD-ROM. The Recovery Console gives you complete control over the repair process but can be dangerous if not used with caution. If you're not an advanced user, you should stay away from this set of commands. If you do plan to pursue use of the Recovery Console, I highly recommend consulting the Windows XP Resource Kit.
The Recovery Console can be used in two ways. It can be installed so that it always appears on the boot menu as an alternate OS. Or, you can use it by initiating a repair via the setup routine. Both of these methods are discussed in this section.
TIP
The following procedure assumes you have boot floppies or the original XP CD. If you don't have them (typically because your computer came with XP already installed and many branded computers don't come with an XP CD), you might still be in luck. If the computer a Hewlett-Packard, it has the ability to make a restore/recovery CD using files in a special “maintenance partition” on the hard disk that essentially contains everything that the XP installation CD does. Check the user's manual with the computer or phone tech support and ask them how to install the Recovery Console.
To run the Recovery Console on a system that will not start, do the following:
Insert the Windows XP Setup Disk into your floppy drive or, if you have a bootable CD-ROM drive, insert the Windows XP CD into your CD-ROM drive.
Restart your computer.
Follow the directions on the screen. If you're using the Setup disks, you are prompted to insert the other Setup disks into the disk drive. Loading files might take several minutes. Choose the options to repair your Windows XP installation when prompted (press R for repair instead of Enter to install) and finally to start the Recovery Console when prompted.
NOTE
To see the commands available on the Recovery Console, type help at its command prompt. You can also find useful information at www.microsoft.com/technet/prodtechnol/winxppro/reskit/prmb_tol_ezjh.asp.
To install the Recovery Console on your computer so that it is always available, you must be logged on to Windows XP as a user with a Computer Administrator account type to be able to complete this procedure.
NOTE
Recovery Console must be installed before you install SP2. If you have already installed SP2, you cannot install Recovery Console on your computer. However, you can use the previous procedure to run Recovery Console from the Windows XP product CD.
Log on to Windows as a Computer Administrator user.
With Windows running, insert the Windows XP CD into your CD-ROM drive.
If you're prompted to upgrade to Windows XP, choose No. Or, if you're already running XP, you'll have to click Exit from the Welcome (“What do you want to do?”) screen.
At the command prompt (Start, All Programs, Accessories, Command Prompt), switch to your CD-ROM drive, and then type the following:
i386winnt32.exe /cmdcons
A dialog box appears, explaining what the Recovery Console is for, telling you it requires about 7MB of hard disk space, and asking whether you want to proceed. Click Yes.
A wizard starts and copies the files onto your hard disk. That's it.
Now that the Recovery Console is installed, it is listed as a selection on the boot menu—not on the Advanced Options Menu.
The following are some notes on installing the Recovery Console:
To run the Recovery Console after it has been installed, you must restart your computer and select the Recovery Console option from the boot menu.
You must be logged on as a Computer Administrator user to be able to install the Recovery Console. If your computer is connected to a network, network policy settings may also prevent you from completing this procedure.
To see the commands available on the Recovery Console, type
helpat the command prompt.You can allow a user to run the Recovery Console without logging on by enabling the Auto Admin Logon attribute in the Security Configuration Editor. The AutoAdminLogin attribute is located in the Console tree under Local Computer Policy, Computer Configuration, Windows Settings, Security Settings, Local Policies, Security Options. Otherwise, once the Recovery Console is started, you'll be prompted for the Computer Administrator user account's password.
If your computer does not start, you can run the Recovery Console from the Windows XP CD (if you have a bootable CD-ROM drive) or the Setup disks.
If you install the Recovery Console on a hard disk drive or partition formatted with the FAT file system and later convert the partition to NTFS, you'll need to reinstall the Recovery Console.
In many cases, the Recovery Console offers you enough reach to repair most problems. However, in the event that the Recovery Console fails to support necessary system alterations, you'll need to attempt a parallel installation.
Before you resort to doing a fresh installation over the top of a dead system, or wiping out the disk and starting over, you might want to try one other approach. This trick can sometimes get you up and running again, assuming you have enough disk space—and some patience. The following procedure creates a back door into a broken installation so that you can remove or change offending drivers, disable some offending services, tweak the Registry, and so on in hopes of getting it back up again. If nothing else, you can do a clean installation and pull in your settings from the old installation.
The basic idea is that you do a clean installation of Windows XP into a fresh directory. Then you can use Regedt32 either to alter the Registry of the dead system or pull what you can out of it (such as user settings) into the new one so that you can trash the old installation.
Here are the basic steps:
Install Windows XP into a fresh directory (a clean installation). For example, if your Windows directory is C:Windows, you might use C:Windows2 for this new installation.
Boot up Windows using the newly installed system. This should occur by default.
Try to repair the old copy by deleting or replacing defective driver files in the original Windows installation directory structure.
If you suspect that a system service is crashing on bootup and that's what's crashing your computer, you can try editing the old system's Registry to disable the service. Here's how:
Run Regedt32.exe from the newly installed version of Windows XP and select the following key:
HKEY_LOCAL_MACHINE
NOTE
If you need help running Regedt32, see Chapter 32, “The Registry.” Don't tinker with the Registry unless you know what you're doing. Improper editing of the Registry can result in a dead computer.
Click Load Hive on the File menu, and open the following Registry file on the original Windows XP installation folder
oldwindowsfolderSystem32ConfigSystem
where oldwindowsfolder is the name of the folder of your original Windows installation.
Assign this hive a name such as
OldSystem. This key contains the old HKEY_LOCAL_MACHINESystem data from your old setup.Browse into the subkey CurrentControlSet if it's displayed. If it's not, look in key Select at Value Current. It will be a number such as 1, 2, or 3. Back in OldSystem, open key ControlSet00x, where x is the number you found under Current.
Browse into the Services key, and look for the likely offending service. Under each service's key is a value named Start, with one of the following values:
Starts in the first phase of bootup (these services are usually used to access file systems)
Starts automatically, just after booting
Starts manually
Disabled
Services with a Start value of 1 are used to boot Windows, and you shouldn't touch them. Services with a Start value of 2 are started just about the same time as the Login dialog appears in Windows. If your Windows system boots and then promptly crashes without your help, try setting the Start value of any suspected service(s) to 3 or 4. Be sure to write down the names of the services and their original Start values before you change anything!
Select the OldSystem key, and select the File menu, Unload Hive.
Use Notepad to view file the C:BOOT.INI. You should see two entries for Windows XP, one using the original directory and one using the new directory. Note the order in which they're listed.
Shut down Windows and reboot. You have to select a Windows installation from the two Windows XP entries listed. Refer to your notes made in step 7 to determine which entry is which. Select the old (original) installation to boot.
You might need to repeat this process a few times, disabling a different service or two each time. If you can manage to reboot the old system with some system services disabled, uninstall and reinstall those services to recover your installation.
This procedure is a little bit like performing brain surgery with a shovel, but it has resurrected systems for me before.
You can reinstall Windows XP over a damaged Windows XP system. Doing so might be time-consuming, but reinstalling is useful if other repair attempts do not solve your problem. You should attempt an upgrade install first. If this works, you will have repaired your OS and retained your installed applications and most system configuration settings. If upgrading fails, you must perform a fresh install, which means you'll have to re-install all of your applications and remake all of your settings changes. Unless you format the drive, your data files will remain unaffected by the upgrade or fresh install process.
TIP
If you do a fresh install, you don't have to worry that your documents and settings will get wiped out. They won't. During a re-install, Windows XP setup checks to see if there are pre-existing Documents and Settings for each user account you create, and uses a modification of that name to create the new account settings. For example, my account name is Bob. So, under D:Documents and Settings, there is a sub-folder called D:Documents and SettingsBob. When I did a fresh reinstallation on the same drive, and set up my user account again (using the name “Bob” once again), XP did not overwrite the existing Bob folder. Instead it created a new folder called D:Documents and SettingsBob.HP-Laptop. XP appended the name of my computer onto my username. Now all I had to do was fish around in files and folders under Bob (such as Desktop, Favorites, Cookies, Application Data, and so on) and copy those over to the new Bob.HP-Laptop folder. Then I was back in business.
However, it is always a good idea to back up your data. Go back and check out the “Backup Tools and Strategies” section in Chapter 29 for ideas on performing that activity. Keep in mind that if your system fails to boot, you can't get access to the Windows backup tool to create a backup. So, you must be proactive by backing up your important files on a regular basis. You might get lucky and be able to use the Safe Mode Command Prompt or the Recovery Console to access a command prompt where you can copy files to a floppy, removable medium, or other drives. But relying on this is not smart.
TIP
If data recovery is what you are after, there are ways to reclaim your data from the hard drive. These techniques assume that the files or folders you want to reclaim did not use NTFS encryption. There are several approaches you could consider. First, if you have a dual-boot system, look for the Documents and Settings folder on the XP boot drive. Drill down until you find the files you want. This assumes the OS you boot into can read the file system that your user files are stored under, of course. Second, you can try connecting the drive to another computer that boots an OS capable of reading the volumes and folders in question. Then go looking for the files. Find them, and copy them where you'd like.
NOTE
In cases where the lost data files were encrypted under NTFS, you will need a recovery key to gain access to them. See Chapter 29 for more about managing the hard disk, and Chapter 28 for details about managing users and passwords.
I have never believed that having to re-install and re-configure an OS is a true recovery method. It's more of a start-over-from-scratch method. There are some system failures which require such far reaching procedures, but in many cases you can prevent them. The most successful preventative measure is backing up. In fact, the only insurance you have from one moment to the next that your system and your data will even be accessible is a backup. Backups should be performed automatically and frequently. But just backing up is not enough; you must also verify that your backups are working properly and periodically walk through the process of restoring your system in the event of a failure.
Backups are the key to a long life of your data. In fact, most of the repair capabilities of Windows XP are based around backups. Many repair functions don't correct problems directly; instead they restore saved functioning files over problematic ones. This includes the Last Known Good Configuration, many functions within Recovery Console, and the System Restore capability (discussed later in this chapter). But all of these restore or repair functions focus on the OS, not on your data. Only a backup you configure and execute will protect your data.
Flip back to Chapter 29, “Managing the Hard Disk,” for more details about backups.
Backups are not the only preventative measures you should take. You should also regularly check your system's performance. This process was discussed in Chapter 25, “Maintaining and Optimizing System Performance.”
It is also a good idea to use a UPS (Uninterruptible Power Supply). A UPS conditions the power being fed to the computer and can provide several minutes of power in the event of a blackout. A UPS will prolong the life of your computer by protecting its sensitive components from electric fluctuations.
Regularly check the Event Viewer for device, driver, and service problems. Problems of this nature usually appear in the System log. They are usually indicated by a yellow triangle or a red stop sign as the event detail's icon. If you see problems related to key components of the system, you need to investigate the situation and resolve the problem. Unfortunately, the event details do not always provide enough information. You'll need to use the Help and Support Center, the Microsoft online knowledge base (support.microsoft.com), or Microsoft technical support over the phone to decipher what cryptic information is presented. In many cases, the Windows XP troubleshooter will provide a workable solution. Otherwise, you should consult the vendor's Web site for updated drivers and troubleshooting instructions.
NOTE
The Event Viewer is discussed in Chapter 27, “System Utilities.” The hardware troubleshooter (both through the Add Hardware applet and the Device Manager) is discussed in Chapter 24, “Configuration via Control Panel Applets.”
You should also endeavor to regularly perform drive maintenance on your system. Maintaining healthy drives reduces the number of drive and file system related problems. Drive maintenance involves the following:
Manually removing old data files, either via deletion or backup
Use Disk Cleanup to remove unnecessary files
Use Error-checking to verify the volume is supporting its file system properly
Use Defragmenter to consolidate files and aggregate free space
NOTE
These drive tools are discussed in Chapter 29, “Managing the Hard Disk.”
System Restore is a fabulous mechanism which first appeared with Windows Me. Now Windows XP incorporates it, too. System Restore enables you to restore the computer to a previously saved state. So, you can “roll back” your computer to the way it was working before your dog jumped on the keyboard, or before you installed that stupid program or device driver that lunched your system. Here's how it works.
Performing a system restore does not affect personal files, such as documents, Internet favorites, or email. It simply reverses system configuration changes and removes installed files to return the system to a stored state. System Restore automatically monitors your system for changes. Periodically easily identifiable restoration points are created. Plus, you can create your own restoration points manually.
It should be obvious, but I'll state it anyway: System Restore is only accessible if you can boot Windows XP. If your system does not boot, you must use one of the previously mentioned system recovery techniques.
There are two control interfaces for System Restore. One is on the System Restore tab of the System applet. The other is the System Restore utility itself accessed through Start, All Programs, Accessories, System Tools, System Restore.
The System Restore tab (see Figure 33.1) of the System applet is where System Restore is enabled or disabled for all drives in the computer. It is enabled by default.

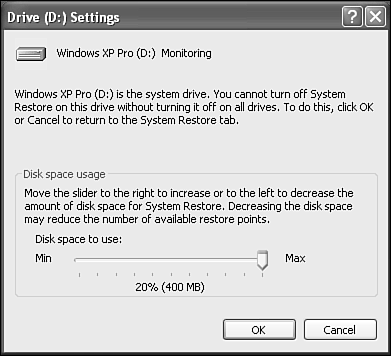
Figure 33.1. The System Restore tab of the System applet where drive by drive settings are defined to enable storage of system restore archives.
While enabled, you can define on a drive-by-drive basis how much space can be consumed by System Restore to maintain restoration points. You can choose to turn off System Restore for individual drives or set the percentage of the drive usable by System Restore. Each drive has either 20% or 12% of its total size set as the default and maximum allowed usage levels (see Figure 33.2). (It seems that if the 20% level results in a value over 400MB, then the 12% level is used.) Keep in mind that if you disable System Restore on a drive, no changes to that drive are retained in restore points.
The number of restore points retained by System Restore will depend on the amount of allowed drive space usage as well as the rate and significance of changes to the system.
Restore points are created by Windows XP automatically whenever any one of several specific events occurs:
On first boot after installation
Every 24 hours of calendar time or every 24 hours of computer uptime
When a program is installed using InstallShield or Windows Installer
Automatic updates via Windows Update
Any restore operation
Installation of unsigned device drivers
At any restore operation using Backup
Keep in mind that not all program installations use InstallShield or Windows Installer. Thus, you should always manually create a restore point before installing applications.
The creation of a restore point at any restore operation allows you to reverse a restoration. Thus, if after a successful restoration you are not pleased with the outcome, you can reverse the restoration. The system automatically removes any failed or incomplete restoration operations.
System Restore does not replace the uninstallation process for removing an application. System Restore only monitors and protects against changes to the OS. It does not track the addition of new files to the system. Use the Add or Remove Programs utility or a vendor provided uninstall routine to remove applications.
The System Restore tool (see Figure 33.3) in the System Tools section of the Start menu is actually a wizard accessed by clicking its icon in the Start menu under All Programs, Accessories, System Tools. This wizard walks you through the process of restoring the system to a previous saved state or to manually create a restore point. Just make a radio button selection and then click Next.

When restoring a system, the list of available restoration points is displayed along with a calendar to help in time-lining and identifying. Once you've selected a restore point, you'll be asked to confirm your wish to restore the system to the saved state and informed that the system will reboot to perform the action. Once the restore is complete, a new third radio button option for Undo My Last Restoration will appear on the first page of the System Restore Wizard.
Creating a restore point is even simpler. All you need to do is provide a name for the restore point and click Create. The system state data will be saved.
It often seems like many professional technophiles have some sort of black magic they use when resolving problems. If you blink, you miss whatever it is they do to get the system back in working order. It's often as if you are working with a techno-mage.
Yes, it is true that some of our skills at resolving problems do seem like hocus pocus. But in reality, it's a mixture of experience and knowledge. Both of which you can gain with time and effort.
In my experience, I've found that most computer problems are physical in nature. Meaning some component is not connected properly or has become damaged. Of the remaining 5%, more than 4.99% is caused directly by the user—whether through deliberate or accidental activity. User-caused problems are typically configuration changes, installation of new drivers, or deletion of important files and folders.
When I troubleshoot a problem on my own systems, I try to mentally walk backwards through whatever I've done to the system over the last few days or weeks. In many cases, I'll remember installing some downloaded application or changing some Control Panel setting that I meant to uninstall or reverse, but never got around to do it. If the brainstorming fails to highlight any suspects, I check for physical issues. Is everything powered on? Are cooling fans still spinning? Are all the right cables still firmly connected?
If I don't discover anything obvious physically, I try a power-off reboot. The power-off reboot will reset all hardware devices, and in many cases resolve the problem (if it was device related). If possible, shut down the system gracefully. Then keep the power off for about 10 seconds before switching the system back on. You'll be amazed at how often this works.
My next steps always include a walk through the Event Viewer and any other types of log files I can find. Let the problem guide you in this process. For example, if the video system is failing, you probably don't need to look through the modem logs.
For me, every problem is unique. Often requiring a different resolution than any other problem I've tackled in the past. However, there are some general rules or guidelines I try to follow:
Try only one change at a time
Reboot twice after each change
Test each change for success
Try the least invasive first
Keep a log of your changes, you may need to undo them to produce a result, or you may need the resolution process again in the future
Consult vendor Web sites for possible solutions, if the problem seems to be specific to one device or software component
Be patient and take your time
After a few attempts at possible solutions, step back and re-evaluate before continuing
If you get frustrated, take a break. Anger and frustration are counter-productive when you need to be thinking clearly
Try to undo any recent changes to the system, including new hardware or software patches
Review areas of the system which have caused problems in the past
Try to repeat the failure; knowing where, how, or why the failure occurs can lead to a solution
Troubleshooting is both an art and a science. You'll need organized patience and outrageous ingenuity. Plus, knowing where to look stuff up never hurts. Keep in mind that the entire Internet is waiting at your finger tips and mouse clicks. Search groups.google.com as well the regular Web. You'll be amazed at what you find. Be precise in your search techniques to help find the exact messages you need to read. The MS knowledge base is extremely helpful, too. Plus, lots of helpful information is included within the Help and Support system of Windows XP as well as the Windows XP Resource Kit. If all else fails, contact Microsoft technical support over the phone (see support.microsoft.com for contact numbers). In most cases, if the troubleshooting techniques in this book don't resolve the issue, it usually beyond the end-user to correct.
Not all of the troubleshooting techniques applicable to Windows XP are contained within this one chapter. If you've noticed, we've been discussing troubleshooting within every chapter. That organizational decision was intended to group recovery information with the discussion of the related technologies, deployment, usage, and management. So, before you throw your hands up in frustration that your questions are not answered or your problem is not resolved in this chapter, go check out the chapter dedicated to the specific subject earlier in this book.