In this chapter
When Windows was first developed in the mid-1980s, none of the hardware we use today to capture and transform still and video images was available. However, as time passed, still photographers and, more recently, videographers, have discovered the computer and its capability to edit, transform, organize, and store their work.
Whether you're a serious photographer with a portfolio that rivals Ansel Adams, a videographer inspired by Stanley Kubrick, or just a casual camera user who's looking for a way to organize company photos, Windows XP contains built-in tools and features that are designed to make the marriage of images and pixels a happy one. Even if you plan to replace the multimedia and imaging tools in Windows XP with higher-powered third-party solutions, Windows XP's architecture makes it easier to use the tools you want to work with the photos and video you love to create.
Some of the imaging and multimedia tools built in to Windows XP are improved versions of those originally designed for Windows Me, whereas others are brand new. Windows XP Professional has every one of the imaging and multimedia tools found in Windows XP Home Edition, so you no longer need to sacrifice imaging and multimedia performance for the stability and security of a corporate operating system. With Windows XP Professional, multimedia and imaging work as well in the office as they do at home.
Windows XP works with virtually any type of imaging device you can connect to your computer, including
Scanners
Digital cameras
Web cameras
DV camcorders
How does Windows XP interface with these devices to capture photos or video? Windows XP uses a technology called Windows Image Acquisition (WIA), originally introduced with Windows Me, which provides a standard method for all types of imaging devices to communicate with Windows. WIA is based on the Windows Driver Model (WDM) architecture for device drivers introduced with Windows 98.
WIA is designed to go beyond what's been possible with older types of imaging hardware/software interfaces, such as TWAIN and ISIS. If you've used scanners or digital cameras before, you might be familiar with TWAIN (developed by the TWAIN Working Group; www.twain.org), which has been used by most flatbed scanners and some digital cameras to communicate between a host application (such as Adobe Photoshop or other image editors) and the imaging device. TWAIN drivers are available for both Windows and Macs. A similar interface preferred by some scanner and imaging-device vendors is Pixel Translation's Image and Scanner Interface Specification (ISIS; see www.pixtran.com for more information). ISIS supports Windows applications.
Although WIA-compatible scanners and digital cameras show up in a program's image acquisition menus just as TWAIN and ISIS-compatible devices do, there are major differences between WIA and TWAIN, the more common scanner and camera interface software:
WIA is activated immediately when a supported device is connected to the computer or turned on. For example, when you attach your digital camera to your computer and turn it on in Connect mode, WIA immediately brings up a menu of choices for working with your camera's images or starts your preferred application. This makes image transfer easier, even for inexperienced computer users.
TWAIN and ISIS rely on your application's File, Acquire menu option to scan or retrieve pictures. This makes image transfers more difficult for inexperienced users.
WIA can offer users a choice of options: copying, viewing, or editing pictures, whereas TWAIN is designed for users who want to edit pictures before saving them.
WIA supports all types of imaging devices, including video, whereas TWAIN is designed for still image cameras and scanners only.
WIA provides a universal interface for all types of imaging devices, whereas the details of TWAIN support vary a great deal from device to device.
WIA supports connections through all common port types, including USB and IEEE-1394 (FireWire) as well as SCSI, parallel, serial, and infrared (IR), and works through the Scanner and Camera Wizard, Windows Explorer My Pictures folder, image-editing programs such as Adobe Photoshop, and authoring programs such as Microsoft Word and PowerPoint. WIA also supports scripting with Visual Basic and other scripting languages, so you can develop custom applications.
Although this chapter focuses on XP's built-in WIA support for imaging devices, you might still prefer to use TWAIN or other device-specific support for your imaging device if WIA doesn't support all its functions.
Like digital photography? Own a scanner? Windows XP supports the immense popularity of digital photography and scanning with the following features:
Scanner and Camera Wizard—. Provides a unified interface for working with all types of digital imaging devices, including digital cameras, flash memory card readers, scanners, Web cameras, and DV camcorders with still image options.
Imaging preview—. See your pictures within Windows Explorer.
My Pictures folder—. Provides sorting, organizing, email, Web site publishing, slideshow, and screen saver options for your digital and scanned photos.
New Photo Printing Wizard—. High-quality printing using templates for layout.
Integrated CD burning—. Create your own CD-R or CD-RW image archive.
No matter where your digital images come from, these features can help you have more fun and get more use from your photographs. In the following sections, you'll learn how each of these features works.
Windows XP's Scanner and Camera Wizard, originally introduced with Windows Me, provides a unified interface for transferring pictures from your imaging devices to your computer, your network, or to the World Wide Web.
If you have more than one imaging device supported by Windows XP, the Camera and Scanner Wizard displays all supported devices when you launch it from the Start menu (click Start, All Programs, Camera and Scanner Wizard the first time you use it) and allows you to choose the one you want to use (see Figure 7.1). Web cameras, scanners, digital cameras, and card readers are some of the devices the Scanner and Camera Wizard can recognize. The wizard also starts automatically when you press the Scan button on a supported scanner, skipping the dialog box shown in Figure 7.1. In these cases, the wizard skips the Choose Device dialog box and opens the scanner.

Figure 7.1. Click the device you want to use, and click Properties to configure it or OK to capture pictures.
If the Scanner and Camera Wizard is not available on your system, no supported imaging devices have been installed, although you can launch the applet manually through the Control Panel.
TIP
If you have a choice between a USB-based scanner and other interface types such as SCSI and parallel, choose USB. The Scanner and Camera Wizard automatically detects and uses many USB devices, but it might not work with other interface types unless specific Windows XP–compatible drivers are available. If you set up other scanner types with Windows XP/2000 drivers, you might need to use the scanner's own TWAIN interface to scan photos and other media.
To start the wizard with your scanner, you can push the Scan button on your scanner; open the Scanner and Camera Wizard and choose the scanner from the Scanner and Camera Wizard menu (refer to Figure 7.1); or use the image acquisition feature from within your favorite photo editor or paint program. Image acquisition is located in the File menu of most applications.
When the wizard starts, click Next to continue. Follow this procedure to scan your pictures:
On the Choose Scanning Preferences screen, select the picture type and select Preview to prescan your picture with default settings. With some scanners, you might need to press the Scan button to perform the preview (see Figure 7.2).

Figure 7.2. The preview scan has been completed. Use the Custom Settings button to adjust resolution, brightness, and contrast.
TIP
If you place only one photo on your scanner, the wizard automatically selects it for you, as seen in Figure 7.2. Adjust the scan boundaries by dragging the corners only if you want to crop the photo during the scan. If you place more than one picture on the scanner, you will need to adjust the scan boundaries manually to scan each photo.
Click Custom Settings to adjust the contrast, brightness, and resolution for the scan (I recommend 75dpi for scans you plan to use in slideshows, and 150–300 dpi for scans you want to print). Click OK to return to the Choose Scanning Preferences screen, and click Next to scan the picture with the settings you've chosen.
On the Picture Name and Destination screen, enter a name for the group of pictures you're scanning, select a file format (BMP, JPG, TIF, and PNG are the options), and select a location. The default location is a subfolder beneath the My Pictures folder (see Figure 7.3). Click Next to scan your picture and save it. Each picture is numbered as it is scanned and saved.
TIP
Which file format should you choose? The default, JPEG, creates very small file sizes but does so by discarding fine image detail; it can be used on Web pages. Unless you're short on disk space, I recommend TIF, which creates large file sizes but retains all picture detail. Use BMP if you're saving files for use on the Windows desktop. PNG files also can be used on Web pages. If you save the file in one format and need to convert it into another later, retrieve the file into Windows Paint and save it in the format you need.
After the picture is scanned, the Other Options screen appears (see Figure 7.4). You can choose to publish your pictures online, order prints from a photo printing Web site, or finish working with the pictures. You also can use the Back button to return to previous menus so you can scan more pictures.
Click Next, and the Scanner and Camera Wizard provides an onscreen report of the number of pictures copied (scanned) and their location. Click the link provided to open the folder.

Note
→ For details about the My Pictures folder, see “Viewing Images,” p. 240.
Start the Camera and Scanner Wizard to retrieve pictures from your digital camera:
Connect your device and turn it on.
Click Start, All Programs, Accessories, Scanner and Camera Wizard.
If you have more than one imaging device, select your digital camera from the opening menu shown in Figure 7.1, and click OK.
If you have only a digital camera, after the wizard locates your device, the opening screen of the wizard appears, as shown in Figure 7.5. To continue, click Next.
By default, all pictures are selected for copying to your computer. To skip a picture, clear the check mark. To rotate it or see its properties, click the buttons below the picture area (see Figure 7.6).
On the next screen, you can supply a name for the group of pictures (replace the default “Picture” with your own name) and specify where to store the pictures. If you use the default location (a folder beneath the My Pictures folder), you can use My Picture's multimedia and printing enhancements. You also can have the wizard delete the pictures from your device to free up space after copying them to your system.
The wizard displays each picture while it copies the selected pictures and provides a status display onscreen, shown in Figure 7.7.
If you chose to delete the pictures from your imaging device, the wizard will also delete them and inform you of its progress.
When the pictures have been copied, you can choose to publish your pictures online, order prints from a photo printing Web site, or finish working with the pictures. You also can use the Back button to return to previous menus so you can copy pictures you skipped (refer to Figure 7.4).
Click Next, and the Scanner and Camera Wizard provides an onscreen report of the number of pictures copied and their location. Click the link provided to open the folder.


Note
→ For details about the My Pictures folder, see “Viewing Images,” p. 240.
Windows XP has built-in support for popular flash memory card readers, and automatically detects card readers and flash memory cards with pictures when you plug them in. When you plug a flash memory card containing pictures into your card reader, you can choose from several actions (see Figure 7.8):
Start the Scanner and Camera Wizard—. The wizard works with flash memory cards the same way it does with digital cameras. For more information, see “Using the Scanner and Camera Wizard with a Digital Camera,” earlier in this chapter.
View a slideshow—. This displays each picture onscreen for a few seconds and continues until you press the Esc key. For more information about slideshows, see “Using Slideshow,” later in this chapter.
Print pictures directly from the media with the Photo Printing Wizard—. For more information about printing, see “Using the Photo Printing Wizard,” later in this chapter.
Open folder to view files—. This option starts the Windows Explorer. For more information about using this option, see “Using Windows Explorer to View Your Photos,” later in this chapter.
Take no action—. Select this option to leave the contents of the flash memory card alone until you decide what you want to do.

Figure 7.8. When you insert a flash memory card containing photos into your card reader, Windows XP displays options to help you copy, view, and print your photos.
Check Always Do the Selected Action after you choose an action if you want to make that action the default.
TIP
Use the Always Do the Selected Action option only if you're sure you always want to perform the same task with your pictures. If you leave this box unchecked, you can choose the task you want every time you insert your flash memory card. It takes only a couple of mouse clicks, so my advice is to keep your freedom and don't choose a default action to perform.
Windows XP provides you with two ways to view your pictures:
Through Windows Explorer
As a slideshow
Which one is better for you? That depends on whether you're looking for immediate gratification or for long-term storage and enjoyment of your pictures. The following sections explain how to use both options.
If you select the Windows Explorer option when you read the photos from your flash memory card, view pictures stored in My Pictures folder or a subfolder, or view the contents of a folder containing photos, Windows Explorer activates several special features designed to make working with your image files easier.
Instead of the normal large icons display of files, Windows Explorer switches to a special Filmstrip display option, which uses a large window on the right side of the screen to display the selected picture and shows other pictures in smaller size below navigation and image-rotation buttons (see Figure 7.9). You can use the navigation buttons to select which photo to display, or click on the photo you want to see in the large view.

Figure 7.9. The Filmstrip view is used automatically by Windows XP when you view a folder containing photos.
TIP
If the filmstrip view isn't selected automatically, click the View tool or the View menu and select Filmstrip. If Filmstrip isn't available because the images are not the correct type or the folder has a mixture of image files and other files, Filmstrip won't be listed as an option. Therefore, if you want to be sure Filmstrip view is available as an option, store your photos in a separate folder from other documents.
The File menu in Explorer also changes when you select a photo, providing the following options:
Preview—. Opens the photo in the Windows Picture and Fax Viewer
Edit—. Opens the photo in an image editor
Print—. Opens the photo printing wizard
Refresh Thumbnail—. Generates a new thumbnail preview of the picture (useful if you've edited the picture)
Rotate Clockwise/Counter-Clockwise—. Rotates the picture in 90-degree increments
Set As Desktop Background—. Puts your digital masterpiece on the Windows desktop
Open With—. Selects another program to open this picture
Send To—. Sends photo to a compressed folder, removable-media drive, or My Documents folder; creates a desktop shortcut; or provides other destinations
Properties—. Displays file properties
TIP
By default, the Edit menu in Explorer uses Windows Paint to edit photos. If you prefer another image editor (and who wouldn't?), right-click a photo and select Open With. Windows XP will display Paint and Windows Picture and Fax Viewer, as well as Choose Program. Click Choose Program and select the program you want to use if it's listed, or click Browse to locate the program you prefer. To keep this choice for all files of the same type, check the Always Use the Selected Program box. You also can search the Web for a suitable program. Click OK when you're finished.
Making a slideshow of your pictures once required you to fire up a program such as PowerPoint and click and paste your way through your digital stack of photos. If all you want to do is view your photos onscreen, you no longer need any third-party software: Just select the slideshow option when it's available within a folder or from the card reader's menu.
Windows XP's slideshow option is very simple: It sequences the images in a folder with five seconds per photo and continues to show the pictures in a loop until you press the Esc key on your keyboard.
An onscreen toolbar lets you play, pause, move to the previous photo or next photo, or exit the show. You also can use the keyboard commands in Table 7.1 to control the show.
Table 7.1. Slideshow Control Keys
Action Desired | Keys to Press |
|---|---|
Go to the previous picture in the folder | Left arrow or Page Up or up arrow |
Go to the next picture in the folder | Right arrow or Page Down or down arrow |
Rotate picture 90 degrees clockwise | Ctrl+K |
Rotate picture 90 degrees counterclockwise | Ctrl+L |
Play or pause the slide show | Spacebar (press once to pause, again to play) |
Go to the next picture | Enter |
Exit the show | Esc |
Hide or display toolbar | Tab on or off (toggle) |
TIP
If you don't want to display all the images in a folder during your slideshow, just select the ones you want to view with Ctrl+Click or Shift+Click, and then click the Slideshow button on the left side of the Explorer screen or choose Slideshow from the menu. Only the slides you've selected will be displayed.
Want to show off the pictures of your spouse or kids but you've run out of room on your desk? You can use the pictures you scan or copy from a digital camera to create a screen saver.
To set up your favorite pictures as a screen saver, create a folder with Windows Explorer and copy the pictures you want to use to that folder. Then, open the Display properties sheet in Control Panel, select the Screen Saver tab, select My Pictures Slideshow, and select the folder containing your pictures. You can display each picture for up to three minutes (the minimum is six seconds) and use anywhere from 25% to 100% of the screen. You can stretch small pictures to fit, show filenames, enable transition effects, and use the keyboard to scroll through pictures. Nobody else has a screen saver like it!
Windows XP's Slideshow feature can show you your digital photos immediately. How about instant prints from your digital photos? Thanks to the brand-new Photo Printing Wizard, you can have pictures as fast as your printer can produce them, and get them in a variety of sizes.
You can start the Photo Printing Wizard from
The flash memory card opening menu
The Picture Tasks menu in a photo folder
The pull-down menu in a photo folder
The File and Folder tasks menu in a regular folder
When the wizard starts, here's how to use it:
The Photo Printing Wizard displays its opening screen. Click Next to continue.
The Picture Selection screen lets you select the pictures you want to print. Clear or add check marks to select the pictures you want to print, and click Next to continue.
On the Printing Options screen, select the printer you want to use (if you have more than one printer). Click the Properties button to select the paper type, print quality, and other document properties (see Figure 7.10). Click the Advanced button to adjust the number of copies to print and other advanced printer features. Click OK to return to the Printing Options menu, and then click Next.

Figure 7.10. For best results in photo printing, choose the paper type you're using from the list of paper types.
TIP
If you haven't used your inkjet printer for several days, or your printouts are of poor quality, you should click the Utilities tab (if available) and run your printer's head cleaning or nozzle test options with plain paper inserted in your printer (take out the photo paper until you're ready to print a good print). Head and nozzle clogs will ruin your printout and waste expensive photo paper, and most recent printers also offer a cleaning routine on this tab. If your printer doesn't have a menu option for head cleaning, check the instruction manual for the correct method to use. You might need to press buttons on the printer to activate a built-in head-cleaning routine.
Use the Layout selection screen to select how your photos should be laid out on the photo paper. Select from full-page; contact sheets; or sizes such as 3.5x5, 4x6, 5x7, and 8x10, and wallets. The preview shows you how your pictures will be laid out on each page. If you select a size that allows for multiple photos on a page, each image will be laid out once unless you specify a larger number (see Figure 7.11). Click Next to print your photos.
CD-RW drives, which can use either rewritable CD-RW media or recordable CD-R media, have become some of the hottest peripheral options on the market. Previous versions of Windows couldn't use these drives until you installed CD-mastering software, but Windows XP has built-in features that enable you to use a supported CD-RW drive as soon as you install or connect it and turn on your computer.
When Windows XP detects a supported CD-RW, the Picture Tasks menu lists Copy to CD as an option. Here's how to use it:
If you want to copy only some of the pictures in your folder, select the pictures you want to copy and click Copy to CD.
To copy all photos in the folder to CD, don't select any pictures first. Click Copy all items to CD.
The pictures are copied to the CD-RW folder.
Repeat steps 1–3 for other folders that contain pictures you want to add to the CD.
Click My Computer in the Other Places menu.
Double-click the CD drive where you will store your pictures.
The folders you are going to copy are displayed under Files Ready to Be Written to the CD. If you've used the CD for other pictures previously, they also will be listed (see Figure 7.12).

Figure 7.12. Displaying the files to be written to the CD and those already on the CD with Thumbnail view.
TIP
To see a small preview of your picture files as shown in Figure 7.12, select Thumbnails from the View menu or View tool instead of the default Icons view. This provides you with an easy way to be sure you're copying only the pictures you want.
Click Write These Files to the CD from the CD Writing Tasks menu at the left side of the screen, and the CD Writing Wizard opens.
Enter the name of the CD on the opening screen. If you want to create just one CD, select Close the Wizard. Otherwise, click Next to continue.
If your pictures were stored in a folder, the wizard creates a folder on the CD for the pictures. While the wizard writes the files to the CD, it displays a progress indicator onscreen (see Figure 7.13).
The system ejects your CD after copying your picture(s). Click Yes to create another CD if you want or close the wizard. If you elected to close the wizard in step 9, the wizard closes automatically.

TIP
If your CD-RW drive doesn't offer buffer underrun protection features such as BURNProof, be sure you're not running other programs while you make your CD. A buffer underrun (the drive running out of data to write to the CD) will ruin the CD. Use the Task Manager (press Ctrl+Alt+Del to display it) or the taskbar to see the programs that are running. Close other programs before writing your CD to help assure a successful burn.
If you are still having problems making a CD successfully, adjust the speed used by your drive to record data. Open My Computer, right-click the drive, and click the Recording tab. Select the next lower speed than the fastest speed listed and try the recording again (see Figure 7.14).
Your photo folders act as regular folders after they've been copied to the CD. If you want to use the special imaging features such as slideshow or photo printing discussed earlier in this chapter, select a file in the folder, open the File menu, and select Preview. The picture is loaded into the Windows Picture and Fax Viewer, which has buttons for photo printing, slideshows, image rotation, editing, and other imaging options. You can use the Forward and Back buttons to select other files in the folder.
TIP
If you start the copy-to-CD process and discover you're out of media, don't panic. Windows XP stores your pictures in a temporary folder and will remind you to finish the copy process with a pop-up balloon-help message coming out of the system tray. Click on the message when you have more media, and follow the prompts onscreen to complete the copy process or discard the temporary files.
Windows XP offers two online options that help you distribute your images to other offices:
Publish Photos to the Web—. Use this option to create an online photo album you can access from any location with Internet access.
Ordering Prints Online—. Get better prints for less cost than using your inkjet printer and its expensive cartridges.
When you open a folder containing photos, one of the File and Folder Tasks available in the left side of your screen is Publish This Folder/File to the Web. Here's how to use this feature to make your pictures available on the Web:
If you want to publish only some of your photos, select them first, and then click Publish. Otherwise, click Publish.
The Web Publishing Wizard starts and connects to the Internet (if you're not already connected). Click Next to continue.
Files that will be published are check-marked. Add or remove check marks if desired, and then click Next.
Select a service provider from those listed, such as MSN and Xdrive. If you select MSN and you don't have a .NET Passport yet, you must complete the .NET Passport wizard that appears and continue. See “Getting a Passport to Microsoft Country” in Chapter 9 for details.
On the File Destination screen, select the destination folder you want to use, or create a new folder. Click Next to continue.
On the Adjust picture size dialog box, you can choose to resize your pictures to fit a Small (640x480; default), Medium (800x600), or Large (1024x768) browser window. Clear the check box to leave your photos at their original size.
TIP
The most common screen size today is 800x600. If you want to create a fast-loading Web page that maximizes screen area for most users, select Medium. However, if your company has standardized on 17-inch or larger CRTs or 15-inch or larger LCD panels, choose Large, because these monitor sizes are a good match for 1024x768 or higher resolutions.
Click Next to publish your photos to your chosen provider. If you are publishing only a few pictures or have a broadband (cable modem, DSL, two-way wireless or satellite, or T1) connection, the copying process can take only a few seconds. If you are using an analog (56Kbps or slower) modem or are copying many pictures, the process could take several minutes.
TIP
Photos stored in the JPEG (.JPG) format use less disk space and can be published faster than other types of photos. JPEG photos can also be viewed over the Web by standard browsers without using special software. If you plan to publish your photos to the Web, save a copy of each photo as a JPEG file.
At the end of the process, a URL for your pictures is displayed and a matching shortcut is added to your My Network Places folder. Close the wizard and your site is displayed.
If you carry your computer with you to meetings, just set up an Internet connection when you arrive, and click on the shortcut in My Network Places to display your pictures. To display the photos from other Web browsers, enter the URL provided, and provide the username and password assigned by your provider.
TIP
The Web Publishing Wizard's not the way to go if you're trying to share pictures with other users when you're not present. If you want to share your photos with everyone in your organization, talk to your company's IT managers about setting up a Web page on the company intranet. You can use any Web-publishing program to create customized pages that also can contain company contact information, the company logo, and other content not available with Microsoft's Web Publishing Wizard.
Inkjet printers are great for printing the occasional snapshot or Web page, but corporate bean counters are likely to start throwing things if you try to turn your high-cost-per-page printer into a high-volume photo producer. Save money and get more options with the Online Prints Ordering Wizard.
To use the wizard, follow these steps:
Click Order Prints Online from the Picture Tasks menu.
When the opening screen of the Online Print Ordering Wizard appears, click Next to continue.
Select the pictures you want to use for reprints.
Select the service from those listed (see Figure 7.15).
Complete the order form that the vendor provides and enter your payment and shipping information when prompted. Depending on the vendor you choose, you can order prints, enlargements, gifts, and novelty items (such as mugs, t-shirts, jigsaw puzzles, and mousepads) from your pictures.
TIP
Digital pictures printed by an online vendor are higher quality than those you can produce with your inkjet printer, but the quality of the images you send to the vendor affect the prints you'll get back. For best results:
Scan your prints at 150dpi for snapshots; use 300dpi if you're scanning only part of a picture.
Scan 35mm slides and negatives (which are much smaller than prints) at 1350dpi or higher for 4x6-inch prints.
Use a two-megapixel digital camera (1536x1024) or greater resolution for 4x6-inch or larger prints, and set the camera to use the highest quality and highest resolution. The minimum camera resolution recommended for 4x6-inch prints is 640x480 (the “VGA” setting on some cameras); remember, more pixels in the original image means better quality in the final print.
The digital still mode on most DV camcorders is usually not nearly high enough quality for printing, although the results will look acceptable onscreen.
Order just a few digital prints from a new vendor and evaluate the quality before you place a big order.
Windows XP's imaging tools make it easy to get digital images into your computer and keep them organized, but unless you're a perfect photographer, some of those images will need cropping, color-correcting, and other enhancements that Windows XP's tools don't offer.
Because WIA-compatible devices can be used from the Acquire menu of your favorite image editor, just as TWAIN-compatible digital cameras and scanners can be, you can use virtually any third-party photo-editing program you prefer to acquire your pictures, or retrieve them from a photo folder for editing after you copy them to your system with the Camera and Scanner Wizard or other Windows XP tool.
My favorite is Adobe Photoshop (www.adobe.com), which is immensely powerful, offering layers, automation, and many different ways to control brightness, contrast, and image appearance, but is also quite expensive. If you're on a budget, some capable alternatives include Adobe Photoshop Elements, Jasc Software's Paint Shop Pro (www.jasc.com), and Corel PhotoPaint (www.corel.com), which is part of CorelDRAW.
In addition to the product sites listed above, check out these online resources:
Imaging Resource (www.imaging-resource.com)—. Covers the gamut of imaging hardware and software products, and has the unique “Comparometer” feature, which compares the actual output of any two digital cameras from their huge database.
DPReview (www.dpreview.com)—. The interactive buying guide helps you get the digital camera that matches the features you want, and its unique Timeline shows you when the camera you own was introduced.
FocalFix (www.focalfix.com)—. The new name for Focus Online, where readers review their favorite products.
John Cowley's Lonestardigital.com—. A long name for a great site with product reviews and tutorials on both digital imaging hardware and software.
If you prefer moving images to stills, Windows XP provides a video-friendly environment. By using the Windows Movie Maker program, Windows XP can capture video from
Web cameras
DV camcorders
Analog camcorders
VHS and other video players
Windows Movie Maker can then be used to edit your video into movies, which you then can save to your hard disk, removable-media drive, or CD for playback on systems through Windows Media Player.
The editing process that Windows Movie Maker and other digital video editing programs use is often referred to as non-linear editing, because you can arrange different digital movie sources in any order, and don't need to physically cut or damage video tape or film to edit your movies.
You will need a video capture card or USB device to capture video from an analog camcorder or video tape player. Some video cards, such as the All-in-Wonder series from ATI, have TV-in jacks that also can be used for analog video capture. If your Web camera is supported by Windows XP, you can use it for video capture without any additional hardware.
You will need a supported IEEE-1394 (FireWire) port or add-on card to capture video from a DV camcorder, and Windows XP also must have support for the DV camcorder if you want to interface directly with Windows Movie Maker.
TIP
If Windows Movie Maker doesn't support your video hardware but it can be used with third-party software, capture your data with third-party software and save it in a Windows Movie-Maker–compatible format, such as .mpeg, .mpg, .m1v, .mp2, .mpa, .mpe, .asf, .avi, or .wmv. You can import these types of files into Windows Movie Maker.
The first time you attach a supported DV camcorder to your Windows XP system and turn it on, WIA displays the menu shown in Figure 7.16. You can start Windows Movie Maker or take no action. To make Windows Movie Maker the default action, select it, and then checkmark the Always perform the selected action box below the displayed options.

When you select Windows Movie Maker, the Windows Movie Maker opening screen is displayed briefly, and then the Video Capture Wizard box is displayed.
You may be offered the choice between different video and audio inputs for your capture. (If not, go to step 2.) If you have more than one video or audio source, you can choose between them. Depending on the sources you have (such as analog or digital video), you'll see different options. In general, DV gives you very few options because they are not necessary. After choosing the source and related options, click Next.
Enter the name of the file to record to, and choose the destination folder. By default, captured files go into My Documents/My Videos. Make sure there is plenty of room (think gigs, not megs) on the destination drive, since video files are large. Browse to a different drive or folder if you need to. Click Next.
In the next dialog (see Figure 7.17), you choose the movie quality. This setting determines how the file is captured, how large the file size on disk is, and ultimately the output quality level of the resulting movie. The Other settings option gives you a raft of options for target device, such as Pocket PCs, Web streaming, and so on. The information panel in the bottom of the dialog will help you decide between the options. (You can also click the link Learn More About Video Settings.) Click Next.
On the next dialog, you decide whether to let the capture driver rewind the entire tape and record it automatically (breaking it into clips that you can rearrange, easily cut and paste, and so on), or to manually choose sections of tape to import. Click Next.
If you chose the manual approach, you'll now see a dialog box with device controls and some other information and options in it. You can advance and rewind and preview the picture using this dialog. You can also use the controls on your video camera or playback device instead. Either will work. Advance the tape to the start point, then use the Start Capture and Stop Capture buttons in the dialog to create your clips. Movie Maker can also be instructed to make clips from the section you captured. It does this by making a separate clip each time you click the Start Capture and Stop Capture buttons.
Notice also that the dialog reports the available disk space on the target drive. This is only somewhat useful, because it doesn't tell you how many minutes of tape you can capture on that drive, using the selected quality. That depends on the capture settings you chose. You'll have to experiment to figure this out, unfortunately.

Each file you save is referred to as a collection of one or more clips in Windows Movie Maker.
As I mentioned earlier in the chapter, if you want to import videos you shot on your digital still camera, you can do it. Once imported, use those as the basis of your movie or to spice up your other imported video. Simply do this:
In the left panel of Movie Maker, expand the Capture Video section and click on Import Video.
Browse to the video file(s) you want, and select them.
Click Import.
They are added to your working collection to later be put on the movie timeline.
When I make movies, I often want to pull in still images, too. Many folks have digital cameras these days, so images are easy to come by. These add richness to your productions. Use the preceding technique, but click on Import Pictures instead of Import Video.
You can import audio tracks, too, for spicing up your movies by adding theme songs, background music, speech, and so forth.
The next task is to get organized. You want to get your video clips, stills, and audio into the same collection so you can easily see them in the collection bin. This makes it simpler to pull them onto the timeline in the order you want.
Click the Collections button in the toolbar. The collections panel appears on the left.
Right-click on Collections (in the left panel), and choose Create New Collection. Give it a name, such as Dan's Birthday Party.
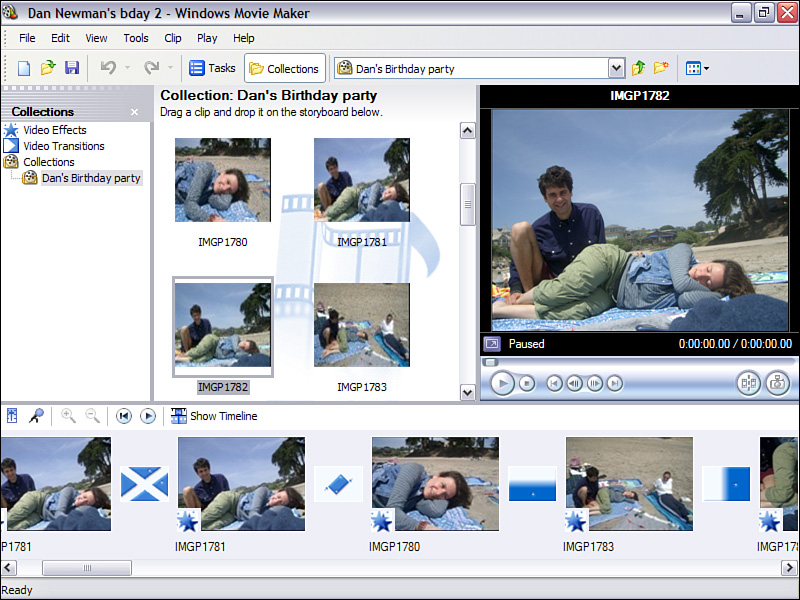
Now drag all your captured video clips, audio clips, and stills for this video production into this collection. (There are other ways to organize collections, such as keeping all video clips in one collection, audio in another, and so forth, but glomming them all together for a given project is the one I use most often.) Move objects around just as you do in Windows Explorer. That is, drag the thumbnails in middle pane over to the destination collection in the left pane. Or, import them into a collection by highlighting the new collection name and then clicking on File, Import Into Collections. You can also drag files from a Windows Explorer window, if you like. Figure 7.18 shows my collection setup for making my Birthday Party movie.

Next you start piecing together your movie by dragging your movie clips and/or still images into the Windows Movie Maker storyboard, which is the filmstrip-like area at the bottom of the screen. The clips you drag to the storyboard are positioned left-to-right (you can change the order later). The movie will eventually play starting with the leftmost clip, and move to the right, through all the clips in order.
Figure 7.19 shows the storyboard area after adding various clips from DV video I captured while making a movie called Dan's Birthday Party.
To play only the currently selected video clip in the Collections pane, click the triangular Play button beneath the preview window. To play the entire storyboard, click Play, Play Storyboard/Timeline from the top-level menu. Use the keys in Table 7.2 to control playback:
After you drag your clips and images to the storyboard, you can use various tools to adjust the length of each clip, the order of your clips, and the transitions between each clip. I like to trim up my clips at least roughly before I add transitions between them, add background music, credits, and so forth.
To change the length of each clip (called trimming), you must use timeline view; click View, Timeline or click on the Show Timeline button just above the storyboard. The timeline replaces the storyboard at the bottom of your screen. To change the order of clips, it's best to be in storyboard view; to edit and trim clips and adjust details of the timing of clips, use Timeline view.
Once you have your clips in the basic order you want, you'll typically have to make adjustments such as
Trim off the beginning and/or ends of a clip
Split a clip into two or more clips so you can move them around on the timeline independently or do transitions between the sections, or apply different effects to each portion.
Combine two clips together if you accidentally split them, or because it's easier to work with a smaller number of clips.
To adjust the length of each clip:
Click on the + or – symbols just above the timeline or choose View/Zoom commands to zoom in or out (making the clips appear larger or smaller). Zooming in makes it possible to accurately adjust the clip. You may have to scroll the timeline left and right a bit to find your clip. Use the scroll bar at the bottom of the Movie Maker window.
Click the clip in the timeline. Notice that if you hover the mouse pointer over the right or left edge of the clip, a red sizing arrow appears. Now you can drag the clip.
To delete the end of the clip, move the trim handle at the start of the clip to the right to the point where you want the clip to start; to delete the end of the clip, drag the trim handle at the end of the clip to the left until you reach the point where you want the clip to end.
TIP
If you're trying to shorten the end of a video clip, play the video clip from start to finish; then play it again and stop it at the point where you want to cut it. A vertical line in the timeline shows the playback location. Move the trim handle at the end of the clip until it is lined up with the vertical line.
You can't make a video clip be longer than its original length; you can only trim it. (Well, you can make it play in slow motion—see the effects section, later in this chapter.) However, still images can play for any length of time. Just drag the still image's edge down the timeline. By default, stills have a length of five seconds.
You can “scrub” across the timeline and see your movie play. Just position the pointer on the time area (looks like a ruler) of the timeline view. Then click and drag. The video will play sort of jerkily. If you click on a spot in the timeline ruler, then click the Play button in the Preview window; the preview will start from that point. This is useful for working on a specific area of the movie.
To move a clip from one position to another, you can use either drag and drop or cut and paste. I prefer drag and drop if I can see the source clip and destination location at the same time. Otherwise I use cut and paste. To use drag and drop:
Switch to storyboard view (not required, but easier to use than timeline view).
Drag the clip left or right on the timeline. A vertical line indicates where it will be inserted (always just before any clip you are hovering over).
To use Cut and Paste:
Movie Maker comes with 60 different transition effects to use between clips. Transitions control how one clip blends into the next. The default transition is called a flat cut. Actually, most film and TV transitions are flat cuts. They happen so quickly we barely notice them. Transitions add life to your creations. Like fonts, though, it's easy to overuse transitions. However, an occasional transition is useful, especially between still images or for a special effect such as in a music video.
TIP
You can download more from various online sources such as
http://www.microsoft.com/windowsxp/downloads/powertoys/mmcreate.mspx
There are several ways to add transitions to your production. To create a transition effect from one scene to another:
Switch to Storyboard view. Zoom in as necessary. Notice that there is a little box between each clip. This is the place holder for a transition.
In the Collections pane, click on Transitions. A bunch of transitions appear in the middle pane. Double-click on any one of them to see the effect played in the Preview window. When you find the one you want, drag it to the little box between the two clips you're transitioning between. In Figure 7.20, I have just added a checkerboard transition between two clips marked by the pointer.

Video effects are fun to play with. If you've used Photoshop filters, you know what these are. They change the look of a clip, for example from color to black and white. The nearly 30 different supplied effects run the gamut from painterly, to old fashioned, to slow motion, even to psychedelic. For still shots there are a few transitions that add a sense of motion. This approach is often used in professional documentaries. There are filters also for fading in and out, rotating clips, and increasing and decreasing brightness.
When you apply an effect, it alters the way the entire clip plays back. Transitions do not alter the actual clip file on your hard disk; they are just applied as the movie runs, and to the final output file you'll create when you save the movie after editing. You can remove effects at any time, so don't hesitate to experiment. If you split the clip, both halves keep the effect.
To apply a video effect:
Switch to storyboard view. (Timeline view works, but I think it's graphically easier to use mode storyboard view.)
In the Collections pane, click on Video Effects. The middle pane should show thumbnails of the available effects (see Figure 7.21). (You can choose View, Details to see descriptions of each effect instead of thumbnails.)
Double-click on an effect to see how it works. If you like it, drag and drop it on a clip and then click the play button on the Preview pane to see the effect on the actual clip. If you don't like the effect, right-click on the clip and choose Video Effects to bring up a dialog box. Click on the effect you dislike and click Remove.
You can add multiple video effects to a single clip. Effects for that clip are processed in the order listed in the Video Effects dialog box.

You can record narration for your movie when the movie is in timeline mode if you have a microphone attached to your computer. To record narration:
Select Timeline mode.
Position the cursor somewhere on the timeline where there is no other audio track. (The Audio/Music track is visible below the video track.) Click File, Record Narration.
The Record Narration Track pane appears (see Figure 7.22). Click on Show more options and you'll see the default audio device and input source as shown in the figure. To change the defaults, use the drop-down lists.
It's a good idea to click Mute speakers if you have your sound turned up, because it will prevent feedback between the speakers and the microphone.
Adjust the recording level as desired (the level should be somewhere near the middle of the colorful Input level meter).
Click Start Narration to begin. Click Stop Narration when you're finished. You'll be asked to name the file. It's saved as a .wma (Windows Media audio) file, then automatically dropped into the timeline in exactly the place where you started narration.

While Windows Movie Maker version 1 didn't have built-in titling features, version 2 does. And they are pretty spiffy. There are many styles to choose from. You can have titles appear over top of clips and stills, or as separate slides (like in an old silent movie). You can also create opening and closing animated titles and credits just like in real movies or TV shows. You can spend a few hours just playing with the titling options, so I'll just point you in the right direction.
To add an opening title sequence, choose Tools, Titles and Credits. In a few seconds the titler loads into the left pane.
Notice the options you have now. You can add a title:
At the beginning of the movie
Before a selected clip
On the selected clip
After the selected clip
At the end of the movie
Click on the desired option. As you enter your titles, you'll see them immediately show up in the Preview pane as they will appear in your movie. The real key lies in the options near the bottom of the titler pane: Change the Title Animation, and Change the Text font and color. Play with these to get some fun effects. See Figure 7.23 for an example.

There are two ways to save your work in Windows Movie Maker. To save the various parts of your movie (the clips on the timeline and the storyboard), click File, Save Project. By default, your Windows Movie Maker Project (.MSWMM) file will be saved to the My Videos folder. Give your project a name, and save it.
You should save your projects frequently during the creation and editing process. If you don't, and a system lockup or power outage takes place, your clips will remain, but the structure and timing of your film will be lost, and it will be back to the digital “cutting room” to start over.
Here's how to save your movie:
Now your project is saved and safe. You can open it again and fine-tune the project, add to it as you capture more video, or whatever. You can close Movie Maker if you want, and then open it and open the project. All the items in the collection should appear, as will the timeline and storyboard, just as it was when you saved it.
Next, you'll want to make sure you are happy with the movie. Once you are, you'll render it, which means to output it in the desired format. This can take a little time, so be ready to take a coffee break while your computer chugs away. Since rendering does take time, it's best to do a dry run of your final movie beforehand. You can see it in the little preview window, or full screen. Simply choose Play, Play Timeline. If happy with it, great. If not, edit as necessary. When you're satisfied with the movie, try outputting to the target medium and see how it looks.
The easiest way to render is to bring up the Movie Tasks sidebar (click on Tasks up in the toolbar). Then expand the Finish Movie section. You'll see these choices: Save to My Computer, Save to CD, Send in Email, Send to the Web, and Send to DV Camera. Choose the option you desire, and move ahead.
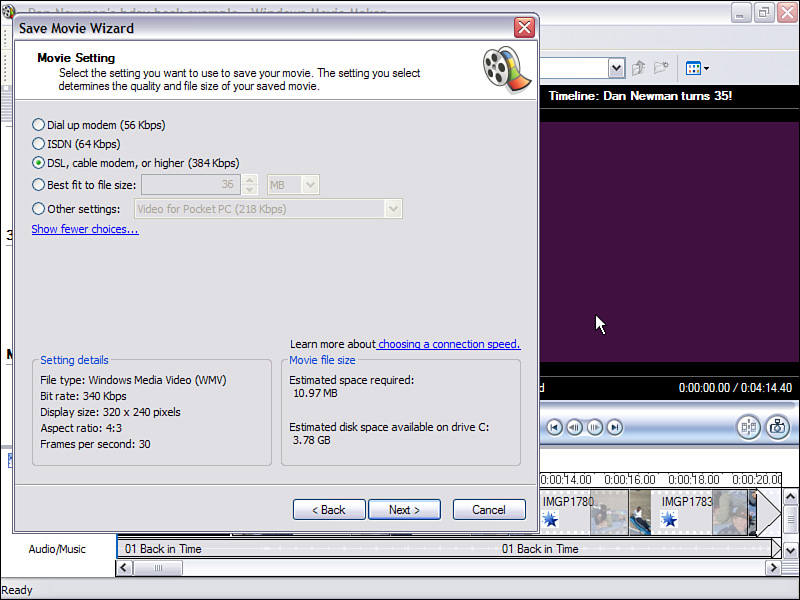
A wizard will run, asking you for additional details that pertain to your choice. For example, if you choose to make the movie available to viewers over the Web, you'll have to decide what connection speed your viewers will likely be using (see Figure 7.24). Also reported are the size of the final file and how much space is left on your hard drive (the hard disk is always used as the intermediary for rendering). The file is written from the hard disk to the target destination.
NOTE
Movies saved to a recordable CD are saved by using Microsoft HighMAT technology. A HighMAT (High-performance Media Access Technology) CD can contain audio, video, and pictures. HighMAT-compatible consumer electronic devices recognize how the content is organized on the CD, and enable users to play content using the displayed menus. The recordable CD can be played back on a computer as well. Be aware that some older standalone DVD players won't recognize this format and will fail to play the movie. You'll have to experiment and/or do a little research. Newer consumer DVD players recognize more formats (such as rewriteable CDs and DVDs), but older ones don't. As for burning actual DVDs, at this time, Movie Maker doesn't write to DVDs. You'd have to use one of the many DVD-writing programs for that, assuming you have a DVD burner connected to your computer. The procedure for making a DVD from Movie Maker would be a two-stage one. First, you would write the movie to the hard disk from Movie Maker. Then you'd use a DVD authoring program to convert the .WMV file (the program has to know how to deal with .WMV files, obviously) to DVD.
TIP
Typically for Web posting, you'll output several different versions and allow the viewer to choose between them, based on their connection speed. You'll also need a Web server than can handle the bandwidth of uploading video. There are services on the Web that will do this. Check with your ISP or Web server administrator. If you really get interested in producing experimental videos and sharing them with the world at large, check www.atomfilms.com.
Just work through each wizard as necessary. Except when outputting to DV tape (make sure to put a tape in the DV camcorder that is not write protected and doesn't have your source material on it, because it will be overwritten), your movie will be output in the proprietary Windows Media Video (WMV) format.
A progress bar meter informs you of the process. After the movie is saved, click Yes to view it immediately. Windows Media Player loads the movie and plays it for you.
Regardless of the destination of your movie (such as in an email), you'll probably want to make a copy for safekeeping. Consider saving it on your computer, or on a CD. You might also want to back up the project file and possibly the source files.
Windows Movie Maker provides an enjoyable and even pretty powerful way to experiment with digital movie making. Movie Maker 2 is actually powerful enough that I have started using it for small projects rather than using my favorite full-blown video editor. If you get hooked on video creation (which is likely to happen if you have the patience, the eye, and the disposition), you may want to try more powerful editing programs. Some video editors are now available in versions that work directly with DVD-R recorders and have fancy multi-track timelines for editing multi-camera shoots, zillions of effects, color correction, industry-standard SMPTE timecode, capability to produce “edit decision lists (EDLs),” and all kinds of other stuff.
Some of the more popular low-priced video-editing programs on the market include Ulead's Video Studio, MGI's VideoWave, and Dazzle's DV-Editor SE. Some IEEE-1394 DV capture cards, TV capture cards, and VGA/TV capture cards may also include various video editing programs, including the previously mentioned ones.
More powerful DV-editing programs you might consider Ulead Media Studio Pro, Sony Vegas Video (highly rated), and Adobe's Premiere 6.0, which can be paired with Adobe AfterEffects for exciting special effects. To get more information about
Media Studio Pro, and Video Studio see www.ulead.com.
VideoWave, see www.roxio.com.
Dazzle's lineup of digital video editing programs and hardware, see www.dazzle.com.
Keyspan 1394 FireWire laptop card, see www.keyspan.com.
SIIG 1394 FireWire laptop card, see www.siig.com.
Maxtor external 1394 FireWire hard drives, see www.maxtor.com.
In addition to the product Web sites listed in the previous section, check out these resources:
Digital Video Magazine—. Look for the big “DV” on the cover for news, reviews, and tips for great digital video. The Web companion to the magazine is located at www.dv.com.
VideoMaker Magazine—. Get advice on good videographic techniques as well as buyer's guides and reviews. The Web companion to the magazine is located at www.videomaker.com.
CodecCorner—. The first stop if you're looking for the last word on streaming media compression algorithms (codecs) and technologies for video and Web animations. Find it online at www.codeccorner.com.
Windows Media Player has grown into a pretty amazing app with multiple personalities. Its talents include playing music and video files from online sources or local drives (including DVDs), playing online radio and TV stations, displaying specialized Web pages, organizing your music files (MP3s and WMAs), burning music CDs, copying and syncing to portable MP3 players, and providing a conduit to online media shopping sites.
Windows Media Player (WMP) was extensively retooled for the initial release of Windows XP, and appears as version 8. Since then WMP was upgraded to Media Player 9. Even at the time of this book revision, version 10 was on board for imminent release. It's likely that it will be available a few months after this book goes to press, in which case you should upgrade to it.
Keeping up with the ever burgeoning media player wars (WMP competes with iTunes, Real Jukebox, WinAMP, Music Match, and others) is almost impossible for us writers. Books just don't come out as fast as easily downloadable new software releases do. Still, here are the basics of Windows Media Player.
Compared to version 8, Media Player 9 has a somewhat spiffed up (although a little less confusing) user interface, as shown in Figure 7.25, to support its many features.

Figure 7.25. Windows Media Player 9 defaults to the Media Guide view when you have a working Internet connection, providing links to popular audio and video content.
Windows Media Player can play the file types shown in Table 7.3.
Table 7.3. Windows Media Player–Supported File Types
File Type | File Name Extension(s) |
|---|---|
Formats not supported: RealNetworks (.ra, .rm, .ram) | |
Music CD (CD audio) | .cda |
Intel Indeo video | .ivf |
Audio Interchange File Format (digitized sound) | .aif, .aifc, .aiff |
Windows Media (audio and video) | .asf, .asx, .wax, .wm, .wma, .wmd, .wmv, .wvx, .wmp, .wmx, .wpl |
Windows Media Center video | .dvr-ms |
Windows video and audio | .avi, .wav |
QuickTime content[*] | .mov, .qt |
Windows Media Player skins | .wmz, .wms |
MPEG (Motion Picture Experts Group) video | .mpeg, .mpg, .m1v, .mp2, .mpa, .mpe, .mp2v, .mp2 |
AU (Unix audio) | .au, .snd |
MP3 (digital audio) | .mp3, .m3u |
MIDI (Musical Instrument Digital Interface) | .mid, .midi, .rmi |
DVD video | .vob |
[*] Only QuickTime files version 2.0 or earlier can be played in Windows Media Player. Later versions of QuickTime require the proprietary Apple QuickTime Player. | |
NOTE
XP doesn't come from Microsoft with DVD playback capability, except in the Media Center Edition of XP. For a stock version of XP to play back DVD video and .mp2v files, first you must install a hardware or software DVD decoder on your system. If you insert a DVD and it doesn't run, that's probably the problem. Installing a decoder is typically a simple software update you can download from the Web. The easiest way to do it is to click on Start, Help (on the XP taskbar). In the Help window, search for DVD. Under “Fix a Problem” in the list of topics, you'll see “If you do not have a DVD decoder.” Click on that. The resulting article has a list of decoder sources down near the bottom. If this doesn't work, search the Web for WinDVD or Power DVD. The decoder will cost you a few bucks (probably around $10). (Although current boxed editions of both players are around $50-$60.)
The major features of Media Player are accessible from the mode selection buttons on the left side of the default (full-view) display. Here's what they do:
Now Playing—. When you select online or locally stored content for playback, the Now Playing window displays a list of the content you're playing. An optional Visualizations feature can be used to display album art (when available) or various animated abstractions that change in response to the music. Open the top-level View menu to enable other features, such as titles, lyrics, graphic equalizer, video settings, and others. Figure 7.26 shows Media Player with a typical selection of Now Playing options.
Media Guide—. As shown in Figure 7.26, this option enables you to select from a wide variety of online content.
Copy from CD—. Click this button to copy all or selected tracks from your favorite music CDs to the My Music folder on your system.
TIP
When you copy music, by default, Windows Media Player prevents copied tracks from being played on any other computer. If you want to disable this feature so you can move copied music from one PC to another, check the box labeled Do Not Add Copy Protection in the dialog box that appears when you click Copy Music. You have to agree to the copyright warning before you can copy the music. As of Media Player 9, you have two new encoding options: Lossless and Variable Bit Rate (VBR). Audiophiles will likely want to use lossless (no loss of data results from this compression scheme, but the files are large). VBR creates smaller file sizes than non-VBR .wma encoding with the same audio quality. Note that to “rip” your CDs into MP3 format, you'll have to buy a plug-in for the Media Player or get any of a hundred or so third-party freeware CD ripper programs. Microsoft wants you to use their own .wma format for your music. This can be a pain if you want compatibility with other music players such as iPods or many others that do not decode .wma files. The plug-ins are not that expensive (at little as $10), but still, come on, Microsoft!
Media Library—. Use this feature to organize and locate your favorite media types you've downloaded or created with Copy from CD. As you download and create music, Media Player automatically creates album and artist information for audio and video content. You also can view content by type and by genre.
Radio Tuner—. Use this feature to connect with the wide world of Internet radio. Featured stations offer a wide variety of music formats, and you also can locate stations by format or by searching for keywords. The Today's Hits section highlights the top pop, Billboard Magazine, R&B, and country hits. This is a very neat feature, a little like having a satellite radio. Type a country name into the Search Keyword box (such as Africa or Denmark) and you'll be amazed at how many radio stations are streaming online! Click on a station to see a description. Then click Play to sample it. Click on Add to My Stations to create your own set of favorite radio stations to easily come back to.
Copy to CD or Device—. After you download or convert music tracks to WMA format, use this feature to transfer your music mix to either writable CDs (CD-R or CD-RW media) or to WMA-compatible portable audio players.
TIP
Be sure you fill your CD with all the music you want to play; unlike conventional CD-mastering programs or Windows XP's Copy to CD feature in other parts of the operating system, Windows Media Player's Copy to CD feature closes the CD (so it no longer can accept data) after you copy your selected music to it, even if you use only a small portion of the CD. Why? Standalone CD players are designed to handle single-session CDs and won't work if you add music later. If you want to create a CD for playback on your computer, use Windows Explorer's Copy to CD feature instead, which will allow you to copy music over several sessions.
Premium Services—. With this button you can quickly sign up for and receive subscriptions-based services such as sports highlights, hit tunes, and thousands of movies on demand.
Skin Chooser—. If you're tired of the default Windows Media Player full view, as seen in Figure 7.27, use this option to select a completely new look (called a skin) for the Media Player. From artistic to sci-fi, from minimalist to charming, Media Player provides lots of choices by default. Click More Skins to see downloadable options available on Microsoft's Web site. Click Apply Skin to use the selected skin; a Return to Full Mode button lets you switch back whenever you want. Figure 7.27 shows the Media Player in its Windows XP skin.


In addition to changing its default playback mode and appearance, you can adjust many other features of Windows Media Player.
Use the View menu to adjust menu bar and taskbar options when Media Player is in full mode and to see statistics for your average connection speed. You can adjust the default for the connection speed in the Tools menu.
Use the Tools menu's Options selection to adjust most of the defaults for Media Player, including
Player tab—. Select how often to check for Media Player updates, Internet options such as media licensing, and general player settings.
Copy Music—. Adjusts the default location and bit-rate used to copy music. Also enables you to compare WMA to other formats and to download the optional MP3 plug-ins, which will allow you to create MP3 files with Windows Media Player 9.
Devices—. Configures playback and copying settings for CD-RW, CD, and portable audio players. With CD-ROM and similar optical drives, you can select analog or digital copying and playback, and whether or not to enable error correction. With portable audio players, you can specify the quality level to use for copying music. With CD-RW drives, you can specify where to store CD images, the recording speed, and whether to eject the CD after recording.
Performance—. Configures the connection speed, network buffering settings, and video acceleration used for Internet content.
Media Library—. Configures access rights for the library and specifies whether to automatically add purchased music to the Media Library.
Visualizations—. Adds and configures visualizations. You can set the screen size and offscreen buffer size for each collection to match your screen resolution or the preferred window size you use for Media Player.
File Types—. Configures which file types compatible with Media Player will use Media Player as the default player program.
TIP
If you prefer a program such as WinAmp, iTunes, Real Jukebox, or Music Match(all of which can rip MP3s from your music CDs as well as play them without needing plug-ins), clear the check box for MP3 Format Sound. Then, your preferred MP3 program can be used instead of Media Player to work with MP3 files.
Network—. Configures network protocols, TCP port numbers, and proxy settings to be used for streaming media. Use this menu to manually configure Media Player if your corporate network prevents Media Player from working when using its normal settings.
TIP
Contact your network administrator for help in configuring this tab, because the allowable settings can vary from network to network.
A rich point of optimization is in the Now Playing enhancements. In Figure 7.27, we're showing the graphic equalizer, for example. But there are many more options. See the little left and right arrows at the upper left corner of the equalizer? Click those to cycle through the other control panels. (If the panel isn't showing, choose View, Enhancements, Show Enhancements.) One of the newer ones is Play Speed Settings. With this one you can slow down or speed up videos, without shifting the pitch of the voice or music. Another is Quiet Mode which reduces the difference in volume of movies, radio, CDs, and recorded CDs as you play them back. This allows you turn down the volume of your computer speakers and still hear things, without the quiet passages dropping too low to hear.
There are a boatload of options with Media Player. Check the Help file for the program, and check for updates regularly. The Help file will evolve as the program is updated.
Choose Help, Getting Started to read more about Media Player, configuration settings, and see some tutorials.
My scanner was working fine with Windows Me, but Windows XP won't list it in the Scanner and Camera Wizard. What do I do?
The Scanner and Camera Wizard is certainly a convenient way to use your scanner, but it's not the only way. Before you try the scanner again, be sure you install Windows XP-compatible drivers for your scanner. You might be able to use Windows 2000-compatible drivers if you can't get Windows XP drivers yet. Install the latest drivers available (you might need to restart your computer afterward) and try the Wizard again. Windows Update is a great way to get new drivers.
Next, see if you can use the scanner with its own TWAIN or ISIS driver. If you can, you don't need to use the Scanner and Camera Wizard. Remember to use the Scan button on the scanner if it has one; some scanners require you to push this button to start the scanning process.
Contact the scanner vendor for help if you're still unable to use the scanner with either the wizard or its own scanning software.
My digital photos look terrific onscreen, but are poor quality when I print them.
There are three major factors which control digital photo quality:
Camera settings
Printer settings
Paper type
Get any of these wrong, and you won't get the print quality you want.
Your digital camera should be set for its highest quality and resolution settings, especially if it's a two-megapixel or lower resolution camera. Highest quality uses less compression to avoid loss of fine detail (more space is used on the flash memory card per picture than with lower quality settings) and highest resolution uses all the pixels to make the picture (again, requiring more space on the flash memory card per picture). If you use your camera to create pictures for use on the Web, the lower-quality and lower-resolution settings are fine, but printed pictures need the best quality available. Remember that your monitor needs just 96 dots to make an inch, while most inkjet printers put 600 to 1,200 dots into the same inch. So, a picture that's just right to fit on the screen doesn't have enough detail to print well.
Similarly, the printer should be set for the best quality setting that matches the paper type. If you're planning to print “knock-em-dead” digital masterpieces, be sure to use photo-quality paper and set the printer's options accordingly. Just want a quick snapshot for the refrigerator? Use plain paper and set the printer for plain paper. Mismatch print type and paper type and you're sure to have problems, because inkjet printers calculate how much ink to use and how to put it on the paper according to the options you select.
Remember, high-quality printing takes time; several minutes for an 8×10-inch enlargement on photo paper with high quality settings is typical.
TIP
If you've been using lower-quality and lower-resolution modes on your digital camera to jam more pictures into your flash memory card storage, that's false economy that leads to poor-quality pictures, especially for printing. With the explosion in the popularity of digital cameras, the per-MB price of flash memory cards is dropping. Camera vendors include very small flash memory cards to hold down the selling price of the camera, but you can almost always use a much larger media size, and sizes continue to increase, almost exponentially it seems.
Check your camera maker's Web site or a leading flash media web site such as Lexar Media (www.lexarmedia.com) to find out what sizes of digital media you can use. If you're responsible for a prolonged shoot away from the office or home, consider picking up multiple memory cards (so you have lots of digital “film” and don't run out) or the IBM Microdrive (now made by Hitachi) if your camera is compatible with it (find out at http://www.steves-digicams.com/microdrive.html). Another solution is a nifty gadget from I/O Magic. It's a small, portable, battery-powered hard drive and media card reader in one. Just insert your camera's card, press a button, and voilà—your pictures are copied to the device's high-capacity hard drive. See www.iomagic.com.
My DV camcorder is detected by Windows Movie Maker, but the only way I can capture video is by using the camera's own controls to advance the tape. What should I do?
Some DV camcorders work better with Movie Maker than others. If you can capture video by controlling the camera yourself but not with Movie Maker's onscreen buttons, check with the camera vendor for updated driver software. Otherwise, keep doing what you're doing. Remember that you can always cut extraneous information from a scene with the editing features in Movie Maker.
If you've been chosen to create an archive of your company's history (or your family's, for that matter), you might need to add a few hardware and software tools to your system to do the job right.
Color photos in particular are frequently affected by fading and color shift as well as the usual photographic problems of poor cropping and exposure. You don't need to buy Adobe Photoshop to fix these kinds of problems. However, if you're not satisfied with the photo editor bundled with your scanner and you're on a budget, try Jasc's Paint Shop Pro (www.jasc.com). Paint Shop Pro (around $100–$110) is a very powerful choice that will leave you some money for the rest of your gear.
As you saw earlier in this chapter, a CD-RW drive is a terrific way to store digital photos. Be sure the drive you buy has at least a 12x speed rating for writing CD-R media (a better choice for long-term storage than erasable CD-RW media) and has a buffer-underrun prevention feature such as BURNProof. Go for an internal IDE/ATAPI drive to get the most bang for the buck; USB 1.1-compatible drives are easy to move around, but are too slow for big archiving jobs. Better to go for USB 2.0-based external drives if you want to go that route. You'll find plenty of choices. If you're planning to incorporate digital video into the mix, you might also want to consider an IEEE-1394–compatible CD-RW drive. It connects through the same port used by DV_camcorders, and you can move it around to any machine with an IEEE-1394 card or port. Because IEEE-1394 has a high bandwidth (up to 400Mbps or 50MBps), it's a much better choice than USB 1.1 for fast data transfer. USB 2.0 is a tad bit faster than FireWire.
Until the 1970s, the most popular way to take color photos was 35mm slide film, and most flatbed scanners either can't scan slides or use clumsy adapters that don't provide high enough scanning resolution to pull fine detail from slides. If the boss hands you some Carousel trays of slides for the archive, you need a real slide scanner to do the job right.
A high-quality slide scanner should scan with a resolution of at least 2,700 dpi to allow you to get great prints from the tiny 35mm slide. And, if black and white or color prints have gotten lost but you have the negatives, slide scanners can scan them as well. You can spend as little as $500 to as much as $1,000 or more for a slide scanner, but be sure the one you buy has a feature called Digital ICE (developed by Applied Science Fiction, Inc—, now owned by Kodak). Digital ICE removes dust and scratches from scans of less-than-perfect slides and negatives. Because most slides and negatives get dirty and scratched over time, Digital ICE is the way to go for scanners. It really works, and saves hours of retouching time (time you can't afford to spend anyway) afterward. Some of the better slide/negative scanners with Digital ICE on-board include
Nikon Coolscan
Canon CanoScan
Minolta Dimage Scan Elite
TIP
Before you buy any scanner, take a good look at the archival materials you're being asked to preserve. Use a flatbed scanner for black-and-white or color prints, and don't overlook the historical value of stock certificates, matchbook covers, postcards, personalized pens, and so on. You can scan anything that fits on the scanner, even if it's not completely flat.
If your company history goes back far enough that some photos are actually large negatives (bigger than 35mm) or lantern slides, you need to buy a flatbed scanner with a special transparency adapter lid (which also can be added to some mid-range or high-end scanners) or internal compartment. Some mid-line scanners can handle transparencies and negatives up to 4x5 inches, but if you have larger-format materials, you need a scanner that can scan up to 8x10 negatives. Some of the better choices with built-in transparency handling up to 8x10 size include Epson's E1680 Professional (www.epson.com—around $799) and Microtek's ScanMaker 8700 (www.microtekusa.com—around $790). These scanners can also handle normal prints, so you get two for the price of one.
Finally, you need a way to view and organize your pictures after you've scanned them. Although the My Pictures folder has some built-in tricks (as described earlier in this chapter), third-party software will help you view and locate pictures stored in any folder and on any type of media. Here are a few programs that you should consider:
MediaTracer (www.mediatracer.com)
Adobe Photoshop Album (http://www.adobe.com/products/photoshopalbum/main.html)
ACDSee (www.acdsystems.com)
You can find other choices at
directory.google.com/Top/Computers/Software/Graphics/Image_Cataloguing/