In this chapter
Windows Messenger is an online, real-time communication program that lets you talk with friends and coworkers across the house or across the world, over the Internet. For starters, Windows Messenger lets you keep a list of contacts—coworkers or friends with whom you're interested in communicating—and lets you know which are online at any given time. When they're online, you can type messages which appear instantly on your contacts' screens.
Depending on your interest and the speed of your Internet connection you can also communicate by voice, and even use two-way video so you can see as well as talk to each other. You can share a virtual electronic “whiteboard” or chalkboard to make collaborative drawings, or work interactively with a program, using a feature called Application Sharing. All of these capabilities are part of Windows Messenger.
NOTE
Many businesses use NetMeeting, an older Microsoft program with these same features. If your organization uses NetMeeting, see “What About NetMeeting?” later in this chapter.
Messaging has become very popular in the business world as a way to communicate with coworkers, to reduce travel costs through videoconferencing, and to give demonstrations and customer support. It can connect the office and wired-network world with specially enabled cell phones and wireless personal organizers. And, messaging also is a great way to stay in touch with friends and family.
Before we get into these details, though, we should talk a bit about the whole phenomenon of messaging itself.
Messaging fills a niche somewhere between email and the telephone. Like email, it can travel anywhere around the globe, essentially for free. Unlike email, though, it requires you and the person you're communicating with to be online at the same time. Like the telephone, it's immediate, interactive, and conversational. But unlike the telephone, it doesn't have to occupy your full attention—with it, you can carry on several conversations at once, or you can divide your attention between a conversation and other work.
Messaging has been around since the early 1980s when the first computer networks and “bulletin board” computer systems appeared. When the Internet became a public phenomenon, programs like IRC (Internet Relay Chat) and ICQ (“I seek you”) became popular. But messaging really took off as America Online soared in popularity, and today millions of people, both AOL subscribers and non-subscribers alike use AOL's “Instant Messenger” service. Microsoft, which may join revolutions late but always brings bigger guns, came up with several attempts to move into the field: Microsoft Chat, then NetMeeting, and now Windows Messenger.
NOTE
Windows Messenger is one of the programs that got Microsoft in some anti-competitive hot water a few years ago, so it's now one of the programs that can be enabled, disabled, or hidden by vendors and by you. If you've just purchased a new computer, you might find that the manufacturer hid Windows Messenger and replaced it with another product. If you want to use Windows Messenger and find that it's not on your Start menu, just click Start, All Programs, Set Program Access and Defaults. Click Custom, and enable access to Windows Messenger.
You can and should try different chat programs; do a survey of your friends, coworkers, or family, and select the one or two that most of them are using. If you find the need to communicate with people on different systems, be sure to read the last section in this chapter.
Also, you'll see references to the “.NET Messenger Service.” That's the technology and user directory behind both Windows Messenger and MSN Messenger.
Messenger has several options for communicating. You can choose any or all of them, so you can start out with the simple stuff and work your way up, if you want. With Messenger and an Internet connection, you can
Type text messages.
Communicate with voice and video even over a dial-up Internet connection. (It's not quite TV quality but you can, say, stick your tongue out at someone, and within a few seconds, they'll more likely than not be able to tell.) Over a cable or DSL connection or a corporate LAN, you can get up to 15 video frames per second, which is nearly TV quality, with excellent voice quality.
Receive video and sound even if you don't have a camera or microphone of your own.
Transfer pictures and files of any type.
Collaboratively draw on a shared “whiteboard,” which can be saved or printed out for permanent storage.
Collaborate on a single application, or even share your entire screen with another. The desktop-sharing feature lets multiple people collaborate on, say, a word processing document, each being able to see the contents of a shared window, grab the cursor, and make edits. It's great for training and demonstrations too.
TIP
There is a free download that adds some additional features to Windows Messenger, such as the automatic notification of new mail arrivals on Hotmail, public chat profiles, and text messaging with pagers and cell phones. You can add those features to Windows Messenger by visiting www.microsoft.com/windows/messenger/addin.asp.
NOTE
Microsoft has another free chat program called MSN Messenger, which has an additional feature, the ability to place telephone calls through the service. The programs share a common pool of chat users. You can download and install MSN Messenger if you wish.
Just to be clear, though, this chapter is exclusively about Windows Messenger, and from this point forward, when I say “Messenger,” I mean Windows Messenger.
Although Messenger lets you communicate with several people at a time with text chat (as many as you want, actually), it does not have a group videoconference conference feature that lets several people participate in one collective voice or video conversation. For that, you'll need to turn to third-party software like CU-See-Me.
Also, in my experience, audio and video communication with Messenger isn't perfect. I've found it to be picky and unpredictable: Sometimes the audio comes through, and sometimes it doesn't. Connections can drop out at random intervals. Audio “echoing” occurs sometimes, as well as other irritating sound glitches. But when it works, it works very well, and after all, it's free. If you look at it as a super CB radio rather than as a telephone, you should have a great time with it.
NOTE
Messenger uses the newly developed SIP Protocol (Session Initiation Protocol) for voice and video. SIP provides a standard way for messaging, telephony (voice), and video programs to communicate. Unfortunately, hardware-based Internet connection sharing routers may not be able to manage SIP data, so voice and video chat won't work if either you or your contact use one of these devices. Check your router's manual to see if it supports SIP Universal Plug-and-Play (UPnP). You might have to upgrade its internal software (firmware) to get this support. Windows Internet Connection Sharing software doesn't have this limitation: It's already “SIP aware.” For more information about this topic, see “Windows Messenger: Shared Connections and Firewalls” on page xxx [this chapter].
For text messaging alone, there are no special requirements beyond having an Internet connection. To use the audio and video features of Messenger, your computer must meet the following minimum hardware requirements:
The most current Windows Messenger version runs only on Windows XP Home Edition or Professional. It's not available on the 64-bit (Itanium and AMD) versions of Windows XP. There are older Messenger versions available for other Windows operating systems, and a Macintosh version of MSN messenger, so you can communicate with people who use those programs. (At least, you can communicate via text messages—video and audio chat may not work with earlier versions.)
Any computer capable of running Windows XP has enough memory and processing power for Messenger.
For text communication only, any connection speed is fine. If you want to use voice or video, you'll need a 33,600bps or faster modem, ISDN, DSL, cable, or LAN Internet connection—the faster the better.
To establish voice or video connections, you need a sound card, a microphone, and speakers. A sound card is required for both audio and video support. Without a sound card, you can only use text chat and desktop sharing.
To transmit video with your calls, you need a video capture card or camera that provides a Video for Windows capture driver. Any recent USB- or FireWire-connected camera should meet this requirement. Older parallel-port cameras are very unlikely to have compatible drivers (see the manufacturer's Web site).
TIP
Owing to the growing use of Messenger, NetMeeting, and other videoconferencing software, numerous companies now sell inexpensive add-on products such as cameras, microphones, headsets, video cards, and software additions. For example, I got a free color video camera as a bonus for buying a $99 hard drive!
TIP
You should install any new audio or video hardware, and, if necessary, update your audio and video device drivers, before you run Messenger for the first time, if possible. Getting it to recognize newly installed hardware isn't always effortless.
Before we go any further, I should warn you that Messenger's voice and video communication may not work properly if you use a shared Internet connection made through a cable/DSL Sharing Router device, as described in Chapter 19, “Connecting Your LAN to the Internet.” Voice and video should work with the Internet Connection Sharing and Windows Firewall systems built into Windows XP. Or, as mentioned previously, if your Internet connection router supports Universal Plug and Play (UPnP), and UPnP is enabled on the device. For more information, see “Windows Messenger: Shared Connections and Firewalls” later in this chapter.
If your hardware router doesn't support SIP and UPnP, you will be able to communicate with text chat, but you will not be able to use voice, video, or desktop sharing. The technical reason is that the SIP protocol used by Messenger isn't compatible with the Network Address Translation (NAT) mechanism that the connection sharing devices use. Yes, it's a drag, but I think it's a small price to pay for the additional protection from hackers that the NAT mechanism provides. I'll discuss this in more detail in Chapter 18 and in the “Troubleshooting” section at the end of this chapter.
Messenger data traffic may also be blocked by a corporate firewall, to prevent corporate users from chatting with others outside the company. In this case, this is a matter of policy rather than a technical issue.
Messenger works with the .NET Passport system which was described in Chapter 9. You can only chat or voice/videoconference with people who have registered for a Passport. As mentioned in Chapter 9, you don't need to use Microsoft's Hotmail or MSN service, but you both need to register with Microsoft. Remember, if you're concerned about privacy, you can submit the absolute minimum of information when you register—only your email address is really required. (Of course, without your name on file, others can't search for you by name if they want to chat you up. They'll need to know your email address.)
The type of messaging you can use is limited by what equipment you and your contact(s) have in common. At the very least, you can always type text messages back and forth. Obviously, if you don't have a camera attached to your computer you can't send video, but if your contacts do, you can still receive video when you chat with them, and vice versa. You'll need a microphone and speakers or a headset if you want to communicate by voice.
Text messaging may be the slowest way to communicate but at least it's a guaranteed thing. Personally, I find that I use it more than voice or video, by far. It's the least obtrusive form of Messenger communication—I can have a chat window or two open and pop off questions and answers while I continue to work on my projects.
To fire up Messenger, look at the bottom-right corner of your screen for the tiny Messenger icon—it looks like two tiny people—in the Notification area, as shown in Figure 12.1.
If this icon doesn't appear in your Notification area, click Start, All Programs, and see if Windows Messenger appears in the menu. If it does, click it. (If it isn't listed, it might have been hidden using the Set Program Access and Defaults tool. See the note at the beginning of this chapter to see how to fix this.)
The first time you start Messenger, you'll see a blank window that says “Click Here to Sign In.” Click there, and Messenger will walk you through a setup wizard to gather your personal information. You'll want to be sure you're connected to the Internet before proceeding.
If you haven't already signed up for a Passport, you'll have to do that now. Messenger will walk you through the .NET Passport Wizard to get this set up.
Note
→ To learn about Passport and the .NET Passport Wizard, see “Getting a Passport to Microsoft Country,” p. 352.
To link up with Passport, you'll have to provide an email address. You can use your current email address, or you can set up a Microsoft Hotmail or MSN email address. If you have already set up a Passport, you'll only need to enter your email address and password, following the .NET Passport Wizard's instructions. Then whenever you log on, Windows will use this Passport automatically.
When the Passport setup process is finished, or if you had already set up your Passport earlier, Messenger will ask you to sign in, as shown in Figure 12.2. It may seem odd that you have to sign in to Windows, and then sign in to Messenger separately. The reasons the process is separate are (a) so you can choose whether or not you want to be available to others who might want to use Messenger to contact you, and (b) you might have several different Passport accounts that you want to use at various times.

Figure 12.2. The Messenger Sign In screen asks for your Passport password. You can also choose to have Messenger sign in automatically when you log on to Windows XP.
By default, Windows will display your Passport email address. If you happen to have multiple passports, you can select an alternate one from the drop-down list, or you can just type in a different email address.
You can also choose to have Messenger sign on automatically when you log on to Windows. If you always want Messenger active and available when you're using your computer, check Sign Me In Automatically. You can always change this selection later on.
Finally, enter your Passport password and click OK.
When you've signed on to Windows Messenger, you'll see a screen similar to the one shown in Figure 12.3. The Messenger screen shows you your current passport account or the name you want to display to others (I'll show you how to change this later in the chapter). Finally, the window shows you which of your contacts are presently online and which are not.

A contact is a person whom you've identified as someone you want to be able to chat with. Before you can communicate with Messenger, you'll need to add your coworkers, colleagues, clients, friends, or family to your Messenger contact list.
To add a contact, click the Add a Contact button at the bottom of the Messenger window or click Tools, Add a Contact. Windows will ask you whether you want to select a contact by their email address (if you know their Passport sign-in name), or whether you want to search for them by name. Right now you can only search through the .NET Messenger (Passport user) directory, your own personal Address Book, or, on corporate networks, Active Directory, but Microsoft may add other search directories later on. Select a method, and click Next.
In the next step, enter the person's email address or Passport sign in name and click Next, or fill out the search form, which is shown in Figure 12.4. Fill in as much information as you can to help narrow things down, select the desired directory under Search For This Person At, and then click Next.

Figure 12.4. To search for a contact in the .NET Messenger directory or your Address Book, fill in as much information as you can.
After a moment, Windows will show you a list of matching names and locations. If you don't see the desired name listed, select Back and change some of your selection criteria. If you do see the entry for your contact, select it and click Next.
As a matter of privacy, your new contact will be notified that you have added them to your contact list. Likewise, you'll be notified if others add you to their contact list. (For your own privacy, if you want to you can block them from knowing if you're online and from sending you messages. I'll show you how in the next section.)
Of course, to add them to your list, your contacts must already have signed up for a Passport account. (This, I'm sure, is part of Microsoft's Grand Plan.) In fact, if you select a contact by searching your own Windows Address Book, and the associated email account isn't registered with Microsoft Passport, Messenger will ask you if you want it to send them an email asking them to sign up. (Don't worry, you'll be able to cancel this if you don't want it to happen.)
When contacts are added to your list, you'll receive notification when any of them sign in, as shown in Figure 12.5. If you find this annoying, you can disable notifications using the Preferences settings, which I'll discuss in the next section.

Messenger has the potential to intrude upon your workday and upon your privacy. You can control how much information about you is revealed, and what ways Messenger is allowed to notify and interact with you. In this section, I'll cover the Messenger options including its privacy settings. Remember that if you use Hotmail, you'll also need to configure your Hotmail privacy settings (such as whether or not your name is listed in the Member directory) on the Hotmail site.
To change Messenger options, click Tools and Options, and then view the six options tabs. I'll go through them in turn.
The Personal tab (see Figure 12.6) lets you choose the name others see when you're signed in to Messenger. By default this is your Passport name; that is, your email address. For privacy reasons, you want to change this to your name or nickname.

You can also select the font used to display chat messages, can enable or disable the automatic display of “smilies” or emoticons (with graphics enabled, if your friend types :) you'll see ![]() ), and optionally, let Messenger send (anonymously) information to Microsoft about how well it's working, information that presumably will be used to improve the software.
), and optionally, let Messenger send (anonymously) information to Microsoft about how well it's working, information that presumably will be used to improve the software.
The Phone tab lets you enter home and work telephone numbers that your contacts will be able to view. If you're using Messenger for business purposes, you'll probably want to enter your work telephone number here. Otherwise, I suggest leaving this page blank. You can always give out your phone number later on if you think it's appropriate.
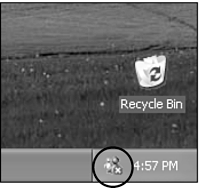
The Preferences tab, shown in Figure 12.7, lets you control how Messenger starts, and how and when it's allowed to alert (or you might say “annoy”) you as contacts and messages come and go. The options you are most likely to want to think about changing are
Run Windows Messenger When Windows Starts—. This is enabled by default. Uncheck to prevent Messenger from starting up automatically. (Automatic sign-in must be changed separately, from the Sign In window. To change that setting, click File, Sign Out, and then File, Sign In.)
Show Me as Away—. If your computer sits idle for 5 minutes, by default your contacts will see a notification that you're “away.” This is another privacy issue. You can change the time, or block the message entirely by unchecking this option.
Alerts—. You can enable or disable pop-up messages and sounds for when contacts sign on and off or send messages with the options in the Alerts section. If you have installed the Messenger add-in pack, you can also control the alerts for new mail.
File Transfer—. This lets you change the folder where any files your contacts send you land. The default folder is My Received Files inside My Documents.
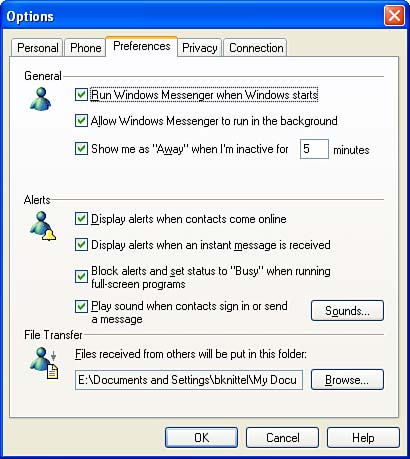
The Privacy tab lets you choose to prevent specific contacts, or all unknown contacts, from seeing your status and from sending you messages. Additionally, you can also see who has added you to their contact list, configure an alert to occur when someone adds you to their contact list, configure security for your Passport by instructing Messenger to always prompt you for your password, and lastly, prevent Messenger from downloading “tabs” (announcement areas that display information such as new-email announcements) if you are using a public computer. All of these options have been provided to allow you to control the amount of security you feel you need.
Figure 12.8 shows the Privacy tab's Allow and Block lists. By default all of your contacts and “All Other Users” are in the Allow List, which lets them see when you sign in and out, and lets them send you messages. You can move individual contacts over to the Block List to shut them out. Move an entry by selecting it in one list or the other, and clicking Allow or Block.
You also can move the Other .NET Messenger Users entry. Other .NET Messenger Users applies to people who have added you to their contact list but whom you haven't yet added to yours. In other words, these are unverified strangers. By default, Other .NET Messenger Users is put on the Block side. Unless you're concerned that other people will look you up by name and contact you, you can probably move this entry to the Allow side.
The Connection tab can normally be ignored. If, however, your computer is on a network that uses a SOCKS or Web proxy server, you might need to make entries here in order to use Messenger. Your ISP or network administrator will tell you if you need to do this.
Finally, when you've enlisted your friends, signed in to Messenger, and gone over your privacy options, you're ready to chat.
On a corporate network, there may be an Accounts tab. If your organization runs its own instant messaging server, use this tab to select which server Messenger should use as its primary connection. You can select the standard, public Microsoft server used by the general public (.NET Passport) or a private server run by your organization (Communications Service). Whichever one you select, you can simultaneously connect to the other service by checking My Contacts Include Users of .NET Messenger Service or My Contacts Include Users of a Communications Service. In this case you can create contacts from either service's membership list.
By default, Messenger displays all of the contacts you enter under the title “All Contacts.” If you have many contacts, you may wish to separate them into categories such as “Business,” “Family,” “Friends,” “Political Commentators,” or whatever. It's pretty easy to do:
Right-click a group name, such as All Contacts, and select Create a New Group.
Enter a name for the group.
Drag contacts from All Contacts to the new group. Contacts may be entered in more than one group.
It's easier to view and manage large contact lists when they're organized this way. To remove a contact from a group, right-click the name and select Remove Contact from Group. This doesn't delete the contact; it remains in All Contacts. To completely delete a contact, right click and select Delete Contact.
To chat with one of your contacts, they have to be signed on. That is, they have to appear in your contact list with (online) next to their name. To start up a conversation with one of your contacts, double-click his/her name in the Online list, or click Actions, Send an Instant Message and select his/her name from the drop-down list.
When you do this, a text chat conversation window appears, as shown in Figure 12.9. Enter your message in the bottom part of the window, and press Enter, or click Send to send the message to your friend. The first message you send will start the conversation.

If someone starts a conversation with you, a notification will appear as shown in Figure 12.10. Click it to open the Conversation window and begin chatting. You can also open the window by clicking on the new button that appears in your taskbar.
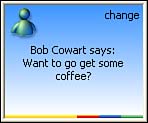
Figure 12.10. When someone starts up a conversation with you, a notification will appear. Click it to open up the Conversation window.
The messages you type to each other will appear in the upper part of the window, as shown in Figure 12.9. This is pretty much all there is to know about text chat. Before we move on to other topics, though, there are a few tips:
Unless you're certain of the identity of the person you're chatting with, don't give out any personal information, especially your telephone number, social security number, credit card info, and so on.
You can save the text of your conversation by clicking File, Save As.
You can change the size of the displayed text with View, Text Size.
You can instantly add the person you're talking with to your Block list by clicking the Block icon or selecting File, Block. This is handy if someone contacts you out of the blue and you don't care to hear from them again.
Online chatting has an etiquette all its own. In face to face conversations, whether we realize it or not, facial expressions and body language communicate almost as much as the words we use. When we're using text chat, many of those emotional cues are missing. Sometimes it's hard to tell from a written message whether a person is joking, angry, sad, or sarcastic, and misunderstandings can follow.
One way to help with this is to spice up your text chat with the popular little punctuation-mark faces called emoticons or smilies. A wry comment might sound too sharp in plain written form, but if it's followed by a winking smiley face signified by ;-), the reader knows the remark was made in jest. Some of the most popular emoticons are listed in Table 12.1. (If they don't make sense, try rotating the page 90° to the right.)
Click the Emoticons button on the conversation window to select from the most commonly used possibilities. But there are actually many more that can be sent only by entering a text shortcut, such as (y) for a “thumbs-up” icon, or my current favorite: (D) which sends a little martini glass picture. To view the full list of emoticons, click Help, Help Topics, search for the word “emoticons,” and select Use Emoticons in Messages to Show Feelings from the resulting list.
Because we tend to type these messages off the top of our head and fire them off instantly, rather than considering them the way we do when writing a letter, it's especially important to think about how your remarks will be perceived. And before you write anything that could come back to haunt you, remember that these chat messages can be saved as files, and they could conceivably reappear as Exhibit A in court someday.
If you're signed in to Messenger but are planning on stepping away from your computer for a while, you can tell Messenger so that it can tell your contacts. This is the polite thing to do—otherwise, if someone tries to contact you while you're away, they'll think you're ignoring them when you don't respond.
To change your status, click File, My Status in the Messenger window, or click the Messenger icon in the Notification area and select My Status. Choose one of the messages, as shown in Figure 12.11. When you select one of the away messages, it will appear next to your name in your friends' contacts lists. This lets them know not to expect an immediate reply from you.

Figure 12.11. When you select a status message (left), it appears on your friends' contact lists (right).
Change your status back to Online when you're ready to be contacted again.
If you're finished with Messenger, if you don't want to be disturbed at all, or if you don't want anyone to know you're at your computer, you can sign off from Messenger completely. However, just closing the Messenger window does not sign you out. Messenger will stay active—you can still see the little person icon in the Notification area.
To sign out completely, choose File, Sign Out in the Messenger window, or right-click the Messenger icon in the Notification area and select Sign Out. Now, you're signed out and no one can contact you. You can sign on again by double-clicking the Messenger notification icon.
You can also completely close Messenger by right-clicking the Messenger notification icon and selecting Exit.
Messenger will let you open several Conversation windows at once and carry on several separate conversations. Sometimes, though, you'll want to have a conversation with several people together. Like conference-calling on the telephone, group chat lets everyone in the conversation see what anyone types. It's great for discussing anything from dinner plans to business proposals.
To set up a group conversation, set up a chat connection to one person. Then, click on Invite Someone to this Conversation in the right part of the Conversation window, or in the Action menu. You can select another name from your contact list, or on the Other tab, enter an email address as you would in the Add New Contact procedure. They'll be invited to join the conversation. You can add as many people as you want by extending additional invitations.
You can't remove someone from the group, but individuals can leave the group at any time by closing their Conversation window.
While you're chatting with someone, you can easily transfer files back and forth using Messenger. You can use this to exchange documents, pictures, movie files, or anything else you please.
To send a file to a person you're chatting with, you can drag the file from the desktop or Explorer to the Conversation window. Or, you can click Send a File on the right side of the Conversation window, or select Actions, Send a File or Photo. In this case, a file selection dialog will appear. Locate the file and click Open to send it. Your friend will have to permit the file to be sent, and then the file will be transferred.
If someone attempts to send you a file, a message will appear in your Conversation window as shown in Figure 12.12. You can click on Accept or Decline. A pop-up message will warn you that you should check files from unknown sources with a virus scanner. I'll emphasize that warning here:

CAUTION
Don't accept files from people you don't know! Don't accept executable program files with extensions ending in .exe, .wsh, .com, .vbs, or .bat unless you are certain that they're safe. You should scan any files you receive with a virus checker before opening them, in any case.
NOTE
If you're using a shared Internet connection, you will not be able to receive files unless your connection sharing system supports Universal Plug and Play (UPnP). See “Windows Messenger: Shared Connections and Firewalls” later in this chapter for more information.
You can explore the folder into which received files arrive by clicking File, Open Received Files. By default, files received by Messenger are placed in My Received Files inside My Documents, but you can change this location using Tools, Options, Preferences.
If you and one of your friends have computers outfitted with a sound card, speakers, and a microphone, you can converse over your LAN or Internet connection.
Now, before you get too excited about this, take note that AT&T and the other telephone carriers haven't sued Microsoft over this intrusion into their territory. Why? Internet voice chat isn't quite up to telephone quality standards. Over a dial-up Internet connection, you may find that the sound is choppy, that you miss phrases, or that the sound connection doesn't work at all. Over a high-speed Internet connection, it's better, but still far from perfect. Still, it's free (well, you're paying for your Internet connection, but using Messenger doesn't cost any more), and when it works, it's fun. On a corporate network or office LAN, the quality can actually be very good.
To use voice chat, as I mentioned, your computer will have to be outfitted with sound hardware (most are, these days), and you'll need speakers and a microphone that are compatible with your sound card. Your local computer store can show you what you need. You'll have even better luck if you use a headset designed for computer use, with an earphone and microphone that hangs in front of your mouth.
NOTE
The voice transmission system used by the version of Messenger in Windows XP is not compatible with older versions of Messenger. Your contacts may have to upgrade their copy of Messenger if they're not using Windows XP. They should check for updates at www.windowsupdate.com or www.microsoft.com.
Before you try to use voice chat for the first time, you should check out your sound equipment using the Audio and Video Tuning Wizard.
Getting your microphone and speaker volume controls set up correctly is an important factor in being able to use Messenger for voice communication. If your microphone isn't set up correctly or its volume control is incorrect, your friends may hear horrendous noise or nothing at all. If your speakers are set too high, they may feed back into the microphone causing weird echoes. Messenger can help you check this out before you try to make your first call.
Click Tools, Audio and Video Tuning Wizard in the Messenger menu, and then follow these steps:
Be sure to close any programs that use sound or video, such as Windows Media Player. Be sure your speakers and microphone (and camera, if you have one) are plugged in. Then click Next.
If you have a video camera or video capture hardware installed, the wizard will ask you to adjust your picture. I'll talk about this later in the chapter. You can skip this part now by clicking Next until you get to the screen that discusses speaker placement.
Read the instructions about proper speaker and microphone placement and click Next.
Select the microphone and speakers you're currently using, if you have multiple sets. If you are not using headphones, uncheck I Am Using Headphones. Then click Next.
Click the button marked Click to Test Speakers and adjust the volume slider (indicated in Figure 12.13) until you can hear the sound clearly. Then click Stop, and Next.
Read into the microphone in a normal speaking voice, and move the microphone until the indicator touches the yellow region at times while you're talking (see Figure 12.14). Windows will adjust the volume control automatically. When the level is correct, click Next, and then Finish to end the wizard.


When your speaker and microphone volume have been adjusted, you're ready to call someone.
If your and your contact's computers are both equipped with a microphone and speakers, or preferably combination headsets that contain a built-in microphone, you can use Messenger to converse for free. The quality of this type of voice connection can vary, and never equals real telephone quality, but it usually works. And, if your Internet or network connection is fast enough, it can save some serious long-distance money.
TIP
Be sure you use the Audio/Video Tuning Wizard to get your speaker and microphone volume set correctly before you make a call, as I discussed in the previous section. This step may save you some frustration later on. If the sound doesn't work at least you'll know it's Messenger and not your hardware.
To use voice chat, you'll need to have your coworker, relative, or friend already listed as a contact in Messenger. Use the instructions I gave earlier in the chapter to add contacts. And, your contact has to be online.
There are two ways you can initiate a voice call:
You can click the large Actions, Start a Voice Conversation. All of your online contacts are listed there. Select your friend's name and choose Computer. This opens up a Conversation window and starts up a voice chat connection.
If you already have a Conversation (text chat) window open, you can select Start Talking on the right side of the window.
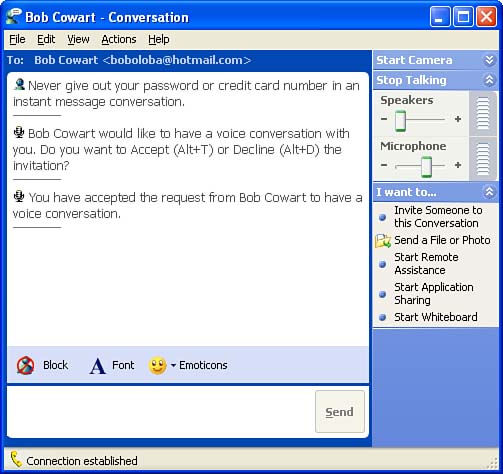
This sends an “invitation” to your contact to start voice chat. They'll need to accept the invitation by clicking on the word Accept in their chat window, as shown in Figure 12.15. Likewise, if one of your friends invites you to start voice chat, you'll see the same message.

When the invitee clicks Accept, the voice conversation is started. The screen changes to show a speaker volume control, and a microphone mute button, as shown in Figure 12.16. You can use these to adjust the incoming sound and to temporarily mute your microphone as you see fit.
You can continue to use text chat in the Conversation window, if you wish. In fact, you may need to if the audio connection doesn't work smoothly.
When you're finished chatting (or give up trying), you can click Stop Talking on the right side of the Conversation window, or you can just close the window entirely.
If your computer has a “Web” camera installed, or if you have video capture hardware connected to a video camera, you can send pictures of your smiling self while you chat. Likewise, if your contact has a camera, you'll be able to see them while you chat. It's pretty nifty. It's just like the futuristic Videophone service that the telephone company promised (but never delivered) way back in the 1960s!
NOTE
The video and voice transmission system used by the version of Messenger in Windows XP is not compatible with older versions of Messenger. Your friends may have to upgrade their copy of Messenger if they're not using Windows XP. They should check for updates at windowsupdate.microsoft.com or www.microsoft.com.
Video chat is an extension of voice chat, so all of the caveats and setup instructions I gave in the previous section apply to video chat. Remember, you don't need a camera yourself to accept video chat calls. You only need to worry about this section if you want to send video.
TIP
I suggest that you use voice chat by itself a few times to get the hang of it before trying video. Video is slower and more troublesome, so you'll have better luck with audio the first time around.
Before you try to use video chat, you'll need to set up your Web camera or video camera according to the manufacturer's instructions. I prefer the little eyeball-sized cameras that connect through your computer's USB port. You can pick these up for $25 to $40 at office supply stores; sometimes they're even free-after-rebate. Chapter 30, “Installing and Replacing Hardware,” has some tips on adding and replacing hardware, if you haven't already installed the camera.
When the camera's installed, follow these steps:
Open Messenger and click Tools, Audio and Video Tuning Wizard. Click Next.
If you have more than one video input device installed, select the one you'd like to use. Click Next.
The Wizard will activate your camera and display your picture. Adjust the picture as needed. Center your face in the image, adjust the lighting, focus, brightness, or anything else needed to get a good picture.
Click Next to proceed through the Audio tune-up portion of the Wizard, as I discussed earlier in the chapter.
When you know your picture and audio equipment are adjusted correctly, you can try to contact a friend.
The procedure for setting up a video connection is similar to the one used for voice chat. Your contact will have to be online first, of course. Click Actions, Start a Video Conversation to initiate a video connection with your friend. Alternatively, you can click the Start Camera button if you already have an open Conversation window.
Windows will inform your contact that you wish to begin a video and voice conversation. They'll have to click Accept or Decline, just as with a voice conversation.
When the connection has been made, a video window appears on the right side of the Conversation window, with sound controls underneath, as shown in Figure 12.17. By default, your own picture will appear in the lower right-hand corner of the video window. You can turn this screen-in-screen display off, and also temporarily stop sending a picture to your friend, by clicking on the Options menu just below the video screen.

Figure 12.17. With a video connection, you can see your own picture as well as your friend's. Click the Options button to change this display setup.
To end a video connection, click Stop Camera, or close the Conversation window.
Messenger provides a few features of the old NetMeeting program that are very useful for collaborating with another user, or for business presentations. From the Actions menu, you can select one of the following:
Start Application Sharing. Application Sharing lets you and your contact both view the window of a program running on your computer. You can both use your mouse and keyboard to control the application. This is helpful for training, software demonstrations, or just plain collaboration on a project.
Ask for Remote Assistance. Remote Assistance, which I will discuss in more detail in Chapter 18, lets someone else view and manipulate your entire screen. Remote Assistance is great when you need help configuring or using Windows; a friend, coworker, or support person can show you what to do, or can just go ahead an fix problems for you.
Start Whiteboard. The Whiteboard is a drawing application that lets both you and your contact draw on a window. You can then save or print the results of your efforts.
Remote Assistance is covered in Chapter 18, “Windows Unplugged: Remote and Mobile Networking.” I'll briefly discuss Application Sharing and the Whiteboard in the next two sections.
If you want a friend, coworker, or consultant to help you work with a Windows program (such as Excel, WordPerfect, or Netscape Navigator) or even to help set up Windows itself, you can issue them an invitation to share the application or desktop. Application Sharing displays your program's window or your entire screen on your friend's computer. Either of you can take control of the program to make changes with the mouse and keyboard.
NOTE
Application Sharing is similar to the Remote Assistance feature, although it's based on older technology. It's slower to use than Remote Assistance, but it does offer you a bit of privacy when you only want to share one application window—your contact won't be able to see the rest of your desktop unless you explicitly share it.
To use Application Sharing, Click Actions, Start Application Sharing. To Start Application Sharing, and select a name from the list of online contacts (or, click Other and enter their Passport address).
Windows will display a “Do you want to Accept” message in the other user's Conversation window. When they click Accept, Application Sharing will start up.
When the connection is established, two new windows will open, as shown in Figures 12.18 and 12.19. (Click App Sharing to open the Sharing dialog if it does not appear.) From the Sharing dialog you can select a window name and click Share to share it, or select the Desktop to share all applications at once. Shared windows appear on your friend's screen, as shown in Figure 12.20. If you click on the Whiteboard button, you will start and share the Whiteboard application.

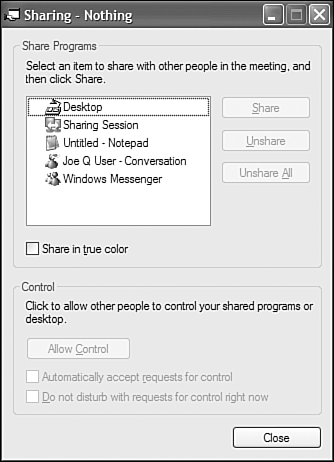

Figure 12.20. When someone shares an application with you, their application appears on your screen.
When you first share an application or the desktop, your contact will be able to see the shared window(s), but not change anything. If you want to let them actually manipulate the program you're sharing, click the Allow Control button in the Sharing dialog. If you want to work with an application someone has shared with you, click Control, Request Control.
When you have control, you can use your mouse and keyboard to make changes in the shared program.
Normally, when the remote user requests to take control of the application, Windows asks the program's owner if this is okay. You can let your friend have control at will by checking the Automatically Accept Requests for Control button, which you can see in Figure 12.19. You can take control back at any time by pressing the Esc key.
When people started using computer conferencing to replace face-to-face meetings, everyone was happy about the travel money they saved, but noticed that it was tough to really interact. Some of the most productive parts of meetings occur at the chalkboard, where you can write down brainstorming ideas or sketch out ideas and get immediate feedback. To give the same sort of shared writing tool to online meetings, Messenger includes a “virtual chalkboard” called the Whiteboard that lets you and your chat partner draw on a common screen, as shown in Figure 12.21.

To start up the Whiteboard, you can select Tools, Send an Invitation, To Start Whiteboard in the Messenger window, or if you're already chatting with someone, you can click the Invite button and select To Start Whiteboard in the conversation window.
Whiteboard is similar to Windows Paint, but I don't have enough space in this book to go into any further detail. I'll leave it to you investigate its menus and drawing tools.
There are two issues with Windows Messenger that you should be aware of: It can be subject to restrictions placed by Windows Firewall or other network firewalls, and, as I've mentioned elsewhere in this chapter, Windows Messenger may have problems with shared Internet connections. Specifically, this means that anyone using a connection sharing router device may have to take special steps to get the advanced Messenger features to work. This section discusses some of the technical details.
First, I'll give you the executive summary.
If you just want to use text chat, you should have no problems even if you and your friends are using a shared Internet connection. All shared connections can handle this.
If you are using Windows Internet Connection Sharing (ICS), you're golden, as ICS copes with all of the problems this section discusses.
If you want to send files to someone else, your router must support Universal Plug and Play (UPnP), or you must manually set up port forwarding in your router. You may have to update your router's firmware to get UPnP support. Also, you probably have to enable UPnP as it's most often disabled by default. UPnP is considered by many to be a security risk, because rogue software on your computer could potentially subvert your firewall's protection. It's a tradeoff you have to make between security and utility.
If you want to use voice, video, application sharing, or the whiteboard, your router must support UPnP, or the router must be “SIP-aware.”
If your router can't support UPnP and can't be made SIP-aware, you may be able to replace it with one that can for very little cost these days. If that's not possible, you could use Windows's Internet Connection Sharing instead. Or, just appreciate the extra security that these devices offer, and consider giving up voice and video chat as a small price to pay.
Receiving files, audio, and video from others requires your computer to receive data from the Internet. By default, Messenger will instruct the Windows Firewall to permit this data to pass. Only if you've deliberately unchecked Windows Messenger in the Windows Firewall Exceptions list will these services fail to work. If your network has some other sort of firewall set up, you'll need to be sure that certain network port numbers are open in order to use Messenger services. Table 12.2 lists these ports.
Table 12.2. Network Ports Used by Messenger Services
Service SIP Protocol
Uses Data Port(s)
Text chat
No
TCP
1863
File Transfer
No
TCP
6891-6900[*]
SIP
—
TCP or UDP
5060
Audio Chat
Yes
UDP
5004-65534[†]
Video Chat
Yes
UDP
5004-65534[†]
Whiteboard
Yes
TCP
1503
Application Sharing
Yes
TCP
1503
Remote Assistance
Yes
TCP
3389
[*] The sending Messenger listens on a port in the range 6891-6900 for a connection initiated by the receiving Messenger.
[†] Audio and Video chat use a UDP port determined by SIP; it's not possible to determine it in advance. A SIP-aware router will handle it automatically; otherwise, it's not possible to manually forward the audio/video data.
NOTE
All of this applies also to the people you want to chat with, if they also use a shared Internet connection.
Now, for the terminally curious, here's the technical background.
The Internet routes data back and forth between computers identified by a number called an IP address. When several computers share a single Internet connection, all of the communications share a single IP address, and the router takes care of directing incoming data to the appropriate computer. It's a lot like the telephone switchboard of a large company: There's one public telephone number, and the operator takes care of routing incoming phone calls to the internal extensions. This is what Network Address Translation is all about, whether it's performed by a hardware connection sharing router device or Windows's Internet Connection Sharing service.
When an Internet connection is initiated by your computer and directed to a computer elsewhere on the Internet, NAT sees your outgoing data and expects data to come back; it knows to send the returned data to your computer. Basic text chat works fine with NAT, because each computer in the conversation makes a connection to an outside chat server run by Microsoft (or by your company, if you're using a corporate network). NAT sees this connection as it's made, and the chat server sends text back and forth through the established data connection. Likewise, if you use File Transfer to send a file to a friend, NAT sees your attempt to contact your friend's computer and tracks the conversation.
Unfortunately, if another computer spontaneously attempts to establish a connection directly to yours, the NAT “operator” isn't expecting the call, and it won't know to whom to direct the incoming data. Sending a file via Messenger's File Transfer option involves an incoming connection initiated by the remote computer directly to yours (to pick up the file), so without special preparations, without special help, it won't work over a shared Internet connection. Likewise, audio and video chat, the whiteboard, and application sharing services all have problems with NAT.
There are two ways they can work. You could manually configure your sharing router to forward incoming connections that use certain “port” numbers to your computer, by entering the port number and your IP address on the router's Applications or Forwarding setup screen.
However, if your router or connection sharing service supports the Universal Plug and Play (UPnP) protocol, it's much easier. Windows Messenger will automatically tell the router to expect an incoming connection, and the router will know to forward it to your computer. UPnP is built into the Windows Internet Connection Sharing service, which is why Messenger works with ICS right out of the box. If you use a hardware sharing router, check to see if it supports UPnP. Nowadays, most routers do. However, you may have to upgrade the router's firmware to get UPnP support; check the manufacturer's Web site for update information.
Messenger's audio and video chat, whiteboard, and application sharing have an additional problem. These services use the Session Initiation Protocol (SIP), in which each computer in the conversation tells the other its IP address in a way that NAT normally can't see and translate. The result is that the two computers attempt to send data to IP addresses that don't exist out on the Internet, and the chat session never gets off the ground. If your connection sharing service or router supports UPnP, Messenger gets around this problem by asking the router for its external, public IP address, and uses this inside the SIP message. If your router doesn't support UPnP, in addition to forwarding the required connection ports, the router must also be “SIP-aware”; that is, it has to know to look specifically for SIP data and to modify it as it it's passed through. SIP support is much less common than UPnP in inexpensive connection sharing routers, so it's unlikely that voice and video will work over a manually forwarded connection. Corporate network routers, on the other hand, probably can be configured to work with SIP, or will have a private SIP server on the network.
NOTE
If there are two NAT routers in between your computer and the Internet, UPnP will not save the day for you, as Messenger can negotiate with the first router, but not the second. This might be the case when, for example, someone shares her Internet connection with a neighbor, and the neighbor uses his own router. (I've actually seen this in friends' apartments; one person buys DSL service and they snake network cables out the windows and all over the rest of building.) In this case, you can probably just forget about voice, video, and the rest.
Finally, some technical data. While I highly recommend using UPnP, if you have the masochistic urge to set up manual port forwarding, Table 12.2 lists the ports used by Messenger services. If your network uses a firewall, you'll also have to be sure these ports are open in order to use the associated Messenger services.
You can read more about this topic by searching Microsoft's website for the article “Windows Messenger 5.0 in Windows XP: Working with Firewalls and Network Address Translation Devices.”
As I mentioned at the beginning of this chapter, Messenger is meant as a replacement for Microsoft's previous chat/voice/video conferencing program called NetMeeting. If you or your organization prefers to use NetMeeting, you'll be happy to know that even though it doesn't appear on the Start menu, it's still present on your Windows XP computer. (The Whiteboard and Application Sharing features in Messenger use parts of NetMeeting, in fact.) If you want to continue to use NetMeeting, just follow these steps to create a shortcut for it:
Right-click on the desktop and select New, Shortcut.
Click the Browse button, and browse in turn into My Computer, the drive containing Windows, the Program Files folder, and the NetMeeting folder. Select conf, click OK, and then click Next.
Enter “NetMeeting” as the name of the shortcut and click Finish. A NetMeeting shortcut will appear on your desktop.
You can drag the shortcut from your desktop to your Quick Launch bar, or into your Start menu. I suggest that you drag it to the Start button and hold it there. When the Start menu opens, drag it to All Programs, Accessories, and Communication before letting it go.
When you start NetMeeting for the first time, it will walk you through its setup wizard. You'll need to enter personal information (only as much as you want to), and run the Audio/Video Tuneup Wizard. When this is done, you're ready to go on the air.
One significant difference between this version of NetMeeting and versions you may have used in the past is that the Directory system is gone. You no longer can log on to the ILS (Internet Locator Service) or a corporate directory server to search for chat buddies. NetMeeting now uses the same contact list that Windows Messenger uses. So, you have only two ways to choose a partner for chatting and conferencing: You can select from your list of MS Messenger contacts, or you can directly enter the IP address of someone else running NetMeeting. Of course, this makes NetMeeting more difficult to use, and that's probably intentional (“You will use Passport. Resistance is futile”).
Also, if you use a shared Internet connection, you need to know that Netmeeting is not “firewall aware”; that is, it doesn't know how to use UPnP to open ports in your firewall or NAT router to permit incoming connections. Visit msdn.microsoft.com and search the Knowledge Base for article 878451 for more information.
When I click Sign In, I get an error message saying Messenger can't connect.
Be sure you're connected to the Internet when you try to sign on with Messenger. If your computer connects to the Internet through a network with a firewall (in a business environment), you may need to contact your network administrator for help.
When I attempt to receive a file from another user, Messenger says “You have failed to receive file so and so,” or, when I attempt to send a file, Messenger says “This file could not be sent because the connection was blocked.”
The person who is sending the file may have a problem with their firewall or connection sharing router. This could be caused by a router that doesn't support Universal Plug and Play. See “Windows Messenger: Shared Connections and Firewalls” earlier in this chapter for the details.
If the dialog shown in Figure 12.22 appears, you were sending a file and Messenger was not previously authorized to pass through the Windows Firewall. Click Unblock and try the file transfer again.

If the Windows Messenger entry in the Firewall exception list is present but unchecked, there will be no popup message explaining why the file transfer fails.
When I speak into the microphone, the green, yellow, and red indicator bar doesn't appear. Or, when I use voice chat, my friend doesn't hear any sound.
First, be sure that your microphone is plugged into the correct jack on your computer or sound card. There are usually three jacks: Line Out, Line In, and Mic. You want to plug into the Mic jack. Be sure that you're using a microphone designed for computer use.
If you have multiple sound cards or sound input devices, be sure you've selected the device that your microphone is actually plugged into.
If that doesn't help, click Start, Control Panel, Sounds Speech and Audio Devices, and Adjust the System Volume. Select the Audio tab, and click Volume in the Sound Recording section. Be sure that the Microphone volume slider is moved up and the Select button under it is checked.
When I initiate or accept a voice conversation, the connection fails with an error message, or I hear no sound.
First of all, if you and/or your friend are using a shared Internet connection, you can't use voice chat if the sharing system doesn't support Universal Plug and Play or if UPnP is disabled. For more information, see “Windows Messenger: Shared Connections and Firewalls” earlier in this chapter.
Otherwise, if there is no clear indication of what the problem is, see if your friend is hearing anything. Use the text chat window to ask them what they hear, while you speak. Check your screen's microphone indicator be sure that it's lighting up while you speak. If it doesn't, your microphone is probably not connected. If it does, have them check their speakers and volume settings. If you or your friend still don't hear anything, try disconnecting and starting the connection again. That sometimes fixes the problem.
When I initiate or accept a video and voice connection, the connection fails with an error message, or I see no picture.
Video connections are even more troublesome than audio connections. There's so much more data to send that any little bit getting lost along the way can foul up the whole process.
First, check the comments in the previous “Troubleshooting” note, “Voice Chat Doesn't Work.” Get the audio portion working before you try video.
If you get a good audio connection but still don't get a video connection, be sure that each person with a camera can see themselves in the lower right-hand corner of the Conversation Window's video area. If they don't, the camera is at fault. If the see-myself area is working but the other user isn't receiving video, disconnect and try making the connection again.
If you spend a lot of time working at your computer, you may find that messaging is a powerful and effective tool for communicating with colleagues, clients, family, and friends. Messaging is much more immediate than email, yet much less intrusive and demanding than the telephone. I use messaging on a daily basis to keep in touch with friends and colleagues all over the country.
Although messaging is free, it costs the providers big money to develop and run. Why do they pay to make this a free service? Well, if you haven't noticed yet, these services are tied into their manufacturers' other ventures. For example, AOL Instant Messenger (IM) displays an unobtrusive but constant parade of advertisements for AOL and other products, and occasionally a video ad with loud audio accompaniment. (I immediately shut it down when it pulls this on me—this is totally inappropriate behavior for a program used in the workplace.) Microsoft's Messenger forces you to sign up for Passport and not so subtly steers you toward using Hotmail, MSN, and other Microsoft services, where you'll again be barraged with advertising that Microsoft collects on.
There's absolutely nothing wrong with this, in itself. The problem is that the messaging companies want you all to themselves, and have steadfastly refused to let their systems interoperate. Microsoft did make headlines by trying to make Messenger work with AOL's IM for a while (perhaps to lure away its users?). AOL modified their software to block Messenger users, and Microsoft fixed that until AOL changed their software yet again; lawsuits followed and it all got very ugly. The bottom line is that AOL Instant Messenger, Windows Messenger, and ICQ don't work together, so their users are in separate, non-communicating camps.
If you find that you have friends and coworkers scattered across all of the major systems, you can either get a third-party program that can connect to all of the systems at once, or load all of the separate programs at the same time.
Multiple-system programs make life simpler, since they merge all of your contacts into one list, and let you use a single user interface for all chatting and file transfers. You also save time when you log on, as you don't have to wait for several programs to start up (AOL Instant Messenger, in particular, has a really ugly startup time; it freezes my desktop for about 15 seconds every time I log on.) The downside is that the message service providers may eventually decide that these third-party programs are cutting into their cross-selling profits, and may take steps to prevent them from connecting.
Some multiple-service programs that you might want to check out are listed here:
Odigo Messenger for Windows at www.odigo.org can connect with AIM, ICQ, MSN and Yahoo!, as well as the Odigo community. Free download.
Sealquest Messenger from wwwl.sealquest.com can connect to MSN and Yahoo! Messenger. It's able to encrypt messages so that others (for example, the service providers) can't monitor or record them. Free download; secure chat option costs $14.95 per month.
Trillian from www.trillian.cc can connect to AIM, ICQ, MSN (Windows Messenger), Yahoo! Messenger, and IRC. Encryption available. Basic version is free; Pro version is $25.00.
NOTE
Always be suspicious of free software; it might come with unsavory “adware” that pops ads up onto your screen, or worse, “spyware” that monitors your online activity and sends the information to marketing companies.
Personally, as most of the people I contact are on one IM system, and I only occasionally need to use the others, I've found it best to use the various providers' own chat programs. If you want to use separate chat clients, here are some tips to help you get set up:
You can download AOL Instant Messenger from www.aol.com. You can get it separately, or as part of the full Netscape browser program. AIM's advantage is its huge community, and the ability to search for chat pals by areas of interest, should you want to.
The ICQ program is now owned by America Online, but its community is totally separate from AOL. ICQ's advantage is its extreme configurability, as well as its search-for-a-pal features. You can download it at www.icq.com.
Yahoo! Messenger can be downloaded from messenger.yahoo.com.
Regardless of which IM client(s) you use, remember to take steps to protect your privacy. Think twice about listing your email address, telephone number, or full name in any of these service's directories. I prefer to contact others directly and give them my chat identification info, rather than making it public.
You can also configure these programs to prevent unknown people from contacting you without your permission. It's your computer, your time, and your connection, so you should be in control of who uses it.
Finally, when you register for one of these services, be sure to opt-out of any marketing email lists that the provider wants to sign you up for.