In This Chapter
Adding documents
Viewing documents
Checking out documents
Working with multiple document versions
The Documents module is the module you turn to when you want to share documents with the rest of your company. You can use the Documents module to store, share, and supervise the versions of your documents. And, just like with a traditional library, you can decide who is allowed to check out documents — and monitor what kind of shape the documents are in when they return.
If you've ever tried to e-mail a large attachment to a colleague, you know that a seemingly easy task can run into a whole bunch of snags. The file might be too big to get past your ISP or, if you can send it out, it might be too big for your recipient's ISP. If the file is large, it might take a long time to transmit — during which you're unable to receive any other e-mail. Your recipient might have a spam blocker, or his company might have e-mail policies that prohibit receiving file attachments.
By using the Document List, you can create a library of documents and graphics that can be shared by all members of your staff. For example, you might be collaborating with a colleague who works from home on a brochure. Or perhaps you're building a custom-ordered widget for your best customer and want to share the specs and some sketches of the final product with your boss who's vacationing in Botswana. By placing documents and graphics in the Document List, you — and anyone else you authorize — can view files whenever and wherever needed.
You can find the Documents module — and add a few documents to the Documents List — by following these steps:
Click Documents on the Module Tab bar.
As you'd expect, the Documents Home page opens. Don't just take my word for it — view it for yourself in Figure 8-1.
Choose Create Document from the Shortcuts menu.
The Documents form opens. You might be surprised at the number of fields you see here. The only required fields are the document name, the publish date, the revision number, and the file itself.
Warning
No pain no gain! The more information you enter now, the more organized you'll be in the future.
On the Documents form, enter information for the following fields:
Document Name: Enter a name for the document. It doesn't have to be the same as the actual filename.
File Name: Click Browse to navigate to the location of the document file and then click Open to add it to the Document form. The form will not reflect the path and filename.
Revision: Enter the revision number; if you're adding a document for the first time, type in 1.
Template: Select this box if you are creating a template to be used in merges.
Document Type: Choose a pre-defined document type from the drop-down list. Just like a library makes use of a filing system, this is a great way to help keep those documents organized if you're planning on housing a lot of them. At the very least, you might want to differentiate your templates from your pictures from your sound bites.
If you're less than thrilled with the options in the drop-down list, you'll want to go Chapter 15 where you discover how to change those options.
Category: Choose a category from the drop-down list. If you're groaning at all these fields, just remember that the Dewey Decimal System contains more than one number. Here's where you might group documents, such as Marketing Materials and FAQ's (Frequently Asked Questions).
Sub Category: If you selected a category, select the category subset if possible. If you add a category and subcategory for the document, you create a document tree, which helps you to organize files and find documents.
Status: Choose the status from the drop-down list to indicate the current state of the document. Consider using choices such as Draft, Under Review, and We've Got a Winner.
Publish Date: Click the calendar icon to memorialize the date of the download.
Expiration Date: Like milk sitting too long in your refrigerator, it's good to have an expiration date. For example, a brochure for an April sale loses its potential on May 1.
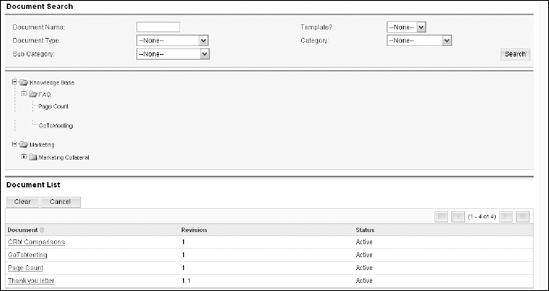
Related Document: Click Select to associate a related document. The window you see in Figure 8-2 opens, revealing the documents you've already downloaded to Sugar. Click the appropriate document name to associate it with the current document.
Related Document Revision: Choose the revision number of the associated document from the drop-down list; if only one revision of the document exists, you'll only have the choice of one number.
Description: Enter a description of the document just in case the document name and filename don't do the trick.
Click Save to add the document to your Sugar database.
Sugar actually clones the document and adds it to Sugar. You can delete the original document if you want without worry because the cloned copy remains safely in Sugar.

After you add documents and graphics to the Documents module, you'll probably find it even more useful than the local library. You can view your files, save a copy to your desktop, create updated versions, and even send them to your adoring masses.
Any file that you attach when you create a document displays on the Document List subpanel of the Documents Home page for your viewing pleasure.
For your first trick, you'll want to learn how to access files. If you're thinking that you'll have to paperclip this page for future reference you're wrong — unless you just want to keep reminding yourself how easy it is to work with the Sugar Documents module.
Click Documents on the Module Tab bar.
Choose Documents List from the Shortcuts menu.
The Documents Home page opens, complete with the Document List subpanel. This list works exactly like all the other lists sprinkled throughout Sugar, so you can sort the List view or even delete selected documents.
Click the name of the saved file.
For your convenience, the document names appear as hyperlinks, so you know something cool will happen when you click one of them. In this case, the Documents page opens, as shown in Figure 8-3.
Tip
Notice our good friend the Duplicate button on the top of the page. Duplication is particularly popular among the smart and lazy of the crowd. After you create a prize-winning document — or at least one that you're happy with — you can duplicate the document, make a few minor changes, save the document again with a different name, and voil&aG! — new document.
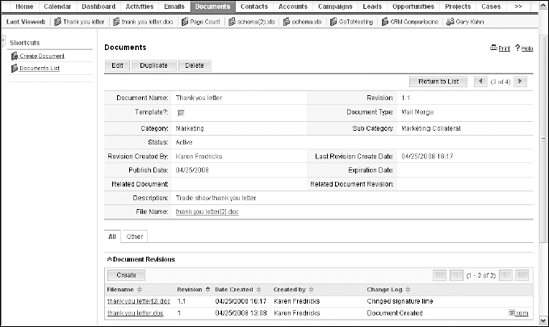
Click the file that you want to see.
You find out how to make document revisions in the next section, but I want to give you a preview of how this is going to play out. You'll notice a file name; that represents the most current version of the file. However, you'll also notice the Document Revisions subpanel, which shows you all versions of the document. And, Sugar very sweetly marks them with a date and time stamp so you can view any of the versions. Usually, you'll just click the filename, but if you need to see the original document or one of its earlier updates, you can click those as well. In all cases, the File Download window will open.
Click Open to view the document immediately, or Save to save the document.
If you open the document, it will open immediately. At this juncture, you can edit the document exactly how you would any other document. And, you can save your changes.
Tip
If you're going to be loading your changes back into Sugar, you'll want to save the document as a different name. Sugar, helpful as always, suggests a name change for you; if the original document was called myfile.doc, Sugar will automatically suggest myfile(2).doc as the new name.
Warning
Sugar gives you tons of software functionality but it can't give you licenses for software that you don't own. If one of your users uploads an Excel spreadsheet — and you don't own a copy of Excel — you won't be able to view that document. You need to have a copy of the software originally used to create a document loaded on to your computer before you can view the document.
Sharing documents is a great timesaver, particularly for those of you who often work from remote locations. Very often, just being able to download and review a document is enough to make you a very happy — and productive — camper.
However, hosting shared documents opens a whole other can of worms. For example, two employees are collaborating on new sales materials from separate, remote locations. They both download copies of the same document and make changes to it. The first employee uploads the document to the library when she is finished. An hour later, the second leader uploads his copy of the document to the library — which overwrites the first employee's document. Yikes!
The folks at Sugar must have run into the exact same problem because they came up with a great solution. Versioning enables you to track and manage multiple revisions of the same document and to view and recover earlier editions if necessary.
Here's how you can add a revised copy of a document back into Sugar:
Click Documents on the Module Tab bar.
Choose Documents List from the Shortcuts menu and then click the name of the document you want to revise in the Document List subpanel.
The Documents Detail view opens. I hate to make assumptions, but I'm going to make an assumption here: I'm assuming that you've already read the previous section, opened a document, made a few changes, and saved it.
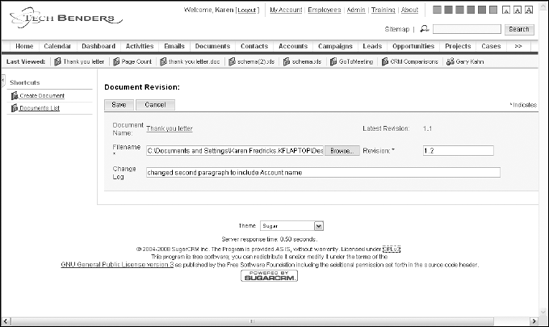
Click Create in the Document Revisions subpanel of the Documents Detail view.
The Document Revision page, shown in Figure 8-4, displays the current document name and revision number.
Enter information into all the fields.
I know all the fields aren't required, but in this case, all the fields are really important ones.
Warning
If you leave one of the fields blank or input incorrect information, you can't go back and edit it after the fact. Proceed with caution!
File Name: Click Browse to navigate to the file location, and then click Open to add it to Sugar. You cannot change the filename of the attached file; Sugar supplies it automatically.
Revision: Specify a revision number for the revised document. If you're making fairly minor changes you might use a decimal, such as 1.1 or 1.76. If you're making fairly radical changes you might want to increase the ordinal to the next integer.
Change Log: Enter a brief description of the changes. You'll find this field to be really helpful if you have to track multiple document versions.
Click Save to save your changes.
The revised file now appears at the top of the Documents Revisions sub-panel, which displays the revision number, the date and time of the last revision, and the Change Log comment.
A particularly useful Sugar feature enables you to create customized document templates. Templates are forms in which your selected data fields are filled by Sugar. You can send these forms to a thousand people as easily as you can send them to just one person. You can send routine documents one at a time on a continual basis, or you can send a document one time to all or part of your database.
A good way to understand the concept of mail merge is to visualize this simple equation:
template + data field(s) = personalized document
Note the (s) at the end of data field, which suggests that you can use either one name or many names. Some of you might think that you'll never perform a mail merge because you have no desire to send a mass mailing. Others of you might have already perfected the art of mass mailing but never realized that a mail merge can be directed to one person or to thousands of people. I hate to be the one to break your bubble, but if you have any kind of routine documents that you're generating repetitively, you should be using Sugar to do so.
The three things necessary to create a mail merge are
A name or a list of names: If you've followed this book to this point, you're the happy owner of a database chock full of Account and Contact information.
A document template: A document template is a letter or form that substitutes field names in place of names and addresses or whatever other information comes directly from your database.
A program that can combine the names into the template: After you have a list of names and a document template, you need something to combine them. You could try to use your food processor, but I prefer to use the mail merge feature.
Sugar has a nifty plug-in that allows you to create mail merge templates in Microsoft Word. The plug-in comes as part of the SugarCRM Professional, or can be purchased separately if you're using Sugar's Community Edition.
You create the templates in Word and upload them to the Sugar Document module. Once uploaded, you can initiate a mail merge in either Sugar or Word.
Because the ability to link Word to Sugar requires a plug-in, you have to install the plug-in if you're running Sugar's Community Edition (the plug-in is included in SugarCRM Professional). Fear not; this isn't a particularly difficult thing to do:
Close Microsoft Word.
You're going to be able to access a special Sugar toolbar from within Word, but in order for the fun to begin, make sure Word is closed.
Download the Sugar plug-in for Word.
Go to
www.sugarexchange.com.Select Integration on the left side of the screen under Browse By Category.
From the alphabetical listing, scroll down and select Sugar Plug-in for Microsoft Word.
The plug-in will come in the form of a
.zipfile. It doesn't matter where you save the download file as long as you remember where you saved the file.Tip
Unfortunately, it's not very easy to find the Office plug-ins so you might need a road map. You'll find them by going to the Sugar exchange (
www.sugarexchange.com/). For the Word plug-in you'll want to click on the Integration category and then scroll down through the list of product until you find the Sugar Plug-in for Microsoft Word. For the Outlook plug-in you'll select the e-mail category and then scroll down to Sugar Plug-In for Microsoft Outlook.Double-click and follow the prompts to extract the file.
You're now the proud owner of your very own Sugar Word plug-in file.
Double-click the
.exeinstallation file and follow the prompts to install the Word plug-in.No need to get fancy here — simply clicking Next and Next will get you where you're going.
Start Word after the installation completes.
Try to curb your enthusiasm! The SugarCRM drop-down menu displays below the Word menu exactly like the one shown in Figure 8-5.
This menu gives you all the options you need to make Sugar and Word play nicely together.
The Sugar drop-down menu in Word.
In Word, choose SugarCRM
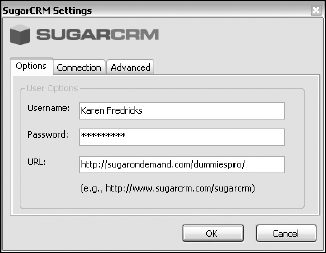
Settings and fill in your SugarCRM credentials.
Figure 8-6 shows you what the SugarCRM Settings window looks like. You just need to add your user name and password, and the URL you use to access Sugar.
In Word, choose SugarCRM
Login.You are now safe to roam around the cabin — and start creating mail merge templates.

Before you can win friends and influence prospects with your dazzling display of personalized documents, you need two basic elements: the data and the document template.
Warning
You're creating a template, not a document, to perform your mail merge. A document is a plain old file that you create and use in Word. You use it once, save it, and store it away for posterity or delete it as soon as you're done with it. Comparatively, a template is a form that merges with your database information. The convenience of templates is that you use them over and over again.
With your data tucked away nicely in your database, all you have left to do is to create the document template, which involves creating a form document. Your document template contains placeholders that are then filled with information from your database after you perform a merge. Create a document template by following these steps:
If you haven't done so already, open Word and choose SugarCRM
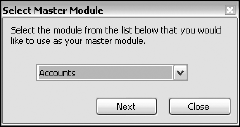
Log in.Choose SugarCRM
Define Template.The Select Master Module dialog box displays, as shown in Figure 8-7.
Select the module that you want to create a template for and then click Next.
You can add most any field to your template. Typically, you'll want to use Accounts, Contacts, Leads, and Prospects fields because that's where you'll find basic contact information, such as name and address. However, you can add Cases and Opportunities fields as well.
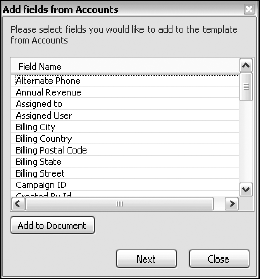
Depending on the module you choose, a list of record field names displays, as shown in Figure 8-8.
Start typing your document.
You are, after all, in Word and can use all of its features. Write your thank you letter or create a few slick marketing pieces.
Click the spot in your document where you want contact information to appear, select the appropriate field name, and then click Add to Document.
Here's where the fun begins. Every time you get to a part that could be populated with Sugar information, scroll down the list of fields, select one to insert into your template, and then click Add to Document. The record type and field name appears in your document set off by lovely double-angle brackets. Treat these field names exactly as you do any other words in your template. For example, if you want to see them set in bold, bold the field name. You also want to place the appropriate punctuation next to an inserted field if necessary; for example, if you place the «Contacts_salutation» field in the greeting line, you'll want to follow it with a colon.
Tip
You can also double-click a field name to insert it into your document.
Click Next to continue.
Here's where you can add other record type fields into your document. For example, you might want to use Accounts fields for the address information, but Contacts fields for the first and last name information.
Warning
When you select Campaign Prospects in the Master Module dialog box, Sugar won't give you the option to include other record types.
Click Finish.
The Add Fields window closes. Fear not, you can get it back again if necessary by clicking SugarCRM3Define Template.
Check your document for accuracy and edit as necessary.
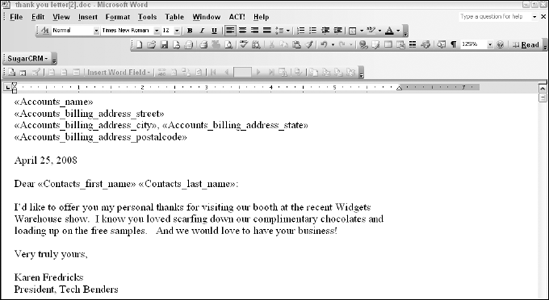
Choose File
Save As.Figure 8-9 shows Accounts billing address fields along with Contacts name fields.
Choose SugarCRM
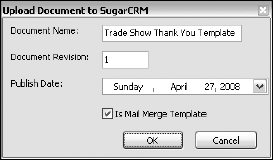
Upload.The Upload Document to SugarCRM dialog box opens, which looks remarkably like the one shown in Figure 8-10. Creating a document template is only half the fun. The other half comes from getting your template into Sugar.
Enter a document name and revision number for the document and then click OK.
Notice that the Is Mail Merge Template check box is selected to ensure that the document is correctly identified as a template in the Documents module.
Now that you've created a document template, you're ready to fill your template with record information. Don't assume that creating a mail merge implies sending a single message to thousands of people at one time. A mail merge can also be used to automate the most mundane and routine of tasks. You can use Sugar's document templates to write a thank you letter every time you land a new client or to write an inquiry letter each time you receive a new lead. After you discover this timesaver, I guarantee that you'll never go back to your old way of creating documents again!
Tip
If a document is a Mail Merge template, the document type will automatically show as Mail Merge on the Documents Detail view.
Here's how you create a mail merge in Sugar:
Navigate to the appropriate module's Home page.
For example, if you want to send a letter to a contact, go to the Contacts module.
Tip
You can also initiate a mail merge by choosing Mail Merge from the Shortcuts menu on the Documents Home page. However, by starting at a record's Home page, you can select the appropriate record(s) prior to the mail merge.
Select the record of whom you want to send a letter.
If you're just sending the template to one record, then you only need to select that record. However, if you'd like to send the template to multiple records, you'll want to search for those records and then choose Select All Records.
Click Mail Merge.
The Mail Merge button is conveniently located next to the Export button above the record list. Clicking it starts the Mail Merge Wizard.
Warning
The Mail Merge option must be enabled on both the Administration page and the My Accounts page to display the Mail Merge option. If you're a database administrator, go to the Administration Home page and check the System Settings to make sure that the Enable Mail Merge option is selected. If you're an end-user, go to the My Account page and make sure there's a check next to Mail Merge. If Mail Merge is not enabled, you will not see a Mail Merge button.
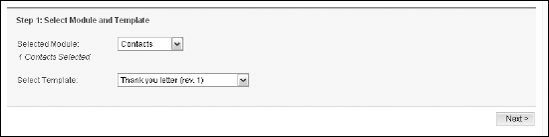
Choose a template from the Select Template drop-down list on the Select Module and Template page.
Take a look at Figure 8-11 just to make sure you're on the right track.
Although you can also choose a different module from the Selected Module drop-down list, you'll probably find it easier to select the record(s) you plan on merging prior to starting the mail merge. You might also notice that only mail merge templates appear in the Select Template drop-down list.
Click Next to continue.
The Merge page that displays depends on the module that you selected. Any records that you select appear in the Selected section on the right. If you did not select any records, you can do so here. Use the left and right arrows to add or remove records.
Click Next to continue.
The third step of the Wizard — the Review and Complete page — gives you a recap of your choices.
Click Begin Merge.
You might hear a bit of clanging as the Wizard starts combining the data with the template. A dialog box opens that requests you specify whether to open the merged document in Word, or save it to a disk.
Make your selection and click OK.
If you choose to open the document in Word, the merged document displays on the screen. If you choose to save the document to a disk, you can now specify the location to which you'd like to save the document.
You'll probably find it much easier to run your mail merges in Sugar rather than in Word. Sugar allows you to make use of its queries, which makes targeting your mailings much easier. However, some of the folks in your organization might find Word to be more familiar territory and want to use Word for their mail merges. Not a problem if you follow these steps:
In Word, open the template you want to use for the merge.
Warning
You'll want to close any other Word documents that you might already have open.
Click SugarCRM
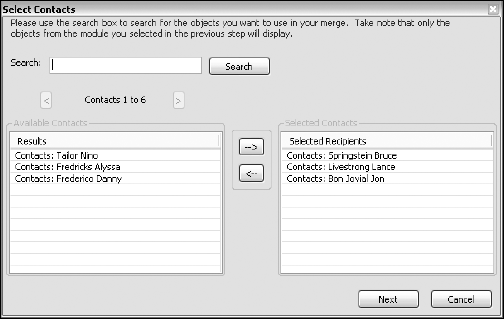
Perform Mail Merge.Similar to the dialog box shown in Figure 8-12, a list of records for the module that you selected in the template appears.
Warning
You must be logged in to the Word plug-in for this to occur.
Use the right arrow to move the records that you want from the Available records list to the Selected Recipients list.
You can use some of your old Windows tricks to help you here, such as holding down the CTRL key while selecting records to select several at one time.
(Optional) Click Next to continue.
You might be asked to select more records depending on the module(s) that you choose when you set up the document template. For example, if the template included both contacts and opportunities, you'll be asked to select your opportunities.
The Complete Mail Merge dialog box displays the selected records.
Click Complete Merge.
The merged document displays in all its glory. At this juncture, you are free to print the document — or save it to Sugar for future reference.