
In This Chapter
In this chapter, I show you how to configure Sugar so that you can send e-mail to an individual contact in your database, or to a selected group of contacts as part of a campaign. You also discover how easy it is to create e-mail templates to make your life even sweeter.
An e-mail system consists of two separate but equal components: sending e-mail and receiving e-mail. Prior to sending e-mail from Sugar, you'll need to set up at least one outgoing e-mail account. However, with incoming e-mail, you have a few more options available to you:
Continue to use your existing e-mail client.
Configure Sugar's e-mail module.
Use a plug-in to integrate Sugar and your existing e-mail client.
You must configure the following areas in order to use any of Sugar's e-mail capabilities:
Mail accounts: You must set up at least one e-mail account in Sugar to be able to send e-mail. Additionally, you need to set up an e-mail account for every external e-mail account that you want to access through Sugar.
General settings: These are your e-mail preferences, such as your page layout. General settings apply to all of your e-mail accounts, but users can change these default settings.
Folders: You can create folders to help keep your incoming e-mail organized.
The administrator must create an e-mail account in order to send e-mail. The first — and most important — e-mail account is one that will allow you to send e-mail from Sugar. After all, you can continue to use your existing e-mail client to receive mail, but you'll need to use Sugar if you plan to do cool things like e-mailing contracts, quotes, or campaigns.
Here's how you create an e-mail account in Sugar for outbound e-mail:
Click the Admin link from any Sugar page and then click E-mail Settings in the E-mail subpanel.
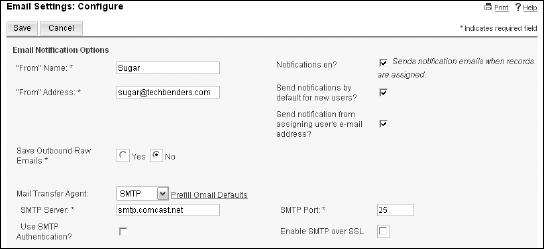
The E-mail Settings Configure page opens, as shown in Figure 12-1.
Enter information for the following fields:
From Name: Enter a name to identify this e-mail account.
From Address: Enter the e-mail address associated with this account.
SMTP Server: Enter the outgoing (SMTP) server's address.
SMTP Port: Enter the e-mail server's port number; generally, it's 25.
Note
The e-mail procedure explained in this section applies to SMTP e-mail. The instructions will vary slightly if you are using a different e-mail system.
(Optional) Add additional settings if your provider requires additional security settings.
Some providers require SSL or SMTP authentication; feel free to add them if needed.
Click Save to save your settings.
You're now ready to start sending e-mail.
After you set up at least one outbound e-mail account, you're ready to create a few inbound e-mail accounts. Inbound e-mail accounts can be accessed by a specific user or a group of users; therefore, you can set up group mail accounts to handle e-mail that is more general and individual e-mail accounts for specific usage by a single user. As a user, you can subscribe to group e-mail accounts that your administrator has created. For example, you and several other people might have access to the [email protected] mail account.
Follow these steps to configure your incoming group e-mail accounts:
Click the Admin link from any Sugar page and then click Inbound E-mail in the E-mail subpanel.
The Inbound E-mail Home page opens.
Choose Monitor New Mail Account from the Shortcuts menu.
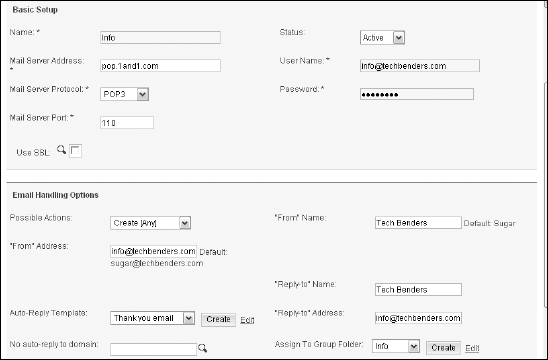
The Inbound E-mail Setup window shown in Figure 12-2 opens.
Fill in the Basic Setup information for the incoming e-mail. Your system administrator or your Internet service provider (ISP) will provide most of this information to you.
Name: Enter a name for the e-mail account.
User Name: Enter the username you need to access your e-mail.
Mail Server Address: Give the address of the incoming e-mail server.
Mail Server Protocol: Choose either IMAP (normally used with an online e-mail client, such as Google or Yahoo!) or POP3 from the drop-down list.
Password: Enter your e-mail password.
Mail Server Port: The system automatically populates this field with the port number for the selected protocol.
Use SSL: Select this box if your external e-mail account requires SSL.
Fill in the E-mail Handling Options section.
Possible Actions: Specify the action that the individual or team is permitted to perform from the drop-down list. For example, e-mails to this address can be used to create a lead or for bug handling.
From Name: Fill in your name or the name of the group handling the e-mail.
From Address: Provide your e-mail address.
Reply-to Name: Enter the name that will be associated with reply e-mails.
Reply-to Address: Enter the e-mail address that will be associated with reply e-mails.
Auto-Reply Template: Choose an existing e-mail template from the drop-down list if you want an automatic response sent to any e-mails that arrive at this e-mail account.
No Auto-Reply to Domain: You can include a domain name that should not receive the automatic response e-mails.
Assign To Group Folder: Choose a group folder from the drop-down list, or click Create to create a new one. Adding a group folder will allow several people to access the group e-mail account.
Click Save to save your changes.
The administrator has the job of setting up the initial outbound e-mail account and the group inbound e-mail accounts for all the users. He'll most probably set up generic inbound accounts that will be used for general purposes, such as information, customer service, or technical support. At that point, he can bid adieu to e-mail setup and turn the rest of the project over to the end-users.
If you're a Sugar end-user, this section is for you because you're going to setup your personal incoming e-mail account — unless Mr. Administrator responds well to bribes — and tweak your e-mail preferences.
Warning
If you are using your own e-mail client, such as Outlook — or you have purchased a link between your e-mail client and Sugar — feel free to skip this section.
You begin your voyage into Sugar's Emails module by clicking Emails on the Module Tab bar. The Sugar Emails page shown in Figure 12-3 opens.
To understand the e-mail portion of SugarCRM fully, you must understand the concept of the e-mail client. An e-mail client is an application that runs on a personal computer or workstation and enables you to send, receive, and organize e-mail. Sugar's Emails module provides you with the following functionality:
Access e-mail without downloading them into your Sugar database.
Import incoming e-mail into Sugar to the My E-mail folder. Once imported, you can associate an imported e-mail with a Sugar record, such as a Bugs or an Accounts record.
Archive outgoing e-mail that you sent to Sugar. For example, you might send an e-mail from Outlook and then use the Sugar Outlook Plug-in to create an e-mail record in Sugar.
Search for e-mail based on various criteria, such as keyword and subject.
Create a related record, such as a Bugs or a Leads record, from an e-mail message.
Create an address book of the users, contacts, and leads to whom you often send e-mail.
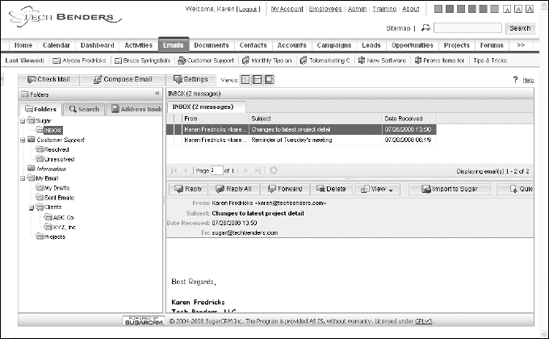
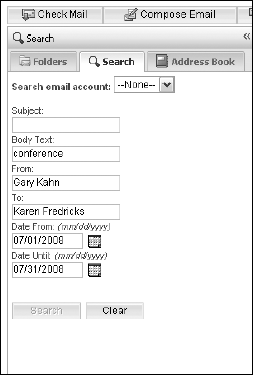
The Check Email, Compose Email, and Settings options appear at the top of the page. The remainder of the Emails module Home page is divided into three panels: Shortcuts, Folders, and Inbox. The Folders panel includes the Folders tab, the Search tab, and the Address Book tab; you might want to flip to the Search tab to hunt down an old e-mail that you're having trouble locating (see Figure 12-4), or access the Address Book tab to find someone's e-mail address.
Any incoming e-mail accounts that your administrator has set up for you appear at the top of the Folders window along with an Inbox subfolder. Once received, you can organize your e-mail into folders that you create in the My Email folder.
You'll find three Views icons at the top of the Inbox panel, which unfortunately aren't labeled. The first icon displays a list of the messages in your Inbox. The second shows a list of your e-mail messages in the top panel and the contents of the currently selected message in the bottom panel. The third icon seems to display exactly the same view as the second icon; however, the e-mail viewing area is increased by removing access to the other Sugar module tabs.
Setting up inbound e-mail accounts: Part 2
Earlier in this chapter, you find that the administrator can set up an outgoing e-mail account and optionally configure incoming accounts as well. For those of you who don't have a nice administrator to do this work for you — or if you have numerous e-mail accounts that you monitor — you can set up additional accounts through the Emails module's Settings tab.
You must set up an e-mail account in Sugar for every external e-mail account that you want to access through Sugar. Sugar automatically creates an Inbox folder for every e-mail account that you configure. Additionally, you can create subfolders under that Inbox to help keep yourself — and your e-mail — organized.
To set up an e-mail account, follow these steps:
Click the Emails module tab and then click the Settings tab.
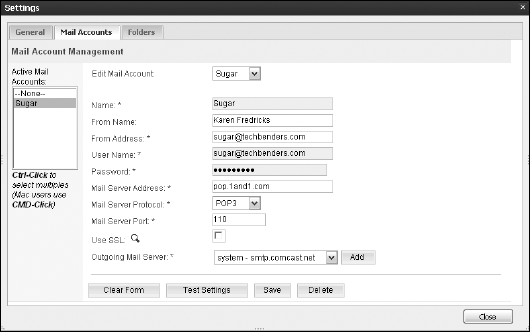
If you've been following along at home, the Mail Accounts tab should look like the window shown in Figure 12-5.
Choose None from the Active Mail Accounts field.
Alternatively, if you need to edit an existing incoming e-mail account, choose the name of the account from the drop-down list.
Enter a name for the account in the Name field.
You'll probably want the name of the account to coincide with the name of the e-mail account that you are receiving, so name it something like Info or Tech Support — or your name.
Enter information into the following fields:
From Name: Your name.
From Address (required): The e-mail address that will be used on any outgoing correspondence.
User Name (required): Your e-mail username for the account.
Password (required): Your password for the account.
Mail Server Address, Mail Server Protocol, and Mail Server Port (all required): Your ISP will provide the mail server address, protocol, and port number.
Choose the Outgoing Mail Server from the drop-down list.
Specify the default e-mail server for your company from the drop-down list, or add a new one by clicking the Add button and filling in the appropriate SMTP information given to you by your ISP.
Click the Test Settings button to ensure that all your settings are correct.
A little window will pop open requesting that you cool your jets while Sugar verifies your information. If all entries are correct, you're rewarded with a message telling you that your setup is correct.
Click Save to create the e-mail account.
Sugar creates the e-mail account — and collects any e-mail waiting to be delivered.
Click Close to return to the Emails module Home page.
You can set a number of e-mail preferences. These preferences include how you view your incoming e-mail and how others view e-mails you send.
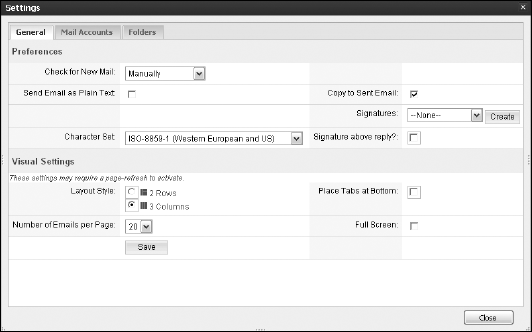
Click Emails on the Module Tab bar and then click the Settings tab.
Click the General tab.
The Settings window opens, as shown in Figure 12-6.
Configure your e-mail Preferences.
Check for New Mail: Determines how often you want Sugar to check for incoming e-mail.
Send Email as Plain Text: Select this check box to send e-mails in plain-text format rather than as HTML.
Copy to Sent Email: Select this check box to store a copy of your outbound e-mail in the Sugar database.
Signatures: Click Create, enter your full name, and format your signature as HTML or plain text.
Character Set: Here's where you can indicate a character set other than Western European if you are composing in a language that contains cool-looking characters and accent marks.
Signature Above Reply: Select this check box to place your signature in your e-mail responses.
Configure your e-mail Visual Settings.
Layout Style: You can view your e-mail in a two- or three-column format.
Place Tabs at Bottom: Select this check box to display the tabs at the bottom of the page rather than at the top.
Number of Emails per Page: Indicate how many e-mails you want to view per page in the Sugar Inbox.
Full Screen: Select this check box for a full-screen display of the Emails page.
Click Save to save your preferences.
In Sugar, the two types of e-mail folders are
Local folders: Folders created by individual users to group and organize their own specific e-mail.
Group folders: Folders set up by the administrator to organize incoming e-mail that is more department-specific.
In the earlier "Setting up inbound e-mail accounts" section, you saw how the administrator could set up group e-mail folders when he configured the group incoming e-mail addresses. In this section, you discover how to use the group folders — and make a few folders of your own.
You create local folders directly on the Emails module Home page. The first time you access the Emails module, you'll notice several folders that Sugar automatically configured for you:
An Inbox for each of your personal e-mail accounts. Mail in this folder is not stored in the Sugar database.
Group folders that the administrator has created. Group folders are identified by an icon of three little people.
The My Email folder, which holds e-mail that is stored in the Sugar database.
The My Email folder is divided into two subfolders:
My Drafts, which holds e-mail you've written but not sent.
Sent Emails, which is the folder that holds all your sent e-mail.
You can create additional folders under the My Email folder to organize the e-mail that comes into your own specific account. You can also create sub-folders under your group folders to help organize your departmental e-mail.
To create additional folders:
You follow the exact same procedure to create a subfolder under a group folder. Refer to Figure 12-3 to get an idea of a typical folder structure.
Choosing your folders
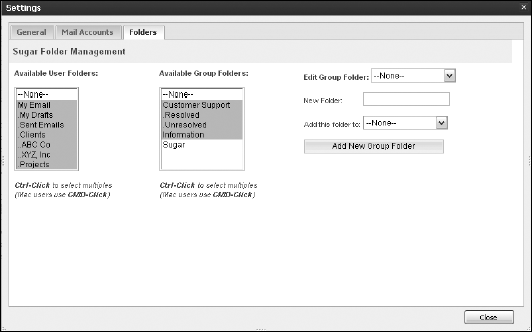
Users have the option of determining which folders they would like to access. It's easy to decide which group folders you have access to — and which ones you want to access — by following these steps:
Click the Emails module tab from any Sugar window and then select the Settings tab.
Select the Folders tab from the Settings window.
The Folders window opens, as shown in Figure 12-7.
Make the desired folder changes.
To select your personal folders: Hold down your Ctrl key and click the desired folders in the Available User Folders panel.
To select group folders: Hold down your Ctrl key and click the desired folders in the Available Group Folders panel.
To rename a folder: Select a folder name from the Edit Group Folder drop-down, modify the name in the New Folder field, and click save.
Tip
Wondering how to rename local folders? Don't let the name Edit Group Folder fool you because all your folders are listed there and can be renamed.
To create a new group folder: Type a name in the New Folder field and then click the Add New Group Folder button.
Click Close to save your changes.
Don't panic if you don't immediately see your new folders. They will magically appear the next time your browser refreshes.
In the upcoming sections are a number of ways to generate outgoing e-mail in Sugar. One way is to use entries in Sugar's Address Book.
Tip
If you generate your e-mail using one of the other methods — or are using a plug-in to connect Sugar to your existing e-mail client — you can skip this section.
The idea here is to add the people you frequently e-mail to the Address Book. The benefit of the Address Book is that Address Book contacts will auto-populate when you type the first couple of letters of a recipient's name into a blank e-mail message.
Here's how to add entries to the e-mail Address Book:
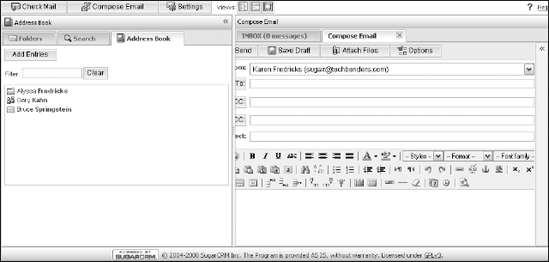
Click the Emails module tab from any Sugar window and then select the Address Book tab from the left panel of the Emails Home page.
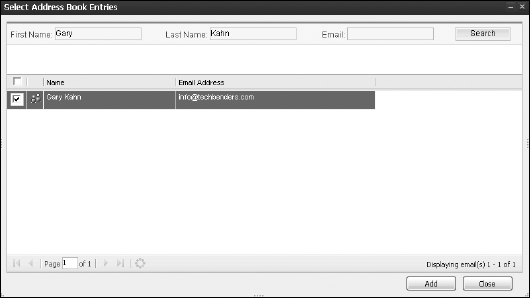
You can see what the Address Book looks like in Figure 12-8.
Click the Add Entries button.
Fill in the name of the person who you want to add to the Address Book and then click the Search button.
Although the Address Book is separate from the other modules, a person must already exist in a Contacts, Leads, Targets, or Users module in order to be added to the Address Book.
Select the e-mail address of the person you want to add to the Address Book and then click Add.
Figure 12-9 shows you what the process looks like.
Repeat Steps 3 and 4 if you want to add more names to the Address Book and then click Close.
The new entries appear in your Address Book.
Before you can win friends and influence prospects with your dazzling display of personalized e-mail documents, you need two things: the data and the document template.
Warning
You're creating a template, not a document. A document is a plain old file that you create, use once, and store for posterity. A template is a form that merges with your contact information that is used over and over again.
A template is a form that contains placeholders that are filled with information from your database. Using Sugar to create e-mail templates enables you to send personalized e-mail to each recipient. For example, you routinely might want to send thank-you e-mails to your contacts and not have to reinvent the wheel each time.
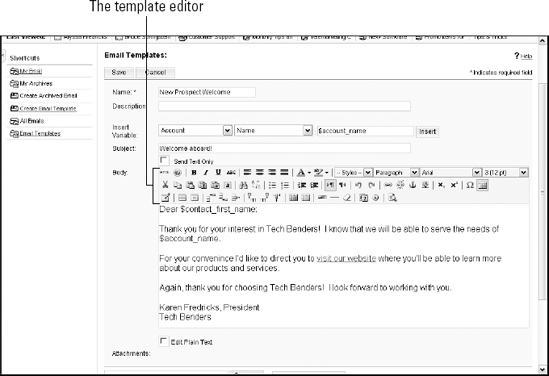
You can create a template by following these steps:
Click the Emails module tab from any Sugar window and then select the Create Email Template from the Shortcuts menu.
The Email Templates page (see Figure 12-10) opens.
Give the template a name and optional description.
After all, if you go to all the effort of creating a template, you may as well be able to find it again!
Supply a subject line and start filling in your message.
Nothing new under the sun here. The template editor includes all the standard formatting options, such as font, size, bold, and italics. For your added fun and enjoyment, you can also embed images and add URL links.
Click the spot in your document where you want to insert a field.
You need to let Sugar know where you want to insert your data placeholders.
Determine what type of field you want to insert into your template from the Insert Variable drop-down list.
Basically, you can insert either Account fields, or fields from your Contacts, Leads, Targets, and Users records.
Select a field and then click Insert.
Your field choices will change depending on your variable type. Sugar will display the official field name and then place it into your template.
Click Save to create the template.
You can use the template whenever you send an outgoing e-mail — and use it in your marketing campaigns.
A benefit of sending e-mail from within SugarCRM is that a history of the event is added to your Contacts record's History subpanel each time you send an e-mail. E-mail is an increasingly popular form of communication, so having a record of all the e-mail that you send to each of your contacts helps you keep track of it all.
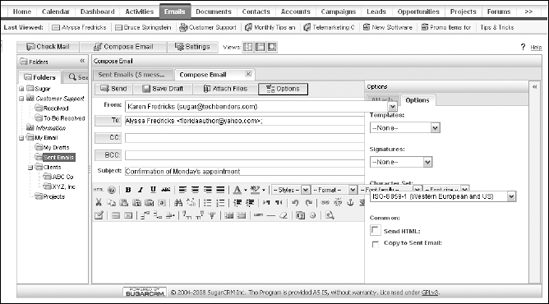
You can send e-mails to users, contacts, leads, and anyone else for whom you have an e-mail address. When you compose an e-mail, you can choose to send it using any of the e-mail accounts that you have configured. You can create your message from scratch using the e-mail editor, or you can use a pre-designed template.
Follow these steps to send an e-mail in Sugar:
Create a new e-mail message using one of the following methods:
Click the contact's e-mail address in either the List or page Detail view.
Add the contact's e-mail address to the Address Book, click Compose Email in the Emails module, and have the address auto-populate in the To field.
Click Compose Email in the Emails module and manually fill in the e-mail address.
These methods all result in a new message (see Figure 12-11). Notice that if you used either of the first two methods, the contact's name already appears in the To field.
Choose an e-mail account from the From drop-down list if you created more than one e-mail account in Sugar.
(Optional) Add the names of additional individuals who will receive a copy of the e-mail.
Fill in the Subject field.
Create your message using one of the following methods:
Enter the text in the body field.
Click Options and choose a template from the Templates drop-down list. While you're there, you might want to choose a signature from the Signatures drop-down list.
(Optional) Click the Attach Files button to attach a file to the e-mail.
The Attach options page appears in the right panel. Click Add File from File System to attach a file located on your computer, or click Add Documents from Sugar Documents to attach a file that's been saved to Sugar.
Click Send to send the e-mail or click Save Draft to save the e-mail as a draft.
Off your e-mail goes, hurtling through cyberspace. You can see the message in the Sent Emails folder or by looking at the History subpanel of the Contacts record's Detail view.
Sugar makes a distinction between incoming e-mail and incoming e-mail that is actually imported into the Sugar database. The distinction is even clearer when looking at the e-mail folders. The top set of folders contains the e-mail accounts that you've set up in Sugar; each account has a single Inbox. However, any e-mails that appear in the group or the My Email folders are e-mails that have been imported into Sugar. When a new e-mail message arrives, you have the option of either leaving it in the Inbox or importing it to Sugar.
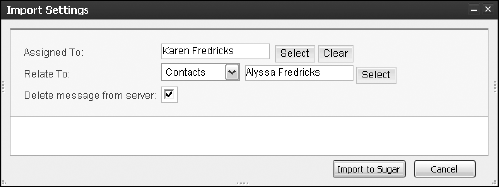
After you view an e-mail in the Sugar Inbox — and decide it's a keeper — follow these instructions to import it to your Sugar database:
Check for new e-mail by clicking the Check Mail button in the Emails module.
Any new messages that arrive on the scene will appear in your Sugar Inbox. Alternatively, you can review the earlier "Personalizing your e-mail" section and request that Sugar automatically check for e-mail at regular intervals.
Right-click the message you want to import to Sugar and choose Import to Sugar from the contextual menu.
The Import Settings window opens (see Figure 12-12).
(Optional) Assign the e-mail to another user.
By default, the e-mail is already assigned to you.
Choose a record type from the Relate To drop-down list.
You can associate an e-mail with virtually any type of Sugar record, including Contacts, Accounts, Opportunities, or Bugs.
Fill the name of the record that you want to link to the e-mail.
Alternatively, you can click the Select button and browse to the name.
(Optional) Select the Delete Message from Server check box if you also want to delete the message from the external e-mail server and the Inbox.
Click the Import to Sugar button.
The imported e-mail will now appear in the My Email folder. From there you can drag it to one of your subfolders if you want. It will also appear in the History subpanel on the related record's Detail view. Once you place an e-mail on the History subpanel, any other Sugar users with access to that record will also have privy to the e-mail message.
In the above section, you take an incoming e-mail message and quickly associate it with an existing record. That method works great if the record already exists in Sugar, but how about times when you receive e-mail from a perfect stranger? And, more importantly, you want to archive that message as well.
One of the nicest features about Sugar is that it is just so darn accommodating — and tries to fulfill your every wish. Here's how you can create a new record on the fly from an incoming e-mail:
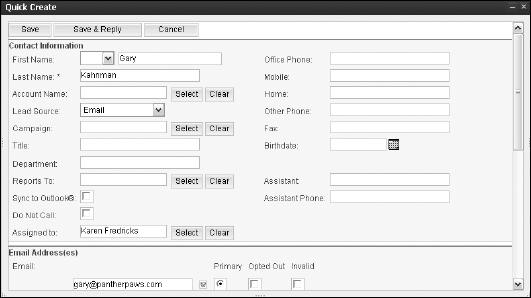
In the Emails module, open the e-mail you want to associate with a new record.
Click Quick Create and choose Bugs, Cases, Contacts, Leads, or Tasks from the drop-down menu.
The appropriate Quick Create form displays. Figure 12-13 shows you what the new Contact form looks like.
Fill in as much information as you can.
Sugar helps you a bit here by filling in the contact's name and e-mail address if the sender has included them in the header of the e-mail.
Click Save to save the new record.
Like magic, the e-mail message will attach to Sugar and appear in the My Email folder. Better yet, you'll have a new record in your database — the e-mail message is accessible from the History subpanel.
You may have discovered numerous features in Sugar that help it live up to its CRM moniker. And, hopefully, you realize that Sugar can automate many of your routine business processes. For many of you, the group folders feature will be the proverbial icing on the Sugar cake.
Group folders are those folders that the administrator sets up to help process e-mail accounts that might be accessed by a department rather than by a specific individual. For example, most companies have an info e-mail account that might receive hundreds of e-mails a day. Thankfully, Sugar can make mincemeat of that large load if you follow these steps:
Select a group folder from the Folders list on the Emails module Home page.
Any e-mails in the group folder display in the right panel.
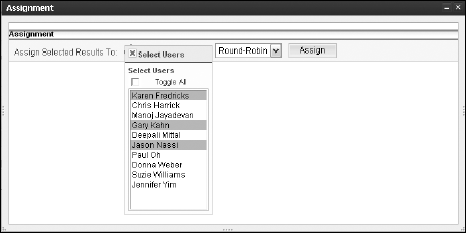
Select the message(s) you want to process, right-click the message(s), and choose Assign To from the contextual menu.
The cool thing here is that you can process more than one message at a time. Hold down the CTRL key and select as many messages as you need.
Click the Users icon in the Assignment window.
Figure 12-14 shows the Assignment window.
You can select a single person to assign the e-mail to, pick specific users, or assign it to everyone in the group.
Choose a rule from the Rules drop-down list.
You have a few choices here:
Direct Assign: Assigns the e-mail to the specific user you selected.
Round Robin: Distributes the e-mails evenly between the selected users.
Least Busy: Assigns the e-mails to the user who has the shortest list of assigned e-mails.
Click Assign.
Poof. The e-mail disappears from the group folder and magically reappears in the My Email folder of the assigned user(s). Talk about magic!
Some Sugar users find themselves needing to use Outlook for a variety of reasons. For instance, your company might use Outlook to maintain the company calendar. Fortunately, you can use both Outlook and SugarCRM if you install the Sugar plug-in for Microsoft Outlook.
Warning
The plug-in is included with both the Professional and Enterprise versions of Sugar. If you're using the Community Edition, you can subscribe to it on a yearly basis.
If you are using the Sugar plug-in for Microsoft Outlook, you can synchronize your Outlook e-mail, contacts, calendar, and tasks to Sugar directly from Outlook. Synchronized e-mails will land in the My Email folder, tasks and appointments will land in your calendar, and your contacts will transform into Sugar accounts or contacts. Additionally, you can attach your Outlook e-mail to various record types, such as Accounts, Opportunities, or Bugs.
After you install the Sugar plug-in for Microsoft Outlook, you notice a Sugar toolbar in Outlook, as shown in Figure 12-15.

The toolbar changes slightly when you wander into different areas of Sugar.
Note
After you install the Outlook plug-in, you can change various Sugar options by accessing Tools
The Sugar plug-in for Microsoft Outlook provides a quick way to attach an e-mail to a Sugar record. You can attach an e-mail to the following record types:
Accounts
Contacts
Leads
Bugs
Cases
Opportunities
Projects
Once attached, the e-mail appears in the History subpanel of that record where you can click the e-mail link to view the details of the e-mail.
Archiving outgoing e-mail
The Sugar plug-in for Microsoft Outlook allows you to send an e-mail and attach it to a Sugar record in pretty much the click of a button if you follow these steps:
Create a message in Outlook following your normal procedures.
Click the Send and Archive button in Outlook's message toolbar.
The Archiving Email window (see Figure 12-16) appears.
Fill in the information about the record you're searching for.
By default, the e-mail address you're sending the e-mail to will already appear.
Select the check box(es) for the record type(s) you're searching for and then click the Search button.
In the wink of an eye, Sugar finds the appropriate record(s).
(Optional) Click the Edit Email tab and change the information that will be attached to the Sugar record.
By default, your e-mail message will appear. However, you can add additional comments or remove extraneous information that you don't want to archive.
Click Archive and then click Close.
The contents of your e-mail message will be attached to the appropriate Sugar record and then sent to the intended recipient.

Archiving incoming e-mail
The Sugar plug-in for Microsoft Outlook really shines when it comes to attaching incoming e-mail from Outlook to Sugar. The three methods for attaching an incoming e-mail are
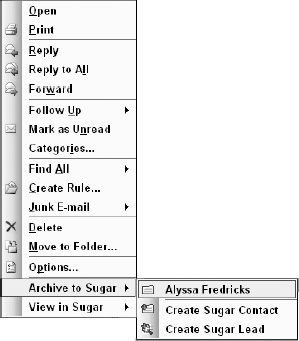
Right-click the incoming message from Outlook's Inbox and choose the Archive to Sugar option. As you can see in Figure 12-17, Sugar automatically identifies the sender and matches her to a record in your Sugar database. Click the sender's name, and the message is immediately attached to the record in Sugar.
Select the message from the Inbox and click the Archive to Sugar button on the Outlook toolbar. This option opens the Archiving Email window (refer to Figure 12-16). By following the instructions discussed in the previous section, "Archiving outgoing e-mail," you can edit the message if necessary prior to attaching it to Sugar.
Open the message and click the Archive to Sugar button conveniently located in the message toolbar. This also opens the Archiving Email window.
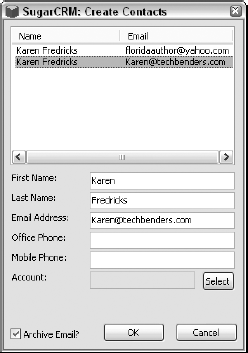
If Sugar can't find an appropriate matching record for an incoming message, you can create a new Sugar Contacts or Leads record by right-clicking the message and choosing one of those options. The Quick Create window (see Figure 12-18) appears, allowing you to fill in the basic record information. To speed the process even further, Sugar fills in as much information as it can garner from the header information of the incoming e-mail.
Tip
Need to attach several incoming messages from the same sender? Hold down the CTRL key, select the messages in your Inbox, right-click anywhere in the highlighted area, and select the record's name. The messages dispatch to Sugar immediately.
Tip
Not sure whether you've archived a message to Sugar? There are a number of ways to tell.
Right-click a message and choose Options; SugarCRM will display in the Categories field.
The message's flag changes to red.
You see the View in Sugar option when you right-click the message in Outlook. Click it, and you're transported to the Details view of the record where you can see the e-mail in the History subpanel.
The Sugar plug-in for Microsoft Outlook allows you to synchronize your Outlook contacts with your Sugar records. Changes made to contacts in either database are updated through the synchronization process.
Warning
Creating and maintaining two separate databases is very time-consuming — and can very easily lead to unnecessary duplication.
Marking existing Outlook contacts for synchronization
Here's how you can begin the synchronization process:
Navigate to the Contacts folder in Outlook and then select the contacts that you wish to synchronize to Sugar.
You can hold down the CTRL key and "cherry pick" the contacts or hold down the CTRL key and tap the letter A to select all contacts.
Tip
When you first install the plug-in, none of your Outlook contacts synchronize to Sugar until you mark them for synchronization. You can double-check that an Outlook contact will synchronize to Sugar by opening the contact in Outlook where you'll see SugarCRM in the category field. In Sugar, a check mark will appear in the Sync to Outlook field on the record's Detail view.
Tip
You can't synchronize Outlook contacts that you've marked as Private.
Click the Sync to Sugar button.
There is a moment of silence while Outlook checks your connection and sends your contacts to Sugar. If you look closely, a dialog box shows you the number of records being sent to Sugar.
Sugar matches your Outlook and Sugar contacts based on the contact's e-mail address, first name, and last name. If no matches are found, Sugar will create a new Contacts record on the Sugar side; you'll be listed as both the creator and the person assigned to the record. Sugar will also attach the Contacts record to the appropriate Accounts record in Sugar; if it doesn't find a match, a new Accounts record will be automatically created.
Warning
Only those Sugar Contacts records with the Sync to Outlook check box selected and Outlook contacts with SugarCRM showing in the category field will synchronize.
Working with new Outlook contacts
During the synchronization process, Sugar hunts through your database looking for Sugar records that match the information you've entered in Outlook. However, there is a little room for error. What happens if you forgot to mark an Outlook contact for synchronization? Comparatively, what if company names of two Outlook contacts are not an exact match and you end up with two separate — but equal — Accounts records in Sugar?
To avoid these unnecessary — and bothersome — problems, the Sugar plug-in for Microsoft Outlook installs a toolbar directly on the contact record's page in Outlook that allows you to do two things:
Save and Mark for Sugar Synch: This saves you the trouble of having to go back and mark a new Outlook contact for Sugar synchronization.
Set Company to Sugar Account: Here's where you can associate the contact with an existing Sugar Accounts record now to avoid duplication later.
Attaching Outlook calendar items and tasks to Sugar uses pretty much the same methodology you use when attaching an Outlook contact to Sugar. You have the option of marking existing appointments or tasks to Sugar from an Outlook list showing those items, or you can opt to mark a new appointment or task during the creation process.
Tip
Because Outlook doesn't make a distinction between calls and meetings, the calls and meetings that you create in Sugar appear as appointments in Outlook.
To synchronize your existing Outlook appointments and tasks to Sugar:
In Outlook, select the appointments or tasks that you want to synchronize to Sugar and then click the Mark to Sync button in the Outlook toolbar.
You can do this from just about any Sugar view. For example, hold down your CTRL key while selecting various appointments from Outlook's monthly calendar.
Click Sync to Sugar in the Outlook toolbar.
A dialog box keeps you posted on how many activities or tasks are synching to Sugar.
To synchronize new appointments and tasks to Sugar, simply click the Save and Mark for Sugar Sync button that appears at the top of the scheduling window in Outlook. The next time you click the Sync to Sugar button, any of the changes you've made to those activities in either Outlook or Sugar will update in both programs.