We know the information required for each of the shapes to achieve our goals. Now, we have to design the classes to include the necessary properties that provide the required data to each instance. We have to make sure that each class has the necessary variables that encapsulate all the data required by the objects to perform all the tasks based on our application domain.
Let's start with the RegularHexagon class. It is necessary to know the length of a side for each instance of this class, that is, for each regular hexagon object. Thus, we need an encapsulated variable that allows each instance of the RegularHexagon class to specify the value for the length of a side.
Tip
The variables defined in a class to encapsulate the data for each instance of the class in Swift are known as properties. Each instance has its own independent value for the properties defined in the class. The properties allow us to define the characteristics for an instance of the class. In other programming languages, the variables defined in a class are known as either attributes or fields.
The RegularHexagon class defines a floating point property named lengthOfSide, whose initial value is equal to 0 for any new instance of the class. After we create an instance of the RegularHexagon class, it is possible to change the value of the lengthOfSide attribute.
Note the usage of Camel case, which is using a lowercase first letter, for class property names. The first letter is lowercase, and then, the first letter for each word that composes the name is capitalized, while the other letters are in lowercase. It is a coding convention in Swift for both variables and properties. For example, we use the lengthOfSide name for the property that stores the value of the length of a side.
Imagine that we create two instances of the RegularHexagon class. One of the instances is named regularHexagon1 and the other, regularHexagon2. The instance names allow us to access the encapsulated data for each object, and therefore, we can use them to change the values of the exposed properties.
Swift uses a dot (.) to allow us to access the properties of instances. So, regularHexagon1.lengthOfSide provides access to the length of side of the RegularHexagon instance named regularHexagon1, and regularHexagon2.lengthOfSide does the same for the RegularHexagon instance named regularHexagon2.
We can assign 20 to regularHexagon1.lengthOfSide and 50 to regularHexagon2.lengthOfSide. This way, each RegularHexagon instance will have a different value for the lengthOfSide attribute.
Now, let's move to the Ellipse class. We can define two floating point attributes for this class: semiMajorAxis and semiMinorAxis. Their initial values will also be 0. Then, we can create three instances of the Ellipse class named ellipse1, ellipse2, and ellipse3.
We can assign the values summarized in the following table to the three instances of the Ellipse class:
|
Instance name |
|
|
|
|
|
|
|
|
|
|
|
|
|
|
This way, ellipse1.semiMinorAxis will be equal to 210, while ellipse3.semiMinorAxis will be equal to 180. The ellipse1 instance represents an ellipse with semiMinorAxis of 210 and semiMajorAxis of 400.
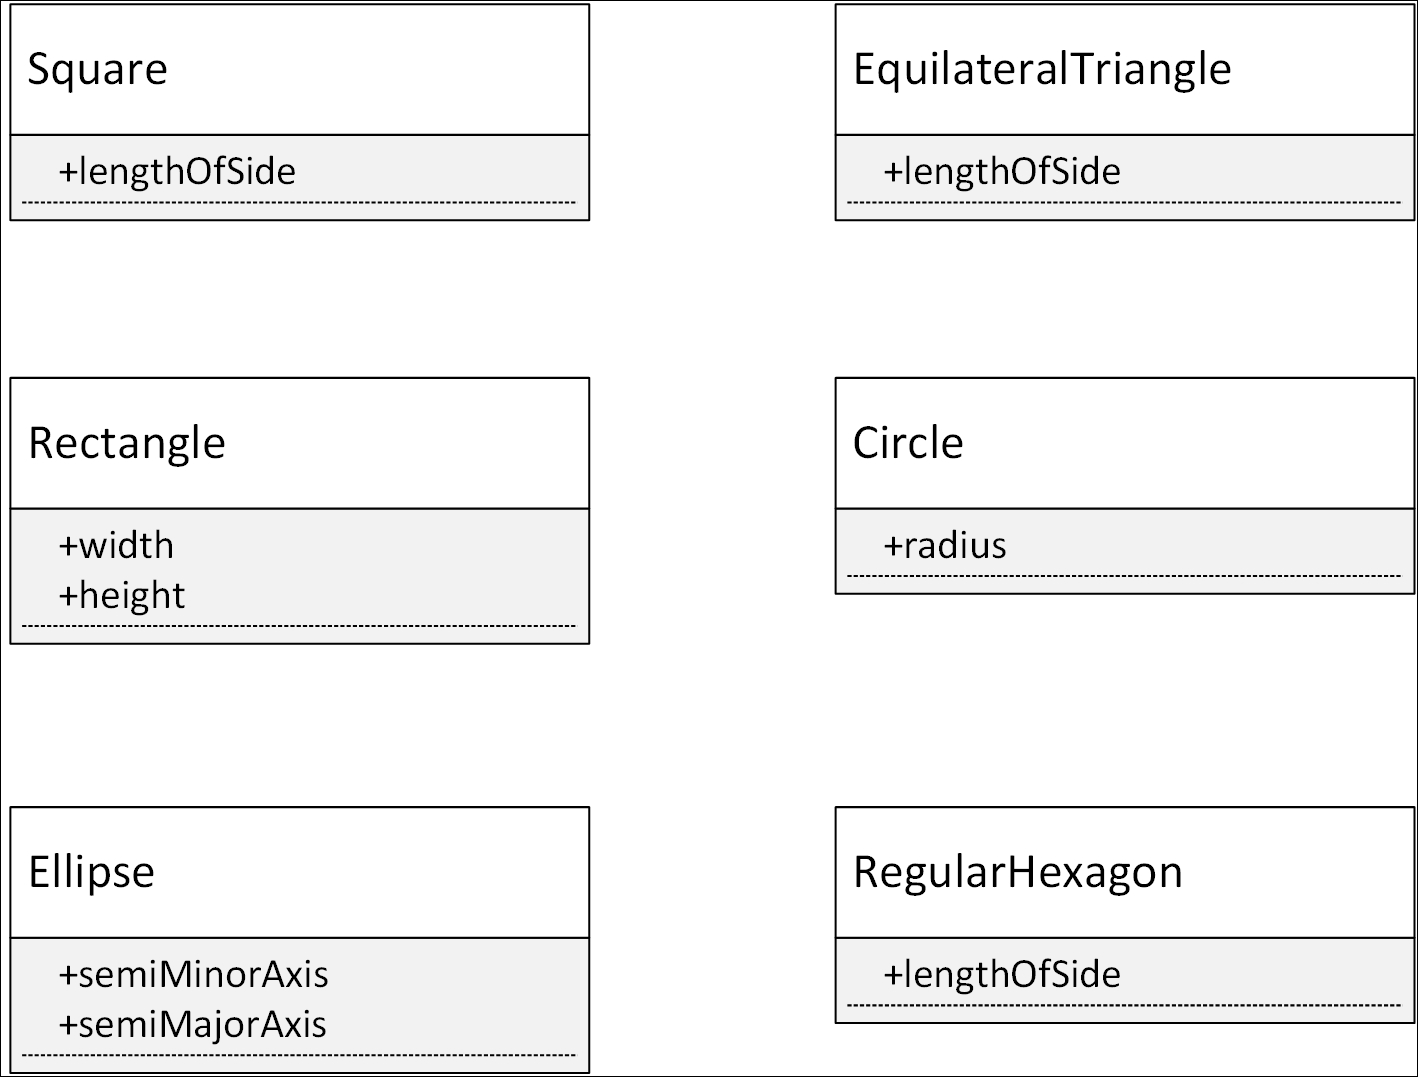
The following table summarizes the floating point properties defined for each of the six classes that we need for our application:
|
Class name |
Properties list |
|
|
|
|
|
|
|
|
|
|
|
|
|
|
|
|
|
|
Note that three of these classes have the same property: lengthOfSide-specifically, the Square, EquilateralTriangle, and RegularHexagon classes. We will dive deep into what these three classes have in common later and take advantage of object-oriented features to reuse code and simplify our application's maintenance. However, we are just starting our journey, and we will make improvements as we cover additional object-oriented features included in Swift.
The following figure shows a Unified Modeling Language (UML) class diagram with the six classes and their properties. This diagram is very easy to understand. The class name appears on the top of the rectangle that identifies each class. A rectangle below the same shape that holds the class name displays all the property names exposed by the class with a plus sign (+) as a prefix. This prefix indicates that what follows it is an attribute name in UML and a property name in Swift: