
In this chapter, we will refactor existing code that doesn't use an object-oriented programming approach and make it easier to understand, expand, and maintain. We will discuss functional programming and how Swift implements many functional programming concepts. We will work with many examples of how to mix functional programming with object-oriented programming.
Sometimes, we are extremely lucky and have the possibility to follow best practices as we kick off a project. If we start writing object-oriented code from scratch, we can take advantage of all the features that we used in our examples throughout this book. As the requirements evolve, we might need to further generalize or specialize the blueprints. However, as we started our project with an object-oriented approach and by organizing our code, it is easier to make adjustments to the code.
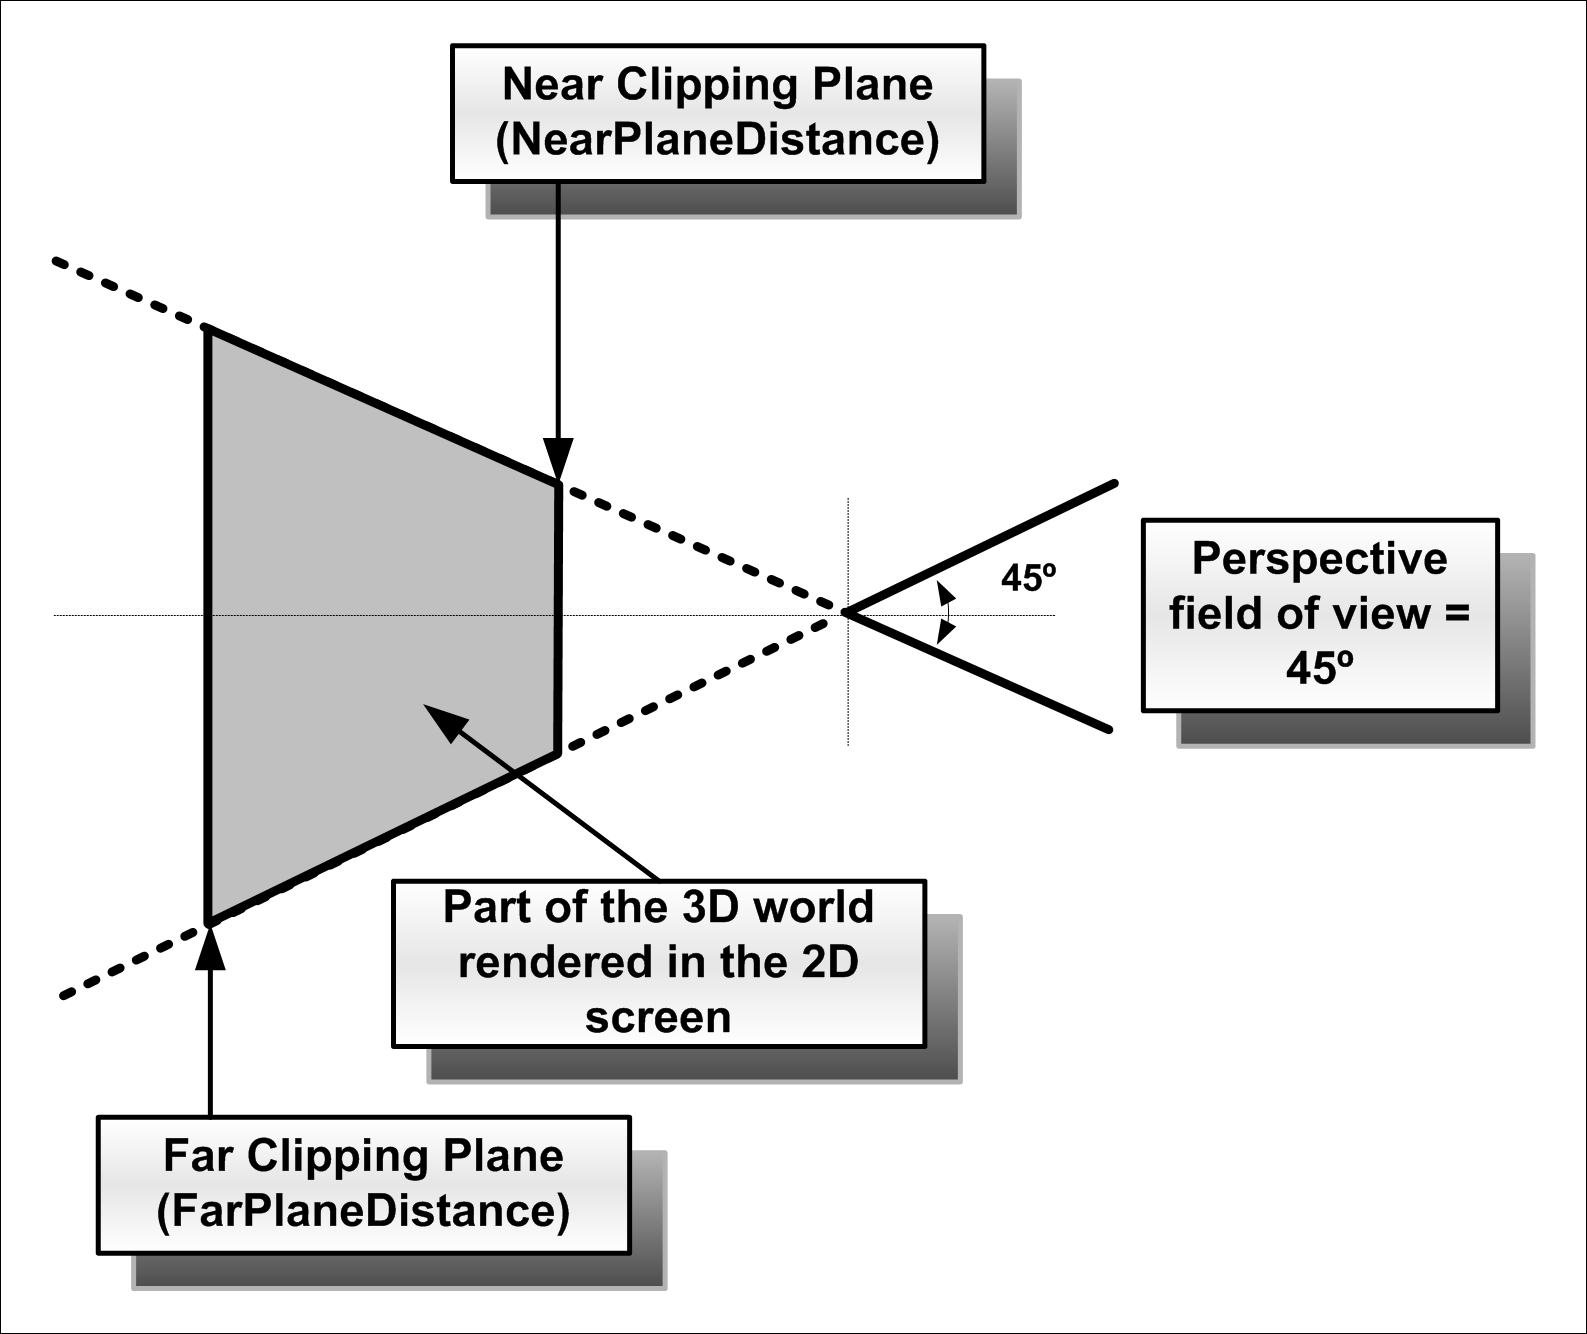
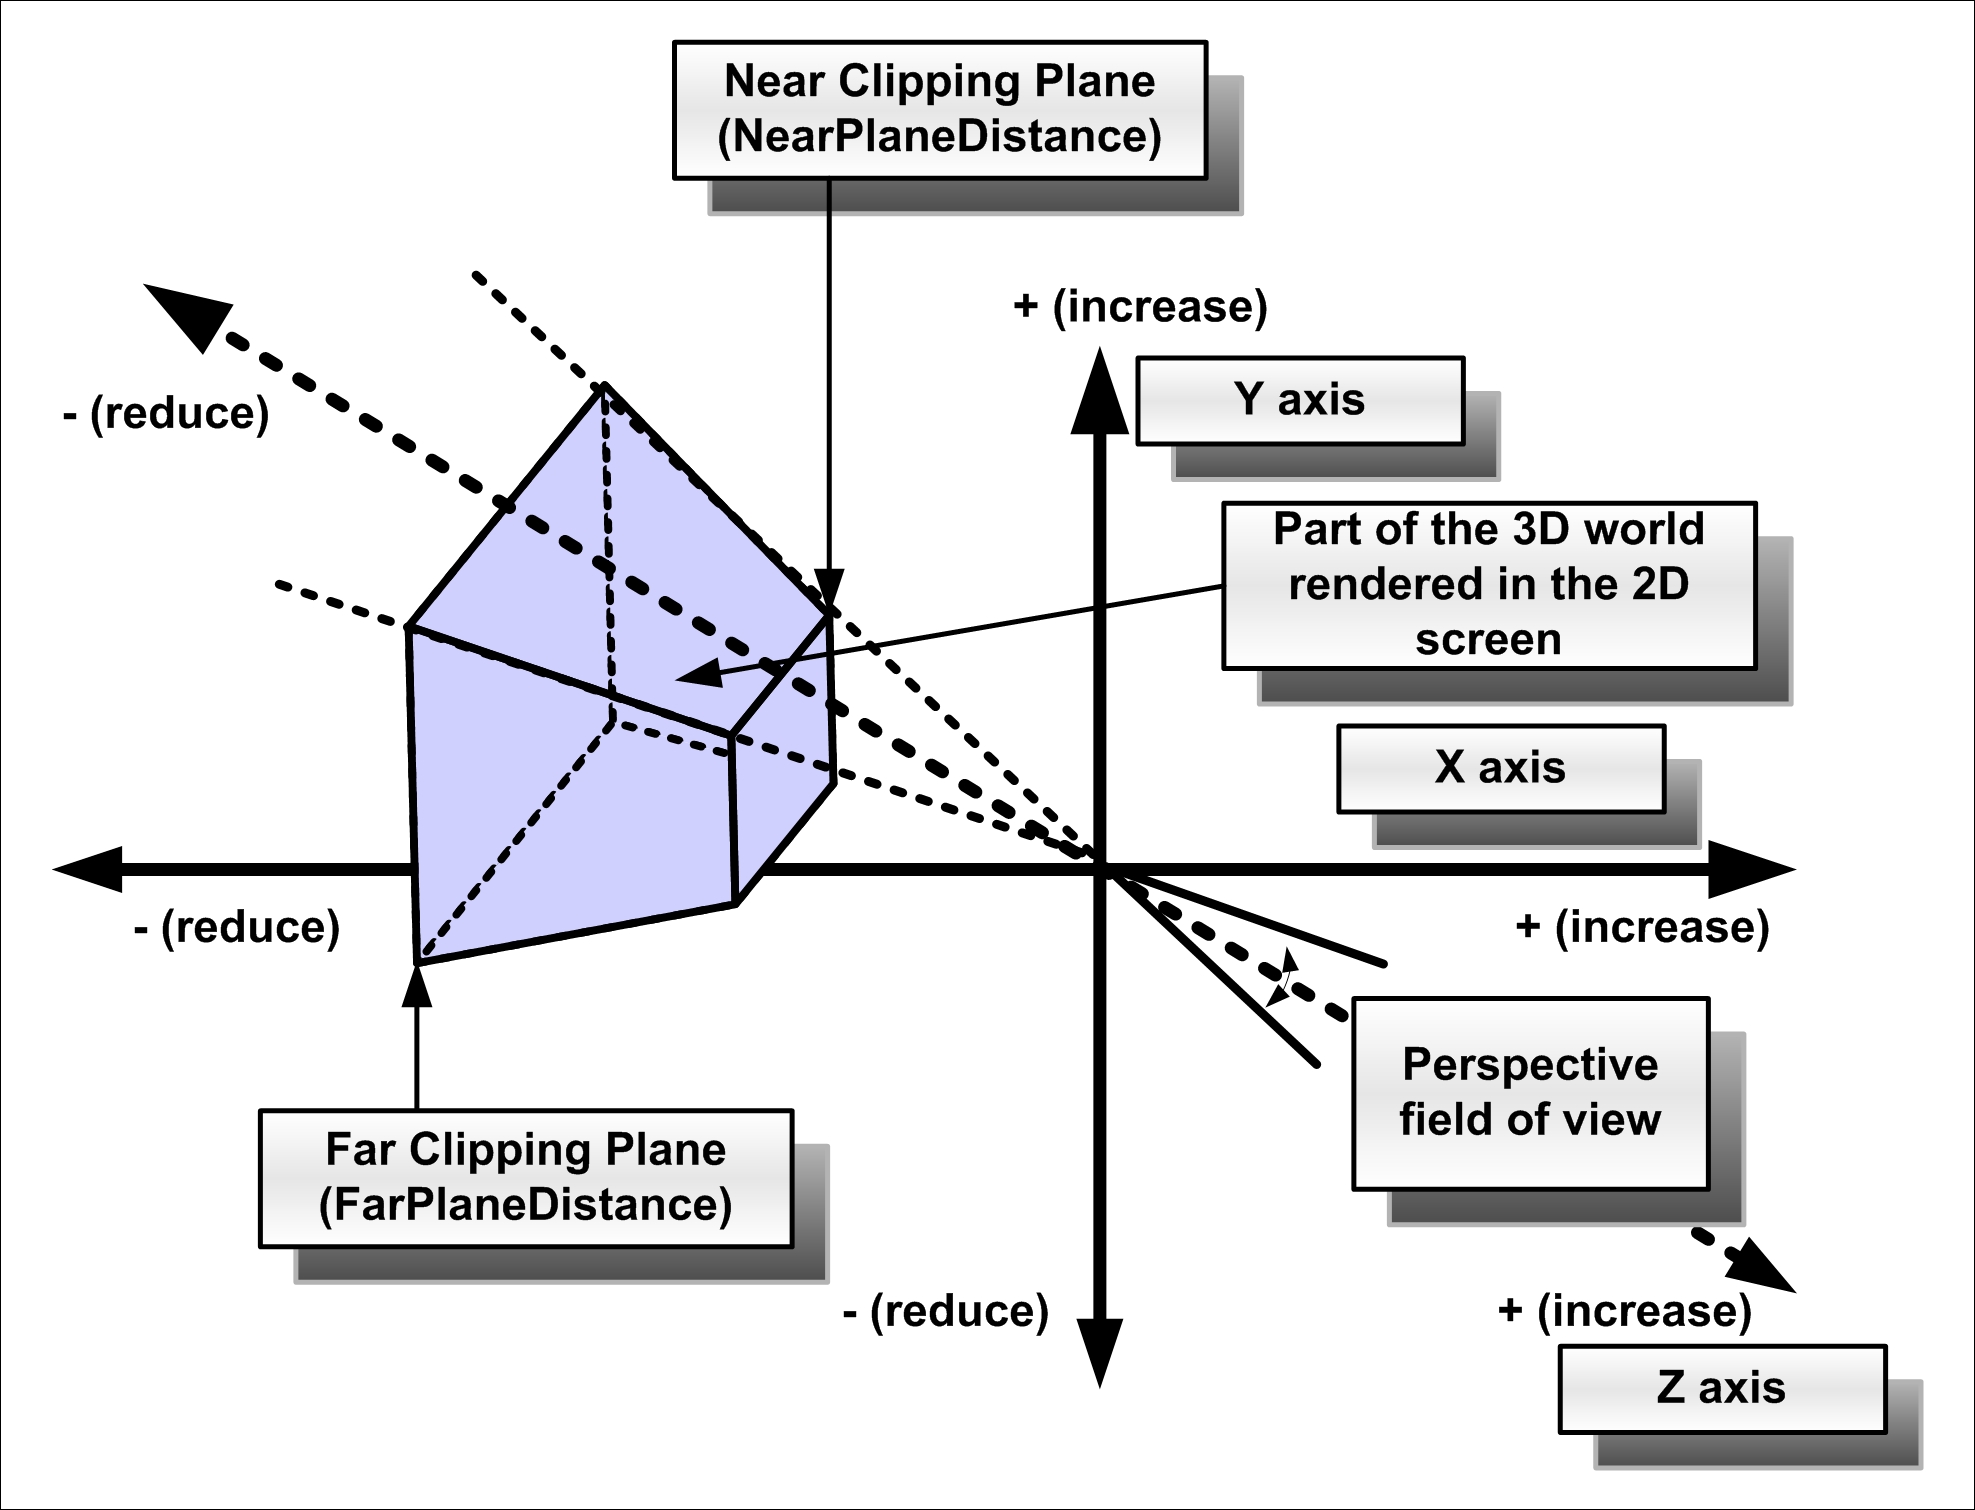
Most of the time, we aren't extremely lucky and have to work on projects that don't follow best practices, and we, in the name of agility, generate pieces of code that perform similar tasks, but without decent organization. Instead of following the same bad practices that generate error-prone, repetitive, and difficult-to-maintain code, we can use the features provided by Xcode and additional helper tools to refactor existing code and generate object-oriented code that promotes code reuse and allows us to reduce maintenance headaches. For example, imagine that we have to develop a universal app that allows us to work with 3D models and render them on the device screen. The requirements specify that the first 3D models that we will have to render are two: a sphere and a cube. The application must allow us to change the parameters of a perspective camera, which allows us to see a specific part of the 3D world rendered on the 2D screen (refer to Figure 1 and Figure 2):
- The X, Y, and Z positions
- The X, Y, and Z directions
- The X, Y, and Z up vectors
In addition, the application must allow us to change the values for the following parameters:
- The perspective field of view in degrees: This value determines the angle for the perspective camera's lens. A low value for this angle narrows the view. Thus, the models will appear larger in the lens with a perspective field of view of 45 degrees. A high value for this angle widens the view, so the models appear smaller in the visible part of the 3D world.
- The near clipping plane: The 3D region, which is visible on the 2D screen, is formed by a clipped pyramid called a frustum. This value controls the position of the plane that slices the top of the pyramid and determines the nearest part of the 3D world that the camera will render on the 2D screen. As the value is expressed taking into account the Z axis, it is a good idea to add code to check whether we are entering a valid value for this parameter.
- The far clipping plane: This value controls the position of the plane that slices the back of the pyramid and determines the more distant part of the 3D world that the camera will render on the 2D screen. The value is also expressed taking into account the Z axis; therefore, it is a good idea to add code to check whether we are entering a valid value for this parameter.
In addition, we can change the color of a directional light, that is, one that casts light in a specific direction, similar to sunlight.
Imagine that other developers started working on the project and generated a single Swift file with a class wrapper that declares many type methods that render a cube and a sphere. These functions receive all the necessary parameters to render each 3D figure---including the X, Y, and Z positions---determine the 3D figure's size, and configure the camera and directional light:
The following lines show an example of the declaration of a SphereAndCube class with two type methods: renderSphere and renderCube. As we might guess from the type method names, the first one renders a sphere, and the second one renders a cube. Take into account that the sample code doesn't follow best practices and we will refactor it. The code file for the sample is included in the swift_3_oop_chapter_07_01 folder:
    open class SphereAndCube {
      open static func renderSphere(
        x: Int, y: Int, z: Int, radius: Int,
        cameraX: Int, cameraY: Int, cameraZ: Int,
        cameraDirectionX: Int, cameraDirectionY: Int,
        cameraDirectionZ: Int,
        cameraVectorX: Int, cameraVectorY: Int, cameraVectorZ: Int,
        cameraPerspectiveFieldOfView: Int,
        cameraNearClippingPlane: Int,
        cameraFarClippingPlane: Int,
        directionalLightX: Int, directionalLightY: Int,
        directionalLightZ: Int,
        directionalLightColor: Int)
      {
        print("Creating camera at X:(cameraX), Y:(cameraY),
        Z:(cameraZ)")
        print("Setting camera direction to X:(cameraDirectionX),
        Y:(cameraDirectionY), Z:(cameraDirectionZ)")
        print("Setting camera vector to X:(cameraVectorX),
        Y:(cameraVectorY), Z:(cameraVectorZ)")
        print("Setting camera perspective field of view to:
        (cameraPerspectiveFieldOfView)")
        print("Setting camera near clipping plane to:
        (cameraNearClippingPlane)")
        print("Setting camera far clipping plane to:
        (cameraFarClippingPlane)")
        print("Creating directional light at X:(directionalLightX),
        Y:(directionalLightY), Z:(directionalLightZ). Light color is
        (directionalLightColor)")
        print("Drawing sphere at X:(x), Y:(y), Z:(z)")
      }

      open static func renderCube(
        x: Int, y: Int, z: Int, edgeLength: Int,
        cameraX: Int, cameraY: Int, cameraZ: Int,
        cameraDirectionX: Int, cameraDirectionY: Int,
        cameraDirectionZ: Int,
        cameraVectorX: Int, cameraVectorY: Int, cameraVectorZ: Int,
        cameraPerspectiveFieldOfView: Int,
        cameraNearClippingPlane: Int,
        cameraFarClippingPlane: Int,
        directionalLightX: Int, directionalLightY: Int,
        directionalLightZ: Int,
        directionalLightColor: Int)
      {
        print("Creating camera at X:(cameraX), Y:(cameraY),
        Z:(cameraZ)")
        print("Setting camera direction to X:(cameraDirectionX),
        Y:(cameraDirectionY), Z:(cameraDirectionZ)")
        print("Setting camera vector to X:(cameraVectorX),
        Y:(cameraVectorY), Z:(cameraVectorZ)")
        print("Setting camera perspective field of view to:
        (cameraPerspectiveFieldOfView)")
        print("Setting camera near clipping plane to:
        (cameraNearClippingPlane)")
        print("Setting camera far clipping plane to:
        (cameraFarClippingPlane)")

        print("Creating directional light at X:(directionalLightX),
        Y:(directionalLightY), Z:(directionalLightZ).
        Light color is (directionalLightColor)")
        print("Drawing cube at X:(x), Y:(y), Z:(z)")
      }
    }
Each type method requires a huge number of parameters. Let's imagine that we have the requirement to add code to render additional shapes and add different types of cameras and lights. The code can easily become a really big mess, repetitive, and difficult to maintain. In fact, the code is already difficult to maintain.
In Chapter 3, Encapsulation of Data with Properties, we worked with both mutable and immutable versions of a class that represented a 3D vector. Then, we learned to overload operators and take advantage of generics. We created an improved version of both the mutable and immutable versions of the 3D vector in Chapter 6, Maximization of Code Reuse with Generic Code.
The first change we can make is to work with MutableVector3D<Int> instead of working with separate x, y, and z values. However, we won't use the same code we created in the previous chapter because we want a different behavior. We will create a new version of the NumericForVector protocol that will allow us to specify all the requirements that any numeric type must implement in order to use it as the generic type parameter for the new MutableVector3D class. In this case, we will just include a parameterless initializer. However, we will need to add many operators as we expand the ImmutableVector3D class. Therefore, in this case, we will just include the protocol to have our code ready for future requirements.
The following lines show the code that declares the new NumericForVector protocol. The code file for the sample is included in the swift_3_oop_chapter_07_02 folder:
    public protocol NumericForVector {
      init()
    }
Now, we have to extend the existing Int type that we want to use for our ImmutableVector3D<T> class to make it conform to the recently created NumericForVector protocol. The code file for the sample is included in the swift_3_oop_chapter_07_02 folder:
extension Int: NumericForVector { }
The following lines show the code for the new ImmutableVector3D<T> class. The code file for the sample is included in the swift_3_oop_chapter_07_02 folder:
    open class MutableVector3D<T: NumericForVector> {
      open var x: T
      open var y: T
      open var z: T

      init(x: T, y: T, z: T) {
        self.x = x
        self.y = y
        self.z = z
      }

      public var representation: String {
        get {
          return String("X: (self.x), Y: (self.y), Z: (self.z)")
        }
      }

      open class func makeEqualElements(initialValue: T) ->
      MutableVector3D<T> {
        return MutableVector3D<T>(x: initialValue, y: initialValue,
        z: initialValue)
      }

      open class func makeOrigin() -> MutableVector3D<T> {
        let zero = T()
        return makeEqualElements(initialValue: zero)
      }
    }
The code doesn't overload operators because we want to keep our focus on the refactoring process. The class declares a representation read-only computed property of the String type that returns a string with the values for the x, y, and z constants. The SphereAndCube.renderSphere and SphereAndCube.renderCube type methods print the values for the x, y, and z coordinates of many elements that compose the scene. We will generalize the generation of the string representation that will allow us to print the values.
We will create a simple protocol named SceneElementProtocol to specify the requirements for scene elements, as follows. The code file for the sample is included in the swift_3_oop_chapter_07_02 folder:
    public protocol SceneElementProtocol {
      var location: MutableVector3D<Int> { get set }
    }
The following lines declare the SceneElement class that conforms to the previously defined SceneElementProtocol protocol. The class represents a 3D element that is part of a scene and has a location specified with MutableVector3D<Int>. It is the base class for all the scene elements that require a location in the 3D space. The code file for the sample is included in the swift_3_oop_chapter_07_02 folder:
    open class SceneElement: SceneElementProtocol {
      open var location: MutableVector3D<Int>

      init(location: MutableVector3D<Int>) {
        self.location = location
      }
    }
The following lines declare another abstract class named Light, which is a subclass of the previously defined SceneElement class. The class represents a 3D light, and it is the base class for all the lights that might be included in a scene. In this case, the class declaration is empty, and we only declare it because we know that there will be many types of lights, and we want to be able to generalize the common requirements for all types of lights in the future. We are preparing the code for further enhancements. The code file for the sample is included in the swift_3_oop_chapter_07_02 folder:
    open class Light: SceneElement {
    }
The following lines declare a subclass of Light named DirectionalLight. The class represents a directional light and adds a color stored property. In this case, we don't add validations for the property setters just to make the example simple. However, we already know how to do it. The code file for the sample is included in the swift_3_oop_chapter_07_02 folder:
    open class DirectionalLight: Light
    {
      open var color: Int

      init(location: MutableVector3D<Int>, color: Int) {
        self.color = color
        super.init(location: location)
      }
    }
The following lines declare a class named Camera, which inherits from SceneElement. The class represents a 3D camera. It is the base class for all cameras. In this case, the class declaration is empty, and we only declare it because we know that there will be many types of cameras. Also, we want to be able to generalize the common requirements for all types of cameras in the future as we did for the lights. The code file for the sample is included in the swift_3_oop_chapter_07_02 folder:
    open class Camera: SceneElement {
    }
The following lines declare a subclass of Camera named PerspectiveCamera. The class represents a perspective camera and adds the following ImmutableVector3D<Int> stored properties: direction and vector. In addition, the class adds the following three stored properties: fieldOfView, nearClippingPlane, and farClippingPlane. The code file for the sample is included in the swift_3_oop_chapter_07_02 folder:
    open class PerspectiveCamera: Camera {
      open var direction: MutableVector3D<Int>
      open var vector: MutableVector3D<Int>
      open var fieldOfView: Int
      open var nearClippingPlane: Int
      open var farClippingPlane: Int

      init(location: MutableVector3D<Int>,
      direction: MutableVector3D<Int>, vector: MutableVector3D<Int>,
      fieldOfView: Int, nearClippingPlane: Int, farClippingPlane: Int)
      {
        self.direction = direction
        self.vector = vector
        self.fieldOfView = fieldOfView
        self.nearClippingPlane = nearClippingPlane
        self.farClippingPlane = farClippingPlane
        super.init(location: location)
      }
    }
The following lines declare a class named Shape, which inherits from SceneElement. The class represents a 3D shape, and it is the base class for all 3D shapes. The class defines a render method that receives a Camera instance and an array of Light instances. Each subclass that implements a specific shape will be able to override the empty render method to render a specific shape. The code file for the sample is included in the swift_3_oop_chapter_07_02 folder:
    open class Shape: SceneElement
    {
      open func render(camera: Camera, lights: [Light]) {
      }
    }
The following lines declare a Sphere class, a subclass of Shape that adds a radius property and overrides the render method defined in its superclass to render a sphere. The code file for the sample is included in the swift_3_oop_chapter_07_02 folder:
    open class Sphere: Shape {
      open var radius: Int

      init(location: MutableVector3D<Int>, radius: Int) {
        self.radius = radius
        super.init(location: location)
      }

      open override func render(camera: Camera, lights: [Light]) {
        print("Drawing sphere at (location.representation)")
      }
    }
The following lines declare a Cube class, a subclass of Shape that adds an edgeLength property and overrides the render method defined in its superclass to render a cube. The code file for the sample is included in the swift_3_oop_chapter_07_02 folder:
    open class Cube: Shape {
      open var edgeLength: Int

      init(location: MutableVector3D<Int>, edgeLength: Int) {
        self.edgeLength = edgeLength
        super.init(location: location)
      }

      open override func render(camera: Camera, lights: [Light]) {
        print("Drawing cube at (location.representation)")
      }
    }
Finally, the following lines declare the Scene class, which represents the scene to be rendered. The class defines an activeCamera private stored property that holds a Camera instance. The lights private stored property is an array of Light instances, and the shapes private stored property is an array of the Shape instances that compose the scene. The add method that has a light parameter adds a Light instance to the lights array. The add method that has a shape parameter adds a Shape instance to the shapes array. Finally, the render method prints some details about the scene that is set up, based on the types of camera and lights. Then, this method calls the render method for each of the Shape instances included in the shapes array and passes the activeCamera and lights arrays as arguments. The code file for the sample is included in the swift_3_oop_chapter_07_02 folder:
    open class Scene {
      private var lights = [Light]()
      private var shapes = [Shape]()
      private var activeCamera: Camera

        init(initialCamera: Camera) {
          activeCamera = initialCamera
        }

        open func add(light: Light) {
          lights.append(light)
        }

        open func add(shape: Shape) {
          shapes.append(shape)
        }

        open func render() {
          print("Creating camera at
          (activeCamera.location.representation)")
          if let perspectiveCamera = activeCamera as? PerspectiveCamera
          {
            print("Setting camera direction to
            (perspectiveCamera.direction.representation)")
            print("Setting camera vector to
            (perspectiveCamera.vector.representation)")
            print("Setting camera perspective field of view to:
            (perspectiveCamera.fieldOfView)")
            print("Setting camera near clipping plane to:
            (perspectiveCamera.nearClippingPlane)")
            print("Setting camera far clipping plane to:
            (perspectiveCamera.farClippingPlane)")
          }

          for light in lights {
            if let directionalLight = light as? DirectionalLight {
            print("Creating directional light at
            (directionalLight.location.representation). Light color is
            (directionalLight.color)")
          } else {
            print("Creating light at (light.location.representation)")
          }
        }

        for shape in shapes {
          shape.render(camera: activeCamera, lights: lights)
        }
      }
    }
After we create the previously shown classes, we can enter the following code in the Playground. The code file for the sample is included in the swift_3_oop_chapter_07_02 folder:
    var camera = PerspectiveCamera(location:
      MutableVector3D<Int>.makeEqualElements(initialValue: 30),
      direction: MutableVector3D<Int>(x: 50, y: 0, z: 0),
      vector: MutableVector3D<Int>(x: 4, y: 5, z: 2),
      fieldOfView: 90,
      nearClippingPlane: 20,
      farClippingPlane: 40
    )
    var sphere = Sphere(location: MutableVector3D<Int>
    (x: 20, y: 20, z: 20), radius: 8)
    var cube = Cube(location:
      MutableVector3D<Int>.makeEqualElements(initialValue: 10),
      edgeLength: 5
    )
    var light = DirectionalLight(location: MutableVector3D<Int>
    (x: 2, y: 2, z: 5), color: 235)

    var scene = Scene(initialCamera: camera)
    scene.add(shape: sphere)
    scene.add(shape: cube)
    scene.add(light: light)

    scene.render()
The code is very easy to understand and read. We create a PerspectiveCamera instance with the necessary parameters and then create two shapes: Sphere and Cube. Then, we create a DirectionalLight with all the necessary parameters and Scene with the previously created PerspectiveCamera as the initial camera.
Then, we add the shapes and the light to the scene and call the render method to render the scene. The following lines show the generated output:
    Creating camera at X: 30, Y: 30, Z: 30
    Setting camera direction to X: 50, Y: 0, Z: 0
    Setting camera vector to X: 4, Y: 5, Z: 2
    Setting camera perspective field of view to: 90
    Setting camera near clipping plane to: 20
    Setting camera far clipping plane to: 40
    Creating directional light at X: 2, Y: 2, Z: 5.
    Light color is 235Drawing sphere at X: 20, Y: 20, Z: 20
    Drawing cube at X: 10, Y: 10, Z: 10
Now, let's compare the previous code with the following lines that call the SphereAndCube.renderSphere and SphereAndCube.renderCube methods with more than a dozen parameters. The code file for the sample is included in the swift_3_oop_chapter_07_03 folder:
    SphereAndCube.renderCube(x: 10, y: 20, z: 30,
      edgeLength: 50, cameraX: 25, cameraY: 25, cameraZ: 70,
      cameraDirectionX: 30, cameraDirectionY: 20, cameraDirectionZ: 35,
      cameraVectorX: 11, cameraVectorY: 15, cameraVectorZ: 25,
      cameraPerspectiveFieldOfView: 140, cameraNearClippingPlane: 150,
      cameraFarClippingPlane: 160, directionalLightX: 30,
      directionalLightY: 30, directionalLightZ: 25,
      directionalLightColor: 156
    )

    SphereAndCube.renderSphere(x: 10, y: 15, z: 25, radius: 32,
      cameraX: 25, cameraY: 35, cameraZ: 10, cameraDirectionX: 30,
      cameraDirectionY: 35, cameraDirectionZ: 10, cameraVectorX: 62,
      cameraVectorY: 5, cameraVectorZ: 2,
      cameraPerspectiveFieldOfView: 7, cameraNearClippingPlane: 20,
      cameraFarClippingPlane: 30, directionalLightX: 5,
      directionalLightY: 4, directionalLightZ: 7,
      directionalLightColor: 232
    )
The following screenshot shows the object-oriented version and the call to the two type methods. The object-oriented version is definitely easier to read and understand. In addition, there is a lot less code duplication:
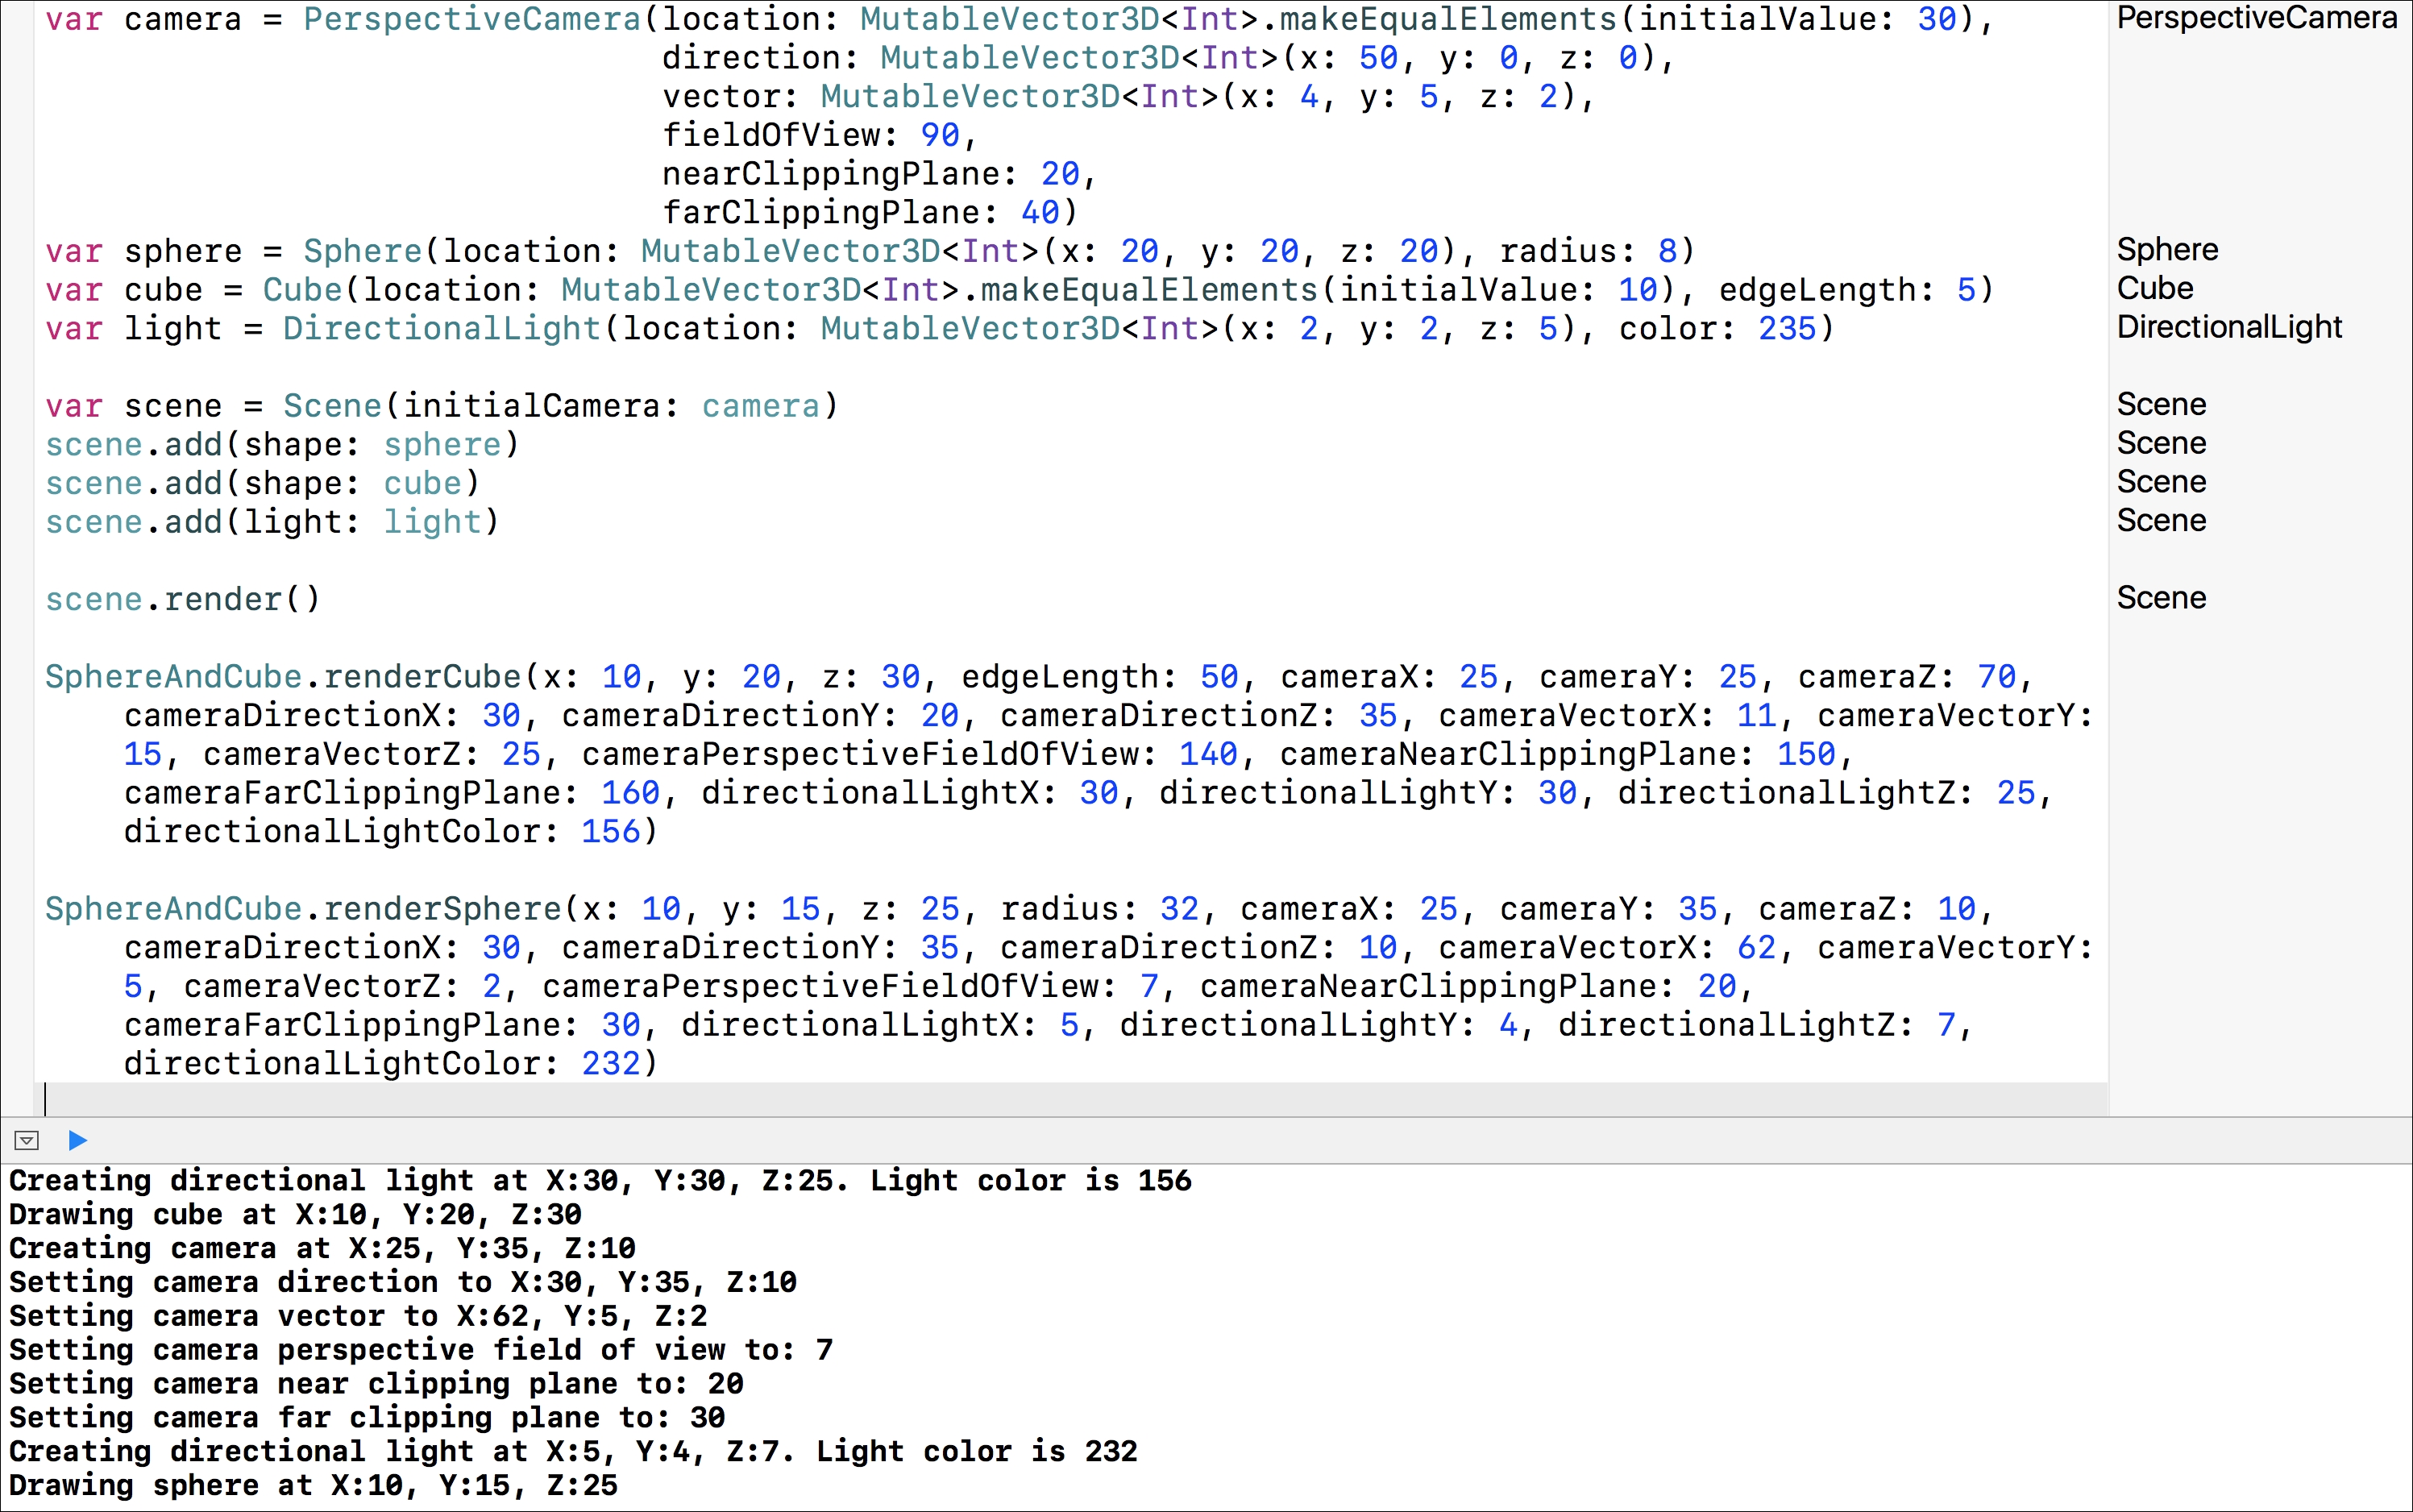
The object-oriented version requires a higher amount of code. However, it is easier to understand and expand based on future requirements. In addition, the object-oriented version reuses many pieces of code. If you need to add a new type of light, shape, or camera, you know where to add the pieces of code, which classes to create, and which methods to change.