
TIP
Import Photos from a Digital Camera
You can import photos from a digital camera and save them on your Mac. If you have the iLife suite installed on your Mac, you can use the iPhoto application to handle importing photos. iPhoto is also available via the App Store. iPhoto enables you to add a name and a description to each import, which helps you to find your photos after the import is complete.
To perform the import, you need a cable to connect your digital camera to your Mac. Most digital cameras come with a USB cable.
Import Photos from a Digital Camera
Import Photos from a Digital Camera
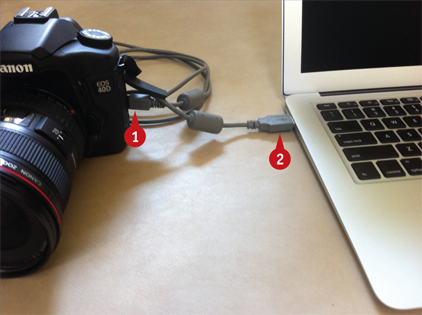
![]() Connect one end of the cable to the digital camera.
Connect one end of the cable to the digital camera.
![]() Connect the other end of the cable to a free USB port on your Mac.
Connect the other end of the cable to a free USB port on your Mac.
![]() Turn the camera on and put it in either playback or computer mode.
Turn the camera on and put it in either playback or computer mode.
Your Mac launches the iPhoto application.
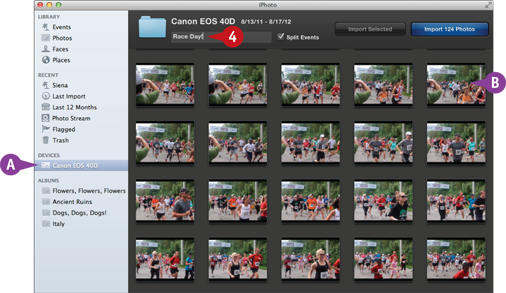
A Your digital camera appears in the Devices section.
B iPhoto displays previews of the camera’s photos.
![]() Use the Event Name text box to type a name for the group of photos you are going to import.
Use the Event Name text box to type a name for the group of photos you are going to import.
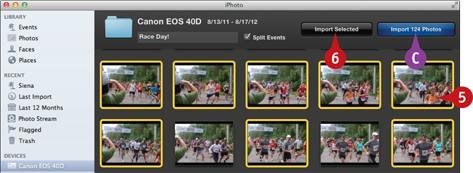
![]() Select the photos that you want to import.
Select the photos that you want to import.
Note: To select photos, either click and drag the mouse (![]() ) around the photos you want, or press and hold
) around the photos you want, or press and hold ![]() and click each photo.
and click each photo.
![]() Click Import Selected.
Click Import Selected.
C If you want to import all the photos from the digital camera, click Import X Photos, where X is the number of photos stored in the camera.
iPhoto imports the photos from the digital camera.
iPhoto asks if you want to delete the original photos from the digital camera.
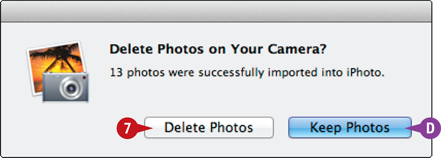
![]() If you no longer need the photos on the camera, click Delete Photos.
If you no longer need the photos on the camera, click Delete Photos.
D If you prefer to keep the photos on the camera, click Keep Photos instead.
View the Imported Photos
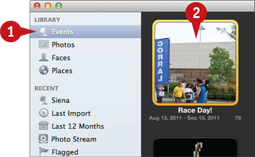
![]() Click Events.
Click Events.
![]() Double-click the event name that you specified in step 4.
Double-click the event name that you specified in step 4.
When I connect my digital camera, why do I see Image Capture instead of iPhoto?
You need to configure Image Capture to open iPhoto when you connect your camera. Follow these steps:
![]() Connect your digital camera to your Mac.
Connect your digital camera to your Mac.
The Image Capture application opens.
Note: If you do not see the Image Capture application, click Finder (![]() ) in the Dock, click Applications, and then double-click Image Capture.
) in the Dock, click Applications, and then double-click Image Capture.
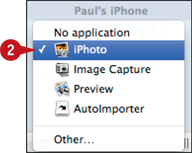
![]() Click the Connecting
Click the Connecting ![]() and then click iPhoto.
and then click iPhoto.
![]() Click Image Capture in the menu bar.
Click Image Capture in the menu bar.
![]() Click Quit Image Capture.
Click Quit Image Capture.
..................Content has been hidden....................
You can't read the all page of ebook, please click here login for view all page.