In this chapter, you learn how to recognize and avoid the most common problems in digital photography.
Avoid Taking Unfixable Pictures 96
What Is a Histogram? 97
Use a Histogram as You Take Pictures 98
Compensate for Shutter Lag 100
Avoid Blowouts 101
Keep Your Camera Steady 102
Avoid Undesirable Color Casts 103
Never Use Digital Zoom 104
Reduce Digital Noise 105
Avoid In-Camera Adjustments 106
Become Comfortable with Your Digital Camera's Settings 107
With all the automatic features in today's digital cameras, it is still possible to take digital pictures that have problems that no amount of computer image editing can fix. You can learn the most common digital photography problems and how to avoid them.
What Are Unfixable Photo Problems?
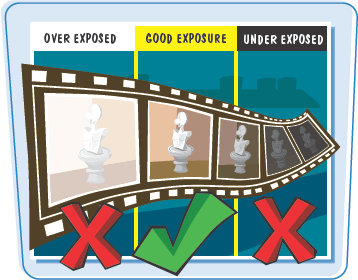
Unfixable digital photo problems include excessively overexposed pictures, pictures with excessive digital noise – unwanted multicolored pixels throughout the image – and blurry pictures. Use the tips in this chapter to avoid taking unfixable pictures as well as to learn about other common digital photography problems.
You can tell if an image is properly exposed by looking at the distribution of light, medium, and dark tones shown on the image histogram on the camera or in an image editing program.
Not all digital cameras offer a histogram feature. Refer to your manual for details.
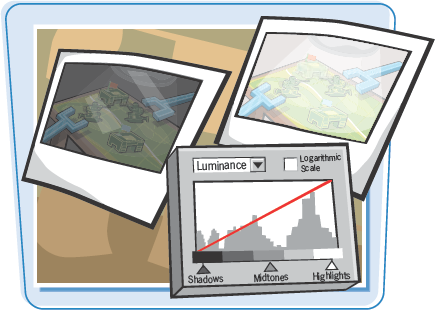
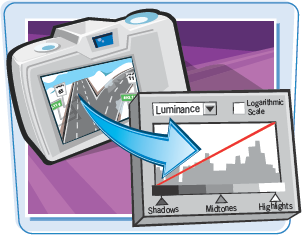
Under the best conditions it is difficult to evaluate a photo on the camera's LCD screen. On digital cameras that display a histogram, you can judge whether a picture is properly exposed by looking at the histogram immediately after you take the picture.
Turn On the Histogram Display
To see if your camera offers a histogram display, check the playback display options, or check the camera manual. Sometimes you may need to scroll through image information pages to get to the histogram in playback mode.
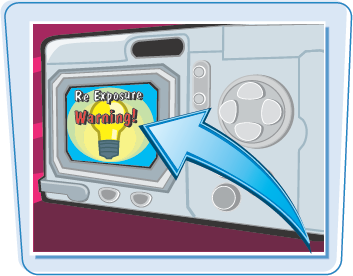
Some cameras offer an LCD display mode that flashes the parts of the image that are overexposed. Some areas of an image, such as a bright, overcast sky or a white fence, can be overexposed without affecting the quality of the photo. If your camera offers a histogram display, areas of the photo that are too light appear bunched up on the right side of the display.
Does the Overexposure Warning Flash?
If the overexposure display flashes in certain areas, note the exposure settings shown. You can then move the subject to a less bright area, or choose an exposure compensation setting, such as −1.0 EV, that lets half as much light into the camera. Take the picture again and check the histogram.
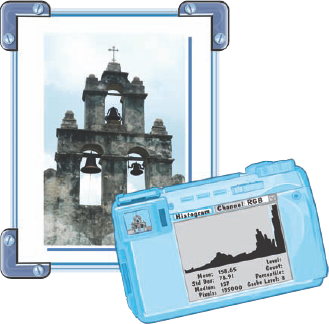
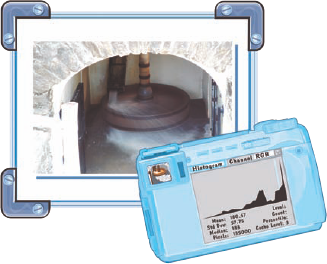
In high-key scenes, with mostly light tones, most of the brightness pixels fall to the right of the histogram, even with an accurate exposure, as shown here. High-key photos are popular in advertising these days but you need to ensure that areas in which the details are to be preserved are not so bright that the camera records no detail in the picture.
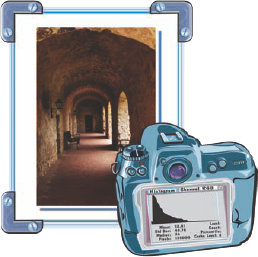
Non-Average Scene Histograms
When scenes are predominately dark or light, the histogram reflects the predominate tones. For example, if you take a picture of a white wall, the pixels fall on the right side of the histogram.
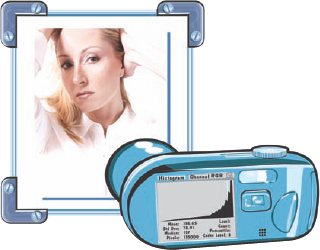
In low-key scenes, with mostly dark tones, most of the brightness pixels fall to the left of the histogram, even with an accurate exposure, as shown here. In low-key scenes, try to ensure that darker shadow areas retain detail by ensuring that the scene is not overexposed. You can also regain some shadow detail using the midtone adjustment in the Levels dialog box.
Unlike film cameras that instantly take a picture when you press the shutter release button, many digital cameras delay before taking the picture. With each new model of digital camera, the amount of delay (shutter lag) gets smaller. The fact is almost all digital cameras that are not digital single lens reflex (SLR) have some degree of shutter lag. Regardless of how much shutter lag your camera has, you can learn how to work around the delay to avoid missing the action.
What Is Shutter Lag? The delay between the time you press the shutter release button and the time when the camera takes the picture is called shutter lag. Because of this delay, you can miss capturing the action, such as the moment a family member blows out candles on a birthday cake, or when a basketball player moves a ball down the court. 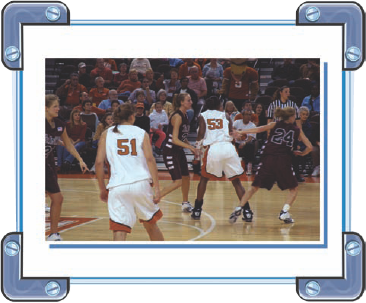 |
 Avoid Missing Critical Moments To work around shutter lag, you can anticipate the action. Focus on where the action will happen and press the shutter release button halfway down, wait for the action, and then take the picture. You should also turn off red eye reduction if you use a flash, and you should remove accessory lenses and avoid using extreme zoom settings. Also switch to burst mode to capture a rapid sequence of pictures with no shutter lag. |
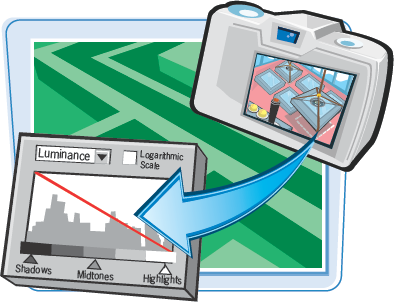
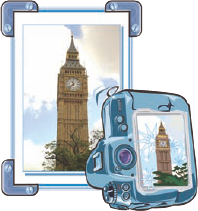
You can fix many problems in image editing programs, but you cannot fix areas of the image where the camera records no details. You can learn how to avoid blowing out the highlight details.
Small, lightweight cameras invite a lot of everyday, impromptu snapshots. But the camera's light weight can also mean blurry pictures. You can learn how to get sharp pictures with small cameras.
|
Newer pocket- and palm-size digital cameras make everyday snaps inviting and easy. Because of their low weight, avoiding camera shake – blur from hand movement during shooting – can be challenging. Whenever you have the zoom lens extended to telephoto, it is more susceptible to shake. 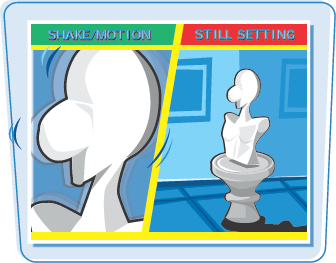 |
 How to Avoid Camera Shake In all but very bright scenes, you need to steady the camera by leaning against a solid surface such as a wall, or by setting the camera on a solid surface when taking the picture. Alternatively, you can buy a tabletop tripod that ensures sharp images. A simple solution is to carry a small sandwich bag filled with dried beans. It is lightweight and form-fits the camera to a fence post or a pillar. |
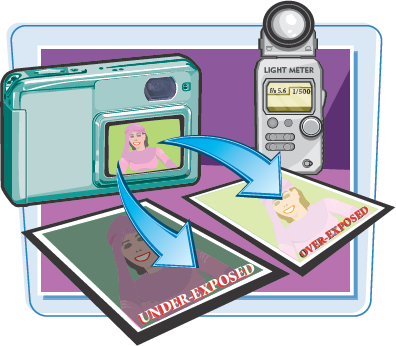
With digital cameras, you can easily avoid taking pictures that have an unwanted color cast. Setting the camera to get accurate color also saves time when you edit images on the computer.
What Causes Undesirable Color Casts? Modern digital cameras produce accurate color in photos automatically without using additional settings. Color casts occur when you take pictures in one type of light, such as shade, but the camera either cannot determine the color temperature of the light source or the camera is set to a type of light, such as bright sun. In the photos shown here, one was shot in automatic mode and the colors of the incandescent lights cast a warm, reddish orange. The second photo was taken with the white balance, or WB, setting deliberately set wrong to show what a difference it makes. To produce accurate colors, the camera must be set for the light in the scene. See Chapter 3 for more information about light. 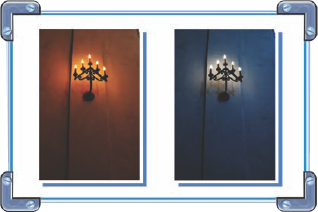 |
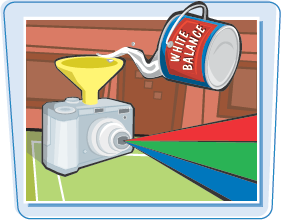 Set White Balance to Get Accurate Color When shooting outdoors, you can usually use the automatic settings with confidence. However, you may want to experiment with different white balance, or WB, settings, to become familiar with the effect that each setting produces and to help you avoid taking pictures with unnatural color casts. To set the white balance, use the camera's menu – usually the shooting menu – to select a setting that matches the scene light, such as daylight, fluorescent, or tungsten (common household light). Be careful when you use manual settings: It is easy to forget that by selecting a white balance setting, you have turned off the automatic white balance. |
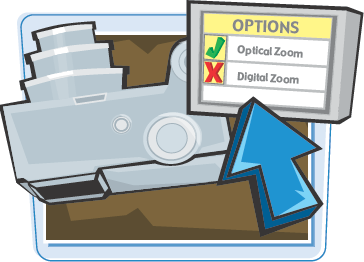
Although all digital cameras advertise a digital zoom capability, digital zoom produces a lower-quality picture than optical zoom.

Digital noise is multicolor flecks or pixels in dark areas of a low-light picture or areas of solid color, such as a bright blue sky. The noise can make your digital images look grainy. You can reduce the chances of getting digital noise by following a few simple guidelines.
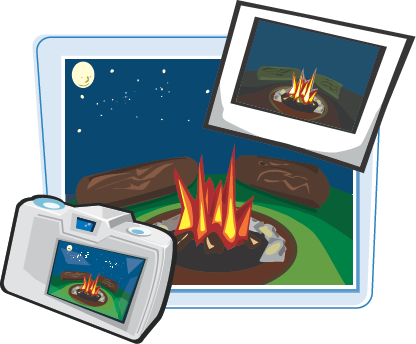
Recognize Digital Noise When you take digital pictures in low-light scenes, you often see brighter, colored pixels scattered throughout the dark and shadow areas of the image. Although you may not see noise on the LCD without zooming in, you see it on the computer at 100 percent or 200 percent magnification, and in prints larger than 4 by 6 inches.  |
 How to Avoid Digital Noise Both high ISO settings and long exposures contribute to digital noise. Increasing the ISO setting decreases exposure times, so it is best to find a balance between the two. To reduce digital noise in low-light shots, select a higher ISO setting, such as ISO 800, and use a tripod. Take some test shots and in the LCD display zoom in as close as possible to see if the noise is excessive. Adjust the ISO settings so the shutter time remains less than 2 seconds if possible. Some cameras offer noise reduction for shutter speeds less than 1/20 of a second; this feature does not completely eliminate the noise but it does reduce it. |
Digital cameras offer options that let you increase or decrease picture contrast and saturation in your camera. Learn to use these adjustments cautiously, and only after evaluating test pictures to avoid an unnatural look.
|
More and more cameras offer options for adjusting image sharpness, contrast, and color saturation. Although these can be useful for snapshots, they also produce images that look artificially enhanced. If your camera offers a contrast level adjustment, you should not select the high-contrast option to avoid taking contrasted images. 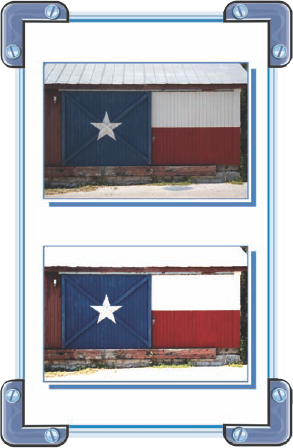 |
 Avoid Increased Saturation Settings Options for increasing saturation, or intensity of colors, add vibrancy to the colors but they also produce images that look unnaturally vivid. If you want more vivid images, wait to increase saturation in an image editing program. |
Camera characteristics vary by type and manufacturer. Learning your camera's characteristics and adjusting for them can produce consistently better pictures.