Do you want to share your files on the Web or attach them to an e-mail? This chapter shows you how to prepare your photos for online viewing. It also shows you how to safeguard your photos with a personal copyright.
Add a Personal Copyright to Protect a Photo 270
Save a JPEG for the Web 272
Save a GIF for the Web 274
Preview an Image in a Browser 276
Create a Web Photo Gallery 278
Send an Image with E-mail 282
Export Images 284
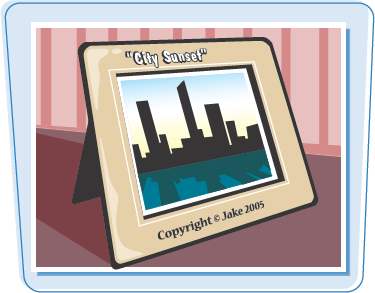
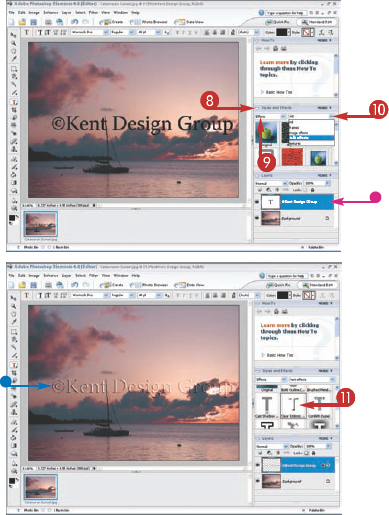
If you upload your photos to a Web site for viewing but do not want others to use the files without your permission, you can add a personal copyright to the photo. You can make the personal copyright transparent to keep the photo visible but still protected.
Add a Personal Copyright to Protect a Photo
Note
If you are using a laptop, press
The copyright symbol appears.
Note
If you are using a laptop, press
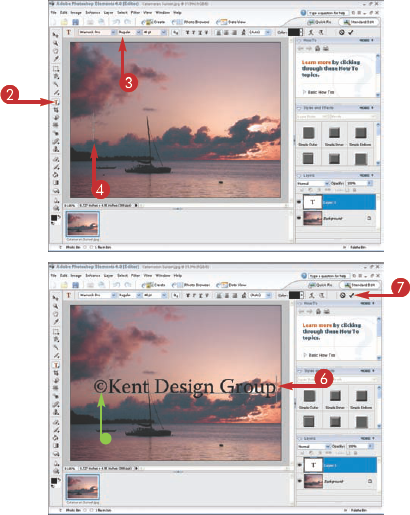
The copyright symbol and your name are on a Type layer above the photo layer.
The copyright and your name appear as a transparent, embossed copyright on the photo.
Tip
How can I move the copyright to a different location on the photo?
Because your copyright is on a separate layer, you can easily move it to another location on the photo. Click the Move tool (

Can I change the size of the copyright?
Yes. Because your copyright is on a separate layer, you can easily change its size. You can cover as much or as little of the photo as you feel appropriate. Click the Move tool (

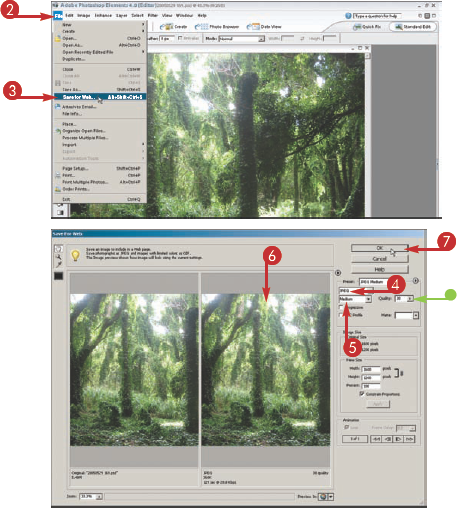
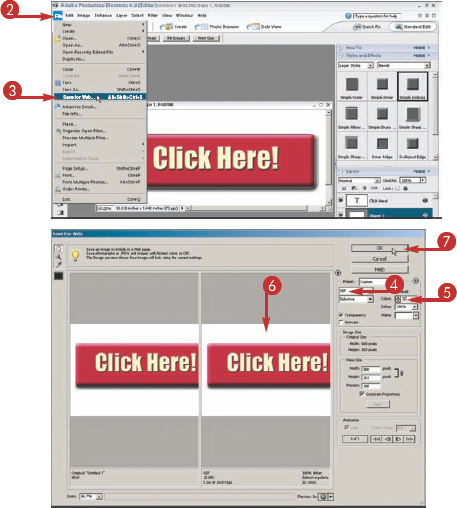
Photo files intended for printing can be large. If you upload this same photo file to the Web, it will appear very slowly on the viewer's screen. Photoshop Elements includes a Save for Web command to automatically save a duplicate of the file in another format that is optimized for Web viewing.
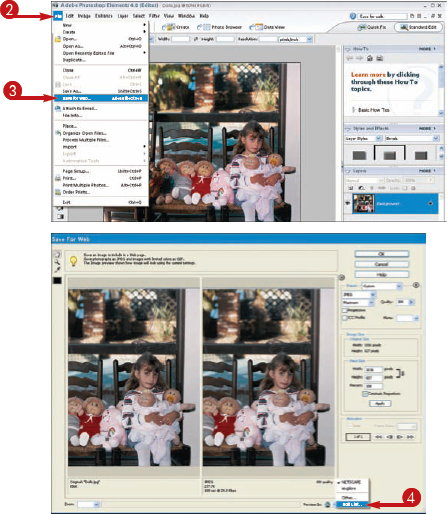
Save a JPEG for the Web
The Save For Web dialog box appears.
Alternatively, you can select a numeric quality setting from 0, low quality, to 100, high quality.
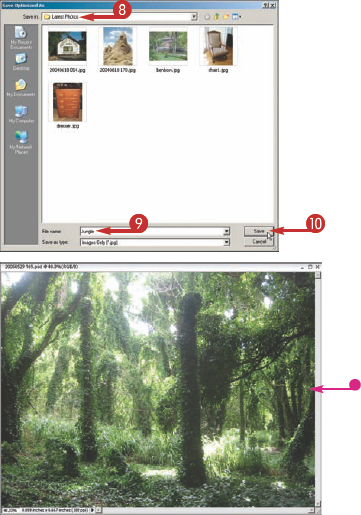
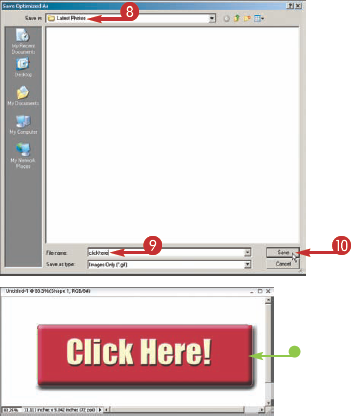
The Save Optimized As dialog box appears.
Photoshop Elements saves the JPEG file in the specified folder. You can open the folder to access the file.
The original image file remains open in Elements.
Tip
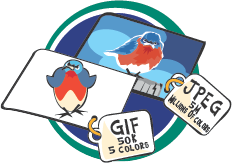
Image compression applies a mathematical formula to reduce file size. JPEG, the compression method most often used with photos, retains all the color information but deletes some pixels to shrink the file size. You can select the amount of JPEG compression by choosing an image quality setting. Lower quality increases the amount of compression and creates a smaller file. Always edit the photo before you save it as a JPEG. Each time you open a JPEG file, edit it, and save it again as a JPEG, the loss of data compounds, further reducing the image quality.

Why not just use the Image menu to resize the photo file?
The Save For Web dialog box automatically saves the file as a duplicate so you do not risk overwriting your original. It also allows you to preview the different options for optimization specifically intended for Web files in a side-by-side view. The preview image window changes to reflect any changes you make to the settings, such as compression and color options, or the size of the image.

You can use Photoshop Elements for more than just editing and saving digital photographs. You can create illustrations or graphic elements, such as a Web button with text and large areas of solid color, and even design Web animations. For these types of files, select GIF — Graphics Interchange Format — in the Save For Web dialog box.
Save a GIF for the Web
The Save For Web dialog box appears.
Note
Selecting fewer colors creates a smaller, faster loading file. Check the preview window to see if fewer colors still shows the image the way you want it.
The Save Optimized As dialog box appears.
Photoshop Elements saves the GIF file in the specified folder. You can open the folder to access the file.
The original image file remains open in Elements.
Tip
If it makes such small files, why not use the GIF format for every image?
The GIF format keeps line art and type sharp but reduces the file size by compressing large areas of color, as in a cartoon, and limits the overall number of colors in the image. JPEG is better for continuous tone photographs because it keeps all the color information even though it somewhat reduces the sharpness of the details in the photo.
Can I create an illustration for the Web and have the Web page background show through?
Yes. When you add type or create a shape in Photoshop Elements, the type or shape is placed on a layer above the Background layer. If you hide the Background layer, you see the type or shape on a gray-and-white checkerboard. The checkerboard indicates transparent areas. To preserve those transparent areas, select Transparency (

Photoshop Elements lets you preview the image in a Web browser so you can see how it will appear to your viewers. You can preview the image in any Web browser you have installed on your computer.
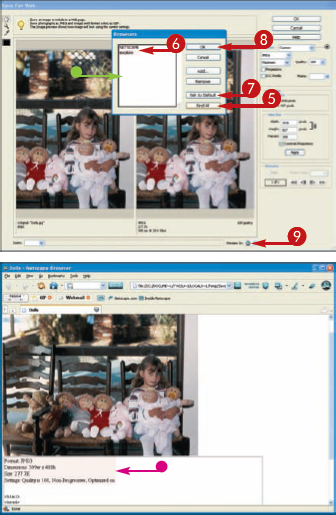
Preview an Image in a Browser
The Save For Web dialog box appears.
The Browsers dialog box appears.
Photoshop Elements populates the list with the browsers installed on your computer.
Photoshop Elements opens the default Web browser on your computer and displays the image in the browser window.
The area below the preview shows general information about the image.
Tip
Why should I preview the image in various browsers?
Different browsers can make colors appear differently because the various browsers use different color spaces. To make sure your image displays the way you want it to, test it in as many browsers as possible.

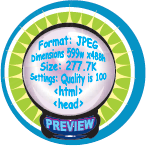
What is all the information below the preview image?
Photoshop Elements lists the image file format, the dimensions in pixels, the image size, and compression specifications. It also shows the coded HTML information in the second paragraph, which is the text required to build a Web page with the image.
You can have Photoshop Elements create a photo gallery Web site that showcases your images. Elements not only sizes and optimizes your image files for the site, but also creates the Web pages that display the images and links those pages together.

Create a Web Photo Gallery
Note
For more information about using Organizer, see Chapter 11.
If you do not select any photos, Elements displays all the images in your gallery.
The Adobe HTML Photo Gallery dialog box opens.
The style determines the gallery theme as well as how the images are organized.
You can type an optional e-mail address to display in your gallery.
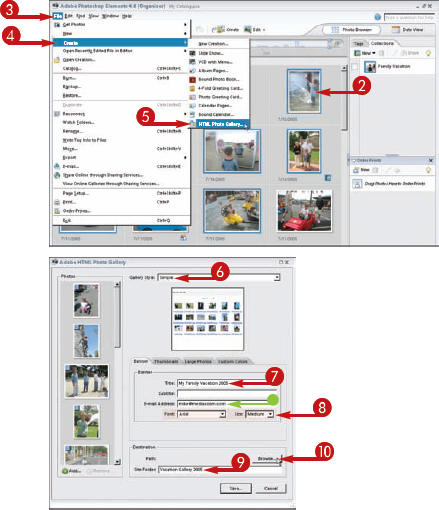
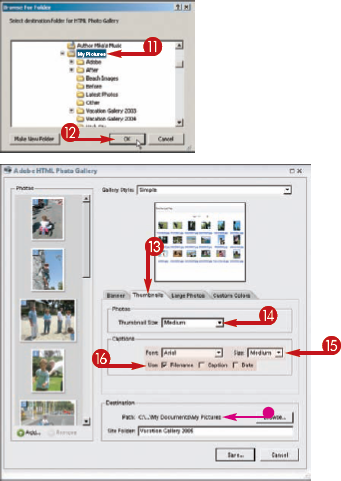
The Browse For Folder dialog box opens.
The folder appears in the Path field.
Thumbnails are the clickable miniature versions of your images in the gallery.
Tip
How do I determine the number of thumbnails that appear on each photo gallery page?
Photoshop Elements arranges the images on the pages based on the size of the thumbnails. To increase the number of images on each page, select a smaller thumbnail size. To decrease the number of photos on each page, select a larger thumbnail size.

How does the e-mail address appear in my gallery?
The Photo gallery style you choose determines where the e-mail address appears on the page. It may appear below the gallery title, or it may appear below each large image. The e-mail address displayed is clickable; clicking it opens a new e-mail message on the viewer's computer.

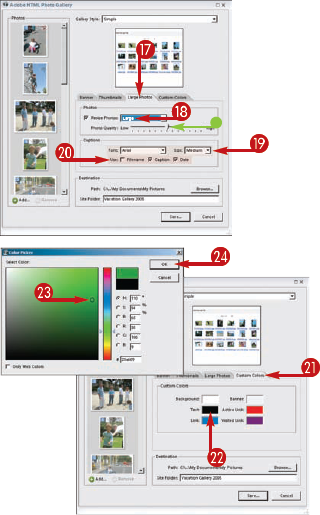
When you create a Web photo gallery, you specify the size and quality of the images that display in the gallery. Photoshop Elements creates small versions of your gallery images, which viewers can click to access larger versions.
You can drag the

Note
Larger and higher-quality images take longer to download over the Web.
You can deselect the Resize Photos option (
The Color Picker appears.
Photoshop Elements closes the Adobe HTML Photo Gallery window and builds the image and HTML files for the gallery.
Photoshop Elements opens the completed gallery in the HTML Photo Gallery Browser window.
The window displays how the gallery looks in a regular Web browser, such as Microsoft Internet Explorer or Netscape Navigator.
You can click a thumbnail to view a large photo.

Tip
How can I view my Web photo gallery as it will appear in a regular Web browser?
You can launch your Web browser and then open the index.html file located in the folder you specified in Step 9. You can typically click File and then Open to open a file on your computer using your browser. The index.html file represents the home page of your Web photo gallery.
How do I get my gallery on the Web?
Photoshop Elements creates a folder with all the parts required for a Web gallery page and includes the HTML code. You can upload this folder to your Internet service provider using a Web publishing application such as Adobe GoLive or Dreamweaver, or you can use another file transfer protocol (FTP) software from your Internet service provider.

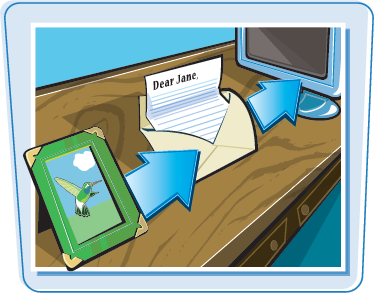
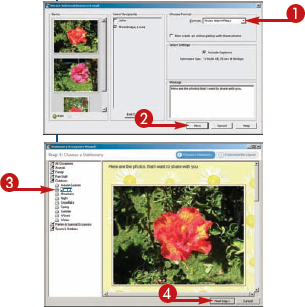
Sharing your photos with your friends and family is easy. You can use Photoshop Elements to automatically attach an image to an outgoing message in your computer's e-mail program.
This feature requires that you already have an e-mail program, such as Microsoft Outlook or Eudora, set up on your computer. Photoshop Elements does not come with e-mail capability.
Send an Image with E-mail
Note
For more information about using Organizer, see Chapter 11.
Note
Photoshop Elements may display a window asking you to choose your e-mail client. If so, choose the software with which you prefer to send e-mail and click Continue.
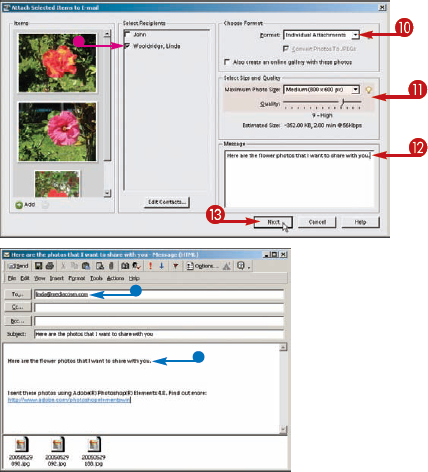
The Attach Selected Items to E-mail dialog box appears.
The Contact Book dialog box appears.
The New Contact dialog box appears.
The recipient appears in the Contact Book.
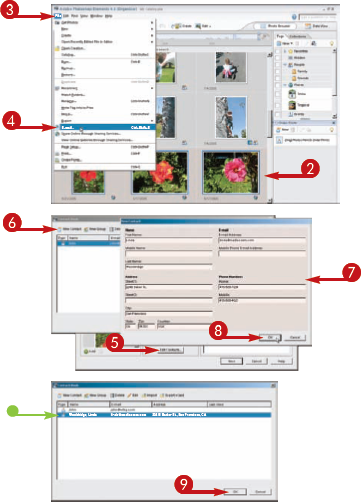
In the Attach Selected Items to E-mail dialog box, click to select one or more e-mail recipients (

You can send your images as attachments, embedded in your message (Photo Mail), or as a slide show.
Note
These settings may differ depending on the chosen format.
Note
If you selected Photo Mail (HTML) in Step 10, the Stationery & Layouts Wizard appears. See the tip below for details.
Photoshop Elements opens a new message in your e-mail client software.
The recipient is added to the To field, and your message text is included in the message field.
Note
For more information about sending your message, see the documentation for your e-mail application.
Tip
Can I customize my e-mail with themes?
You can access various templates that add graphical themes to your messages with the Photo Mail (HTML) style.
When you click Next in the window that follows, Elements adds the layout to your e-mail message.
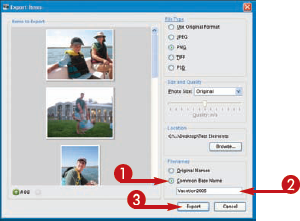
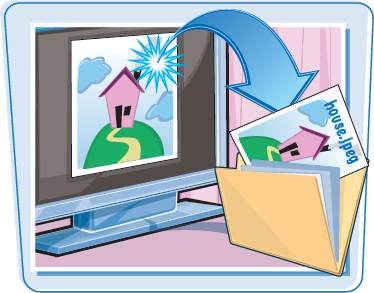
You can export the images in Organizer to a folder in a different location on your hard drive or on a separate hard drive for backup purposes. The original file remains in the catalog and you can export the photos at various sizes and in different file formats.
If you have a mobile phone connected to the computer, you can click To Mobile Phone to move a copy of the selected photos directly to the phone. Photoshop Elements resizes the files appropriately.
The Export Items dialog box appears.
•Some file types allow you to specify a size or quality.
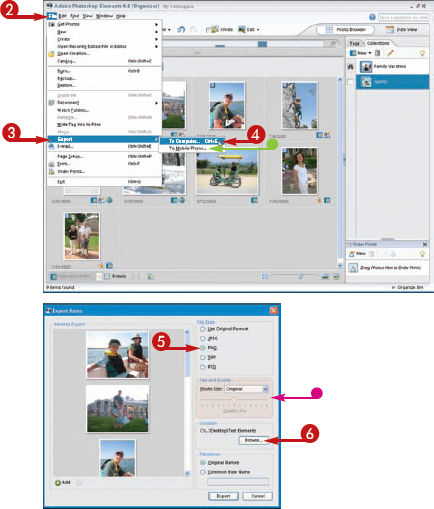
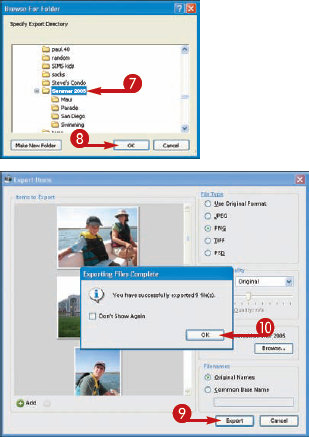
The Browse For Folder dialog box appears.
Elements exports your images.
The Exporting Files Complete dialog box appears telling you how many files were exported.
Tip
How do I customize the names of my exported images?
You can customize the filenames of your exported images in the Export Items dialog box:
Elements exports your images.
It appends a hyphen and number to your base name to create each filename.