
CHAPTER 19 Starting Cortex-M3 Development Using the GNU Tool Chain
Background
Many people use the GNU tool chain for ARM product development, and a number of development tools for ARM are based on the GNU tool chain. The GNU tool chain supports the Cortex-M3 and is currently freely available from CodeSourcery (www.codesourcery.com). The main GNU C Compiler development will include support for the Cortex-M3 in the near future.
This chapter introduces only the most basic steps in using the GNU tool chain. Detailed uses of the tool chain are available on the Internet and are outside the scope of this book.
Assembler syntax for GNU assembler (AS in the GNU tool chain) is a bit different from ARM assembler. These differences include declarations, compile directives, comments, and the like. Therefore, assembly codes for ARM RealView Development tools need modification before being used with the GNU tool chain.
Getting the GNU Tool Chain
The compiled version of the GNU tool chain can be downloaded from www.codesourcery.com/gnu_toolchains/arm/. A number of binary builds are available. For the most simple uses, let’s select one with EABI1 and without a specific embedded OS as the target platform. The tool chain is available for various development platforms such as Windows and Linux. The examples shown in this chapter should work with either version.
Development Flow
As with ARM tools, the GNU tool chain contains a compiler, an assembler, and a linker. The tools allow projects that contain source code in both C and assembly language (see Figure 19.1).

There are versions of the tool chain for different application environments (Symbian, Linux, EABI, and so on). The filenames of the programs usually have a prefix, depending on your tool chain target options. For example, if the EABI environment is used, the GCC command could be arm-xxxx-eabi-gcc. The following examples use the commands from the CodeSourcery GNU ARM Tool Chain shown in Table 19.1.
Table 19.1 Command Name of CodeSourcery Tool Chain
| Function | Command (EABI Version) |
| Assembler | arm-none-eabi-as |
| C Compiler | arm-none-eabi-gcc |
| Linker | arm-none-eabi-ld |
| Binary image generator | arm-none-eabi-objcopy |
| Disassembler | arm-none-eabi-objdump |
| Notice how command names | of tool chains from other vendors differ. |
The linker script in the development flow is optional but often required when the memory map becomes more complex.
Examples
Let’s look at a few examples using the GNU tool chain.
Example 1: The First Program
For a start, let’s try a simple assembly program that we covered in Chapter 10 that calculates 10 + 9 + 8 .. +1:
- The .word directive here helps us define the starting stack pointer value as 0x20000800 and the reset vector as start.
- .text is a predefined directive indicating that it is a program region that needs to be assembled.
- .global allows the label _start to be shared with other object files if needed.
- .code 16 indicates that the program code is in Thumb.
- .syntax unified indicates that the unified assembly language syntax is used.
- _start is a label indicating the starting point of the program region.
- start is a separate label indicating the reset handler.
- .type start, function declares that the symbol start is a function. This is necessary for all the exception vectors in the vector table. Otherwise the assembler will set the LSB of the vector to zero.
- .end indicates the end of this program file.
Unlike ARM assembler, labels in GNU assemblers are followed by a colon ( : ). Comments are quoted with /* and */, and directives are prefixed by a period ( . ).
Notice that the reset vector (start) is defined as a function (.type start function) within thumb code (.code 16). The reason for this is to force the LSB of the reset vector to 1 to indicate that it starts in Thumb state. Otherwise, the processor will try starting in ARM mode, resulting in a hard fault. To assemble this file, we can use as, as in the following command:
![]()
This creates the object file example1.o. The options -mcpu and -mthumb define the instruction set to be used. The linking stage can be done by ld as follows:
![]()
Then the binary file can be created using Object Copy (objcopy) as follows:
![]()
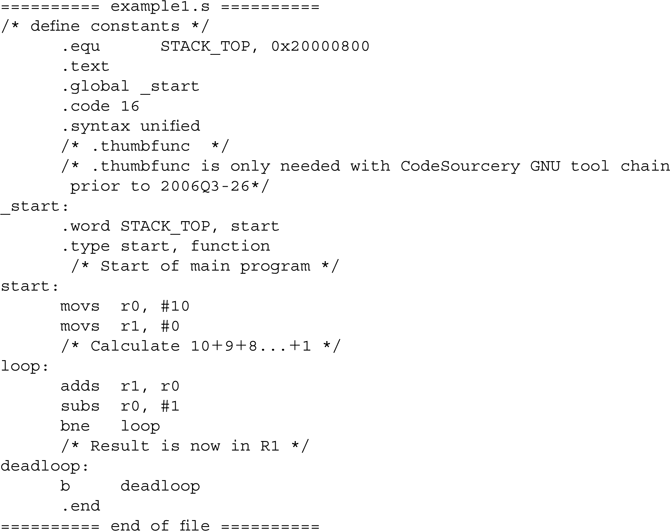
We can examine the output by creating a disassembled code listing file using Object Dump (objdump):
![]()
which looks like:

Example 2: Linking Multiple Files
As mentioned before, we can create multiple object files and link them together. Here we have an example of two assembly files, example2a.s and example2b.s; example2a.s contains the vector table only, and example2b.s contains the program code. The .global is used to pass the address from one file to another:

To create the executable image, the following steps are used:
- Assemble example2a.s:

- Assemble example2b.s:

- Link the object files to a single image. Note that the order of the object files in the command line will affect the order of the objects in the final executable image:

- The binary file can then be generated:

- As in the previous example, we generate a list file to check that we have a correctly assembled image:

As the number of files increases, the compile process can be simplified using a UNIX makefile. Individual development suites may also have built-in facilities to make the compile process easier.
Example 3: A Simple “Hello World” Program
To be a bit more ambitious, let’s now try the “Hello World” program. (Note: We skipped the UART initialization here; you need to add your own UART initialization code to try this example. A example of UART initialization in C language is provided in Chapter 20.)
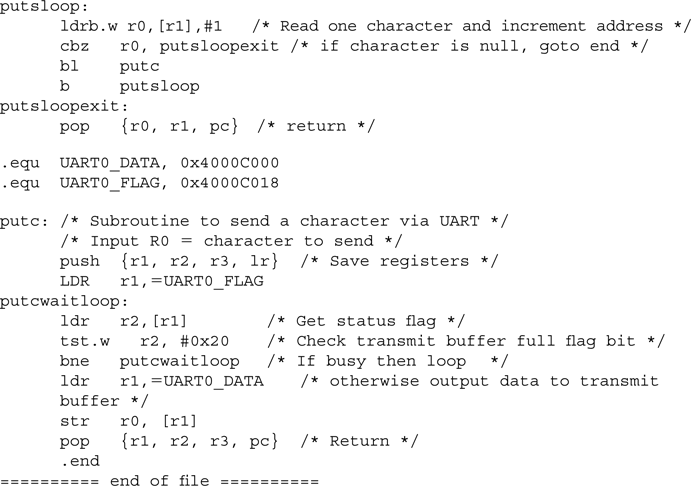
In this example we used .ascii and .byte to create a null terminated string. After defining the string, we used .align to ensure that the next instruction will start in the right place. Otherwise the assembler might put the next instruction in an unaligned location.
To compile the program, create the binary image, and disassemble outputs, the following steps can be used:

Example 4: Data in RAM
Very often we will data store in SRAM. The following simple example shows the required setup:

In the program, the .data directive is used to create a data region. Inside this region, a .word directive is used to reserved a space labeled Result. The program code can then access this space using the defined label Result.
To link this program, we need to tell the linker where the RAM is. This can be done using the -Tdata option, which sets the data segment to the required location:

Also notice that the –R .data option is used in running objcopy in this example. This prevents the data memory region from being included in the binary output file.
Example 5: C Only, Without Assembly File
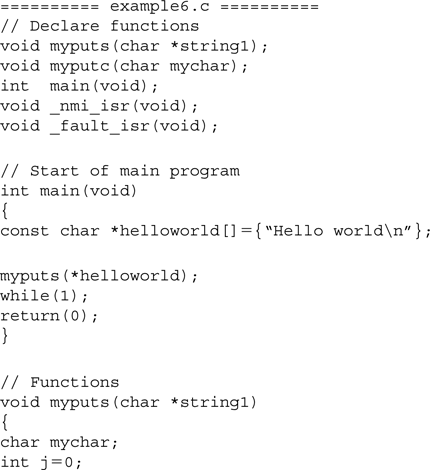
One of the main components in the GNU tool chain is the C compiler. In this example, the whole executable—even the reset vector and stack pointer initial value—is coded using C.
In addition, a linker script is needed to put the segments in place. First, let’s look at the C program file:


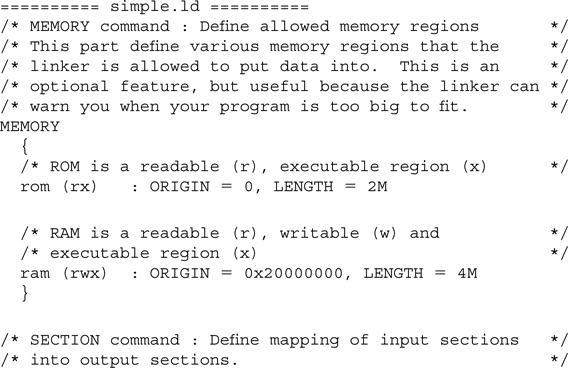
The vector table is defined using the __attribute__ code. This file does not say where the vector table is; that’s the job of the linker script. A simple linker script can be something like the following simple.ld:

The memory map information is then passed on to the compiler during the compile stage:
![]()
The output object file can then be linked, again, using the linker script:
![]()
In this case we only have one source file, so the linking stage can be omitted. Finally, the binary and disassembled list file can be generated:
![]()
In this example we used a compiler option called -nostartfiles. This prevents the C compiler from inserting startup library functions into the executable image. One of the reasons for doing this is to reduce the size of the program image. However, the main reason to use this option is that the startup library code of the GNU tool chain is dependent on the suppliers of the distributions. Some of them might not be suitable for the Cortex-M3; they might be compiled for traditional ARM processors such as the ARM7 (using ARM code instead of Thumb code).
But in many cases, depending on the applications and libraries used, it would be necessary to use the startup library to carry out initialization processes such as initialization of the data regions (for example, regions of data that should be initialized to zero before running the application). The next example shows a simple setup for this.
Example 6: C Only, with Standard C Startup Code
In normal situations, the standard C library startup code is automatically included in the output when a C program is compiled. This ensures that run-time libraries are initialized correctly. The C library startup code is provided by the GNU tool chain; however, the setup might vary between different tool chain providers. The following example is based on CodeSourcery GNU ARM Tool Chain version 2006q3-26. For this version, you need to contact CodeSourcery support to get the correct startup code object file, armv7m-crt0.o, because this version provides an incorrect startup code compiled in ARM code rather than Thumb code. This problem is fixed in version 2006q3-27 or after. Versions of the GNU tool chain from different vendors can have different startup code implementations and different filenames. Check the documentation from your tool chain to determine the best arrangement for defining the startup code.
Before we compile the C source code, the C program in Example 5 requires several small modifications. By default, the startup code armv7m-crt0 already contains a vector table, and it has the NMI handler and hard fault handler names defined as _nmi_isr and _fault_isr, respectively. As a result, we need to remove our vector table from the C code and rename the NMI and hard fault handlers:

A number of linker scripts are already included in the CodeSourcery installation. They can be located in the codesourcey/sourcery g++/arm-none-eabi/lib directory. In the following example, the file lm3s8xx-rom.ld is used. This linker script supports the Luminary Micro LM3S8XX series devices.
Aside from the current directory, when the C program code is located, a library subdirectory called lib is also created in the current directory. This makes the library search path setup easier. The startup code object file armv7m-crt0.o and the required linker script are copied to this lib directory, and in the following examples, the -L lib option defines directory lib as the library search path.
Now we can compile the C program:
![]()
This creates and links the output object file as example6.out. Since there is only one object file, the binary file can be directly generated:
![]()
Generation of disassembly code is the same as in the previous example:
![]()
Accessing Special Registers
The CodeSourcery GNU ARM tool chain supports access to special registers. The names of the special registers must be in lowercase. For example:

Using Unsupported Instructions
If you are using another GNU ARM tool chain, there might be cases in which the GNU assembler you are using does not support the assembly instruction that you wanted. In this situation, you can still insert the instruction in form of binary data using .word. For example:

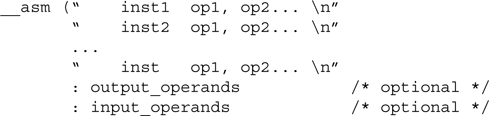
Inline Assembler in the GNU C Compiler
As in the ARM C Compiler, the GNU C Compiler supports an inline assembler. The syntax is a little bit different:
![]()
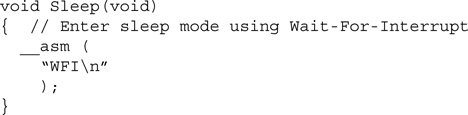
For example, a simple code to enter sleep mode looks like this:
If the assembler code needs to have an input variable and an output variable—for example, divide a variable by 5 in the following code—it can be written as:

With this code, the input parameter is a C variable called DataIn (%0 first parameter), and the code returns the result to another C variable called DataOut (%1 second parameter). The inline assembler code manually modifies register r3 and changes the condition flags cc so that they are listed in the clobbered register list.
For more examples of inline assembler, refer to the GNU tool chain documentation GCC-Inline-Assembly-HOWTO on the Internet.
1Embedded Application Binary Interface (EABI) for the ARM architecture—executables must conform to this specification in order for them to be used with various development tool sets.