Project Setup
Define your project organisation
This chapter explains the steps you need to take during the Initial Investigation Stage to set up a project and ensure that control is established from the very start.
‘Mix a little foolishness with your serious plans; it’s lovely to be silly at the right moment.’
HORACE, 65–8 BC

- Understand the driving business need.
- Define the scope and boundaries for the project.
- Use your team to define and plan the project.
- Harness your stakeholders’ influence.
This chapter explains the steps you need to take during the Initial Investigation Stage to set up a project and ensure that control is established from the very start. For clarity these steps are described sequentially, but in practice you will find that you need to do them in parallel, as each step may influence any of the other steps.
How to go about it
There are five key activities for you to undertake when setting up a project:
- Set up the project team.
- Prepare a project definition and business case.
- Prepare a project plan.
- Define your project organisation.
- Engage your stakeholders.
The purpose of formally setting up the project is for you to state explicitly the business drivers, scope and objectives for the project, that is:
- why you are doing it;
- what you will produce;
- when you will produce it;
- how you will approach the project;
- who will be involved;
- how much it will cost and benefit you.
This information is gathered in a document set which, together with the associated plans, provides you with the starting point (baseline) on which all subsequent project decisions will be taken and against which you can measure project performance. Different organisations have different sets of documents to support this, the common ones being:
- Project Initiation Document (Prince2);
- Project Definition;
- Project Management Plan (APM, PMBoK);
- Business case.
All these mostly contain the same information, it is just the way they are assembled and named that changes. For example, the Project Management Plan often comprises a subsidiary set of documents defining how each aspect of the project is managed, for example risk management plan, schedule management plan. Some organisations combine the ‘business case’, which justifies why you are dong a project and proves its viability, with the ‘definition’, which defines the scope, schedule and costs. The reason for this is simply to ensure the two documents align as there is often a degree of duplication. In this book, I have assumed the business cases and the project definition are combined in a single document, called a ‘business case’.
The headings under which you should define your project follow. I have chosen to structure the document in three parts, each serving a different interest group. It is important for you to avoid having to write up your project in many differing ways to meet differing needs. For example, it is not unusual for finance functions to want a ‘special’ document on which to base the authorisation of funds for the project (hence why some organisations have a separate business case document altogether). However, good design of a key document, such as that outlined here, can avoid such duplication and thus reduce your workload and the discrepancies which can appear if separate documents are required for different interest groups.
WHAT A WASTE OF TIME!

‘But why do I need to write it all up? Isn’t it just a waste of time?’
Writing up your project in a structured and thorough way helps you to ensure that all the important aspects are covered. The template is, in itself, a checklist for building quality into your projects.
Unless you are the only person involved in the project, you will need to communicate your intentions. You may know everything about the project, but if the others who need to be involved don’t understand what you are trying to achieve, the project will fail. The document is your explicit form of communication.
Keep the document brief. Put in the minimum content to communicate the bare essentials. Ironically, the simpler the project, the more people tend to write, as they know so much about it. Larger, more complex projects are frequently ill defined and too brief.
Headings to define your project
The three parts of the business case are:
Part 1 – Finance, which is primarily aimed at the finance function. They will be interested in this section as a priority and then Section 2.1 to 2.4. The project sponsor will also be interested in this as it sets out the financial criteria to be met.
Part 2 – Project Definition is of interest to the project sponsor, stakeholders and project team. It is the meat of the document.
Part 3 – Project Organisation is of most interest to the project manager, team and line managers as it sets out how the project has been organised.
| Section | Section heading | Question answered |
| 1 | FINANCE | |
| 1.1 | Financial appraisal | HOW MUCH? |
| 1.2 | Sensitivity analysis | HOW MUCH? |
| 2 | PROJECT DEFINITION | |
| 2.1 | Background | WHY? |
| 2.2 | Business objectives | WHY? |
| 2.3 | Benefits | WHY? |
| 2.4 | Output description | WHAT? |
| 2.5 | Scope, impacts and interdependencies | WHAT? |
| 2.6 | Deliverables | WHAT? |
| 2.7 | Timescales | WHEN? |
| 2.8 | Risks and opportunities | CONTEXT? |
| 2.9 | Prerequisites, assumptions and constraints | CONTEXT? |
| 2.10 | Project approach | HOW? |
| 2.11 | Analysis of options | HOW? |
| 3 | PROJECT ORGANISATION | |
| 3.1 | Review and appraisal points | HOW? |
| 3.2 | Change control | HOW? |
| 3.3 | Progress reporting | HOW? |
| 3.4 | Project team and stakeholders | WHO? |
The content of Part 2 is described in detail later in this chapter.
Set up the project team
The typical ‘project structure’ was described in Chapter 4 and is shown again in Figure 19.1.
Project teams are:
- short term, being established only for the duration of the project;
- cross-functional, to provide the necessary skill mix;
- frequently part time, with team members fulfilling line and project tasks.
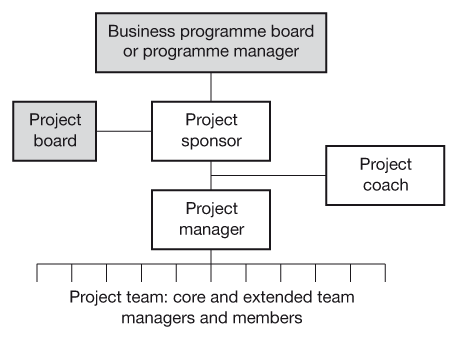
Figure 19.1 A typical project organisation structure
The project sponsor requires the benefits, possibly supported by a project board and reports to the project review group or to a programme manager. The project manager reports to the project sponsor and is accountable for the day-to-day running of the project. A project coach supports these key roles. All team managers and members report to the project manager. See also Chapter 4.
Bearing this in mind, it is essential that you agree the project roles from the start (e.g. project sponsor, project manager and project board membership) with the individuals concerned and their line managers (if appropriate). As many of the team members are likely to be part time and have other daily duties to attend to, it is essential that you agree with their line managers what their commitments are and how you should handle changes to this. The line managers may also have a quality assurance role to undertake, if so this must be agreed. If necessary, write and agree a role description, defining the individual’s accountabilities. Even if these descriptions are never referred to again, the act of creating them with the individuals, and agreeing them, will clarify each person’s role and ensure there are fewer misunderstandings. Finally, do ensure that accountability for any activity or work package on the project rests with a single person only. Shared accountabilties do not work; they lead to omission, duplication and confusion (see also p. 286). Summarise the key members’ roles in Section 3.4 of the initial and full business case documents.
You should create, with the team, a set of values for the project to share and an agreed way of working together. Project Workout 19.1 provides some ideas for this. Fostering team spirit is the responsibility of all on the team, led by the project manager. The sooner the team can settle down to work together in an environment of openness and trust, the better it will be for the project. Project setup is the ideal time to do this. Even if you know what to do on the project, sparing the time for the team to contribute will lead to greater commitment and better results. Preferably the early days of the project should be spent as much as possible as a group working in a creative environment. Project planning is an ideal vehicle for forming the team as well as being of vital importance to achieving results. Projects that are designed solely by one person usually lack the vitality and level of involvement necessary for achieving extraordinary results.
WELCOMING NEW TEAM MEMBERS
It is all well and good ensuring the team is bonded and aligned from the start but do not forget that as the project moves through its life cycle, team membership will change. Welcome new team members and ensure they have bought into the team values and the project objectives. If there are a number of new members, for instance for a new project stage, treat it as if it is a new project. Project Workout 19.1 (The first team meeting) and those related to planning can easily be adapted for the start of each stage.
19.1 THE FIRST TEAM MEETING

This is best done in a relaxed atmosphere without any tables acting as barriers between people. The ‘board room’ arrangement is not recommended. Team meetings are best in rooms with space to move around and wall room for flip charts. Confined rooms confine thinking.
The first time team members gather is very important and can set the tone for the rest of the project. Some individuals may know each other (and you) well. Others may know no one. Some may have worked together before on other projects. Even if some have not met before, they may have preconceived ideas of others on the team based on gossip and rumor from other colleagues. It is you, as project manager, who must bond this disparate group into a committed team. One way of doing this is to:
- bring the group members to respect each other;
- create a set of team rules!
| 1 | Ask all present to introduce themselves and say a little about their interests outside work. Ask them to tell the others something about themselves that none of the others knows. |
| 2 | Ask each person to say what his/her commitments are to the project, why he/she would like to see it succeed and what that person will do to help success become a reality. |
| 3 | When the individual has finished, each of the other team members should build on what that individual has said about him/herself by saying what skills and competencies they know or feel the person has which they respect. Keep to positive and strong points only. |
| On receiving this acknowledgment, the individual should not be embarrassed. ‘Thank you’ is all he or she needs to say. | |
| 4 | Steps 1 to 3 should be gone through for every person in the group. |
This may sound contrived, but it does work if treated seriously. It can remove or dispel rumour. It brings people onto a personal footing.
Team values
Creating a set of ‘rules’ that the team agrees to live by and uphold is also a powerful way of bonding:
- Brainstorm a set of values or rules for the team to live by. Put these on a flip chart.
- The team should then select those which it wants to live by.
- Display the values prominently in the team’s workroom and at every team meeting.
During the brainstorm, individuals will often shout out things that annoy them. For example, if someone really gets heated if meetings start late, he/she may want the rule/value ‘All meetings start on time’. The brainstorm list, therefore, becomes a set of potential ‘hot buttons’, which can turn each person from a likeable, rational soul into an angry unreasonable one. It’s good to know what these are at the start! Some of the most powerful values can also appear very shallow. One senior team had ‘chocolate’ as a value. At every meeting someone was accountable for bringing one or two bars of chocolate. It became a symbol of ‘looking after each other’ and something to joke about to lighten the tension when business issues were weighing heavily and the team could not agree a way forward.
Prepare a project definition
Part 2, the project definition section of the business case document, defines your project – why you are doing it, what you will produce and how you will go about it. The details for each section are as follows:
2 Project Definition
2.1 Background
Describe, briefly, the background to the project:
- Explain why the project has come about (e.g. as a result of a strategy study, as a result of findings from another project).
- Refer to any other associated projects or initiatives, business plans, or conclusions from previous studies.
2.2 Business objectives
You should describe why you are doing the project. Explain:
- the business objectives the project will satisfy;
- the needs the project fills;
- how the project supports your business strategy.
2.3 Benefits
You should describe the benefits you hope to achieve from the project (see also Chapter 20). These may be in two forms:
- Financial – these should be stated in ‘money’ terms (e.g. increased revenue, cost savings, etc.).
- Non-financial – changes in operational and key performance indicators should be quantified. If you are unable to quantify a particular benefit, describe it as best you can – just because you can’t count it, doesn’t mean to say it does not count.
Include a statement on what else the project will accomplish, for example say what new possibilities will be created operationally, commercially, or for new projects.
In addition you should outline:
- the minimum conditions of satisfaction required in order to declare the project a success (e.g. achievement of a specific market share, revenue, cost saving);
- the method for measuring and confirming the achievement of each benefit;
- any possible events which, if they occur, will lead you to consider terminating the project.
Answering the question ‘Why?’ is very important. There are four basic reasons why you should want a project:
- to earn more revenue;
- to save costs;
- to reduce working capital;
- to enable you to remain in business.
All programmes (related projects) will ultimately be aiming for one or more of these. In a programme, however, individual projects may focus on other benefits, for example improving performance or service quality. Other projects are created as vehicles to learn about new markets, technologies or approaches. Be honest when stating the business objective. If you pretend a ‘learning’ project is a revenue generator, don’t be surprised if it is cut in favour of projects which generate greater revenue.
2.4 Output description
You should describe, in one paragraph, what the project is going to produce overall. This may be a new product, a new culture, process, manufacturing line, computer system, etc. Section 2.6 will list the key deliverables and these need not be stated here. The output description document will contain the detail.
2.5 Scope, impacts and interdependencies
Define the work necessary to meet the business objectives outlined in Section 2.2 and to create the output described in Section 2.4. Include:
- the areas impacted by the outcome of the project (boundaries of the project);
- any aspects which are specifically excluded from the project;
- key interdependencies with other projects (see p. 353).
You should also state, in broad terms:
- the impact the project will have on current operations and existing projects;
- the functions or departments in your organisation which will be affected.

Interdependency. If Project B requires a deliverable from Project A in order to achieve its objective, Project B is dependent on Project A, i.e. a deliverable is passed from one project to another.
For example, Project A builds a computer platform as one of its deliverables. Project B uses this platform to run software it has built as one of its deliverables. If Project A failed, Project B will fail as it is dependent on it.
A deliverable can be created by one project only. It may, however, be used by many subsequent projects.
SCOPE
The project scope must comprise everything which is needed to ensure that the benefits can be realised. There should be no assumptions that ‘others’ are providing a key part. If other projects are providing deliverables, this must be stated explicitly as a dependency, and not assumed.
2.6 Work packages and deliverables
List the work packages and major deliverables from your project, which are needed to create the output described in Section 2.4. Deliverables may take two forms:
- Final deliverables – which are to be handed over by the project team to the users at the end of the project (e.g. hardware, software systems, brochures, product specifications, tariffs, business processes, advertising campaigns).
- Temporary deliverables – which are to be produced during the course of the project for review and sign-off (e.g. feasibility report, business case).
For each deliverable, specify:
- the format and content in which it is to be produced (e.g. a written report, TV advertisement);
- the named individual accountable for its production;
- the named individual(s) accountable for reviewing and/or approving it.
If the list is extensive, you should detail them in an appendix and list only the key ones in the main body of the document.
2.7 Timescales
Outline the overall project timescales by stating the target completion dates for key milestones. Include all the staged framework milestones: Development Gate, Trial Gate, Release Gate, launch, project complete (see p. 60). Add any other significant milestones or events such as the letting of a major contract.
2.8 Risks and opportunities
This section should contain:
- a list of the significant risks and opportunities that may potentially jeopardise or enhance the success of the project;
- actions that will be taken at the outset to reduce the likelihood or impact of each risk identified;
- actions or contingency plans that may be implemented, should any risk or opportunity happen.
You may conveniently present this in the form of a risk and opportunities log. (See Chapter 23 for a full discussion of risks and opportunities.)
2.9 Prerequisites, assumptions and constraints
Include:
- any circumstances outside your control which must be in place if your project is to be successful;
- all assumptions that have been made about the environment (e.g. economic factors, competitors, systems, people) in which your project is to be conducted;
- any constraints which have been imposed on your project which may affect the outcome.
It is important that you list all assumptions and constraints, even if they appear obvious to you; they may not be so obvious to others associated with the project.
2.10 Project approach
Describe how the project will be undertaken and explain why you have chosen this particular approach. Include:
- a work breakdown structure (e.g. phases, stages, subprojects, work packages) with justification;
- key interdependencies between subproject elements and with suppliers.
Where subprojects are complex, you should consider having each one formally defined by the sub project manager using Parts 2 and 3 of this document.
2.11 Analysis of options
Summarise the key points from the investigative studies, stating which options have been rejected and which have been carried forward for further analysis. Give your reasons for any choices made.
19.2 DEFINING A PROJECT
Take any new project that you are associated with. With the project sponsor, project manager and key team members, create, on flip charts in a workshop environment, the project definition part of the business case document. Base it on the template given above.
Ensure you answer every section fully – it all counts.
Note where there are gaps in the answers and be honest. You will fool no one but yourself in the long term.
Work with the team to fill the gaps identified in this workout:
- If you don’t know why you are doing the project, consider terminating it.
- If you don’t know what you are delivering, regard your costs and timescales as unstable and your risk high.
- If you don’t know when it will be done, carry out more investigations until you do know.
- If you don’t know how you will approach the project, regard risk as high and investigate further.
19.3 PROJECT DEFINITION CHECKLIST
Use this checklist to review any projects currently in progress.
| Criteria | |
| Has a project definition been written, reviewed by the stakeholders and approved by the project sponsor? | |
| Do the scope and objectives of the project meet the needs of the business? | |
| Have the benefits been fully assessed and quantified wherever possible? | |
| Do the benefits match the needs? | |
| Have all significant risks been identified, categorised and taken into account in the plan and business case? | |
| Has a comprehensive and satisfactory work breakdown been developed? | |
| Does the work breakdown reflect the deliverables to be produced? | |
| Are all key logical relationships between projects and activities clear? | |
| Has the plan been developed to minimise or offset the risks? | |
The only way a project can be delivered is by its deliverables. For each deliverable check:
| Are the project deliverables relevant and are they feasible both to produce and use? | |
| Have quality criteria been established? | |
| Is it clear who is accountable for preparing each deliverable? | |
| Is it clear who will review the deliverable prior to signing off acceptance of each deliverable? | |
| Is it clear who will approve each deliverable? | |
| Has sufficient time been allowed for reviewing/amending each deliverable? |
Project definitions

A major food manufacturer was undertaking a radical reorganisation of its processes and working methods. This involved warehousing, distribution, manufacturing, marketing, human resources and sales. In all, there were seven projects within the complex change programme. A considerable amount of study work had been completed and some of the projects had actually started. The managing director asked his management team, each member of which was sponsoring one or more projects, to write up each project in a form similar to that given in this book. When asked how long it would take, they all said a week. The managing director gave them two weeks.
Seven weeks later the last project definition arrived. ‘What took you so long?’ the managing director asked. One director said that as he was writing his, it dawned on him he wasn’t really sure what he was doing. Further, when they read each others’ documents they were surprised and often perturbed at what they were doing. The extra time was to work on the gaps and to check that they all formed a coherent programme.
TESTING IF PEOPLE ARE REALLY WORKING ON THEIR DEFINITIONS OR MERELY PAYING LIP SERVICE
With the projects in the case study, I designed a front cover with a space for the name and signature of the project sponsor and project manager, No one was asked to sign anything. Of the seven documents, four came back, unprompted, with both signatures and the other three with only that of the project manager.
Guess which projects proceeded more smoothly and with fewer misunderstandings!
I do not advocate inky signatures on every piece of paper. It looks too much like bureaucracy. However, it can be used as a device to test commitment in a culture where a signature has value.
Prepare the project plan
Preparing a project plan enables you to control the project by:
- defining the scope – specify the activities which need to be performed to complete the project scope and the target dates for their completion;
- assigning accountability – identify an owner for each activity who will be accountable for its completion;
- monitoring progress – provide the baseline against which progress will be measured.
The content and format of the schedule plan are described in the following sections. While these deal with schedule plans, the approach is also valid for the related resource and cost plans which should always use the same work breakdown structure.
Earlier in this chapter we discovered that ‘Projects which are designed solely by one person usually lack the quality and level of involvement necessary for achieving extraordinary results’. I was illustrating the vital team-building benefits of working together at the start of the project. However, the benefits are far more practical and tangible than that. If a team develops an approach to the project and plans it together, there will be debate and argument based on the differing perspectives of each team member. As a result of such discussions, each member will come to understand the needs and viewpoints of the others. Building a good plan is hard work, however, and, once done, all the reasons for it being as it is are embedded in the minds of those who created it. Each individual is less likely to make independent decisions on his/her work scope which will have adverse effects on the work of others. Similarly, when things go wrong (as they probably will), the team will know more instinctively the correct way to handle it. Team members will be more likely to concur on the method of resolution: they will have already cleared away all the inter-functional blockages in their minds when they created the original plan.

The project was one which comprised a number of related software changes to four interrelated systems. The owners of each system had planned their parts of the project, BUT no one had as yet put them all together. They spent two full days locked in a room listing what each needed from the others and eventually built a plan which showed how the whole project fitted together. They had it on large sheets of paper with Post-It Notes joined by arrows. It was hard work. They didn’t understand each other. Everyone else was unreasonable. They didn’t know why the ‘others’ had to do their work in such an inconvenient way (a way inconvenient to them).
Once completed, the plan looked obvious. The approach was clear and the team members were happy with each other. They had even agreed who would be accountable for end-to-end testing across the systems (previously missing from the plan). When the inevitable happened and one team member’s part went wrong, there was no blame apportioned, only solutions offered. They didn’t even need to consult the plan; they knew it well enough as it was theirs.
The project was completed successfully.
‘Planning is everything – the plan is nothing.’
EISENHOWER
Content of the project plan
A good project plan should include consistent plans for benefits, schedule, cost and resources and would include:
- Stages – these represent the natural high level break points in the project life cycle (e.g. initial investigation, detailed investigation, develop and test, trial, release).
- Work packages – these represent the clusters of work within each stage, usually focused on a key deliverable.
- Activities – these are the individual components of work within the work packages that must be undertaken to complete the project. Each activity should be defined in terms of its start and end dates and the name of the individual accountable for its completion.
- Milestones – these are the significant events (often representing the start of a stage) which should be used to monitor progress at a summary level.
- Deliverables – each of the key deliverables defined in the project definition should be shown in the plan. Use milestones to represent their completion.
- Reviews – include reviews at key points throughout the project when progress and performance will be critically evaluated.
- Interdependencies – define all inputs from (and outputs to) other projects. These should include all those defined in the project definition.
You will very rarely be able to plan a project in full at the very start but you should always be able to plan the next stage in detail, with an outline plan for the remainder.
Format of the project plan
Cost and resource plans are best shown in tabular format, perhaps summarised in a graphical format (S-curve) or histogram. See Chapter 21 for a fuller treatment of this topic.
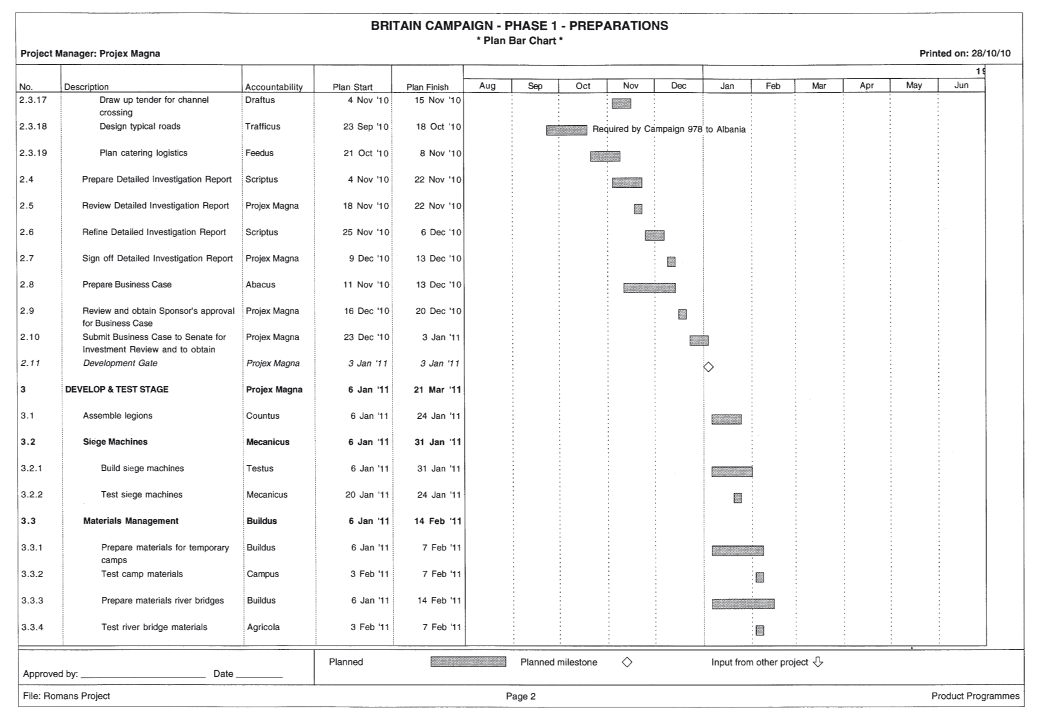
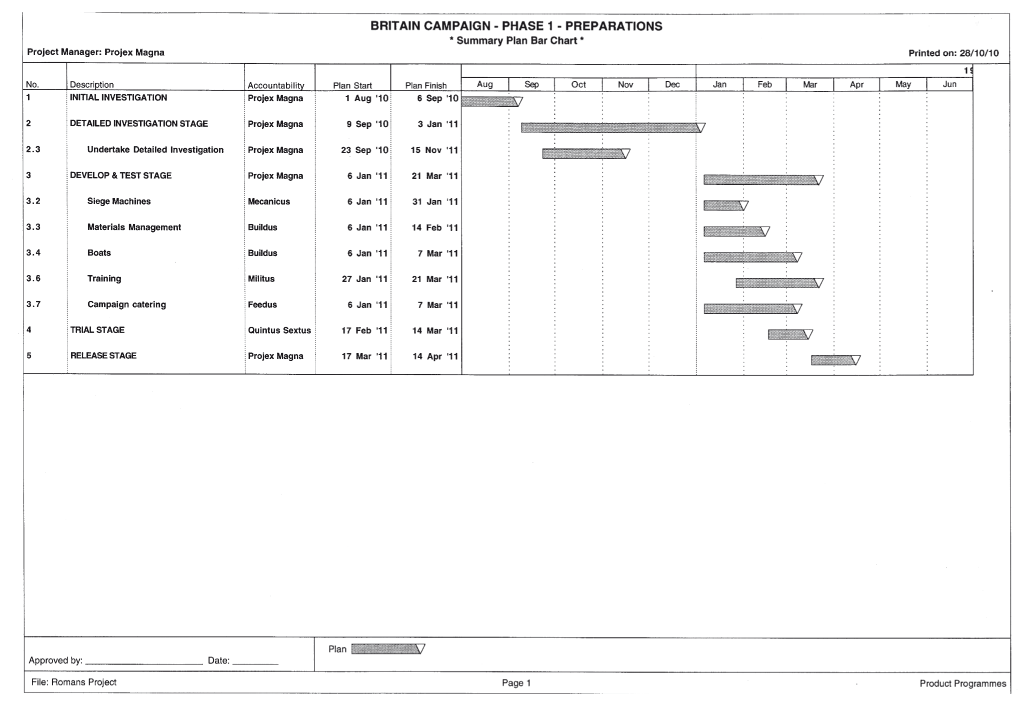
Project schedule plans are most conveniently presented as bar charts, two forms of which are illustrated on the following pages:
- In detail – (Figure 19.2) a progress bar chart, used by the project manager and the team members to control their day-to-day work. This contains all the elements defined in the previous section.
- In summary – (Figure 19.3) a management summary used to present overall progress of the project to the project sponsor, project board and other interested parties. This should show the stages, milestones and other important activities necessary to give an overview of the project. (See Chapter 20 for a fuller treatment of schedule planning.)
Define your project organisation
Once you have your project defined and planned out you should make sure that other organisational aspects of the project are addressed, including defining:
- project administration needs (filing);
- project progress reporting needs;
- who can authorise changes to the project;
- what formal review points are required.
The last three points are documented in Sections 3.1 to 3.3 of the initial business case.
Project administration
Projects can generate a considerable volume of information, correspondence and reports, most of which needs to be accessible and some of which needs to be archived. It is essential that the project manager sets up the administration of the project as soon as practical and that he/she makes sure that all team members and support staff understand what is required and available. The format and media for storing such documentation can vary from being paper based to a full electronic ‘groupware’ platform accessed via an intranet. In many cases, different sections will be held in different formats thus harnessing the capabilities of any support tools and avoiding duplication. Regardless of how you choose to store the information, its content will be similar. The following comprises a checklist on which to base your own project administration requirements. Benchmarking shows that many organisations have a prescribed structure, such as the following, to ensure that records are kept in a consistent way, enabling newcomers to the project to know where to start looking for the information they require.
Contents of a project file
1 Project summary details
This should comprise a short description of the project and the names of those holding the key accountabilities. The summary, as held on a project-tracking system, should fulfil the needs of this section (see p. 263).
2 Contact list
A list of all the team members, their roles and how they can be contacted.
A chronological record, owned by the project manager, of significant meetings, events and commitments. This should refer to detail in other sections of the file where appropriate.
4 Business case and change log
This section contains the fundamental definition of and case for your project. The change log is an amendment record, listing any changes to the business case which are under consideration or which have already been approved or authorised. By having a change log as a supplement to the Business Case, you avoid the need for updating the main document for every change. You need only reissue it when the number of changes becomes too unwieldy to keep in separate documents.
5 Progress reports
All regular and special progress reports should be retained. If a number of different reports are to be prepared for particular audiences, this section should be subdivided accordingly.
6 Project logs
- Issues log.
- Risk and opportunity logs.
- Lessons learned.
7 Schedule
This section contains a copy of the most recent schedule showing achievement and forecast against the agreed plan.
8 Finances
This section contains a copy of the most recent cost and benefit position showing achievement and forecast against the agreed plan.
9 Meetings
All meetings should either be minuted or notes should be produced to promote clear communication. This should include:
- agreements: record any agreements made (even agreements to disagree!);
- actions: be clear who has the accountability for any actions, when they have to be done by and who the recipients are for outputs from those actions.
10 Key deliverables
This section comprises a listing of the key deliverables (with accountabilities for preparation, review and approval). Copies of the documents themselves must be held for team use and archive purposes.
| For Gate Decisions | Other deliverables |
| Proposal Ready for Trial Report Ready for Service Report Project Closure Report Post-Implementation Review Report |
Output Description Feasibility Report Test Plan Test Results Trial Plan Trial Results |
PLUS any others that are required, as defined in the project, such as detailed specifications, requirements, documents, tender documents, etc.
11 Correspondence
Record of all incoming and outgoing correspondence.
12 Reviews
Copies of any additional project reviews, other than the mandatory gate reviews (held in Section 10), should be kept.
For complex projects, individual subprojects and work packages should follow a similar structure to that held for the overall project.
Progress reporting
If you are the project manager, you are accountable for controlling the project and taking the necessary actions to ensure that it delivers the expected outputs. You therefore need to be clear what is actually happening.
You should gather your team together on a regular basis (preferably physically) and check what progress has been made and what progress is forecast. You should also assess the issues which have arisen and the risks which are looming on the horison.
Progress should be recorded by updating the project benefits, schedule and cost forecasts to show:
- activities completed and milestones achieved;
- forecasts of completion dates for activities in progress (or not yet started) where these are known to differ from the agreed plan (e.g. slippage);
- costs spent to date;
- forecasts of costs to complete the current stage of the project and for completing the project in full.
Additionally you should prepare, for the project sponsor and other key stakeholders, a concise written progress report which includes the following information:
- Business objectives.
- Progress summary and outlook.
- Financials.
- Milestones.
- Issues.
- Risks and opportunities.
- Changes.
A description of the content of each of these sections follows. Progress reporting should be active, with you telling the stakeholders what they need to know in as concise a form as possible. If your organisation has a single defined format for the report then that is excellent. It helps make sure the reports are full and complete and aids the reader by providing a familiar, consistent format. So, if you have a reporting system, use the same headings.
Make sure your reports:
- are forward looking, focusing on the likelihood of the benefits being realised and objectives achieved;
- are honest and open, without undermining confidence;
- are focused on key issues;
- balance the good and the bad news;
- acknowledge the achievements of the team members.
Contents of progress report
1 Business objectives
As many stakeholders will not be familiar with your project from its number or title, you should summarise:
- the business objectives the project will satisfy;
- how the project supports your business strategy.
This is taken from Section 2.2 of the business case (see p. 298).
2 Progress summary and outlook
Briefly describe the progress of the project both in terms of achievements to date and expected future performance. Will it achieve its objectives? For any significant schedule slippage or cost variance give the reason, its impact and any corrective action being taken.
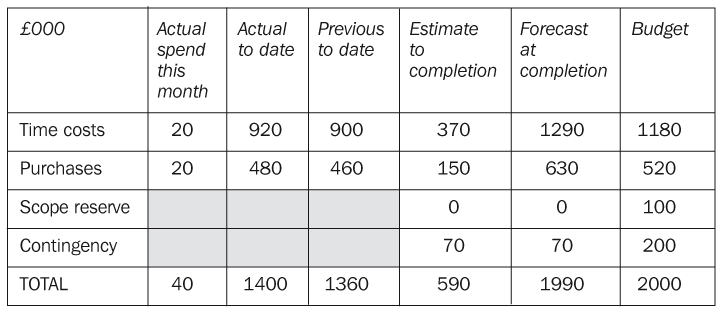
3 Financials
Provide a summary of the project finances in terms of expected benefits, spend to date and total expected spend compared to that planned.
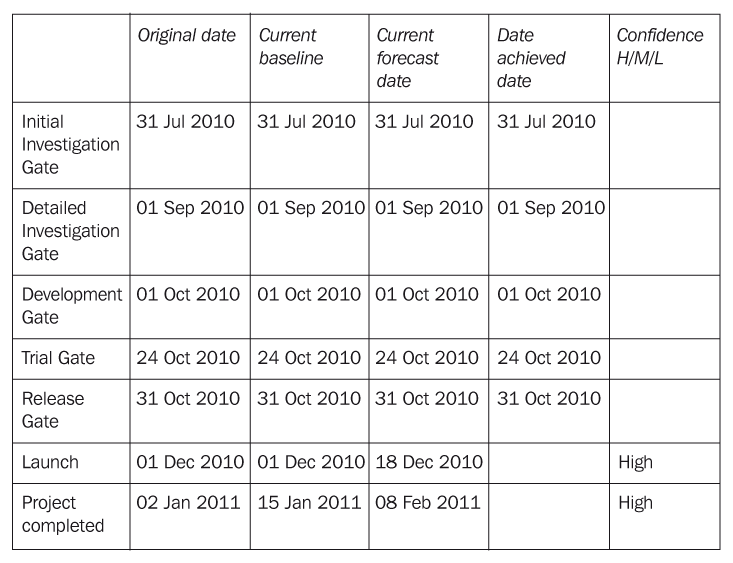
4 Milestones
List the major milestones. These should at least be the gate milestones as defined in Part Two. For each give:
- original and current baseline date;
- forecast date or actual date achieved;
- confidence indicator (your confidence in achieving the forecast date).
Describe the key issues which require escalating for resolution. For each give:
- the nature and impact of the issue;
- action being taken to resolve the issue and who is accountable.
6 Key risks and opportunities
Summarise the high risks and major opportunities which have arisen. For each give:
- the nature and impact of the risk or opportunity;
- action being taken to manage the risk or opportunity and who is accountable.
7 Changes
List all outstanding changes which are beyond the project manager’s authority to authorise. For each give:
- the reason for the change;
- impact of the change;
- who is accountable for authorising the change.
8 Attachments
It may be convenient to attach, for detailed reference:
- cost report;
- progress bar chart;
- issues log;
- risks log;
- opportunities log;
- change log.
UNDER A BUSHEL
Don’t be modest; if you don’t acknowledge the achievements made by you and your team on the project, don’t be surprised if the stakeholders don’t either. It has been said that the definition of an easy project is one which is successful. If it wasn’t easy, it would have failed. The project managers and teams of successful projects are, therefore, in danger of becoming ‘invisible’ or having their achievements undervalued even if it was their own hard work, excellent planning and adherence to best practice which got them there. DON’T BE INVISIBLE!
Change control
Once the project has been authorised, its scope, cost, benefits and timescale are baselined and used as the basis on which to monitor progress. Under certain circumstances it is, however, legitimate (and often desirable and/or unavoidable) to change these baselines. Who authorises such changes depends very much on the impact. It is, therefore, essential that the extent of the authority given to the project manager and project sponsor is defined. (Chapter 25 describes this more fully.)
Document who has accountability for authorising changes in Section 3.2 of the business case.
Review points
The management framework comprises a staged approach to projects with the ‘gates’ defining the key points when a formal project review is undertaken. However, the time lapse in some stages can be very long, particularly in the Develop and Test Stage. It is, therefore, essential that a sufficient number of additional review points are built into the plan to check that:
- the project still meets a real business need and is achievable;
- the quality of the deliverables is adequate;
- the plans are in place;
- the project organisation is working.
As a guide, a project should have a formal review every three months or when a major commitment is to be made. The occurrence of such reviews should be formally documented, as they comprise an essential part in managing the risks.
Reviews are often regarded as taking up valuable time and hampering progress on the project. However, it is in the project sponsor’s interest that reviews take place with accountability to make sure they happen. (Chapter 26 discusses reviews more fully.)
Document the additional reviews in Section 3.1 of the Business Case.
19.4 PROJECT ORGANISATION CHECKLIST
Use this checklist to audit any projects currently in progress.
| Criteria | |
| Have progress reporting formats been set up? | |
| Have progress reporting lines been set up? | |
| Has a system for capturing and managing risks and opportunities been set up? | |
| Has a system for capturing and managing issues been set up? | |
| Has a system for recording and approving changes been set up? | |
Engage your stakeholders
Ignore stakeholders at your peril
Every project will create some change in the organisation; otherwise there is no point in undertaking it! However, some changes are ‘easier’ to effect than others as they align with the status quo and do not cross any politically sensitive boundaries. In essence, most of the people carry on as they always have done. Other changes, however, are fundamental and will result in shifts in power bases internal to the organisation or even external, such as unions, suppliers or customers.
Stakeholders are those affected by the project. All those involved in the project are, therefore, stakeholders. However, there are also those who take no direct part in the project as team members, but whose activities will in some way be changed as a result. These could be users of new systems, people in new departments resulting from reorganisations (or those made redundant), those taking roles in new processes as managers, supervisors and workers. Often the project is of little importance to them but they are of great consequence to the project if their consent is critical to success. It is essential to identify them because it is critical to enroll them at an early stage in the project to ensure their power does not cause the project to fail later. Never underestimate stakeholders’ ability to ruin your best laid plans!
It is both the project manager’s and project sponsor’s role to ensure that all stakeholders are adequately briefed on the project. Too much communication will drown them – they won’t read it. Not enough will mean your project will be lower down their priority list than you want it to be.
Engaging stakeholders and keeping them enrolled is a taxing but essential task. It is accomplished both by a formal communication plan and by ‘enrolling behaviour’ on behalf of all the project team on both a planned and opportunistic basis.
Sources of power
All organisations are ‘political’ to some extent and the greater your project’s scope to change the status quo, the more you will need to be tuned in. You will need to identify the power bases you and others are operating from. These include:
- Position, which results from rank and formal authority. This can be actual or ‘reflected’ (when a person uses the position of their boss to enhance their own standing).
- Status, which results from how people perceive an individual, often related to their charisma and leadership qualities and may bear no relationship to facts of any particular project.
- Resource, where a person has direct authority over resources and can therefore smooth the way for, or block, any initiative requiring those resources. This can be directors, managers or unions.
- Expertise, where the knowledge or skill of an individual is such that others listen to and follow them.
- Legal and regulatory, where a group or body has authority over the ‘rules of engagement’ for your industry.
- Customer, where individuals or groups can influence you through persuading your customers to buy or not buy from you.
19.5 STAKEHOLDER INFLUENCE MAPPING
To be done in project team mode.
| 1 | Brainstorm who your stakeholders are. Write each on a Post-It Note and stick them onto a white board or flip chart. Stakeholders may be individuals or groups. | |||
| 2 | Cluster the stakeholders into groups based on similar need or impact from the project. Rationalise the stakeholder list if possible, but don’t worry if you can’t. | |||
| 3 | Define the role of each stakeholder (Figure 19.4). Stakeholder roles are defined as: | |||
| • | Decision maker – this stakeholder is required to make a decision regarding the project. | |||
| • | Influencer – this stakeholder has influence over the project and/or over the decision makers. | |||
| • | Player – this stakeholder is required to play a part in the project, perhaps providing resources, facilities or review time. | |||
| • | Consent – the consent of this stakeholder is required if the project is to be a success (e.g. computer system users, customers). | |||
| 4 | Take each stakeholder in turn and, using one flip chart per stakeholder, answer the following questions: | |||
| • | What is this person or group’s stake in the project? | |||
| • | What is their role in the organisation? | |||
| • | What will they gain as a result of the project? | |||
| • | What will they lose as a result of the project? | |||
| • | What do they control, which the project needs? | |||
| • | What is their source of power now (see above)? | |||
| • | What will be their source of power after the project (see above)? | |||
| • | What is their attitude to the project? (strong/weak/positive/neutral/negative)? |
|||
| • | How are they likely to be influenced (e.g. emotion or logic)? | |||
| It may be convenient to capture this information in a template for future reference (See CD-ROM for an example). | ||||
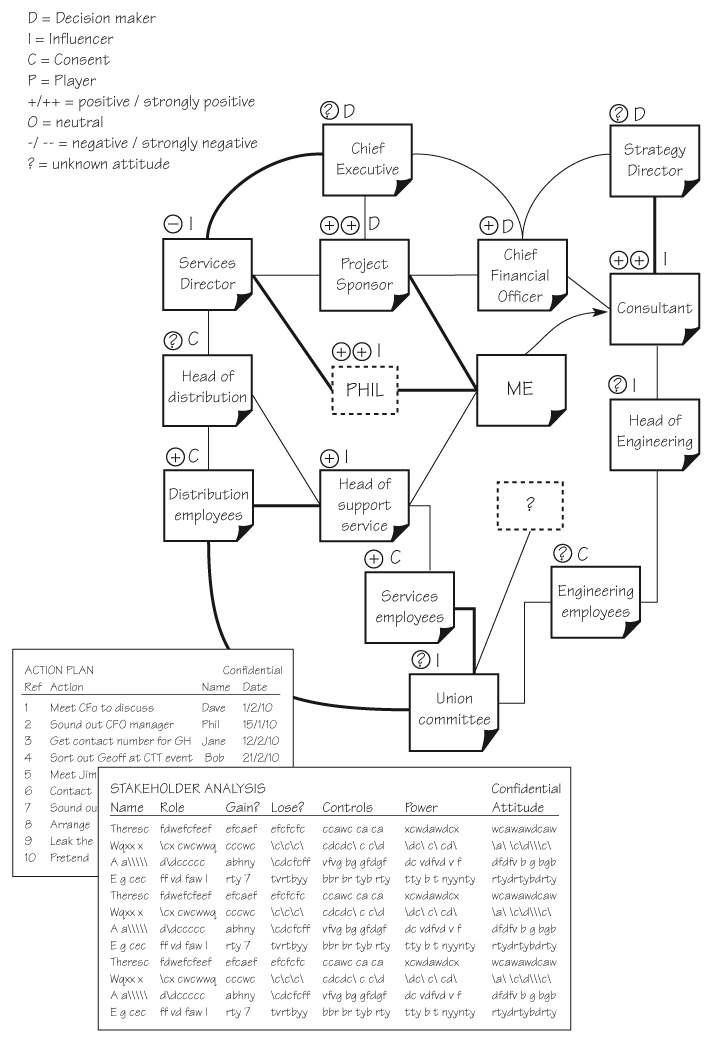
Figure 19.4 A typical stakeholder influence map
The typical output from stakeholder analysis. Key individuals have been identified and a list of their characteristics drawn up. Relationships are shown by lines between the individuals – thick lines represent strong relationships. A number of key individuals have unknown attitudes to the project. Use existing relationships or develop new relationships to address these. Don’t rely on the hierarchy. Finally, agree an action plan and be very careful who you allow to see these documents!
- Regarding stakeholders who are negative or neutral. You need to address them.
- For those stakeholders where the line of influence is missing or very long. You must aim to shorten it to gain access to that person.
- As for those whose attitudes are unknown, you must find out what they are.
- Monitor the neutral ones, to ensure they do not become antagonistic.
19.6 STAKEHOLDER COMMUNICATION PLANNING AND TRACKING
Work with your project team using the output from Project Workout 19.5.
| Planning | ||
| 1 | On a flip chart, brainstorm the following for each stakeholder: | |
| • | the messages you need them to receive; | |
| • | possible methods/media or people you could use to communicate with them; | |
| • | frequency of communication. | |
| 2 | Consider, if you were them, what you would want to know and when? Aim to see things from their perspective. If possible, ask them! | |
| 3 | On a large sheet of paper or a white board, list each stakeholder along the top. | |
| 4 | Decide who should receive the standard regular progress report. Put an asterisk over the relevant stakeholder to indicate this. | |
| 5 | Brainstorm the possible communications which you may wish to send out to the stakeholders. Write each on a Post-It Note. Place these on the chart on the left-hand side, in chronological order. | |
| 6 | On smaller Post-It Notes, add a tick to show which stakeholder(s) is/are ‘hit’ with each particular communication. | |
| 7 | Review how frequently each stakeholder will receive a message. Is it too often? Is it not frequently enough? Rearrange the Post-It Notes until you create a plan that the team is comfortable with (Figure 19.5). | |
| 8 | Transfer the key communications to your schedule plan and ‘fix’ the plan onto your white board by rewriting directly onto it rather than onto Post-It Notes. | |
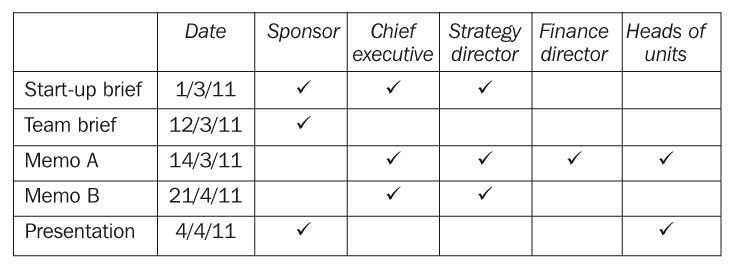
Figure 19.5 Stakeholder communications
An example of a chart to keep track of communications to key stakeholders.
Do not be concerned that you cannot see very far into the future. The objective is to make sure you consider who you need to communicate with, when and how.
Tracking
Using the same white board output, simply write the communication made and the date on the left hand side, ticking the relevant stakeholder columns.
You will thus build a listing from which you will easily see who you have missed. You can then work both from your formal plan and add extra communications when you see these as desirable. You will also be confident that they look rational and consecutive to the recipients.