
Chapter 5: Customizing the Camera

Introduction
Navigating the menus and setting the commands on the Sony A77 can be frustrating. The number and diversity of commands and functions can make it difficult to find, select, and choose the settings you need. To remedy this, the camera has some customization opportunities.
You may find that you change a specific function frequently and you want easy access to it. You have that capability with this camera. Three of the camera buttons can be reassigned to execute different functions.
In addition, you may find you frequently utilize a complete set of camera settings. Instead of setting and resetting your camera’s command values, you can store up to three customized set of command values for instant recall. This can give your camera a whole new personality; it can be like having four cameras instead of just one.
Using the camera’s predefined color schemes for your pictures and movies can even eliminate the need to post-process your images. Lastly, you can take advantage of a couple of command settings to facilitate your camera utilization style.
Assigning Button Functionality
Although each of the camera’s buttons is labeled and has a default value, three of them—AEL, ISO, and AF/ MF (figure 5-1(a-b) can be reassigned to execute a different function. This has one obvious drawback: if you change the button’s function, it no longer matches the button’s label. This might cause some confusion later if you forget the button’s special use or if you share your camera with someone who is unfamiliar with your customized settings. But the advantages can outweigh the potential confusion if you frequently activate or change a specific function.
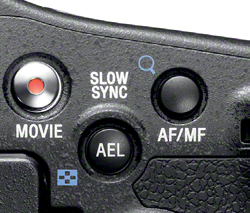
Figure 5-1a: AEL and AF/ MF programmable camera buttons
For example, the AEL (Automatic Exposure Lock) button, which locks the exposure, might be a button you rarely use. (Instead, you can press the shutter button halfway to lock in focus and exposure.) On the other hand, you might constantly change the camera’s Metering Mode. You can reset the AEL button’s function to the Metering Mode command and have its options at your fingertips.

Figure 5-1b: ISO programmable camera button
The AEL, AF/MF, and ISO buttons may be customized through the following three menu commands.
MENU>Custom Menu (3)>AEL button
MENU>Custom Menu (3)>ISO button
MENU>Custom Menu (3)>AF/MF button
The following is a list of the available values for each button.
Exposure Comp. |
Flash Comp. |
AEL Hold |
Aperture Preview |
Drive Mode |
White Balance |
AEL Toggle |
Shot. Result Preview |
Flash Mode |
DRO |
Spot AEL Hold |
Smart Telecon. |
AF Area |
Auto HDR |
Spot AEL Toggle |
Focus Magnifier |
Face Detection |
Creative Style |
AF/MF Control Hold |
Memory |
Smile Shutter |
Picture Effect |
AF/MF Control Toggle |
Aperture Preview |
ISO |
Image Size |
Object Tracking |
|
Metering Mode |
Quality |
AF Lock |
|
Reassigning any of these three buttons can give you easy access to your most frequently used commands, modes, and settings. When you press one of the customized buttons, the assigned option is initiated. As your needs change, you can always reset the button back to its default or to a different command, mode, or setting.
Note that the values of these three buttons revert to their defaults when you execute the Initialize command’s [Reset Default] or [Custom reset] options but not when you execute Initialize [Rec mode reset].
Assigning Button Functionality Recommendation
We recommend that you use this capability only if you are going to consistently use a specific operation and need quick access. Otherwise, we recommend leaving the three buttons set to their delivered defaults.
Memory Command
The Memory command allows you to register a group of camera commands, functions, and settings, most of which are covered in detail later in the book. At this point, we cover what the Memory command does and how to utilize it as a customization shortcut. We recommend waiting to set up a memory group until you have read the rest of the book and become more knowledgeable about the camera’s settings. That way, you will be better equipped to construct an effective and useful combination of camera settings to be stored in a memory group.
The camera allows you to register up to three separate combinations of camera settings and then recall and apply them. You can select a saved memory group by using the mode dial’s MR (Memory recall) option (figure 5-2). Any subsequent changes to the camera’s settings remain outside the saved memory group and are not applied when the group is recalled.
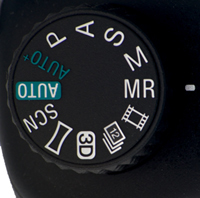
Figure 5-2: MR option on the mode dial
This allows you to have up to four sets of camera settings available at any time: three saved, customized memory groups (MR groups) plus the current camera settings outside of the groups. For example, if you have a favorite set of camera settings for taking landscape pictures, you can save them in one MR group and recall them whenever you wish to take a landscape picture. Maybe you also take a lot of outdoor portraits. Save your most used settings in another one of the MR groups. This way you can speed up your photographing process by moving the mode dial to MR and selecting the appropriate MR group.
Although not all of the camera’s command values can be saved in MR groups, the values of the following frequently used items can be saved:
Mode Dial Option |
ISO |
Creative Style |
Object Tracking |
Exposure Mode |
White Balance |
Flash Mode |
Picture Effect |
Aperture |
Exposure Compensation |
Flash Compensation |
Local AF Area’s Position |
Shutter Speed |
Metering Mode |
Face Detection |
Still Shooting Menu Items |
Drive Mode |
DRO/Auto HDR |
Smile Shutter |
|
As long as the MR mode dial option is selected, you can use any one of the three MR groups. You can temporarily override any of the saved settings by selecting a command or function and changing its value. This does not change the saved MR group’s settings, but the new value stays in effect until you exit the MR mode dial option or select another MR group.
Note that the saved MR group settings are reinitialized to the camera defaults when Initialize command is set to [Reset Default] only. The MR group’s content is retained when the Initialize command is set to [Rec mode reset] or [Custom reset].
Setting Memory Group Values
Execute the following steps to save a set of camera settings for later recall:
1. Move the mode dial to an option other than MR.
2. Set the camera options to the values you wish to save.
3. Select
MENU>Still Shooting Menu (3)>Memory>[1], [2], [3]
1, 2, and 3 each represent a specific MR group with a specific set of camera values (figure 5-3).
4. Toggle the multi-selector to select a specific MR group number.
5. Press the multi-selector button to save the camera settings in the selected MR group.
You cannot save exposure compensation adjustments or manual focus settings in an MR group.
Recalling Saved Memory Settings
To recall the saved settings:
1. Turn mode dial to MR.
2. Toggle the multi-selector to the left or right to select an MR group and its saved settings.
3. To view any of the settings, toggle the multi-selector up or down to move through the selected MR group’s saved settings.
4. Press the multi-selector button to activate the selected MR group’s settings.
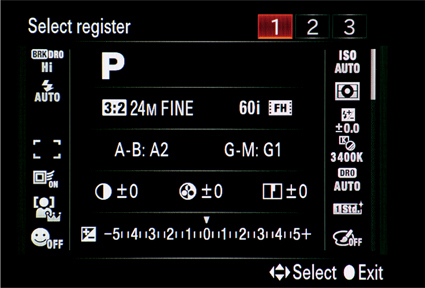
Figure 5-3: MR 1 group selected with first page of values displayed
Keep in mind that when you use a memory group, the mode dial is set to MR. Look at the LCD screen to see the applied MR group’s saved mode and recalled settings.
To change the selected MR group, either exit and reenter the MR mode dial option or press the Fn button and highlight Memory recall in the top left corner. Then repeat the above steps 2 through 4.
Overriding Recalled Memory Settings
Just because you save a set of commands and apply them doesn’t mean you can’t change them on the fly for a specific image. Once a memory group is applied, you can change a setting’s value simply by using any non-mode dial button. For example, if you wish to override an MR group’s White Balance (WB) value, press the Fn button, select WB, and choose another value. Remember this overridden value is not saved in the MR group; it only changes the setting’s value for the current usage. Once you exit, the MR group will have its original WB value when you recall it.
This expands the benefits of MR groups even more. Instead of having a memory group handle only a specific type of image, you can set up an MR group to handle a specific image genre. In other words, an MR group can recall a group of settings for portraits with the WB function set for indoor lighting. When you recall the group, you can either leave the setting at indoor lighting or override it to another setting such as outdoor shade using the Fn button. The overrides are applied only as long as you remain in the MR group and do not override them again. If you recall a different MR group or change the mode dial from MR, the override will be lost, and the original MR group will show the WB function set for indoor lighting the next time it is recalled.
Memory Mode Recommendation
This timesaving feature can be very useful if you take pictures with a specific group of camera settings over and over again. Sony has made this a very easy feature to save, view, and repetitively use without slowing you down. The only concern you might have is remembering what MR group is for what type of pictures or movies. In this case, we recommend you keep some simple notes outlining each MR group’s purpose for easy reference. This will also be valuable should you have to execute the Initialize command’s [Reset Default] option where the MR groups’ settings are reset to the camera’s defaults.
Utilizing Predefined Color Schemes
Instead of conducting post-processing later on your computer, the Sony A77 gives you the option of applying a look and feel at the time you take the picture or movie. This can be done using either the Creative Style or Picture Effect functions available through the Fn button (figure 5-4).
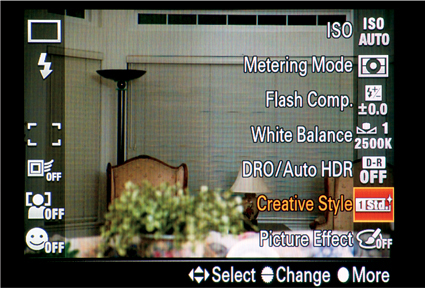
Figure 5-4: Creative Style and Picture Effect icons, lower right
Creative Style Function
When you press the Fn button, the Creative Style function is in the right column one up from the bottom. This function is available for all mode dial options except for the automatic modes (Auto, Auto+, and SCN). Automatic modes force Creative Style to its default value, Standard. When you recall an MR group, the applied Creative Style is the one saved at the time the MR group was created.
The Creative Style function has 13 options to choose from. Each option applies a different mood or style to your resulting image. Table 5-1 lists the available Creative Style options and descriptions.
Creative Style |
Description |
Standard |
Default – captures image with natural coloration. |
Vivid |
Accentuates colors, making them stand out more. |
Neutral |
Tones down colors, making them more subdued. |
Clear |
Captures images in clear tones with fluid colors in highlighted areas. Good choice for radiant light. |
Deep |
Enables intense coloration to stand out while maintaining color differentiation. |
Light |
Enables light color tones to brighten and increases contrast for better viewing. |
Portrait |
Softens skin tones for a more pleasing effect. |
Landscape |
Heightens saturation, contrast, and sharpness to produce more vivid and crisp results. |
Sunset |
Accentuates existing colors and adds warm sunset/sunrise tones. |
Night Scene |
Accentuates contrast to capture an image closer to the actual scene. |
Autumn Leaves |
Accentuates existing colors and adds warm red, orange, and yellow tones. |
Black & White |
Transforms the image into black-and-white with gradations of gray. |
Sepia |
Transforms the image into old-fashioned sepia coloration. |
Table 5-1: Creative Style options
The camera allows you to go a step further and fine-tune the selected Creative Style’s contrast, saturation, and sharpness (figure 5-5) for all styles except [Black & White] and [Sepia], where only contrast and sharpness can be adjusted.
Each fine adjustment has a range from +3 to –3 that changes in increments of 1, meaning you can increase or decrease the option by a factor of 1, 2, or 3. Your fine-tuning adjustments are retained until you change them or execute the Initialize command to reset the camera settings to their defaults.
The effects of your selected color scheme and fine adjustments are best evaluated on the LCD display screen. Table 5-2 describes each of the available adjustments and its effect on the image. The camera allows you to preview a Creative Style prior to its selection. Although each style’s name gives you an idea of how the image will be affected, the only way to be sure is to actually preview it on the display screen. For example, applying [Vivid] Creative Style to a multi-colored floral image will have a much different effect than applying it to an image with one or two colors. In the latter case, you may find a different Creative Style to be more appealing.
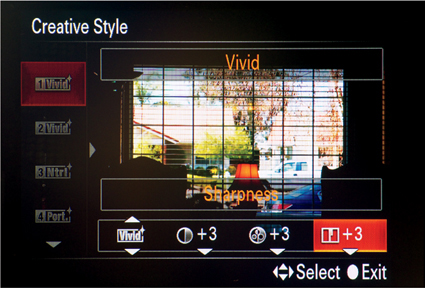
Figure 5-5: Creative Style’s fine adjustment options
Fine Adjustment Option |
Description |
Contrast |
Controls the intensity of highlights and shadows. A +3 value increases highlight and shadow intensity, reduces white and black color variations, and gives the image a bolder, stronger look. A -3 value reduces highlight and shadow intensity, increases white and black color variations, and gives the image a smoother overall look. |
Saturation |
Controls the richness of the colors. A +3 value makes the colors bolder and accentuates them, giving the image more color contrast. A -3 value mutes and softens the colors, giving the image a more homogenous look. |
Sharpness |
Controls the identified detail edges. A +3 value heightens the edges, creating a bolder, more pronounced image. A -3 value softens the edges, creating a more blended look. |
Table 5-2: Creative Style’s fine adjustment options
Important points:
• You can set a Creative Style when Quality is set to RAW, but since the Creative Style is only saved with JPEG files, you will not see its effects on saved RAW files outside the camera. In this case, the images will appear as though no Creative Style had been applied.
• Creative Styles are available for MP4 and AVCHD movie files.
• Creative Style is set to [Standard] with no adjustments when the mode dial is set to AUTO, AUTO+, or SCN, or when the Picture Effect function is selected.
• Saturation adjustment is not available for the [Black & White] and [Sepia] options
• The selected Creative Style and its adjustments can be stored in an MR group.
• The selected Creative Style and its adjustments are retained even if the camera is turned off and back on.
• Creative Style adjustments are reset to zero via the Initialize command’s [Reset Default] and [Rec mode reset] options. The Initialize [Custom reset] option does not reset the Creative Style values.
• Use the exposure button to adjust exposure while using a Creative Style.
Selecting a Creative Style is easy. Just execute the following steps:
1. Press the Fn button.
2. Select the Creative Style icon from the lower right column of functions. The Creative Styles screen displays (figure 5-6). The last six selected Creative Styles display in the vertical column on the left side of the screen, with the latest selected option listed first. The full list of options is available in the far left menu option on the horizontal bar at the bottom of the display screen.
3. Toggle the multi-selector to the right to enter into the Creative Style horizontal menu. You will be positioned on the Creative Style menu option (far left). Scroll through the options toggling the multi-selector up and down.
4. To adjust the style’s contrast, saturation, and sharpness, toggle the multi-selector to the right.
5. Scroll through the selected adjustment options using the multi-selector to toggle up and down to change an adjustment value (figure 5-7).
6. Press the multi-selector button to apply the style and its adjustments and exit back to Live View.
The Creative Style icon is displayed on the image preview (figure 5-8) indicating the selected Creative Style and its adjustment settings. You will see the same icon displayed the next time you press the Fn button (figure 5-9).
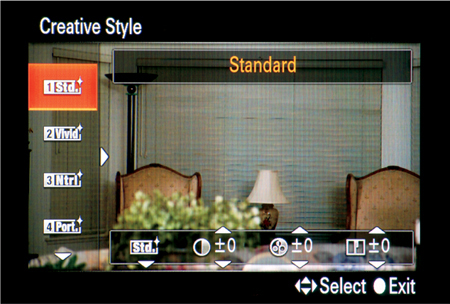
Figure 5-6: Creative Style menu
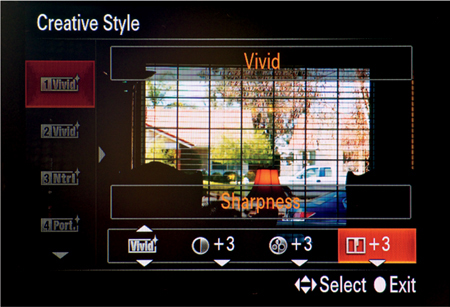
Figure 5-7: Creative Style icon with changed adjustment settings
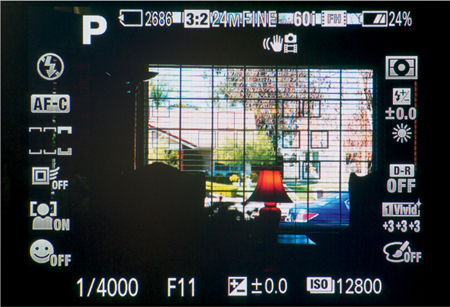
Figure 5-8: Live View with applied Creative Style icon with its fine adjustments
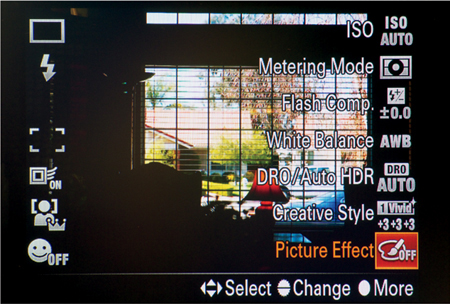
Figure 5-9: Creative Style icon with its fine adjustments displayed via the Fn button
Picture Effect Function
The Picture Effect function gives you the opportunity to quickly apply a predefined effect filter while recording movies and picture files rather than as a post-processing activity. There are 12 Picture Effect options (table 5-3), several with suboptions to apply tinting or identify a focus area.
At first, Picture Effect might seem like a duplication of Creative Style, but this is not the case. There are some similarities between Picture Effect and Creative Style. Both are accessed through the Fn button, with Picture Effect listed last in the right column. Both function values can be stored in an MR group, but both functions cannot be operational at the same time. Picture Effect automatically turns off when Creative Style is set to a value other than Standard. Creative Style switches to [Standard] when selecting a Picture Effect option. In other words, each function defaults to a non-competing value when you set the other to a non-standard option.
Aside from the facts that the Picture Effect function’s color repertoire is different and you can pinpoint a focus area, you cannot use Picture Effect options when Quality is set to capture RAW files. In addition, while Creative Style and Picture Effect are not available in automatic modes (Auto, Auto+, and SCN), Picture Effect is also not available in Sweep Panorama, 3D Sweep Panorama, or Continuous Advance Priority AE.
Picture Effect options do not have the fine adjustment capability that Creative Style options have. Instead, some Picture Effect options allow you to further identify how the effect should be applied. For example, the Toy Camera option has the suboptions [Normal], [Cool], [Warm], [Green], and [Magenta], giving you the opportunity to apply a color tint to the Toy Camera effect.
Important points:
• Picture Effects can be applied only when Quality is set to JPEG files.
• Picture Effect is set to [Off] when the mode dial is set to AUTO, AUTO+, SCN, Sweep Panorama, 3D Sweep Panorama, and Continuous Advance Priority AE, and when a Creative Style option other than [Standard] is selected.
• Picture Effect options along with their suboptions can be stored in an MR group.
• The selected Picture Effect and its suboptions are retained even if the camera is turned off and back on.
• Picture Effect is set to [Off] via Initialize>[Reset Default] and [Rec mode reset]. Option Initialize>[Custom reset] does not reset Picture Effect value.
• While using a Picture Effect, adjust the exposure (shutter speed and aperture) with the exposure button.
• You can further adjust a Picture Effect image using Sony-supplied Image Data Converter software.
Icon |
Description |
Options |
|
Off |
|
Turns off Picture Effect. |
|
Toy Camera |
|
Creates an image as if it were taken with a toy camera. Colors and shadowing are more pronounced with less smoothness and gradation. |
Set the color tone: |
Pop Color |
|
Emphasizes color tones and makes them more vivid. |
|
Posterization |
|
Emphasizes primary colors—or, in the case of a black-and-white image, makes the two colors more pronounced. Creates a more contrasting, abstract look. |
Select primary colors or black-and-white: [Color], [B&W] |
Retro Photo |
|
Creates the image in an old-fashioned photo style using sepia and faded contrasts. |
|
Soft High-Key |
|
Creates a softer and more ethereal image. |
|
Partial Color |
|
Creates an image that retains one color and turns the rest of it black-and-white. |
Select retained color: |
High Contrast Mono. |
|
Creates a high contrast black-and-white image. |
|
Soft Focus |
|
Creates a soft lighting effect. |
Set effect intensity: |
HDR Painting |
|
Takes three images and merges them to create a high-dynamic range (HDR) image. The image’s colors and detail are heightened. |
Set effect intensity: |
Rich-tone Mono. |
|
Takes three images and merges them to create a high-dynamic range (HDR) image in black-and-white. |
|
Miniature |
|
Creates an image with the main subject in focus and the background out of focus. Often used for miniature model images where the model is in focus and the background is not. |
Set focus area: |
Table 5-3: Picture Effect options
Selecting a Picture Effect is easy. Just execute the following steps:
1. Press the Fn button.
2. Select the Picture Effect icon, which is the last option in the right function column.
3. Scroll through the options using the multi-selector to toggle up and down.
4. For options with right and left arrows on the icon, toggle the multi-selector right or left to move through Picture Effect’s suboptions (figure 5-10).
5. Press the multi-selector button to apply the Picture Effect and the selected suboptions.
An icon is displayed on the image preview (figure 5-11) indicating the selected Picture Effect and suboption. You will see the same icon displayed the next time you press the Fn button.
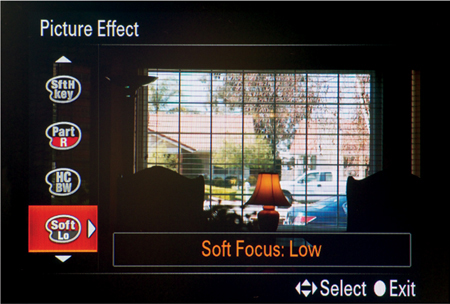
Figure 5-10: Picture Effect function’s Soft Focus and suboption
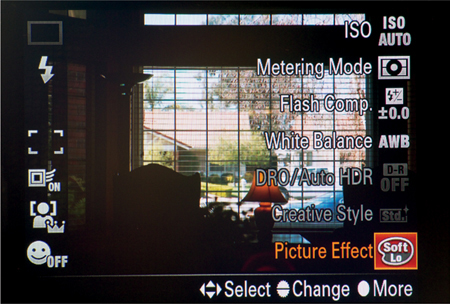
Figure 5-11: Live View with Soft Focus Picture Effect icon with Low suboption
Creative Styles and Picture Effect Recommendation
Creative Style and Picture Effect provide interesting color effects with some limitations. Although you can modify a Creative Style’s color contrast, saturation, and sharpness, the allowable range may not be everything you want. Creative Style allows you to capture the image in both RAW and JPEG formats while still giving you the option of processing your pictures outside the camera. Picture Effect allows you to apply expressive filters to your pictures, but only to JPEG files.
We recommend that you play with both functions and see if any of the special styles and effects gives you results you like. If so, use them. One note of caution: many Creative Style options are subtle. Unlike Picture Effect, which has an [Off] option, the closest Creative Style option to [Off] is [Standard]. That said, the [Standard] option has contrast, saturation, and sharpness adjustments available. If your intention is to have no Creative Style affecting your images, make sure these adjustments are set to zero.
Customizing Camera Commands
Display Menu
When you first turn on the camera and press the MENU button, the resulting display screen has the camera’s menu positioned at the beginning.
MENU>Still Shooting Menu (1)>Image Size
This might work out fine when you need to change a variety of commands scattered throughout the menu structure. But you might find it much more convenient to have the display menu positioned at the last selected command instead. This is very convenient when you are making adjustments to a specific command between shots, since you can eliminate having to toggle through the menu to the command you want. Once you set the Menu start command for the last command viewed, you can instantly make the change you want the next time you press the MENU button.
MENU>Setup Menu (1)>Menu start>[Top], [Previous]
The [Top] option positions the menu at the first command in the menu structure. The [Previous] option positions the menu at the last command viewed.
Delete Confirmation Step
Not all captured pictures and movies are keepers. There are several delete methods to choose from, one of which is to delete a single file using the Delete button. This delete method has a default confirmation step with two options: [Delete] and [Cancel]. The default is to have the [Cancel] option enabled, but you can enable the [Delete] option instead. Leaving the default set to [Cancel] requires you to toggle up, position the cursor on [Delete], and press the multi-selector button to finalize the delete process.
MENU>Setup Menu (2)>Delete confirm>[“Delete” first], [“Cancel” first]
Changing the command to [“Delete” first] eliminates the need to reposition the cursor from [Cancel] to [Delete]. This might not seem like much of a timesaver, but if you frequently delete files from your camera using the Delete button, it will definitely save you time.
One thing to keep in mind: once you delete a file from the memory card, it is gone forever. For some people, keeping the [Cancel] option enabled is a worthwhile safeguard, even though it requires one extra step to delete a file.
Mode Dial Guide
If you are a novice to the Sony camera line, you might want to set the Mode Dial Guide command to [On]:
MENU>Setup Menu (3)>Mode Dial Guide>[On], [Off]
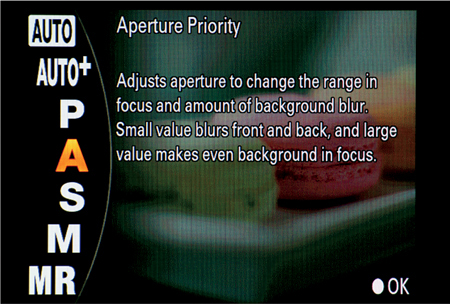
When the guide is activated, an informational screen tells you about the selected shooting mode each time you turn the mode dial (figure 5-12). This is great while you are learning the camera, but it won’t take long before you know more about the selected mode than the informational screen gives you. We turned this feature off very quickly.
Recommendations
Whether you use any of these customizations comes down to your own personal preference. The few times we re-initialized the camera, we quickly changed the Menu start and the Delete confirm commands to the [Previous] and [“Delete” first] options respectively, and left the Mode Dial Guide command set to [Off].
If you frequently shoot the same type of pictures or movies with few setting changes, consider saving the camera settings in a Memory recall (MR) group. This is an excellent way to record quickly without taking time out to adjust your camera settings. For example, a day at the park would most likely mean sunlight, high shutter speeds, low ISO, and possibly AF Tracking. It could also mean that most of your pictures would include smiling people whose faces have already been registered in the camera. But then, you might also want to take close-up pictures of the flowerbeds scattered around the park. Consider setting up MR groups for both scenarios so you can easily switch back and forth throughout the day.
If you are going to keep MR groups for any length of time, we recommend that you carry a written record with a short description of each group. There have been times when we have forgotten what a saved MR group is for. Better to have a safety net to refresh your memory rather than miss an opportunity because you temporarily forgot something. Also, write down your settings so that you can rebuild an MR group should you need to re-initialize your camera.
Whether you eliminate the extra Delete process step or not is completely your own decision. We only recommend that you consider it and base your decision on how certain you are that the selected image is one you really want to delete. This shortcut does not do the actual deleting. It only positions the action on the Delete option instead of making you take an extra step to confirm your decision. We do most of our deleting outside the camera, so this shortcut rarely matters to us. But if you frequently delete your images within the camera and you aptly select images to be deleted, you may want to set this shortcut to [“Delete” first] to save yourself an extra step.
If you wish to add some ambiance to your pictures and movies, investigate the available options in the Creative Style and Picture Effect functions. We have enjoyed using both functions and have been surprised by how easy it is to capture an artistic image with little effort. We have even taken the results and done additional image processing on our computer using third-party software.
As mentioned earlier, the settings for Creative style and Picture Effect options are retained and automatically applied to your movies and pictures in most of the camera’s modes. Therefore, when you don’t want to apply any specific styles or effects, make sure that Creative Style is set to [Standard] with all of its adjustments at zero and that Picture Effect is set to [Off].
In regard to setting the AEL, ISO, and AF/MF buttons to other functions, this again depends on how you use the camera. If you use this shortcut, be careful not to be confused by the camera’s labels for each button. You can always set a button to a new function for a specific photo shoot and then change it back afterwards. If you find you want to permanently set one of the buttons to another function and you tend to be forgetful, consider using some tape to relabel the button.
We recommend not changing any button functions until you are very familiar with the types of pictures and movies you will be taking. However, due to the difficulty of pressing the Preview button, we quickly reset the AF/MF button to execute the depth of field Preview function.