
Chapter 11: Recording Movies

Introduction
The Sony A77 is a hybrid, capable of taking both excellent still pictures and movies. As such, it allows you to carry one camera to do two tasks. To switch from taking still shots to shooting movies is as easy as pressing the Movie button to begin recording (figure 11-1). Moreover, the movies are of excellent quality and can be played on HDTVs or recorded to DVD discs.
In this chapter, we introduce the movie operation of the Sony A77 and approach the topic at a beginning level for users who are more familiar with still photography. We also provide an explanation of file formats as well as the commands that are used to record movies.
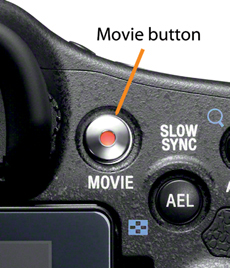
Figure 11-1: Movie button (photograph courtesy of Sony)
There are two ways to take movies. One is to let the Sony A77 make all the decisions, including focusing. This is what happens when you press the Movie button on the back of the camera while the mode dial is set to an option other than Movie. If you want to exert more control and adjust the aperture or the shutter speed, turn the mode dial to Movie mode (the icon that looks like a film strip, figure 11-2). This allows you to control the shutter speed and the aperture, but at the expense of automatic focusing. You will have to use the camera in manual focusing mode, but this is not as much of a hardship as you might think. Thanks to the Peaking feature, you can adjust focus precisely and quickly. The color fringes provide an immediate indication of when and where you are in focus. Moreover, if you own a lens that has a noisy focusing motor, you will need to use manual focus to avoid recording the grinding noise of the focusing motor.
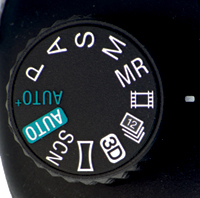
Figure 11-2: Movie mode on mode dial
One thing that may surprise you is the amount of preparation that is needed to take a high quality movie. It is necessary to preplan the scene and spend time to ensure camera stability and correct lighting.
As popularized in some professionally made movies, there is a technique of shooting handheld movies where the videographer rapidly shifts position to provide diverse vantage points. This is not typically the best way to record a short clip. While such techniques can have a powerful effect when conveying fast, tension-filled action, they are unsuitable when recording a family birthday party. Such events require smooth panning so the subject does not appear to be jittering within the frame. You may be disappointed in your results if you handhold the camera and unnecessary movement distracts your audience.
Just as with still pictures, recording a good movie usually involves a tripod and some careful planning. Pay attention to your lighting source. If your framed image has areas that are extremely bright or dark, you may need to sacrifice details in either the highlights or shadows. Consider whether you intend to create a certain mood. For example, dark shadows can add an ominous feeling to a clip. However, if that is not your intent, adjust your lighting so that there is a balance between lighting extremes. Unlike still photography, you will not be working with RAW files. You cannot compensate later for errors in exposure, nor can you control regional contrast. What you capture is pretty close to what you will have to show. Remember, the DRO functions on the Sony A77 can help you balance out the extremes in shadows and highlights. While we tend to avoid using them in still pictures, we tend to make use of them when recording movies.
Glossary of Movie Terms
To introduce the still photographer to movies, we provide an initial table defining many of the terms we use (Table 11-1). You can refer to this table while reading this chapter.
Term |
Description |
Aspect Ratio |
A ratio of height to width that defines the dimensions of an image. For example, 16:9 represents a 1.78:1 ratio of height to width. 4:3 represents a 1.38:1 ratio of height to width. |
AVCHD |
Advanced Video Coding High Definition. This is a file format for recording and saving high-definition videos. It provides a high degree of video compression and is typically not edited in its native format. Instead, the file must be translated, or transcoded, before it can be edited. |
Frame Rate |
The number of still pictures (frames) recorded per a unit of time, generally expressed as frames/second. |
Bit Rate |
The rate that data is processed per a unit of time. |
Interlaced Scanning |
Captures or projects movie images by creating two “fields” per frame. Together the two fields contain the full number of lines for the frame; individually, each field contains only half the number of lines. To view the complete image, the two fields are combined—so when capturing 30 fps, you are actually capturing 60 fields per second (fps). |
Mbps |
Megabits per second. It is a measure of data content via the rate of information being processed. Higher quality videos are recorded at higher Mbps values. |
MP4 |
A multimedia format based on the QuickTime file format for storing digital video files. |
NTSC |
National Television System Committee. This is a U.S. television and video standard that uses 525 vertical lines of resolution. For video, it is associated with collecting images at approximately 30 fps. |
PAL |
Phase Alternating Line. This is a European and Asian television and video standard that uses 625 vertical lines of resolution. For video, it is associated with collecting images at approximately 25 fps. |
Progressive Scanning |
Captures a movie image in its entirety with a single scan, unlike Interlaced Scanning, which requires two scans. |
Table 11-1: Movie-related terms
Keep in mind that taking a movie provides some restriction on your lighting conditions. Frequently, the Sony A77 records at a frame rate of either 30 or 25 frames per second (fps), and for very high quality work a videographer may shoot at a frame rate of 60 or 50 fps. You will note there are variations in this frame rate (e.g., 30 vs. 25 or 60 vs. 50). The number is dependant on the camera’s country of origin. The 30 fps is a NTSC (National Television System Committee) standard utilized in the U.S., and 25 fps is a PAL (Phase Alternating Line) standard used by cameras used outside of the U.S. As a matter of convenience, we will use the NTSC standard.
Since you are shooting a sequence of shots, you will find that you cannot use the slow shutter speeds available to the still photographer. Obviously, when shooting at 30 frames per second, you cannot maintain this rate if you set the shutter speed to ¼ second. So you are limited when recording in low light levels. Further, having too fast of a shutter speed is not desirable either. If you use a fast shutter speed of, say, 1/1000 second and you play it back at 30 fps, rather than having a smooth motion, your audience may feel that the moving subjects seem to move in a strobe-like fashion. This appearance comes from having too sharp an individual frame. Since they are only being displayed at 30 fps, a crisp edge exaggerates the fact that you are seeing a series of individual frames being projected. Ironically, if you were making a movie for surveillance, this crisp rendering is desirable. For instance, it can be used for reading the numbers and letters off the license plate of a speeding car. However, for most videographers, a good starting place for setting your shutter speed is about 1/60 second if you are shooting a 30 fps or 1/120 second if you are shooting at 60 fps.
Choosing a File Format
The first step before taking a movie is to determine how you intend to use it. There are two file formats available: AVCHD or MP4 (table 11-2). Choose AVCHD if your goal is to record and/or view the movie at its highest resolution on your HDTV, or if you intend to create DVDs that can be used on your DVD player. Choose MP4 if your goal is to process and view your movie on a computer or send it as an email attachment.
We recommend that you choose MP4 if you are just starting out and are unfamiliar with shooting movies. This file format is easy to work with and there are several free viewing and editing software packages available. On the other hand, if you want to get the highest quality images possible, then choose AVCHD.
To select the file format, retrieve the following command:
MENU>Movie Shooting Menu (1)>File Format>[AVCHD 60i/60p], [MP4]
When you use this command, if you purchased your camera outside of the U.S., you will see [AVCHD 50i/50p] option instead of [AVCHD 60i/60p].
Use |
|
AVCHD |
Provides the highest quality videos. Can be viewed directly when the camera is coupled to a suitable HDTV. PMB can translate AVCHD files for burning onto a disc and playing on a HDTV. |
MP4 |
Provides lower quality videos that can be easily attached to emails or inserted in web documents. Can be worked on easily with older, slower computers. |
Table 11-2: Sony A77 file formats
Table 11-2 characterizes the use of the two formats. At least two camera manufacturers recommend using AVCHD for direct viewing from the camera to your TV or making playable DVDs for HDTV. Their recommendation is very conservative. You should disregard it if you want to work with your movie files on your computer. After all, Sony does provide PMB, which can serve as a rudimentary movie player and editor.
If you do decide to work with AVCHD, you will eventually want to buy a more capable software package. On our MacBook Pro we use iMovie ’11, an inexpensive movie editor that works with most of our AVCHD files. Whatever software you choose, just make sure it can transcode the files so you can work on them. At the time of writing, the Sony A77’s highest quality mode, 60p 28Mbps, was not read by iWorks ’11 or Final Cut Pro X.
AVCHD
AVCHD files provide the highest fidelity and smoothest perception of movement for your movie. However, they make greater demands on your computer and software. Although you can work with these files on older computers, newer computers with plenty of RAM and large, fast hard drives handle these files better.
We have edited our AVCHD clips using iMovie and PMB. Both of these software packages are basic, inexpensive editors: PMB comes free with your camera, and Apple users can download iMovie ’11 for $14.99. If you decide to work with a higher-end movie editor such as Final Cut Pro X or Adobe After Effects for Windows, you will have to pay considerably more, $300 and $560 respectively.
MP4
This movie file format is the easiest one to work with, since it can generate data files that are read easily by other software programs. You can get free programs for opening and viewing MP4 files, such as Apple’s QuickTime. If you decide you want more power in your movie editing, you can buy QuickTime Pro from Apple for only $29.95 using the following url: http://store.apple.com/us/product/D3381Z/A.
The vertical number of pixels is the same for both MP4 and AVCHD, so if you choose MP4 format, you do not give up much in regards to resolution. What you do lose is some width in the image, which becomes a concern if you want to display the movie in a widescreen 16:9 format. Also, you can save MP4 files only in a 640 by 480 pixel display, the smallest file size for saving your movies. This is an advantage if you intend to attach the movie file to an email.
Movie Quality
Several things determine the quality of the movie: number of fps, bit rate, and format type. We have talked about the format type already: AVCHD or MP4.
The number of fps determines whether enough frames were recorded to produce a sequence that plays back smoothly as if you are watching a live event. Too few fps, and the movie will look like a series of still pictures put together to simulate movement.
The number of bits being processed determines how fine the details are within the movie. Too few, and the movie will not have satisfactory definition and detail.
Interlaced Scanning
Older analog cameras and displays for broadcast television relied on forming an image by interlaced scanning. This was due to technological limitations. In order to display enough images sequentially for a smooth perception of movement, a television camera would use two fields to make a single frame. This strategy would allow the viewer to see an object moving smoothly across the screen. The interlaced scanning method is an option still used by many cameras, including the Sony A77.
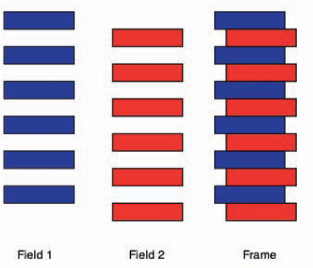
Figure 11-3: A diagrammatic representation of an interlaced scan were two fields are collected separately and combined to make one frame
In this method, a recording device with a spatial resolution of 600 horizontal lines actually collects only 300. It starts with the top line and then collects every other line to create an image with 300 horizontal lines (figure 11-3). If you define the top line as number one, the sensor collects every odd line for the first field. Then the sensor collects the remaining 300 lines, starting with the second line from the top, to form the second field. Combining the two fields yields a single frame of 600 lines. In essence, to display movie at 30 fps, a camera or television has to collect and display 60 fields per second.
If you see the letter “i” with an fps number in your Sony A77’s viewfinder or LCD screen, it stands for interlaced scanning, indicating that two fields were taken and combined to form the single frame. If one field had a moving object, its edges would display an offset artifact because the first field collected the image before the second field. This would blur the edges of the moving object, but due to how the human eye works, the motion would be perceived as smoother.
Progressive Scanning
Progressive scanning is the modern way of recording and playing back movies. All computers use this method to display images on their monitors. The newest cameras, such as the Sony A77, also have the progressive scanning option. If you see the letter “p” with an fps number on your Sony A77’s viewfinder or LCD screen, it stands for progressive scanning.
This method is pretty straightforward. Basically, the movie camera and the display projector collect all the vertical lines of a frame in sequence and then display them at once (figure 11-4). For a moving object, this provides a sharper display of its edges. If you had to deal with a single frame, that frame would provide the highest definition for regions that move from frame to frame. For image processing, this is the preferred image type.

Figure 11-4: Progressive scanning format
Progressive scanning is viewed as the ultimate in image quality. However, it has one peculiarity. Because of the sharpness of the individual images, the playback may not appear as smooth as with interlaced scanning. If you were to look at a single frame of a clip captured with progressive scanning, a moving subject would show finer details and cleaner edges.
So, which one to use; interlace or progressive? One rationale for using interlaced scanning is that a slight blurring of the individual frames helps hide the transition from frame to frame. However, the individual frames of a progressive scan are a tad sharper. Experiment with each method and decide which you prefer. For video editing you will probably opt for movies obtained by progressive scanning. If you are just viewing the movies and are not interested in using the freeze frame to study fine details, then most people will be satisfied with using interlaced scans.
Bit Rate and Frame Rate
AVCHD and MP4 files are highly compressed. How much data is preserved is determined by the amount of data being processed: the more data processed, the greater the fine detail. In computing, the measure of data being processed is its bit rate (bits/second). In the case of a movie, so such information is processed that you need to express the data in terms of millions of bits per second, or Mbps (Megabits Per Second). The Sony A77’s highest quality movies are processed at 28 Mbps, while the lowest are processed at only 3 Mbps.
These data rates reflect the fact that movies are a sequential series of images recorded at different frame rates. AVCHD files recorded at the highest frame rate, 60, generate the greatest amount of data and have the highest Mbps value.
So, which file format should you chose? There is no clear answer to this question, simply because it depends on what you intend to do with your movies. If you intend to view the files directly on your TV or make them into playable DVDs, then by all means chose AVCHD and use the highest recording quality your playback device will support. If you like to use the freeze frame to carefully study the details in the individual frame, then you should use the highest Mbps data. Also, the highest values are useful for video editing.
Remember, if you decide to use PMB and record your movie to disk, there will be some degradation in image quality. The playback quality will not match the quality you can attain if you use your camera to play back the movie on a TV capable of handling this format. If you choose AVCHD 60i or 60p and use PMB to create your disk, Sony reports that your disk will not display the full image quality recorded by your camera.
If you are a new to movie making and want to record movies quickly and make clips to playback on your computer, we suggest the MP4 format. It is easy to use and requires a minimal investment in hardware and software.
AVCHD Record Setting Command
This is one of the more complicated commands. When you select the AVCHD file format, you will see an extensive range of options. The command for selecting movie quality for U.S.-sold cameras is:
MENU>Movie Shooting Menu (1)>Record Setting>[60i 24M], [60i 17M], [60p 28M], [24p 24M], [24p 17M]
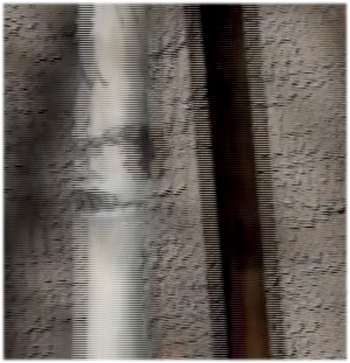
Figure 11-5: Artifact of interlaced scanning showing the blurring of the edges when the camera is panning a stationary object
Most of these options appear rather cryptic to the still photographer, but the selections can be summarized by their bit rates (table 11-3). Maximum quality is 28 Mbps, which is described as [60p 28M]. Referring to the glossary earlier in the chapter, this translates into a format that is recording at 60 fps in progressive mode. You may wish to contrast [60p 28M] with the next highest resolution mode, [60i 24M]. The difference between these file formats can be subtle if your goal is to observe the movie stream on your television. The individual frames will have sharper edges on moving objects in 60p versus 60i (figure 11-5). Remember, “i” stands for interlaced scanning where two fields are taken and interlaced to form a single frame.
The frame rate 24p is referred to as cinematic because it is used in movies. If your subjects are rapidly moving about—for example, at a sports event—we would not recommend this frame rate. You will be more pleased by capturing at 60 fps, which renders rapid motion more realistically by gathering more images. At 24p, you may find that the playback appears jittery. This may become even more apparent if you select a very short shutter speed in Movie mode, which freezes the subject’s motion in the individual frame.
File Format = [AVCHD 60i/60p]/[AVCHD 50i/50p] |
||
Record Setting Value |
Average Bit Rate |
Movie Recording Size and Frames/second (fps) |
60i 24M(FX) / 50i 24M(FX) |
24 Mbps |
Records high quality videos, 1920 x 1080 pixels at either 60i/50i fps |
60i 17M(FH) / 50i 17M(FH) |
17 Mbps |
Records standard quality videos, 1920 x 1080 pixels at either 60i/50i fps |
60p 28M(PS) / 50p 28M(PS) |
28 Mbps |
Records the highest quality videos, 1920 x 1080 pixels at 60p/50p fps |
24p 24M(FX) / 25p 24M(FX) |
24 Mbps |
Records high quality videos, 1920 x 1080 pixels at 24p/25p fps (cinema-like movies) |
24p 24M(FH) / 25p 24M(FH) |
17 Mbps |
Records standard quality videos, 1920 x 1080 pixels at 24p/25p fps (cinema-like movies) |
Table 11-3: AVCHD file recording settings
MP4 Record Setting Command
When you select MP4 for your file format, you will have two Record setting options to choose from. The one you select depends on the number of pixels you wish to display.
MENU>Movie Shooting Menu (1)>Record Setting>[1440x1080 12M], [VGA 3M]
File Format = [MP4] |
||
Record Setting Value |
Average Bit Rate |
Movie Recording Size |
1440 x 1080 12M |
12 Mbps |
Records 1440 x 1080 movies |
VGA 3M |
3 Mbps |
Records 640 x 480 movies |
Table 11-4: MP4 Record setting values
The first option, [1440x1080 12M], is easy to understand; your pixel array will be 1440 x 1080 pixels. The second option, [VGA 3M], is a bit cryptic because of the letters VGA. This refers to an old monitor resolution standard, Video Graphics Array, and means the movies will be shown as a pixel array of 640 x 480. So VGA provides a much smaller movie frame, generating a small movie file that can be used as an email attachment.
Additional Movie Controls
There are some additional controls available when recording movies. The first question to ask yourself is whether to record sound with your movie. Normally, the answer is yes. Since audio tracks can be removed later on through editing, you can always go ahead and capture the audio, and then decide later whether or not to keep it. To select audio recording, use the following command:
MENU>Movie Shooting Menu (1)>Audio Recording>[On], [Off]
If you are recording on a windy day, the camera microphone can pick up the distracting sound of the wind. To reduce this annoyance, you can invoke a wind noise reduction feature. Use the following command:
MENU>Movie Shooting Menu (1)>Wind Recording Reduct.>[On], [Off]
The final control option is the SteadyShot command. For handheld movies, this command should be set to [On], but for tripod work, set it to [Off].
MENU>Movie Shooting Menu (1)>SteadyShot>[On], [Off]
This SteadyShot command is separate from the one in the Still Picture Menu and works independently. You can have SteadyShot set [On] for movies and [Off] for still pictures, or vice versa.
Framing and Starting the Movie
The Sony A77 Live View is set at a 3:2 aspect ratio for still photography. When you press the Movie button, you will find that your display screen changes appearance. Basically, the field of view becomes smaller, and your frames can drop to a 16:9 aspect ratio. This can be disconcerting if you have already framed your subject. To ensure that you get accurate framing before you press the Movie button, change your screen so it shows grid lines as discussed in chapter 3. If you do this, you will see a set of four marks within the display that mark the corners of your movie screen. If you carefully frame your subject within these marks, you will have an accurate frame when you start your movie.
Once you frame your scene, you can start recording with a single press of the Movie button. The maximum length of a single recording session is 30 minutes.
Movie Mode
If the camera’s mode dial is set to an option other than Movie, and you press the Movie button to start taking a movie, the camera automatically adjusts the shutter speed and the aperture. One peculiarity is that the aperture is always set to its maximum opening, providing a very shallow depth of field that causes much of the scene to be out of focus. This is intentional in that the accuracy of the automatic focus sensors is best when using the widest aperture. However, when taking a movie on a sunny day, the shutter speed can reach 1/1000 second. This will affect your movie recordings; if you recorded using 24 fps, you will see rapid, jerky motion during the movie playback.
Figure 11-6: Fn button menu showing Movie option
You can remove such effects by controlling the camera’s aperture or shutter speed manually. To do this, execute the following steps.
1. Turn the focus mode dial to MF.
2. Turn the mode dial to Movie.
3. The screen will show Movie mode options with a brief description of each mode.
4. Toggle the multi-selector up and down to choose [P], [A], [S], or [M].
Figure 11-7: Fn button menu showing a Movie mode P selected
Note: if you do not see the Movie mode options with a description of the mode, press the Fn button.
Fn button>Movie (left)>[P], [A], [S], [M] (figure 11-6, 7)
As you highlight P, A, S, or M, you will see a screen describing the selection’s function and purpose. Basically, P mode is fully automated where the camera selects both the aperture and the shutter speed. The A mode (Aperture-Priority) is used for selecting lens aperture and controlling the depth of field. S mode (Shutter-Priority) is used for selecting shutter speed and determining how tightly you wish to freeze the motion in the movie frame. The M mode (Manual) is used to adjust both the aperture and shutter speed.
Changing the shutter speed can be useful to avoid the flickering caused by recording under fluorescent lights. Fluorescent bulbs have a cyclic output with a frequency that can, at certain shutter speeds, cause a distracting brightening or fading of the movie. Try selecting a shorter or longer shutter speed to remove this effect. You might find that adjusting the shutter speed to 1/100 or 1/125 second will record a more uniform lighting.
So what do you give up when you use the camera in the Movie mode? It is the loss of automatic focusing. You will have to use manual focusing mode only. The one exception is P mode. If you set the camera to Auto ISO, the camera will still focus automatically even though you will see an error message that says only manual focus is available in this mode. To minimize the inconvenience, make sure the Peaking feature is activated. This will enable you to rapidly identify the areas that are in focus. While this is not as convenient as automatic focusing, it has one advantage when you use older or less expensive lenses: you will eliminate the sound of the automatic focus motor.
Recommendations
We enjoy taking movies with the Sony A77. In some cases, we have planned carefully prior to recording and meticulously executed our shoot with the camera mounted on a tripod. In other cases, we have acted on an impromptu desire to record an event by handholding the camera. In both cases, the Sony A77 has performed well.
For the most satisfying and professional-looking movies, you should mount the camera on a tripod. While you certainly can create a pleasing movie without this accessory, failing to use a tripod may result in a movie where the subject appears to bounce up and down within the frame. The resulting movie may look unpolished and unprofessional, especially if you intend distribute the results.
Do not be afraid to work with AVCHD. If you take short movie recordings, you should be able to easily edit these files on your computer. In the case of Mac computers, you will have to buy additional software; however, the cost is nominal. iMovie ’11 can be downloaded for $14.99; however, at the time of writing, this program would not read the highest quality recording from the Sony A77, the 60p 28 Mbps. If you own a PC, be sure to load Sony’s supplied program, PMB, and use it to work with AVCHD files and create DVDs.
If you simply want to dive in and play and edit your movies on your computer, then use the MP4 file format. Using this format is straightforward and requires the minimum upgrades in software and hardware as compared to the AVCHD format.