
Chapter 9: Using Accessories

Introduction
The Sony A77 is a versatile tool that can be expanded by using accessory lenses and adapters. With the right accessories you can take on any photographic assignment. If you own accessory lenses for an older Minolta Maxxum or Konica Minolta film or digital camera, they are most likely usable on your A77.
Supplementary lenses can give you a new perspective on recording scenes. You can use a super wide-angle lens to encompass a greater area in an interior shot, or employ a telephoto lens for a close-up portrait of a wary animal. You can play with perspective to generate a picture that emphasizes the expanse of a scene, or use an extreme telephoto to flatten a scene so that objects appear to be juxtaposed. All of these tricks become possible once you mount different lenses on the camera body.
Besides lenses, there are other accessories of interest, such as tripods for holding the camera. By holding the camera steady, a tripod ensures that you obtain the maximum performance from your optics. Its ability to accurately aim and move the camera can help you generate panoramic shots at a higher resolution than that available in Sweep Panorama mode.
Choosing a Kit Lens
When you buy a Sony A77, you need to decide whether to buy just the body or add a kit lens. The Sony A77 is sold with a choice of two zoom lenses: one with a focal length ranging from 16-50 mm (figure 9-1) and one with a focal length ranging from 18-135 mm.
Both are capable of handling most photographic assignments. Which one should you chose? Consider the following:
• Price. The 16-50 mm currently sells for about $699.99 while the 18-135 mm is $499.99.
• Optical Characteristic. The 16-50 mm has more features than the 18-135 mm. The former has a fixed aperture of f/2.8 that does not vary as you change the focal length. The latter’s aperture varies with its focal lengths. If you work with studio flashes that require a set aperture, you will have to compensate for the 18-135’s changing apertures as you zoom in or out. The 16-50 mm lens with its fixed aperture does not require this sort of compensation.
• Dim light capability. The 16-50 mm is better suited for work in dim light. When it is used at 50 mm, you have a maximum aperture of f/2.8. In contrast, the 18-135 mm at 135 mm has a maximum aperture of only f/5.6.
• Weight. The 16-50 mm is a much heavier lens at about 20 ounces, as compared to the 18-135 mm at 7 ounces.
• Quiet operation. The focus motor of the 16-50 mm is much quieter than that of the 18-135 mm. Consequently, it is less disruptive when recording audio in Movie mode.
• Coverage. The 16-50 mm provides a wider angle of view than the 18-135 mm. However, the 18-135 provides an increase in its telephoto over the 16-50 mm.
So, which lens should you get? We have used the 16-50 mm and find it a great lens for scenes with dim lighting and studio flash work. It provides excellent resolution, and its only disadvantage is its weight. However, if your budget is limited, the less expensive 18-135 mm is a good choice, and its lighter weight is a benefit for outdoor work. Although it is not optically equal to the 16-50 mm, you will be pleased by its performance.
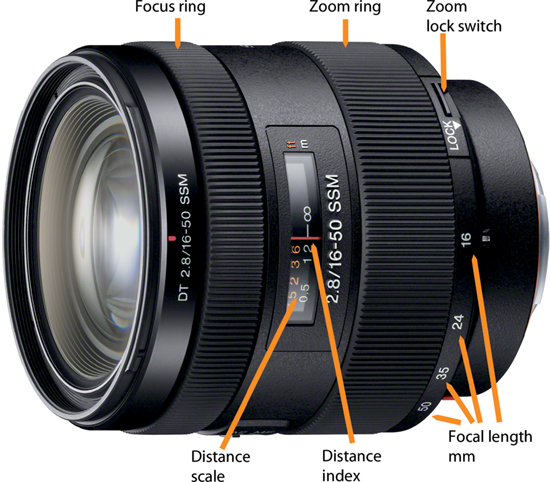
Figure 9-1: Parts of the Sony 16-50 mm f/2.8 kit lens (Photograph courtesy of Sony)
Focal Length |
Aperture |
Type |
|
Sony |
100 mm |
f/2.8 |
Fixed |
Sony |
11-18 mm DT |
f/4.5-5.6 |
Wide-angle zoom |
Sony |
135 mm |
f/2.8 |
Telephoto zoom |
Zeiss |
16-35 mm |
f/2.8 |
Normal zoom |
Sony |
16-50 mm DT |
f/2.8 |
Normal zoom |
Sony |
16-50 mm DT |
f/2.8 |
Normal zoom |
Zeiss |
16-80 mm DT |
f/3.5-4.5 |
Normal zoom |
Sony |
16 mm |
f/2.8 |
Wide-angle fixed |
Sony |
18-200 mm |
f/3.5-6.3 |
Normal zoom |
Sony |
18-250 mm |
f/3.5-6.3 |
Normal zoom |
Sony |
18-55 mm DT |
f/3.5-5.6 |
Normal zoom |
Sony |
18-70 mm DT |
f/3.5-5.6 |
Normal zoom |
Sony |
20 mm |
f/2.8 |
Wide-angle fixed |
Zeiss |
24-70 mm |
f/2.8 |
Normal zoom |
Sony |
24 mm |
f/2.0 |
Wide-angle fixed |
Sony |
28-75 mm |
f/2.8 |
Normal zoom |
Sony |
300 mm |
f/2.8 |
Telephoto fixed |
Sony |
30 mm DT |
f/2.8 |
Macro fixed |
Sony |
35 mm |
f/1.4 |
Normal fixed |
Sony |
35 mm DT |
f/1.8 |
Normal fixed |
Sony |
50 mm |
f/1.4 |
Moderate telephoto fixed |
Sony |
50 mm |
f/2.8 |
Macro fixed |
Sony |
50 mm DT |
f/1.8 |
Moderate telephoto fixed |
Sony |
55-200 mm DT |
f/4.5-5.6 |
Telephoto zoom |
Sony |
70-200 mm |
f/2.8 |
Telephoto zoom |
Sony |
70-300 mm |
f/4.5-5.6 |
Telephoto zoom |
Sony |
70-400 mm |
f/4.5-5.6 |
Telephoto zoom |
Sony |
75-300 mm |
f/4.5-5.6 |
Telephoto zoom |
Sony |
85 mm |
f/2.8 |
Telephoto fixed |
Sony |
85 mm |
f/1.4 |
Telephoto fixed |
Sony |
500 mm |
f/4.0 |
Telephoto fixed |
Table 9-1: List of Sony-compatible A-mount lenses
Sony A-Mount Lenses
The Sony A77 uses an A-mount—a design that traces its roots back to the Minolta AF (Autofocus) lens. This means that all of the older Minolta and Konica Minolta AF lenses can be used on the A77. Although they are no longer made, these lenses are sometimes available for purchase through online auction houses or in camera stores at discounted prices. For example, we have acquired an older Minolta 100-300 mm APO lens of outstanding optical quality for a very reasonable price. Its low cost is balanced against its slower and noisier focusing system, making it great for still pictures but limiting its usability for taking movies.
Like all companies, Minolta and Sony use a series of letters to describe their lenses. Here is a list of some of their terms.
• G: Premium optics and superior mechanical design. Other than indicating that this is an excellent lens, mechanically and optically, there is no definition of the term “G.”
• D: Distance Encoder. This allows the camera to use AID flash control.
• DT: Digital Technology. These lenses can only be used on cameras with APS-C sized sensors. They vignette when used with full-frame camera sensors.
• HS: High Speed. HS is found on lenses that rely on a motor in the camera body. The gears for moving the lens are optimized for speed.
• SSM: Super Sonic Wave Motor. This motor resides in the lens body and provides fast and quiet operation. The lack of noise is important when taking movies since any motor noise disrupts audio recording.
• SAM: Smooth Autofocus Motor. This motor resides in the lens body. It tends to be noisier than lenses with SSM and is associated with lower-priced lenses.
Manual Focusing A-Mount Lenses
The focusing motor for the lens may be located in either the lens or the camera body. In the latter case, you will see what appears to be a recessed screw head on the back of the lens. This engages a screw blade that protrudes from the camera’s lens mount (figure 9-2). When the lens is mounted, the screw blade engages the slot so as to supply the force for moving the lens-focusing ring. The focusing motor is, in this case, located in the camera body.
If you wish to use manual focus (MF), you will need to disengage this focusing motor so you can freely rotate the focusing ring without damaging the lens. Otherwise the focusing motor’s mechanism could be stripped by trying to manually rotate the lens focusing ring. Set the focus mode dial on the lower front of the camera to MF or press the AF/MF button on the back of the camera.
The golden rule in operating Sony lenses is: become familiar with the effort it should take to turn the focusing ring. If you encounter high resistance, make sure the camera is set to MF to avoid damaging the focusing motor.
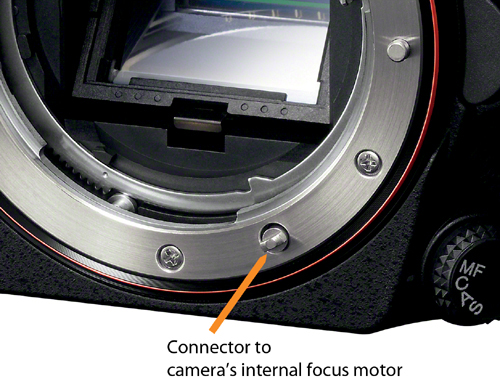
Figure 9-2. Connector for lens focusing motor protruding from mount (photography courtesy of Sony)
Used Lenses
A glance at an online auction site or a visit to a camera store reveals an abundance of used lenses. While they may be optically excellent, these lenses are on sale because they are discontinued models. Older lens may lack some of the latest features, such as a distance encoder or built-in focusing motor, but this does not affect their ability to project a sharp image onto the sensor. For you, they can be bargains, providing excellent optical tools for your Sony A77 at a very reasonable price.
Minolta, Konica Minolta, Sigma, Tamron, and Tokina have made autofocus lenses that work on the A77. Before buying a lens, we strongly urge you to learn about it by looking for online reviews. This is critical because you can find out if a lens has trouble interfacing with your camera. For example, the gearing of one manufacturer’s lenses may not withstand the torque of the Sony autofocus motor in the camera body. A helpful website for lens reviews is: www.dyxum.com
Older manual focus Minolta lenses will not work properly on the Sony A-mount. You can buy adapters to physically attach such lenses, but we found them disappointing. Most would not allow the lens to focus to infinity. When we did find one that allowed an older Minolta lens to focus to infinity, it did so with the aid of an interior lens that degraded the overall performance.

Figure 9-3: Fotodiox adapter to attach Nikon lens to Sony A mount
Nonetheless, such adapters can be useful provided that you remove the interior lens. For example, Fotodiox makes an adapter for attaching a Nikon manual focus lens to the Sony A-mount (figure 9-3). It has a lens that degrades performance; however, it can be unscrewed easily. Once the lens is removed, the Fotodiox serves as a short extension tube that limits you to close-up work. However, there is now no degradation of the image. We use this adapter for macro photography when attaching a bellows or using Nikon’s macro lens. Considering that Nikon has an extensive line of special macro lenses, this has increased the utility of the A77 without the need to buy a Sony macro lens.
When you use a macro lens, you will be focusing manually. The A77’s Peaking function, described in chapter 7, can aid you in finding focus. Here the electronic viewfinder presents an obvious advantage. The viewfinder and rear LCD’s automatic gain feature keeps the display screens bright when you are working with a long bellows and small aperture macro lenses (although there is an increase in noise). In contrast, for DSLRs with optical viewfinders, the view gets progressively dimmer, which enhances display screen imperfections and ultimately makes it impossible to find focus.
Buying New Third-party Lenses
As mentioned earlier, several companies make lenses compatible with the Sony A77 that can become valuable additions to your system. These lenses are frequently less expensive, but more importantly, they cover focal lengths that are absent in the Sony lens line. Buying these lenses new from an authorized dealer ensures that you have a warranty.
One must be cautious in using third-party lenses. For example, they will not be in the Sony database so the camera cannot correct for their optical imperfections. On occasion certain lenses have proven to be problematic. If a problem occurs, and you bought the lens new from an authorized retailer, the manufacturer will upgrade the lens or fix the problem. However, if you buy the lens used or from an unauthorized reseller, you may have to have the lens repaired at your own expense.
One lens you may wish to consider for close-up work is the Tamron 90 mm. It has an enviable optical reputation and can be viewed as a safe buy for providing excellent optical performance.
Microscopes
For over 50 years, SLRs have been used on microscopes to take high magnification pictures of single-celled plants and animals as well as slides of human tissue. In the past, Nikon and Olympus sold elaborate accessories for mounting film cameras onto microscopes. However, these cameras were ill-equipped for the task. Their optical viewfinders had to be modified to obtain clear views for focusing. The standard viewing screen obscured fine details of the specimen, and additional magnification was needed to obtain accurate focus. In addition, the movement of the instant return mirror and the mechanical shutter vibrated the camera body at the moment of exposure, blurring the picture.
With improvements in camera design, these weaknesses have been remedied in the Sony A77. Live View electronic finders now allow accurate focusing, and electronic first curtain shutters with locked, stationary mirrors reduce vibration.
The Sony A77 takes all of these advances and combines them into a single camera that can be a working tool for a microscopist. Its live preview solves the problem of accurate focusing, giving you a bright image that can be magnified. The Peaking function works well, and it can be used to see an overall view of the specimen while still providing an accurate means of focusing. Because it previews the image, errors in color balance can be corrected. When working with older microscopes or current microscopes from a variety of manufacturers, you might find that their optics introduce a color cast. Thanks to Custom WB, unwanted tints can be removed so you can record an image with colors that are accurately represented.
Perhaps the A77’s most important feature for the microscopist is the absence of vibration during image capture. A fixed mirror eliminates mirror slap, and the electronic first curtain shutter is vibration free. Thus, the camera is always ready to take a picture at any shutter speed. With older mechanical shutter cameras, you had to resort to long exposures of one second or more to minimize the effects of shutter movement.
The way in which you mount the camera on the microscope depends on whether you have access to a research microscope in a laboratory or a microscope at home. Research microscopes are expensive and consequently not commonly available to the hobbyist. Attaching the camera can be expensive as well. A company that makes adapters to fit research microscopes is Martin Microscope Company (www.martinmicroscope.com/MMSLR.htm). This company has an adapter for about $500 that can make it a simple manner to mount the Sony A77 onto your microscope.
If you are interested in obtaining a home microscope, you can find affordable used microscopes at online auction houses; however, we recommend finding a seller with a brick-and-mortar store. The cost may not be as low as an online auction house, but you have a better guarantee that the microscope has been checked and adjusted for proper operation. We have purchased used microscopes from Bunton Instrument Company (www.buntgrp.com/used_microscopes.htm), Nightingale (www.microscopesfromnightingale.com), and G. W. Brown Company (www.gwbrowncompany.com).
Used microscopes should be purchased with trinocular heads. The majority of hobbyist microscopes have narrower photographic ports than those found on modern research microscopes. Most hobbyist microscopes have a tube with a 25 mm outside diameter. The simplest camera adapter is a tube with a clamp on one end that fits outside the microscope tube. The other end is a male screw threaded to take a variety of bayonet mounts. This is usually a T-mount, and you can easily buy such a mount for the Sony A77.
Follow these steps when using the Sony A77 on a microscope:
1. Adjust the microscope with the slide to get a sharp image through the eyepiece.
2. Adjust the microscope’s light source intensity so the view through the eyepieces is comfortable. If the light is controlled with a voltmeter, run it at the voltage recommended by the manufacturer. If it is too bright, reduce the light intensity with neutral density filters.
3. Set the camera’s focus mode dial to MF.
4. Set the camera’s ISO to 100.
5. Turn the camera’s mode dial to A or S mode.
6. Use the following commands:
MENU>Custom Menu (1)>Release w/o Lens>[Enable] to allow the camera to fire without its camera lens. When you first use the camera, you will find this command is [Disable].
MENU>Custom Menu (1)>Front Curtain Shutter (5)>[On] to prevent vibrations from the first curtain shutter. When you first use the camera, you will find this command is set to [On]
7. Set the camera’s WB to Incandescent Lights, or set the color temperature scale to 3200 kelvin. If this does not work, use Custom WB.
8. Focus the image using the microscope control while viewing it on the LCD screen. We recommend using the Peaking function.
9. Fire the camera with a remote release or set the camera’s self-timer to a two-second delay. This keeps any vibrations caused by manually pressing the shutter button from disturbing the picture.
Cable Release
Sony sells a cable release, the RML1AM Remote Commander Shutter Release Cable, for $69.95. While this may seem expensive, a remote shutter release can be an essential accessory to avoid vibration when you are taking pictures on a tripod-mounted camera. Not only is it convenient, but it is also mandatory for telescope and microscope work. If you use the B setting on Manual Exposure for shutter speeds longer than 60 seconds, this accessory provides a convenient lock mechanism to hold the shutter open for these longer exposures.
Another, less expensive option is the Sony RMT-DSLR1 IR Remote Commander Shutter Release Cable. Although it sells for only $29.95, we do not use this accessory. It requires that the IR beam be intercepted by the camera’s sensor, which is positioned on the front grip. Since we are usually behind the camera, this accessory is not helpful. However, if you tether the camera to an HD television in order to project movies, this remote can be handy. It provides the ability to control HDTV playback in addition to remotely shooting your camera.
If you forget to pack your remote release, remember that you can eliminate vibration by using the self-timer command and setting it for two seconds. Its only disadvantage is that the two-second delay may cause you to miss the shot.
Tripod
You may already own a tripod, but if not, this section is for you. This accessory is often overlooked when you first start taking pictures and movies.
A steady support for picture taking is essential for long exposures, extreme telephoto work, and obtaining maximally sharp images with the camera. Nonetheless, many photographers object to using a tripod, arguing that it is bulky, reduces mobility, and hinders spontaneous photography. These arguments are all true, but it is also true that consistently using a tripod will improve the quality of your work. In fact, its inconvenience may be its strongest benefit because it forces you to work at a more deliberate pace—carefully framing the subject, evaluating depth of field, and ensuring that the horizon is not canted. This deliberate pace trains you to visualize the image before snapping the shutter.
Professional tripods are usually sold in two parts: the legs and the head. The legs provide the support, but they do not have a mechanism for aiming the camera. The head is attached to the legs and is the actual aiming mechanism. Although one can buy a tripod with legs and head, many, if not most serious photographers buy the two components separately. In this way, one can have a custom unit that suits one’s personal photographic style.
A good tripod can easily cost $300, with more expensive units running over $1,000. Although initially expensive, a good tripod will outlast a typical camera and lens. One of our tripods is over 30 years old and still functional. Your collection of tripods will grow along with your expertise in photography. We have a heavy studio tripod for home use; while its weight prevents us from taking it into the field, we appreciate its stability when working with critical subjects. For fieldwork, we use more expensive tripods made with carbon fiber. They weigh only a few pounds, and their light weight lets us take them wherever we go. This is not a good time to skimp on the cost of equipment. Inexpensive tripods are not only flimsy, but are also slow to set up and sometimes unable to hold their settings. Once you mount and position the camera, an inexpensive tripod may drift slowly out of position or even topple over with your camera attached.
Plan to spend a minimum of around $400 for the tripod’s two components: the legs for support and the head for aiming the camera. This last unit can be surprisingly expensive, especially if you tend to use long telephoto lenses. What you get for more money is elimination of any play in the mount or drifting after you think you have locked the lens down.
There are two types of tripod heads available: pan and tilt heads, and ball heads (figure 9-4). Pan and tilt heads are heavier and less expensive and may cost about $65 (Manfrotto 804RC2 3). They allow you to pan the scene (horizontal movement) and tilt the camera (vertical movement). Ball heads are lighter and are more expensive at about $350. They allow you to move the camera on the tripod any way you want in a smooth motion. We started out over 40 years ago with a Bogen 3047 pan and tilt head, but replaced it when we found the speed of working with an Acratech ball head preferable.
We use an older Acratech GV2 ball head for our photography. This accessory has a nifty design: a gimble slot that can be engaged with a small key by rotating the ball 90 degrees to its side. This allows the head to swing along a vertical plane while the base rotates along a horizontal plane. In essence, the head works like a pan and tilt, with increased stability when tilting the lens up and down along the vertical plane and when rotating the entire head on the horizontal plane. With a long telephoto lens attached, it places the center of the lens closer to the swivel point for much better balance and control. This wonderful feature is carried over into newer Acratech models. When we use our 16-50 mm lens, we do not need to use the gimble design. Instead, we use it as a ball head. There are two tightening knobs for the ball head. One is applied to provide just enough friction so as to position, aim, and keep the camera from drifting. Before taking the picture, we tighten the second knob for locking the head completely. By using the two knobs, one can have a very fast operating system, releasing one knob to allow rapid aiming and then tightening it to ensure the position is locked.

Figure 9-4: Acratech GP-SS ball head. (Photograph courtesy of Acratech, Inc.)
We recommend that you get a quick release clamp for your tripod head. Typically, a basic head has you attach the camera to the tripod head with a ¼-inch threaded screw. Attaching and detaching the camera can become time-consuming and awkward. To speed up the operation, use a tripod head with a quick release clamp (figure 9-5). This clamp engages a plate that is attached to the bottom of your camera. Attaching and detaching the camera from the tripod becomes a fast and simple operation. To attach, simply place the plate into the head’s quick release clamp and secure it with a lever. To detach, release the lever.
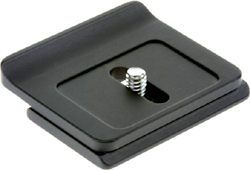
Figure 9-5: Quick release clamp for attaching the tripod head to the camera. (Photograph courtesy of Acratech, Inc.)
Next to consider are the tripod legs. Fortunately, their connection to the tripod head is standard; a screw secures the head of your choice. The price of tripod legs ranges from $300 to over $600. Premium models are made of light and durable carbon fiber. Typically, the legs collapse for convenient transport. Gitzo makes some of the best legs, which may cost over $500. The legs are built in sections and telescope into each other to shorten their length.
We chose less expensive legs by Manfrotto at about $300 and combined them with an Acratech ball head. Several of our colleagues have told us that they have been satisfied with Velbon, Slik, and Hakaba carbon fiber tripod legs costing between $200-$300.
Telescopes
Long-distance photography fascinates many photographers. The thought of obtaining a close-up of the moon makes some photographers long for a super telephoto lens. The longest telephoto lens made by Sony is 500 mm. This can provide impressive views, but suppose you want something even longer?
We have found that to get a full frame shot of the moon, we need a 2000 mm lens. One way to accomplish this is to attach your camera to a telescope. Mounting can be as simple as removing the camera’s lens, replacing it with an adapter (figure 9-6), and inserting the adapter into the telescope’s eyepiece holder. An image of the subject will be projected directly onto the camera’s sensor—a method known as prime focus photography. Exposure is automated and is done in A mode using the telescope controls.
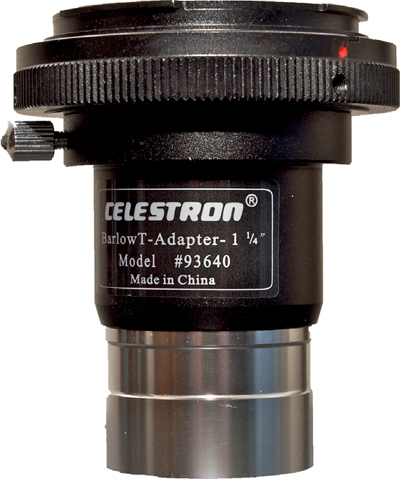
Figure 9-6: This adapter fits in a 1¼-inch eyepiece holder
The first step is to find a telescope that can be used with your camera. Today, there are a tremendous number of telescopes of varying sizes to choose from. We will restrict our discussion to smaller telescopes that can double for terrestial fieldwork. These telescopes typically have lenses with a front element ranging in diameter from 50 mm to 100 mm (2 to 4 inches). Any smaller than this, and you are talking about an instrument with a performance that can be matched by a telephoto lens. A telescope with an objective larger than 100 mm is difficult to handle for fieldwork. An excellent telescope in the 50 to 100 mm range is expensive; however, its optical performance equals the best telephotos.
One company that makes telescopes with resolving power suitable for photography is Tele Vue. We have used their 60 mm (figure 9-7), 76 mm, and 85 mm telescopes, and they provide exceptionally high resolving power. The 60 mm (360 mm f/6.0) sells for less than $1,000, the 76 mm (480 mm f/6.3) for $2,000, and the 85 mm (700 mm f/7.0) for $2,495. Their optical performance rivals, if not exceeds, that of the finest Nikon or Canon telephoto lenses with their 500 mm optics costing $6,000 to $8,000.
This is not to say that these telescopes can replace a professional telephoto lens. They cannot. They lack an iris diaphragm, so you need to shoot wide open. Also, they are not compact and require a tripod. Finally, focusing is done manually. But, if you want a super long telephoto effect as well as the ability to work with an astronomical telescope, these telescopes do not seem so expensive.
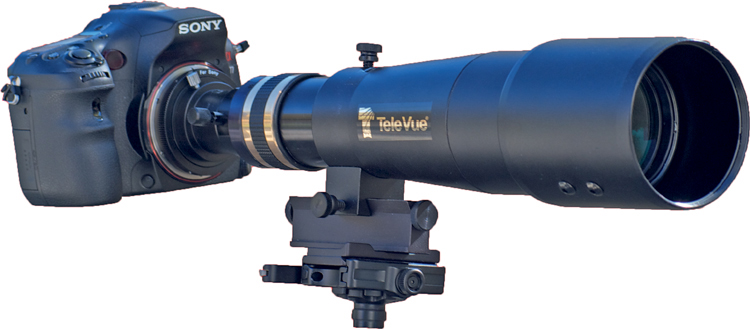
Figure 9-7: Tele Vue 60 mm telescope with a 1¼ eyepiece adapter and Sony A77. (Telescope courtesy of Woodland Hills Camera and Telescope.)
We have tested the Sony A77 extensively on a Tele Vue-85 and a Tele Vue-60. The first telescope has a 2-inch eyepiece holder, while the latter has a 1¼-inch eyepiece holder. Both telescopes can accept camera adapters that fit in the eyepiece tube and have T-mounts for attaching a Sony A-mount. Neither adapter caused vignetting. To use these telescopes with the Sony A77 requires only that the eyepiece be removed and replaced with the adapter. The camera should be set for A mode and manual focusing. To ensure that the camera will fire, set it to: MENU>Custom Menu (1) > Release w/o Lens>[Enable].

Figure 9-8: Photograph of sparrow taken with Tele Vue telescope
We typically use the viewfinder when aiming the telescope at terrestrial objects. Ambient daylight can obscure the LCD screen. Make sure Peaking is active to allow rapid identification of when the camera is in focus.
Recommendations
Thanks to Sony’s SLT technology, the electronic first curtain shutter, and the electronic viewfinder, the A77 is remarkably versatile. It can be used effectively on specialized optical instruments such as telescopes and microscopes. The absence of vibration and the ability to precisely focus on the subject lends itself to macro photography. As your expertise increases along with your desire to explore new areas, you may find that the accessories cost more than the camera. Even something as mundane as a tripod may prove to be surprisingly expensive; however, these accessories expand the camera’s full potential.
The Sony A77’s kit lens is an excellent photographic tool. We recommend mastering the included lens before buying additional lenses. When you’re taking pictures and movies, you will find that the appearance of the subject changes radically between a wide-angle focal setting and a moderate telephoto setting. Experiment with choosing a single focal length and then walking up close to the subject or walking away from it.
For example, fishermen prefer the use of wide-angle lenses that magnify the size of their catch. They proudly pose holding the fish in front of them and have the photographer move in close, framing the fish so it appears double to triple its actual size. If you use a moderate telephoto lens instead, step back, and photograph the fisherman holding the fish out front, the fish will appear to have shrunk dramatically. This moderate telephoto provides a more accurate perspective and shows the fish properly—much to the chagrin of a proud fisherman.
The 16-50 mm f/2.8 Sony lens has the quiet SSM motor, an advantage when recording audio along with movie. The 18-135 mm lens with its SAM motor is noticeably louder. Loudest are lenses that use a key drive. For such lenses, you may wish to use manual focus. Alternatively, if you are enthusiastic about movie recording, you may wish to get an accessory microphone.
Get to know the strengths and limitations of your camera’s kit lens before you acquire any additional lenses. If you decide to buy more lenses, we recommend Sony lenses (including Zeiss lenses sold by Sony). Optically, these lenses are of high quality, and you can be confident that they are fully functional with your camera. If the price is too high, you can purchase third-party lenses instead: Tokina, Sigma, and Tamron are reputable brands with good quality optics. Generally, these lenses are less expensive, and many photographers view them as providing the maximum return on their money. In some cases, their optical quality is impeccable. The Tamron 90 mm macro is reputed to be one of the best in its class.
However, the risk in buying third-party lenses is that they may not function properly on the newest model camera bodies. If the lens is purchased new, you can rest assured that these companies have good reputations and try to satisfy their customers. You have to be cautious when buying these lenses used. Before purchasing a used lens, check online reviews to make sure that it has a good optical and mechanical reputation.