
Chapter 3: Managing Your Images

Introduction
The Sony A77’s electronic display screens (LCD screen and viewfinder) serve two purposes. The first is to frame the subject, helping you to compose the image, check the focus, and ensure that the exposure and automatic modes are suitable for image capture. The second is to evaluate the picture or movie after it has been captured and then if needed, fine-tune the camera settings to ensure that subsequent images have the results you want.
Only one of the two display screens works at any one time. The viewfinder is enabled when the camera senses the presence of something, presumably your eye, near its window. When this happens, the viewfinder turns on and the LCD screen turns off. You can view either screen with the assurance that the battery is not being drained unnecessarily.
Although they both serve the same purpose, each display has its advantages. The LCD screen can swivel and extend out from the body of the camera. It allows you to view the subject conveniently while manipulating the camera’s controls. The viewfinder blocks the outside light, enabling you to frame your subject when the lighting is too bright to view on the LCD screen. Be flexible and use whichever display provides the best results in a given situation.
This chapter covers how to preview and review your still pictures and movies, along with useful tools to evaluate your images and get the best results. As with everything associated with the A77, there is often more than one way of accomplishing your goals. It is best to experiment. Over time, you will develop preferences that work well for you.
The LCD Screen
The Sony A77 uses a large, high-quality liquid crystal display (LCD), composed of 921,600 dots, located on the back of the camera (figure 3-1). It has a diagonal measurement of three inches and is large enough to be viewed at arm’s length. Unlike the viewfinder, you don’t have to raise the camera up to your eye to see the LCD. Instead, you simply hold the camera, frame the picture, and press the shutter button.
The LCD screen’s hinged display and ability to extend out from the camera body allow you to position the camera at almost any angle, an advantage when working in cramped or awkward locations. For example, to frame a creative photograph from ground level looking up, it may be necessary to rest the camera base on the ground. With the viewfinder, or even with a non-tilting LCD screen, you would have to lie down behind the camera. But the A77’s tilting LCD screen can be adjusted so the screen faces up. Now you can comfortably view the screen from above and compose the photograph.
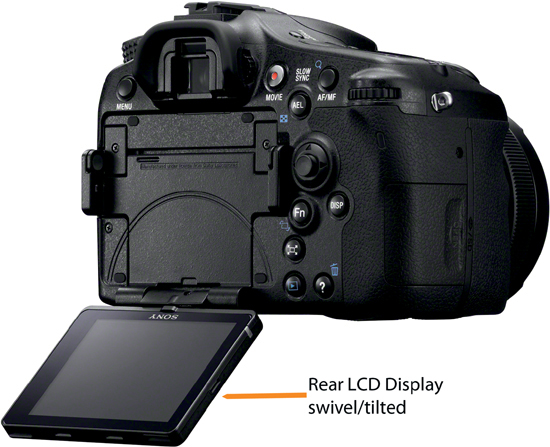
Figure 3-1: Swivel capability of the LCD screen. Photograph courtesy of Sony.
You may find that extending the LCD screen out from the camera body gives you a better view of your subject. It is even possible to take a self-portrait by pointing the camera toward yourself and turning the LCD screen to face you.
Another advantage of the LCD screen is that you can see the camera commands and buttons simultaneously, making it much easier to navigate through the menu and function structure and to review stored pictures using the multi-selector. In addition, using the LCD screen often makes it easier to view your framed image when the camera is mounted on a tripod.
The Viewfinder
The Sony A77’s electronic viewfinder consists of a small screen of 2,359,296 dots with a magnifier. It provides a Live View with the camera settings reflected in the image prior to taking the picture; its function corresponds to a DSLR optical viewfinder. In comparison, Sony’s viewfinder provides an excellent, enlarged, and bright image, making composition easier. The viewfinder’s magnifier allows you to conveniently view fine details. As described in chapter 1, you should focus the viewfinder to your eye by using the diopter adjustment dial.
Unlike an optical viewfinder, you can display the camera’s menu and function options in the A77’s viewfinder, as well as graphical displays such as histograms. The multi-selector, plus the front and rear control dials, all function in the same manner as they do for the LCD screen. For example, when you review stored pictures and movies, you can use the multi-selector or the rear control dial to scroll through them. In most cases, when framing and reviewing pictures and movies, you will see the same data display formats as you do when you use the LCD screen.
Unfortunately, viewing your subject on the LCD screen in bright light can be difficult. The controls for brightening the LCD screen are inadequate in full sunlight. Using the viewfinder is the way to go in such a situation. Since your eye is close to the viewfinder, your face shields the screen from bright light, enabling you to easily view your command options and subject. Another viewfinder advantage is the stability you gain by holding the camera against your face. This is invaluable when working with a long telephoto lens where the slightest tremor is magnified. Steadiness is even more critical when capturing movies, since every camera movement is recorded.
Top LCD Display Panel
The camera has a second, smaller LCD screen called the Display panel on the top of the camera where you can quickly view several major camera settings (figure 3-2).
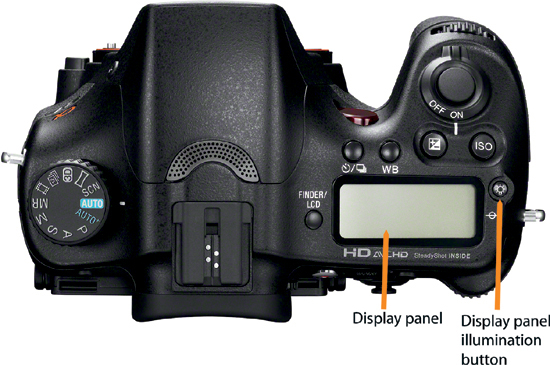
Figure 3-2: Top of camera showing the Display panel and buttons
Some of the camera functions are also changeable through this panel by using the buttons on the top of the camera or by selecting them via the Fn button (table 3-1). When working in the dark, use the Display panel illumination button next to the panel to light the display.
Display Panel Data |
|
Display Data |
Control Data |
Shutter Speed |
ISO Sensitivity |
Aperture |
Drive Mode |
Flash Compensation |
Exposure Compensation |
Image Quality |
White Balance |
Remaining Battery |
|
Remaining Number of Recordable Images |
|
Image Quality |
|
You have several options for navigating through the Display panel’s control data. You can use the front and rear control dials to scroll through the function’s available values. Their actions can vary. When selecting ISO for example, you will find that the rear control dial moves the ISO in 1/3 f-stop steps, while the front control dial moves in full f-stop steps. The rear control dial scrolls through each value one at a time, while the front control dial skips two values. Although this helps you get through the list quicker, you can end up passing over the value you want and having to switch back to the rear control dial to reclaim it. Instead, you might want to consider using the multi-selector to find and select your desired value.
Keep in mind that control data on the Display panel also shows on both the rear LCD and viewfinder display screens. For example, when you press the ISO button to change its value it can be altered by studying the changing values on either the Display panel or the rear LCD display screen.
Data Display Formats
Reviewing the camera settings prior to and after recording gives you the opportunity to adjust the settings and ultimately record a better image. The following sections cover data display formats prior to and after recording a still picture or movie. Become familiar with each format. You may find that different display formats work best with different scenarios.
Previewing Data Display Formats
The Sony A77 has two commands that control which data display formats are available on the LCD screen and viewfinder when previewing images prior to recording. DISP button(Monitor) controls the LCD screen and DISP button(Finder) controls the viewfinder.
MENU>Custom Menu (2)>DISP Button(Monitor)>[Graphic Display], [Display All Info.], [No Disp. Info.], [Level], [Histogram], [For Viewfinder]
MENU>Custom Menu (2)>DISP Button(Finder)>[Graphic Display], [Display All Info.], [No Disp. Info.], [Level], [Histogram]
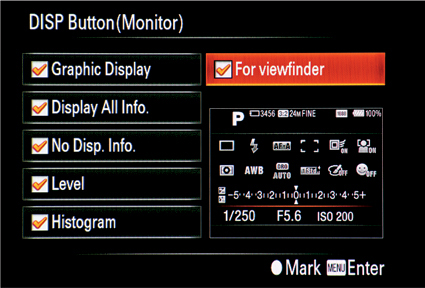
Figure 3-3a: DISP Button(Monitor) command positioned on [For Viewfinder]

Figure 3-3b: DISP Button(Finder) command positioned on [Histogram]
Both commands show a list of data display formats with check boxes (figures 3-3(a-b). Toggle the multi-selector to move through the list. As you move through the available formats, a sample display screen shows in the lower right corner. Press the multi-selector button to check or uncheck an option. You can check from one to all of the options.
The following describes each of the data display formats:
• Graphic Display: Displays the full-size image plus two scales, shutter speed, and aperture, each with its current setting indicated on the scale as a vertical bar.
• Display All Info.: Displays the full-size image with the camera settings superimposed around the border of the image.
• No Disp. Info.: Displays only the image.
• Level: Displays the full-size image plus the digital level gauge tool in the center of the screen. The gauge’s indicator turns green when the camera is level horizontally and front to back.
• Histogram: Displays the full-size image plus the white live histogram in the lower right of the screen.
• For viewfinder: Displays only the camera settings without the image (figure 3-3a).
Once you select your data display formats, the DISP button controls cycling through them in order. For example, say you select [Display All Info.], [Level], and [Histogram] for the Monitor. Each time you press the DISP button while previewing a framed image, you will cycle through these three display formats. If you also select [No Disp. Info.], your framed image will be displayed on the LCD screen without any data the next time you press the DISP button after viewing [Display All Info.]. The display formats work the same way with the DISP Button(Finder) command except there is no [For Viewfinder] option.
• The DISP button cycles through all of the checked DISP button options in order.
• The checked DISP options are not saved within a Memory group.
• Although DISP button command settings are utilized in all mode dial options, there are some exceptions:
- The [Histogram] display format will be the same as [No. Disp. Info.] format for Movie, 3D Sweep Panorama, and Sweep Panorama mode dial options.
- The [Graphic Design] display format will be the same as [No. Disp. Info.] format for 3D Sweep Panorama and Sweep Panorama mode dial options.
- The [For viewfinder] display format will be the same as [Display All Info.] format for Movie, 3D Sweep Panorama, and Sweep Panorama mode dial options.
Reviewing Still Picture Data Display Formats
There are three data display formats available when reviewing your still pictures, including panoramas:
• With recording data (figure 3-4a)
• With histograms (figure 3-4b)
• Saved image only (figure 3-4c)
After you press the Playback button to review your saved pictures, press the DISP button to cycle through the three data display formats.
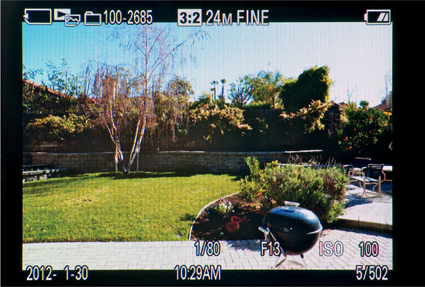
Figure 3-4a: Data display with recording data
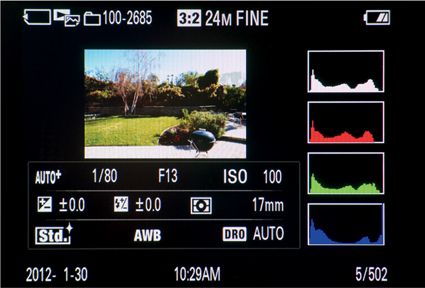
Figure 3-4b: Data display with histograms
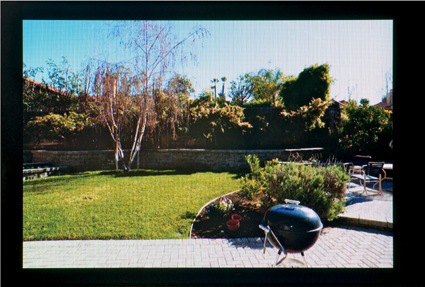
Figure 3-4c: Data display with saved image only
Each display layout has its benefits. The recording data superimposed around the edges of the image consists of the camera settings used to produce the image. This is invaluable when analyzing which camera settings work and which might need to be adjusted to improve the next shot.
The histograms view displays the intensity range of the color channels and the overall luminosity of the recorded picture. Thus, you are able to see if the overall light intensity, or one or more colors (red, green, or blue), is under- or overexposed. The last format gives you the opportunity to see the image without being distracted by superimposed data.
You will also see any overexposed, blown-out areas blinking from white to black and any underexposed, dark areas blinking from black to white. This is an excellent way to determine what part of the image was not recorded with the best exposure.
Reviewing Movie Data Display Formats
Unlike still pictures, only two data display formats are available when reviewing movies. After you press the Playback button, press the DISP button to cycle through the following formats:
• With recording data
• Saved movie only
The data display format is applied only on the first frame prior to playing the movie back. Once the movie is initiated, the display format disappears.
Preview Images
Compositional Controls
In addition to data, the camera can project lines and grids onto the screen to aid you in composition. These overlays can help you align and frame your pictures and movies. They are not recorded or visible when the file is played back.
Use the following command to set these lines and grids:
MENU>Custom Menu (2)>Grid Line>[Rule of 3rds Grid], [Square Grid], [Diag. + Square Grid], [Off]
The three grid line options each have specific patterns and benefits. The [Rule of 3rds Grid] pattern consists of a 3 x 3 array of rectangles (figure 3-5). This pattern allows you to position the main subject one-third or two-thirds of the way up from the bottom, down from the top, or from either side of the screen. The [Square Grid] pattern divides the screen into 6 x 4 squares to help you make sure the picture is well balanced and not tilted. The final pattern, [Diag. + Square Grid], divides the screen into 4 × 4 rectangles with diagonal lines radiating from the center to each corner, which helps you center the image in the frame.
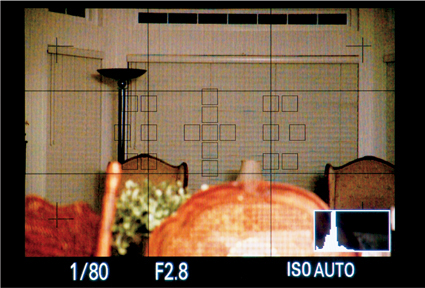
Figure 3-5: Rule of 3rds grid superimposed on framed image
No grid lines show when the command is set to [Off].
All three grid patterns are useful in architectural photography and in scenic shots with a horizon. They help you avoid canting the subject by providing an alignment guide for buildings and the horizon. The pattern you use depends on where you wish to position the subject within your picture.
Magnifying Images During Preview
The Focus Magnifier button (figure 3-6) has two functions: magnifying the image to better select the framed detail and determine whether it is in focus; and magnifying the image to save a cropped version of the original. Both of these processes are controlled by the Smart Telecon. Button command:
MENU>Custom Menu (3)>Smart Telecon. Button>[Smart Telecon.], [Focus Magnifier]
The first thing to keep in mind is that the [Smart Telecon.] option magnifies the previewed image only when the Quality command is set to a JPEG only format. If you are shooting in RAW or RAW&JPEG format, you must set the Smart Telecon. Button command to [Focus Magnifier]. In addition, the [Smart Telecon.] option magnifies the preview image considerably less than the [Focus Magnifier] option; plus, the [Smart Telecon.] option does not let you move around within the magnified image to view specific portions like you can with the [Focus Magnifier] option. These two features are covered in more detail in chapter 6.
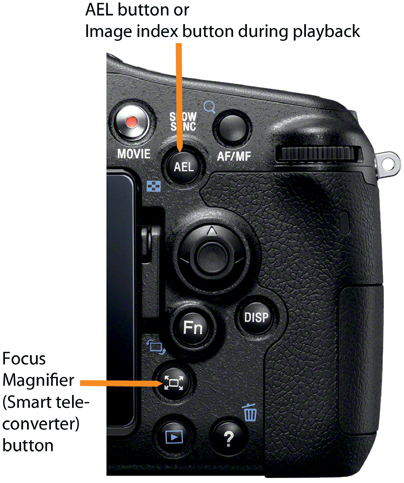
Figure 3-6: Focus Magnifier and Image index buttons
Review Recorded Images
Displaying Recorded Images
Once you have recorded a still picture or movie, you should review the results. This will give you the opportunity to retake the picture or movie before moving on. There are a couple of tools to help you do this. Keep in mind that when we refer to still pictures, we include both types of panorama shots.
Auto Review or No Auto Review
The Auto Review command allows you to view a picture immediately after it is taken and before you take the next picture. You can choose to display the picture for 2, 5, or 10 seconds, or not at all by using the [Off] option.
MENU>Custom Menu (2)>Auto Review>[10 Sec], [5 Sec], [2 Sec], [Off]
You are returned to Live View automatically when the display time has elapsed or when the shutter button is pressed.
There are times when you might find it advantageous to turn this command to [Off] so that the camera returns to Live View immediately after taking a picture. This saves battery power and eliminates any interruption from taking pictures.
Reviewing Files with the Playback Button
You can review your still pictures using either the Slide Show command, discussed later in this chapter, or the Playback button, which puts the camera in playback mode. Movies and MP4 files can only be reviewed through the Playback button.
The type of file displayed—i.e., still pictures or movies—depends on two controls. When you press the Playback button, the last type of image recorded dictates the images that will be displayed. If the last image recorded was a movie, only movies will display for your review. If the last image recorded was a still picture, then only still pictures will display.
To change which image type will be displayed the next time you press the Playback button, use the following menu command:
MENU>Playback Menu (1)>View Mode>[Folder View(Still)], [Folder View(MP4)], [AVCHD View]
Initially, each value displays the selected group’s saved images in groups of four. Toggle the multi-selector to navigate through the images. The vertical bar on the right side of the screen changes as you move through the images, indicating the relative position of the displayed images within the total number of images saved on the memory card. The vertical View Mode bar on the left side controls the View Mode. For example, if you are displaying movie files and now want to review still pictures, toggle to the View Mode bar and press the multi-selector button. When the View Mode menu displays, select the [Folder View(Still)] option. Press the Playback button to display saved still pictures instead of saved movies.
Of course, you can always just snap a still picture to reset the Playback button’s image type. Either way, keep in mind that saved files are reviewed based on file type.
Playing Back Still Pictures
Once you know you are positioned to display still images, press the Playback button. Either the last recorded or the last played back still picture will be displayed first. Toggle the multi-selector right to display the next saved picture or left to move backwards through them. Note that the displayed images wrap around as you continue to toggle the button (i.e., they start from the beginning). Remember to use the DISP button to view the images’ stored recorded data through the different data display formats.
Playing Back MP4 or AVCHD Movies
Only the first frame of a movie is seen as you cycle through the memory card files in playback mode. Press the multi-selector button to initiate the movie. Whatever data display screen format was selected disappears, and the selected movie plays. Pressing the DISP button toggles between just playing back the movie and playing back the movie with showing operational information including playback status, the playback bar indicating the playback’s position, the number of seconds played, and icons representing rewind, pause, fast forward, etc. (table 3-2).
Keep in mind that playing back a movie can mean automatically playing back multiple specific View Mode movies stored on the memory card. For example, if you have three saved AVCHD movies and the camera is positioned on the first one, initiating playback will play it and the two subsequent movies in succession.
Function |
Multi-Selector/Front or Rear Control Dial Operation |
Play/Pause |
Press the multi-selector button to initiate playback of the movie. Continue to press the multi-selector button to switch between the Play and Pause functions. |
Stop |
Press the shutter button to terminate the movie playback. |
Fast Forward |
While the movie is playing, press the multi-selector button to pause it. Then toggle to the right. Note playback will continue through all of the movies after the current movie. |
Fast Rewind |
While the movie is playing, press the multi-selector button to pause it. Then toggle to the left. The movie plays back by skipping several frames at once and therefore has a jerking look. Note playback will continue through all of the movies before the current movie. |
Slow Forward |
While the movie is playing, press the multi-selector button to pause it. Then rotate the front or rear control dial to the right. Note playback will continue through all of the movies after the current movie. |
Frame-by-Frame Rewind |
While the movie is playing, press the multi-selector button to pause it. Then rotate the front or rear control dial to the left. The movie plays frame-by-frame backwards and has a jerking look. Note playback will continue through all of the movies before the current movie. |
Reduce or Increase Volume Level |
Toggle the multi-selector downward to initiate volume change. Once the volume control vertical bar is displayed on the right side of the screen, toggle the multi-selector downward to decrease the volume or toggle upward to increase the volume. |
Display Operational Information |
Press the DISP button to display movie information: playback status, playback bar, number of seconds played, date recorded, number of the movie file currently playing (out of the total number of movie files), and available operational controls. Note that different operational controls display depending on whether the movie is playing or paused. |
Table 3-2: MP4 and AVCHD movie playback operations
Reviewing Multiple Pictures and Movies
You can view up to nine images within a folder at one time. Press the Image Index button (figure 3-6) while in playback mode. A group of four images displays on the screen. Press the DISP button once, and the group of displayed images increases to nine. Press the DISP button again to switch back to viewing only four images. If you wish to view a specific image’s camera settings, toggle the multi-selector to navigate to the image and then press the multi-selector button. The camera then shows only the selected image, and the DISP button cycles through the checked data display formats.
As with playback mode, images in the last recorded folder are displayed when you press the Image Index button. To change View Mode to another type of image, toggle to the left vertical bar and press the multi-selector button. The View Mode menu is then displayed with the current folder highlighted. Select another type of folder to display its recorded images.
Reviewing Still Pictures with the Slide Show Command
The Slide Show command plays all of your 2D still pictures on your camera or, using a connector cable, to a compatible TV in sequence starting with either the last played back or recorded still picture. This command is unavailable for AVCHD or MP4 movies and therefore is only enabled when the last image saved is a picture or when the View Mode command is set to [Folder View(Still)].
To build and execute a slide show, navigate to the following command:
MENU>Playback Menu (1)>Slide Show>[Repeat], [Interval], Image Type]
Once you enter the Slide Show command, you will see three submenus: the current settings for Repeat, Interval, and Image Type; the [Enter] menu option; and the [Cancel] menu option (figure 3-7).
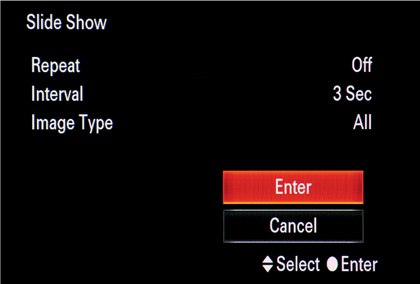
Figure 3-7: Slide Show command options
The Repeat [On] option enables the slide show to loop back through the pictures continuously. The [Off] value executes the slide show only once and then exits to Live View.
MENU>Playback Menu (1)>Slide Show>Repeat>[On], [Off]
The Interval option allows you to set the length of time each picture is displayed from 1 to 30 seconds.
MENU>Playback Menu (1)>Slide Show>Interval>[1 Sec], [3 Sec], [5 Sec], [10 Sec], [30 Sec]
The Image Type option allows you to include either all of your still pictures or only the 3D Sweep Panorama images saved on your memory card.
MENU>Playback Menu (1)>Slide Show>Image Type>[All], [Display 3D Only]
To initiate the slide show, select the [Enter] option and press the multi-selector button. Select the [Cancel] option to exit the Slide Show command.
Once a slide show begins, you have a couple of additional options. Toggle the multi-selector right and left to move forward or backward through the slide show. The slide show resumes with the selected interval once you stop toggling. There is no way to pause the slide show.
To terminate the slide show, either press the shutter button to return to Live View, or press the multi-selector button to stop the slide show and enter playback mode starting with the displayed image. At this point, the still picture data display formats are at your disposal when you press the DISP button.
Keep in mind that the Slide Show command only includes still images saved on the inserted memory card. Therefore if you need a permanent show, you must download your pictures to your computer and then use the PMB (Picture Motion Browser) or other third-party software to build a new slide show.
Zooming In on Recorded Images
Just reviewing a recorded picture is not always enough to determine if it’s a keeper. Sometimes you need to zoom in to see if the fine details within the image are sharp. You can do so when the camera is in playback mode by pressing the AF/ MF button, which becomes the Enlarger button (figure 3-8). Once the image is enlarged, a box containing a picture of the original image is superimposed in the lower quadrant of the screen. Within this is a small red box indicating the portion of the original image that is enlarged (figure 3-9).
Turn the rear control dial to zoom in or zoom out of the picture. Four arrows surrounding the enlarged image indicate the directions in which you can move the displayed portion by using the multi-selector.
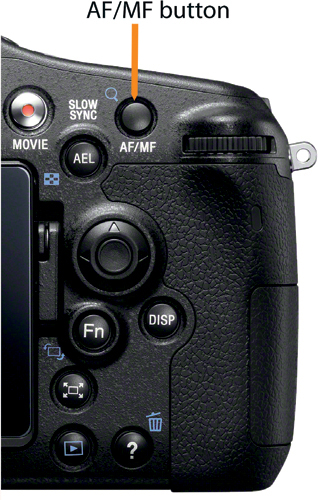
Figure 3-8: AF/MF (Enlarger) button. Note the magnifying glass icon
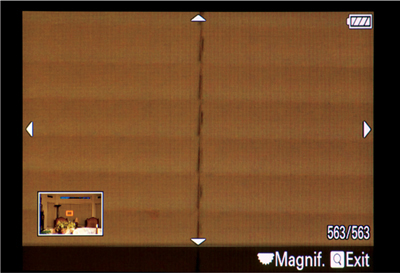
Figure 3-9: Magnified image with original image box superimposed
There may be times when you have taken multiple shots of the same image and you want to pick the sharpest of the bunch. You can zoom in on one image and then compare the same enlarged section in each of the other saved images. To do this, put the camera into playback mode, display the first image, and magnify the portion you want to review. Turn the front control dial to the right to advance to the next saved image or to the left to move to the previously saved image. In either case, the enlarged section remains constant as you view the preceding or succeeding image. Using the front control dial, you can change the magnification and/or move to another portion within the image, and the new position will be carried over to the next displayed image. This makes it easy to assess the sharpness of your images.
Evaluating Exposure with Histograms
The histogram is a tool that helps you evaluate your images’ exposures. It’s a graphical representation of the distribution of light intensities recorded by the sensor. Intensity values are represented on the horizontal axis (black to white), while the numbers of pixels are represented on the vertical axis.
Theoretically, the histogram has the shape of a classic bell curve whose maximum is near the center, indicating that most of the image’s pixels have a brightness level in the middle—not too bright, not too dark. Figure 3-10 shows three histogram plots taken from the Sony A77 LCD screen.

Figure 3-10: Examples of an image with its histogram showing an underexposure, a proper exposure, and an overexposure
The far left histogram indicates that the image is underexposed, meaning not enough light is hitting the sensor; the middle histogram belongs to a properly exposed image; and the far right histogram indicates that the image is overexposed, meaning too much light is hitting the sensor.
As you do more photography, you will notice that many histograms have multiple peaks, none of which are centered on the horizontal axis. This does not necessarily indicate poor exposure. Instead, you should watch for large numbers of pixels appearing at either end of the graph, which would indicate an out-of-balance lighting situation that might need to be fixed to get a properly exposed picture. A large number of pixels pushed up against the extreme right or left of the graph (i.e., clipped), indicates maximum intensity or minimum intensity respectively. Either way, you will have problems—at the extreme right, the image will have burned-out highlights, and at the extreme left, the image will have black shadows that lack detail.
To display the histogram during preview, make sure the Histogram data display format box (figure 3-11) is checked in both of the following commands:
MENU>Custom Menu (2)>DISP Button(Monitor)
MENU>Custom Menu (2)>DISP Button(Finder)
As stated earlier, the histogram will not be displayed when previewing movies or panoramas.
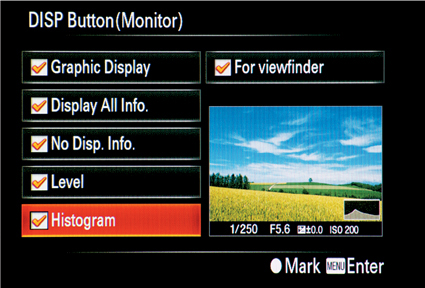
Figure 3-11: Histogram box checked
Keep in mind that the histogram represents how the camera is measuring light at the current moment. The histogram will most likely change when the lighting changes, or when you change the camera’s settings or reframe the image. In addition, you may find that image results cannot always be determined by previewing the histogram when you are using flash or dealing with low light situations.
Histograms also allow you to evaluate an image’s exposure in playback mode, after it has been recorded. Here along with the overall white histogram, you will have additional color channel histograms (red, green and blue) to better determine the image’s exposure. When you view individual color channel histograms, look for the curve shifted to the left or the right. This will let you know if a specific color is under- or overexposed, respectively.
Studying color channels is important because red, green, and blue channels have different sensitivities to light. If one channel goes into over- or underexposure, as evidenced by its histogram, your picture may take on a color cast. The luminosity (white) histogram may miss this detail. Luminosity is at best an averaging of light intensities, which is made up of intensities from the red, green, and blue photo sites. For example, underexposed images show intensity values accumulating and spiking on the left border of the graph. This can be corrected by reshooting with an increased exposure. The reverse is true for overexposure.
Protecting Saved Pictures and Movies
Have you ever intended to save a picture and inadvertently deleted it? It’s pretty upsetting when that happens. The Protect command allows you to indicate which images cannot be deleted by the camera’s Delete functionality.
MENU>Playback Menu (1)>Protect>[Multiple Img.], [Cancel All Images]
1. Use the [Multiple Img.] option to select images to protect. The saved images are displayed with a check box on the left side.
2. Scroll through the images using the multi-selector. Press the multi-selector button to indicate that the image should be protected. A check mark is entered in the box. To uncheck, press the multi-selector button again.
3. Press the MENU button to exit the displayed images. Select [OK] to save the Protect indicators; select [Cancel] to return to the displayed images.
To unprotect images, either re-enter the Protect command and uncheck the boxes one at a time, or execute the [Cancel All Images] option to clear all of the Protect indicators.
Important points:
• The Protect command is enabled only if there is at least one image stored on the memory card.
• Protected images are deleted when reformatting the memory card using the Format command.
Deleting Saved Pictures and Movies
Not every picture or movie is going to be a keeper. As you view the saved images on the camera, you may want to delete one or more.
There are multiple ways to delete files.
1. While in playback mode, use the Delete button to delete one image at a time. The Delete function menu will be displayed with [Delete] and [Cancel] options. Select [Delete] to delete the file. [Cancel] will close the Delete function menu.
2. Use the Delete command in the Playback menu to delete multiple images:
MENU>Playback Menu (1)>Delete>[Multiple Img.], [All in Folder]
The [Multiple Img.] option will display saved images one at a time with a check box on the left side of the screen if the file is unprotected. Use the multi-selector or rear control dial to scroll through the saved images. Press the multi-selector button to insert a check within the box to mark the saved image for deletion. Press the MENU button when done. Select [OK] to complete the deletion process; [Cancel] to return to the Delete process.
When the [All in Folder] option is selected, the follow message will be displayed: “Delete all images in this folder?” [Delete], [Cancel]
The folder represents still pictures, AVCHD, or MP4 movie files. Select [Delete] to delete all of the images in the displayed folder. Select [Cancel] to exit the Delete process. The Delete function pertains only to unprotected, saved files on the memory card.
3. Reformat the memory card to delete all saved files:
MENU>Memory Card Tool Menu (1)>Format>[Enter], [Cancel]
Executing this command will delete all stored files (even protected files) on the memory card.
Important points:
• The Delete command is enabled only if there is at least one image stored on the memory card.
• When you delete a saved file, it is permanently gone from the memory card.
Working Outside the Camera
Overview
There are many ways to view and manage your pictures and movies outside the camera. You can play them as slide shows on your computer or TV, print the pictures, email them, and add them to your personal website. As technology evolves and new inventions are developed, you will most likely want to move your pictures and movies to those new arenas.
The technology you use depends on your available equipment and software, as well as your level of knowledge. Rather than go into the details of how to use various technologies, we recommend that you consult your other equipment and software manuals, along with their corresponding websites, for specific information on how to accomplish your goals.
Downloading Pictures and Movies to Your Computer
Eventually you will want to download your pictures and movies from your camera’s memory card to another device, most likely your computer, and then delete them from your memory card. Sony supplies Image Data Converter and PMB software to help you manage your files on your computer and create lasting files for you to share and view. Of course, you can use third-party software instead, such as Apple iLife or Adobe Photoshop Elements.
There are two ways to download your picture and movie files to your computer. The first way is to use the supplied USB cable. Insert the cable into the mini-USB port on the camera and into the USB port of your computer. Typically, if you have installed Sony’s Image Data Converter and PMB software on your computer, a prompt will pop up on your computer monitor with options to copy the camera files to your computer. This is a straightforward process, but it uses the camera’s battery to move the files. If you deplete your battery during the download, you may corrupt and lose your files. So, if you use this download method, make sure you have a fully charged battery.
The second way is to download the files directly from the memory card. You can remove the card from your camera and insert into a card reader connected to your computer’s USB port. Card readers are devices that have a slot for one or more types of memory cards. Sometimes you don’t even need a card reader; many laptop computers have an SD card reader built into the chassis. You simply insert the memory card into your computer and start your download. Again, if you have a PC with Image Data Converter and PMB software, you will see prompts to save your files onto your computer. After the files are downloaded, you can organize them, edit them, and display them.
If you want to process your files and use more advanced controls than those provided by the Sony software, you can use proprietary software. Apple’s Aperture and Adobe Lightroom are two programs that provide a way of organizing and manipulating images. For the most advanced user, one might wish to buy Adobe Photoshop. These programs cost at least $200 and if one wishes to use an inexpensive package (less than $100) one should consider Adobe’s Elements ($80) or Apple’s iPhoto ’11. There are even two free choices for either Windows or Macintosh computers: Picasa (http://picasa.google.com) and GIMP (www.gimp.org).
Delivered Sony A77 Software
Your Sony A77 camera is delivered with a CD containing two software applications: Image Data Converter and Picture Motion Browser (PMB). Both applications work with RAW and JPEG files, but to varying degrees. Image Data Converter works mainly with RAW files and allows some minor image processing of JPEG still pictures. PMB works mainly with JPEG files plus AVCHD and MP4 movies, while allowing some very minor manipulation of RAW files.
Image Data Converter works on either PCs or Macs, while PMB is only for PCs. To use either program, you will need to install the software onto your computer. If you are not already using third-party image processing programs, try these out and see if they suit your needs.
We prefer using third-party software for working with our images, since such programs execute commands faster than Image Data Converter. However, if you’re shooting in RAW format, Image Data Converter allows you to get the best quality images from your Sony A77 as soon as you receive the camera. With third-party software, you first need to make sure your software is current and capable of translating your Sony RAW files.
Image Data Converter
Image Data Converter is image-processing software that works with Sony RAW so you can adjust ISO, WB, and DRO. You can also apply Creative Styles and add shading compensation, sharpness, and noise reduction along with some other image processing functions. The software also lets you do some minor image processing to JPEG files, such as rotating an image and adjusting its tone curve.
If you are not already familiar with a third-party image-processing program, Image Data Converter is definitely something to try out. We find it capable of producing excellent results, but also find it to be very slow and not as easy to use as Photoshop or Aperture. Then again, Image Data Converter comes with the camera at no additional cost. We have worked with it on a Dell computer with a quad core processor (i5) and a MacBook Pro with a dual core processor. In both instances, the program was workable, but it took a second or two to execute a function or open a pull-down menu.
Picture Motion Browser (PMB)
You can download your images (pictures and movies) onto your computer using PMB software. The program lets you organize and maintain files in folders. Not only can you view your files by name or file type, or as thumbnails, but also you can organize your files via a calendar structure.
PMB is intended mainly for image processing JPEG and movie (AVCHD and MP4) files. You can adjust brightness, color saturation, image sharpness, tone curve, and red-eye reduction, plus you can crop and rotate your JPEG still pictures. You can add date information and visually organize your saved files by date on a calendar. The software even allows you to view GPS locations captured with the camera. In regard to movies, PMB allows you to combine and/or edit both AVCHD and MP4 files.
Although you can download your RAW files in PMB, it allows for only minor manipulations. Instead, PMB supplies a direct link to Image Data Converter so you can conduct more complex image processing tasks on your RAW files there.
One more important PMB feature is that you can create slide shows consisting of still pictures and movies, all of which can be viewed on your computer, exported, or written to discs.
Playing Pictures and Movies on Your TV Screen
The Sony A77 can be connected directly to your TV. Use the supplied AV cable to connect to a non-HDTV or purchase an HDMI cable to connect to an HDTV. The way in which you link the camera to the TV depends on the age, brand, and type of TV you have. We recommend that you consult both the camera and TV manuals, as well as the manufacturers’ websites, to get up-to-date information.
After the camera is connected, you can play your slide shows on your TV. One advantage of viewing your slide show on a wide-screen HDTV is the huge screen size as compared to the camera’s LCD screen. This makes it possible to comfortably show your pictures and movies to several friends at once. You will be able to better appreciate the definition, color, and contrast of your pictures and movies when they are viewed on a large screen rather than on the small LCD screen on the back of the camera.
To view 3D Sweep Panorama images, you must connect your camera to a 3D-capable TV and have 3D glasses available. Once connected, initiate 3D playback with the following command:
MENU>Playback Menu (1)>[3D Viewing]
Initiate playing back your 3D images by pressing the multi-selector button, and then toggle right and left to advance to the next image or return to the previous image. Toggle down to exit the 3D playback.
Things you should know:
• [3D Viewing] is not enabled unless the camera is connected to a 3D-capable TV.
• Only 3D Sweep Panorama images play back with this command.
Printing Your Pictures
You can manage printing your images on your own with third-party software or utilize the Specify Printing command in the Sony A77:
MENU>Playback Menu (1)>Specify Printing>[DPOF Setup], [Date Imprint]
This command formats your selected images utilizing the common DPOF (Digital Print Order Format) protocol. The [DPOF Setup] option displays a check box on the left side on each eligible saved image. Still pictures saved as RAW files and movies are not eligible for printing. Using DPOF is advantageous if you do not have a computer or a printer. You can take your memory card to a printing service and they can use the information directly from the card to generate your selected prints. It should be noted that the memory card can be inserted directly into some manufacturers’ inkjet printers and use the DPOF data to generate your selected prints. Utilizing this function is straightforward with the following steps:
1. Enter MENU>Playback Menu (1)>Specify Printing>DPOF Setup>[Multiple Img].
2. Select [Enter] option to initiate the process; [Cancel] to exit.
3. The memory card’s first saved image is displayed on the screen. Only DPOF-printable images have a check box displayed on the left side of the screen.
4. Toggle the multi-selector right or left to scroll through the displayed images. When you identify an image you wish to print, press the multi-selector button. A check mark will appear within the box. Press the button again to uncheck the box if you change your mind.
5. Once you identify all of the images you want to print, press the MENU button. Select [OK] to save the DPOF indicators; [Cancel] to exit back to the displayed images with the DPOF indicators.
6. Enter MENU>Playback Menu (1)>Specify Printing>Date Imprint>[On] if you wish to include the image’s recorded date on the prints.
7. Select the [Enter] option to initiate the process, and press the shutter button halfway to exit; select [Cancel] to exit.
Important points:
• DPOF specifications will be visible on your saved images after printing. To remove them, either re-enter the Specify Printing command and uncheck the print indicator at the individual image level, or execute MENU>Playback Menu (1)>Specify Printing>DPOF Setup>[Cancel All] to erase all DPOF specifications.
• The Specify Printing command is available only for JPEG still pictures.
• You cannot select RAW files.
• You cannot specify the number of prints at the image level.
• The Specify Printing command is enabled only if there is at least one image stored on the memory card.
Recommendations
We leave automatic switching [On] from the LCD screen to the viewfinder and back. This way, we can quickly switch between the two display screens without making a change through the menu structure or pressing the LCD/FINDER button.
We usually set the Auto Review command to [Off]. Most of the time, we shoot a series of pictures and then review them as a group. Some of the pictures take only a second to review; some take longer. Setting Auto Review to [Off] puts the review process in our hands, plus it eliminates the constant drain on the battery.
It might seem like overkill, but we have concluded that it is best to select all of the data display formats for previewing the images. Although we have our preferences, we find that we use each of the display formats at least occasionally. Therefore, checking them all gives us the flexibility to use what we want. If we decide we need the Level gauge, it is already available. All we have to do is press the DISP button to get to the desired format.
We recommend that you review the histograms frequently. They are excellent windows into your image’s exposure, both before and after recording. We use histograms often, especially in the camera’s semi-automatic and manual modes.
We set the grid line command to the [Rule of 3rds Grid] option. This option helps us balance the image’s composition with a minimal number of lines. The grid lines are prominent enough to see when you want and faint enough to overlook when you don’t.
We are judicious about deleting files while photographing in the field. We occasionally weed out unacceptable images via the camera but find it much easier to do this cleanup process later, when we view the images on our computer. To minimize the chance of being caught short on memory, we download the pictures to our computer after each photo shoot and then do a bulk erasure or reformat the memory card. This saves us time and camera battery power.
It is amazing how quickly you can fill up a memory card, especially if you are taking movies. Since memory card costs keep decreasing, we recommend having a second or even a third memory card available. Without an extra card, you may end up having to spend your time reviewing and deleting saved images instead of taking pictures.
Most likely you are going to rely on your computer to manage your photos and movies. This may sound obvious, but get in the habit of downloading your pictures and movies to your computer soon after they are recorded when your memory is still fresh.
Last, but not least, use your computer to build slide shows using either Sony’s Image Data Converter and PMB software or third-party software. Then store the results on a DVD so you can play back your saved memories on your computer or TV. An added benefit is that you can make copies of your DVDs to share with friends and family.