
Chapter 10: Flash Photography

Introduction
As sensitive as the Sony A77 is to light, there are times when it requires a little help via additional lighting, such as when photographing indoors. This can be accomplished easily and conveniently with the camera’s built-in flash. However, the flash is a low-powered unit and has insufficient output to illuminate a large room. It should be regarded as a supplemental rather than a primary light source. If you anticipate doing much interior work, you should consider getting an attachable external flash unit that fits on the camera’s accessory or “hot shoe” (figure 10-1). These units will double, and can even quadruple, your light output depending on the unit’s size.
Sony provides several attachable external flash units that will provide the light you need to photograph a group of people. The larger accessory units have greater coverage, and you can control the direction of the light by tilting or rotating the flash head. With this, you can take advantage of what is know as “bounce flash,” where you aim the flash toward the ceiling rather than illuminating the subject straight on. These units have enough power so that the reflection off the ceiling (i.e., the bounced light) will provide flattering, soft light.

Figure 10-1: Top of the camera showing the hot shoe (photograph courtesy of Sony)
Principles of Electronic Flash
The electronic flash for the Sony A77 uses a small tube filled with xenon gas. When the flash fires, its high-voltage electricity generates a short burst of light (1/1000 second or less). The light’s WB approximates daylight; however, its color temperature is a bit cooler. If you use preset WB at its daylight value, you will record an image with a slight bluish tinge. Using AWB or presetting WB to electronic flash will produce a more pleasing color image.
The flash duration is much shorter than the camera’s shutter speed and requires that the sensor be fully exposed to light. For the A77, the sensor is fully exposed at 1/250 second (flash synchronization shutter speed) or longer. As a consequence, flash synchronization requires a shutter speed of 1/250 second or slower to be used with the built-in flash. In Auto or Auto+ mode, the camera is set at 1/60 second. At shutter speeds faster than 1/250 second, the shutter opening is a slit passing across the front of the sensor; if the flash were to fire, only a portion of the sensor would be exposed to light and only a part of the sensor will record the light arising from the flash. The recorded image will show only a small fraction of the subject.
Flash exposure is governed by its duration. The maximum light output occurs when the flash lasts 1/1000 second. To illuminate the subject with less light, its duration can be reduced to as little as 1/50,000 second. To determine how much flash is needed, the camera fires a brief pre-flash of known intensity. This light reflects off the subject, allowing the camera to estimate what the exposure should be.
If you are interested in exploring flash further, there is a formula for calculating exposure. Each flash has a Guide Number, or GN, that serves as a measure of its intensity. This number is used to calculate the f-stop the camera should use with the flash. For example, when fired at its full duration, the built-in flash has a GN of 12 for ISO 100 and the subject’s distance from the camera is measured in meters. The formula is described below:
GN = Distance in meters x f-stop
or
f-stop = GN/distance in meters
Per this calculation, for a subject that is 3 meters (9.6 feet) away, you can use an f-stop of f/4:
f-stop = 12/3 or f/4
This type of calculation is used to help the Sony built-in flash calculate exposure. If you look at the menu for setting flash, you will see the following three options:
MENU>Still Picture Menu (2)>Flash control>[ADI flash], [Pre-flash TTL], [Manual flash]
These three options represent different methods of controlling flash output. The [Manual flash] option is unavailable in Auto and Auto+ modes. Consequently, this selection is grayed out on the camera menu and is not available until you switch to P, A, S, or M mode.
The basis for automatic flash exposure is [Pre-flash TTL], which requires the firing of a low-power flash as a reference beam. This beam is reflected by the subject and passes through the camera lens on its way to the sensor. This light is used to calculate the duration of the main flash, and it is the reason behind the letters TTL (Through The Lens).
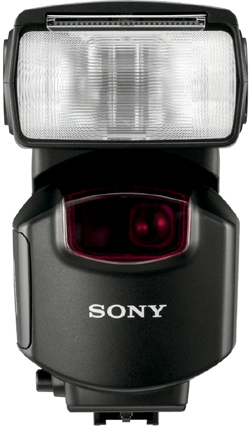
Figure 10-2: External flash that can be attached to hot shoe (photograph courtesy of Sony)
While the Pre-flash TTL measurement is a reliable means of controlling the flash, it can be fooled if the subject reflects more light than what can be expected for a typical scene. To provide a more accurate exposure under these conditions, Sony employs ADI (Advanced Distance Integration). When the camera focuses on a subject, the lens has a distance encoder that tells the camera how far away it is. From the GN equation described earlier in this chapter, the camera can calculate what the light output should be to properly illuminate the subject. So, if the return light is too bright—as might be the case if there were a mirror in the picture—ADI will note this, and the camera can compensate for the high light level.
It’s also good to know about GN because it provides a quick and handy measure for comparing the light output of different flashes. Sony sells several accessory units that attach to the top of the camera’s hot shoe (figure 10-2). There is a small compact unit, the HVL-F20AM, which has a GN of 20, meaning that it will cover almost twice the distance of the built-in camera flash. Sony has two other units that are larger and more expensive, with respective GNs of 43 (HVL-F43AM) and 58 (HVL-F58AM). If you prefer to use flash units made by other companies, their GNs can provide a useful comparison.
Flash Artifact: Red-Eye
The Custom Menu contains a flash-related command for reducing red-eye.
MENU>Custom Menu (1)>Red eye reduction>[ON]
This command needs a bit of background to clarify its function. The camera’s flash unit sends out light, and if a person—or an animal—is looking into the lens, the light will enter the eye and be reflected off the retina and back to the camera. Since the human eye has a rich vascular structure, the reflected light is red in color; and if a person is staring into the camera, the resulting photograph has the eyes glowing red. As an aside, animals (such as cats or dogs) can have a reflective layer behind their retinas, which causes the animals’ eyes to glow yellow rather than red when they look toward an electronic flash. This is significant for pet photographers because automated software removal for red-eye may fail to take the glow out of their subjects’ eyes.
When Red eye reduction command is set to [On], the camera’s flash sends out several flashes prior to the main flash. Presumably, this makes the subject’s pupils constrict and reduces the chance that light from the flash will enter the eyes and reflect back to the camera. This command has three flaws. First, it is not always successful, and therefore you may still have subjects with glowing red eyes. Second, the additional flashes can annoy the subject enough so that they blink or squint. While this reduces red eye, it can spoil the shot. The final problem is that the delay imposed by using these flashes can delay the capture of the image and you may miss a photographic opportunity. The Red eye reduction command’s default is [Off] in Auto or Auto+ modes.
Flash Function
The Flash function is found in the left column of the Fn button menu. The function has five options (table 10-1). Not all of the options are available in each of the modes.
To maintain the streamlined shape of the camera body, the Sony A77’s built-in flash head is folded against the body. It must be raised before it can be used. The camera raises the flash automatically under two conditions. The first is when ambient illumination is low and the sensor needs additional light. In Auto and Auto+ modes, the flash is automatically raised and fired if the camera cannot increase the ISO or open the aperture sufficiently. The second is when there is a dramatic difference in the light coming from the background and foreground—for example, when the backlight is so intense that the foreground will be recorded as a silhouette.
The flash may also be raised in certain SCN predefined scene modes, such as Night Portrait. For the beginner, this is a convenient feature, but eventually you may decide to take control by turning the mode dial to P, A, S, or M. In these modes, the flash is always off unless you raise it by depressing a small button on the side of the camera. In Auto or Auto+ modes, this button is inoperative.
Option Name |
Description |
|
|
Flash Off |
Prevents the flash unit from firing. |
|
Autoflash |
The camera decides when the flash is needed. The flash unit pops up automatically and fires at low light levels. If the flash is up in Auto or Auto+, it may not fire if you go to a brighter lighting condition and the camera decides no more light is needed. The flash may also fire if the subject appears as a silhouette because of intense backlighting. |
|
Fill-flash |
The flash will always fire, providing light to the subject. In Auto or Auto+, if the flash unit is down, it will pop up immediately upon applying slight pressure to the shutter button. |
|
Rear Sync. |
Use this option with a slow shutter speed. The flash will go off at the end of the exposure just before the second shutter curtain closes. If there is movement during the exposure, the resulting picture will record the subject frozen in its last position right before the exposure ended. If there is enough ambient light, the subject’s movement during the exposure will be captured as a blur. |
|
Wireless |
This option triggers an external Sony flash unit. When the camera’s built-in flash is raised, it emits small bursts of light that signal the external flash to fire. |
Table 10-1: Available Flash function options
Using Flash in Auto and Auto+ Modes
Only the first three Flash options are available in the Auto and Auto+ modes: [Flash Off], [Autoflash], and [Fill-flash].
The flash commands in Auto and Auto+ modes are pretty straightforward. With [Autoflash], you let the camera decide whether it should use flash. With [Flash Off], you tell the camera never to use the flash. With [Fill-flash], you tell the camera to use the flash all the time.
What You Can Do with Flash in Auto or Auto+
The first option you should consider is [Autoflash]. This option allows the camera to decide whether the flash is needed or not. In Auto or Auto+ mode, the flash unit pops up from the closed position and fires. The flash remains upright until you decide to close it.
There are conditions when you do not want the flash to fire under any circumstances, such as during a live stage production. To accommodate this situation while in Auto or Auto+, set the Flash option to [Flash Off]. When this option is selected, the flash will not fire.
The opposite situation arises when you want the flash to fire all the time. For example, this can occur if you are shooting indoors with brilliant sunlight coming in through a window behind the subject. The background lighting renders the subject as a silhouette (figure 10-3). In this situation, there is a lighting imbalance, and you want the flash to fill in the shadows by selecting the [Fill-flash] option. In figure 10-4, you have a brightly lit scene with a lamp in silhouette by a window. By using [Fill-flash], you can illuminate the front of the lamp and fill in its shadow.
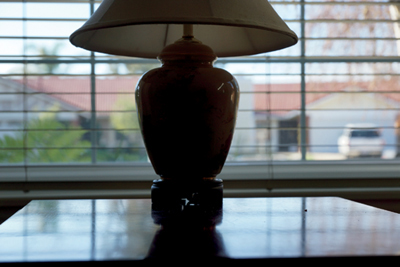
Figure 10-3: An imbalance between foreground and background lighting renders a lamp as a silhouette
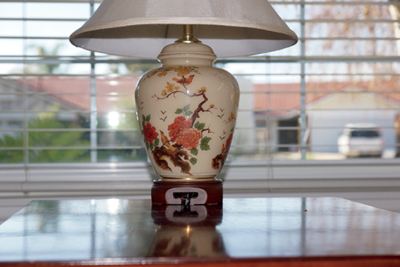
Figure 10-4: [Fill-flash] balances the lighting, revealing the lamp’s surface
What You Can’t Do with Flash in Auto or Auto+
As you gain experience, you may realize that you are constrained by lack of control over the flash. First, when the flash is used for interior shots, the lens is set at its largest aperture. If you wish to increase the depth of field, you will find you cannot close the aperture. This reflects the automatic nature of the camera as it tries to capture the image with available light.
When in Auto or Auto+ mode under low light conditions, the first thing the camera does is open its aperture to admit more light, slows its shutter speed, and raises its ISO. When the shutter speed becomes so slow as to result in a blurred picture, the built-in flash pops up and the camera uses it to take the picture. Unfortunately, it does so at 1/60 of a second with a large lens opening. This is a disadvantage if you want to capture a detailed view of people scattered throughout a room. Since the lens is wide open, the depth of field is minimal, causing many of the people to be recorded indistinctly. To render the people sharply, you would need to close down the lens aperture; however, this is not an option in Auto or Auto+.
Secondly, you may notice that when you use the [Fill-flash] option, the foreground may not be exposed the way you like. When photographing under bright sunlight, the flash can be used to illuminate the shadows. However, if too much light is applied the flash can give your subject an unnatural appearance by removing all the shadows. The image may look better if you decrease the flash output so that subtle shadows are still present, thereby sculpting the subject and giving it a three-dimensional appearance. You cannot control the flash intensity in Auto or Auto+ mode.
Finally, you may decide that you need more power to take interior photographs in a large room. Here, the built-in flash is inadequate. To gain additional power, you will have to purchase an accessory flash unit. Many of the Sony units allow you to use bounce lighting. We will discuss this later.
Flash Options in P, A, S, or M Modes
When you switch over to P, A, S, or M mode, your built-in flash becomes more controllable. First off, the little flash release button on the top of the camera becomes functional. When pressed, this button will pop up the flash unit and force it to fire with each shot. Basically, it sets the camera to Fill-flash mode. When you press the Fn button and select Flash, you will also notice that the [Autoflash] and [Flash Off] options are grayed out. Instead, the flash will never fire when it is folded against the camera body (replaces the [Flash Off ] option). When you raise the flash head, it will always fire (replaces the [Fill-flash] option). The [Autoflash] command is unnecessary because you decide when you want to use the flash.
The Flash control command’s third option, [Manual flash] (figure 10-5) becomes active when you go into P, A, S, or M mode:
MENU>Still Picture Menu (2)>Flash control>[Manual flash]
Along with this, another command now makes its appearance (figure 10-6a):
MENU >Still Picture Menu (2)>Power ratio>[1/1], [1/2], [1/4], [1/8], [1/16]
Now the flash no longer provides automatic exposure. Instead, you specify the amount of light intensity that it provides. A Power ratio of [1/1] means the flash is firing at its maximum intensity (figure 10-6b). The other values indicate a fraction of the power that is being provided. This setting seems archaic when you consider all of the automation that is available to you. However, it is advantageous to have this capability if you decide to use the camera in a studio lighting situation. Here automatic exposure is not needed (remember, you can calculate the needed exposure based on the GN number). Since the A77 does not have to calculate the flash intensity by using a preflash, you gain a camera that responds quickly to the shutter button. The camera and flash both fire as soon as you depress it.

Figure 10-5: Manual flash menu becomes available in P, A, S, or M mode
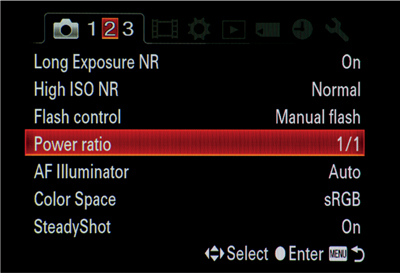
Figure 10-6a: Power ratio command becomes available in P, A, S, or, M mode
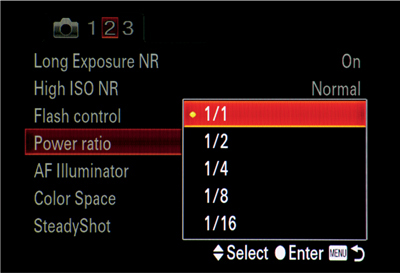
Figure 10-6b: Power ratios available for built-in flash
There are two additional Flash function options available in the semi-automatic and manual modes: [Rear Sync.] and [Wireless]. The former is used for special effects and coordinates the firing of the flash to the movement of the camera’s internal shutter. Normally, the flash is timed to fire at the beginning of the camera’s internal shutter. However, you can synchronize the flash to fire at the completion of the shutter instead. You can use this feature to record so-called “writing” with light, which is a technique where someone takes a lighted flashlight and waves it about. You record an image of the tracks of light glowing in space and the person holding the flashlight. To acquire this type of image, set the flash to fire on [Rear Sync.]
Fn button>Flash (left)>[Rear Sync.]
Once set, follow the instructions below:
1. Pose a person in a blackened room with a lighted, colored LED flashlight.
2. Set the camera to S mode and choose a shutter speed of 5 seconds.
3. Press the shutter to start the long exposure.
4. Have the person move the lighted flashlight, using it as a pen to “write.” The camera will capture this as a trail of light.
5. At the end of the 5-second exposure, the flash will fire, illuminating the subject and capturing an image of the person holding the flashlight at the end of his glowing script. It will appear as if the person has written glowing letters in midair.
The [Rear Sync.] option is often used to photograph a moving car with glowing headlights. This results in an image of the car followed by the streak of light from the headlights and taillights.
The [Wireless] option allows you to fire an external flash unit that is not physically attached to the camera. This option affords you all kinds of different lighting, which would not be available to you if the flash unit had to be physically tethered to the camera. We will discuss this further later in the chapter.
Using the Flash in P, A, S, or M Mode
Switching to P, A, S, or M mode provides you greater control when using either an external or internal flash. Specifically, you can close down the lens aperture and move away from its maximum aperture. Table 10-2 illustrates the active controls when you move out of Auto or Auto+ mode.
Mode |
Shutter Speed |
Aperture |
P |
1/60 second |
Camera selects |
A |
1/60 second |
User-selectable |
S |
User-selectable from 1/250 second or slower |
Camera selects |
M |
User-selectable from 1/250 second or slower |
User-selectable |
Table 10-2: Shutter Speed/Aperture in P, A, S, and M modes
As you can see, P mode does not differ much from Auto or Auto+. The camera sets the shutter speed to 1/60 second and attempts to use a large aperture for the lens. If you want to use a narrower aperture and increase the depth of field, A mode is better; it allows you to increase the depth of field by closing down the lens aperture, though you are still forced to use a shutter speed of 1/60 second. S mode allows you to select the shutter speed, but the maximum shutter speed can be shortened to only 1/250 second. Sadly, this mode tends to use the maximum aperture of your lens.
M mode is the prize. It allows you to control both lens aperture and shutter speed. Most importantly, it opens up using a flash synchronization shutter speed higher than 1/60 of a second and it enables you to use smaller apertures. This is critical in that it increases your ability to use the flash outdoors as a fill light.
If you recall, the camera’s normal ISO is 100. For a sunny day, the base exposure is 1/100 second at f/16. But suppose you want less depth of field and an aperture of f/8. You cannot do this in Auto, Auto+, P, or A mode because the shutter speed is locked at 1/60 second. Nor can you accomplish this in S mode; while you can get a 1/200 second shutter speed, you cannot change the aperture. The solution is to use M mode, switching the lens aperture to f/8 and the shutter speed to 1/200 second.
This higher flash synchronization speed gives you greater flexibility when using your flash in daylight; it actually increases the potential range of your flash unit. As covered in the section on GN, the primary determinants for flash exposure are the distance from camera to subject and the lens opening for a given ISO. With a higher synchronization speed, you can open your lens aperture by slightly more than two f-stops.
Another advantage of the higher synchronization speed becomes evident if your subject has some movement. To freeze movement, a shutter speed of 1/250 second is more effective than a shutter speed of 1/60 second.
When using the flash for fill work, we routinely use M mode. Remember, this does not prevent you from using slower shutter speeds. Indeed, not only can you still take flash exposures at 1/60 second, but you can also use longer shutter speeds such as a full second!
M Mode and Viewfinder Brightness: A Note for Studio Photographers
When we adjust aperture and shutter speed in M mode for interior photography, we sometimes run into a problem. Our viewfinder and LCD screens become so dark as to be unusable. This is a complaint that studio photographers reported on earlier SLT camera models. It results from having a live preview that attempts to show your image before you press the shutter button. This works well when you use the camera in a semi-automatic exposure mode (P, A, or S) with ambient lighting because the camera is always adjusting its settings to ensure you have a recordable image. But when you choose M mode and select an aperture or shutter speed that will be very underexposed, the viewfinder turns black. This can be annoying if you are using the camera for flash photography.
To keep the viewfinder and LCD screen bright when doing flash photography, set the following menu command:
MENU>Custom Menu (2)>Live View Display>[Setting Effect OFF]
The default for this command is [Setting Effect ON], which allows you to see the effects of Exposure Compensation as well as the special enhancement effects of Creative Style and Picture Effect. However, if you are using your camera only for flash photography, this is an incredible useful command—one that studio photographers should have in their repertoire.
Controlling Flash Output
In a scene where the flash is a supplemental light source, you will want to adjust the lighting ratio between regular and flash illumination. There are several controls to do this. The Exp. Comp. set command keeps flash exposure constant and then adjusts the exposure of the ambient lighting.
MENU>Custom Menu (4)>Exp. Comp. set>[Ambient&flash], [Ambient only]
This command allows you to brighten or darken the image when using Exposure Compensation. [Ambient&flash] option takes both light sources into account when applying or taking away exposure. [Ambient only] adjusts the external lighting and leaves the flash intensity unaltered. You can also apply Exposure Compensation to the flash, taking away or adding more light. This is achieved by using the Fn button (figure 10-7 a–b).
Fn button>Flash Comp. (right)>Toggle left or right for exposure compensation.
The final method of controlling the flash is to set the Flash control command to [Manual flash]. Once this is active, select the Power ratio. As mentioned earlier, if you decide to use this, there will be no pre-flash—just a single flash for exposing the picture.
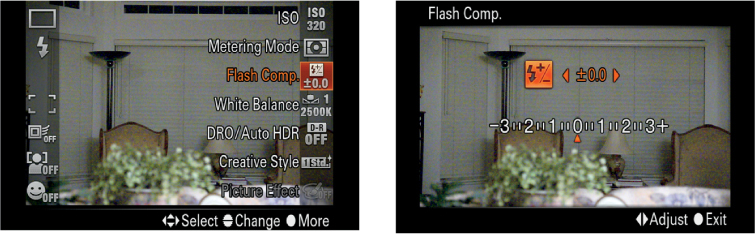
Figure 10-7 a–b: Selecting flash compensation and entering compensation by pressing multi-selector button.
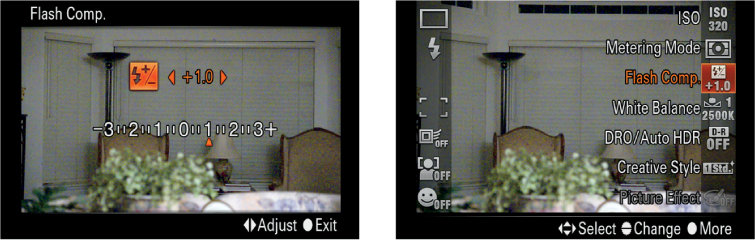
Figure 10-7cd: Toggle right to increase flash exposure, press multi-selector button. Note exposure compensation value entered for flash.
Sony Accessory Flash Units
Sony sells accessory (external) flash units for the A77. Table 10-3 summarizes the models and their pricing.
Flash Model |
GN |
Zoom Head |
Max Wide Angle with Diffuser |
Weight (oz.) |
Bounce Capable |
Battery Power |
Price (Sony Store) |
HVLF20AM |
20 |
No Telephoto setting |
27 mm |
3.2 |
Yes |
2 AAA |
$149.99 |
HVLF43AM |
43 |
Yes: 24-105 mm |
15 mm |
12 |
Yes |
4 AA |
$349.99 |
HVLF58AM |
58 |
Yes: 24 mm-105 mm |
16 mm |
15.6 |
Yes |
4 AA |
$499.99 |
Table 10-3: Sony A77-compatible external flash units
As you can see, there is a flash for most everyone, ranging from the family photographer who needs a bit more power for his interior shots to the professional who needs to work with a unit that provides considerably more light. All of the flashes have their own internal power source, either AA or AAA batteries, ensuring that you will not drain your camera batteries when doing flash photography.
A nice feature of the Sony accessory flash units is that they use inexpensive batteries that can be purchased at the corner drugstore. However, it would not be remiss to talk about recycle time when using these units. Typically, when the flash is used in an automatic mode for relatively short distances, it fires a very brief burst of light that is much shorter than the maximum duration. This short burst will help conserve battery power, and the capacitor recharges very rapidly. Rather than fire the flash at full power every time, the flash conserves the unused energy and uses it for the next flash. So instead of having to fully recharge, it needs to only partially recharge to reach full capacity.
But once you start using the flash in a large room and it fires at maximum duration, you will note that the recycle time increases. You can check this in the viewfinder of your camera, where you will see an orange circle. If it is flashing, it means the flash is recharging and it cannot be fired. As you drain the batteries, the recharge time becomes progressively longer.
However, there are situations where you want the flash to fire more quickly. If this is the case, you might consider replacing the flash’s normal disposable alkaline batteries with rechargeable nickel metal hydride batteries. These batteries have a lower internal resistance and reduce the recycle time between flashes. Since they can be recharged, they can be an economical choice if you do a lot of flash photography. If they have any disadvantage, it is that they do not hold as much energy as the alkaline batteries. But this is of little concern when the recycle times for the alkaline batteries become unacceptably long, since you would replace them before their full charge is utilized.
Sony’s smallest and least expensive external flash unit is the HV-20AM (table 10-3). It can be a handy little unit to keep in your camera bag. It gives you the ability to aim the flash directly at the subject or to adjust the head so that it fires a beam at a 75-degree angle toward the ceiling. This provides bounce or indirect lighting and reduces the harsh lighting that may result if the flash is aimed directly at a person. Bounce flash tends to produce a more flattering portrait, providing soft light that hides wrinkles. This unit’s only disadvantage is its low intensity flash— about one third to half the power of Sony’s more expensive units.

Figure 10-8: Dog photographed with direct flash

Figure 10-9: Dog photographed with bounce flash
We prefer the two larger, more expensive units—the HVL-F43AM and the HVL-F58AM. While they are bigger and heavier, they have more power, giving us more range. Both of them have heads that can be angled toward the ceiling for bounce lighting, and their greater power makes them more useful for this application. Both flashes have what Sony describes as a Quick Shift Bounce: when you take a vertical shot with your camera, the shoe-mounted flash can swivel its head so that it remains horizontal. Other manufacturers’ flash heads shift to a vertical orientation. Sony’s clever design ensures that their flash units provide the most efficient coverage for bounce lighting, whether you hold your camera in a vertical or horizontal position.
The HVL-F43AM and the HVL-F58AM both have a motorized zoom. The lens system distributes the light so it matches the zoom setting of your lens. This provides efficient coverage of your subject when you aim the flash directly at it, and also increases the maximum range of the flash. If we use the GN as a rough approximation of maximum distance, the HV-20AM provides a 1.7X increase, the HVL-F43AM provides a 3.6X increase, and the HVL-F58AM provides a 4.8X increase.
Of the three flash units, we found the HVL-F43AM best suited for our needs. It provided sufficient power for our applications, and we felt that the additional cost of the HVL-F58AM was not justified.
Bounce or Indirect Lighting: Flash Accessories
One of the benefits of an accessory flash with a tilting and rotating head is the ability to use bounce flash. When the flash is aimed directly at your subject, the light can be unflattering. The lighting is described as harsh (figure 10-8) and displays facial wrinkles and strands of hair—or in this case strands of fur—with distressing clarity.
One simple strategy for reducing this effect is to swivel the flash head; instead of aiming it directly at the subject, aim it at a ceiling or an adjacent wall. The light will bounce from these areas onto the subject. Such light has had a chance to become diffused. As a result, the lighting is softer, masking wrinkles and deemphasizing individual strands of hair to provide a more pleasing image. In figure 10-9, the diffused lighting softens the dog’s appearance.
One reason we do not use the inexpensive Sony HVL-F20AM flash unit is because it lacks power required for bounce illumination. In addition, while the lighting can be angled up at a fixed angle of 75 degrees, we do not have the flexibility to stop down the lens as much as we would like. The higher output of the HVL-F43AM flash unit allows considerable flexibility in closing down the aperture if we so desire.
One caveat on using a bounce flash is that if you have the camera set for red-eye reduction, the flash will emit small bursts of light prior to the exposing light. This is not needed with bounce flash, so make sure you turn red-eye reduction [Off].
If you use external flashes for much of your photography, you will want additional ways of diffusing the light. Although we like bounce lighting, it is not always usable. For example, if the ceiling or walls are heavily colored, they will impart the color to the reflected light, destroying the white balance.
One helpful accessory is a little plastic diffuser that attaches directly to the flash head. Sto-Fen makes the Omni-Bounce that attaches directly to the front of the Sony flash head. It is fitted by friction, which is advantageous since you don’t need tape to keep it affixed to the flash. The device is small enough so you can keep it in your camera bag, and it does diffuse the light—though if there is one problem with the Omni-Bounce, it may not diffuse the light enough.
There is no substitute for using large reflectors and/or diffusers, but they can be cumbersome and expensive accessories. If you wish to experiment with them, you can assemble your own for pennies. Below is a website that has several tutorials for assembling your own flash accessories:
www.digital-photography-school.com/
diy-flash-and-lighting-hacks-for-digital-photographers
Also, check out Rocky Nook’s Low Budget Shooting by Cyrill Harnischmacher for loads of ideas on do-it-yourself studio gear and accessories.
On occasion, we tilt our flash head vertically and attach a white sheet of heavy paper with tape. By folding the top of the sheet over the flash head and arranging it so it directs the light forward onto the subject, we have an inexpensive reflector/ diffuser that can be discarded as soon as the session is over.
Sony Wireless Flash
You will need an accessory Sony flash to take advantage of the Flash [Wireless] option.
Fn button>Flash Mode (left)>[Wireless]
This option enables your Sony built-in flash to serve as a trigger (Master) to fire your external accessory flash (Slave) wirelessly. The first step involves pairing the two units so they can communicate to one another. This is done by the following sequence:
1. Turn the mode dial to P, A, S, or M.
2. Take the accessory flash and mount it on the camera’s flash auto lock accessory shoe.
3. Turn both the external flash and the camera on.
4. Press the Fn button and toggle to the Flash function. Press the multi-selector button to select it. Toggle to the [Wireless] option and press the multi-selector button again to select the option.
5. Remove the flash unit. You should see a red light slowly flashing on it, indicating that the flash is ready to use as a slave.
6. To test whether the two flashes are communicating:
- a. Raise your built-in flash.
- b. Press the AEL button.
- c. The built-in flash will emit a small burst of light.
- d. In response, the slave flash will fire a burst of light to confirm the two flash units are communicating.
Once you complete this operation, you can position your accessory flash (slave) so it can see the light from the built-in flash (master). This light can be a reflection, so the slave need not be pointed at the camera. It takes surprisingly little light to activate the signal, and it can operate from light reflected off the subject or a wall. You can check to see if this communication link is active by pressing the AEL button.
The advantage of the [Wireless] option is that you do not have to have your external flash connected to your camera body. You can position it in a variety of places. For example, you may notice that some photographers have camera brackets for holding the flash unit away from the camera body. You can use such devices to ensure flattering lighting and reduce the chances of red-eye. Or, you can put your Sony flash on its pedestal (supplied) and position it well away from the camera body.
One trick we use at family gatherings is to mount the flash on the pedestal, place it on a strategically located table, and aim it at the ceiling. We then use the wireless flash to fire the flash for our group shots. The lighting can be very flattering, and you can move about as you fire the camera without carrying the weight of the flash unit.
Slow Flash Synchronization
When photographing someone against a scenic background at night, you may wish to record both the person and the background. If you use the standard synchronization speed of 1/60 of a second or shorter, this may be impossible. But you might be able to record the background with a longer exposure—perhaps an exposure of one or two seconds, or more.
To accomplish this, you can use your AEL button. With the built-in flash up, press the AEL button while pressing the shutter. This forces the camera to take a longer exposure of the background scene. When properly done, the foreground subject is exposed by the flash and the background scene is exposed by the slower shutter speed. This command is unavailable when the mode dial is set to M or S.
Recommendations
Although the built-in flash can be used in Auto, Auto+, or SCN mode, we urge you to use it in P, A, S, or M mode. Especially important, in our opinion, is learning to use the flash with the camera set to M mode. This allows you to adjust both the camera’s shutter speed and the lens aperture. You can increase your depth of field dramatically if you adopt this strategy. If you use the flash as a fill light outdoors, set the shutter speed to 1/250 second rather than 1/60 second to use the flash to fill in shadows.
If you are doing a lot of interior photography, you may wish to consider getting an external flash unit. In our opinion, the HVL-F43AM has an excellent feature set for its cost. Bounce and wireless flash lighting can be exploited with this flash unit.
One feature we did not yet mention with the HVL-F43AM is that it is possible to use shutter speeds shorter than 1/250 second. This model and the HVL-F58AM have a feature called HSS (High-speed synchronization). HSS allows you to set the shutter speed at 1/250 second or faster; you can set a shutter speed up to 1/8000 second. This is an advantage when you use the flash as a fill light and you wish to open the aperture to ensure a shallow depth of field.