
Chapter 7: Manual Operation of the Camera

Introduction
Chapter 6 dealt with partially automated/partially manual settings, where the camera is setting its own aperture, shutter speed, or focus. This chapter is about taking complete control of the camera and fine-tuning its settings.
There are conditions where you want the exposure and focus to be fixed to a constant value. For example, suppose you want to take a panoramic shot the old-fashioned way without using the A77’s Sweep Panorama feature (see chapter 8). To do this, you mount the camera on a tripod, set the exposure to manual, and take a series of overlapping pictures by panning with the tripod head. Focus is also fixed and will not change as you perform the pan. After you take all the pictures, you merge them on your computer to create your panoramic image.
The advantage of doing a panoramic this way, which is more inconvenient than Sony’s automated Sweep Panorama mode, is the increase in resolution. By working with the full area of the sensor, you can collect a series of images that have a vertical height of 4000 pixels rather than the 2000 pixels generated with Sweep Panorama. A knowledgeable shooter can go further and create an even larger panorama by doing multiple sweeps.
Knowing how to set the camera to manual exposure and manual focus enables you to pursue strategies like this for improving your images.
In addition, we cover some advanced features that can be used in P, A, or S modes to extend your control over the camera. For example, you can instruct the camera to change a command value incrementally for each picture in a series. This creates a set of images (or “bracket”) in which each is slightly different so you can select and use the best. For example, you can set a command to take a series of pictures where the exposure varies between each shot. Simplistically, this provides a shotgun approach for finding the proper exposure. For the expert, it may be the basis for generating an image under difficult lighting conditions, or for creating a surrealistic color rendition by using HDR in post-processing.
Manual Exposure Mode Controls
Turning the mode dial to M sets the camera to Manual Exposure (M) mode and displays M in your electronic viewfinder or LCD display (figure 7-1a). The aperture and shutter speed values are displayed at the bottom of the screen as white numbers. You can change them by rotating either the front or rear control dial: once you start rotating the dial, the numbers controlled by it turn orange and change in value (figure 7-1a). If you do not move the control dial for 10 seconds or more, the orange color will change to white. As you proceed to set the aperture or shutter speed, you will see a set of numbers change. These numbers are next to the letters M.M. (Metered Manual) on the bottom, center of the LCD screen. The numbers indicate the EV, and that you are departing from the recommended exposure. In the case of figure 7-1b, the camera is set to –1.3 EV; a lower exposure than what the camera recommends.
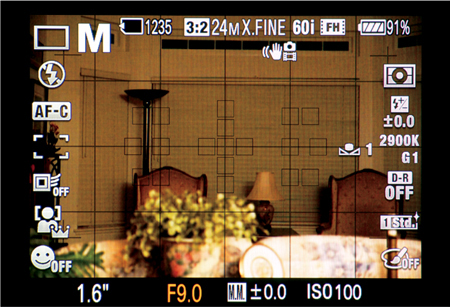
Figure 7-1a: M is displayed when in M mode and f-stop is being altered
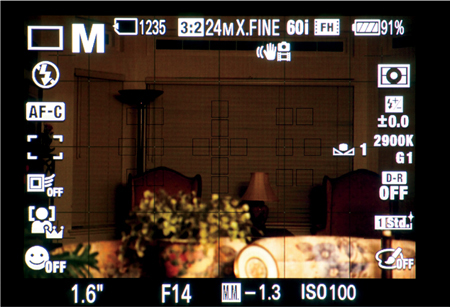
Figure 7-1b: Varying from recommended exposure
In M mode, the brightness of the Sony display screen is an indicator for the appearance of the recorded image. If the camera’s sensor is receiving too little light to record an image, you will see a black screen. If the sensor is receiving too much light, you will see a brilliant white screen. Use the front and rear control dials to adjust the aperture and shutter speed until the image appears acceptable on the display screen.
The camera’s display screen provides EV data indicating whether you are following the camera’s recommended exposure (0 EV) or the degree you are departing from that recommendation. It will show a 1/3 EV difference for up to +/– 2 EV. The EV scale provides a quantitative value so you can apply a known offset to the recommended exposure. As the camera departs from 0 EV, you will see a scale indicator. The changing set of numbers indicates how far you are moving from the camera’s recommendation. For example, when recording a snow scene, you may feel that the recommended exposure results in an image where the snow appears dingy or gray. To restore the brilliant white appearance of the snow, you can apply +1 EV additional exposure. The beauty of having a Live View camera is that you can ascertain the efficacy of changing the exposure from the camera’s recommendation.
A convenient feature of M mode is that you can see a live histogram while changing exposure values. This provides an additional data point to help you avoid overexposing highlights or underexposing shadows.
Extremely Long Exposure “B” Shutter Speed
M mode allows you to set exposures of up to two minutes. Turn the rear control dial to the left until the shutter speed numbers switch from numerical values to the letter B (Bulb). This occurs when you go beyond a 30-second exposure. At this setting, the shutter opens upon depressing the shutter button and remains open as long as it is depressed. Releasing the shutter button terminates the exposure. The B shutter speed is unavailable in any of the semi-automatic (P, A, or S) modes. The longest shutter speed you can set in those modes is 30 seconds. When using long exposures, be sure the camera is mounted on a tripod. Use a cable release to ensure that pressing and releasing the shutter button does not jar the camera.
Noise Reduction with Long Exposure
Images with long exposures may suffer from noise. This image defect is corrected by a procedure known as Dark Frame Subtraction, which is controlled by the Long Exposure NR command as follows:
MENU>Still Shooting Menu (2)>Long Exposure NR>[On], [Off]
When the command is turned [On] and exposure is set to 1 second or longer, the following steps occur:
1. When the shutter button is pressed, the camera records the image including the noise generated by the sensor.
2. The camera takes another exposure but does not record an image. This is the so-called “dark frame” which creates a reference map for the noise pattern.
3. The camera subtracts the dark frame image from the first image to reduce the noise.
The Long Exposure NR command at least doubles the time it takes to record an image. For example, if you take a photograph with a 10-second exposure, the camera will automatically take a subsequent exposure of equal time to create the dark frame. Then the camera processes the subtraction to remove the noise from the first image. For exposures that run over several seconds, this can create a tedious wait, so some people turn this command off.
Most of our exposures are less than 1 second in duration, so for us this function is rarely useful. However, in the few pictures we have taken with long exposures, we have been pleased with the results of the Long Exposure NR command, and therefore we leave it on.
Noise Reduction at High ISO
We previously mentioned that using higher ISOs results in increased noise and that we tend to photograph at ISOs lower than 1600. If you are forced to work at higher ISOs, you might try the in-camera noise reduction option. You can set noise reduction to High, Normal, or Low. While this option does work, it sacrifices definition to provide you with a smoother image. It also works only on JPEG files, not on RAW files. Be aware that this command can take some time to execute, so for a moment your camera may not be ready for the next shot. You can use the following menu command to adjust the level of Noise reduction:
MENU>Still Shooting Menu (2)>High ISO NR>[High], [Normal], [Low]
We set the High ISO NR command to [Low]. If noise is a problem, we take the picture as a RAW file and remove the noise later using third-party software. We use Noise Ninja, which seems to reduce noise with less loss of detail than Sony’s High ISO NR option.
Metering Modes
When controlling your exposure is critical, it is important to know where and how your camera’s light meter measures intensity. There are three methods used by Sony’s built-in meter: [Multi segment], [Center weighted], and [Spot] (table 7-1).
The default and most commonly used method is [Multi segment], where light over the entire area of the display is used to calculate the exposure. This is more than a simple average—it is a complex algorithm that ensures a good exposure for a wide variety of subjects. Historically, various digital camera manufacturers developed these algorithms. While the early designs were unreliable, current versions are so reliable that this measurement practically turns your camera into a point-and-shoot. The results are quite good, and you can refine them by studying the live histogram to adjust the exposure slightly. Again, the advantage of having a Live View camera is the ability to ascertain if you need to modify the exposure before you take the photograph.
Metering Mode Option |
Option Name |
Description |
|
Multi segment |
The camera divides the framed image into multiple areas, measures the lighting in each, and determines an overall exposure. |
|
Center weighted |
The camera biases its exposure on the central area and provides less emphasis on the periphery. |
|
Spot |
The camera only uses the center of the framed image to determine exposure. A faint circle displays on the screen indicating the area the camera will use. |
Table 7-1: Metering Mode command icons
The second method is [Center weighted], which uses an easily understood algorithm for evaluating exposure. It is based on the assumption that the most important part of the picture is in the center; therefore, the meter biases the exposure so that the center of the display screen is well exposed. The peripheral areas are measured as well and contribute to the overall exposure, but they are given less priority. Historically, this has been a popular way to measure light in an SLR camera. While this older technology has the virtue of simplicity, it is not as reliable as [Multi segment] area metering, and it results in a higher percentage of unacceptable exposures.
The third and most direct way to meter is [Spot]. It is a natural for M mode. When it is selected, you see a small circle in the center of the screen that marks the area being measured for light. By placing this circle over an area, you get a measure of the intensity from that restricted area; and, by aiming your camera so that this circle covers the region you wish to expose, you can easily set your exposure. It requires finesse and thought to interpret the reading, but it is a natural to combine this with manual exposure. For example, suppose you are shooting a stage play where the actor is lit with a spotlight and the remainder of the stage is black. You can find the exposure for the actor by using [Spot] to measure the light reflected off his face. The actor’s face and body will be exposed properly, and the dark background will not influence the exposure measurement.

Figure 7-2: Metering Mode’s three options with [Multi segment] selected
The metering method is selected with the following command (figure 7-2):
Fn button>Metering Mode (right)>[Multi segment], [Center weighted], [Spot]
Manual Focusing: Overriding Automatic Focusing
In chapter 6, we described how to focus a lens by turning the focusing mode dial to MF. We also described how to use the AF/MF button for quickly resetting focus by switching temporarily to MF. These are important skills, but now we will introduce how to improve focus accuracy even more.
If you have very fine details in your image, you may need to magnify the Live View image to achieve a more accurate focus. This is done by pressing the Smart teleconverter/Focus Magnifier button (figure 7-3, orange arrow). This button’s dual name can be confusing because it serves two different functions. Superficially, the functions look identical in that they raise the magnification of the image on the LCD screen or viewfinder. Practically, they are quite different. The Smart teleconverter function works only when Quality is set to a JPEG option. When executed, the magnified image can be captured. It is an example of digital magnification and its effect can be obtained in post-processing the image on the computer. In contrast, Focus Magnifier function solely works as a means of increasing the magnification of an image on the LCD screen and viewfinder and does not allow you to save the magnified image. It will work in either RAW or JPEG formats.
This button’s functionality is controlled by the following command:
MENU>Custom Menu (3)>Smart Telecon. Button>[Smart Telecon.], [Focus Magnifier]
When set to [Smart Telecon.], pressing the button once provides a 1.4X increase in magnification; press it again to get a 2X increase in magnification. This enlarges fine details on the subject’s surface, making it easier to focus precisely.
Remember, the Smart teleconverter command only works when you use JPEG and not when you use RAW. Its real role, as mentioned earlier, is as a digital zoom that crops the captured image down to what you see in the display screen. If you attempt to use this feature while shooting RAW & JPEG or just RAW, you will be interrupted by an error message requesting that you set the camera to JPEG. Typically, this occurs just as you are about to take a prize-winning picture, and the delay imposed by this message forces you to miss the shot.
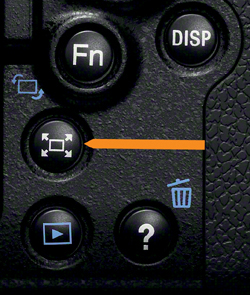
Figure 7-3 Smart teleconverter/ Focus Magnifier button on the back of the camera (Photograph courtesy of Sony)
Since the Smart teleconverter/Focus Magnifier button performs a function that can be done at home on the computer, we don’t care to use it. To avoid losing shots, we reassign this button’s function to [Focus Magnifier]. When the button serves only as Focus Magnifier, it works with both RAW and JPEG formats.
The major disadvantage of increasing magnification is losing the overall view of your subject. Admittedly, you return to full view when you press the shutter button, but the delay can be disconcerting. Because of this, we take advantage of the Peaking function. This is a colorization strategy that highlights the borders of in-focus areas with a fringe of color. You can determine how large and what color these fringes should be. They are not recorded with your picture or video, and they only appear when you resort to manual focus.
MENU>Custom Menu (2)>Peaking Level>[High], [Mid], [Low], [Off]
MENU>Custom Menu (2)>Peaking Color>[Red], [Yellow], [White]
We use Peaking at its [Mid] setting with the yellow color when taking pictures through a microscope or telescope. When we take pictures outside, we switch to red, which stands out much better in sunlight. For evening pictures, we usually switch to white.
Peaking is inactive while the camera is in AF. It only appears when you use MF by either turning the focus mode dial to MF or pressing the AF/MF button.
Fine Adjustment Screen for Color
In chapter 6, we described how to use standard settings for white balance and how to calibrate your camera to a light source using a white sheet of paper. For most of us, this is sufficient. However, the Sony A77 provides even greater control by allowing you to visually fine-tune your color settings. Once you select a WB setting, you can add tinting to record the perfect image.
Undesirable colors can be the result of unusual lighting conditions, such as when several different light sources illuminate the subject. For example, an interior scene might be lit by daylight streaming through the window, an incandescent light on the table, and fluorescent lights on the ceiling. These extreme conditions can be corrected by adding a tint to the image. The slight additions of hue will be recorded in both JPEG and RAW files. Sony calls this Fine Adjustment for Color. It is a continuation of using a WB preset.
When you are in a WB preset—for example, with daylight highlighted—toggle the multi-selector to the right (figure 7-4a). This brings up the color fine-adjustment screen, which is seen as a multi-hued square. Initially there is an orange dot in the center of the square. Toggle the multi-selector vertically to control the magenta/ green tint (figure 7-4b) or toggle horizontally to control the amber/blue tint. Apply these controls until you neutralize any color cast on the viewing screen. The degree of tinting is shown by the displacement of an orange square within a large multicolored square. Press the multi-selector button to exit the WB adjustment. In the case of figure 7-4b we actually imparted a magenta/amber tint to the screen to show the tints being applied.
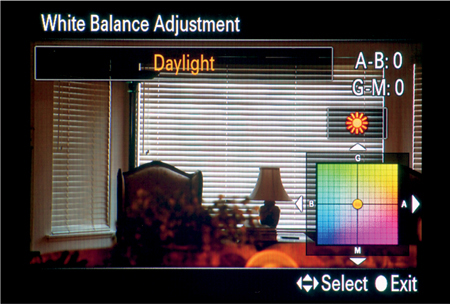
Figure 7-4a: WB color fine adjustment screen
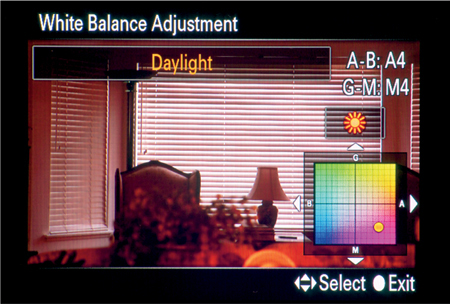
Figure 7-4b: WB color fine adjustment modified to apply magenta/amber to the image
Lens Compensation
To obtain the ultimate picture quality, the A77 has software that corrects imperfections introduced by the lens. These imperfections include vignetting (peripheral shading), distortion (geometric distortion), and chromatic aberration (color fringing). Vignetting indicates uneven illumination, with the periphery of the image darker than the center. Distortion indicates that straight lines bow in (pincushion distortion) or bow out (barrel distortion). Finally, chromatic aberration indicates that the subject’s borders have red or blue fringes due to the lens’s inability to bring all wavelengths of light to the same focus.
Correcting these problems with software requires an in-camera database to catalog the lens defects and a processing algorithm to correct the image. Sony periodically provides updates to the camera firmware, expanding the database as new lenses are introduced to its line-up. Remember, this correction is a software alteration of the image and is providing a modified image file. For the scientist who requires the recording of an unaltered image, these corrections should be turned off, leaving the recorded image showing all of the lens defects.
The chromatic aberration and shading correction default setting is [Auto]; so, if the attached lens is in the database, these optical faults will be corrected in JPEG files. RAW files are not corrected, and they will show the image defects. Curiously, at the time of writing, the distortion default setting is [Off]. If you desire it to be active, you must turn it to [Auto].
Below are the three lens compensation commands. Once you select one of them, press the multi-selector button to enter the command and then toggle up to select [Auto] or down to select [Off].
MENU>Custom Menu (5)>Lens Comp.:Shading>[Auto], [Off]
MENU>Custom Menu (5)>Lens Comp.:Distortion>[Auto], [Off]
MENU>Custom Menu (5)>Lens Comp.:Chromatic Aberration>[Auto], [Off]
Fine Tuning Autofocus
The phase detection sensor used for focusing is noted for its speed. However, it is also known that, for some lenses, the sensor may incorrectly identify the focus point and set it behind (back focus) or in front (front focus) of the desired point. Sony provides the following command for the experienced user to tweak the focus point:
MENU>Setup Menu (2)>AF Micro Adj.>[AF Adjustment Setting], [amount], [Clear]
If you suspect that your lens is front or back focusing, you should use the command. Keep in mind that this adjustment, if done improperly, can result in your images being further out of focus.
We recommend the following procedure to test a lens for focus accuracy: first, mount the lens on the camera and aim it at a newspaper lying flat on the floor. Use a tripod and adjust the camera so it is aimed down at approximately 45 degrees. What you want to see in the viewfinder is the lines of newspaper print running parallel to the viewfinder’s horizontal axis. The camera’s digital level gauge and grid lines can help ensure that when looking through the camera’s viewfinder, the lines of the newspaper text should run parallel with the horizontal frame of the viewfinder.
Next, focus on a single line of text by setting the camera to [Spot] AF area. Aim the central AF area on the selected text. In figure 7-5a, it is the line with the bold lettering, “incident brightfield . . .” Using the maximum aperture, take a picture and note in playback mode whether this line is sharp or blurred. You will have to magnify the image in playback, but if it was centrally placed it will stay in the center of the LCD screen.
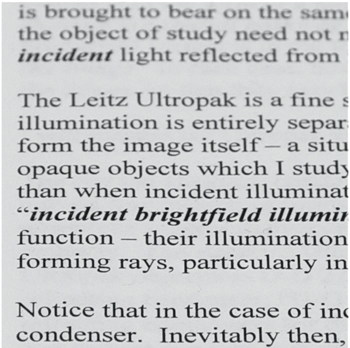
Figure 7-5a: Camera aimed at newspaper to test lens focus accuracy. The bold font in the center is in focus; the text toward the top is out of focus.
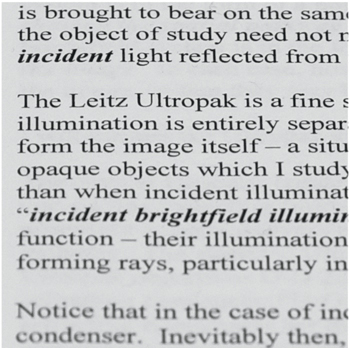
Figure 7-5b: Lens focus AF Micro Adj. changed so the bold type in the center and the text toward the bottom are now out of focus
If this line is out of focus, as in figure 7-5b, you have a problem: here, it is back focusing. To correct, go into the AF Micro Adj. command, select [AF Adjustment Setting] and adjust by selecting +5 or –5. You can then go back and repeat the shot to see whether you corrected the error.
Sony cameras can remember up to 30 lenses. Apparently the lens focal length and aperture are the identifying tags; so, if you have two lenses with the same focal length and aperture, they cannot be distinguished.
Bracketing and Dynamic Range
The Sony A77 has a special feature for dealing with unusual lighting conditions. If it is difficult to judge exposure, white balance, or contrast, the camera can record several images, each differing slightly. By using this shotgun approach, it helps you find the best setting. Three of these functions are available when you press the Drive Mode button or the Fn button. They are White Balance (WB) Bracket, DRO Bracket, and bracket exposure.
WB bracket works with both RAW and JPEG files. You will get three RAW and three JPEG files where the JPEG files will show the effects of different WB values on a single exposure.
DRO Bracket works most efficiently with JPEGs. Firing an exposure records three JPEG images, each reflecting a different level of DRO. If you try to use DRO Bracket with RAW or RAW & JPEG, the three RAW images will look identical when loaded into your computer.
Bracket exposure works with both JPEG and RAW files and involves taking three shots each with a different exposures resulting in three JPEG and three RAW files. The RAW and JPEG files will differ, reflecting the changing exposure.
White Balance Bracket
In WB Bracket, the camera takes one exposure and generates three images from it via internal processing that show slight variations in white balance. You can find this option by pressing the Drive Mode button or by selecting the Drive Mode function through the Fn button. Then use the multi-selector to navigate to WB Bracket. You can select [Lo] or [Hi] level of color shift; [Hi] provides a greater color shift than [Lo].
Fn button>Drive Mode (left)>WB Bracket>[Lo], [Hi]
DRO Bracket
We described DRO in chapter 6. DRO Bracket is found when you press the Drive Mode button or select Drive Mode function through the Fn button.
Fn button>Drive Mode (left)>DRO Bracket>[Lo], [Hi]
When you select DRO Bracket, you have a choice of [Lo] or [Hi]. Your selection depends on how wide a range you want to cover with the bracket. [Lo] provides three images with a DRO effect of LV1, LV2, and LV3. [Hi] covers a greater range, providing three images with a DRO effect of LV1, LV3, and LV5.
Like WB Bracket, DRO Bracket uses one exposure to generate three renderings of the subject. Remember, these differences are generally seen in the JPEG files and not in the RAW files. The camera only fires one shot and generates the three different images through internal processing. One oddity about using RAW files with DRO Bracket is that you will see its effects during playback on the LCD screen or if you use Sony’s Image Converter software. But if you use third-party software, such as Apple’s Aperture, you will not see any difference in the three recorded RAW files.
Bracket Shooting Cont. and Single Bracket
Bracket shooting differs from both WB and DRO brackets: your camera actually exposes the sensor multiple times and records multiple shots. Although the saved shots can be used to fine tune exposure, we prefer using them for HDR (High Dynamic Range) photography. To do this, we download the three exposures to our computer and use HDR software to combine them into a composite image. With tone mapping software, we can alter color and contrast to produce surrealistic images. This differs from Sony’s Auto HDR function, which renders a more realistic image without extreme coloration.
The bracket shooting technique overcomes the sensor’s limitations through image processing. For example, a single exposure concentrates on the mid-tones in a scene; therefore, a bright sky may be overexposed and deep shadows may be underexposed (figure 7-6a). When you bracket exposures, you can use the first shot to record the camera’s optimum exposure; the second shot to record details in the highlights (figure 7-6b); and the third shot to record details in the shadows (Figure 7-6c). The final composite HDR image shows detail in both the highlights and shadows (figure 7-6d).
Individually, figures 7-6(a-c) would be unsatisfactory; but, with the right tone mapping software, you can merge them into a single image that displays details in the highlights, the mid-tones, and the shadows (figure 7-6d).
To accomplish this requires collecting a set of varying exposures. Scroll down through the Drive Mode options. Figure 7-7 shows the BRK S and BRK C options on the same screen. The BRK S option will collect five shots separated by 0.3 EV when it becomes enabled. The figure also shows BRK C selected with a preset value of three shots separated by 3.0 EVs. To change its value, toggle the multi-selector right or left. To select a new value, press the multi-selector button.
Figure 7-6a: Camera’s recommended exposure
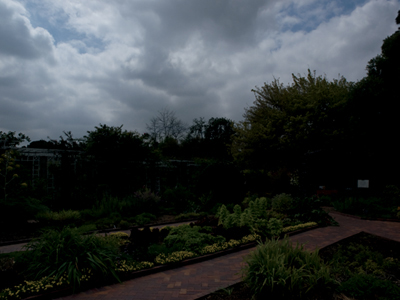
Figure 7-6b: Underexposed by 2 f-stops

Figure 7-6c: Overexposed by 2 f-stops

Figure 7-6d: Combined image using HDR software
In summary, by pressing the Drive Mode button or the Fn button to access the Drive Mode function, you will find the following commands:
Fn button>Drive Mode (left)>BRK S>[select series] with the series: [0.3EV3], [0.5EV3], [0.7EV3], [2.0EV3], [3.0EV3], [0.3EV5], [0.5EV5], [0.7EV5]
Fn button>Drive Mode (left)>BRK C>[select series] with the series: [0.3EV3], [0.5EV3], [0.7EV3], [2.0EV3], [3.0EV3], [0.3EV5], [0.5EV5], [0.7EV5]
To select the series, you will be prompted to specify the number of shots you wish to take and the difference in EV for each shot. For example, you can choose to take five shots and have them vary by 0.3, 0.5, or 0.7 EV. Or, you can choose to have the shots vary further by 2.0 or 3.0 EVs; however, doing so, limits you to three shots.
Another difference between BRK S and BRK C is that BRK S requires you press the shutter button for each exposure. BRK C takes all the shots automatically when you press the shutter button. We see little need for BRK S and find it inconvenient. It is simpler to use BRK C and collect all our images with a single press of the shutter button.
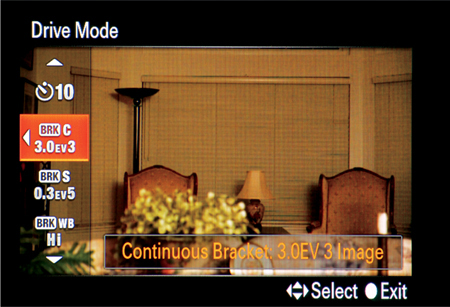
Figure 7-7: BRK S and BRK C (highlighted) options and assigned values
If you intend to load a series of images into an HDR program, you should be aware of the order in which they are recorded. For example, the Photomatix program prefers receiving the images in this order: underexposed, mid-exposure, overexposed. The file numbers assigned to each image are used to establish order, with lower numbers indicating less exposure. So you want your bracket series numbered to indicate this. If you do so, loading your files onto the program will be an easy process since it will automatically take the data and process it correctly. If you set the Bracket order to [0![]() -
-![]() +] the computer will not be able to process the images automatically. You will have to manually renumber the file names so that they follow a progression of underexposed to overexposed photographs.
+] the computer will not be able to process the images automatically. You will have to manually renumber the file names so that they follow a progression of underexposed to overexposed photographs.
MENU>Custom Menu (4)> Bracket order>[0![]() -
-![]() +], [-
+], [-![]() 0
0![]() +]
+]
The option [0![]() -
-![]() +] starts the exposure sequence at the exposure recommended by the camera meter and then proceeds to underexpose and overexpose the scene. (Photomatix has trouble accepting this sequence, and you will have to reorder it.) The second option, [-
+] starts the exposure sequence at the exposure recommended by the camera meter and then proceeds to underexpose and overexpose the scene. (Photomatix has trouble accepting this sequence, and you will have to reorder it.) The second option, [-![]() 0
0![]() +], starts the exposure on the underexposure side, proceeds to the recommended exposure, and then goes to the overexposure. This is the correct order for Photomatix.
+], starts the exposure on the underexposure side, proceeds to the recommended exposure, and then goes to the overexposure. This is the correct order for Photomatix.
Recommendations
Manual operation of the camera is for the perfectionist who wants to obtain the best possible exposure and focus. Though it can be done by handholding the camera, the better strategy is to mount the camera on a tripod.
You might think that tripods are only for static landscapes, but this is not so. If you are a nature photographer working with extreme telephotos or macros, you will find the tripod a useful tool. Its stability helps you judge focus critically and frame your pictures precisely. You can obtain high quality images with lower ISOs and longer shutter speeds, and also work with f-stops where your lens exhibits the best sharpness.
For our work with telephotos and close-up lenses, we find ourselves using f/8 or f/11 and relying on MF. We may use AF at first, but with some subjects—especially animals in the field—we have to override AF and use MF. To ensure the most accurate focus, we reassign the Smart Teleconverter button’s function to [Focus Magnifier].
We also find the Peaking function to be invaluable. It also assures us that our subject is in focus, thus we acquire a higher percentage of sharp photographs. This reduces the need to delete out-of-focus images and do reshoots. Set the Peaking Level to the [Mid] option first. From there, you can determine whether you prefer more or less color fringe. When choosing a color, consider one that will show up the best with the type of pictures you take.
When shooting outdoor scenes, we turn off AWB and set WB to one of the preset values. When working indoors with incandescent lighting, we use Custom WB. We do not do fine adjustments of color on the camera; for that, we prefer working with the saved file on our computer.
We do not use WB Bracket or DRO Bracket, since the Sony A77’s live preview allows us to get good results with the camera controls.
When photographing for HDR, we use bracket shooting over Auto HDR. We load the images into third-party software, such as Photomatix. Once the photographs are merged we use the software for tone rendering. If you decide to do this, we have the following recommendations.
First, mount the camera on a tripod. Any shift in the camera position will blur the resulting pictures when they are merged. Use the camera in A mode to force it to maintain a constant aperture, and then you can vary the exposure by changing the shutter speed. Maintaining a constant depth of field is essential for merging the images; otherwise, you will lose definition in areas that become blurred as the depth of field becomes changes. Lastly, use a cable release in order to prevent any movement prior to or during exposure.
If you do not have a tripod, it is possible to capture HDR by bracing yourself against an immobile object, using a fast ISO to keep the shutter speed high, and using a wide-angle zoom setting. If you do this, it will increase the chance that you will capture a high-quality set of images that can be merged.
Do not forget to select BRK C. You want to capture the shots as quickly as possible with the camera aimed at the same point during the sequence. If you use BRK S, you will have to press the shutter for each shot you take, allowing sufficient time for a mobile subject to move, and thus resulting in images that will be significantly out of alignment.