
Chapter 6: Taking Control of the Camera
Introduction
This chapter is about taking more control of your camera’s operation. Auto, Auto+, and predefined scene modes automatically set the camera’s focus, shutter speed, and aperture. While this yields a sharp and properly exposed image, it prevents you from adjusting the camera settings and improving the image at a higher level.
You can gain this enhanced capability by using the P, A, S, and M modes, which stand for Program AE, Aperture-Priority AE, Shutter-Priority AE, and Manual Exposure. By setting the mode dial to these values, you can override the camera’s automatic recommendations and apply a bit more or a bit less exposure. Moreover, you can have greater control of functions. For example, you can set the ISO when you use Multi Frame Noise Reduction. You can also gain more control of your autofocus lens, controlling where it will focus within the viewfinder.
Remember, automatic focusing is established by 19 focusing sensors aimed at different points on the display screen. These focusing points are marked by tiny black-framed squares, and any one of them can serve as the target area to be focused on.
Sometimes the focusing sensors can be a detriment; for example, if you take a portrait of a dog, you may find the point of focus is on the dog’s nose, blurring the eyes. To remedy this, you can disable most of the focus points and use only the one aimed at the eyes.
Also, you may wish to control the depth of field or shutter speed. Certain types of photography require the aperture to be set at a constant value or the shutter speed to be set for exposures longer than 30 seconds. These settings are unavailable to you in Auto or Auto+. Furthermore, the Sony A77 has some unique algorithms for improving image quality by taking several pictures in rapid sequence and then combining them. You can utilize these commands at will if you use P, A, S, or M modes.
In this chapter, we first cover some of the general controls that become available when you quit using the automatic modes. Then we discuss P, A, and S modes, saving M mode for chapter 7.
Exposure Compensation
Fine Tuning Automatic Exposure
You can alter your image’s exposure once you enter P, A, or S mode. If you feel the scene needs a little more or less light, you can adjust the exposure by pressing the Exposure Compensation button marked with a plus/ minus on top of the camera (figure 6-1).

Figure 6-1: Arrow points to Exposure Compensation button with +/- symbol
The Exposure Compensation scale (figure 6-2a) is displayed on the screen as a horizontal scale in units of 0.3 EV (Exposure Value). To use it, either toggle the multi-selector or turn the rear control dial to the right for more exposure (figure 6-2b) or to the left for less exposure. In figure 6b, 1 EV more exposure is being applied.
The extent of compensation is shown graphically. You will see numbers from -5 to +5 on the scale with two tick marks between each number. Each number represents one f-stop, and each tick mark represents 0.3 f-stop increments. As you turn the rear control dial, an orange arrow moves along the top of the scale indicating the amount of EV or f-stop change. The shutter speed and/or aperture settings change as you move the arrow left or right on the scale. The arrow starts blinking if you try to compensate the exposure past the scale’s range. As you move away from the camera’s recommended exposure, the screen either brightens or darkens.

Figure 6-2a: Exposure Compensation scale at the camera’s recommended exposure
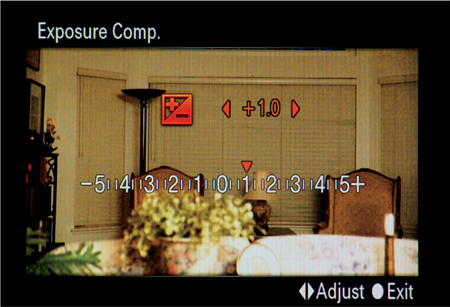
Figure 6-2b: Exposure Compensation scale set to increase exposure
The amount the arrow moves with each turn of the rear control dial or toggle of the multi-selector is controlled by Exposure step command:
MENU>Exposure step>Still Shooting Menu (3)>[0.5 EV], [0.3 EV]
Normally, we leave Exposure step at its default value of 0.3 EV. Depending on whether you are in Aperture-Priority or Shutter-Priority, you are changing, respectively, the shutter speed or the aperture opening as you move left or right on the Exposure Compensation scale. The beauty of the camera’s electronic display is that it shows you, in real time, the effects of overriding the camera’s recommendations. Once you have set the exposure, a slight press of the shutter returns you to live preview.
Use this tool when you suspect that the camera’s exposure recommendation is incorrect. You might feel that darkening or brightening the image provides a better mood for the scene. Or, it may be that the lighting situation is so extreme that you have to decide which areas—the bright highlights or the dark shadows—have to be sacrificed in order to capture the image.
Focus Mode: Identifying Where to Focus
The Sony A77 uses phase detection sensors to determine focus, with each sensor aimed at a small, select region of the scene. These areas are referred to as AF (autofocus) areas. Their placement within the scene is marked by small, black-bordered squares (figure 6-3). By dispersing the AF areas, a larger percentage of the scene is available for focusing. The appearance of these AF areas varies. Later, in chapter 7 we will describe how you can activate or deactivate AF areas. If the borders become a darker, thicker black it indicates that you have activated these areas to be focused (figure 6-3) while the fainter black border squares have been deactivated (figure 6-3). If none of the squares have a heavy black border, then the camera is in a default mode were all the focus areas are potentially active. This is the most commonly used focusing area. When the camera identifies focus, the squares overlying the focus region have green borders (figure 6-4).
The focusing points are concentrated in the central regions of the scene, so a single subject might cover multiple AF areas. When this occurs, there is a bias to focus on the areas closest to the camera. This is reasonable, since we often take pictures of the objects closest to us. However, this is not always the desired objective. For instance, a portrait photographer likes to focus on the eyes rather than the nose. So, for a face-on photograph, you can limit the AF area to one point and use that point to aim at the subject’s eyes.
The AF area function command that determines the target area where the camera establishes focus is:
Fn button>AF area (left)>[Wide], [Zone], [Spot], [Local]
Table 6-1 defines the focus areas.
When the camera has identified a focus area, it signals this by changing the area’s translucent borders from black to green (figure 6-4).

Figure 6-3: Small black squares mark AF area focus points. The thicker black borders are selected.

Figure 6-4: AF border’s becomes green if it is identified as being in focus.
Option Name |
Description |
|
|
Wide |
The camera determines which of 19 AF areas should be used to determine focus. AF areas used to establish focus develop green borders. If Face Detection is turned on, focusing on a face can only occur if the face is positioned over an AF area. |
|
Zone |
This option allows you to tell the camera which of three zones (left, center, right) to use to establish focus. Toggle the multi-selector button to select one of the zones. As you toggle through them, the highlighted zone’s AF focus area squares show thicker borders (figure 6-4). They appear dark and distinguished from inactive AF areas. Press the multi-selector button to select a zone. The selected zone’s AF area focus squares remain bold. |
|
Spot |
The camera uses only the center AF area to obtain focus. All of the other points are inactive. The center AF area’s borders appear thicker and darker than the other 18 AF areas. |
|
Local |
This option allows you to tell the camera which of the 19 AF areas to use to obtain focus. Toggle the multi-selector button to one of the 19 AF areas and press the shutter button halfway to obtain focus. The selected AF focus area has a darker, wider border than the other 18 AF areas. |
Table 6-1: AF area function’s options
Choosing an AF Area Function
Normally, we set AF to the default, [Wide], since it is reliable and rapidly acquires focus without the need to aim the camera precisely. We turn off Object Tracking so that we can transition to spot focusing by pressing the multi-selector button. This is advantageous when we’re using a telephoto lens with a shallow depth of field.
For example, when photographing animals from a distance, we like the eyes of the animal to be recorded sharply with a reflective glint. Spot focusing enables us to accomplish this. By selecting [Spot] and aiming the center focus point at the eyes, we can lock focus there. If we used wide focusing on a small bird, focus would invariably be on the body part closest to us: usually, the breast or back.
While [Wide] gives you the widest possible field to establish focus, it doesn’t necessarily give you the best picture. You may want only your subject in focus and the rest of the image somewhat blurred and de-emphasized. If this is the case, activate just a single focus point by selecting either [Spot] (the center focus point) or [Local] (selecting a focus point that lies off center on the screen).
Ultimately, the key to reliable AF focusing is a well-illuminated subject with fine details. If this is not the case, you will need to use manual focusing.
ISO
To get a feel for ISO, many film photographers once used the following rule: for a subject in open sunlight, set a shutter speed that is the reciprocal of the ISO (1/ ISO) and set the lens’s aperture to f/16. Old-time photographers will recognize this as the “Sunny f/16” rule.
The Sony A77’s nominal sensitivity is ISO 100, so on a sunny day, without clouds, you will get a properly exposed image by setting the shutter speed to 1/100 of a second and the lens’s aperture to f/16. For many photographers, increasing the camera’s ISO eight times to an ISO of 800 will generate an image of acceptable quality—at this ISO, the shutter speed is reduced to 1/800 while retaining a lens aperture of f/16. This setting makes the camera more suitable for action photography, as the fast shutter speed will freeze the subject’s motion. In this way, ISO adjustment makes your camera a more versatile recording tool.
When in Auto, Auto+, or SCN mode, the camera uses an Auto ISO setting where it varies its rating for subject and lighting. Eventually, you will find this limiting because you will want to set the camera for maximum picture quality, even if it means using a tripod. An experienced photographer usually prefers to set the ISO manually, and to do so, it’s necessary to set the mode dial to P, A, S, or M. We will discuss more about this later; right now, we will show you how to change ISO settings.
There are two ways to control ISO. The one that provides the most information but is slower to implement is to press the Fn button on the back of the camera.
Fn button>ISO (right)>[ISO n], [AUTO], [n]
Note: [n] above represents the ISO number ranging from 50 to 16000.
Table 6-2 lists the ISO function’s available options.
Option Name |
Description |
|
ISO n |
Multi Frame Noise Reduction |
n = the selected ISO number |
AUTO |
Auto ISO |
The camera determines the appropriate ISO value based on available light, detail contrast, aperture, and shutter speed within the specified range. |
n |
ISO |
n = the selected ISO number |
Table 6-2: ISO function options
A faster way to activate the ISO function is to press the ISO button on the top of the camera (figure 6-1). This immediately drops you into the ISO function so you can begin selecting the option you want. You can either toggle the multi-selector or rotate the front or rear control dial to select your ISO value. The front dial changes settings rapidly by one f-stop increments, while the rear dial does so at 1/3 f-stops. So if you need to rapidly change from ISO 50 to 6400, use the front control dial.
Setting your own ISO requires that you keep an eye on shutter speed. If your shutter speed is too slow, the camera may move during exposure and blur the image. These movements are due to hand tremors and can be avoided by using a tripod or reduced by bracing oneself against a solid support.
A handy rule of thumb when shooting 35 mm film is to use a shutter speed that is the reciprocal of the focal length of the lens in mm. So, if you set the lens to 100 mm, then you should set a minimum exposure of 1/100 second. For digital photography, this guideline may be too conservative; some readers will point out that because of the sensor crop, the shutter speed should be 1/150 second. Other readers who are knowledgable about the Sony’s SteadyShot feature will point out that this stabilization device allows you to shoot at 1/50 or 1/25 second. SteadyShot works on the sensor, counterbalancing camera movement to ensure a sharp image is captured. Normally, it is active and has to be turned off as a menu command.
Obviously, there are many variables that affect how slow a shutter speed you can use before blurring the image. We simply use the 1/focal length rule and are thankful that we have the SteadyShot feature to provide a safety factor when taking photographs. Remember, the way the camera is held determines how steady it is. Using the viewfinder and bracing the camera against your face provides more stability than holding the camera at arm’s length and composing with the rear LCD monitor. When possible, we brace the camera against a solid support, such as a nearby tree or pole. However, nothing beats a tripod, and arguably the finest details can only be obtained by using this accessory with a remote release.
Letting the Camera Set the ISO
In addition to selecting a specific ISO value from the displayed ISO numbers, there are two more ways to set ISO: Auto ISO and Multi Frame Noise Reduction.
Auto ISO, as the name implies, adjusts the camera sensitivity automatically. Essentially, when ambient light levels are low, the camera raises its ISO so you can use a faster shutter speed. This increases your chances of getting a sharp photograph while handholding the camera. The Auto ISO’s range can be set so that it does not raise the ISO to the point where noise degrades the image.
You can stipulate the minimum and maximum ISO that the camera can automatically apply. This way, the camera will stay within the range you set. To set the Auto ISO’s minimum and maximum, press the Fn button and select ISO. You can also press the ISO button instead. In both cases, toggle down to Auto ISO.
Fn button>ISO (right)>Auto ISO
When you reach Auto ISO, use a right toggle to access the submenu for setting the ISO’s lower and upper limits. You will be positioned at the minimum limit option. Toggle up or down to select a minimum ISO value. Toggle right again to position on the maximum option. Again, toggle up or down to select the upper limit of the ISO range. Press the multi-selector button to accept your entries.
A legitimate question is, how high should the limit be set? Unfortunately, there is no definitive answer. The upper limit can only be established through personal use and preference. We recommend 1600 as a starting point, with the assumption that most people will start finding unacceptable noise above that level when making 8 x 10 or larger prints. However, if you are using the images to send as email attachments or are printing them in small sizes such as 4 x 6, you may be very pleased by the camera’s performance at 3200 or even higher.
You can set the camera’s ISO to incredibly high values. However, we find that values exceeding 6400 result in very noisy images. The lowest value you can set is 50. We don’t usually use this except for special situations, for example, if we want a very slow shutter speed on a bright day. On a bright day, it is difficult to open the shutter long enough to blur the moving of water in a stream, so we use ISO 50 for this type of shot. Otherwise, we generally leave the lower ISO value at 100.
You cannot use Auto ISO in M mode. It is only available in P, A, and S modes. Auto ISO is the default mode in Auto, Auto+ and SCN modes.
Multi Frame Noise Reduction
One method Sony uses to handle noise is to fire multiple shots and average the images to reduce noise. This feature is available in SCN Hand-held Twilight mode. Unfortunately, when you use this mode, you cannot set the ISO, nor can you use Exposure Compensation. In essence, you have to trust the camera to make the settings for you.
However, the ISO function has the Multi Frame Noise Reduction option, which implements a similar noise reduction process while allowing you to set a specific ISO. When this option is activated, the camera takes a series of shots and merges them to form a single image with reduced noise. We tend to use this feature at ISOs of 3200 or 6400; setting higher ISOs generates levels of noise that this command cannot remove.
Fn button>ISO (right)>[Multi Frame Noise Reduction]
As before, you can save a step by pressing the ISO button and then toggling up and down to find Multi Frame Noise Reduction. Once you are there, toggle right and then set the ISO by toggling up and down. Press the multi-selector button to accept your choice. You can now fire the camera.
WB (White Balance)
The Sony A77 has to be calibrated to record colors accurately. In effect, the camera must be told what type of light is illuminating the subject. This task used to be performed manually; however, the method was inconvenient and would result in an image with horrible colors if the wrong light source were selected. This was especially true with DSLRs relying on optical viewfinders.
To get around this problem, camera designers developed AWB (Automatic White Balance), which enables the camera to calibrate itself to the light source. In essence, AWB takes a statistical sampling of the image and makes a “best guess estimate” on the identity of the light. For the most part, it does a good job, and many users always use AWB. But, like all statistical sampling techniques, it can be fooled. This is most evident when working with indoor lighting. Fortunately, the Sony A77 has tools to compensate for this.
To better control the appearance of your photograph, we recommend that you become accustomed to setting your own white balance (WB). Your results will be more consistent and more reproducible if you get into this habit. To do so, use the following command:
Fn button>WB (right)>See table 6-3 for the list of values
You can also access the WB function by pressing the WB button on top of the camera (figure 6-1).
WB Function Option |
Option Name |
Description |
|
AWB |
White balance is set automatically by the camera. |
|
Daylight |
White balance is set for the subject being in direct sunlight. |
|
Shade |
White balance is set for the subject sitting in the shade and not illuminated by direct sunlight. |
|
Cloudy |
White balance is set for subject on a cloudy, overcast day where the sun is hidden by the cloud cover. |
|
Incandescent |
White balance is set for the subject illuminated by indoor lights (assumes the light is tungsten filament). |
|
Fluor.: Warm White |
White balance is set for the subject illuminated by “Warm” fluorescent lights (3000 K). |
|
Fluor.: Cool White |
White balance is set for the subject illuminated by “Cool” fluorescent lights (4100 K). |
|
Fluor.: Day White |
White balance is set for the subject illuminated by “Day White” fluorescent light (5000 K). |
Fluor.: Daylight |
White balance is set for the subject illuminated by “Daylight” fluorescent light (6500 K). |
|
|
Flash |
White balance is set for using an electronic flash unit. Some yellow tints are added to enrich and warm up the picture. |
|
C.Temp./ Filter |
This option allows you to set the white balance based on a specific color temperature value represented in K units (kelvin). 1. Toggle the multi-selector to the right to enter the list of color temperature values. Scroll up or down through the list using the toggle button. 2. Right toggle again to enter the color temperature selection grid. You can toggle in all directions to move the color temperature value. 3. Press the multi-selector button to select a final value. |
|
Custom 1 |
Use this option to store a custom white balance setting. |
|
Custom 2 |
Use this option to store a custom white balance setting. |
|
Custom 3 |
Use this option to store a custom white balance setting. |
|
Custom Setup |
Use this option to set up a custom white balance to be stored in one of the three custom settings. |
Table 6-3: WB icons and light sources
When you press the WB button, you can immediately select most of the options by toggling up or down with the multi-selector. This allows you to highlight AWB or one of the light source icons (figure 6-5). Once a value is highlighted, press the multi-selector button to select it.
The icons in table 6-3 graphically represent light sources, making them easy to remember. However, they only serve as a rough guide to the illuminant’s color. For example, the Incandescent option assumes an idealized bulb emitting a specific color. In fact, indoor bulbs can emit widely varying color content; and, depending on the operating voltage, the light can range from ruddy red to brilliant white. For those who need rigor in setting these values, use the Color Temp./Filter option.
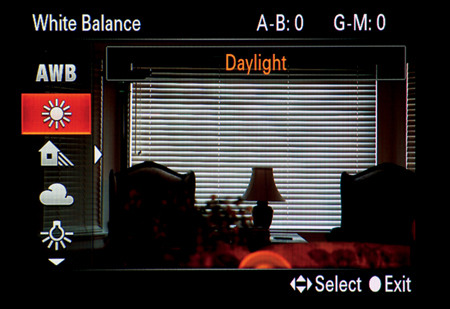
Figure 6-5: White balance for a daylight setting
Inaccurate preset WB occurs frequently with fluorescent lights. These bulbs vary so widely in their color output that the WB settings provided by Sony may not work. If the results are unsatisfactory, use Custom WB instead.
There are other choices in WB that require a bit more effort. When you select [C. Temp./Filter] you will have additional options to select. One of them is the letter K, which stands for the color temperature scale. Chemists and physicists know this as the abbreviation for kelvin, a quantitative way of specifying color temperature. Rather than discuss the scientific and physical basis of the scale, it is sufficient to say that you can dial in the correct value to give you accurate color balance. This is especially handy if you’re using photographic lights with output specified in degrees kelvin.
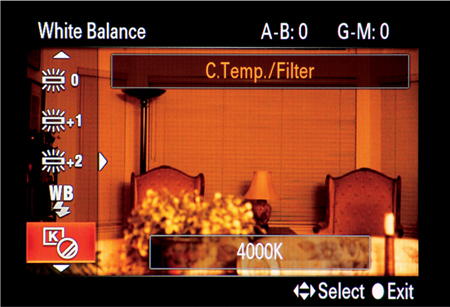
Figure 6-6a: Selecting Color Temp./Filter for k to a numerical value

Figure 6-6b: Color temperature scale set to 2800 K
Follow these steps to use the color temperature scale:
1. Press the WB button on top of the camera. Highlight the [Color Temp./Filter] option (figure 6-6a). Right toggle to enter the color temperature scale. Note that the camera is set to 4000 K and the resultant image is too orange.
2. Select the color temperature by toggling up or down. You can also turn the rear or front control dial to raise and lower the temperature setting. The range is 2500 K to 9900 K.
3. When the number reaches the value you want, in this case 2800 K, press the multi-selector button (figure 6-6b). Note that the color value appears more natural.
To use the above option, you need to know the color temperature of the light source. An expensive color temperature meter is the most accurate way to determine this value. Also, check to see if the manufacturer provides a k value. For example, the tungsten illuminator on our microscope is rated at 3200 K, a value provided by the lamp manufacturer, so we dial that number into the camera’s white balance scale.
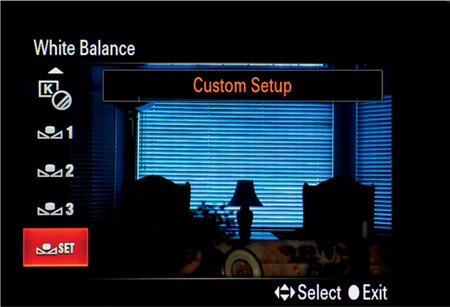
Figure 6-7a: White balance set for Custom WB
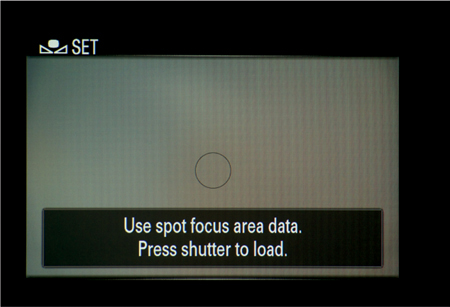
Figure 6-7b: Gray circle indicating where to place a white piece of paper in the frame
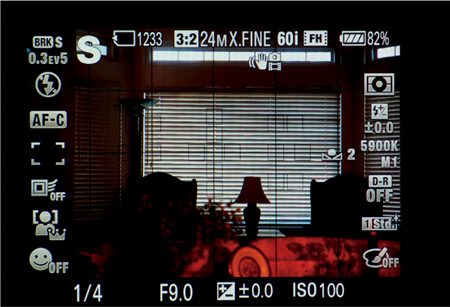
Figure 6-7c: Calibrated value stored in Custom WB #2 and applied to image. Note change in white balance.
Unfortunately, many light sources are not rated. Worse, sometimes bulbs that are rated fail to maintain their ratings over the life of the bulb. Tungsten filament bulbs emit a cooler color as they age. Also, their color temperature depends on their operating current, and they emit a warmer color with a drop in voltage.
In the case of fluorescent bulbs, there is a wide variation among manufacturers; therefore the color temperature values in table 6-3 are only approximations. For these situations, we rely on our favorite method of setting color temperature, Custom white balance. We set the white balance manually by calibrating it to the light source (white paper) and store it in the camera’s memory. To do this, all you need is a blank white sheet of paper and follow these steps:
1. Press the WB button on the top of the camera.
2. Highlight the icon labeled SET (Custom Setup) (figure 6-7a).
3. The screen changes. A circle with a fine line border appears in the screen (figure 6-7b).
4. Aim the camera at the white sheet of paper; making sure the paper fills the targeting circle.
5. You will see the prompt, “Use spot focus area data. Press shutter to load.”
6. Press shutter.
7. A new screen appears, prompting you to “Select a register.” You will have three registers to store your color temperature. Select one and press the multi-selector button. In this case, Register #2 was selected.
8. The value will be stored in the register.
9. You can now use the camera.
10. The Custom white balance can be recalled if you select the Custom 1, 2, or 3: the number being the one you selected when storing the WB value it. Note that Register 2 (figure 6-7c) is being used in this Live View. The Custom WB #2 has a color temperature of 5900 K.
You can store WB custom settings in one of three registers and use them as preset WBs. We find this procedure to be very reliable, and it is our preferred method of manually adjusting the camera to the light source. When working with a microscope, we remove the specimen from the field of view and calibrate the WB setting against a clear region. The camera is then calibrated to the light with the benefit that any color cast introduced by the lens is also removed. We find it to be a more accurate adjustment; colored specimens are rendered better than when the camera was calibrated with the C. temp. setting.
Here is another suggestion to use when customizing your white balance: instead of using a white sheet of paper, substitute an 18% gray card. This, as the name implies, only reflects a percentage of light and provides a handy reference for neutral color under varying light conditions.
Using a gray card has a dual purpose. First, you can use it for Custom WB, substituting it for a white piece of paper. Second, you can position an 18% gray card within your picture, in an unobtrusive location that can be cropped out of the final image. You can then use this point for the Specify Gray Point command when processing your picture with Image Data Converter. Although you can use a white sheet of paper, the danger is that one of the color channels may be clipped, biasing your WB to the properly exposed color channels. By using the 18% gray card, you can be assured that all of the color channels will be properly exposed.
Fine-tuning WB: Fine Adjustment
Sometimes, no matter what you do, the procedures described above may generate an unacceptable coloration in your image. When using fluorescent or LED lights sources that emit a discontinuous spectrum of light, you may find the images have color casts that cannot be removed by selecting a preset WB value. In the next chapter, we will describe how Sony deals with this type of discoloration within the camera. Now, we will describe how these color casts can be adjusted in your computer.
At the onset, we will state that our preference is to use post-processing software for correcting color casts. Sony’s Image Data Converter software and third-party software such as Photoshop or Aperture provide powerful tools for “touching up” RAW images.
Earlier, we recommended that you save your images as both RAW and JPEG files. Each file format has its advantages. A major benefit of saving in RAW format is the ease of correcting white balance errors outside the camera.
If you’re using Image Data Converter, figure 6-8 shows a slider and a color temperature scale in a side screen for fine-tuning white balance. The slider allows you to rapidly evaluate different color temperature settings. Additionally, there is a button marked Preset which displays a variety of light sources, enabling you to find your illumination type.
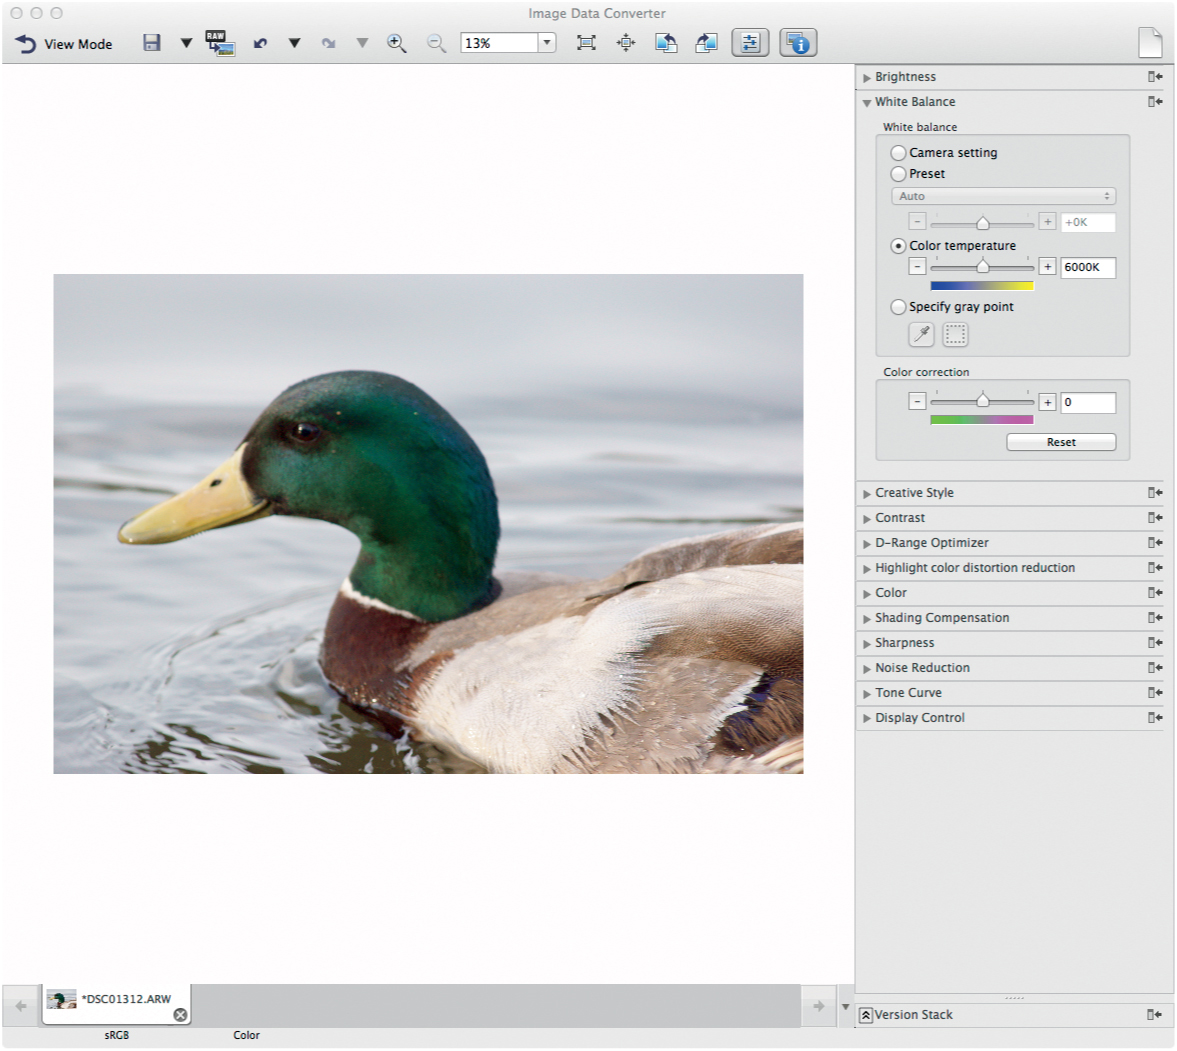
Figure 6-8: Image Data Converter controls for adjusting a RAW file’s color temperature
In the previous section, we mentioned including an 18% gray card within a picture. This technique can be used with the Specify Gray Point command to provide a neutral reference for adjusting WB (figure 6-8). In addition, Image Data Converter has another slider called Color correction (figure 6-8) were you can adjust the tint from green to magenta. Together with its Color temperature slider, you should be able to obtain an image with a neutral-looking white balance.
Summary of WB
The majority of our photographs are taken with AWB. The camera does a satisfactory job of recording pleasing colors from subjects illuminated with various lighting sources. However, we have noticed that indoor lightning with incandescent lamps can throw off AWB. Under these conditions, our images have an orange-red hue. To obtain more neutral colors, we use the WB setting for incandescent lighting (accessed via the WB button on top of the camera). For very difficult conditions where there are several light sources—e.g., a mix of incandescent and fluorescent bulbs—we calibrate WB against a white sheet of paper (Custom white balance option).
Again, we recommend saving files in RAW format. Virtually all programs that read RAW files have a straightforward command for readjusting white balance when it is set incorrectly in the camera.
Customizing Automatic Focusing
Automatic Focusing: Speeding up Focusing
The Sony A77 conserves battery power by not starting autofocus until you press the shutter button halfway. In addition, to guarantee a sharply focused image, the camera does not fire until focus has been established. Although this is a good thing, it also slows down your ability to capture your subjects quickly. To speed up firing the camera, you can select an option to start focusing by simply viewing through the electronic viewfinder. Use the following command:
MENU>Custom Menu (1)>Eye-Start AF>[On], [Off]
Another strategy for speeding up your photography is to disable the camera’s ability to block activating the shutter until focus is achieved. This speeds up initiating exposure at the risk of obtaining an unfocused image. Use this command:
MENU>Still Shooting Menu (3)>Priority setup>[AF], [Release]
The [AF] value requires that the image be in focus for the shutter button to be activated except in manual focus mode, where this has no effect. The [Release] value does not require the image to be in focus. Interestingly, this value allows out-of-focus shots even in Auto and Auto+ modes.
Automatic Focus in Dim Light
The camera needs light to operate its autofocus. In dim surroundings, the camera may not be able to focus. It solves this problem by projecting a red beam called the AF Illuminator light to illuminate the subject. Normally, this provides enough light to achieve automatic focus. Although a red light is less obvious than a brilliant white beam, it can be annoying to audiences and performers—for example, if you are shooting a stage production in a dimly lit theater. To avoid this distraction, Sony provides the command below:
MENU>Still Shooting Menu (2)>AF Illuminator>[Auto], [Off]
The [Auto] value enables the camera to turn the AF Illuminator light on in low-light situations, whereas the [Off] value means the light does not turn on.
Controlling Autofocus Speed
The camera has an AF drive speed command for you to set an autofocusing speed.
MENU>Custom Menu (4)>AF drive speed>[Fast], [Slow]
Reports on online forums say that if the AF drive speed is not set to [Slow], some third-party lenses are in danger of having their focusing gears stripped. We are not willing to personally risk one of our lenses to test this out; therefore, we can only pass on this advice as a precautionary note.
Manual Focus: Overriding Automatic Focusing
Our discussion about using manual focus spans this chapter and the next. In this chapter, we discuss overriding automatic focus and fine-tuning focus manually. In chapter 7, we describe using manual focus as the sole means of focusing.
First, a cautionary note. Some Minolta and Sony lenses can damage the focusing motor if the lens focusing ring is forced. So, when you turn the ring, stop if you feel resistance. To experience what you should feel when turning the focusing ring, first see if your lens has an AF/MF switch. If so, turn it to MF. If your lens lacks this switch, turn the focus mode dial to MF. Once the camera is in MF mode, turn the lens ring. This is the level of drag you should experience. Anything more, and you risk damaging the focusing motor. Sony has three different autofocus motors for their cameras, and failing to properly switch to MF can damage them. A good safety rule is to know the feel of manually focusing the lens and stop turning it if there is any resistance.
The focus mode dial (figure A page xiv) is inconveniently placed if you need to change focus rapidly from AF to MF. Frequently, especially with long telephoto lenses, you will find that the lens is not focused precisely on the subject and you need to fine tune the focus. One way is to use just one AF sensor with a [Spot] AF area. By using a single sensor and aiming it at the point you wish to focus on, you can focus precisely on one part of the subject.
An easier way to fine tune AF is to engage manual focus by pressing the AF/ MF button on the back of the camera. You can fine tune focus and take the shot while pressing this button. A useful adjunct to this command is to make the AF/ MF button an on/off switch—i.e., when you press it once, the lens is in manual focus; when you press it a second time, it returns to autofocus. This is accomplished by reassigning the function of the AF/MF button. Use the following command:
MENU>Custom Menu (3)>AF/MF button>[AF/MF Control Toggle]
One command that we don’t care for is direct manual focus (DMF), which is obtained with the following:
MENU>Still Shooting Menu (3)>AF-A setup >[DMF]
When DMF is used with Sony lenses that are driven by the camera body’s motor, it allows you to switch automatically from automatic to manual focus. Basically, what happens is that the camera will autofocus when DMF is set. When the camera finds focus, the lens is disengaged from the motor and you can turn the focusing ring to adjust focus further. This sounds handy, except that it doesn’t work with Sony lenses containing the SAM (Smooth Auto Focus) focusing motor. A more complete description of SAM can be found in Chapter 9. As a result, we avoid this command, preferring to use the AF/MF button on the back of the camera.
DRO/Auto HDR Function
When photographing, you sometimes encounter a scene with overly bright regions that show no detail. Or, you might encounter another subject with deep shadows that appear as a featureless black mass. Finally, between these two extremes are regions with mid-tones that lack contrast. To an extent, these deficiencies can be remedied by downloading the image to a computer and post-processing the image with programs like Photoshop. But Sony has designed the A77 so that you can correct these deficiencies in the camera with two processes: Dynamic Range Optimization (DRO) and Auto High Dynamic Range (Auto HDR). When you select either one of these two operations, the camera will process the image automatically and then save it to your memory card.
Choose DRO when one exposure can record all of the intensity values for the scene. When this is impossible and extreme light levels overwhelm the sensor, use Auto HDR. Auto HDR employs three exposures taken in rapid succession: one for recording highlights, one for recording mid-tones, and one for recording shadows. By combining these three images, it is possible to create a composite where shadows can be lightened, highlights darkened, and mid-tones maintained.
The DRO and Auto HDR functions are found through the Fn button, where you can turn either function off or select one of them.
Fn button>DRO/Auto HDR (right)>[D-R Off], [DRO], [HDR]
Set the function to [D-R Off] to prevent either of the processes from executing.
DRO Function
The [DRO] function has a list of submenu options (table 6-4).
Fn button>DRO/Auto HDR (right)>[DRO]>[DRO AUTO], [Lvl1], [Lvl2], [Lvl3], [Lvl4], [Lvl5]
DRO Function Option |
Option Name |
Description |
|
D-R Off |
Disables DRO/Auto HDR function. |
|
D-Range Optimizer |
Brings out detail in shadows by lightening and bright, washed-out areas by darkening so that fine details in both areas are more easily discerned. |
Sub-Options |
|
Executes DRO automatically when the image has deep shadows and bright highlights. The camera chooses what level to adjust the blacks and whites. |
|
Level 1 – The least amount of change to blacks and whites in the image. |
|
|
Level 2 – The second least amount of change to blacks and whites in the image. |
|
|
Level 3 – The middle amount of change to blacks and whites in the image. |
|
|
Level 4 – The second most amount of change to blacks and whites in the image. |
|
|
Level 5 – The most amount of change to blacks and whites in the image. |
Table 6-4: DRO options of the DRO/Auto HDR function
The DRO Level command determines the extent to which shadows are lightened in an image: the maximum effect occurs at Lvl 5, while the minimum effect occurs at Lvl 1. It is difficult to estimate what level you need for a given scene. We recommend trying multiple levels until you get to know how each should look. With practice, you should be able to implement this function to your liking. There is a DRO Auto option where the camera makes the decision, but this does not guarantee recording an image you will like.
As you might remember from chapter 4, the Drive Mode function has the option [BRK DRO]. When this is set, the DRO/Auto HDR function’s value automatically changes to DRO Auto, and the function is locked to prevent you from changing the Lv value. Once you change the Drive Mode’s setting from [BRK DRO] to another value, the DRO/Auto HDR function reverts back to its previous value.
The DRO function is available in P, A, S, M, Continuous Advance Priority AE, and Movie modes. You can add a Creative Style to affect the results, although Picture Effects are not enabled with the DRO function. Be prepared for some processing wait time if you shoot a long video or hold down the shutter button for many shots in Continuous Advance Priority AE mode.
Auto HDR Function
Traditionally, HDR photography involves downloading pictures taken at different exposures and combining them on a computer to form a composite image. Usually an operation called tone mapping is performed to create an image that displays details in the brightest and darkest areas of the scene. Frequently, the resulting image displays oversaturated colors and a surrealistic appearance, which many find attractive. For example, when you merge three different exposures with third-party software like Photomatix, the final composite image will have dramatically different colors from the original scene.
When you use Sony’s Auto HDR function, you might be surprised to find that the final image does not have the supersaturated colors seen when the same images are processed with Photomatix. Indeed, the color balance and saturation of Auto HDR are similar to a DRO image. It appears that Sony engineers have adjusted Auto HDR output so that the resulting image retains the color balance and tonality associated with a typical photograph.
Even though Sony A77 HDR and DRO images resemble each other, there is in fact a difference. If you look in the deep shadows, the DRO image reveals noise while the Auto HDR image does not. This reflects HDR using a longer exposure for capturing shadow detail. In contrast, by using a single exposure, DRO has to increase the brightness in the shadow areas by image processing, thereby making the noise more evident.
The following command (table 6-5) enables the HDR process:
Fn button>DRO/Auto HDR (right)>[HDR]>[HDR AUTO], [1.0EV], [2.0EV], [3.0EV], [4.0EV], [5.0EV], [6.0EV]
Once HDR is selected, you have the choice of letting the camera determine the best EV by setting [HDR AUTO]. Alternatively, you can take control and select a specific EV value ranging from 1.0 to 6.0. The selected value becomes the range over which the three shots are distributed. Use a low EV value when the scene has a moderate range of light intensities; use a high EV value when the range of intensities is more extreme.
HDR Function Option |
Option Name |
Description |
|
Auto HDR: Exposure Diff. |
The camera shoots three images and combines them to bring out detail, especially in the shadows and bright, washed-out areas. The process closely retains the subject’s coloring. |
Sub-Options |
|
The camera determines the best EV value to use to bracket the three shots. |
1.0EV |
The camera brackets the three shots within 1.0EV. |
|
2.0EV |
The camera brackets the three shots within 2.0EV. |
|
3.0EV |
The camera brackets the three shots within 3.0EV. |
|
4.0EV |
The camera brackets the three shots within 4.0EV. |
|
5.0EV |
The camera brackets the three shots within 5.0EV. |
|
6.0EV |
The camera brackets the three shots within 6.0EV. |
Table 6-5: HDR option of the DRO/Auto HDR function
The HDR function is available in P, A, S, and M modes only and is enabled for JPEG files only (Quality = [Extra fine], [Fine], or [Standard]). As with DRO, Picture Effect is not enabled, but you can add a Creative Style to affect your results.
Using DRO and Auto HDR
We encourage you to try these imaging techniques and see if they help your photography. They can be a benefit. But as you gain more experience, you may decide to forego these processes.
We rarely use DRO for still photography. We prefer to post-process RAW images on our computer, where we can try various DRO levels to obtain the effect we want. Sony’s PMB software allows you to approximate the DRO effect by working with RAW images. Although the effect is not identical, we prefer having greater control over the process rather than relying on an automated camera rendering.
Where we have found DRO to be a powerful benefit is in recording video. Your ability to post-process these files may be limited, and DRO provides a simple means of taming extremes in contrast to make a pleasing video.
In regard to Auto HDR: like DRO, it can improve an image, but also like DRO, it is difficult to anticipate the image’s appearance. We prefer shooting in RAW, which Auto HDR cannot do, and post-processing on the computer, which allows us to experiment with different interpretations of the composite image. To generate the image files for this task, we describe how to acquire various exposures with auto bracketing in chapter 7.
Three Semi-automatic Modes: Shutter-Priority (S), Aperture-Priority (A), and Program (P)
Using the S, A, and P modes gives you greater control over the camera. You select these modes by rotating the mode dial (figure 6-9). Unlike the Auto and Auto+ modes and the SCN predefined scene modes, here you can select the shutter speed, aperture, WB, and ISO. This gives you greater artistic control in creating the image; however, there is the increased risk of selecting a setting that detracts from image quality.
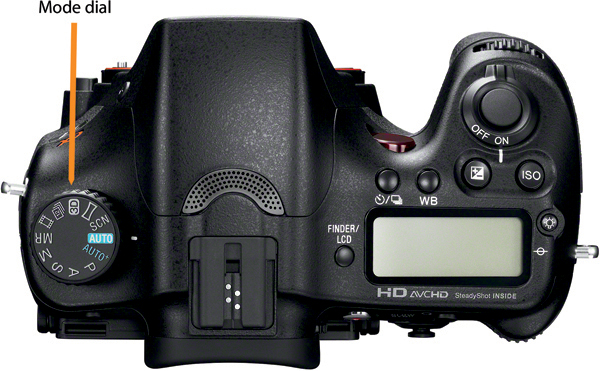
Figure 6-9: The mode dial is the largest knob on top of the camera
Shutter-Priority (S) Mode
Turn the mode dial to S to select Shutter-Priority mode. In this mode, you choose the camera’s shutter speed while the camera selects the aperture for proper exposure. This is advantageous for action shots. A fast shutter speed can keep you from blurring the image while your subject is moving. Conversely, if you wish to show moving subjects as an extreme blur, you can use this mode with a slow shutter speed.
When this mode is selected, the letter S appears in the upper left corner of the display screen with the shutter speed number and aperture values glowing white on the lower border. If you rotate either the front or rear control dial, the numbers for the shutter speed change. As the white numbers are changed, they become orange colored. As you change the shutter speed, there is a commensurate change of aperture value ensuring that you maintain a constant exposure. If you reach the limits of the lens aperture control—i.e., if you exceed the maximum or minimum aperture—the aperture values will not change and will instead start flashing.
The orange number 2 at the bottom left of figure 6-10 refers to the camera being set for a 2 seconds exposure. Pressing the shutter button halfway reveals the aperture number in white (figure 6-10). If Exposure Compensation is used, the image on the display screen can be either too bright or too dark. If the histogram is visible, it too will indicate over- or underexposure by shifting to the right or to the left.
To correct this, press the Exposure Compensation button. You will see a new screen showing an Exposure Compensation scale (figure 6-11). Rotate the rear or front control dial to the left or right to see the effects of changing exposure on the image. The display screen darkens or brightens: the shutter speed is maintained while the aperture closes or opens. The scale and numerical values provide a record of how far you have changed the exposure. Press the shutter button halfway to return to Live View.

Figure 6-10: S mode with aperture set for f/0.9—note it is displayed in white

Figure 6-11: Exposure Compensation scale
Awareness of shutter speed is important for two reasons. The most obvious is in action photography when you wish to freeze motion. A shutter speed of 1/500 of a second or faster is desirable when freezing a running athlete. Conversely, a slow shutter speed of 1/60 of a second may blur the athlete’s entire body, giving the impression that he is speeding along the track.
With experience, you can combine these two effects so that a running athlete’s face and body are recorded sharply while his feet and arms are blurred. This provides an intermediate effect, allowing the viewer to recognize the athlete while maintaining the impression of rapid motion. A favorite technique in scenic photography is to use a long shutter speed to blur moving water, hiding the individual splashes and drops (figures 6-12(a-b).
The second reason for keeping an eye on shutter speed is that the camera can move during slow shutter speeds, especially if it is being handheld. Hand tremors blur the fine details of the image. As a rough approximation, when the shutter speed is slower than 1/focal length of a lens in mm, the subject’s fine detail can be blurred by camera movement. When you are at slow shutter speeds, consider the following three options: opening the aperture, raising the ISO, or mounting the camera on a tripod. The SteadyShot feature provides you with a bit more safety: users claim they can hold 2-3 EV lower shutter speeds when this is on. But without a tripod, there is no guarantee of obtaining a tack-sharp image at slow shutter speeds.

Figure 6-12a: A small stream recorded with a shutter speed of 1/320 second
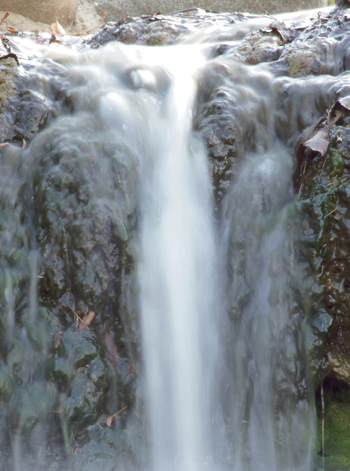
Figure 6-12b: The impression of movement is enhanced when using a longer shutter speed (4 seconds)
Aperture-Priority (A) Mode
Aperture-Priority (A) mode is the converse of S mode. Here, you select the aperture and the camera selects the shutter speed. This gives you control of depth of field, which is critical for close-up photography where depth of field is shallow. If the lens aperture is open, the shallow depth of field blurs parts of the image. This effect can be advantageous in portraiture where you focus on the model’s face, opening the aperture to blur the background and foreground. In this manner, the viewer’s attention is focused on the face.
In A mode, as soon as you press the shutter button, you see both the aperture values and the shutter speed (figure 6-13). When you turn either the rear or front control dial, the aperture numbers turn orange while the shutter speed numbers remain white. Exposure Compensation works as described for S mode, except you change the shutter speed rather than the aperture when over- or underexposing.
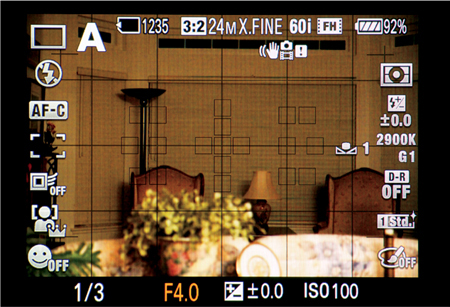
Figure 6-13: A mode with aperture at f/4 and shutter speed 1/3 of a second displayed in white
Press the Preview button to see the effects of closing down the aperture and ascertain whether you have sufficient depth of field. This button stops down the lens to the recommended exposure so you can see its effects.
Program (P) Mode
Program (P) mode is similar to Auto mode in that it sets both shutter speed and aperture, but with an important difference: you are in complete control of both. You have to make the decision whether the shutter speed should be fast or slow, or whether the aperture should be opened or closed. When the camera first selects an aperture/shutter speed you will see a P in the upper left corner of the screen (figure 6-14). If either the aperture or shutter speed is inappropriate, you can change these values with the Program Shift function. Simply rotate the front or rear control dial, and these values change in synch so that you maintain a constant exposure. An asterisk will appear next to the P as a reminder that you have implemented the Program Shift function.

Figure 6-14: When you select P mode, shutter speed and aperture are displayed on the screen
To use Program mode turn the mode dial to P and press the shutter button halfway. The aperture and shutter speed values appear in white. Turning the rear control dial to the left or right changes both the shutter speed and aperture. Your exposure does not vary.
Exposure Compensation is also available in the P mode via the Exposure Compensation button.
Recommendations
Once you move the mode dial to P, A, or S, you start taking greater control of your camera. Many controls unavailable to you in the Sony A77’s automatic modes are now accessible, and you can develop your own working style.
The first thing is to be aware of how the controls work. For example, the focusing area can be changed, and being able to do so rapidly can make your camera more responsive. We usually use the [Wide] option because it does not require precise aiming and can quickly focus on the subject. The danger is that out of 19 autofocus areas, the camera may select one that is not optimal. Because of this, we tend to use a smaller lens opening to increase the depth of field.
When working with a lens with a shallow depth of field, we take advantage of [Spot] and [Local] and use a [Single] focusing area. This slows us down, but it is necessary when photographing small birds with a long telephoto. When the bird is perched, we aim the selected [Spot] on the bird’s eye and use it for focus. With a long telephoto and an open aperture, the bird’s eye and head are in focus: the shallow depth of field causes some blurring of the breast feathers or beak.
To rapidly switch between [Wide] and [Spot,] we disable the Object Tracking function. This activates the multi-selector button so that pressing it during live preview sets the AF area to [Spot]. Keeping the button depressed initiates and locks focus. We take the picture by maintaining pressure on the multi-selector button while pressing the shutter button.
Even with accurate control of the autofocus area, we find it necessary to rapidly switch from AF to MF for critical work with long telephotos. The AF/MF button is conveniently placed at the rear of the camera body, and pressing it disengages the motor drive from the focusing ring. This is especially critical if you are using an older Minolta or Konica Minolta lens that is driven by the focusing motor in the camera’s body. Pressing the AF/MF button frees the lens’s focusing ring so it can be rotated without damaging the internal motor.
When working with long lenses, we find it desirable to go into the menu and reassign the AF/MF button’s function from [AF/MF Control Hold] (the default) to [AF/MF Control Toggle]. The former requires that you continually press the AF/ MF button to focus manually, while the latter requires only one press. In order to return to AF, you press the AF/MF button a second time.
We use AWB. However, we often find using predefined WB selections to be useful. For example, when photographing a red sunset, AWB seems to tone down the colors, and we feel we obtain better coloration by using the preset Daylight WB. If you shoot RAW, you can alter white balance during post-processing, and we frequently take advantage of this convenience. For example, in Image Data Converter, the Specify Gray Point function enables you to select a region of neutral color in your image and use it to establish WB. This is a very nifty capability; sadly, it is not usable with JPEG files. Because of this, when we shoot JPEGs only, we take extra care in choosing WB. If the color balance is incorrect and the preset values do not work, we use Custom white balance.
In regard to ISO, we like to set our own speed. For our highest quality work on a tripod or in the laboratory, we use ISO 100. For rapidly moving subjects in daylight, we use ISO 400-800. For dim light work, we go to 1600 and occasionally 3200. For low light work, we prefer ISO 400 with a tripod. For occasions when a tripod is unavailable, we use Multi Frame Noise Reduction.
In terms of regulating contrast with unusual lighting conditions, we do not use DRO. In part, the problem is the difficulty of envisioning the results prior to taking the exposure. We are more comfortable taking a picture with this command [Off] and then post-processing our RAW files instead. Many image processing software packages allow you to control the brightness of highlight and shadow areas independently. Image Data Converter has a DRO command, and we find that working with it is more convenient than trying to work with the Sony camera commands.
In regard to Auto HDR, we do use this function to tame extremes in lighting levels. However, when we want to generate surrealistic HDR colors, we use Bracket Continuous. We save differently exposed images and download them to a computer for post-processing with the Photomatix program. We enjoy the effects that can be achieved with that software.
In terms of our shooting style, we tend to use Aperture-Priority (A) mode when we are concerned about depth of field and Shutter-Priority (P) mode when we are concerned about shutter speed. This usually translates into using Aperture-Priority for stationary subjects and Shutter-Priority for moving subjects. Program-Priority is our point-and-shoot mode. Although we could use the more automated Auto or Auto+ modes, we like to save our files as RAW and therefore prefer the camera’s Priority modes.