
When you want to display text in Processing, it’s important to understand the basics of working with strings, and that’s where this project starts. Once you have the fundamentals down, I’ll show you how to create a font, make a rough typing program, and even create your own data dashboard in Processing.
Just like numbers, text and letters have data types associated with them. Individual letters fall under the char, or character, data type. Characters are normally written inside a pair of single quotes— for example, 'a'. A grouping of characters is called a string and is normally written in double quotes—for example, "Cool!".
THE STRING DATA TYPE
The String data type holds—you guessed it—strings. Just as with any other data type, when you create a string, you need to give it a variable name and initialize the variable to some value. Here I initialize the string as empty, as you can see in the following example:
String myString = "";
String myOtherString = "Something cool";
For this example, I started with the creative name of myString, and I initialized it to "", which is an empty string. Even when you’re not ready to initialize a new string to any particular value, always at least set it equal to the empty string, or your code won’t compile. If you wanted to start with a string, you could make it equal to "Something cool" instead.
A great thing you can do with strings is add, or concatenate, them. That means you can take two strings and mash them together to make one longer string. For example, let’s combine our example string, "Something cool", with a new string.
String myOtherString = "Something cool";
String aString = "is going to happen, I promise!";
String myString = "";
void setup()
{
❶ myString = myOtherString + " " + aString;
print(myString);
}
This piece of code shows the power of concatenation by adding aString to myOtherString ❶. You can even throw single characters into the mix, as I did by adding a space (" ") between the two strings. In this case, I’m just printing the string to the console, as shown in Figure 7-1, but you can perform a whole slew of actions with strings.
FIGURE 7-1: The Processing IDE prints myString to the console.

You can split strings, read individual characters, use an if() statement to test them, and more. For now, you’ll deal with strings strictly on an output and display basis.
Displaying information in the console is handy, but displaying information within your sketch itself is even more useful. This is where the text() function comes in: it takes a string or piece of data and draws it within your sketch. Let’s print myString from the previous example within a sketch using the text() function.
String myOtherString = "Something cool";
String aString = "is going to happen, I promise!";
String myString = "";
void setup()
{
size(250,250);
myString = myOtherString + " " + aString;
print(myString);
}
void draw()
{
❶ text(myString,125,125);
}
The text() function needs at least three parameters ❶. The first parameter is the data you want to display, which is either a string or variable data. Your variable data can be of any data type, as long as you have created the variable and it has a value assigned to it. The next two parameters are the x- and y-coordinates of your string. The origin of the text is the upper-left corner of the string you’re printing, just like in the rect() function. Your example text should appear with the origin at the center of your sketch, as in Figure 7-2.
FIGURE 7-2: Imaginary rectangle around a text field displaying myString with a position of x,y. The last four words weren’t drawn because the sketch window was too small for the string.
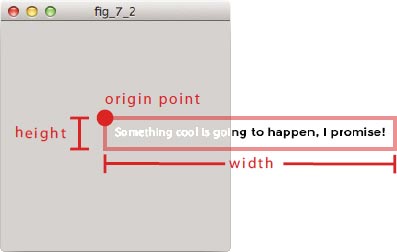
Okay, that wasn’t too impressive; in fact, the sketch window was so small that half of the string was cut off! But it’s a start, and you can take your text to the next level with modifiers.
TEXT MODIFIERS
The text() function has a number of modifier functions that make displaying and reading text much easier. The first, and probably the most useful, is the textSize() function, which you’d pass a single parameter to set the height you want in pixels. Text modifiers work just like the other modifiers we’ve worked with: you place them before the text you want to modify in your sketch.
If you want to change where the origin of the text field is located, you can use the textAlign() function with the same parameters you saw in Project 6: CORNER, CORNERS, or CENTER. Most of the time, I’ll use the CENTER or CORNER modes because they’re easier to envision in my head.
Text boxes are particularly useful when you’re designing specific areas for information within a sketch, and you can envision the text() function like a text box you would use in any other presentation or document software. Passing the text() function width and height values will cause the text to wrap automatically when your string data gets too long. You can even use fill() to change the text color! Just add another fill() function above the text and give it an RGB value.
{
size(250,250);
background(150);
smooth();
}
void draw()
{
background(150);
String myString = "I love strings, even when they are in knots.";
textAlign(CENTER);
textSize(20);
fill(0,0,0);
❶ text(myString,10,height/4,180,200);
}
Here, I’ve also specified where the string should start and the dimensions it should be contained in ❶ so that it doesn’t run off the sketch like the example in “Basic Text Functions” on page 121. This code should result in the sketch shown in Figure 7-3.
FIGURE 7-3: myString printed as text within a sketch
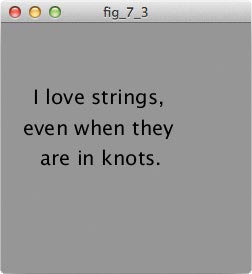
Notice that this time, the string doesn’t look so pixelated. That’s because there’s now a background() call in the draw() loop. The text is still a little lacking, however. Let’s make it prettier, and try a different font.
You can improve the look and feel of your text through fonts, and fonts have their own data type called PFont. The process for adding a font is similar to the process for adding an image, though it’s not exactly the same.
Creating a Font
To add a font to your sketch, first place that font file in your data folder. Click Tools ![]() Create Font to bring up a dialog like the one in Figure 7-4.
Create Font to bring up a dialog like the one in Figure 7-4.
FIGURE 7-4: The Create Font dialog
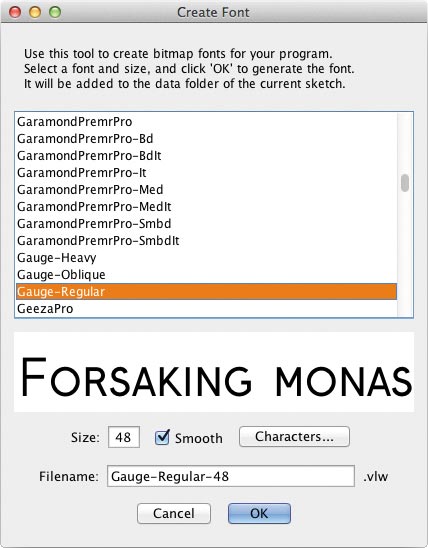
The Create Font tool is pretty self-explanatory; just select the font you want from the list at the top of the dialog. If you’ve ever picked a font in a word processing application, you’ll feel right at home.
This list of fonts is generated from the fonts installed on the computer you’re using. If you have any custom fonts installed on your computer, they should show up here so you can use them in your Processing sketch. And if you want some great fonts for free, check out Dafont (http://www.dafont.com/). Almost all of the fonts I’ve added to my computer came from that site, and checking out new fonts is one of the most entertaining ways to waste time.
You’ve already used the Color Selector tool, and now you’re exploring the Create Font tool. Tools are just what their name suggests—things that make your job easier. If you take a look at the Tools menu, you’ll see a couple more tools I haven’t touched on yet (Archive Sketch and Movie Maker). If you have time, I’d suggest checking out all of these built-in tools.
You can also add new tools to Processing by selecting the Add Tool option at the bottom of your Tools menu. This will bring up the Tools Manager, and you can read through and install any tool that you’re interested in. When you add a tool, be sure to read its documentation so you know how to use it! Just click the tool’s name in the Tools Manager window to learn more.
After you select your font, select a size. Font size is an important choice: even though you can change the size of the text in your sketch, you still want a readable font size to start with. Fonts, just like images, get pixelated or grainy if you start out small and blow them up. But if you start out larger than you need, shrinking your font usually doesn’t have the same impact as making it bigger.
Finally, give your new font a name. Just as with images, I tend to give font files simple but descriptive names. If I’m using only one font in my sketch, my personal convention is to name it “font.” (I know, what an exciting life I live.)
Once you’ve named your font file, click OK. The window will close, and if you check your sketch’s data folder (Sketch ![]() View Sketch Folder
View Sketch Folder ![]() Data), you should see a .vlw file with your font name (in my case, font.vlw). If you have a .vlw file, give yourself a pat on the back: you’ve officially created a font!
Data), you should see a .vlw file with your font name (in my case, font.vlw). If you have a .vlw file, give yourself a pat on the back: you’ve officially created a font!
Loading a Font
Now that the shiny new font you’ve created resides in your data folder, bring it into your sketch. First, create a variable to hold your font file. Again, use something simple and descriptive, but don’t use the same name as your font filename, because that could get confusing.
PFont myFont; //create a PFont variable
void setup()
{
myFont = loadFont("font.vlw"); //load your font to
//the variable
}
I created a font variable called myFont with the data type of PFont, and then in the setup() code, I assigned the font.vlw file to myFont using loadFont(). The loadFont() function takes the filename as a string, but be careful when assigning files this way. Processing is really finicky when it comes to spelling errors, incorrect capitalization, and so on. I recommend copying and pasting the filename directly into the function to avoid any errors.
Once you call loadFont(), that’s it! You’ve loaded your font into your sketch; now, it’s project time.
A SIMPLIFIED TYPEWRITER
Most projects, especially data dashboards, rely on text to communicate specific information. In this section, you’ll create a really simple (if a bit janky) typewriter application. I wouldn’t write a book using it, but it’s a fun little project nonetheless. The ultimate goal of the final sketch is to read the keyboard keys being pressed, add each character to a string, and draw that string onto the sketch.
First, open the Create Font tool, create your font (I selected a 14-point Arial font), and load it to your sketch.
PFont myFont;
❶ String myString = "";
void setup()
{
❷ size(800,1100);
background(255);
myFont = loadFont("font.vlw");
}
void draw()
{
❸ textFont(myFont);
}
To ensure your page begins blank, start with an empty string ❶. To make your sketch window feel like a piece of paper, set window size to 800×1100 pixels ❷, which is roughly the same aspect ratio as a sheet of US Letter paper. Your string should stay visible the entire time, so place the background() function in the setup() code as well. I chose a white background, but pick whatever color you like.
After you’re all set up, applying the loaded font to text is just like using any other modifier: you need to place it before the text() function that you want to modify. To change the font, call textFont() and pass it the variable name ❸.
Fetching Letter Keys
Next, tackle the rest of the draw() loop. The keyPressed and key system variables will help you read keypresses within your sketch, and you can check those using an if() statement.
void draw()
{
background(255);
textFont(myFont);
❶ if(keyPressed)
{
❷myString = myString + key;
}
❸ fill(0);
❹ text(myString,10,10,width,height);
}
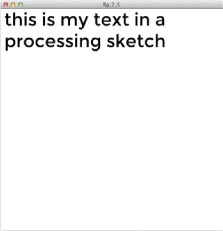
When a key is pressed ❶, concatenate new letters to your string by adding the key variable ❷, which returns the character of the key that was pressed. Then set a fill() color for your text ❸; I’m using black. Finally, display your string using the text() function in the text box mode ❹, which will allow for text wrapping. Click Run and try it out! Some of the text I typed in my final application is shown in Figure 7-5, though I’ve included only part of the sketch window here.
My font size grew because of the size I set in the Create Font tool, but you could also use the textSize() function to bump the size up or shrink it down. If the font seems fuzzy or horribly grainy, I’d recommend re-creating the font at a larger size and replacing the file that you currently have for best results.
FIGURE 7-5: Processing replaces the default font with yours, and now you can type away!
When you’re done marveling at your text, notice that the typewriter actually gets ahead of itself, repeating the same letter multiple times for one keystroke. The characters get added to myString really fast, making it impossible to type anything legibly. Let’s slow the computer down a bit, because it’s reading faster than you can push a key and then pick your finger up.
Useful Delays
The advent of Processing 2.0 brought the incredibly handy delay() function. If you’re familiar with Arduino, you probably know this function and its power all too well, so do a happy dance; I’ll wait.
If you’re completely new to this function, delay() is essentially a stoplight for your computer—a way for you to tell it to wait for a given amount of time before moving on. Just pass it the amount of milliseconds you want it to wait, keeping in mind that 1,000 milliseconds equals 1 second. Try it out!
void draw()
{
background(255);
textFont(myFont);
if(keyPressed)
{
myString = myString + key;
❶ delay(100);
}
fill(0);
text(myString,10,10,width,height);
}
Add the delay right after concatenating the latest keypress ❶ to give a time buffer before Processing grabs the next one. And with that, your typewriter application is finished!
Of course, there are plenty of tools that would work a whole lot better for writing a research paper than this one. But Processing is really useful for communicating information, such as statistical data, in text form. I’ll show you how to do that next.
A DATA DASHBOARD
You can build live text readouts of information using the text() function and raw variable data, and you can have text change when a value changes, too. You can do this with a simple group of if() statements and reassigning of a string.
The readout (or dashboard) that I’ll teach you to make in this section is meant for you to hack and change, and it gives you a good structure to use for the rest of this book. Text, strings, and dashboards will show up more as you progress, so come back to this project whenever you need a refresher. But first, spend some time playing with this simple sketch to get familiar with the order you should place functions in and how they impact what you see.
Fetching Statistics and Setting Up
This clear, concise data dashboard displays three statistics: the time, your mouse coordinates, and which quadrant of the sketch your cursor is in. The code for the dashboard starts with four global variables:
PFont font;
String myString = "";
String location = "";
String dispTime = "";
These global variables include three strings for storing text information and the font variable for the font we want to use. I’ve also named each variable so it’s clear what information each string will hold.
Next, look at this project’s setup() function.
void setup()
{
size(800,800);
font = loadFont("ADAM-48.vlw");
}
This code sets the size of the sketch window and loads the font object with a font called Adam-48, which is one of SparkFun’s standard fonts. You should replace ADAM-48.vlw in your code with a .vlw filename for a font of your choice.
The draw() loop is pretty lengthy, so I’ll explain it in a few subsections.
Indicating Mouse Quadrant
The draw() loop opens with a chain of if() statements that displays text indicating which quadrant of the sketch window the cursor is in.
void draw()
{
background(150,150,0);
if(mouseX <= width/2 && mouseY <= height/2)
{
myString = "UPPER LEFT";
fill(255);
}
if(mouseX >= width/2 && mouseY <= height/2)
{
myString = "UPPER RIGHT";
fill(0,0,255);
}
if(mouseX <= width/2 && mouseY >= height/2)
{
myString = "LOWER LEFT";
fill(0,255,0);
}
if(mouseX >= width/2 && mouseY >= height/2)
{
myString = "LOWER RIGHT"
fill(255,0,0);
}
}
Each if() statement compares the mouseX and mouseY variables to half the sketch width and height, respectively. These comparisons determine which of the four quadrants the mouse cursor lies in. Depending on the cursor position, myString is assigned to one of four quadrant location labels we specify ("UPPER LEFT", "UPPER RIGHT", "LOWER LEFT", or "LOWER RIGHT"). We also define a different fill color depending on quadrant, which will be applied to an ellipse that follows the mouse around.
Next, draw that ellipse immediately after the last if() statement, but before the ending curly brace.
noStroke();
ellipse(mouseX,mouseY,200,200);
Remove the outline of the ellipse with the noStroke() function and pass mouseX and mouseY to the ellipse() function so the shape follows your cursor.
After writing the ellipse code, add modifiers inside the draw() loop to display the text stored in myString on the ellipse.
❶ fill(0);
❷ textFont(font);
textAlign(CENTER);
textSize(25);
text(myString,mouseX,mouseY);
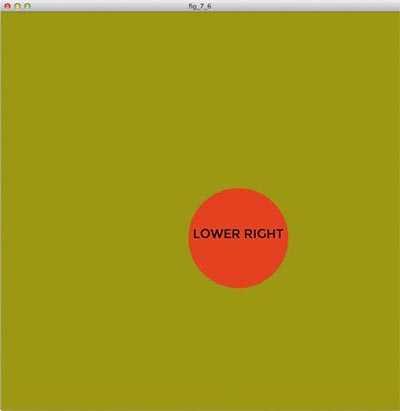
First, set your fill ❶ and font ❷. Then, to center the text on the cursor, pass CENTER to the textAlign() function. If you don’t like the current text size (48 point for this font, which I didn’t want to use), just call the textSize() function to resize it. Finally, display myString with the text() function; pass mouseX and mouseY as the x- and y-coordinates so the text follows your mouse along with the ellipse. Run your code to see the dashboard so far; it should look similar to the sketch window in Figure 7-6.
FIGURE 7-6: The labeled ellipse should follow your cursor and tell you the current quadrant.
You should see a simple but cool sketch that displays text and changes color.
Showing Time and Mouse Coordinates
The last code in this project creates two strings and displays the exact location of your cursor, along with the time. Add this inside your draw() loop:
❶ String location = "Cursor Location: " + mouseX + "," + mouseY;
❷ text(location,width/2,height/2);
String dispTime = "Time-> " + hour() + ":" + minute() + ":" + second();
text(dispTime,width/2,(height/2) + 45);
To concatenate a string to variable data, all you have to do is add them together ❶. For example, the location string adds "Cursor Location", mouseX, ",", and mouseY to form an ordered pair. This allows you to build complicated strings of text and data but keep the text() function clean and simple.
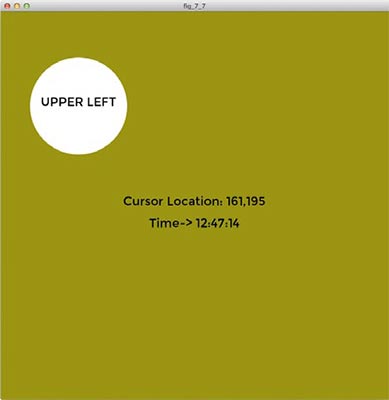
Once you create your data string, just print it out ❷! Follow a similar process to concatenate and display the dispTime string, and then add the final curly brace to end your draw() loop. The final product should look something like Figure 7-7.
FIGURE 7-7: Final dashboard sketch
How would you improve either the typewriter or the dashboard to make it more useful? I suggest coding a way to clear the sketch window in your typewriter (hint: clear it with a mouse click) and adding more information to the dashboard, such as the current date.
As you progress through this book and build your knowledge, I really urge you to tinker with previous projects and incorporate new functions and concepts. For example, to practice using text, you could label the photos in your collage from Project 6 or add a greeting like “Happy Holidays!” to your holiday image from Project 2. Processing is just like any spoken language: the more you use it, the more fluent you’ll be.