
A Tour of the OneNote Workspace
Before you get started with some hands-on practice, first look at the most important components of the OneNote 2010 interface. Figure 3.1 shows the OneNote program window as it appears in the sample notebook that you created in Chapter 1, “Introducing Microsoft OneNote.”
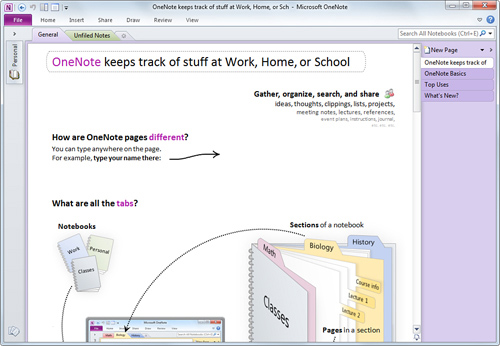
Figure 3.1 The OneNote 2010 program window, the way it appears when you run OneNote for the first time.
The OneNote 2010 interface includes the following main components:
• The ribbon
• The Quick Access Toolbar
• The Backstage View
• The navigation bar
• Section tabs
• The Search box
• Page tabs
• The editing pane
 SHOW ME Media 3.1—A Tour of the OneNote Workspace
Access this video file through your registered Web Edition at my.safaribooksonline.com/9780132182447/media.
Let’s take a closer look at each of these items and what you can do with them.
The Ribbon
If you’re upgrading to OneNote 2010 from a previous version, the most prominent change to the interface is the inclusion of the “ribbon”—a bandlike interface that spans the top of the program window (see Figure 3.2). The ribbon replaces the menus and toolbars from previous versions and makes it easier to find and use the various commands and buttons that let you control the features in OneNote and the content you store in it.
![]()
Figure 3.2 The ribbon in OneNote 2010, as it appears with only its tabs visible in the default view.
The ribbon consists of several tabs (labeled File, Home, Insert, Share, Draw, Review, and View) that you can click to display contextual commands for each of these categories. When you click a ribbon tab, you’ll see several labeled groups within it—each containing one or more commands. For example, on the Home tab, the groups are labeled Clipboard, Basic Text, Styles, Tags, and Mail. Within any of these groups, click any of the buttons representing the commands you want to use.
When you first launch OneNote 2010, the ribbon appears minimized, and only its tabs are visible (see Figure 3.2), allowing for more of your screen space to remain visible while taking or reading notes. This is especially useful if you’re using OneNote on a laptop or netbook computer with a small screen. To use the ribbon in this minimized state, click any ribbon tab to temporarily reveal all of the commands available on that tab. As soon as you click a command, the ribbon hides itself again.
If you work on a desktop computer with a large monitor, or if your laptop computer has a decent sized screen, you can opt to keep the full ribbon visible at all times (see Figure 3.3). To do so, hold down the Ctrl key on your keyboard and then press the F1 key.

Figure 3.3 The ribbon in OneNote 2010, expanded to full view.
Keeping the ribbon always expanded is also a good idea if you’re still new to OneNote and you want to explore and discover features more easily. You can always minimize the ribbon again later, when using the new interface has become second nature to you. To collapse the ribbon again at any time, just use the Ctrl+F1 keyboard shortcut.
Like in other Microsoft Office programs, the ribbon in OneNote 2010 can be fully customized to suit your needs and preferences. For example, you can easily modify and reorder any of the existing tabs, groups, and commands; turn off those that you don’t need; and even create your own custom tabs that contain only the commands you want. You’ll learn more about this in Chapter 12, “Customizing OneNote 2010.”
The Quick Access Toolbar
Near the top-left corner of the OneNote program window is the Quick Access Toolbar (see Figure 3.4). It is a fully customizable area where you can keep shortcuts to the commands you use most frequently. Commands that you place on the Quick Access Toolbar are always visible while you use OneNote, no matter what ribbon tab is displayed.
![]()
Figure 3.4 The Quick Access Toolbar.
When you first start OneNote, the Quick Access Toolbar contains shortcuts to the Back, Undo, Dock to Desktop, and Full Page View commands. You’re not limited to these suggestions, however. Click the small arrow to the right of the toolbar’s last icon to reveal some additional choices that you can toggle on or off—like Print or Print Preview (see Figure 3.5).
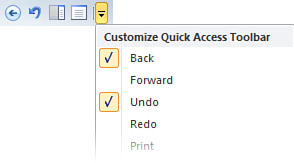
Figure 3.5 The Quick Access Toolbar with expanded customization menu.
If you don’t like any of the available presets or you want to keep some commands handy that aren’t listed, click More Commands on the menu to add virtually any command that’s available in OneNote 2010. Remember, feel free to experiment. You can always turn off or reset commands you’ve added if you change your mind.
The Backstage View
OneNote’s file and notebook management options—including opening, creating, sharing, and printing notebook files—are located in the Backstage View. You can access it by clicking the File tab on the ribbon (see Figure 3.6).
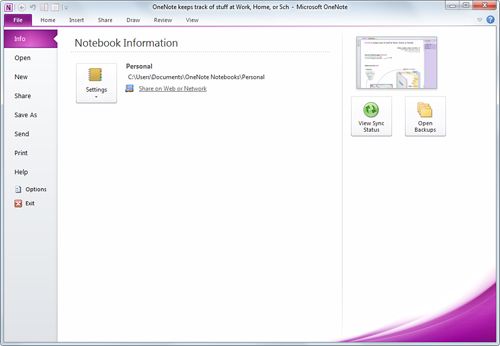
Figure 3.6 The Backstage View, accessible by clicking the File tab.
The Backstage View also provides an entry point for the OneNote Options dialog box, where you can specify many advanced OneNote settings. We’ll cover some of these a bit later in this book.
To close the Backstage View, click the File tab again (or any other tab on the ribbon). You can also press the Esc key to close the Backstage View.
The Navigation Bar
Under the ribbon and docked to the far-left side of the OneNote program window is the navigation bar (see Figure 3.7). This area of the interface provides easy access to all of your notebooks, whether they are stored on your computer’s hard drive, on your company’s or school’s network, or on the Internet.
![]()
Figure 3.7 In its default view, the collapsed navigation bar shows the notebook (or notebooks) that you currently have open.
Like the ribbon, the navigation bar is shown in a collapsed view when you first start OneNote. In this mode, it displays a clickable icon for each notebook that you currently have open. Clicking a notebook icon on the navigation bar will switch to it so you can work with it. You can also drag the notebook icons up and down to rearrange them in your preferred order.
If you expand the navigation bar (see Figure 3.8), the hierarchy of the sections within each of your open notebooks is revealed, making it easier to organize and rearrange notes or to copy or move notes between notebooks.
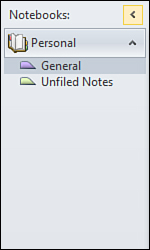
Figure 3.8 When expanded to full view, the navigation bar also shows the sections within each notebook.
When you first begin using OneNote, you’ll probably work with a single notebook. Over time, you may create and use multiple notebooks or use shared notebooks at work or at school to collaborate with others. The first time you open any additional notebook, that notebook is added to the navigation bar so you can quickly switch between all of your open notebooks.
No matter if the navigation bar is expanded or collapsed, you can right-click any notebook icon on the navigation bar to see additional commands.
Section Tabs
The shark fin-like tabs just under the ribbon and near the top center of the OneNote program window are the notebook section tabs (see Figure 3.9). Like a paper-based, five-subject notebook with color tabs that you can label, OneNote notebooks can be divided into sections to keep notes organized based on subject matter, projects, locations, people, or anything else that makes sense to you. Unlike in paper-based notebooks, however, OneNote lets you add a virtually unlimited number of sections. You can just as easily remove or rename them, move or copy them, or change them to a different color whenever you feel like it.
![]()
Figure 3.9 Horizontal tabs let you access and organize the sections in a notebook.
Section tabs can be the target of links you create in your notes, which lets readers quickly jump to a specific section of the notebook, no matter where they are. This functionality lets you create wiki-style notebooks that you can use for training or reference at work, at school, or for your family.
Notebook sections in OneNote can be password protected to protect them from unauthorized access.
You’ll learn more about working with notebook sections in Chapter 4, “Notebooks, Sections, and Pages.”
The Search Box
Searching for information and finding it instantly is where OneNote 2010 really shines. Located just under the ribbon and near the right side of the program window, the Search box (see Figure 3.10) lets you enter a word or phrase for which to search, and OneNote will instantly show you where a result is found—on the current page, in the current section, anywhere in the current notebook, or even across multiple notebooks in different locations.
![]()
Figure 3.10 The Search box gives instant access to any part of your notes.
If you have tagged parts of your notes, you can also search by tag names and make instant lists of the search results. For example, you could search by the note tag that marks action items for you from your meetings at work. By searching on the appropriate note tag, OneNote can compile an instant to-do list for you to make sure that you don’t forget important follow-up tasks.
The Search box also lets you find words or phrases within pictures and images that you’ve inserted into your notes. If you enable audio search, you can even find search results in audio clips that are part of your notebook.
You’ll learn more about searching and tagging notes in Chapter 7, “Organizing and Searching Notes.”
Page Tabs
Located just under the Search box and near the right side of the OneNote program window are the page tabs (see Figure 3.11). This column of tabs changes whenever you click a different section tab in the current notebook. Unlike a paper-based notebook that has a specific amount of pages in a section, each OneNote section can contain a virtually unlimited number of pages. Similarly, each page will never run out of “paper” because you can keep creating more space.
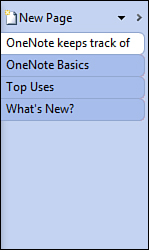
Figure 3.11 Vertical tabs let you access and organize the pages in each section.
To help organize groups of pages logically within the same notebook section, OneNote lets you indent page tabs to visually mark them as “subpages” of a parent page. For example, if you’re using OneNote to plan a garden, your main pages could be labeled with the names of the flowers, plants, and trees you plan to have, and subpages underneath each main page could be your notes about their proper care from the research you’ve collected online.
Like section tabs, page tabs can be the target of links you create in your notes, which lets readers quickly jump to a specific page.
You can apply templates to new notebook pages, either to give them the appearance of a ruled notepad, to apply a decorative background that can function like stationery, or to add useful formlike functionality to pages in your notebook (for example, a to-do list, a calendar, or a message log).
You’ll learn more about working with notebook pages, subpages, and templates in Chapter 4.
The Editing Pane
Smack in the middle of the OneNote program window is the editing pane (see Figure 3.12). It displays the page that is presently selected in the active section of the notebook that you have open, and it functions as a canvas where you can take notes, collect information, insert files or images, record audio and video, format and tag notes, and much more.

Figure 3.12 In the center of the program window is the editing pane, where you can edit the pages in your notebooks.
The top of each page can contain an optional page title and an optional date and time stamp that indicates when the page was first created. The page title is also shown as the title in the corresponding page tab on the right and in the title bar at the top center of the OneNote program window.
You’ll learn more about working with notebook pages in Chapter 4 and more about taking and formatting notes in Chapter 5, “Taking and Formatting Notes.”