
Sharing Notes with Other People
Whenever I mention the sharing capabilities in OneNote 2010 to people who are new to electronic note-taking, I invariably get one of two responses: an immediate nod of approval—or sheer, visible horror.
For those of us who grew up before the Internet was everywhere, the latter reaction is understandable. In the age of social networking, it may well be commonplace to share literally everything, everywhere, all of the time—our thoughts, our current activities, our pictures, our videos, our music. But for many, there was a time when a notebook or journal was considered a very personal thing, no matter what was kept inside.
Before you skip over this chapter and assume the worst, keep in mind that “sharing” in the computer world can mean and imply many different things. In the real world, sharing something typically means that you must give up at least part (or all) of that something so that someone else can possess it or benefit from it. If you give half of your chocolate bar to a friend, you lose that half. If you let a friend borrow a book, you can’t read that book yourself until your friend returns it to you. Similarly, for things not easily duplicated, such as a handwritten note that you might have passed to another student in class, he or she will be the only person to end up with that note. Likewise, if you send someone a handwritten letter in the mail, you’ll no longer have access to the original after it leaves your possession.
The benefits of the electronic equivalents to these examples are immediately obvious. Passing notes in class has been replaced by texting on cell phones. Now, both the sender and the recipient have an instant copy of the original note available to them, and they can even build a “conversation” by sending more notes back and forth. Similarly, sending a letter in an e-mail lets you keep an instant copy of everything in your Sent Items folder, so that you can refer to it again at any time you want or need to.
Taking and sharing notes electronically has similar benefits. If you share your notes pages or an entire notebook with a classmate, you don’t lose the ability to use those notes while your friend is using them, even if you both use them at the same time. You both can benefit from the information, no matter who authored it and no matter who has the original. If you use OneNote for your study group, for example, it’s easy to see how several people can benefit from information that may have originated in just one place. If every student in a shared notebook contributes to a particular page or section, all can benefit from the notebook, which results from the shared effort. In other words, OneNote lets you instantly share your thoughts, ideas, plans, brainstorms, and other collections of information so that both you and others can share the benefit (see Figure 9.1). No matter what you share with OneNote, you always retain your own full use of that information.
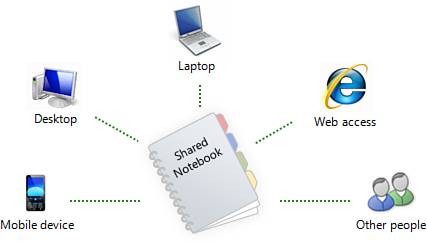
Figure 9.1 This illustration from the OneNote Guide notebook outlines the options you have for sharing a notebook on a variety of devices—either for yourself, for the benefit of others, or both.
If you’re still worried about protecting the privacy of your notes, you can take comfort in the fact that OneNote lets you fully control what you share. The concept of privacy may be evolving, but there’s no question that some types of information will and should always be regarded as sensitive, private, or personal. As you saw in Chapter 8, “Security Features in OneNote,” the password-protection features in OneNote let you apply your own privacy preference to the individual sections in any of your digital notebooks. This level of control remains in place even if you decide to share the rest of your notebook with others—be it colleagues at work, classmates in school, or your friends and family at home. And, as you’ll see later in this chapter, sharing your notes in the cloud lets you apply even more control over who can view and use notes that you share. OneNote 2010 gives you the best of both worlds: protecting your personal information while still enjoying the many benefits of sharing notes.
This chapter first covers how you can share static snapshots of your notes for others, which is a quick way to distribute a copy of your information without giving others access to your source material. An example of this is passing out printed notes to your co-workers or e-mailing the members of your study group a copy of your teacher’s instructions about a homework assignment that you jotted down in class.
Next, this chapter shows you how you can set up and use a shared notebook, either as a way for you to access your notebooks across multiple computers (and, thus, sharing it with yourself) or as a way to collaborate with other people where multiple authors can view and edit the same set of notes.
Finally, this chapter gives you a brief overview of the wonderful OneNote Web App that works together with your free Windows Live SkyDrive account, which lets you instantly share notes online with anyone in the world, including people who don’t have the full version of OneNote 2010.
 SHOW ME Media 9.1—Printing and Publishing Copies of Notes
Access this video file through your registered Web Edition at my.safaribooksonline.com/9780132182447/media.
Printing Your Notes
Although OneNote is designed to help you “go green” by making it easier to cut down on your paper use, there might still be times when you need to print out a page or a set of notes to give to someone. You can print from OneNote 2010 as easily as with any other Office program.
![]() LET ME TRY IT
LET ME TRY IT
Previewing Notes Before Printing
Although OneNote uses a page metaphor to store and organize notes in a section, pages printed from OneNote can appear quite different than they do in traditional page-based documents used by other programs, such as Microsoft Word. In a word processor, the page typically matches that of a piece of paper. In OneNote, however, any single page can technically scroll on forever, depending on how you take notes and organize them.
To give you an idea about how your notes will look when printed out on paper, you can save paper by first previewing any print job.
To preview your notes before printing, do the following:
1. In your notebook, navigate to the page you want to print.
2. Click the File tab, click Print, and then click Print Preview.
3. In the Print Preview and Settings dialog box that opens, inspect the image under the Print Preview heading (see Figure 9.2). Here, you can see how the first page in your printer will be filled by OneNote if you print the current notes page with the settings shown. Underneath the page image, OneNote tells you how many physical pages will be needed to print the current OneNote page.
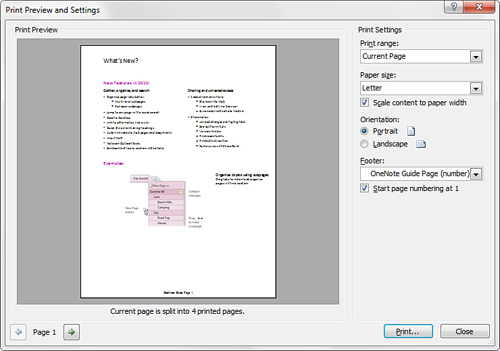
Figure 9.2 The Print Preview dialog box shows you how notes pages will appear when printed to standard size pages on paper. You can cycle through all of the pages here and make any necessary adjustments to the print settings.
4. In the lower-left corner of the dialog box, use the Next Page and Previous Page buttons to cycle through all of the page previews to make sure the notes will be printed the way you want. If necessary, adjust any of the Print Settings on the right side of the dialog box and then re-inspect the previewed pages.
5. If you don’t want to print the previewed pages, click Close to exit Print Preview without printing. Alternately, if the previewed pages look all right to you and you want to print them out, click Print. In the Print dialog box that opens, select your printer, and then click Print.
As it is in other Office programs, using the Print Preview feature in OneNote 2010 is entirely optional.
![]() LET ME TRY IT
LET ME TRY IT
Printing Notes
To print notes without previewing them first, do the following:
1. In your notebook, navigate to the page you want to print.
2. Click the File tab, click Print, and then click Print again.
3. In the Print dialog box that opens, select your printer and then click Print.
Depending on the make and model of your printer, the Print dialog box provides access to additional printing options for your printer. After selecting your printer in the list, click the Preferences button. In the Printing Preferences dialog box that opens, make any selections you want and then click OK.
Although printing notes is a perfectly legitimate and often necessary way of sharing information with others, it can also serve as an unintentional crutch for new OneNote users who are reluctant or hesitant to commit to making the switch to electronic note-taking. If you find that you’re printing out many or most of your notes for yourself instead of others, try to remind yourself of the many advantages electronic note-taking offers over traditional, paper-based notes by reviewing all that you’ve learned so far in this book. Although you can certainly choose to not fully embrace all of what OneNote has to offer, you’ll be cheating yourself out of many of the benefits that come with a life less cluttered with stacks of paper everywhere.
Next, take a look at sharing copies of your notes through a more environmentally friendly way: your e-mail program.
Sharing Notes in E-mail
Perhaps the easiest way to share a copy of any page in your notes is to send it in an e-mail. If you have an e-mail program like Microsoft Outlook 2010 installed on your computer and properly configured, OneNote provides an easy interface for sending notes in e-mail.
If you don’t use Outlook or you use a web-based e-mail service like Hotmail, you can still send and share notes with a few extra steps.
Before getting started with OneNote’s e-mail features, first get up to speed about what’s required.
Requirements for Using E-mail Features in OneNote
Using e-mail integration features in OneNote—such as sending notes in an e-mail message or sending invitations to shared notebooks—requires a copy of Microsoft Outlook 2010 that’s installed and configured on your computer. If you installed OneNote 2010 as part of Microsoft Office Home and Business 2010, Professional, Professional Plus, or Professional Academic, you already have Outlook 2010 available, but you must first properly configure it (see Figure 9.3).
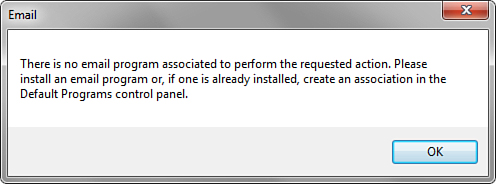
Figure 9.3 If you have Microsoft Outlook 2010 installed on the same computer as OneNote 2010, you can use the e-mail integration features. If you see this error message, it means that you merely installed Outlook, but that you still have to properly configure it with your e-mail account information. After Outlook is configured to send and receive mail, all OneNote/Outlook integration features will be enabled, including e-mail.
If you installed the standalone version of OneNote 2010, or as part of Microsoft Office Home and Student 2010 edition, you’ll need to either purchase Outlook 2010 separately, or you can configure and use another Windows-based e-mail application to use some of OneNote’s e-mail features.
The way OneNote works with your e-mail program also depends on the version of Windows you are using. For example, whereas Windows XP and Windows Vista included basic e-mail clients (see Figure 9.4), Windows 7 no longer offers this feature (see Figure 9.5) because of the ever-increasing popularity of web-based mail programs. If you fall into the latter category, you can still share notes and invite others to shared notebooks by following some additional, manual steps that I’ll provide in context with some of the procedures in this chapter.
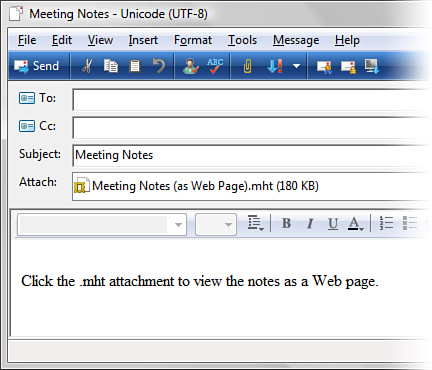
Figure 9.4 If you’re running an older version of Windows, such as Windows Vista (shown here), you can use its integrated Windows Mail client with OneNote. However, note that you’re limited to sending notes as separate web page attachments because older mail clients can’t render OneNote pages like Outlook can. Only Microsoft Outlook 2010 offers the full set of integration features with OneNote 2010.

Figure 9.5 If you have no e-mail program installed on your computer, you might see this dialog box when trying to use OneNote’s e-mail features to send or share notes. To resolve this error, install a program like Microsoft Outlook 2010.
If you don’t use a locally installed e-mail program on your computer because you prefer web-based e-mail like Hotmail, Yahoo! Mail, Gmail, or a similar service, you can’t use the shortcuts to the mail integration features in OneNote (such as the E-mail Page button on the ribbon). However, in most cases, you can go through a few simple steps to achieve the same result. I’ll point these out throughout the rest of this chapter, where applicable.
Sending Notes in an Outlook Message
If you’re using Microsoft Outlook 2010 or a similar e-mail program on your computer, sending a copy of any notes page is as simple as clicking a button on the ribbon.
To send notes in an Outlook message, do the following:
1. In any notebook, click the section that contains the page that you want to send.
2. Navigate to the page you want to send by clicking its page tab.
3. Click the Share tab, and then click E-mail Page.
Outlook 2010 will open a new message and place the contents of the notes page into the body of the message. It will also use the page title and place it into the Subject field of the message, which you can keep or modify as needed.
As long as you have Outlook configured for HTML-based e-mail, notes pages you send from OneNote will be rendered exactly as they appear in your notebook, letting recipients of the e-mail message view the page as if they had access to your notes.
Sending Notes as an Outlook Attachment
If you’re using Outlook 2010 to send notes in e-mail, you can opt to include a copy of a notes page as a file attachment. This is a good option if you’re not sure if the recipient of your message has Outlook 2010 or another HTML-based e-mail program. It is also useful if the recipient has a copy of OneNote 2010 and you want them to be able to view and use your notes page in OneNote instead of e-mail.
If you want OneNote to include page attachments whenever you click the E-mail Page button on the ribbon, do the following:
1. Click the File tab, and then click Options.
2. On the left side of the OneNote Options dialog box that appears, click the Advanced category.
3. On the right side of the dialog box, scroll down to the E-mail Sent from OneNote heading (see Figure 9.6).

Figure 9.6 On the Advanced tab in the OneNote Options dialog box, the top check box lets you tell OneNote to include a file attachment of notes you send in e-mail. This lets the recipient open the copy of the notes in OneNote 2010.
4. Select the Attach a Copy of the Original Notes as a OneNote File check box, and then click OK.
5. In your notebook, click the section that contains the page that you want to send and then navigate to the page by clicking its page tab.
6. Click the Share tab, and then click E-mail Page.
With this option configured, Outlook 2010 opens a new message and places the contents of the notes page into the body of the message, just like before. However, it will now also include a file attachment containing a copy of your original notes page. If your recipient has OneNote 2010 installed on his or her computer, he or she can double-click the attachment and view the notes page in OneNote instead of just in the e-mail message. This is useful when you want someone to review your notes and perhaps send back corrections or additions that you might want to add to your original notes.
If you don’t know if the recipient has Outlook and whether or not he or she will be able to see the message in HTML format, you can use an alternate way to generate an e-mail message that contains both a OneNote file attachment and a copy of the notes in *.mht web page format that the recipient can view in Internet Explorer.
Do the following:
1. Navigate to the page you want to send as an attachment.
2. Click the File tab, click Send, and then click E-mail Page as Attachment.
Outlook 2010 will open a new message and place the contents of the notes page into the body of the message. It will also attach a copy of the page in OneNote format and include a separate copy of the notes as an *.mht file that recipients without Outlook or OneNote can view in Internet Explorer as a web page.
Although it’s a more passive way to collaborate with others, e-mailing notes back and forth is a perfectly acceptable way to share your notes with others without giving them access to your notebook.
The following procedures outline how you can send notes in e-mail when using e-mail programs other than Microsoft Outlook or when using web-based e-mail like Hotmail.
![]() LET ME TRY IT
LET ME TRY IT
Sending a Copy of One or More Pages in an E-mail
When using any e-mail program other than Outlook, you can create a file attachment of one or more OneNote pages, and then attach that file to a new e-mail message.
To send a copy of one or more pages in an e-mail, do the following:
1. In any notebook, click the section that contains the page or pages that you want to send.
2. Navigate to the first page by clicking its page tab. If you want to select additional pages, hold down the Ctrl key on your keyboard, and then click once on the page tab of each additional page that you want to include. Release the Ctrl key when you’ve clicked the tab of the last page to be included.
3. Click the File tab, and then click Save As.
4. Under the heading 1. Save Current, leave Page selected.
5. Under the heading 2. Select Format, click OneNote 2010 Section (*.one).
6. Click Save As.
7. In the Save As dialog box that opens, navigate to the folder on your computer where you want to save the file containing your selected pages, type a descriptive title into the File Name field (for example, Meeting Notes for the Week of April 16th), and then click Save.
8. In your e-mail program, open a new message and then attach the *.one file you created.
When OneNote creates the file containing the pages you selected, it opens the contents of that file in a special display area called Sections Opened During This Session (see Figure 9.7). This lets you quickly verify that all of the pages you wanted were included in the section file you saved.
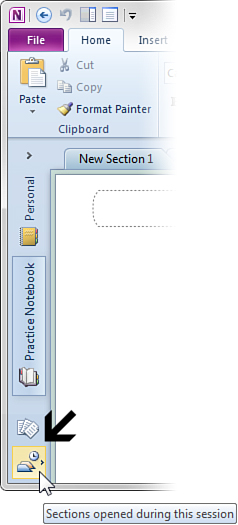
Figure 9.7 The Sections Opened During This Session icon appears at the bottom of the navigation bar after you’ve manually created a file attachment of one or more pages of notes. In this temporary display area, you can review the contents of saved section files that are not part of any notebook.
To return to your original notes, either click the round Back arrow button on the Quick Access Toolbar (see Figure 9.8), or click the icon of the notebook to which you want to return.
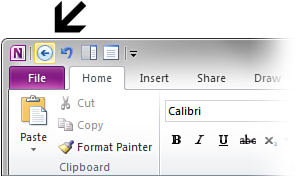
Figure 9.8 On the Quick Access Toolbar, click the Back button to return to your original notes after examining the pages from which you created a file attachment.
![]() LET ME TRY IT
LET ME TRY IT
Sending a Copy of a Section in an E-mail
If you want to send all of the pages in any particular section of your notebook, you can create a file attachment of an entire notebook section, and then attach that section file to a new e-mail message.
To send a copy of a section in an e-mail, do the following:
1. In any notebook, click the section that you want to send.
2. Click the File tab and then click Save As.
3. Under the heading 1. Save Current, click Section.
4. Under the heading 2. Select Format, click OneNote 2010 Section (*.one).
5. Click Save As.
6. In the Save As dialog box that opens, navigate to the folder on your computer where you want to save the file containing your selected pages, type a descriptive title into the File Name field (for example, July Project Notes), and then click Save.
7. In your e-mail program, open a new message, and then attach the *.one file you created.
You can use the preceding steps to send entire sections in Outlook e-mail, too.
![]() LET ME TRY IT
LET ME TRY IT
Sending a Copy of an Entire Notebook in an E-mail
If you want to send all of your notes in a particular notebook, you can create a file attachment of the entire notebook, and then attach that notebook file to a new e-mail message.
To send a copy of an entire notebook in an e-mail, do the following:
1. Navigate to any page in the notebook you want to send.
2. Click the File tab and then click Save As.
3. Under the heading 1. Save Current, click Notebook.
4. Under the heading 2. Select Format, click OneNote Package (*.onepkg).
5. Click Save As.
6. In the Save As dialog box that opens, navigate to the folder on your computer where you want to save the notebook file, type a descriptive title into the File Name field (for example, Robert’s Psychology Class Notebook), and then click Save.
7. In your e-mail program, open a new message, and then attach the *.onepkg file you created.
You can use the preceding steps to send entire notebooks in Outlook e-mail, too.
Publishing Your Notes Online
Because OneNote provides such a flexible canvas for capturing ideas and streams of consciousness, you might want to share copies of your notes electronically with people whom you don’t know or converse with in e-mail. For example, you could use OneNote to draft blog posts and then publish those notes as web pages. Or, you could save your notes in a portable file format so that people can download and read your notes on a variety of computer platforms and devices. Alternately, you can also take your thoughts and ideas that you jot down in OneNote and then send them to Microsoft Word whenever you need to use the information in a more formal document that you’ll share with others.
![]() LET ME TRY IT
LET ME TRY IT
Saving Notes as a Web Page
Sharing your notes as a web page lets people view and read them exactly as they appear in your notebook, even if they don’t have OneNote installed. This is a good option if you have formatted your notes extensively, either for visual appeal or to organize the information on your pages.
To save notes as a web page, do the following:
1. Navigate to the notes that you want to save as a web page.
2. Click the File tab and then click Save As.
3. Under the heading 1. Save Current, choose what you want to include (the current page, the current section and its pages, or the entire notebook you’re currently in).
4. Under the heading 2. Select Format, click Single File Web Page (*.mht).
5. Click Save As.
6. In the Save As dialog box that opens, navigate to the folder on your computer where you want to save the web page containing the notes you selected, type a web page title into the File Name field (for example, My Science Project), and then click Save.
If you now double-click the *.mht file you saved, it will open in Internet Explorer and show you what the notes will look like when you upload the page to your web server or FTP server.
![]() LET ME TRY IT
LET ME TRY IT
Saving Notes as a PDF or XPS File
The best way to preserve page fidelity in portable files that others across different platforms can open and view reliably, no matter what type of computer or device they’re using, is to create a copy of your notes in Adobe’s Portable Document Format (PDF) or in Microsoft’s XML Paper Specification (XPS) format.
Both of these formats are read-only document files that can be viewed, searched, and printed. Of these, Adobe’s PDF file format is perhaps the most widely used in the world.
To save notes as a PDF or XPS file, do the following:
1. Navigate to the notes that you want to save as a portable file.
2. Click the File tab and then click Save As.
3. Under the heading 1. Save Current, choose what you want to include (the current page, the current section and its pages, or the entire notebook you’re currently in).
4. Under the heading 2. Select Format, click either PDF (*.pdf) or XPS (*.xps) to create a file in either format.
6. In the Save As dialog box that opens, navigate to the folder on your computer where you want to save the file containing the notes you selected, type a title into the File Name field (for example, My Research Notes), and then click Save.
You can share PDF and XPS files by attaching them to e-mail messages, by publishing them on your website or blog, or by uploading them to an FTP server so people can download the files.
One benefit of sharing PDF or XPS files on a website or FTP server is that you can overwrite the files with newer versions of your notes at any time so that more recent visitors will receive the most up-to-date information that you’re sharing.
![]() LET ME TRY IT
LET ME TRY IT
Saving Notes as a Microsoft Word File
If you were a dedicated note-taker before OneNote came along, you already know that many thoughts, ideas, plans, and schedules start as a few scribbles on a piece of paper. You took that information and eventually moved it elsewhere to flesh it out more and perhaps prepare it to be read and evaluated by others.
OneNote’s role in giving life to your ideas and plans is no different. Though you can keep, format, organize, and use everything you care about in OneNote, there will likely be many times when you need to present a more formal document to someone, such as your boss or your teacher.
When your notes are taking shape and are ready to be moved into a Microsoft Word document for more advanced formatting and word processing, OneNote provides a direct path to its Microsoft Office counterpart.
To save your notes as a Microsoft Word file, do the following:
1. Navigate to the notes that you want to save as a Word document.
2. Click the File tab, and then click Save As.
3. Under the heading 1. Save Current, choose what you want to include (the current page, or the current section and its pages). Note that you cannot save an entire notebook as a Word document.
4. Under the heading 2. Select Format, click either the Word Document (*.docx) option to save the file in a newer format that can be used by Microsoft Word 2010 and Word 2007, or click the Word 97–2003 Document (*.doc) option to save the file in an older format that can be read by Microsoft Word 97, Word 2000, Word XP, and Word 2003.
5. Click Save As.
6. In the Save As dialog box that opens, navigate to the folder on your computer where you want to save the file containing the notes you selected, type a name into the File Name field (for example, Curriculum Vitae), and then click Save.
Although all of the sharing options I’ve discussed so far in this chapter are effective ways to give others access to information you’ve created or collected, none of these methods provide a way to really collaborate with each other in real time. Let’s proceed to learn about the features in OneNote that make it possible to do just that.
Collaborating with Others in Shared Notebooks
When the first version of OneNote first came onto the scene in 2003, its capabilities were quite limited. Although already a powerful tool for electronic note-taking, OneNote 2003 only let you have a single notebook and that notebook was trapped on your computer’s hard drive. Not at all a bad start for such a revolutionary program, but people soon wanted the ability to do more.
First, they wanted the option to not only view but fully edit their notebook from another computer. Although you could set up a shared folder on a hard drive to accomplish this over a network, the computer had to remain switched on at all times or access to the notebook from elsewhere on the network was lost. A single power outage could quickly defeat such an elaborate setup.
Second, people wanted the ability to give others access to their notebooks so that the latest, newest information would always be seen by all participants in real time, meaning the screen would refresh automatically with new information whenever someone else added a new paragraph of notes, a new picture, or anything else on a page.
When OneNote 2007 was released, it had a feature called Live Sharing Sessions, which was a step in the right direction. Once two or more computers were connected, their users could edit notebooks together and really collaborate on ideas, even if they were a city or an ocean apart. The downside to this feature was the need to futz around with TCP/IP addresses and ad hoc passwords for each participant and session. If used in meetings, a Live Sharing Session could take up a significant amount of set-up time before everyone was connected and ready to go.
As a result, OneNote developers scrapped the Live Sharing Sessions and let the shared notebook features come into full maturity in OneNote 2010. Now it’s finally possible to do everything people want to do when working together with others: Share information in real time, see each other’s changes and updates clearly marked, and retain a complete set of notes that can be viewed and edited even if the connection is temporarily broken for any of the participants (for example, while on an airplane).
OneNote handles all of the updating and synchronizing automatically, letting even groups of authors focus on their thoughts and ideas instead of having technology get in the way of it all.
SHOW ME Media 9.2—Taking Notes Together with Other People
Access this video file through your registered Web Edition at my.safaribooksonline.com/9780132182447/media.
The shared notes features in OneNote 2010 allow you to use your network to create and keep one or more notebooks in a shared location (for example, a personal file share on a file server, or a subweb on a SharePoint site) and then let authorized participants use those notes together in that location.
After a shared notebook is set up, using it is as easy as any other OneNote notebook that you’ve used on your own hard drive. The following section covers some of the less-obvious additional features that are available when you’re in shared mode. If you have access to a file share on the network at your company, your school, or your organization, I encourage you to try out these features to get a real sense of what shared notebooks in OneNote can do.
![]() LET ME TRY IT
LET ME TRY IT
Creating a New Shared Notebook
The best way to get started with a shared notebook is to create a fresh, new notebook in the location to which you and the intended participants (authors) have access.
If you don’t already have a file share on your network in which you can create and change files, contact your Help Desk or system administrator to help you get set up on your network. If your support staff is not yet familiar with OneNote and shared notebooks, simply explain that you need a file share with read/write permissions and then also list the names of your co-workers, faculty, or teachers and students who will need full permissions to this location on the network.
Once you have permission to create and change files on your network, do the following:
1. Click the Share tab.
2. In the Shared Notebook group, click New Shared Notebook. (You can also get here by clicking the File tab, clicking New, and then clicking Network.)
3. Under the heading 1. Store Notebook On, click Network (see Figure 9.9).

Figure 9.9 Creating a new shared notebook is as easy as 1, 2, 3. Decide on a platform, a descriptive name, and the location of your new shared notebook, and then click the Create Notebook button.
4. Under the heading 2. Name, type a meaningful description for the notebook (for example, Team Research Notes). Remember that the notebook name should make sense to all participants.
5. Under the heading 3. Network Location, click Browse and then navigate to the file share on your network where you and the other authors have full access permissions to create, open, and change files. If you’re creating your shared notebook on a SharePoint site, enter the full http:// address of the SharePoint folder where the shared notebook should be created.
6. Click Create Notebook.
7. When prompted to invite others to the notebook via e-mail (see Figure 9.10), click No, Thanks. (I’ll explain why in a moment.)
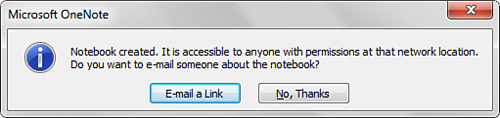
Figure 9.10 This dialog box appears after you create a new shared notebook on your network. You can either generate an invitation e-mail right away or do it later, after you’ve created some content that you want the other participants to see (for example, a welcome page with instructions).
When OneNote creates the shared notebook, it prompts you whether or not you want to invite someone else to your notebook (see Figure 9.10). You can choose to send invitations right away or do it later.
There are some advantages to doing this later, especially if you’re still new to working with shared notebooks, so choose to decline this option for now by clicking No, Thanks. I’ll cover this in more detail under “Inviting Others to Your Shared Notebook” later in this chapter.
When a shared notebook has been created, it is placed as an open notebook icon on the navigation bar, the same way new notebooks on your hard drive appear after you’ve first created or opened them.
While you are connected to a shared notebook on a network, you can leave it open at all times, even when you close OneNote or shut down your computer. Unlike other file-sharing programs, where participants must check files in and out and lock them for editing and require everyone to wait their turn, the beauty of shared notebooks in OneNote is that you’ll never lock the file, even when you’re actively adding new notes to the notebook or changing any of the information that’s already there.
Another benefit of hosting a shared notebook in a file share on your network instead of in a folder on your computer is that others can continue to use the shared notebook, adding and changing information as needed, even when you turn off your computer at night or shut down your laptop computer between meetings. Whenever anyone connects to a shared notebook again by starting OneNote, its pages will be automatically refreshed, so that all participants will always see all of the latest information.
Before we learn more about shared notebook features, let’s first look at how you can convert any notebook that already exists on your computer’s hard drive into a shared notebook.
![]() LET ME TRY IT
LET ME TRY IT
Sharing an Existing Notebook
If you’re already working in a notebook on your hard drive and you’ve already created or collected a significant amount of notes and information and you now want to invite co-workers or class members to co-author in the notebook by adding and managing their own information in the notebook, you can easily promote a normal notebook to a shared notebook.
To share an existing notebook, do the following:
1. Open the notebook on your hard drive that you want to share and then click the Share tab.
2. In the Shared Notebook group, click Share This Notebook. (You can also do this by clicking the File tab and then clicking Share.)
3. Under the heading 1. Select Notebook, make sure the notebook you want to share is selected.
4. Under the heading 2. Share On, select Network.
5. Under the heading 3. Network Location, click Browse and then navigate to the file share on your network where you and the other authors have full access permissions to create, open, and change files. If you want to share your notebook on your shared notebook on a SharePoint site, enter the full http:// address of the SharePoint folder where the notebook should be shared.
6. Click Share Notebook.
7. When OneNote acknowledges that the notebook is now shared at the location you chose (see Figure 9.11), click OK.
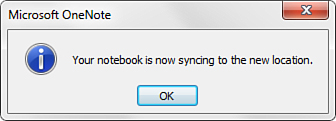
Figure 9.11 When you see this confirmation, a notebook that was previously only accessible by you has been changed to a shared notebook. You’ll also see this confirmation when you change the location or file share path of a shared notebook in the Notebook Properties dialog box.
Adding or Changing Notes in a Shared Notebook
Taking notes in a shared notebook is no different from starting a newly created notebook on your computer’s hard drive: Just click on a page and start typing!
If any other notebook authors are connected to the shared notebook while you’re already typing anywhere in it, your notes will automatically appear on their screens (and theirs on yours) and all notes will be continuously refreshed every few minutes so that everyone can see each other’s latest changes, additions, and deletions.
Even if two or more people are editing the same notes page or even the same paragraph of notes at the same time, OneNote silently manages the split-second differences between the time new information was added and existing information was changed or deleted by someone else to avoid “note collisions.” This clever way of monitoring changes is what makes real-time note-taking in OneNote such a useful thing. Nobody has to worry about the technology; everyone can just focus on their thoughts and ideas.
Inviting Others to Your Shared Notebook
If you followed the steps under “Creating a New Shared Notebook” a little earlier in this chapter, you probably saw the dialog box that appears after a shared notebook has been created (see Figure 9.10). Although clicking the E-mail a Link button in this dialog box is a convenient way to begin sharing a notebook immediately by telling others where to access it, you may want to click the No, Thanks button instead, so you can first add some content to the shared notebook. Generally, it’s best to send shared notebook invitations to others later, after you’ve verified that the shared notebook is accessible by everyone on your team (and on your network) and when you can be sure that the recipients will know what to do with your notebook once they successfully connect to it.
Personally, I always choose to send invitations later, after I’ve added some preliminary structure and content to the shared notebook, which helps the other participants to know in which sections they should add pages and to which pages they can add information. I also tend to include a welcome page that gives authors some instructions about what to do in the notebook and what’s already available, which can be helpful for people who aren’t yet very familiar with shared notebooks or with OneNote (see Figure 9.12).
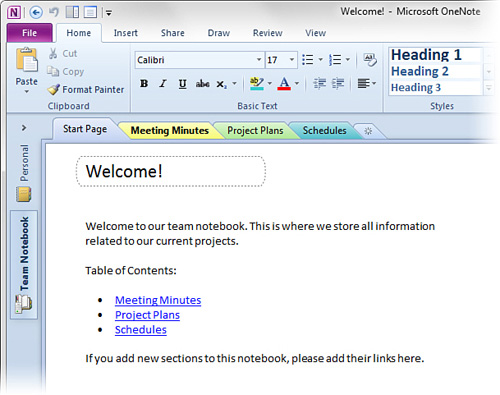
Figure 9.12 In a new shared notebook, consider adding a welcoming message and shortcuts on the first page of the first section that new participants will see when they first open the shared notebook. A simple welcome page like this can take the mystery out of getting started with a shared notebook and help to orient new authors.
You can easily create a welcome page by adding content to the first page in the first section of your shared notebook, which new participants will see when they first connect to your shared notebook. The welcome page could contain a brief welcome message from you that lets others know they’re in the right place and remind them what sorts of information will be stored in the notebook. You could also provide a simple Table of Contents on the page, consisting of clickable links to all of the sections in the notebook. This is especially useful for novice users, who’ll already know how to click text links even if they don’t immediately know to click through the notebook sections. Remember, you can easily create links to specific sections and pages by right-clicking the notebook’s section or page tabs and using the Copy Link To commands on the shortcut menu. See “Navigating Notebook Content with Links” in Chapter 7, “Organizing and Searching Notes,” if you need a refresher about this useful feature.
Once you’ve created the basic section structure of your notebook and customized the first page with a welcome message and other information, you’re ready to let others know about your shared notebook. If you have an e-mail program installed on your computer, you can have OneNote generate the invitation, which you can then send to the other authors.
To invite others to your shared notebook, do the following:
1. Open the shared notebook. If it’s already open on the navigation bar, click its icon there, the same way you would switch to any other notebook that you have open.
2. Click the File tab to open the Info tab in the Backstage View. Here, you see a list of all of your open notebooks.
3. In the list of notebooks, find (and scroll down to, if necessary) the shared notebook you currently have open.
4. Underneath the name and location of the shared notebook, click the Invite People to This Notebook link.
5. On the next screen that is displayed, OneNote will confirm that this notebook is already shared. At the bottom of the text you see here, click the E-mail Others About the Notebook link.
6. OneNote creates a new e-mail message containing the link the recipients of the message can click to automatically open the shared notebook in their copy of OneNote 2010 on their computer. Add the appropriate recipients to the e-mail message and then click Send.
The steps for inviting other participants to a shared notebook are the same for brand-new shared notebooks and for existing notebooks that you decide later to share with others.
If you’ve never shared a notebook before and want to avoid any possible technical problems before sending mail to a large number of people, first send this invitation e-mail to a friend at work who can try out the link to make sure everything works as expected. Networks can be complicated things, and depending on how your company, school, or organization administers and secures it, you might need to first verify that the people you’ll invite to your shared notebook actually have network access to that location. If the test with your friend goes well, you can follow the previous steps to generate a new invitation e-mail for all of the authors.
Synchronizing a Shared Notebook
Shared notebooks are automatically synchronized whenever OneNote detects that you or any other author has made a change to the notebook’s contents. The purpose of synchronization is to let all participating notebook authors continuously see the most recent changes that have been made to the contents, organization, and structure of the shared notebook.
When a shared notebook is synchronized, it appears the same in all locations from which it is accessed. Because shared notebooks are typically updated quite frequently, synchronization attempts can occur each time OneNote detects an addition, a change, or a deletion in the shared notebook. This would be cumbersome to manage manually, which is why this process is entirely automatic in OneNote 2010.
Just like you never have to click a Save button in OneNote while you’re working in your computer-based notebooks, you don’t have to manually synchronize any changes that you’ve made to a shared notebook. Similarly, you won’t need to manually synchronize a shared notebook to see changes made by others. As long as your computer maintains a healthy connection to your shared notebook on your organization’s network or on the Web, you don’t need to take any action to keep your notes in sync.
Notebook synchronization happens quietly in the background, so you won’t need to stop working in the shared notebook during synchronization. If someone else is editing the same page as you, their notes will appear and update on your screen from time to time so you can see their work and they can see yours.
Before you learn about those rare occasions when you might have to take action, it’s important to understand the symbols that can appear over the navigation bar icons of shared notebooks to which you connect (see Figure 9.13).
![]()
Figure 9.13 Similar to the way regular notebook icons appear on the navigation bar as shown here, the icons for shared notebooks let you check the location and status of each of your shared notebooks at a glance.
When you connect to a shared notebook, its navigation bar icon provides continuous clues about the connection and synchronization status of the notebook. Besides indicating the location of a shared notebook, a navigation bar icon can communicate the following four distinct synchronization statuses:
• OneNote is currently synchronizing changes to the shared notebook (see Figure 9.14).
![]()
Figure 9.14 When OneNote is in the process of synchronizing changes to a shared notebook—made by you or by other authors—a green, spinning, double-arrow symbol temporarily appears over the shared notebook icon. (The version on the left is used if your shared notebook is stored on a network. The version on the right is used if it is stored on the Web.) When you see either of these two icons, your shared notebook is functioning properly.
• OneNote has finished synchronizing changes to the shared notebook (see Figure 9.15).
![]()
Figure 9.15 When OneNote has finished synchronizing changes to a shared notebook (made by you or by other authors), no status symbol appears over the shared notebook icon. (The version on the left is used if your shared notebook is stored on a network. The version on the right is used if it is stored on the Web.) When you see either of these two icons, your shared notebook is functioning properly.
• OneNote could not fully synchronize changes to the shared notebook (see Figure 9.16).
![]()
Figure 9.16 When OneNote has attempted to synchronize changes to a shared notebook but encountered one or more errors, a yellow warning symbol appears over the shared notebook icon. (The version on the left is used if your shared notebook is stored on a network. The version on the right is used if it is stored on the Web.) Though some errors can resolve themselves during a future synchronization attempt, you should check the OneNote error log if this warning symbol persists or appears often.
• OneNote cannot connect to the shared notebook (see Figure 9.17) and therefore cannot synchronize any changes.
![]()
Figure 9.17 When OneNote cannot connect (or can no longer connect) to a shared notebook, a red, slashed circle symbol appears over the shared notebook icon. (The version on the left is used if your shared notebook is stored on a network. The version on the right is used if it is stored on the Web.) If your connection was temporarily interrupted for known reasons, these errors can resolve themselves during a future synchronization attempt. However, if this warning persists or appears often, you should check the OneNote error log.
To check errors that a shared notebook may have encountered (see Figures 9.16 and 9.17), you’ll need to check the OneNote error log.
To check the OneNote error log, do the following:
1. Go to any page in the shared notebook that you want to troubleshoot, click the File tab and then click Info.
2. On the far right on this screen, under the thumbnail image of the current page of the notebook you have open, click the View Sync Status button (see Figure 9.18).

Figure 9.18 On the File tab, in the Info screen, clicking the View Sync Status button opens the Shared Notebook Synchronization dialog box where you can view the error log to see what might be keeping your shared notebook from synchronizing or connecting.
3. In the Shared Notebook Synchronization dialog box that appears, make sure that the first option, Sync Automatically Whenever There Are Changes, is selected.
4. Click the Errors tab and look for any symptoms and troubleshooting suggestions (see Figure 9.19).
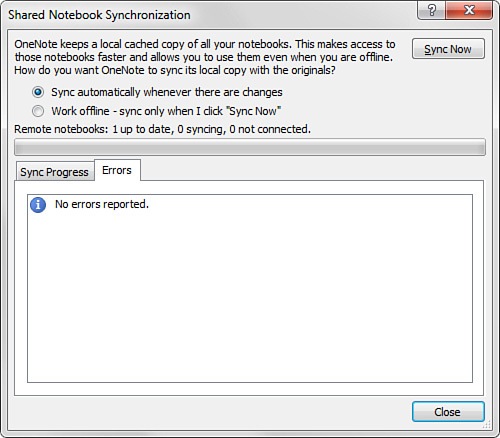
Figure 9.19 Whenever a shared notebook encounters a connection problem or a synchronization error, information about the issue will appear on the Errors tab in the Shared Notebook Synchronization dialog box. Here, you can make sure you’re not accidentally working in offline mode, and you can manually synchronize the shared notebook to try and resolve temporary network congestion.
5. If you suspect the problem was a temporary network congestion issue, click the Sync Now button to try synchronizing the shared notebook again manually. If this does not resolve the problem, try this again later, or contact your Help Desk or network administrator to further troubleshoot the network connection or synchronization issue.
It’s important not to panic if you’re encountering any temporary connection issues with any of your shared notebooks. Networks are complicated and fickle. It’s quite normal for most shared notebooks to run into temporary hiccups now and then. Your changes to shared notebooks that cannot sync aren’t lost; they’re just waiting to be added the next time you can successfully connect. Any unsynchronized changes that you’ve worked on are still stored in the version of the shared notebook that’s on your computer.
If you’re worried or need to urgently share your notes with someone in preparation for a meeting or a presentation, you can always send yourself or others a copy of those notes in an e-mail. If you want to create a quick backup, you can save a copy of your version of the entire notebook as a *.onepkg file (see “Sending a Copy of an Entire Notebook in an E-mail” earlier in this chapter).
Once your connection has been restored, you can let the automatic synchronization take care of getting your notes back on track, or you can copy or move any pages from your backup to the shared notebook.
![]() LET ME TRY IT
LET ME TRY IT
Working Offline in a Shared Notebook
Automatic notebook synchronization happens quietly in the background, so you won’t need to stop working in the shared notebook, even if other authors are adding or changing information in the same notebook at the same time.
If other people are editing the same page as you, their notes will appear and update on your screen from time to time so you can see their work and they can see yours. If you find this distracting or annoying and you’d prefer to think about only your own notes on the current page, you can opt to work offline and have OneNote synchronize your changes later.
To temporarily stop automatic synchronization of your shared notebook, do the following:
1. Right-click the navigation bar icon of the shared notebook you want to stop synchronizing, and then click Notebook Sync Status on the shortcut menu that appears.
2. In the Shared Notebook Synchronization dialog box that appears, click Work Offline—Sync Only When I Click “Sync Now.”
3. Click Close.
While you’re working in offline mode, a red, slashed circle will appear over the notebook’s navigation bar icon (see Figure 9.17). This is to signal you that the connection is temporarily severed and that your changes to the shared notebook will not appear to others until the next time the notebook is synchronized.
To resume normal synchronization of a shared notebook, do the following:
1. Right-click the navigation bar icon of the shared notebook you want to resume synchronizing, and then click Notebook Sync Status on the shortcut menu that appears.
2. In the Shared Notebook Synchronization dialog box that appears, click Sync Automatically Whenever There Are Changes.
3. Click Sync Now.
When the shared notebook has finished synchronizing, click Close.
Now that you’ve learned the basics of notebook synchronization, it’s time to learn more about working with the contents of shared notebooks and the features that are unique to them.
![]() LET ME TRY IT
LET ME TRY IT
Showing or Hiding Author Information
Notes that you yourself have added or changed will look the same as in any other notebook. However, if you want to know which other authors have added information, you can opt to temporarily or permanently display this information by doing the following:
1. While in any section of a notebook, click the Share tab.
2. In the Shared Notebook group, take note of the Hide Authors button (see Figure 9.20). The button appears orange by default, which means that the initials of authors who have added or changed notes on the current page are currently not displayed.
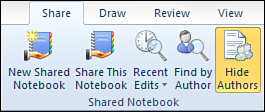
Figure 9.20 To reveal the initials of authors who have added or changed information on pages in a shared notebook, turn off Hide Authors mode by clicking the button on the far right of the Shared Notebook group on the Share tab. When the button no longer appears orange, authors’ initials will be shown in shared notes.
3. To exit the selected Hide Authors mode, click the Hide Authors button. It no longer appears orange and the initials of any page authors are revealed.
4. To view more information about a change made by a particular author, rest the mouse pointer over the initials displayed next to a paragraph of text. You’ll see the author’s full name and the date and time that his or her edits took place.
When you inspect the page now, you may see lines next to paragraphs of notes marked with the initials of any of the other authors (see Figure 9.21). If you see no initials, it either means that no author has edited the page, or that it was you who edited it. (Your own initials are never shown to you, only to others.)
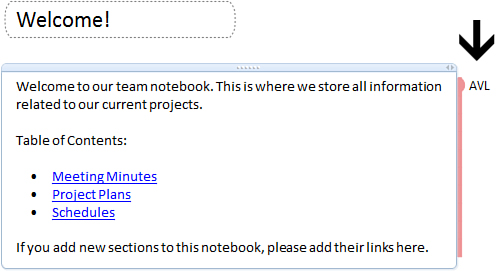
Figure 9.21 When the Hide Authors option is turned off, the initials of shared notebook authors who have made additions or changes to the notebook content will appear next to the locations of their edits. If you rest the mouse pointer over any initials you see, OneNote will display the full name of the author and the date and time of his or her edits.
Author information is useful to be kept visible while you’re editing complex notes and you want to visually keep a separation between the contributions of any of the other people taking notes in the shared notebook.
If you no longer want or need to know which authors contributed which notes, do the following:
1. Click the Share tab.
2. In the Shared Notebook group, click the Hide Authors button. It will once again appear orange, meaning that it is selected and the authoring information is hidden.
Because this book is aimed at beginners, I won’t go into all of the technical details of everything that can occur while taking notes together in the same space. Suffice it to say that even when a rare conflict in editing occurs, OneNote will inform you in plain English what it needs to know from you and how it should handle certain updates. Similarly, there is fail-safe functionality that prevents others from erasing notes you care about, something I’ll briefly touch on in some of the upcoming procedures in this chapter.
Catching Up on Unread Notes
Each new shared notebook created with OneNote will assume that its authors will want a way to easily view what’s been added or changed since the last time the shared notebook was accessed. Such notes are called unread notes.
Catching up on unread notes is useful if you need to carefully review the accuracy or relevance of new notebook content that others have added or changed, or when you’ve been disconnected from the notebook for a time and want to catch up on the newest information. For example, imagine your company has employees in opposite time zones in another country. While you’re sleeping at night, they add new information to the shared notebook. When you come to work the next day and reconnect to the shared notebook, you can quickly review the new notes that were added or changed by your international colleagues by stepping through all of the unread changes. They can do the same with notes that you’ll add during your workday.
To review unread notes in a shared notebook, do the following:
1. Open the shared notebook whose changes you want to view.
2. On the Share tab, in the Unread group, click Next Unread. OneNote switches to the next unread page in the shared notebook. If the Next Unread button is not available, it means that there are no new unread notes or that you’ve reached the last page of unread notes.
3. To mark a page as read, click the Mark as Read button on the ribbon, and then click Mark as Read on the shortcut menu (see Figure 9.22). For a faster way, you can use the Ctrl+Q keyboard shortcut.

Figure 9.22 The shortcut menu that appears when you click the Mark as Read button lets you mark unread pages as read, mark read pages as unread, and mark entire notebooks as read. Here, you can also turn this feature off entirely.
After a page is marked as read, it will no longer be included in the Next Unread cycle. If you want to remind yourself to review a particular page again the next day or the next time you connect to the shared notebook, you can mark a page as unread again by following the preceding steps and clicking Mark as Unread in step 3. You can also use the keyboard shortcut again: Ctrl+Q toggles a page between its read or unread state.
![]() LET ME TRY IT
LET ME TRY IT
Searching Shared Notes by Author
If you don’t want to cycle through all of the pages in a large, shared notebook to see what’s new, you can instead monitor what information was added or changed by a particular notebook author.
To search shared notes by author, do the following:
1. Open the shared notebook whose changes you want to view.
2. On the Share tab, in the Shared Notebook group, click Find by Author.
3. In the Search Results task pane that opens, click the small triangle that appears to the left of an author’s name to view the names of the pages he or she has edited and when those changes were made (see Figure 9.23).
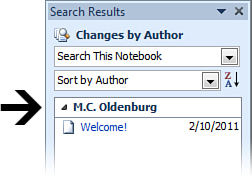
Figure 9.23 When you click the Find by Author button on the Share tab, OneNote displays a special version of the Search Results task pane, which lets you view the pages that each author in a shared notebook added or changed and when. At the top of this task pane, you can also narrow your search scope or choose to display the results by modification date instead.
4. If you need to narrow your search results, use the first drop-down menu near the top of the task pane.
5. If you want to toggle between authors’ names and the modification dates of their notes, use the second drop-down menu near the top of the task pane.
6. To jump to any particular page of notes, click its light blue page title in the search results list.
When you’re done with the Search Results task pane, you can close it by clicking the X in the upper-right corner.
![]() LET ME TRY IT
LET ME TRY IT
Viewing Recent Edits in Shared Notes
Similar to the author search function in the previous steps, OneNote can also quickly create a list of notes that have recently been edited in a shared notebook.
This is useful if you want to narrow your review of new or changed notes by others to a specific span of time. For example, imagine you were on vacation for a week or two. When you return to the office, you can opt to view only the notes that were added or changed in the past 7 or 14 days.
To view recent edits in shared notes, do the following:
1. Open the shared notebook whose changes you want to view.
2. On the Share tab, in the Shared Notebook group, click Recent Edits.
3. From the menu that appears, select the date range you want. Alternately, if you want a complete list of all of the pages in the shared notebook and have them sorted in a list that’s organized by date, click All Pages Sorted by Date.
![]() LET ME TRY IT
LET ME TRY IT
Viewing and Managing Multiple Versions of a Changed Page
OneNote 2010 includes a useful history feature to keep track of changed pages in your shared notebooks. This makes it easy to keep track of notes that shouldn’t have been changed or deleted.
If you use shared notebooks in a creative process, this option also lets you see the thought process of others by reviewing any previous versions of a page and comparing them with the current or final version of the page.
To view previous versions of a page, do the following:
1. Open the shared notebook whose history you want to view.
2. On the Share tab, in the History group, click the small arrow next to the Page Versions button.
3. On the menu that appears, click Page Versions. This option is a toggle that turns the page history display on or off. If any previous versions of pages exist, they will be shown as gray tabs immediately underneath the current version of the pages (see Figure 9.24). Tabs indicating a previous version of a page don’t show the page title but the edit date and author of each version that OneNote remembers.
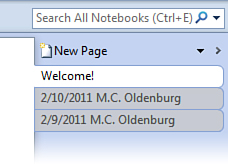
Figure 9.24 The Page History feature lets you compare the most current page in a shared notebook with a prior version that you or someone else previously edited. If older versions of any particular page are available, clicking the Page Versions command makes them appear immediately underneath the current page tab.
To view the contents of an older version of the page, click the page tab with the modification date and author’s name you want. While viewing a previous version of a page, OneNote displays an orange bar under the section tabs and over the top of the page. If you click this bar, a shortcut menu appears that lets you decide what to do with this version of the page (see Figure 9.25).
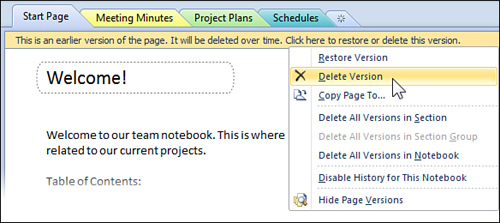
Figure 9.25 When you click any gray page tab to view the previous version of a page it contains, OneNote displays an orange bar over the page to warn you that you’re looking at an older version of the page. Clicking the bar lets you access a similar version of the shortcut menu that appears when you click the Page Versions button on the ribbon. You can use these menu commands to manage your shared notebook’s page history.
The shortcut menu that appears when you click the orange bar is nearly identical to the shortcut menu that appears when you click the arrow next to the Page Versions button on the ribbon. It doesn’t matter where you use a history menu command, but because working with page versions can take greater care and concentration than working with normal pages, you might want to deliberately switch to a specific page version and then use the menu from the orange bar on that page. This way, you can be sure that you’re working with the particular page version that you want to manage.
If, after clicking the orange bar, you click the Restore Version command on the shortcut menu, the older version of the page will be immediately promoted as the current page. The version that was current before you began managing the page history will, in turn, be demoted as the most recent older version of the page. If you do this by accident, remember that you can use the Undo command on the Quick Access Toolbar (or press Ctrl+Z on your keyboard).
If you prefer, you can use the Copy Page To command on the shortcut menu to save the information elsewhere in the shared notebook or in another notebook. This option is useful if you want to save older information in a safe location when you’re not sure if that version should become the most current or final version of the page.
To permanently discard a specific previous version of a page, click its gray tab and then click the orange bar. On the shortcut menu that appears, click Delete Version. Alternately, you can also click Delete All Versions in Section, Delete All Versions in Section Group (if there is a section group in the shared notebook), or Delete All Versions in the Notebook to remove any unwanted page history.
If you want to completely disable the history features in OneNote, click the Disable History for This Notebook command on the shortcut menu that appears when you click the arrow next to the Page Versions button on the ribbon or when you click the orange bar that appears at the top of a previous page version that you’re viewing. Note, however, that disabling the notebook history will also disable the Notebook Recycle Bin, which is described in the following procedure.
![]() LET ME TRY IT
LET ME TRY IT
Viewing the Contents of the Notebook Recycle Bin
If you’ve been using Microsoft Windows for any amount of time, you’re probably well aware of the Recycle Bin that appears on your computer’s desktop. In Windows, the Recycle Bin gives you a last chance to salvage any files that you’ve deleted before they are permanently and irrevocably destroyed.
Similarly, OneNote 2010 employs a Notebook Recycle Bin for shared notebooks, which lets you review and restore important pages or sections that were discarded either by you or by another author working in a shared notebook.
To view and recover deleted sections or pages, do the following:
1. Open the shared notebook for which you want to view the Notebook Recycle Bin.
2. On the Share tab, in the History group, click the small arrow next to the Notebook Recycle Bin button.
3. On the menu that appears, click Notebook Recycle Bin. See Figure 9.26.
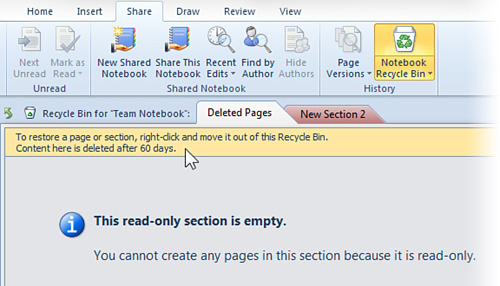
Figure 9.26 When deleting pages or sections from a shared notebook, they’re placed in the Notebook Recycle Bin. Deleted pages appear in the special Deleted Pages section, whereas deleted sections appear next to the Deleted Pages tab. To save, delete, move, or copy any deleted page or sections from the Notebook Recycle Bin, right-click the page or section tab and then make a selection from the shortcut menu that appears.
If you want to empty the Notebook Recycle Bin and permanently discard any pages or sections it contains, click the small arrow next to the Notebook Recycle Bin button on the ribbon, and then click Empty Recycle Bin on the shortcut menu that appears.
The Notebook Recycle Bin is turned on by default, but you can turn this feature off if you don’t want to use it. Click the Disable History for This Notebook command on the shortcut menu that appears when you click the small arrow next to the Notebook Recycle Bin button on the ribbon. Note, however, that disabling the Notebook Recycle Bin will also disable the page history features in OneNote, which is described in a previous part of this chapter.
![]() LET ME TRY IT
LET ME TRY IT
Closing a Shared Notebook
When you no longer need to work in a specific shared notebook, you can close it and thus remove it from your navigation bar.
As with regular notebooks, closing a shared notebook does not delete it, nor does it revoke notebook access from the other authors. It merely removes it from your navigation bar to avoid clutter.
To close a shared notebook, do the following:
1. Before closing a shared notebook, you should synchronize it once more to prevent any final edits you’ve made from getting stuck on your computer. Although this is unlikely to happen, it’s a best practice to manually synchronize notebooks once before you close them.
2. On the navigation bar, right-click the shared notebook you want, and then click Notebook Sync Status on the shortcut menu that appears.
3. In the Shared Notebook Synchronization dialog box that opens, click Sync Now.
4. When the notebook has finished synchronizing, click Close.
5. On the navigation bar, right-click the shared notebook once more, and then click Close This Notebook on the shortcut menu.
Sharing Notes in the OneNote Web App
The free OneNote Web App is one of the cool new features in OneNote 2010. It lets you view and edit OneNote notebooks in a computer-based or mobile web browser. By storing one or more shared notebooks on a free, secure Internet file storage service (or “in the cloud,” as we’re fond of saying these days), you can share your notes across multiple computers, laptops, cell phones, and other devices—no matter where in the world you are.
As with shared notebooks on a regular network, this can be very beneficial when you want to simply access your private notes from anywhere. For example, while you may frequently be out of range of your company’s network, you can easily retain access to your important notes by placing them online and then accessing them in the web browser of your mobile phone.
The OneNote Web App also provides a great solution for sharing specific notebooks with other people—either as a way for them to view your notes from anywhere or for the purpose of collaborating together on shared research and projects. This is very useful when working with people who are outside of your company’s or school’s network (for example, a contractor or contract firm that you’ve hired for temporary work, or a friend in your study group who goes to another school), and it’s also a great way to share your notes with people who don’t yet have the full version of OneNote 2010.
SHOW ME Media 9.3—Sharing Notes on SkyDrive
Access this video file through your registered Web Edition at my.safaribooksonline.com/9780132182447/media.
Naturally, the free OneNote Web App has only a limited set of features compared with the full version of OneNote 2010, but it supports the basics of note-taking and cross-platform sharing, which are typically all you need to stay on the same page when working with others online.
![]() LET ME TRY IT
LET ME TRY IT
Creating a Free Windows Live SkyDrive Account
If you don’t already have a free Windows Live, Hotmail, or Xbox LIVE account, you must create one before you can use the OneNote Web App or any of the other Office 2010 Web Apps.
Signing up is simple and free. Do the following:
1. Type http://www.skydrive.com into your web browser’s Address bar and then press Enter.
2. When the Windows Live SkyDrive home page appears (see Figure 9.27), click the Sign Up button and then follow the steps to create a new account.
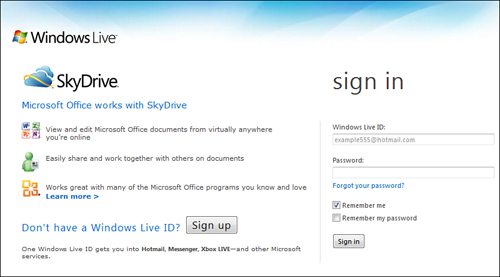
Figure 9.27 SkyDrive is a free file storage service that lets you store your computer files online so that you and anyone you authorize can access them from virtually anywhere. SkyDrive runs on Microsoft’s Windows Live service, so you can either use your existing Hotmail or Windows Live account, or create a new one.
If the screenshot in Figure 9.27 doesn’t precisely match what you see on your screen, don’t worry. Online software and their websites are often updated without notice.
Because all of the customization options on Windows Live and its various services (Hotmail, Messenger, etc.) are entirely optional, I won’t cover any of them in this book. Feel free to nose around a bit and set any preferences about your Windows Live experience that you might have.
At the time this book was written, a free SkyDrive account included a generous 25GB of storage for all of your files, including shared notebooks. As is the custom for most online storage providers, Microsoft may adjust this allowance over time, so be sure to check your Windows Live account now and then for any important announcements about the service.
Files you store on SkyDrive work in a similar fashion as they would on your computer’s hard drive. For example, although you can use OneNote 2010 to create a notebook on SkyDrive, you can also do so right in SkyDrive and then simply open that notebook in OneNote 2010.
Remember that the Office Web Apps on SkyDrive have limited functionality compared with the full versions of OneNote 2010, Word 2010, PowerPoint 2010, and Excel 2010. For this reason, I typically recommend creating new shared notebooks on SkyDrive from within OneNote 2010 so you can learn the interface properly. If you later prefer to do all of your shared notes housekeeping from your SkyDrive home page, that choice is entirely yours.
![]() LET ME TRY IT
LET ME TRY IT
Creating a SkyDrive-Based Shared Notebook
Until you become familiar with how OneNote 2010 on your computer and your SkyDrive account interact with each other, I recommend using the OneNote 2010 interface to create and maintain your shared notebooks and staying signed in to your SkyDrive home page in your web browser so you can see how your files show up.
Let’s first create a brand-new notebook on SkyDrive. This is actually a pretty simple undertaking, but I’ll break this procedure into a few more steps to give you some context along the way about what’s happening.
Follow these steps:
1. In OneNote 2010, click the Share tab. In the Shared Notebook group, click New Shared Notebook. (You can also get here by clicking the File tab and then clicking New.)
2. Under the heading 1. Store Notebook On, click Web.
3. Under the heading 2. Name, type a meaningful description for the notebook (for example, Holiday Travel Planning). Remember that the name of the notebook should make sense to all participants if you plan on sharing this notebook with other people.
4. Under the heading 3. Web Location, click the Sign In button and then either sign in with your Windows Live, Hotmail, or Xbox LIVE account (see Figure 9.28). Depending on the speed of your Internet connection, you might see a progress indicator for several seconds while OneNote 2010 establishes a secure connection to the SkyDrive servers (see Figure 9.29).
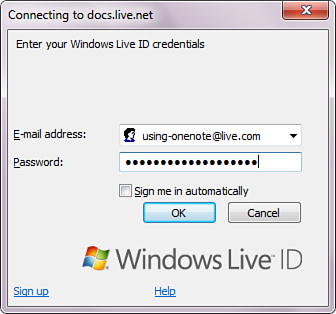
Figure 9.28 When you click the Sign In button during the web notebook creation process in OneNote 2010, you’ll be prompted to enter your Windows Live account credentials. If you don’t want to see this screen every day, click the Sign Me In Automatically check box before clicking OK.

Figure 9.29 A progress bar might appear briefly while OneNote 2010 establishes a secure connection with the SkyDrive server over the Internet. If you see this indicator for a long time, verify that you’re still connected to the Internet.
5. When you’re successfully signed in, your default SkyDrive folder (My Documents) will appear with an orange highlight under the 3. Web Location heading (see Figure 9.30). The orange color means that this SkyDrive folder is selected and, if you proceed, the notebook will be created here. Because we’ll want to later share this particular notebook with other people, let’s create a new folder whose permissions you can manage separately from your personal My Documents folder. To do so, click the New Shared Folder button (see Figure 9.30).
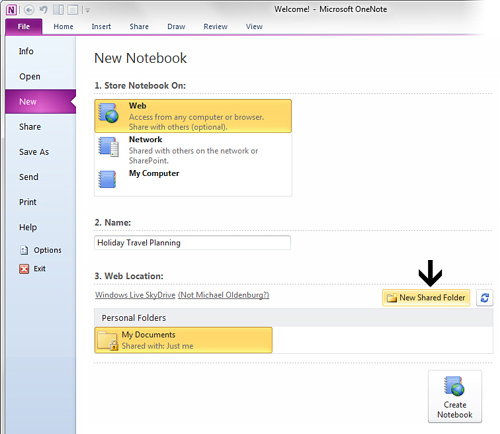
Figure 9.30 Once you’re signed in to your SkyDrive account, your name and your personal folders will appear under the Web Location heading. It’s best to keep all of your notebooks that you plan to share with other people in a separate, new folder. To create this new folder, click the New Shared Folder button.
6. OneNote 2010 switches to SkyDrive in your web browser and displays the Create a Folder interface. In the Name field, type a meaningful name for the new folder (for example, My Shared Notebooks), and then click Next (see Figure 9.31).
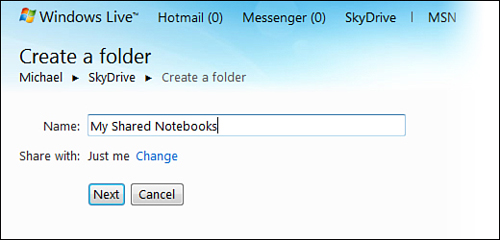
Figure 9.31 When OneNote 2010 switches to the SkyDrive interface to create a new folder to which you can later apply specific permissions for other people, type a folder description into the Name field and then click Next. When the folder has been created on SkyDrive, return to OneNote 2010 to finish creating a new shared notebook in this folder.
7. When the folder has been created on SkyDrive, it will appear empty. Switch back to OneNote 2010. (If necessary, click the File tab and then click New to return to the place you were at.) Here, you might see a prompt to refresh your shared folder list. Click the Refresh button if it appears (see Figure 9.32). Even if you’re not prompted to do so, refreshing your SkyDrive contents in OneNote 2010 before working with the files in any of your folders is a good habit to get into.
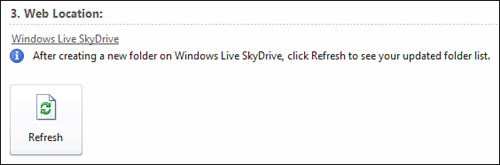
Figure 9.32 Whenever OneNote 2010 detects that the SkyDrive folder list has changed, it might prompt you to refresh the folder display in the Backstage View (to return here, click the File tab and then click New). Click the Refresh button to display any folders that you’ve created or modified on SkyDrive.
8. In the refreshed folders list, click the new My Shared Notebooks folder (see Figure 9.33). This is where you’ll create the new notebook. OneNote confirms your selection by highlighting the folder in orange.

Figure 9.33 When you’ve refreshed your Personal Folders list in OneNote 2010, click to select the new My Shared Notebooks folder that you created. It will appear highlighted in orange to let you know it has been selected. If you need to refresh your folders list at any time, click the small button with the two blue arrows. When you’re ready to create the new notebook in the selected folder, click the Create Notebook button.
9. Click Create Notebook to create the new notebook in the selected SkyDrive folder.
10. When prompted to invite others to the notebook via e-mail (see Figure 9.10 earlier in this chapter), click No, Thanks. You can invite others to the notebook later, when you have set the appropriate notebook permissions and have created the basic notebook structure.
After the new notebook has been created on SkyDrive, it will be displayed in OneNote 2010 the same way as any other notebook or shared notebook you create, with one exception: The SkyDrive notebook’s icon on the navigation bar reminds you that you’re working in a web-based notebook by placing a globe symbol (for World Wide Web) over the notebook icon (see Figure 9.34). For a reminder about the other clues that shared notebook icons on the navigation bar can indicate, refer back to “Synchronizing a Shared Notebook,” earlier in this chapter.
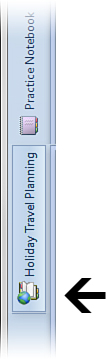
Figure 9.34 When a globe symbol (for World Wide Web) appears over a notebook icon, it means that notebook is shared on a web server such as SkyDrive. As with normal shared notebooks on your network, you generally don’t need to do anything to keep a SkyDrive notebook in sync. If a red, slashed circle appears over the icon, it means your connection has been broken. See “Synchronizing a Shared Notebook” earlier in this chapter to learn more about shared notebook icons and the actions they suggest.
Although a SkyDrive-based notebook will always be referred to as a “shared notebook,” this does not mean that other people can necessarily see it. In the previous procedure, when you created the new Shared Notebooks folder, you saw that I didn’t have you change the access permissions. I did this on purpose for two reasons.
For one, it’s important that you understand the difference between a shared notebook, where shared indicates that you can share the information it contains with yourself from various points of access, such as OneNote 2010 on your desktop computer, the OneNote Web App on your laptop, and even from your cell phone in OneNote Mobile (more about that in Chapter 11, “Using OneNote on Your Mobile Phone”). In this scenario, the notebook isn’t shared with other people and your information is secure and kept confidential.
The second reason we didn’t set access permissions for the Shared Notebooks folder you created on SkyDrive is because I want you to know how to do this after the fact. As I mentioned earlier in this chapter (in the section “Creating a New Shared Notebook”), it’s a good idea to first set up the new notebook’s sections structure before inviting other authors to view and edit your shared notebook. You can even include a brief welcome page with instructions about how others should use, navigate, and add information to the notebook. This provides useful guidance to people who aren’t yet very familiar with the OneNote Web App or with shared notebooks in OneNote 2010.
Although there’s no reason not to use your full version of OneNote 2010 to view and edit your shared notebooks on SkyDrive, let’s take a look at how you can open such notebooks in a web browser with the OneNote Web App. This will also show you how your notes might appear slightly differently than they do in the full version of OneNote and how other people might see those notes.
Opening a SkyDrive Notebook in the OneNote Web App
The simplest way to open a shared notebook in the OneNote Web App is to log into your SkyDrive account and then open the notebook from within the online folder in which it is stored.
To open a notebook, do the following:
1. In your web browser, open http://www.skydrive.com and sign into your Windows Live account, if necessary.
2. Under My Files, click the folder that contains the shared notebook you want to open. To stay with our previous example, click the folder called My Shared Notebooks.
3. When the contents of the My Shared Notebooks folder are displayed, click the OneNote icon of the notebook you want to open. (In this case, click the notebook called Holiday Travel Planning.)
4. OneNote opens the notebook in the OneNote Web App in your web browser (see Figure 9.35).
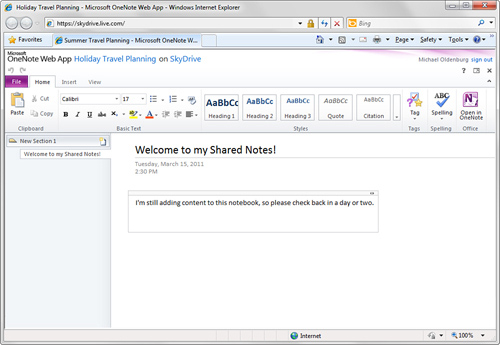
Figure 9.35 When you open a shared notebook in the OneNote Web App, it resembles what you see in the full version of OneNote 2010. The page tabs appear on the left side to simulate an expanded navigation bar, showing the structure of your notebook. The commands that are available on the ribbon indicate the OneNote 2010 features that the Web App supports. If in doubt, right-click items for additional options (for example, page and section tabs). If you make a mistake while exploring by clicking commands and icons, click the Undo button over the File tab.
When you’re done viewing or editing your shared notebook in the OneNote Web App, you can return to the SkyDrive home screen by clicking the blue SkyDrive text link over the Web App ribbon near the top of your browser screen.
If you want to quickly view or edit a SkyDrive-based shared notebook in the OneNote Web App (for example, to make sure that new content you’ve added to the notebook with OneNote 2010 shows up as you expect it to), you can copy and paste the direct link to the notebook by doing the following:
1. In OneNote 2010, click the File tab and then click Info.
2. In your list of notebooks, look for the title of your shared notebook on SkyDrive (Holiday Travel Planning).
3. Move the mouse pointer over the URL shown under the notebook name and then click the left mouse button once to select the text (see Figure 9.36).
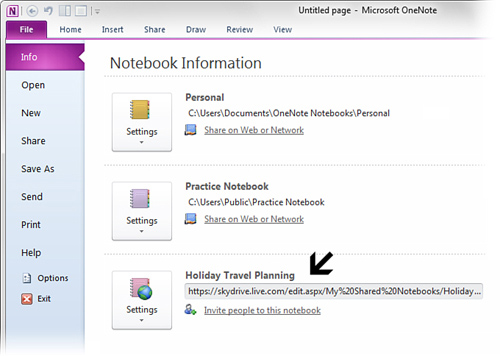
Figure 9.36 Although you can click the Invite People to This Notebook link underneath the name of a shared notebook, the URL shown under the title of a SkyDrive notebook can be copied and pasted into your web browser if you want to quickly view or edit this notebook in the OneNote Web App.
4. When the URL turns blue to confirm that it has been selected, press Ctrl+C on your keyboard to copy the address.
5. Switch to your web browser, click in its Address box, and then press Ctrl+V to paste the copied URL.
6. Press Enter to open the shared notebook in the OneNote Web App.
Allowing Others to View or Edit Your SkyDrive Notebook
When you’ve created a basic notebook structure of sections and pages in your shared notebook and have perhaps added some welcome text or instructions for others, you can assign specific permissions to let others view or edit the shared notebook.
Do the following:
1. While signed in to your Windows Live account, go to http://www.skydrive.com.
2. When your list of folders appears, click the folder whose permissions you want to change.
3. When the contents of the folder appear, click the Edit Permissions link in the navigation bar on the far right of the screen (see Figure 9.37).
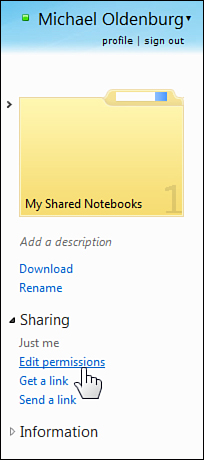
Figure 9.37 As you navigate through your files and folders on SkyDrive, keep an eye on the contextual navigation bar near the right side of your screen. Here, you can look up and change things about your selected folder or file.
4. When Windows Live displays the Edit Permissions screen (see Figure 9.37), click and drag the vertical slider upward to select the group of people for whom you want to set permissions. The higher you go, the more people can potentially see or use your files.
5. Next to each level of access that you’ve included, click the drop-down menu to set the specific level of authorization. This lets you specify whether you want certain people to only view your notebooks in a web browser without the ability to edit your notes, or if you want to give them full author’s rights.
6. To set permissions for specific people, either click the Select From Your Contact List link or enter single e-mail addresses one at a time and then press Enter to add them to the permissions list.
7. When the permissions have been set to your liking, click Save. If you don’t click the Save button before leaving this screen, your settings will not take effect.
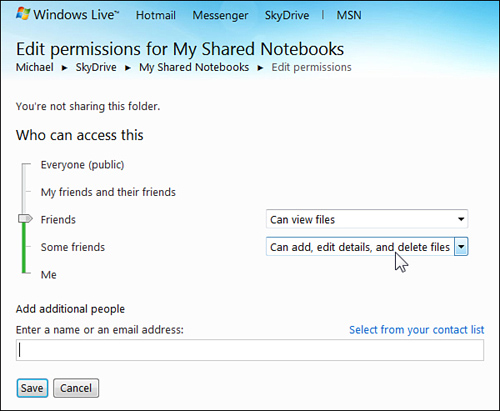
Figure 9.38 By clicking and dragging the slider to the appropriate position and then selecting the level of access for the people on your Windows Live friend list, you can control who can see or use the files in the selected SkyDrive folder. You can also select specific people from your Windows Live contact list by clicking the blue link in the lower right or entering the e-mail addresses of people you want to authorize to view and use your files.
Remember to check the permissions list for your SkyDrive folders now and then, especially as you add more and more files to the same folders and the information (and perhaps the intended level of sensitivity) in your notebooks changes over time. The security of your personal files on SkyDrive is only as strong as your password. A strong password includes a mix of numbers and letters, a mix of uppercase and lowercase letters, and a symbol or two (such as a dash or underscore).
After you’ve set the permissions for your My Shared Notebooks folder (or any other SkyDrive folder you want), you can invite people to access your shared notebook. If you have Microsoft Outlook 2010 or another e-mail program installed, OneNote can generate the invitation e-mail message for you.
To invite people to access your shared notebook, do the following:
1. In OneNote 2010, click the File tab and then click Info.
2. Next to any listed notebook whose Settings button shows a globe symbol over the notebook icon, click the Invite People to This Notebook link (see Figure 9.36) and then send the e-mail message to the people with whom you want to share your notebook.
3. If you don’t have Outlook 2010 or another e-mail program installed or properly configured, or if you use a web-based e-mail program, select the https:// link shown under the notebook title by clicking it once.
4. Press Ctrl+C to copy the link, switch to a new e-mail message, and then press Ctrl+V to paste the link into your message.
If you’re away from the computer that has the full version of OneNote 2010 installed, you can still invite others to your shared notebook on SkyDrive by doing the following:
1. In your web browser, open http://www.skydrive.com.
2. Navigate to the SkyDrive folder in which the shared notebook is stored.
3. Near the far right side of the screen, click Get a Link.
4. On the Get a Link screen, press Copy above the link that SkyDrive provides for you.
5. Create a new e-mail message in Hotmail or whichever program or service you’re using, and then press Ctrl+V to paste the copied link to the shared notebook folder you want the mail recipient to know about.
![]() LET ME TRY IT
LET ME TRY IT
Downloading a Copy of Your SkyDrive Notebook
If you want to download a copy of any notebook currently stored on SkyDrive, you can do so from the notebook list in the SkyDrive folder that the notebook is stored in.
Do the following:
1. In your web browser, open http://www.skydrive.com.
2. Navigate to the SkyDrive folder in which the shared notebook is stored.
3. Move the mouse pointer over the notebook you want to download. When a round “i” icon appears at the far right, click this icon to display a Download link in the navigation bar on the far right side of your browser.
4. Click the Download link and then, when the File Download dialog box appears, click Save.
Saving a Zip file of your SkyDrive notebooks provides an easy way for you to make manual backups of your notes on occasion. This is especially useful after you or one of the other authors has made significant additions or changes to a notebook. Although the OneNote Web App supports the Page History feature previously covered for the full version of OneNote 2010, sometimes it might just be easier to create a quick manual backup file.
Another use for saving a SkyDrive notebook as a Zip file is that you can quickly share this file with others who don’t have access to your SkyDrive folder but who still want or need to see the information in the notebook. Although sharing a notebook in this way does not keep its information up-to-date with what’s online, this lets you share a snapshot of a set of notes without the need to add that person or a group of people to your SkyDrive folder permissions list.
![]() LET ME TRY IT
LET ME TRY IT
Deleting a SkyDrive Notebook
To delete a notebook from SkyDrive, do the following:
1. In your web browser, open http://www.skydrive.com.
2. Navigate to the SkyDrive folder in which the shared notebook is stored.
3. Move the mouse pointer over the notebook you want to delete. When a round “i” icon appears at the far right, click this icon to display a Delete link in the navigation bar on the far right side of your browser. (Note that if you don’t first select a notebook to delete by clicking the “i” icon, clicking the Delete link that appears in the right navigation bar of the current folder deletes the entire folder.)
4. Carefully heed the warning that appears. If you haven’t yet warned the other authors that you’re deleting the notebook, click Cancel. If you’re absolutely certain that you don’t care about the information in the selected shared notebook, click OK to permanently erase the notebook.
Displaying Content from Features Not Supported by the OneNote Web App
SkyDrive and your Windows Live account have a lot of other tricks up their sleeves, so be sure to explore all of the tools that are available to you while you are logged into the service.
Before concluding this chapter, I did want to reiterate something I previously mentioned. Although the OneNote Web App is a wonderful way to view and edit your shared notebooks on the Web from anywhere in the world, browser-based clients typically offer only a subset of features compared with their full desktop versions. OneNote is no exception. The full OneNote 2010 desktop client is the only version that contains every feature that OneNote has to offer.
If you use the OneNote Web App to view and edit a notebook that was originally created with the full version of OneNote 2010, some of its pages might contain content that the OneNote Web App cannot display. Examples of such content include handwriting from a Tablet PC, drawing objects, and custom formatting.
When such pages are viewed in the OneNote Web App, it will warn you with an orange alert message over the top of the page (see Figure 9.39) that it cannot show you all of the page content.
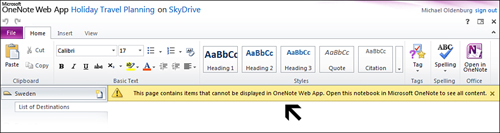
Figure 9.39 When using the OneNote Web App to view notebook pages originally created in the full version of OneNote 2010, a warning will appear at the top of any page that contains objects or content that the Web App can’t understand or display, such as handwriting or drawing objects. If you must see the complete version of the page, click the Open in OneNote button on the Web App ribbon.
In Chapter 11, you’ll learn how you can access your SkyDrive notebooks with the OneNote Mobile apps that are available for Windows Phone 7 and the iPhone—or from mobile browsers on other cell phones and devices.
Though nothing matches the full functionality of OneNote 2010 on your computer, keeping your notes on SkyDrive gives you the most flexibility in accessing, searching, and using your information from virtually anywhere in the world, no matter if you’re merely sharing your notes across devices with yourself or if you’re sharing them with other people.