
Collecting and Researching Information
Although it’s perfectly all right to use Microsoft OneNote strictly as a note-taking tool, you’ll be missing out if you do. That’s because OneNote offers some really great features that let you use your electronic notebook as a living repository for all kinds of information that you collect over time and from various sources (see Figure 6.1).
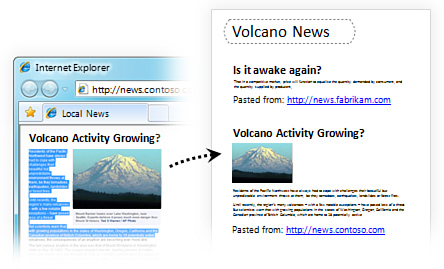
Figure 6.1 It’s easy to bring information into OneNote from other files and programs.
No matter if you use OneNote at home, work, or school, think of a OneNote notebook as a limitless scrapbook in which you can collect, paste, and save everything that interests you. If you’re not into the idea of scrapbooking, think of your electronic notebook as your virtual junk drawer—or a never-ending bookshelf—that can hold everything you’ll eventually need to find again, no matter if the contents relate to each other or not. You don’t have to keep things organized if you don’t want to, and your notebook will neither run out of space nor take up a lot of it.
OneNote is also great when you’re collecting information for specific research, no matter if you’re looking to make travel plans, pricing a new purchase, or gathering facts for a work project or a school paper.
In this chapter, we’ll take a closer look at some of the features that make it easy for you to supplement your own typed or handwritten notes with information from other sources—be it from computer files and documents, images and multimedia files, information from the Web, or scans and digital printouts. We’ll also take a quick look at the built-in research tools that Microsoft has included with OneNote 2010.
Meet the OneNote Screen Clipper and Launcher
Before getting started with examples of using OneNote 2010 for collecting information and doing research, I want to first take a moment to draw your attention to a small and often overlooked component of OneNote 2010—the OneNote Screen Clipper and Launcher, which unlocks additional functionality that can make using OneNote on your computer even more convenient.
The Screen Clipper and Launcher is a tiny program that loads itself when your computer starts up and stays in memory until you turn your computer off again. Keeping it enabled lets you:
• Launch the full OneNote 2010 program with a keyboard shortcut instead of hunting down and double-clicking its program icon.
• Create so-called “side notes,” which are an electronic version of the yellow sticky notes that might be plastered all over your computer monitor right now.
• Use a hotkey to bypass the user interface for creating instant screen clippings.
• Record new audio clips in your notes without first having to start OneNote.
 SHOW ME Media 6.1—Using the OneNote Screen Clipper and Launcher
Access this video file through your registered Web Edition at my.safaribooksonline.com/9780132182447/media.
This small but useful program is often overlooked for two main reasons. For one, it’s placed in the Windows Startup folder on your computer when OneNote 2010 is first installed (see Figure 6.2). Over the past few years, many computer users have gotten in the habit of clearing the contents of their Startup folder in an effort to save every last bit of available memory. I can understand this quite well. It seems that just about every other program that you install these days leaves a little icon near the clock display on the right side of the Windows taskbar. Most of these icons take up both space and memory without any real benefit. Up until the most recent versions of Windows, which hide these icons after a time, it wasn’t uncommon for a typical computer user to see a cluttered row of some 10–20 icons on the Windows taskbar.
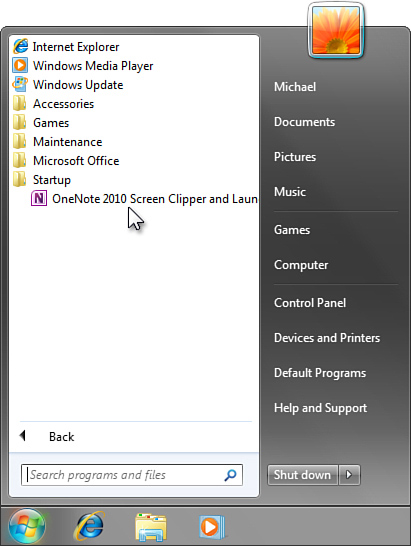
Figure 6.2 After the very first time you’ve started Microsoft OneNote 2010 on your computer, the OneNote 2010 Screen Clipper and Launcher is placed into the Startup folder in Windows.
Personally, I’m all for disabling any unnecessary apps and useless add-ins to help keep your computer running smoothly. However, I do recommend keeping the OneNote Screen Clipper and Launcher available, especially if you come to appreciate the functionality that it provides.
Another reason why the OneNote Screen Clipper and Launcher is often overlooked even when it’s running is due to a design change in the way taskbar icons are displayed in the most recent versions of Windows, including Windows 7 and Windows Vista. To eliminate the clutter of icons that can accumulate over time as you install more and more programs, Windows eventually begins to hide the icons that install themselves in the notification area on the Windows taskbar.
Although I personally love this feature in Windows 7, it means that I must manually unhide any icons of the programs that actually offer some functionality by staying in the background, such as the OneNote Screen Clipper and Launcher.
Before you can enjoy the benefits of keeping the OneNote Screen Clipper and Launcher running in the background, take a moment to check whether it is loading properly on your computer and learn how to unhide its icon in the Windows taskbar notification area.
![]() LET ME TRY IT
LET ME TRY IT
Turning the Screen Clipper and Launcher On or Off
To check whether the OneNote Screen Clipper and Launcher is loading on startup, follow these steps:
1. Click the Windows Start button, click All Programs, and then click the Startup folder.
2. Look for a purple OneNote icon labeled OneNote 2010 Screen Clipper and Launcher (see Figure 6.2).
If the icon is there, it means that the OneNote Screen Clipper and Launcher program is loaded automatically each time you start Windows.
If you (or someone else who uses your computer) disabled the startup program for some reason, you can reenable it by following these steps:
1. In OneNote, click the File tab and then click Options.
2. In the Options dialog box that opens, click Display in the left column.
3. On the right side, select the check box that’s labeled Place OneNote Icon in the Notification Area of the Taskbar.
4. Click OK to save changes.
If the Screen Clipper and Launcher icon was shown in your Startup folder and if the display check box in the OneNote Options dialog box is selected, but you can’t see a small OneNote icon near the right side of your Windows taskbar, it means Windows has hidden it from view to avoid taskbar clutter.
Take a moment now to unhide the icon so you’ll have easy access to the features that you’ll learn about in the rest of this chapter.
![]() LET ME TRY IT
LET ME TRY IT
Keeping the Screen Clipper and Launcher Permanently Displayed
If you’re running any edition of Windows 7, you can easily turn on and off the icons of any programs that are running in the background—including the OneNote Screen Clipper and Launcher.
Here’s how:
1. On the Windows 7 taskbar, click the small, upward-facing arrow near the clock display in the lower-right corner of your screen. In the little pop-up menu that appears, you’ll see a small version of the OneNote icon, plus any other icons of programs hidden from view.
2. Click Customize (see Figure 6.3).
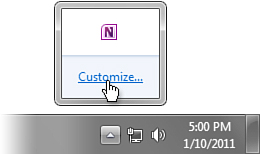
Figure 6.3 Clicking the Customize link in the Show hidden icons menu opens the display options for your notification area icons.
3. In the Notification Area Icons dialog box that opens, scroll through the list and find the OneNote icon labeled as Microsoft OneNote Quick Launcher (merely an alternate, shorter name for the OneNote 2010 Screen Clipper and Launcher).
4. Click the drop-down menu next to the OneNote icon and then select Show icon and notifications (see Figure 6.4). The OneNote icon will now appear in the notification area. It is no longer hidden.
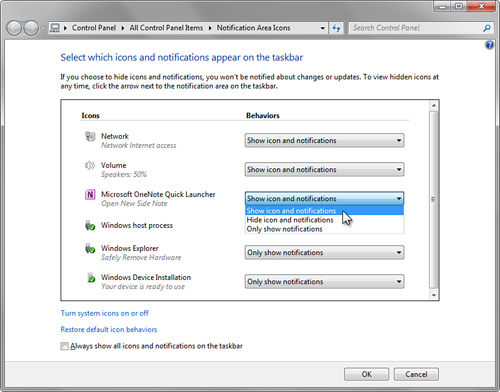
Figure 6.4 Options in the Notification Area Icons window let you control which icons in the notification area on the Windows taskbar are shown or hidden from view.
5. Click OK to save your changes.
After you’ve followed these steps, the icon remains visible, and its functionality can be accessed by right-clicking it or by using the keyboard shortcuts shown on the right-click menu (see Figure 6.5).
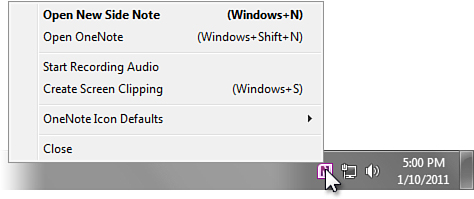
Figure 6.5 The OneNote Screen Clipper and Launcher icon as it appears when displayed in the notification area of the Windows taskbar. When the icon is visible here, the keyboard shortcut combinations shown next to the commands provide instant access to those commands, even when OneNote 2010 isn’t running.
I’ll talk more about the customization options for the OneNote Screen Clipper and Launcher in Chapter 12, “Customizing OneNote 2010.” Now that you know how to run and display it, let’s continue by learning how it helps you with your collection of information and research in OneNote.
Inserting Pictures and Screen Clippings
Admit it, one of the things that made your old paper notebook so appealing was the ability to gather a bunch of handouts, note scraps, scribbles, doodles, and printouts, toss them into your notebook, and then take it all with you. Sure, it was messy and unorganized, but at least you had that cozy feeling of having everything with you—even if it was going to be a time-consuming affair to leaf through it all and find anything again.
OneNote 2010 does it one better. It matches the ability of a paper binder to keep everything together and take it all with you, but it also lets you easily find everything again. With OneNote, you’ll also never have to worry about one of the scraps of paper falling out of your notebook.
First things first, though: Take a closer look at the many ways in which you can collect and import all kinds of information into your OneNote notebook.
![]() LET ME TRY IT
LET ME TRY IT
Inserting a Picture from a File
Pictures can be placed inside of a notes container or as free-floating objects on any page in OneNote (see Figure 6.6).
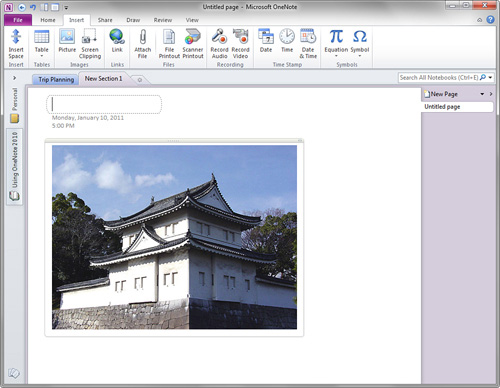
Figure 6.6 A digital image file, as it appears after being inserted onto a notes page.
A picture can be any image file that your computer supports, such as a photo that you’ve taken with your digital camera, a stock photograph that you’ve purchased on a website, a piece of clip art that you’ve downloaded, or a screenshot that you’ve captured with your computer.
SHOW ME Media 6.2—Inserting Pictures into Notes
Access this video file through your registered Web Edition at my.safaribooksonline.com/9780132182447/media.
![]() LET ME TRY IT
LET ME TRY IT
Inserting Pictures into Notes
Although you can simply copy an image from somewhere on your computer and then paste it into OneNote, properly inserting the actual picture file may produce higher-quality results, especially with pictures that contain text or other kinds of information.
To insert a picture into your notes, follow these steps:
1. Open or create the page in your notebook where you want to insert a picture.
2. Click the place on the page where OneNote should place the imported picture. A blinking cursor will confirm where the picture will be placed.
3. On the Insert tab, in the Images group, click Picture.
4. In the Insert Picture dialog box that opens, navigate to the folder on your computer where the picture file is stored.
5. Click to select the picture you want to insert and then click Insert.
OneNote 2010 lets you import a large variety of image file types, including the following:
• Joint Photographic Expert Group (.jpg, .jpg, .jpe, .jfif)
• Portable Network Graphics (.png)
• Graphics Interchange Format (.gif)
• Tagged Image File Format (.tif, .tiff)
• Encapsulated PostScript (.eps)
• Windows Bitmap (.bmp, .dib, .rle)
• Windows Metafile (.wmf)
• Windows Enhanced Metafile (.emf)
• Compressed Windows Enhanced Metafile (.wmz)
• Macintosh PICT (.pct, .pict)
• Compressed Macintosh PICT (.pcz)
• Computer Graphics Metafile (.cgm)
• WordPerfect Graphics (.wpg)
![]() LET ME TRY IT
LET ME TRY IT
Inserting a Picture from a Scanner
If you have a scanner, it’s easy to import pictures that you don’t already have in a digital format. This is not only a convenient way of importing old photographs, but for scanning business cards, receipts, sketches, napkin scribbles, and diagrams as well.
To import pictures that you don’t already have in digital format, follow these steps:
1. Open or create the page in your notebook where you want to insert the scanned picture.
2. Click the place on the page where OneNote should place the imported picture. A blinking cursor will confirm where the picture will be placed.
3. On the Insert tab, in the Files group, click Scanner Printout (see Figure 6.7).
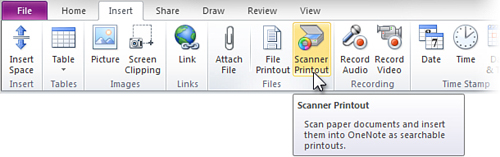
Figure 6.7 If you have a scanner connected to your computer, you can use the Scanner Printout command on the OneNote ribbon to scan pictures and documents right into OneNote.
4. In the Insert Picture from Scanner or Camera dialog box, make sure the make and model of the scanner you’re using is selected as the active device (see Figure 6.8).
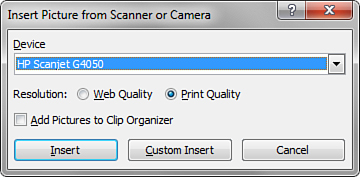
Figure 6.8 After you click the Scanner Printout button in OneNote, options for the make and model of your scanner might appear, such as choosing a quality setting for the scan.
5. Choose from the available resolution settings by clicking either Web Quality (if you’re only going to be looking at the scanned image on your screen) or Print Quality (if you plan to print the notes containing the scanned image).
6. Click Insert.
Depending on the make and model of your own scanner, you might see a slightly different user interface after you click the Scanner Printout button, but the results should be the same. As long as your scanner is properly configured and you can successfully scan images with it in other Windows programs, it should work perfectly fine in OneNote, too.
If you’re having trouble scanning, please refer to the documentation that came with your scanner and make sure you download the latest drivers for it from the manufacturer’s website.
Inserting a Screen Clipping on the Current Page
OneNote includes a super-easy way to take a picture of anything on your computer screen and place it into your notes.
Although you can already do this for the whole screen by pressing the PrtScn (print screen) key on your keyboard and then pasting the result where you want it, OneNote lets you first draw a selection over the specific part of your screen that you want to capture. A so-called “screen clipping” then is placed into your notes.
SHOW ME Media 6.3—Creating Screen Clippings
Access this video file through your registered Web Edition at my.safaribooksonline.com/9780132182447/media.
To create a screen clipping, do the following:
1. On your computer screen, bring into view whatever it is that you want to capture. For example, open a particular page on a website in your browser.
2. In OneNote, navigate to the page where you want to insert the screen clipping and then click on the page where you want it to appear.
3. On the Insert tab, in the Images group, click Screen Clipping.
4. OneNote hides itself and brings back into view what you had on your screen before. The screen dims and the cursor changes to a crosshair symbol, prompting you to select the part of the screen you want to capture.
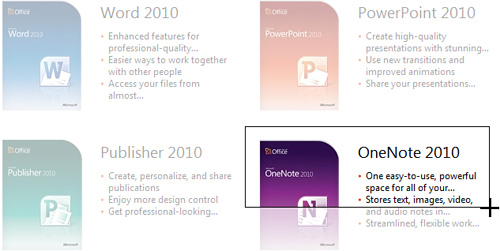
Figure 6.9 When you initiate a screen clipping, OneNote hides itself and dims the screen of what you were looking at before. You can click and drag a selection with your mouse to capture that portion of the screen as an image, which is then inserted into your notes.
5. When your selection is complete, release the mouse button. OneNote restores itself and places your screen clipping on the current page where you had activated the cursor.
If you make a mistake and grab too much (or too little) of the screen, delete the screen clipping and simply take another. You can remove screen clippings that you no longer want by clicking the image and then pressing the Delete key to delete it.
Screen clippings are ideal for quickly capturing and importing all kinds of information that you just want to capture and don’t need to edit again. For example, if you’re doing research for a trip and you want to compare the cost of airfare between several airlines, you could take screen clippings of the fare tables and compare them side by side in OneNote. As such information is sure to change quickly at the source, your screen clippings can provide a lasting record of such information.
Screen clippings are also great for taking screenshots of software for which you’re providing training materials. If you’re a blogger, you can use screen clippings to create illustrations for your blog posts. If you use OneNote to maintain information related to your hobbies, such as gardening or keeping an inventory of a recipe or movie collection, you can clip photos of your flowers, recipes, or DVDs and import them into your notes to make them more visually interesting. In school, you can quickly grab your class schedules, lab info, study group agendas, and just about anything else that appears on your school’s website or digital handouts.
![]() LET ME TRY IT
LET ME TRY IT
Inserting a Screen Clipping with Quick Filing
If you plan to import a whole bunch of information as screen clippings and you don’t want to always first go to the place in your notes where the images should be placed, you can use an alternate way of inserting them.
Instead of placing each screen clipping image at the location of your cursor on the page, OneNote will prompt you with its quick filing dialog box, in which you can select the specific page to which the current screen clipping will be sent.
To insert a screen clipping using the quick filing dialog box, follow these steps:
1. On your computer screen, bring into view whatever it is that you want to capture. For example, open a particular page on a website in your browser.
2. At the far right of the Windows taskbar, right-click the small OneNote icon in the notification area—the Screen Clipper and Launcher that you learned about earlier in this chapter—and then click Create Screen Clipping (see Figure 6.10). For the same result, you can also hold down the Windows key on your keyboard and then press S.

Figure 6.10 By initiating a screen clipping from the OneNote Screen Clipper and Launcher icon on the Windows taskbar, you can decide where the screen clipping should be placed after it has been created. Using the icon also means you don’t always first have to switch to OneNote to initiate a new screen clipping.
3. The screen dims and the cursor changes to a crosshair symbol, prompting you to select the part of the screen you want to capture. Move the mouse to the upper-left corner of the area you want to capture, click and hold the left mouse button, and then drag a rectangular selection over the screen until everything you want to include in the screen clipping is selected.
4. When your selection is complete, release the mouse button. Unlike what happened with the Insert Screen Clipping command in the previous procedure, OneNote now displays the Select Location in OneNote dialog box, which is also known as the quick filing feature.
5. In the list, click the notebook section where you want the screen clipping to appear, and then click Send to Selected Location (see Figure 6.11).
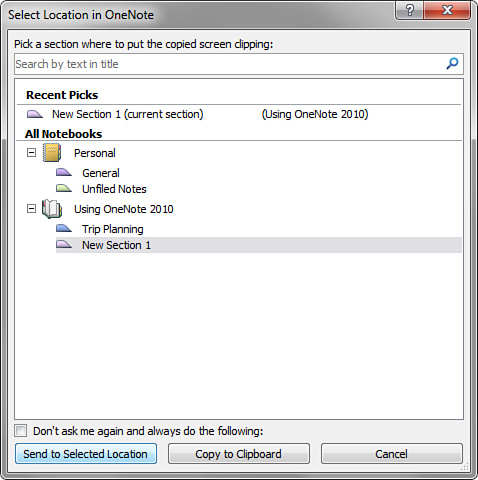
Figure 6.11 This quick filing dialog box appears after you initiate a screen clipping from the OneNote Screen Clipper and Launcher icon. It lets you choose a destination for the screen clipping you’ve just taken.
This method is easier for collecting multiple screen clippings because you don’t have to first decide where on a specific page in a specific notebook you want each screen clipping to go. Another benefit of using this method is that you can do it anytime you see something on your screen that you want to capture, without first switching over to OneNote.
Using the quick filing method, OneNote will automatically create a fresh, new page for each screen clipping you take and place it in the section that you’ve selected. You can later consolidate or discard specific screen clippings, after you’ve had time to review them all and move the ones you want to keep to specific sections in your notebooks. You’ll learn more about moving pages and sections in your notebooks in Chapter 7, “Organizing and Searching Notes.”
![]() LET ME TRY IT
LET ME TRY IT
Collecting All Future Screen Clippings in One Place
If you want to make the process of collecting multiple screen clippings a complete no-brainer, consider creating a special section in your main notebook that you’ll use as the automatic target destination for all of your future screen clippings.
To collect multiple screen clippings in one place, follow these steps:
1. In your notebook, create a new section and name it “My Screen Clippings” (or a similarly meaningful description).
2. Bring into view what you want to capture, right-click the small OneNote icon in the notification area (or hold down the Windows key and press S), and then click Create Screen Clipping.
3. When the screen dims, drag a selection with the mouse to create your screen clipping.
4. In the Select Location in OneNote dialog box, find the “My Screen Clipping” section you created in step 1 and click it once to select it.
5. Just underneath the list of notebooks and sections, select the check box labeled Don’t Ask Me Again and Always Do the Following (see Figure 6.12).
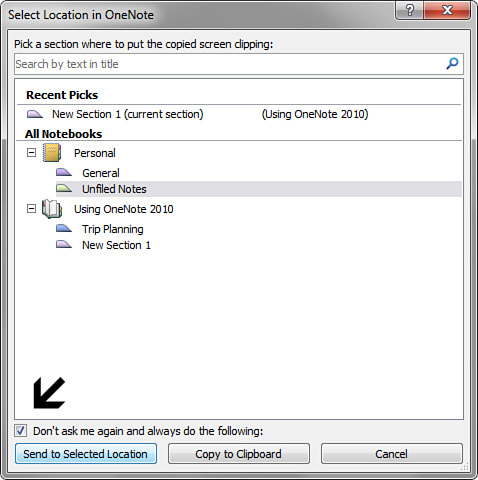
Figure 6.12 Selecting the check box at the bottom of the quick filing dialog box will send all future screen clippings that you’ll capture to the notebook section that you select here. It’s a convenient way to have OneNote automatically gather all screen clippings in one place.
6. Click Send to Selected Location.
OneNote creates a new page for your screen clipping in this section. In addition, because you checked the box that told it to stop asking for a destination the next time, all of your future screen clippings that you initiate from the OneNote icon in the Windows taskbar notification area or with the Windows key + S keyboard shortcut will be sent to this location automatically without you having to make a decision or selection each time you take a screen clipping.
This is the fastest way to take a bunch of screen clippings for collecting information and research and then review the “My Screen Clippings” section in your notebook later, where you can consolidate, delete, or move screen clippings to where you ultimately want them.
Formatting Pictures and Screen Clippings
Now that you’ve learned all about importing pictures, scanned images, and screen clippings into your notes, it’s time to learn how to make them appear in your notes the way that you want.
SHOW ME Media 6.4—Formatting Pictures and Screen Clippings
Access this video file through your registered Web Edition at my.safaribooksonline.com/9780132182447/media.
![]() LET ME TRY IT
LET ME TRY IT
Resizing or Scaling a Picture
Whether you insert a picture from an image file, by using your scanner, or by creating a screen clipping, you can modify its dimensions by resizing or scaling the picture.
Resizing lets you shrink or enlarge the appearance of pictures that contain text or small details that you want to preserve even at a smaller size in your notes.
Scaling can be used for making pictures appear taller or wider so they fit into your notes. Scaling usually distorts the original image, so it works best with pictures containing sketches or drawings, instead of photographs or screen clippings.
To resize a picture on a page without abnormally stretching or squeezing its appearance, do the following:
1. Click the picture you want to resize. Eight dots (called “handles”) appear around the picture selection (see Figure 6.13).

Figure 6.13 The eight dots that appear around a picture when you click to select it are selection handles. You can click and drag some of them to manipulate the selected image in different ways.
2. Click the round, dot-shaped handle in the lower-right corner of the selected picture and then drag the handle to the left or to the right to make the picture smaller or larger. Release the mouse button when the picture is the size you want.
To scale an image horizontally or vertically, do the following:
1. Click the picture you want to scale. Eight dots appear around the picture selection.
2. To scale the image horizontally, click the small, square-shaped handle in the middle of the picture’s right border and then drag the handle to the left or right.
3. To scale the image vertically, click the small, square-shaped handle in the middle of the picture’s bottom border and then drag the handle up or down.
If a picture is pasted outside of a notes container, you can resize or scale the picture with more precision by using the arrow keys on your keyboard instead of dragging with the mouse.
To resize or scale a picture with more precision, follow these steps:
1. Make sure the inserted picture is not inside of a notes container. If it is, click to select the picture, press Ctrl+X to cut it, click the page anywhere outside of the notes container, and then press Ctrl+V. When you reselect the picture now, you should only see the eight selection handles around its border, not the gray notes container.
2. Click to select the picture, right-click it, and then click Resize on the shortcut menu. (If the Resize command is not available on the menu, the picture is still inside of a notes container.)
3. When the handles around the image have disappeared, look for a white, four-headed arrow to appear over the middle of the selected picture. Use any of the four directional arrow keys on your keyboard to make the picture as small or as large as you want. If you want to resize the picture proportionally without scaling it, you’ll need to press the up or down arrow keys the same number of times as the right or left arrow keys.
4. If you distort the image too much, press the Esc key and try again. When the picture appears the way you want, press the Enter key to accept the new dimensions.
![]() LET ME TRY IT
LET ME TRY IT
Restoring a Modified Picture to Its Original Size
Changing the appearance of pictures in OneNote by resizing or scaling them does not actually modify the size of the picture file itself.
For example, if you size down an inserted photo to a very small size on your notes page, the original, underlying image file is still saved in its original file size and dimensions. This lets you restore any picture that you’ve modified in OneNote to its full, original glory at any time.
To restore a modified picture, follow these steps:
1. Right-click a modified (resized or scaled) picture on your notes page.
2. On the shortcut menu that appears, click Restore to Original Size.
Preserving the original dimensions of picture files that you insert into your notes is just another way in which OneNote keeps all of your source information together in one place, while still giving you full control over how such items show up in your notes.
![]() LET ME TRY IT
LET ME TRY IT
Moving a Picture to Another Place on a Page
After you’ve inserted a picture into your notes, it’s not stuck there. You can freely move it around on the page to the location you want.
To move a picture around on the page, follow these steps:
1. Click the picture you want to move.
2. Move the mouse pointer over the middle of the selected picture until the pointer changes to a white, four-headed arrow (see Figure 6.14).

Figure 6.14 The white, four-headed arrow in the middle of a picture prompts you to move the picture in any direction on the page, either by clicking and dragging the mouse or by using the directional arrow keys on your keyboard.
3. Click the left mouse button and then drag the image to its new location on the page.
4. Release the mouse button when the picture appears where you want it.
If a picture is pasted outside of a notes container, you can move it with more precision by using the directional arrow keys on your keyboard instead of dragging with the mouse.
To move a picture with more precision, follow these steps:
1. Make sure the inserted picture is not inside of a notes container. (If it is, see “Resizing or Scaling a Picture” earlier in this chapter.)
2. Click to select the picture, right-click it, and then click Move on the shortcut menu. (If the Move command is not available on the menu, the picture is still inside of a notes container.)
3. When the handles around the image have disappeared, look for a white, four-headed arrow to appear over the middle of the selected picture. Use any of the four directional arrow keys on your keyboard to move the picture to its new location on the page.
4. If your finger slips and you move the image too far off the page, press the Esc key and try again. When the picture appears where you want it, press the Enter key to accept the new location.
![]() LET ME TRY IT
LET ME TRY IT
Rotating Pictures on a Page
Continuing in the vein of features borrowed from page layout programs like Microsoft Publisher and Adobe InDesign, OneNote also offers the ability to quickly rotate imported pictures and screen clippings.
This is most useful when importing scanned images or cell phone camera pictures that may appear sideways or upside down when first imported. A simple click of a button or two and you’ll have it the way you want it.
To rotate a picture on the current page, do the following:
1. Click the picture you want to rotate.
2. On the ribbon, click the Draw tab and then, in the Edit group, click Rotate.
3. On the pop-up menu that appears, choose the rotation you want:
• Click Rotate Right 90° to rotate the selected image clockwise by 90 degrees. Click this command up to three times to achieve the correct amount of rotation you want.
• Click Rotate Left 90° to rotate the selected image counterclockwise by 90 degrees. Click this command up to three times to achieve the correct amount of rotation you want.
• Click Flip Horizontal to create a horizontal mirror image of the selected picture.
• Click Flip Vertical to create a vertical mirror image of the selected picture.
I should point out that OneNote 2010 does not offer the ability to freely rotate a selected image or object by any degree. If you need that kind of precision, it’s best to import the original picture into an image-editing program like Adobe Photoshop and rotate it there. You can then save and import the result back into OneNote.
![]() LET ME TRY IT
LET ME TRY IT
Overlapping Multiple Images on a Page
Another useful page layout feature available in OneNote is the ability to control the layering of objects such as pictures and screen clippings.
This is most useful when you want to overlap multiple pictures to create a design on the page. You can also use this method to maximize page space by overlapping multiple images in such a way that only the parts you care about are shown.
The fancy term for the ordering of two-dimensional objects is “Z-order,” which refers to the order of objects along the z-axis in coordinate geometry, where x typically refers to the horizontal axis and y to the vertical axis. When two or more objects overlap, their Z-order determines which object or layer appears on top of the other. For bitmap-type images, this means that the topmost layer covers up the ones below it. For image formats that can have a transparent background (such as GIF and PNG files), you can control the Z-order more creatively to create a composite picture or design from the layers of multiple, stacked pictures.
In OneNote, you can control the Z-order of page objects with the Arrange command, which works the same as in many popular page layout and web design programs. You can use this command to arrange multiple pictures that are different from each other or to arrange multiple copies of the same picture.
Ultimately, the usefulness and result of manipulating the Z-order in OneNote really depends on the specific objects (pictures, scanned images, screen clippings, or notes containers) that you will use on your own pages.
The following steps should give you an idea about how this works:
1. On the current page, insert two to three different pictures, scanned images, or screen clippings.
2. Click and drag the pictures you have just inserted and drag them together so they all slightly overlap (see Figure 6.15).
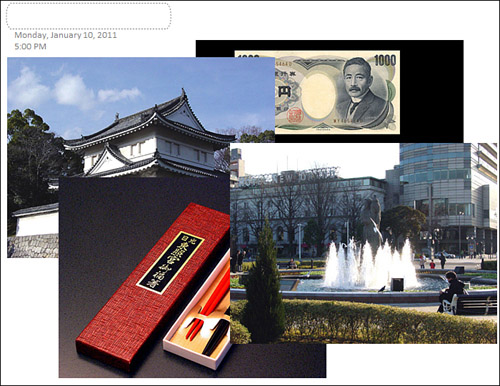
Figure 6.15 When you combine several pictures so that they partially overlap on the page, you can select a particular picture and then change its Z-order to make the selected picture appear in front of or behind the other pictures.
3. Click to select the picture that’s farthest underneath the other two.
4. On the ribbon, on the Draw tab, in the Edit group, click Arrange.
5. On the pop-up menu that appears, rest the mouse pointer over the available commands to read the ToolTip descriptions that appear. You can choose from four commands:
• Clicking the Bring Forward command promotes the selected picture or notes container to one layer higher than the current one. You can click this command multiple times, if necessary.
• Clicking the Bring to Front command promotes the selected picture or notes container to the highest possible layer, covering up all other layers beneath it.
• Clicking the Send Backward command demotes the selected picture or notes container to one layer lower than the current one. You can click this command multiple times, if necessary.
• Clicking the Send to Back command demotes the selected picture or notes container to the lowest possible layer, hiding it behind all other layers that appear in front of it.
To conclude this procedure, you could click the Bring to Front command to make the picture you selected in step 3 appear in front of the other two.
It might take some practice for you to learn how to control the Z-order of multiple objects on a page, so practice this on your own for a bit using different types of pictures (for example, some that have a transparent background) and using a mix of notes containers and pictures.
One trick to mastering the arrangement of overlapping objects on a page is to be mindful of both the order in which to select items as well as for which items to change the ordering. If you’re creating a design with overlapping objects and images, think of the layers you’re controlling the same way as you might think of setting up multiple backdrops on a theater stage. By having the order of objects clearly in your mind, you can better differentiate between using the two extreme commands—Bring to Front and Send to Back—as well as the more incremental commands—Bring Forward and Send Backward—which nudge the ordering of the selected item forward and backward by just one layer.
Practice makes perfect and, as you’ve learned, the beauty of OneNote is that you won’t waste any paper while attempting to master your techniques.
![]() LET ME TRY IT
LET ME TRY IT
Copying Text from Pictures
After you begin to routinely insert screen clippings from web pages and your documents into your notes pages in OneNote, there will undoubtedly be times when you’ll wish that you could occasionally edit the text in a screen clipping. Well, there’s good news.
OneNote 2010 includes a fantastic feature called Optical Character Recognition (OCR). This is a fancy technical name for your computer’s ability to electronically recognize and translate words in images and convert those words to editable text. OCR software is most commonly included with scanners, so that you can create text files from the documents you scan. Although you can certainly make your scanner do the work, the built-in OCR feature in OneNote lets you quickly extract text from your inserted images whenever you want to use the text within them.
To copy text from a picture, follow these steps:
1. Insert a picture, scanned image, or screen clipping that contains the text you want to copy. For example, you could insert a picture of a scanned business card or a screen clipping of a paragraph of text on a web page.
2. Right-click the picture and then click Copy Text from Picture (see Figure 6.16).
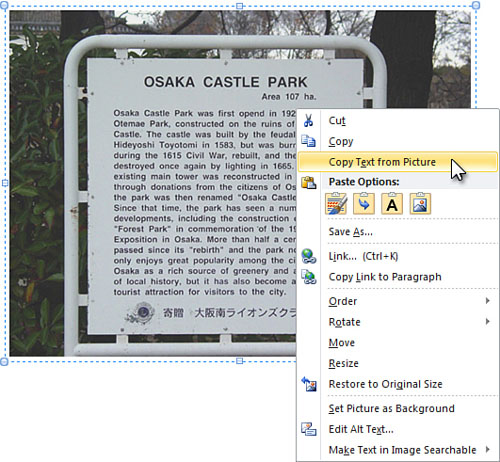
Figure 6.16 The Copy Text from Picture command in OneNote lets you extract text from any type of inserted image and paste that text anywhere into your notes.
3. Click anywhere else on the page where you want to paste the copied text, and then press Ctrl+V.
The quality of text recognition depends greatly on the quality and legibility of the picture containing the text. In most cases, handwriting or highly stylized or script-like fonts won’t yield very good results.
If the text recognition produces just a few errors, you can quickly type the necessary corrections in place. This is infinitely faster and easier than retyping the entire original text yourself. Either way, the OCR feature in OneNote is sure to save you at least a little time.
![]() LET ME TRY IT
LET ME TRY IT
Entering Alternative Text for an Image
If you plan to publish any of your notes containing pictures as a web page, you can improve the reading experience for the visually impaired by describing each picture with a short sentence or phrase. In web browsers, this is called alternative text (or “alt text” for short).
To enter or change the alternative text for any picture in OneNote, do the following:
1. Right-click the picture you want to describe with alternative text.
2. On the shortcut menu that appears, click Edit Alt Text.
3. In the Picture Alternative Text dialog box that opens, enter a short, descriptive phrase for the selected image, and then click OK.
If you now save the current page as a web page (click File, Save As, Page, Single File Web Page, and then click OK), and you open the file in a web browser, the alternative text that you entered for the picture will appear as a ToolTip when you move the mouse pointer over that picture (see Figure 6.17).
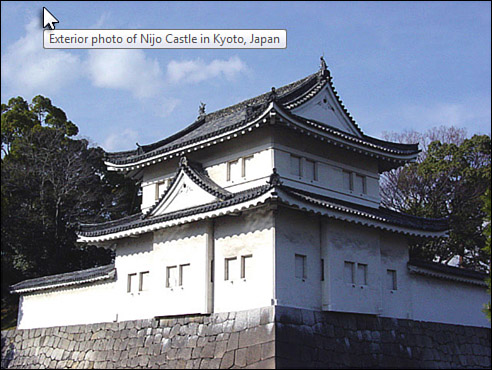
Figure 6.17 When you specify alternative text for an inserted picture in OneNote and you then save the notes page as a web page, the alt text will appear in a ToolTip whenever the mouse pointer is moved over the image.
Keep in mind that this feature is intended for visually impaired or blind people, so choosing meaningful alt text is very important. The user’s computer will read standard text to them out loud with the speech capabilities built in to Microsoft Windows, but pictures can only be described by having the computer read the alt text out loud. The more specific you are when creating this descriptive text, the more helpful it will be.
For example, if your page contains a picture of a company logo that shows a red rose, you might describe the image as “the Rose Company logo” instead of “Company logo” (What company?) or “This is a flower” (Why is it there? What does it have to do with the notes here?). Give your picture descriptions as much context as possible for people who’ll depend on those descriptions.
In OneNote, entering alt text for pictures is optional. That’s because most people won’t publish their notes as HMTL web pages. Unless you decide to share your notes in this way, you probably don’t need to bother with alt text.
![]() LET ME TRY IT
LET ME TRY IT
Setting a Picture as the Page Background
After a picture appears on your page the way you want it to, you have the option of leaving it in place on your notes page or merging it with the background of the page. This is slightly different than the Z-ordering that you learned about earlier in this chapter. When you set a selected picture as the background image, it becomes part of the page on which your notes appear.
Setting a picture as your page background has several uses. For one, you can use a decorative photo or piece of clip art to function much like a stationery design does for writing paper. This is how many OneNote templates are given a decorative background—you place a picture of a nice, subtle design into the upper-left corner of your page and then set that image as the background so that any typed and handwritten notes appear over it (see Figure 6.18).

Figure 6.18 A typical decorative stationery design in a OneNote template. Because the picture is set as the background, the person using this template can’t accidentally mess it up. They can freely type their notes over the picture.
Another benefit of setting a picture as the page background is to protect it from accidentally being selected, moved, resized, or scaled. A background picture can’t be selected again until you right-click it and then turn off the Set Picture as Background option.
To set a picture as your page background, do the following:
1. On your notes page, position the picture that you want to set as your background image where you want it to appear.
2. Right-click the picture and then click Set Picture as Background.
Working with Links
If you’re using OneNote to take notes just for yourself, an important part of collecting information and doing research is to keep track of where important information came from, in case you later want or need to return to its source.
If you’re using OneNote to also share your notes, information, and research with other people, pointing them to more information (or to additional information that relates to it) becomes just as important. In this section, you’ll learn how to create and use links—sometimes also called hyperlinks—to achieve both goals.
SHOW ME Media 6.5—Working with Links
Access this video file through your registered Web Edition at my.safaribooksonline.com/9780132182447/media.
You might have noticed that when you take screen clippings from a web page by using the Insert Screen Clipping command on the ribbon, OneNote automatically inserts into your notes a link back to the source page where the screen clipping was taken (see Figure 6.19).
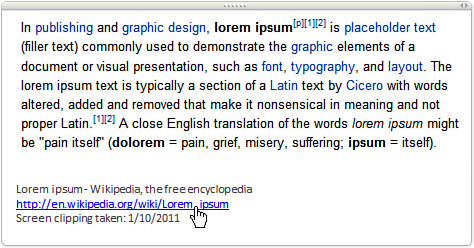
Figure 6.19 When you paste or import something from another source, such as a website, OneNote automatically includes a hyperlink back to that source so you can go back to it at a later time. If you don’t want to keep the link, you can delete it.
Automatic source links make it easy for you to revisit the origins of an imported selection of text, a picture, or a screen clipping again in the future—for example, when you want to check whether the original information has been updated or supplemented since you captured it.
Such automatically created links are easy enough to deal with: You can keep and click them when you want or need to, you can ignore them, or you can delete them when they’re no longer needed.
Now it’s time to learn how you can create and modify your own links from the text and pictures that make up your notes.
![]() LET ME TRY IT
LET ME TRY IT
Creating a Link from Typed Text
While typing notes on a page in your notebook, you can quickly and easily have OneNote create a hyperlink by including certain parts of a link URL (short for uniform resource locator, better known as a web address that you type into a web browser).
To create a link from typed text, follow these steps:
1. Click anywhere on the page and begin typing the following sentence, followed by a space: For more information, visit
2. After the space, type www.office.com. As soon as you typed the prefix for World Wide Web, OneNote converted the text to an underlined blue style, which is a universal indicator for clickable text (also called hypertext, which is where the official term hyperlink got its name).
3. When you now move the mouse pointer over the blue underlined text of the web address, the pointer changes to a hand icon, indicating you’re hovering over a clickable link (see Figure 6.20). If you click the text, OneNote will launch your web browser and open the web page that the link points to.
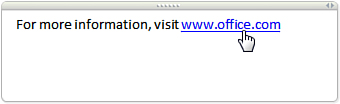
Figure 6.20 You can visit the destination of any hyperlink in your notes by moving the mouse pointer over the text and clicking it when the pointer changes to a hand icon.
![]() LET ME TRY IT
LET ME TRY IT
Creating a Link from Selected Text
To manually create links from text in your notes, you can use OneNote’s Link command. Follow these steps:
1. In your notes, select the text from which you want to create a link. If the link will be from a single word, double-click the word to select it. To select multiple words (for example, “Microsoft Office”), click and drag a selection with the mouse over the words you want to format as a link.
2. When the text you want is selected, click the Insert tab on the ribbon.
3. In the Links group, click Link.
4. In the Link dialog box, type the full website URL (for example, http://www.office.com) into the Address box and then click OK.
Unlike an automatic hyperlink, which exposes the web address right in the text, links manually created from actual notes text won’t reveal their destination unless you move the mouse pointer over the link to reveal its URL in a ToolTip that appears (see Figure 6.21).
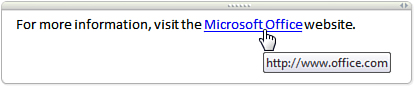
Figure 6.21 To check where a link that is embedded in text will go when you click it, rest the mouse pointer over the text until a ToolTip with the web address appears.
In most cases, links embedded in actual notes text are more useful because such links have immediate context and make your notes more readable than if a bunch of geeky URLs appear littered throughout your notes. This might not be an issue for you personally, but it’s something to consider when you share your notes with other people.
![]() LET ME TRY IT
LET ME TRY IT
Creating a Link from a Picture
Quite similar to making text clickable, you can also format a picture, a scanned image, or a screen clipping to contain a link that points to a website.
To create a link from a picture, follow these steps:
1. In your notes, click an inserted picture from which you want to create a link.
2. On the ribbon, click the Insert tab.
3. In the Links group, click Link.
4. In the Link dialog box, type the full website URL (for example, http://www.onenote.com) into the Address box and then click OK.
Although linked text will tip you off about its clickability by changing to a blue and underlined type style, linked pictures do not show any obvious sign of containing a link.
However, when you move the mouse pointer over a picture that contains a link, a ToolTip appears, showing you the destination of the link (see Figure 6.22).
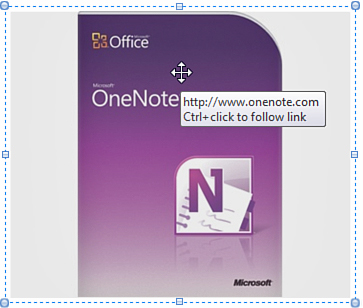
Figure 6.22 To check where a link that is embedded in a picture will go when you click it, rest the mouse pointer over the picture until a ToolTip with the web address appears.
Just below the web address in the ToolTip, you’ll also see the instruction to hold the Ctrl button if you want to click and follow the link from the picture. This intentional link activation isn’t meant to make life more difficult for you. It makes clicking a link from a picture a more deliberate action and it preserves the ability to easily select, format, and work with pictures that contain a link. Without this Ctrl key click confirmation, you could never again click to select a picture to format, move, or delete it without constantly opening its link in a web browser.
![]() LET ME TRY IT
LET ME TRY IT
Modifying a Link in Your Notes
If you want to update the web address that a link in your notes points to, you can easily edit it.
To modify a link in your notes, follow these steps:
1. On the page, right-click the text or the picture that contains the link you want to modify.
2. On the shortcut menu that appears, click Edit Link.
3. In the Link dialog box that opens, the URL of the link is already selected for you in the Address box. Type over this address with the new or corrected link and then click OK.
For manually created links from a word or phrase of text that describes the link, or for links from pictures, you needn’t do anything else to modify a link. However, if you used the previous steps to modify a text link that OneNote automatically created from a web address or URL that you typed, modifying the link in the dialog box will not change the clickable text you see in your notes.
For example, if the link you edited originally appeared in your notes as www.microsoft.com in a blue, underlined style, and you then change the Address field in the Link dialog box to www.adobe.com, the link will now point to the Adobe website but the displayed text will continue to appear as www.microsoft.com, as before. To avoid this, make sure that you also change the Text to display field in the Link dialog box right above the Address field whenever you’re changing the existing URL of a link.
![]() LET ME TRY IT
LET ME TRY IT
Removing a Link from Your Notes
If you want to delete a link from notes text or from a picture in your notes, follow these steps:
1. Right-click the text or the picture that contains the link that you want to delete.
2. On the shortcut menu that appears, click Remove Link.
This covers the basics of creating and modifying links in OneNote 2010. Rest assured that OneNote has a few more tricks up its sleeve when it comes to intelligent linking. If you looked closely at the Link dialog box, some of that functionality was already foreshadowed. However, those advanced features fall more under the subject of notebook organization, which you’ll learn about in Chapter 7.
For now, let’s get back to the main topic of this chapter and learn how you can import existing content from your other files into your notes.
Inserting Documents and Files
As I often say, one of my favorite features in OneNote 2010 is the ability to drop virtually any content into my notebook and keep it there, along with everything else that relates to a particular project or subject. I don’t have to worry about file names, file versions, accidentally overwriting newer information with old, or any of the usual housekeeping issues that come with manually managing files and folders on my hard drive. You’ve already seen how easy it is to collect information from text and pictures on websites, but what about information that exists in the files and documents that you use every day?
With its tight integration with Microsoft Office and Windows, OneNote 2010 can intelligently work with all of your computer files in a variety of ways. You can attach documents, spreadsheets, presentations, and other files much in the same way you would attach them to an e-mail message. You can also virtually “print out” your files in such a way that they appear visually in your notes—much like printouts appear on paper—allowing you to annotate their content by typing, writing, or drawing over it.
The combination of OneNote’s sophisticated file import and management features gives you a whole new level of paperless reviewing and editing possibilities that doesn’t quite exist in any of the other Office applications.
SHOW ME Media 6.6—Inserting Documents and Files into Notes
Access this video file through your registered Web Edition at my.safaribooksonline.com/9780132182447/media.
![]() LET ME TRY IT
LET ME TRY IT
Inserting a Copy of a File on a Page
The easiest way to keep existing content from a computer file together with your notes is to insert a copy of the file on a page in your notebook.
To insert a copy of a file on a page, follow these steps:
1. If necessary, navigate to the page where you want to insert a copy of one of your computer files, such as a Word document, an Excel spreadsheet, a PowerPoint presentation, and so on.
2. On the ribbon, click the Insert tab.
3. In the Files group, click Attach File.
4. In the dialog box that opens, navigate to the folder where the file you want is located and then select one or more files that you want to insert into your notes. To select a single file, click it once. To select multiple files in a list, hold the Ctrl key while single-clicking one file after another.
5. Click Insert to import the selected file or files.
OneNote can insert any file that Windows understands. When you insert a file from your computer or a file server into OneNote, the original file still exists in its original location. OneNote merely makes a copy of the file and then stores that copy as part of your OneNote notebook.
Importing copies of documents to keep them handy for reading and referring to is probably the easiest use for imported files, and one that doesn’t require much thought. However, for any files you’re still actively working on, or files that you actively share and revise together with others, you’ll need to decide which version of the file is considered your master document. For example, you could consider the original file on your hard drive or network server to be the master file and the copy you insert into OneNote as your backup of that file.
In Chapter 9, “Sharing Notes with Other People,” you’ll learn about sharing your notes with others, so you can collaborate and edit notes together with other people in real time. In such circumstances, it might make more sense for you to keep all of your “living documents” right in OneNote. Until such time, however, be sure that you have it clear in your mind where various versions of your documents are located and where you consider their originals to be.
When you attach a document or file to a page in your notebook, its icon appears where you placed the copy of the file. These document and file icons work much the same way as they do in Windows. To open an attached file from within OneNote, double-click its icon and the content of the file will be opened in the program with which that file is associated (see Figure 6.23).
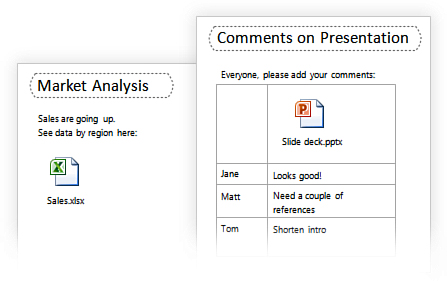
Figure 6.23 OneNote lets you attach documents and files to your notes so you can keep everything related to a particular project or subject together in one place. To open an attached file from within OneNote, double-click its icon.
For example, if you installed OneNote 2010 on your computer as part of a Microsoft Office 2010 suite, documents and rich text files will typically open in Microsoft Word, spreadsheets and workbooks will open in Microsoft Excel, slide decks and presentations will open in Microsoft PowerPoint, and so on.
Other, non-Office file types will work similarly. For example, Portable Document Format (PDF) files will open in Adobe Acrobat Reader, if you have it installed. In some cases, such as with image files, the result of double-clicking a file icon depends on which program is registered to handle such files on your computer.
For example, on a normal Windows installation, double-clicking a JPEG file will open in Windows Photo Viewer. However, if you have an image-editing program like Adobe Photoshop installed, it will open the file instead. If need be, you can edit these file associations in Windows to select certain programs to handle certain file types. OneNote will use whatever default file associations that Windows has registered.
When you double-click a file icon in OneNote to view the information it contains, you have the option of editing that version of the document or file. For example, if you double-click a text file you’ve inserted and it opens in Windows Notepad, you can modify the text while the file is open by typing new text or changing and deleting existing text. When you click Save, the copy of the file attached to your page in OneNote is modified. Because you work outside of OneNote whenever you do this, you cannot undo such changes.
Until you’re sure you understand how the content of imported files is managed, be sure to keep backups of the original versions of your imported files or be sure to only open and view imported files without changing them.
![]() LET ME TRY IT
LET ME TRY IT
Inserting a File Printout on a Page
An alternate way to import content from a file on your computer into OneNote is to make it appear on your notes page like a printout on paper. This ensures that there’s no confusion between an imported copy of a file and its original version on your hard drive, because the imported copy appears as a static image that cannot be edited.
Although this might seem limiting compared with importing an actual copy of a file, this option has two benefits. First, the layout and appearance of the original file is preserved perfectly, much like a PDF document would appear on your screen. Second, the images of the printout can be annotated with typed or handwritten text or with drawings, offering a much more flexible way to review and annotate content, especially when reviewing it together with other people.
To insert a file as a printout, follow these steps:
1. On your notes page, click to activate the cursor where you want the file printout to begin.
2. On the ribbon, click the Insert tab.
3. In the Files group, click File Printout.
4. In the Choose Document to Insert dialog box that opens, navigate to the folder containing the file you want to print to OneNote.
5. Click to select the file and then click OK. Depending on the size of the file and the processing speed of your computer, a progress indicator might briefly appear. When it reaches 100%, one or more static images resembling the page (or pages) of your “printed” file appears on your notes page (see Figure 6.24).
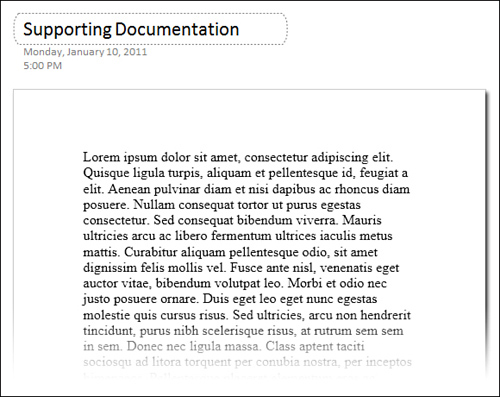
Figure 6.24 Using the File Printout command, you can send the contents of a selected file or document to OneNote as one or a series of images. This makes it easy to read, review, and annotate its information in context with your other notes.
Because file printouts are very much like normal images on your page, you can apply to them all that you’ve learned in this chapter about controlling pictures. Each image in a file printout can be resized, scaled, moved, rotated, and ordered in layers—just like any other inserted pictures.
File printouts can be easily annotated by setting their images as the page background and then clicking over the image to create a notes container that holds your text annotations and other notes about the file’s content. This is especially useful when reviewing visual content, such as the slides in a PowerPoint presentation deck.
When annotating file printouts with typed text, you can use the font formatting features that you’ve learned about earlier in this book to change your text to a different color whenever you want to provide more context for yourself or other reviewers (for example, you could use red text to annotate proposed changes that are still under review, and you could use green text for changes that have already been reviewed and agreed upon).
Another convenient imaging feature to remember for file printouts is the Copy Text from Picture command that’s available whenever you right-click an inserted picture. In the case of file printouts, the images offer two slightly different commands on the right-click menu—one for copying text from just the selected image (or page) of the printout, and another for copying all text from all of the images (pages) in a file printout. Just like with regular images, this lets you copy the file’s text and paste it into an editable annotation where you can then revise it with your proposed changes.
![]() LET ME TRY IT
LET ME TRY IT
Inserting a Scanner Printout on a Page
An alternate way to import existing content is to use your scanner. The same steps that you previously learned in this chapter for scanning pictures can be used to scan content from files that you’ve already printed out or to import information that exists only on paper.
Scanning paper-based documents into OneNote is also an effective way to preserve sole-surviving copies of important documents, such as purchase receipts, signed legal forms, or contracts. By scanning such documents into OneNote, you’ll have an easier way of finding them again when you need them most, plus you’ll never have to worry again about spilling a cup of coffee on them.
To insert a scanner printout on a page, follow these steps:
1. In OneNote, open or create the page in your notebook where you want to insert the scanned picture. For archiving scanned documents, you might want to create a separate page for each scan and then change its date stamp to match that of the scanned document.
2. On the page, click the location where OneNote should place the imported picture. A blinking cursor will confirm where the scanner printout will be placed.
3. On the Insert tab, in the Files group, click Scanner Printout.
4. In the Insert Picture from Scanner or Camera dialog box, make sure your scanner is selected as the active device.
5. For the Resolution, choose Print Quality. This yields a higher-quality scan for printed documents.
6. Click Insert.
Depending on the make and model of your own scanner, you might see a slightly different user interface after you click the Scanner Printout button in step 3, but the results should be the same. As long as your scanner is properly configured and you can successfully scan with it in other Windows programs, it should work perfectly fine in OneNote, too.
If you’re having trouble scanning, please refer to the documentation that came with your scanner and make sure that you download the latest drivers for it from the manufacturer’s website.
After you’ve scanned a document into OneNote, its image can be resized, scaled, moved, rotated, and ordered in layers—just like regular images.
You can also copy the text from a scanned document by right-clicking the scanned image and then clicking the Copy Text from Picture command. Just like with regular images, this lets you copy the original text of a file printout and paste it elsewhere into your notes as editable text.
In Chapter 10, “Using OneNote with Other Programs,” you’ll learn some additional ways of bringing content into OneNote, including how to control the way that file printouts from other programs appear in OneNote.
Doing Research with Side Notes
After having just learned about some of the many excellent ways in which you can collect information and bring content from anywhere into OneNote, seeing a separate section in this chapter about doing research with OneNote might seem a bit superfluous. Indeed, it might be, but I wanted to point out a few additional features that, depending on your work habits and needs, could come in really handy in your research work.
Let’s start with side notes—the electronic equivalent of little yellow sticky notes that you can create with OneNote and position all over your monitor (see Figure 6.25).
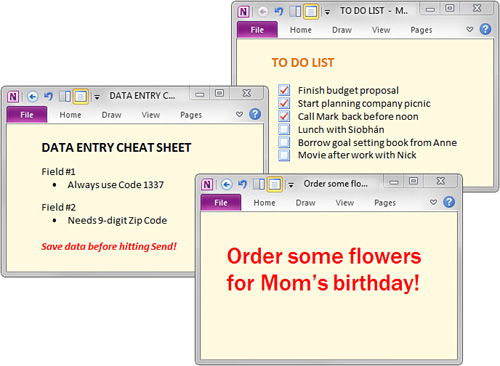
Figure 6.25 Side notes are mini OneNote windows that strip away the user interface, leaving you just enough space to jot down brief, important notes to keep in view during the day. These pages instantly become part of your notebook and can be used and searched like regular pages in OneNote.
What’s the point of side notes? Quite simply, they are marvelous for keeping important lists, reminders, and reference information visible at all times while you work in other programs. You can keep less-important side notes in the background and pin the most important ones on top so they stay visible even over other windows.
SHOW ME Media 6.7—Creating and Managing Side Notes
Access this video file through your registered Web Edition at my.safaribooksonline.com/9780132182447/media.
Unlike paper-based sticky notes, side notes come with all the benefits of a regular notes page in OneNote. You can format text, make lists, add pictures and screen clippings, add links, insert audio and video recordings, and tag important notes. Like all regular notes, side notes are automatically saved as part of your notebook, so that any information you jot onto them can be recalled again later and, if you like, be moved to the appropriate places in your actual notes. Have you ever tried consolidating all of your paper-based sticky notes in this way? Other than manually retyping everything, it just doesn’t work. Only OneNote makes managing sticky notes easy by taking all of the work out of them.
Using side notes is as simple as pressing a keyboard shortcut to create them. The canvas of a side note may appear smaller, but it works the same as a normal page in OneNote. Type some text, either for important reminders, daily to-do lists, or stuff you want to have on your screen at all times, and you’re set to go. The uses for side notes are as unlimited as those yellow sticky notes. In OneNote, however, they’re not only more convenient, but also much more environmentally friendly.
![]() LET ME TRY IT
LET ME TRY IT
Creating Side Notes
To create a new side note, follow these steps:
1. On any page in your notes, on the ribbon, click View.
2. In the Window group, click New Side Note. A small window with a yellow background appears. Like any notes page in OneNote, you can click this note and begin typing (see Figure 6.26). To quickly format its text, select it, and then make your choices from the Mini toolbar that appears.
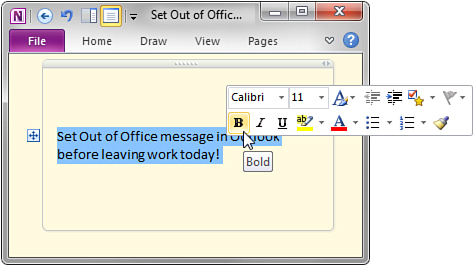
Figure 6.26 They may be small, but the pages behind side notes can be fully formatted—the same as regular pages in your notebook. For really important reminders, you can make the text large and stand out with color.
To keep a side note visible at all times, do the following:
1. Switch to the side note that you want to keep on top of all other windows.
2. Click the View tab at the top of the small side note window. When the ribbon appears, click Keep on Top. The side note will now stay pinned on top of any other windows displayed on your monitor. To turn this option off again, click the View tab once more and then click Keep on Top again to turn the option off.
To quickly browse through all of your side notes, do the following:
1. Switch to any side note you currently have open.
2. Click the Pages tab and then click either Previous Page or Next Page.
3. Repeat step 2 until you find the side note you want. Alternately, you can press the Ctrl+PgUp (Page Up) keyboard shortcut to skip to the previous side note, or you can press the Ctrl+PgDn (Page Down) keyboard shortcut to skip to the next side note.
To make things easier, all side notes are sent to a special section called Unfiled Notes, which is stored in the default notebook you created when you first installed OneNote 2010. Think of the Unfiled Notes section as your virtual OneNote junk drawer, where you can temporarily toss all of the random things you collect until you later have time to discard what you no longer need and organize what you want to put where it really belongs.
As with all organizational features that are available in OneNote, cleaning out your Unfiled Notes collection is entirely optional. Even if you never organize it, you’ll still be able to find everything stored there—including any and all side notes that you’ve created. This is because side notes and the Unfiled Notes section are automatically included in OneNote’s search feature, which you’ll learn more about in Chapter 7.
As we’re on the topic of side notes, though, let me quickly teach you how you can access the Unfiled Notes section to view and review any side notes that you create.
![]() LET ME TRY IT
LET ME TRY IT
Reviewing Side Notes
To view all of the side notes you’ve created and collected, do the following:
1. In OneNote, near the lower-left corner of the program window, click the Unfiled Notes icon under the navigation bar (see Figure 6.27).
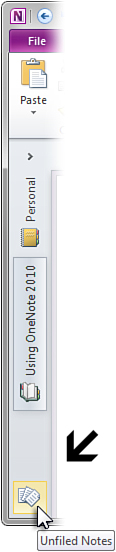
Figure 6.27 The special Unfiled Notes section can be opened by clicking the icon located at the bottom of the navigation bar.
2. When the Unfiled Notes section is displayed, click its page tabs to quickly view all of the random and unfiled notes that you have collected here.
While looking at all of your side notes pages in the Unfiled Notes section, you can copy and paste any of the information from your side notes to your regular notes pages.
You can move more detailed or lengthy side notes to other sections in your notebook and even to other notebooks. Because this works the same as moving and organizing regular pages in your notebooks, I’ll cover this in more detail in Chapter 7.
To exit the Unfiled Notes section and return to the place in OneNote where you were before, click the Back button on the Quick Access Toolbar (see Figure 6.28).
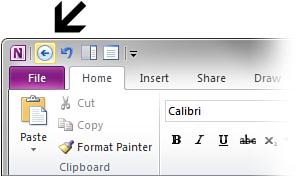
Figure 6.28 On the Quick Access Toolbar, located just above the File tab in the OneNote program window, the Back button lets you navigate through recently visited notebooks, sections, and pages. It can be clicked multiple times to go backward through the parts of your notebooks that you visited in any single OneNote session.
If you opened OneNote to the Unfiled Notes section, the Back button won’t be available. In that case, click the icon of the notebook you want on the navigation bar and then click a section within that notebook.
For now, let’s learn how you can use the quick filing feature in OneNote to easily file away important side notes that you want to keep in your notes for a while.
Moving Side Notes to Your Existing Notes
Imagine you pasted a couple of charts or tables comparing current airfare rates into a side note while doing research online about the best routes and rates for an upcoming trip. After you have the information you want, you won’t want to flip back and forth between your trip planning notes and that obscure little side note in the Unfiled Notes section. It would be like trying to find a random yellow sticky note when you need it most.
OneNote makes it easy to quickly file away your side notes. Because they work just like regular notes pages, you can quickly place them in the exact section of your notebook where you think they belong.
To try this out, you can use one of the side notes you created in this chapter and move it to another place in your notebook, such as the Trip Planning section in your Using OneNote 2010 notebook that you created in Chapter 4, “Notebooks, Sections, and Pages.”
To move side notes to your existing notes, follow these steps:
1. Open or create a new side note. If you currently have any side notes open, press the Alt+Tab keyboard shortcut repeatedly until the side note you want comes into view. If you have no side notes open, hold the Windows key and press N, click the Pages tab in the new side note, and then click Previous Page (or press Ctrl+PgUp) repeatedly to go to a previous side note that you created.
2. When the side note you want to file away is in view, click the Pages tab, and then click Move Page.
3. In the Move or Copy Pages dialog box that opens, expand the Using OneNote 2010 notebook (if necessary) by clicking the + symbol next to it to reveal the Trip Planning section in that notebook (see Figure 6.29). If you’re already working in the Using OneNote 2010 notebook and its sections are already shown here, you can skip this step.
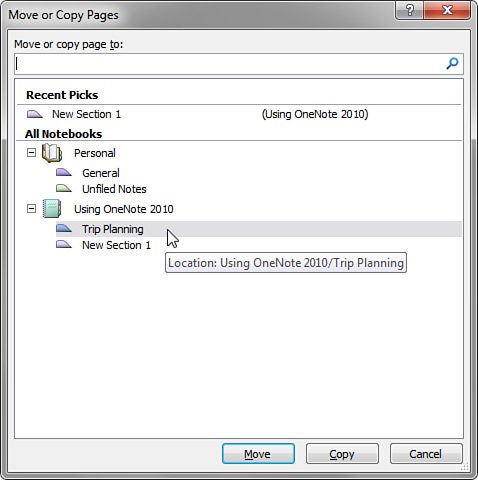
Figure 6.29 The Move or Copy Pages dialog box is one of several so-called quick filing dialog boxes that allow you to quickly organize parts of your notebook. In this case, you can click a destination to which to send a side notes page.
4. In the list, click the section tab labeled Trip Planning as the destination and then click Move.
When you move a side notes page in this way, it is removed from the Unfiled Notes section (your “junk drawer”) and placed into a real section in your notebook. You can keep it there on its own page or cut and paste its content to any of your existing notes pages in that section. However organized you choose to be is entirely up to you.
In Chapter 7, you’ll learn how easy it is to organize and find everything again in OneNote, so don’t worry too much about the housekeeping and organization of your notes for now.
Doing Research with Linked Notes
Linked notes are a convenient new feature in OneNote 2010 that allows you to dock the OneNote 2010 program window to the side of your desktop so that you can take notes on anything that you’re reading and researching in other programs or in your Web browser. When you take notes in this side-by-side fashion, they are automatically linked to their source material in the programs in which they originated (see Figure 6.30).
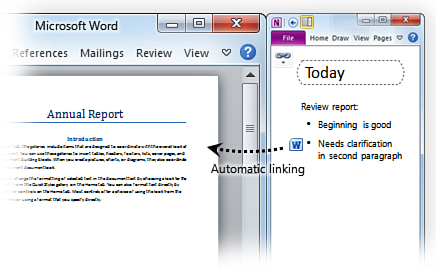
Figure 6.30 In linked note-taking mode, you can take notes side by side with Internet Explorer web pages, Word documents, PowerPoint presentations, or other OneNote pages. Each paragraph of your linked notes remembers the program and file you were looking at when you took the notes in question, allowing you to easily revisit source and research material.
Whenever you’re in a linked notes session and you take notes on things you’re looking at in Internet Explorer, in Word, or in PowerPoint, each paragraph in those notes will display a link icon when you hover your mouse pointer over any paragraph of the notes text. You can click these link icons to quickly return to the source material and the associated program that the notes relate to.
Linked notes in OneNote are a revolutionary way for your computerized notes to retain the full context of your thought process by capturing and saving the relationship between your thoughts and ideas that originated at the time when you looked at the source materials that sparked those thoughts and ideas.
In addition to the automatic, clickable link icons that appear next to linked notes text, OneNote also indicates the program that the source material is linked with (for example, Internet Explorer), and it stores a small thumbnail image and a text excerpt of the page, so you can easily recognize the correct web page, document, or presentation slide again later on.
SHOW ME Media 6.8—Taking Linked Notes
Access this video file through your registered Web Edition at my.safaribooksonline.com/9780132182447/media.
Because the linked notes feature is new to OneNote 2010, it can be used only while working in a notebook that’s been created or saved in the OneNote 2010 format. If you’re working in older, shared OneNote 2007 notebooks that have not yet been upgraded, you won’t be able to use the linked notes feature. For more information, see Chapter 9.
Beginning a Linked Notes Session
The linked notes feature in OneNote is available when viewing a web page in Internet Explorer 8 or later, a Word 2010 document, a PowerPoint 2010 presentation, or any OneNote 2010 notes pages.
To start a linked notes session, do the following:
1. If you want to take linked notes on web pages that you’ll be viewing in Internet Explorer, click the Tools button on the Internet Explorer toolbar, and then click OneNote Linked Notes (see Figure 6.31).
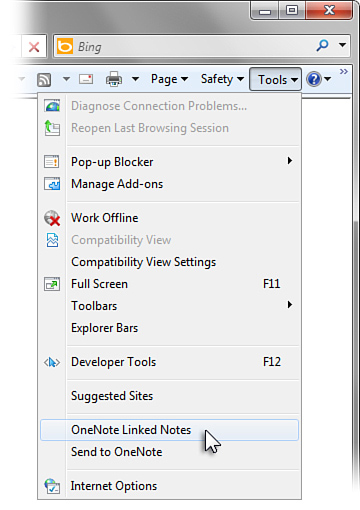
Figure 6.31 To start a linked note-taking session with Internet Explorer, click the Tools button near the upper-right corner of the browser window and then click the OneNote Linked Notes command on the menu that appears.
2. If you want to take linked notes on files you’ll be viewing in Word 2010, PowerPoint 2010, or OneNote 2010, go to the ribbon in the program you want, click the Review tab, and then, in the Notes group, click Linked Notes (see Figure 6.32).
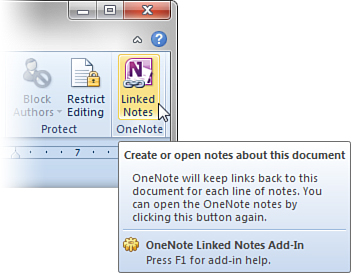
Figure 6.32 To start a linked note-taking session in Word 2010, PowerPoint 2010, or OneNote 2010, click the Review tab on the ribbon and then click the Linked Notes button. Shown here is the entry point for Word 2010.
3. In the Select Location in OneNote dialog box that appears, select the notebook section or page where you want to create your linked notes, and then click OK. If you select a section, a new page will be created in it. If you select an existing page, your linked notes will be added to that page.
4. OneNote opens a docked window on the right side of your screen and opens the page you selected on which to take your linked notes. If you selected a new page, type a descriptive title into the Page Title field at the top of the page, above the date and time stamp for the page, and then press Enter to move the cursor to a new notes container.
5. In the upper-left corner of the docked OneNote window, look for the chain-link icon. When you move the mouse pointer over it, a ToolTip will confirm that you’re currently working in a linked notes session (see Figure 6.33).
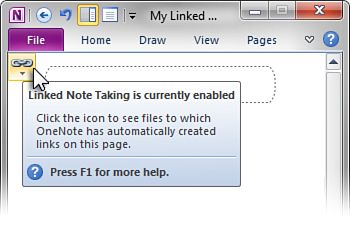
Figure 6.33 The small chain-link icon in the upper-left corner of the docked OneNote window indicates whether you’re in a linked note-taking session or not. Move the mouse pointer over the icon to see a status ToolTip or click the link icon for more options.
6. Now, take notes the way you normally would. For example, switch to Internet Explorer and bring up a web page. When you return to the docked OneNote window and start typing notes, each paragraph of notes that you create while Internet Explorer is active in docked mode will be linked to the current web page that it displays. If you switch to another page and take more notes, those paragraphs will then be linked to the new page, and so on. Similarly, if you bring up any Word documents or PowerPoint presentations during your linked notes session, they will also be linked to any notes you take in the docked OneNote window.
![]() LET ME TRY IT
LET ME TRY IT
Ending a Linked Notes Session
If you want OneNote to stop keeping links between the things you type in OneNote and the programs you’re looking at, you can end a linked notes session that you’ve started.
To turn off linked notes, do either one of the following:
• In the upper-left corner of the docked OneNote window, click the link icon and then click Stop Taking Linked Notes.
• In the docked OneNote window, on the View tab, click the Normal View button.
When a linked notes session has been ended, the chain-link icon in the upper-left corner of the page will show a red circle with a slash through it (see Figure 6.34) to indicate that no further links will be created. Any notes that were linked to other programs up until that point are retained.
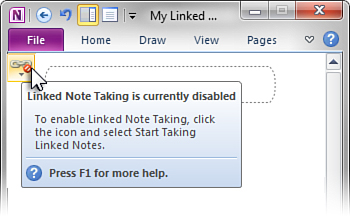
Figure 6.34 A small red circle with a slash through it appears over the chain-link icon in the upper-left corner of the docked OneNote window to indicate that a linked note-taking session has ended.
![]() LET ME TRY IT
LET ME TRY IT
Viewing Linked Notes
You can return to the notes you took and the information you looked at during a linked notes session by doing any of the following:
• To view the notes you took during a linked notes session, simply open that notes page again in OneNote.
• To view the pages and documents on which your linked notes were based, move the mouse pointer over the paragraphs of notes that you took in a linked notes session. Just to the left of each paragraph, you should see a small icon representing the program that your notes are linked to (see Figure 6.35). When you move the mouse pointer over any of these program icons, you’ll see a ToolTip with details about the linked document or page, including a visual preview to help you recognize the page again (see Figure 6.36).
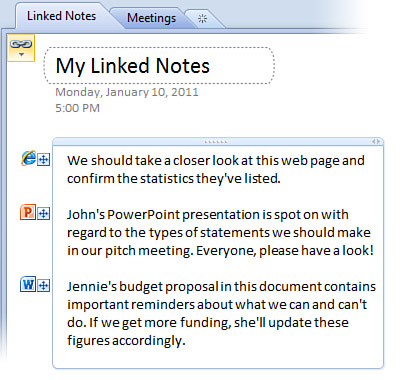
Figure 6.35 Moving the mouse pointer over the paragraphs of text from a linked note-taking session reveals the icons of the applications with which the notes are associated. (Unlike in this screenshot, the icons are shown one by one, not all together.)
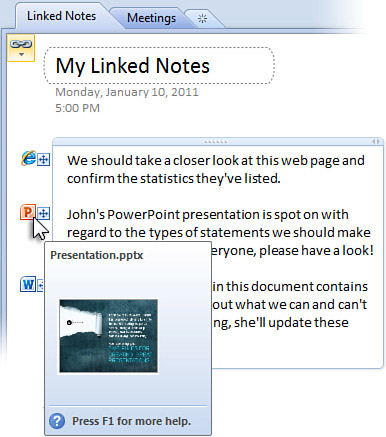
Figure 6.36 Resting the mouse pointer over any of the program icons that appear to the left of the notes paragraphs from a linked note-taking session displays a thumbnail image of the page or file with which the notes are associated.
• To return to any of the original information that you looked at during a linked notes session, click any of the small program icons to the left of your linked notes paragraphs to open the source pages or documents on which your linked notes were based.
Disabling or Reenabling Linked Notes
If you want to occasionally use the Dock to Desktop feature in OneNote but you don’t want to begin a linked notes session, you can turn it off by doing the following:
1. In OneNote, press Ctrl+Alt+D to dock the program window to the side of your desktop.
2. In the upper-left corner of the page, click the link icon, and then click Stop Taking Linked Notes.
If you later want to reenable linked note-taking, do the following:
1. In a docked OneNote window, click the link icon in the upper-left corner.
2. On the pop-up menu that appears, click Start Taking Linked Notes.
Linked notes might take a little practice at first, but if you’re using OneNote to frequently do a lot of research online, or you’re working with other people to pore over and annotate lengthy documents or presentations, you might just find the linked notes feature to be an invaluable help to you.
Using the Research and Translate Tools
Before concluding this chapter, I want to quickly point to a couple of other, built-in resources that you might find useful when collecting information in OneNote or doing research online.
Like some of the other programs in the Microsoft Office 2010 suite, OneNote 2010 includes a Research task pane that provides web search integration and basic translation services. This tool can be helpful whenever you want to quickly look up information while typing your notes or if you want to translate a selection of text in another language.
OneNote 2010 also includes the Mini Translator, which provides a more interactive way to translate text in a foreign language in your notes.
![]() LET ME TRY IT
LET ME TRY IT
Setting Options for the Research Task Pane
To display the Research task pane in OneNote 2010 and set options for it, do the following:
1. On the ribbon in OneNote 2010, click the Review tab, and then, in the Spelling group, click Research.
2. In the Research task pane that opens, click the Research Options link at the very bottom of the task pane (see Figure 6.37).

Figure 6.37 The Research task pane makes it easy to look up information without leaving the OneNote program window.
3. In the Research Options dialog box, select any of the available reference books and sites that you want to use with this feature and deselect any that you do not want to consult. For example, if you’re traveling on business to the United Kingdom, you might want to temporarily change your Thesaurus selection from the U.S. to the U.K. version.
4. Click OK when you’ve set the options that you want.
![]() LET ME TRY IT
LET ME TRY IT
Searching with the Research Task Pane
If, while taking notes, you suddenly need clarification about something, you can use the Research task pane to look it up without having to switch to your web browser.
To search with the Research task pane, follow these steps:
1. If you dismissed the Research task pane after the previous steps, you can return to it by clicking the Review tab on the ribbon and then clicking Research in the Spelling group.
2. In the Research task pane that opens, type a word or phrase into the Search for box. From the drop-down menu just below it, select the reference book or research site you want to use for your search, and then click the green Start Searching arrow.
For example, entering the word constitution in the Search for box and choosing Bing as the search engine will define the term you’ve searched for, yield a Wikipedia article about the U.S. constitution, and much more. You can click the blue link below each search result to fetch and display the full text of web articles in your browser. For results in books and dictionaries, you can click and select and then copy any of the text to paste it in your notes.
To modify a search (for example, to change from a Bing search on the Web to an Encarta Dictionary search), click the green Back button just above the search results list and then modify where OneNote should look for the word or phrase you previously entered (see Figure 6.38).
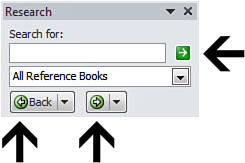
Figure 6.38 To start a search, click the green, square-shaped arrow pointing to the right. To navigate between search results, click the green, circular-shaped arrows pointing left or right.
For best results when searching with the Research tools, start with a broad search of a single or simple term and then slowly narrow the search with additional keywords, if need be. If you start by being too specific in your search (for example, “white fuzzy bunnies in the snow”), you might not find what you’re looking for. Beginning with a much simpler search (“bunnies”) is a better starting point from which to narrow your results.
![]() LET ME TRY IT
LET ME TRY IT
Adding Research Services
If you find the Research pane to be a valuable addition to your work in OneNote, or if you have need of a profession-specific resource for your research work, you might want to check out what else is available for it in the Office marketplace.
Please note that I cannot personally endorse any of these third-party companies or services, but I wanted to at least point out to you the availability of these services.
To add research services, do the following:
1. Near the bottom of the Research task pane, click Get services on Office Marketplace.
2. In the Available Research Services overview that opens, have a look at some of the additional services that you can add to your Research pane functionality in OneNote.
Finally, let’s look at the built-in translation features in OneNote 2010.
![]() LET ME TRY IT
LET ME TRY IT
Translating a Word or Phrase with the Research Pane
Whether you’re reviewing documents and notes from your company’s foreign subsidiaries, or you work with an exchange student at your school, there might be times when you want a quick text translation when working in OneNote.
To translate a single word or short phrase in your notes, do the following:
1. Select the foreign word or phrase in your notes, right-click the selection, and then click Translate. The Research pane opens, this time with Translation set as the default search engine.
2. If necessary, select the appropriate languages in the From and To boxes under Translation. For example, if you’ve selected the word étudiant in your notes, you could select French in the From box and English in the To box (see Figure 6.39).
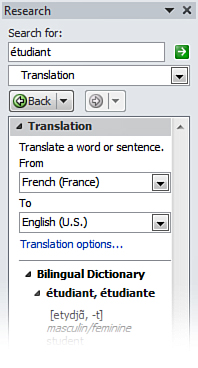
Figure 6.39 When using the Research task pane for language translation, you can choose the language from which to translate and the language into which to translate the selected text.
3. Click the green Start Searching arrow at the top of the task pane and then look for the translated result in the results list.
If using the Research task pane for on-the-fly translations isn’t quick enough for you, you can opt to use OneNote’s built-in Mini Translator instead. This built-in translation engine lets you rest the mouse pointer over foreign words in your notes and translate on the fly. Using the Mini Translator, you can also play back certain text to hear its pronunciation.
Setting Your Preferred Mini Translator Language
Before you can use the Mini Translator, you must first set the language into which you want to translate selected text in OneNote.
To set your preferred Mini Translator language, do the following:
1. On the OneNote ribbon, click Review, and then, in the Language group, click the small downward-facing arrow at the bottom of the Translate button.
2. On the pop-up menu that appears, click Choose Translation Language.
3. In the Translation Language Options dialog box that appears, click the Translate to drop-down list and then select French (France) or any other language that you prefer.
4. Click OK.
Once your preferred translation language is set, you can start using the Mini Translator.
![]() LET ME TRY IT
LET ME TRY IT
Translating Text with the Mini Translator
Now that you’ve set your translation language, you’re ready to translate any part of the text on your notes page.
To translate text with the Mini Translator, do the following:
1. If the Research task pane is still displayed near the right side of the OneNote program window from the previous procedures, go ahead and close it. Click the small X in the upper-right corner of the task pane to dismiss it.
2. On your notes page, type some text that you want OneNote to translate. For example, you could type The world is watching!
3. On the OneNote ribbon, click the Review tab, and then, in the Language group, click the Translate button.
4. On the pop-up menu that appears, click the second option, which appears as Mini Translator [French (France)].
5. Now that you’re in translation mode, you can simply move the mouse pointer over one of the words in your text and then wait a moment until the Mini Translator appears in a slightly dimmed state. When it appears, move the mouse pointer over it to make it fully visible and read the translation of the word. For example, if you hovered over the word world, OneNote would correctly translate it into French as monde.
At the bottom of the Mini Translator pop-up window are several icons that provide additional functionality (see Figure 6.40):
• Expand—Click the leftmost icon to open the selected word in the Research task pane.
• Copy—Click the second icon from the left to copy the translation text to your Clipboard. You can use the Ctrl+V keyboard shortcut to paste the text anywhere into your notes.
• Play—Click the third icon from the left to hear the pronunciation of the selected word.
• Stop—Click the fourth icon from the left to stop playback of a word pronunciation. This button is usually only necessary if you have a long phrase of text selected whose pronunciation you’re currently playing back and want to interrupt.
• Help—Click the last icon at the bottom of the Mini Translator to read tips for using the Mini Translator in OneNote.
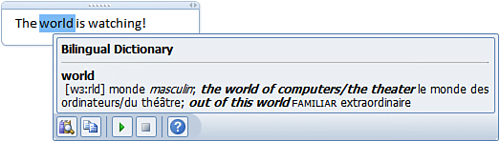
Figure 6.40 The icons at the bottom of the Mini Translator window provide additional options.
It’s easy to see why OneNote is a great companion for information gathering and research, no matter if you’re doing it for work, for school, or for personal projects at home. Though the tips in this chapter represent only the proverbial tip of the iceberg, I hope that they have helped to illustrate just how rich in features OneNote is under the hood.
If you use OneNote every day as part of your work or home life and you apply the functionality of its features to your specific professions or projects, you’ll soon discover additional techniques that can save you time and help you master the oceans of information and details that we all have to deal with in our lives every day. When that time comes, I hope you’ll share some of your own tips and techniques with other OneNote users—be it your friends, your family, your colleagues, your schoolmates, or people online with whom you share common interests and pursuits. You can find and interact with other OneNote users on Facebook (visit facebook.com/microsoftonenote) and on the Office Blog (visit blogs.office.com).