
Customizing OneNote 2010
Throughout this book, you’ve read the words default or default settings a few times in reference to any number of OneNote (or Windows) features or their behaviors. Although the word default typically has a negative connotation (defaulting on a loan, for example), it can also refer to the initial factory settings with which a product is shipped.
For example, when you buy a toaster, its 1-through-10 heat dial will probably be set to 5 at the factory. This initial, middle-of-the-road setting is likely the best choice for most people. If you buy the toaster, but you happen to prefer a type of bread that burns easily, you’re free to change the heat setting from 5 to something lower. This lets you toast your choice of bread to perfection. If you also wanted to toast bagels once in a while, you could temporarily increase the heat setting to accommodate the higher density of the bread. Your toaster gives you this control by letting you indicate a preference that you can set and easily change to something else at any time.
In software, it’s quite similar. For example, when you install Windows on your computer (or when you buy a PC with Windows already installed), certain features are turned on, even though you might not ever need or want them, and others are turned off, even though you happen to be someone who could benefit from them. This isn’t done to annoy you; it’s simply not possible for the author of the software to guess which features you’ll care about and which you’ll never use. By providing an interface for optional settings (just like the dial on your toaster), the person or company releasing the software lets you tweak these settings so that the software and its features are tailored to better meet your needs (see Figure 12.1).
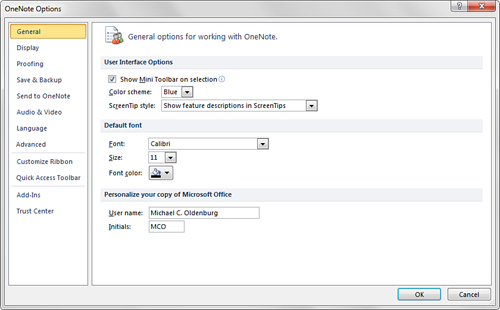
Figure 12.1 In the OneNote Options dialog box, you can click any of the categories listed on the left to inspect, customize, or override any of the initial or current settings shown on the right. If necessary, you can resize this dialog box by clicking and dragging its lower-right corner.
The only pity about software customization is how relatively seldom the average user seems to take advantage of it. Although some tweaks might be nothing more than a cosmetic change, such as choosing a different background picture on your computer or selecting a new ring tone on your cell phone, some settings can dramatically change the way your software performs or how it controls the device on which it runs. For example, the power management control panel in Windows 7 lets you decide whether you want to get the most processing power out of your computer or whether you care more about getting every last minute out of a battery charge on your laptop. By changing these settings at the right times, you can tell Windows how it should adjust its performance to fit your situation—no matter if you’re about to embark on a processor-hungry task at your desktop such as video editing or database crunching, or if you need to have enough juice in your laptop battery to last you through a day full of meetings.
Although you don’t have to change all (or any) of the default settings of your software programs, knowing about these options and understanding what they do can have a profound effect on your time, productivity, and the enjoyment that you get out of your computer. OneNote 2010 has a marvelous range of preferences that you can take advantage of. Many of these settings work together with others, giving you a much wider array of program customization than what other programs might offer.
Unless self-explanatory, I’ll provide examples of why and how the following preferences can be useful when selected or changed. I’ll also omit here any settings that I’ve already discussed in context in any of the previous chapters, unless there’s more to be said about them.
If ever you’re not sure whether you need to change a particular feature preference in OneNote, it’s probably best to leave its default setting in place. As soon as you’ve gotten more comfortable with the basics of using OneNote 2010 and you’re ready to fine-tune the specific features that you use the most often, you can return to the information here.
Setting Display Preferences
In OneNote, display preferences include optional settings that let you show or hide certain parts of the OneNote interface or control how and where such elements appear.
![]() LET ME TRY IT
LET ME TRY IT
Showing or Hiding the Ribbon
In OneNote 2010, the ribbon defaults to a minimized state, with only its tabs visible (see Figure 12.2). As I explained in Chapter 3, “A Tour of the OneNote Workspace,” this setting allows for more of your screen space to remain visible while taking or reading notes. This is especially useful if you’re using OneNote on a laptop or netbook computer with a small screen. To use the ribbon in this minimized state, click any ribbon tab to temporarily reveal all of the commands available on that tab. As soon as you click a command, the ribbon hides itself again.
![]()
Figure 12.2 The ribbon in OneNote 2010, as it appears with only its tabs visible in the default view.
If you work on a desktop computer with a large monitor, or if your laptop computer has a decent-sized screen, you can opt to keep the full ribbon visible at all times (see Figure 12.3).

Figure 12.3 The ribbon in OneNote 2010, expanded to full view.
To toggle the ribbon display, do either of the following:
• Hold the Ctrl key and then press F1.
• At the far right of the ribbon tabs, next to the circular blue Help (?) button, click the Expand the Ribbon (or Minimize the Ribbon) button (see Figure 12.4).
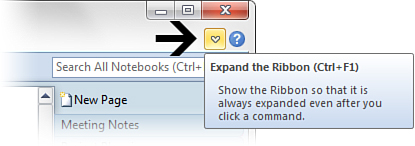
Figure 12.4 The small arrow button to the far right of the ribbon tabs lets you toggle the ribbon display between minimized and expanded view. You can also use the Ctrl+F1 keyboard shortcut to toggle the ribbon view in the same way.
Aside from showing or hiding its contents, you can fully customize the ribbon, including its commands, groups, and tabs. See “Customizing the OneNote Workspace” later in this chapter.
![]() LET ME TRY IT
LET ME TRY IT
Changing the Current Page View
The commands in the Views group let you change the appearance and dimension of the OneNote program window.
To change the current page view, do the following:
1. Click the View tab.
2. In the Views group (see Figure 12.5), do any of the following:
• Click the Full Page View button (or press the F11 key) to remove most interface elements from the OneNote program window. This gives you the most amount of available screen space for reading and editing notes. The Quick Access Toolbar and the ribbon tabs are still available, and keyboard shortcuts that you know still work in this mode. To exit this view, click the View tab and then click Normal View (or press F11 again).
• Click the Dock to Desktop button (or press Ctrl+Alt+D) to shrink OneNote down to a narrow vertical window that docks to the right side of the Windows desktop. This view is useful for taking notes on something else you’re looking at. To exit this view, click the View tab and then click Normal View (or press Ctrl+Alt+D again).
• Click the Normal View button whenever you want to return the OneNote program window to its original appearance and dimensions.

Figure 12.5 On the ribbon, the Views group on the View tab lets you switch between Normal view, Full Page view, and a window docked to the Windows desktop. The button that appears orange is the view you currently have selected.
![]() LET ME TRY IT
LET ME TRY IT
Displaying Rule Lines or Gridlines on All New Pages
In Chapter 4, “Notebooks, Sections, and Pages,” you learned how to change the appearance of your notebook pages by applying a color background or adding rule lines or gridlines to the page. If you want all new pages that you create to have rule lines or gridlines, you can tell OneNote to apply them automatically by doing the following:
1. Open or create a blank, new page.
2. Click the View tab.
3. In the Page Setup group, click the Rule Lines drop-down arrow and then click the style of rule lines or gridlines you want to use for the current page.
4. Click the Rule Lines drop-down arrow again, but this time, click Rule Line Color and then select a color if you want the rule lines or gridlines style you chose to appear differently from the default color of Light Blue. If you don’t like a color selection you made, repeat this step with another choice until you find a color you like, or reselect the Light Blue setting at the top of the list.
5. After you’ve selected the line style and color in steps 3–4, click the Rule Lines drop-down arrow once more and then click Create New Pages with Rule Lines.
OneNote will now apply the rule line or gridline style and color you selected in steps 3–4 and automatically apply them to all future new pages when they are created.
Note that if you want any existing pages in your notebook to have the same look, you’ll need to go back to those pages and manually apply the same rule line or gridline style.
One question that I’m sometimes asked is why OneNote doesn’t provide a similar setting for automatically applying a specific color to all new pages. One way to achieve this is to create a blank, new page, applying your preferred background color to the page (View tab, Page Setup group, Page Color button) and then saving that page as a template. You then can have OneNote automatically use that simple template as your default page appearance for all of the new pages you’ll create from then on. For more information, see “Automatically Applying a Template to All New Pages” in Chapter 4.
Zooming the Page Display
Much like in other Microsoft Office programs, you can increase or decrease (zoom) the magnification of a page to either get a closer look at a part of your notes or to see more of the entire page layout all at once. Zooming in and out lets you change the size of your notes text and any other objects on the page without changing the formatting of the content itself. You can return to the 100% view setting again at any time to restore the normal appearance of the page.
To zoom in or out of your notes, do the following:
1. Open the page you want to zoom.
2. Click the View tab.
3. In the Zoom group, do any of the following:
• Click Zoom In (either once or repeatedly) to increase the level of magnification of the current page.
• Click Zoom Out (either once or repeatedly) to decrease the level of magnification of the current page.
• Click the 75% button to decrease magnification by 25%.
• Click the 100% button to restore the current page view to its normal appearance.
• Click the Zoom box drop-down arrow to select a specific level of magnification (see Figure 12.6).
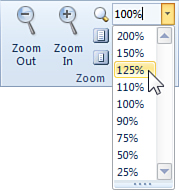
Figure 12.6 To zoom in and out of a page, either click the buttons provided in the Zoom group on the View tab, or select a specific level of magnification from the Zoom drop-down menu.
![]() LET ME TRY IT
LET ME TRY IT
Opening Additional OneNote Windows
Typically, working in a single OneNote window will suffice. However, if you frequently need to switch between different pages without losing your place (for example, when comparing notes in different locations on the page or in different locations in a notebook), you can open any number of additional OneNote windows and navigate to a different place in your notes in each of them.
To open additional OneNote windows, do the following:
1. On the View tab, in the Window group, click New Window. OneNote opens a duplicate of your current OneNote program window. To open additional windows, click the New Window button again.
2. In any new window, navigate to any page you want—either in the same notebook or in a different one.
3. Use the Windows Alt+Tab shortcut to switch between all of your open OneNote windows.
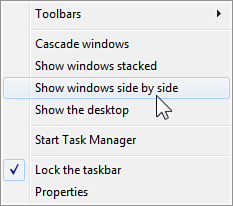
Figure 12.7 If you have multiple OneNote windows open and you want to see their contents all at once, you can choose to arrange them across your Windows desktop in equal tiles. Click in a blank area of the Windows 7 taskbar and then click the Show Windows Side by Side command on the shortcut menu. To change things back to the way they were, return to this menu and then click the Undo Show Windows Side by Side command that will now appear.
When you no longer need any of the additional OneNote windows you’ve opened, simply close them.
Displaying a New Docked Window
Because we’ve already covered the Dock to Desktop command in the Views group on the ribbon, the command called New Docked Window in the Window group might seem redundant.
The difference is that while the Dock to Desktop command docks the current OneNote window to the right side of the Windows desktop, the New Docked Window command opens an additional OneNote window, which it docks to the desktop while leaving your original OneNote window the same.
This is mainly useful if you want to take notes about another notes page—either elsewhere in the same notebook or in another notebook, such as a SkyDrive-based notebook.
To display a new docked window, do the following:
1. Click the View tab.
2. In the Window group, click the New Docked Window button. OneNote doesn’t change your current OneNote window but instead opens a second OneNote window, which it then docks to the Windows desktop (see Figure 12.8).
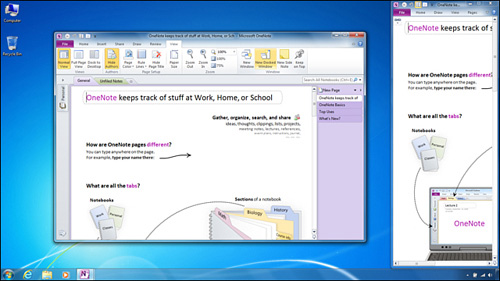
Figure 12.8 If you use the New Docked Window command on the View tab, OneNote opens a secondary OneNote window that’s docked to the side of your desktop. You can then create a new page in the docked window to take notes on any pages that you’re viewing in the normal OneNote window.
![]() LET ME TRY IT
LET ME TRY IT
Docking New Side Notes to the Desktop
In Chapter 6, you learned about side notes, the small OneNote windows that resemble the yellow sticky notes you might still be in the habit of pasting all over your computer’s monitor. Because side notes are a great way to take notes on top of other documents or programs, you might prefer to have OneNote automatically dock new side note windows to the desktop.
To dock new side notes to the desktop, do the following:
1. Click the File tab and then click Options.
2. In the OneNote Options dialog box, click the Display category on the left side.
3. On the right side, under the Display heading, select the Dock New Side Note Windows to the Side of the Desktop check box.
4. Click OK to save your changes.
Now when you open a new side note by clicking the New Side Note button on the View tab, OneNote will automatically dock it to the side of your Windows desktop. Though docked side notes don’t look like little yellow sticky notes, they’ll still work the same as side notes that aren’t docked.
![]() LET ME TRY IT
LET ME TRY IT
Keeping OneNote Visible over Other Windows
If you’re taking notes on information displayed in other windows (such as documents or web pages), you can choose to have OneNote stay on top of such other windows so you can still see your notes even when you switch control to any of your other open windows.
To keep OneNote visible over other windows, do the following:
1. Click the View tab.
2. In the Window group, click Keep on Top. The button turns orange, letting you know that this window will now stay pinned on top of other windows.
3. To restore normal window behavior at any time, click the Keep on Top button again.
The Keep on Top option is a separate control for each OneNote window you have open. This way, you can control which window should always appear over the other windows. For example, if you’re taking notes in your main OneNote window but need to reference information in a side note, you could pin the side note to the top so that this information remains visible even while you’re typing your notes in the main window.
Displaying Page Tabs on the Right or Left
By default, the page tabs column appears to the right side of the OneNote program window. If you want to display your page tabs on the left side instead, do the following:
1. Click the File tab and then click Options.
2. In the OneNote Options dialog box, click the Display category on the left side.
3. On the right side, under the Display heading, select the Page Tabs Appear on the Left check box.
4. Click OK to save your changes.
If you frequently work in both the full version of OneNote 2010 (which displays the page tabs on the right) and the OneNote Web App (which displays the page tabs on the left), you can use this option to match the appearance of the page tabs between the full version and the Web App.
![]() LET ME TRY IT
LET ME TRY IT
Turning the Floating New Page Button On or Off
In previous versions of OneNote, if you wanted to insert a new page between two existing pages, you would first have to create the new page and then drag it from the end of your page tabs list to the position where you wanted it.
In OneNote 2010, you can move the mouse pointer over any existing page tabs and then click the small New Page icon that appears just to the left of your position (see Figure 12.9). OneNote will then insert a blank page between those pages.

Figure 12.9 Whenever you move the mouse pointer between page tabs, a small New Page icon appears just to the left of the page tabs, with a small arrowhead indicating where OneNote will create a new, blank page if you click the icon. If you don’t want the shortcut icon to be displayed for some reason, you can turn this option off.
If you don’t want this shortcut icon to be displayed when you move the mouse pointer over your page tabs, you can turn it off by doing the following:
1. Click the File tab and then click Options.
2. In the OneNote Options dialog box, click the Display category on the left side.
3. On the right side, under the Display heading, uncheck the Show the Floating New Page Button Near Page Tabs check box.
4. Click OK to save your changes.
![]() LET ME TRY IT
LET ME TRY IT
Displaying the Navigation Bar on the Left or Right
Much like you can switch the side on which the page tabs appear, you can swap the position of the navigation bar (the area on the side of the OneNote program window that shows the notebooks that you currently have open) from the left side of the OneNote program window to the right side.
Do the following:
1. Click the File tab and then click Options.
2. In the OneNote Options dialog box, click the Display category on the left side.
3. On the right side, under the Display heading, uncheck the Navigation Bar Appears on the Left check box. This will place it on the right side instead.
4. Click OK to save your changes.
Displaying the Vertical Scrollbar on the Left or Right
As any notes page fills up with notes past the bottom edge of your OneNote program window, a vertical scrollbar appears to the left of the page tabs. This lets you quickly scroll through the contents of long notes pages, the same way scrollbars work elsewhere in Windows.
If you don’t want the scrollbar so close to the page tabs (for example, if you tend to accidentally click a random page tab instead of the scrollbar), you can swap its position.
To display the vertical scrollbar on the left, do the following:
1. Click the File tab and then click Options.
2. In the OneNote Options dialog box, click the Display category on the left side.
3. On the right side, under the Display heading, select the box labeled Vertical Scroll Bar Appears on the Left.
4. Click OK to save your changes.
When active, the vertical scrollbar will now appear to the left of the page.
![]() LET ME TRY IT
LET ME TRY IT
Changing the Microsoft Office Color Scheme
Though you can freely change the colors of your notebook icons, your sections, and the background of your pages, the default color scheme of certain elements of the OneNote interface (for example, the surface of the ribbon) will appear as light blue. If this clashes with your other Windows color preferences or you’d simply prefer something more neutral, you can choose from two other Microsoft Office color schemes that are built in to OneNote 2010.
To change the Microsoft Office color scheme in OneNote, do the following:
1. Click the File tab and then click Options.
2. In the OneNote Options dialog box, click the General category on the left side.
3. On the right side, under the User Interface Options heading, click the Color Scheme drop-down menu.
4. From the list, select Silver to change the user interface from light blue to a more neutral light gray. Alternately, select Black to choose a dark gray contrast color scheme.
5. Click OK to save your changes.
![]() LET ME TRY IT
LET ME TRY IT
Turning the OneNote Taskbar Icon On or Off
In Chapter 6, you learned about the OneNote 2010 Screen Clipper and Launcher—the small OneNote icon that appears in the notification area of the Windows taskbar (see Figure 12.10). If you previously dismissed this icon and want it back, or if you want to turn it off temporarily, you can set the appropriate option by doing the following:
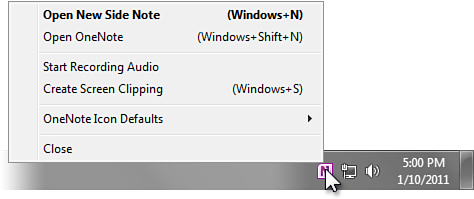
Figure 12.10 The small OneNote icon on the taskbar provides access to additional OneNote functionality as well as some useful keyboard shortcuts. Note that Windows might hide this icon after some time, in which case you’ll need to first expand your notification icons by clicking a small arrow that will appear near your Windows clock display.
1. Click the File tab and then click Options.
2. In the OneNote Options dialog box, click the Display category on the left side.
3. On the right side, under the Display heading, click the Place OneNote Icon in the Notification Area of the Taskbar check box.
4. Click OK to save your changes.
The ability to turn this feature off is provided in case you’re using other programs that use the same Windows keyboard shortcuts, in which case you can resolve the conflict by removing the OneNote taskbar icon.
If you have no keyboard shortcut conflicts, turning this icon off is not recommended. Doing so will disable several useful features and keyboard shortcuts. For more information, see “Meet the OneNote Screen Clipper and Launcher” in Chapter 6.
![]() LET ME TRY IT
LET ME TRY IT
Turning Screen Clipping Notifications On or Off
Whenever you insert a new screen clipping into your notes, OneNote offers guidance by displaying helpful messages whenever you begin and finish a new screen clipping (see Figure 12.11).
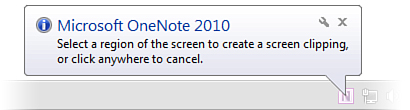
Figure 12.11 The helpful notifications that appear whenever you create a screen clipping with OneNote 2010 can be suppressed after you’re an old pro at using this feature.
Although these messages are quite helpful while you’re learning OneNote, you might eventually prefer not to display them once you’ve gotten the hang of working with screen clippings.
To turn off the notifications, do the following:
1. Click the File tab and then click Options.
2. In the OneNote Options dialog box, click the Display category on the left side.
3. On the right side, under the Display heading, click the Disable Screen Clipping Notifications check box.
4. Click OK to save your changes.
![]() LET ME TRY IT
LET ME TRY IT
Turning Linked Notes Thumbnails On or Off
Whenever you work in Linked Notes mode (see Chapter 6), OneNote keeps track of any documents, presentations, or websites you look at and it automatically links to this information from your notes. To help you quickly distinguish between multiple types of information, it includes a small thumbnail image for each link so you can recognize its content (see Figure 12.12).

Figure 12.12 Resting the mouse pointer over any of the program icons that appear to the left of notes from a Linked Notes session will trigger the display of a thumbnail image of the page or file with which the notes are associated. If these thumbnail images get in the way of other tasks, such as formatting your notes, you can suppress their display.
Though generally useful, these thumbnail images can sometimes prove distracting—for example, when you’re going through your linked notes to format them and the pop-ups get in the way of your text.
To suppress the thumbnail images that may repeatedly appear, do the following:
1. Click the File tab and then click Options.
2. In the OneNote Options dialog box, click the Advanced category on the left side.
3. On the right side, scroll down to the Linked Notes heading, and then uncheck the Save Document Snippets and Page Thumbnail for Better Linking to the Right Place in the Document check box.
4. Click OK to save your changes.
Customizing or Hiding the OneNote E-mail Signature
Whenever you send a notes page in e-mail, OneNote appends a signature at the bottom of the last page (see Figure 12.13). If you don’t like the default text or you want to disable the signature altogether, do the following:
1. Click the File tab and then click Options.
2. In the OneNote Options dialog box, click the Advanced category on the left side.
3. On the right side, under the E-mail Sent from OneNote heading, do one of the following:
• To change the signature text, type over the existing text with new text that you want to use for your signature.
• To turn off the signature, uncheck the Add the Following Signature to E-mail Messages and Web Pages Created in OneNote check box.
4. Click OK to save your changes.
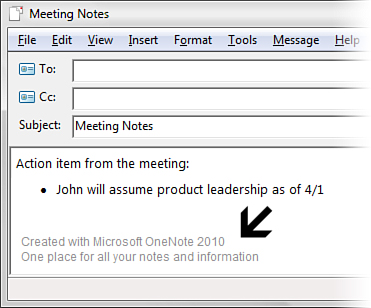
Figure 12.13 OneNote automatically appends its default signature to pages sent in e-mail or as a web page. Depending on your preference, you can customize or disable this text.
![]() LET ME TRY IT
LET ME TRY IT
Changing How Tagged Notes Are Displayed on a Tags Summary Page
When you tag notes to categorize them or to mark them for follow-up, they will typically appear in your notes and in your tag search results the same way they appeared when you created them.
If you frequently tag notes for follow-up and you use the Create Summary Page option in the Tags Summary task pane, you can effectively mark tags as read by making them appear dimmed once you’ve collected them on a summary page.
To do this, follow these steps:
1. Click the File tab and then click Options.
2. In the OneNote Options dialog box, click the Advanced category on the left side.
3. On the right side, scroll down to the Tags heading and then do the following:
• To show note tags as dimmed after you’ve collected them in a summary page, click the option labeled Show Original Tags as Dimmed. Unless you check the next option as well, the dimmed original versions of the tags will not appear in subsequent tag searches in order to avoid duplicate search results.
• Additionally, you can select the check box labeled Show Dimmed Tagged Notes in the Tags Summary Task Pane. This will include any previously searched (and now dimmed) note tags in your next search. With this option, their dimmed state will be your only reminder that you’ve already searched for these tags previously and that your Tags Summary search results list may contain duplicates.
4. Click OK to save your changes.
For more information about note tags, see Chapter 7, “Organizing and Searching Notes.”
Customizing the OneNote Workspace
OneNote 2010 is the first version of OneNote to include the Microsoft Office ribbon interface and the Quick Access Toolbar. Aside from providing convenient access to the most popular commands available in OneNote, these interface elements also provide an unprecedented level of customization, allowing you to precisely fine-tune the OneNote interface to your preferences and needs.
I encourage you to try out these options without fear of messing anything up. You can easily reset any customizations you experiment with if you don’t want to keep the result or if you want to start over.
![]() LET ME TRY IT
LET ME TRY IT
Changing the Location of the Quick Access Toolbar
The Quick Access Toolbar is a small row of frequently used command icons (see Figure 12.14). Although it typically appears to the left of the title bar in the OneNote program window, you can choose to display it underneath the ribbon instead. You can make this change as a purely cosmetic preference or to increase the amount of space available for toolbar customization.
![]()
Figure 12.14 The fully customizable Quick Access Toolbar leaves frequently used commands visible at all times, no matter which ribbon tab you’ve selected. By default, it appears in the upper-left corner of the OneNote program window. However, if that’s too far to move the mouse every time, you can opt to display this toolbar underneath the ribbon instead.
To change the location of the Quick Access Toolbar, do the following:
1. Click the small drop-down arrow to the right of the Quick Access Toolbar.
2. On the menu that appears, click Show Below the Ribbon. The toolbar now appears on its own row between the ribbon and the top of the section tabs in the current notebook.
When displayed underneath the ribbon, the Quick Access Toolbar has a bit more space available for adding additional command buttons (see “Adding or Removing Quick Access Toolbar Commands” in the procedure that follows).
![]() LET ME TRY IT
LET ME TRY IT
Adding or Removing Quick Access Toolbar Commands
After you first install OneNote 2010, it will display the following four preset commands on the Quick Access Toolbar:
• Back
• Undo
• Dock to Desktop
• Full Page View
The first two buttons are good to have available at all times, as you may frequently want to navigate back to the previous notes page that you looked at or you might need to undo an unintentional change that you made to your notes. If you find the Dock to Desktop and Full Page View options useful, you can keep them around; otherwise you can remove them from the Quick Access Toolbar and replace them with commands you tend to use more often.
To turn any preset commands on or off, do the following:
1. Click the small drop-down arrow to the right of the Quick Access Toolbar.
2. On the menu that appears, do either (or both) of the following:
• To add a new command to the Quick Access Toolbar, click it in the list. For example, Chapter 9, “Sharing Notes with Other People,” suggested that if you frequently print notes, adding the Print command to the Quick Access Toolbar will make this task more convenient. While you rest the mouse pointer over the Print command in the list, a ToolTip appears to confirm what will happen when you click it (see Figure 12.15).

Figure 12.15 Adding or removing commands from the Quick Access Toolbar is as easy as clicking them in this menu. A check mark appears next to commands you’ve already added. Resting the mouse over any of the commands listed tells you if you’ll be adding or removing the command if you click it in the list.
• To remove a command from the Quick Access Toolbar, click it in the list. Commands that are currently on the toolbar will appear with an orange-highlighted check mark icon to the left of the command’s name.
If the command you want to add to the Quick Access Toolbar isn’t listed on the customization presets menu but you see it on one of the ribbon tabs, you can just as quickly add the commands you want by doing the following:
1. Navigate to the ribbon tab that contains the command you want to add to the Quick Access Toolbar.
2. Move the mouse pointer over the command button and then right-click it.
3. On the shortcut menu that appears, click Add to Quick Access Toolbar (see Figure 12.16). OneNote will instantly append the command to the end of the Quick Access Toolbar.
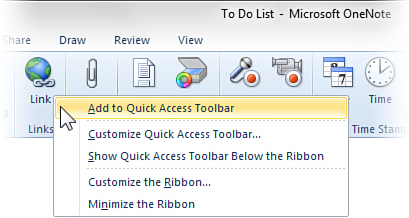
Figure 12.16 If the command you want to add to the Quick Access Toolbar appears somewhere on the ribbon (such as the Link command in this example), you can right-click its icon and then click Add to Quick Access Toolbar.
If the commands you want to add to the Quick Access Toolbar appear neither on the customization presets menu nor on the ribbon, you can display the advanced interface for the customization of the toolbar (see Figure 12.17). Here, you can find and add just about any command that’s available in OneNote 2010.

Figure 12.17 Though it might seem a bit daunting at first, the advanced customization screen for the Quick Access Toolbar is actually quite easy to use. In the list of icons and commands on the left, click the specific command that you want to add, and then click the Add button in the middle. When all of the commands you want have been added to the list on the right, you can organize their order of appearance.
1. Click the small drop-down arrow to the right of the Quick Access Toolbar.
2. On the menu that appears, click More Commands.
3. In the OneNote Options dialog box that appears, the Quick Access Toolbar will appear selected. Under Choose Commands From, click the drop-down arrow and then select All Commands (see Figure 12.17).
4. Scroll through the alphabetical list to browse commands.
5. To add a command to the Quick Access Toolbar, click to select it in the list on the left and then click the Add button between the two lists (see Figure 12.17).
6. When the commands you want appear in the list on the right, you can select individual commands and then click the Up and Down arrow buttons on the far right of the dialog box to organize the commands in the order you want them to appear.
7. To save your changes, click OK.
![]() LET ME TRY IT
LET ME TRY IT
Exporting Your Quick Access Toolbar Customizations for Use on Other Computers
If you’ve spent a fair amount of time making significant customizations to the Quick Access Toolbar and you want to duplicate these settings on another computer where you have a second copy of OneNote 2010 installed (or if you want to share your settings with a friend who uses OneNote 2010), you can export your settings to a file.
To do this, do the following:
1. Click the File tab, click Options, and then, in the OneNote Options dialog box that appears, click Quick Access Toolbar in the list of categories on the left.
2. At the bottom of the list on the right, click the Import/Export button, and then click Export All Customizations on the shortcut menu that appears (see Figure 12.20 later in the chapter).
3. In the File Save dialog box, accept or change the filename that is provided and then click Save.
4. Click OK.
By importing this settings file into OneNote 2010 on another computer, your Quick Access Toolbar customizations will be applied to that installation of OneNote.
![]() LET ME TRY IT
LET ME TRY IT
Resetting Your Quick Access Toolbar Customizations
If you’ve made extensive customizations to the Quick Access Toolbar that you no longer want to keep, or if you made a mistake and you want to restore the Quick Access Toolbar to its initial settings, do the following:
1. Click the File tab, click Options, and then, in the OneNote Options dialog box that appears, click Quick Access Toolbar in the list of categories on the left.
2. At the bottom of the list on the right, click the Reset button (see Figure 12.17) and then click Reset Only Quick Access Toolbar.
3. Click OK.
![]() LET ME TRY IT
LET ME TRY IT
Adding Commands to the Ribbon
Although the Quick Access Toolbar is intended to provide access to your most frequently used commands at all times, it’s important to understand that it does not replace the ribbon, which is your main and most important toolbox in OneNote 2010. For this reason, Microsoft has included the same sophisticated customization interface for ribbon commands, ribbon groups, and ribbon tabs.
To create your own custom ribbon tab with a ribbon group of commands, do the following:
1. Click the File tab, click Options, and then, in the OneNote Options dialog box that appears, click Customize Ribbon in the list of categories on the left.
2. Near the top middle, under Customize the Ribbon, click the Choose Commands From drop-down and then select All Commands (see Figure 12.18).
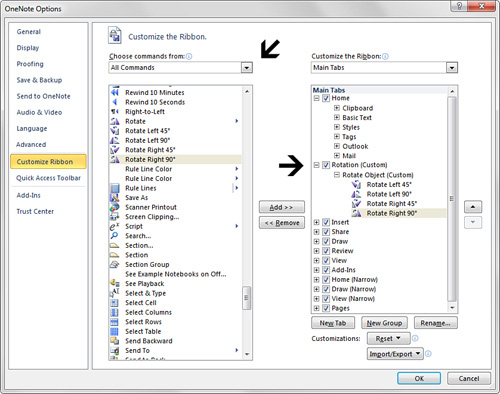
Figure 12.18 In this example, we’re adding a new tab called Rotation to the ribbon. This tab will contain one ribbon group called Rotate Object, and that group will contain four command buttons for the four rotation commands that are available in OneNote.
3. Scroll through the list on the left to look for your first command. In this example, scroll down to commands beginning with the letter R and then click to select the Rotate Left 45° command.
4. In the list on the right, click to select Home in the Main Tabs list, and then click the New Tab button at the bottom of the list. OneNote creates a new ribbon tab called New Tab (Custom) and it creates on that tab a new ribbon group called New Group (Custom).
5. Right-click New Tab (Custom) and then click Rename on the shortcut menu that appears. In the Rename dialog box that appears, replace the selected text by typing Rotation as the new name for this tab, and then click OK.
6. Right-click New Group (Custom) and then click Rename on the shortcut menu that appears. In the Rename dialog box that appears, replace the selected text by typing Rotate Object as the new name for this group, and then click OK (see Figure 12.18).
7. With the Rotate Left 45° command still selected in the list on the left, click the Add button between the two lists. OneNote adds the command to the new ribbon group on the new tab you just created.
8. In the list on the left, click to select the Rotate Left 90° command and then click the Add button between the two lists.
9. In the list on the left, click to select the Rotate Right 45° command and then click the Add button between the two lists.
10. In the list on the left, click to select the Rotate Right 90° command and then click the Add button between the two lists.
11. When all four rotation commands appear in the new ribbon group under the new tab you created (see Figure 12.18), click OK to save your changes.
The tab you just created now appears where it was shown in the list (see Figure 12.18)—between the Home and the Insert tabs. If you click the new Rotation tab, you’ll see the four commands you added to it, which are in the ribbon group that you called Rotate Object (see Figure 12.19).
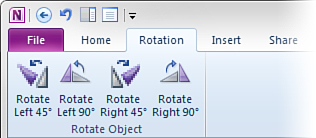
Figure 12.19 Shown here are the results from following the previous steps. The newly created tab that now appears between the Home and Insert tabs is called Rotation. It contains one ribbon group called Rotate Object, and this group contains four commands that control the rotation of a selected picture or drawing object. If no object on the page is selected, these four commands will appear dimmed.
To try out the commands you just added, do the following:
1. Create a new, blank page and then click the Draw tab.
2. In the Insert Shapes group, click the rectangle shape.
3. When the mouse pointer changes to a crosshair icon, click and drag a rectangle on the blank page.
4. Click the Rotation tab you created. Because your drawing object is still selected, all four rotation commands should now be available.
5. Click any of the four commands to see the rotation angle of your selected rectangle change.
As with the Quick Access Toolbar customizations, I encourage you to experiment with these settings as soon as you feel comfortable with using OneNote.
Removing Commands from the Ribbon
To remove commands from the ribbon, you can either hide the tab that contains the commands, or you can delete custom commands as well as custom groups or entire custom tabs.
To hide a ribbon tab, do the following:
1. Click the File tab, click Options, and then, in the OneNote Options dialog box that appears, click Customize Ribbon in the list of categories on the left.
2. In the list on the right, clear the check mark next to the tab you want to hide, and then click OK.
The tab and its associated groups and commands will no longer appear on the ribbon. It’s still available, however, so whenever you want to turn it back on, repeat the previous steps and then click the check box next to the tab you want to restore.
To remove a custom command or a custom ribbon group from its associated ribbon tab, do the following:
1. Click the File tab, click Options, and then, in the OneNote Options dialog box that appears, click Customize Ribbon in the list of categories on the left.
2. In the list on the right, click the + sign next to the name of the custom ribbon tab that contains the ribbon group or the commands you want to remove.
• To remove an entire custom ribbon group, click to select it in the list.
• To remove a specific command, click the + sign next to the name of the ribbon group containing that command, and then click to select the command in the list.
4. Click the Remove button between the two lists to remove either the selected ribbon group or the selected command.
5. Click OK to save your changes.
Restoring deleted ribbon groups cannot be easily done. You must re-create the groups and their commands the same way you initially created them. For this reason, don’t breeze by these features while you’re still learning them and take care when deciding which ribbon customizations you want to delete.
![]() LET ME TRY IT
LET ME TRY IT
Renaming Ribbon Tabs or Groups
There might be times when you want or need to rename existing tabs or ribbon groups. For example, if you’re customizing a ribbon group with new commands, these commands might no longer fit their group or tab label. Rather than creating a new tab or group, you can rename the existing one.
To rename ribbon tabs or groups, do the following:
1. Click the File tab, click Options, and then, in the OneNote Options dialog box that appears, click Customize Ribbon in the list of categories on the left.
2. In the list on the right, click to select the tab or ribbon group you want to rename. If necessary, click the + signs next to the name of the tabs containing the groups you want to rename.
3. At the bottom of the list, click the Rename button.
4. In the Rename dialog box that opens, type a new name for the tab or group and then click OK.
5. Click OK to save your changes.
Exporting Your Ribbon Customizations for Use on Other Computers
If you’ve made any customizations to the OneNote interface—either just to the Quick Access Toolbar, just to the ribbon, or to both—you can save your custom settings in a file that you can then transfer to another computer that has OneNote 2010 installed.
To export your OneNote 2010 interface customizations, do the following:
1. Click the File tab, click Options, and then, in the OneNote Options dialog box that appears, click Customize Ribbon in the list of categories on the left.
2. At the bottom of the list on the right, click the Import/Export button, and then click Export All Customizations on the shortcut menu that appears (see Figure 12.20).
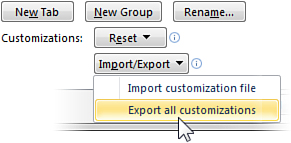
Figure 12.20 The Export All Customizations command lets you save all of your OneNote 2010 interface customizations to a single file, which you can then import on any other computer that also has OneNote 2010 installed. This way, your time-consuming customizations to the ribbon and to the Quick Access Toolbar can be instantly duplicated for use on other computers or for other OneNote users.
3. In the File Save dialog box, accept or change the filename that is provided and then click Save.
4. Click OK.
By importing this settings file into OneNote 2010 on another computer, your ribbon customizations will be applied to that installation of OneNote.
Resetting Your Ribbon Customizations
If you’ve made extensive customizations to the ribbon that you no longer want to keep, or if you made a mistake and you want to restore the ribbon to its default settings, do the following:
1. Click the File tab, click Options, and then, in the OneNote Options dialog box that appears, click Customize Ribbon in the list of categories on the left.
2. To restore only a specific ribbon tab, click it in the list on the right.
3. At the bottom of the list on the right, click the Reset button (see Figure 12.18) and then click Reset Only Selected Ribbon tab. Alternately, if you want to reset all ribbon customizations, click the Reset button and then click Reset All Customizations.
4. Click OK.
Setting Preferences for Editing and Searching
OneNote 2010 also includes several optional settings that affect the way you take notes, import and edit content, and how you link to and search for information.
![]() LET ME TRY IT
LET ME TRY IT
Setting the Default Font
Typed text in OneNote 2010 defaults to 11-point Calibri—a very legible screen font that’s included with all Microsoft Office 2010 applications. If you have a different preference for how new text should appear in your notes, you can specify a different font, font size, and font color to be used as the initial setting for text on new pages.
To set the default font, do the following:
1. On the File tab, click Options.
2. In the OneNote Options dialog box that opens, look for the Default Font section.
3. Select your preferences from the Font, Size, and Font Color drop-down menus, and then click OK. Your preferences will be applied to all new text that you create in your notes.
![]() LET ME TRY IT
LET ME TRY IT
Changing the Default Measurement Unit
If you frequently print notes and you need to work with specific paper sizes, you can change the unit of measure from inches to a different preference by doing the following:
1. On the File tab, click Options.
2. In the OneNote Options dialog box, click the Advanced category on the left side.
3. On the right side, scroll down to the Other heading at the very bottom and then select the unit of measure you want from the Measurement Units drop-down menu.
4. Click OK to save your changes.
5. Click the View tab.
6. In the Page Setup group, click Paper Size.
7. In the Paper Size task pane, verify that the paper size or print margins you want are shown with the new units of measure.
![]() LET ME TRY IT
LET ME TRY IT
Turning Note Containers On or Off
As you type in OneNote, a small gray frame appears around the text you type (see Figure 12.21). These frames are called note containers. They are only visible while you type or format the text within them, or while you move the mouse over them.

Figure 12.21 Unless you choose to hide them, note containers containing text or objects can be resized and repositioned by interacting with them on the page. When note containers are hidden, you can still move the mouse over a line of text and then click and drag the four-headed arrow icon that appears next to the text to reposition it on the page.
Think of note containers as little helpers that make it easier for you to line up text and objects on your page. They don’t show up when you print a page or share a page with someone over e-mail.
If you don’t ever need to resize or move blocks of text on your page, you can hide the note containers around text by doing the following:
1. On the File tab, click Options.
2. In the OneNote Options dialog box, click the Display category on the left side.
3. On the right side, under the Display heading, uncheck the Show Note Containers on Pages check box.
4. Click OK to save your changes.
![]() LET ME TRY IT
LET ME TRY IT
Showing or Hiding the Mini Toolbar when Selecting Text
Whenever you select text on a page, the Mini toolbar appears, giving you quick access to the formatting commands that you can also find on the ribbon (see Figure 12.22). Though it gives you convenient shortcuts to your formatting commands, there might be times when you want to disable the Mini toolbar.
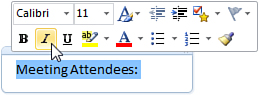
Figure 12.22 The Mini toolbar appears whenever you select text on a page. Its formatting commands and buttons work the same as they do on the ribbon. If this frequently covers up what you want to select on a page, you can temporarily or permanently turn the Mini toolbar display off.
To hide the Mini toolbar when selecting text, do the following:
1. On the File tab, click Options.
2. In the OneNote Options dialog box, click the General category on the left side.
3. On the right side, under the User Interface Options heading, uncheck the Show Mini Toolbar on Selection check box.
4. Click OK to save your changes.
![]() LET ME TRY IT
LET ME TRY IT
Turning Automatic Spell Checking On or Off
Like most Microsoft Office programs, OneNote 2010 automatically checks your spelling as you type text, underlining misspelled or questionable words with a red, squiggly line.
If you want to disable automatic spell-checking for some reason (for example, if you’re temporarily typing notes in a different language), do the following:
1. On the File tab, click Options.
2. In the OneNote Options dialog box, click the Proofing category on the left side.
3. On the right side, under the When Correcting Spelling in OneNote heading, uncheck the Check Spelling as You Type check box.
4. Click OK to save your changes.
![]() LET ME TRY IT
LET ME TRY IT
Viewing or Editing the Word List in Your Custom Dictionary
Whenever you encounter misspelled or questionable words during a spell-check, you have the option of adding such words to your custom dictionary. This is useful when you want to add legitimate words and names to your dictionary so that OneNote doesn’t question them again in the future.
To view or edit the word list in your custom dictionary, do the following:
1. On the File tab, click Options.
2. In the OneNote Options dialog box, click the Proofing category on the left side.
3. On the right side, under the When Correcting Spelling in Microsoft Office Programs heading, click the Custom Dictionaries button.
4. In the Custom Dictionaries list, select the dictionary you want (typically, you’ll only see CUSTOM.DIC in the list) and then click the Edit Word List button.
5. In the dialog box that opens, you can review words on the list, add new ones by clicking Add, or delete existing words by selecting them and then clicking Delete.
6. Click OK to save your changes.
7. Click OK to exit the Custom Dictionaries dialog box.
8. Click OK to close the OneNote Options dialog box.
![]() LET ME TRY IT
LET ME TRY IT
Setting AutoCorrect Options
Like most Microsoft Office programs, OneNote 2010 can automatically replace words or phrases that you frequently misspell and correct them on the spot. For example, if you type the misspelled word adn in OneNote, it will automatically correct it to and.
You can also use this feature to assign text codes for long or complex phrases that you need to frequently type. For example, you could have OneNote automatically change “fmi” to the phrase “for more information” if this is something you must frequently type.
To view or edit your AutoCorrect options, do the following:
1. On the File tab, click Options.
2. In the OneNote Options dialog box, click the Proofing category on the left side.
3. On the right side, under AutoCorrect Options, click the AutoCorrect Options button.
4. In the AutoCorrect Options dialog box that opens, set the options you want. In the double column list at the bottom, you can view the text replacements that are currently in effect, and you can add new ones by filling in the Replace and With fields and then clicking Add.
5. To delete any entry that you no longer want to use, click to select it in the list and then click Delete.
6. If you want to view or change the default AutoCorrect options for Math equations, click the Math AutoCorrect tab.
7. Click OK to save any changes you made in either dialog box tab.
![]() LET ME TRY IT
LET ME TRY IT
Showing or Hiding the Paste Options Button when Pasting
Whenever you paste text on a page in OneNote, the Paste Options button automatically appears (see Figure 12.23), letting you choose how the pasted text should be formatted.

Figure 12.23 When you paste copied text into OneNote, the Paste Options button appears. You can click this button or press the Ctrl key to open the Paste Options menu, which lets you specify how pasted text should be formatted. Rest the mouse pointer over each of the available buttons for a more detailed explanation.
Although a convenient and useful feature, the Paste Options button can sometimes partially hide or obscure text. If you find this annoying, or if you don’t care how copied text appears in your notes, you can temporarily or permanently turn off the Paste Options button by doing the following:
1. On the File tab, click Options.
2. In the OneNote Options dialog box, click the Advanced category on the left side.
3. On the right side, under Editing, uncheck the Show Paste Options Button When Content Is Pasted check box.
4. Click OK to save your changes.
![]() LET ME TRY IT
LET ME TRY IT
Including or Suppressing Source Links when Pasting from the Web
Whenever you paste content from a web page or you insert a screen clipping, OneNote includes a web link back to the source page underneath the pasted content (see Figure 12.24). This lets you easily return to the source content if you need to find the original information again.
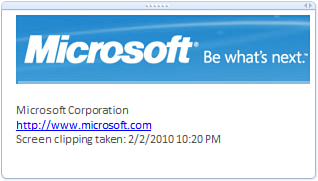
Figure 12.24 OneNote automatically generates a clickable link underneath pasted text, pictures, or screen clippings that you’ve imported from the Web. This lets you easily return to the source of the information you’ve included in your notes.
If you don’t find this information useful or if you don’t want to reveal it to people with whom you share your notes, you can suppress the automatic inclusion of links by doing the following:
1. On the File tab, click Options.
2. In the OneNote Options dialog box, click the Advanced category on the left side.
3. On the right side, under Editing, uncheck the Include Link to Source when Pasting from the Web check box.
4. Click OK to save your changes.
![]() LET ME TRY IT
LET ME TRY IT
Automatically Applying Numbers or Bullets to Lists
Though you can click the Numbering or Bullets buttons on the Home tab to start either type of list, OneNote can also automatically recognize when what you type resembles a list.
For example, if you start a new line by typing 1. followed by space and some text, OneNote will assume you want to start a numbered list. Likewise if you type an asterisk (*) followed by a space and some text, OneNote will assume that you want to start a bulleted list. Typically, this is very helpful. However, if you don’t want list formatting to be applied for you automatically, you can turn this feature off by doing the following:
1. On the File tab, click Options.
2. In the OneNote Options dialog box, click the Advanced category on the left side.
3. On the right side, under Editing, do either of the following:
• Uncheck the Apply Numbering to Lists Automatically check box.
• Uncheck the Apply Bullets to Lists Automatically check box.
4. Click OK to save your changes.
![]() LET ME TRY IT
LET ME TRY IT
Automatically Calculating Mathematical Expressions in Notes
OneNote includes a handy little feature that’s affectionately called “napkin math.” When enabled, OneNote will attempt to solve any simple mathematical expressions that you type out on a page.
For example, if you type 1+1= and then type a space or press Enter, OneNote will correctly place the number 2 after the equal sign. You can solve additions, subtractions, multiplications, and divisions in this way, and you can combine any amount of numbers and operators for slightly more complex calculations.
If you frequently type out figures and you don’t want OneNote to solve anything that looks like a math problem, you can turn this feature off by doing the following:
1. On the File tab, click Options.
2. In the OneNote Options dialog box, click the Advanced category on the left side.
3. On the right side, under Editing, uncheck the Calculate Mathematical Expressions Automatically check box.
4. Click OK to save your changes.
![]() LET ME TRY IT
LET ME TRY IT
Enabling or Disabling Automatic Wiki Link Creation
As you learned in Chapter 7, OneNote supports automatic wiki link creation. If you type the name of a page or section within double brackets (for example, [[Meeting Notes]]), OneNote will automatically link to the section or page with that title, allowing you to click the link and jump to that part of your notes without having to manually navigate to it.
If you use wiki links for pages that don’t yet exist, OneNote will automatically create a blank new page in the current section to remind you that you wanted to link to such a page later on. If you’d prefer to do this manually instead, you can turn off automatic wiki link creation by doing the following:
1. On the File tab, click Options.
2. In the OneNote Options dialog box, click the Advanced category on the left side.
3. On the right side, under Editing, uncheck the Enable Link Creation by Typing [[ ]] Around a Phrase check box.
4. Click OK to save your changes.
Disabling Linked Notes Creation in a Docked Window
By default, OneNote will assume that you want to begin a Linked Notes session whenever you dock the OneNote program window to your Windows desktop (see “Changing the Current Page View” earlier in this chapter) or whenever you choose to open a new docked window (see “Displaying a New Docked Window” and “Docking New Side Notes to the Desktop” earlier in this chapter).
If you prefer to take notes in a docked window without starting a Linked Notes session, do the following:
1. Click the File tab, and then click Options.
2. In the OneNote Options dialog box, click the Advanced category on the left side.
3. On the right side, scroll down to the Linked Notes heading, and then uncheck the Allow Creation of New Linked Notes check box.
4. Click OK to save your changes.
Once you’ve followed these steps, you will not be able to use the Linked Notes feature in any new docked OneNote windows. To remind you of this, the Linked Notes icon in the upper-left corner of the docked window will be shown with a red, slashed circle over it (see Figure 12.25).
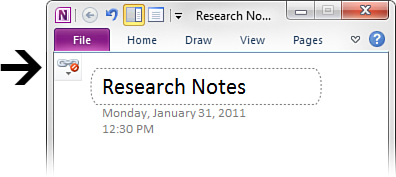
Figure 12.25 Whenever the Linked Notes icon in the upper-left corner of a docked OneNote window appears with a red, slashed circle over it, the Linked Notes feature is turned off. You can still type notes normally in the docked window, the same way you would in a normal OneNote window.
To restore Linked Notes functionality in your docked OneNote windows or your docked side notes, repeat the steps in the previous procedure, but be sure to select the check box option in step 3. Click OK to save your new preference.
Once Linked Notes functionality has been restored, the red, slashed circle over the link icon will disappear. You can then click the icon for additional options.
![]() LET ME TRY IT
LET ME TRY IT
Removing Links from Linked Notes
If you no longer need the information that OneNote saves about the source documents and pages for linked notes, or you started a Linked Notes session unintentionally and want to remove the links it created, do the following:
1. Click the File tab and then click Options.
2. In the OneNote Options dialog box, click the Advanced category on the left side.
3. On the right side, scroll down to the Linked Notes heading, and then un-check the Save Document Snippets and Page Thumbnail for Better Linking to the Right Place in the Document check box.
4. Click OK to save your changes.
Turning the Scratch-out Gesture On or Off
If you’re using the handwriting features in OneNote 2010 on a Tablet PC or Touch-compatible device, you can choose whether you want to use the scratch-out gesture for removing ink strokes while taking notes.
By default, this option is disabled. To turn it on, do the following:
1. Click the File tab and then click Options.
2. In the OneNote Options dialog box, click the Advanced category on the left side.
3. On the right side, scroll down to the Pen heading, and then uncheck the Disable the Scratch-out Gesture While Inking check box.
4. Click OK to save your changes.
To disable the options again, repeat the previous steps but click to select the check box in step 3.
![]() LET ME TRY IT
LET ME TRY IT
Turning Pen Pressure Sensitivity On or Off
If you’re using the handwriting features in OneNote 2010 on a Tablet PC or Touch-compatible device, you can choose whether you want to use variable pen pressure, the way ink might flow when you rest or press the pen on the paper in different ways. Using this feature can give your handwritten or drawn notes a more natural appearance, but it can also increase the file size of your OneNote notebooks.
By default, this option is disabled. To turn it on, do the following:
1. Click the File tab and then click Options.
2. In the OneNote Options dialog box, click the Advanced category on the left side.
3. On the right side, scroll down to the Pen heading and then click to select the Use Pen Pressure Sensitivity (Increases File Size) check box.
4. Click OK to save your changes.
To disable the options again, repeat the previous steps but be sure to clear the check box in step 3.
![]() LET ME TRY IT
LET ME TRY IT
Automatically Switching Between Inking, Selecting, Typing, and Panning
If you’re using the handwriting features in OneNote 2010 on a Tablet PC or Touch-compatible device, OneNote automatically switches its selection mechanism when you switch between inking and typing and when selecting and panning content.
If you frequently work with mixed content on a page and you want OneNote to stay in the mode you selected, you can turn this option off by doing the following:
1. Click the File tab and then click Options.
2. In the OneNote Options dialog box, click the Advanced category on the left side.
3. On the right side, scroll down to the Pen heading, and then uncheck the Automatically Switch Between Inking, Selecting, Typing and Panning check box.
4. Click OK to save your changes.
The use of “panning” here is in reference to the Panning Hand, a page navigation command that you learned about in Chapter 5, “Taking and Formatting Notes” (see Figure 12.26).
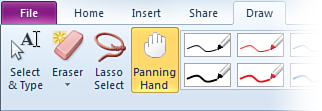
Figure 12.26 Using the Panning Hand tool, you can bring other parts of the page into view without accidentally deselecting any handwriting objects on the current page. The Select & Type command at the far left of the Draw tab is activated automatically, unless you turn the automatic mode switching option off.
Enabling or Disabling Text Recognition in Pictures
When you search your notes for a specific word or phrase, OneNote will try to find them not just in typed text but also in pictures that contain the word or phrase (for example, in a scanned business card image). If you don’t want OneNote to recognize text in pictures in your notes, you can disable this feature by doing the following:
1. Click the File tab and then click Options.
2. In the OneNote Options dialog box, click the Advanced category on the left side.
3. On the right side, scroll down to the Text Recognition in Pictures heading and then click to select the Disable Text Recognition in Pictures check box.
4. Click OK to save your changes.
![]() LET ME TRY IT
LET ME TRY IT
Enabling or Disabling Word Recognition in Audio and Video Clips
When you search your notes for a specific word or phrase, OneNote is capable of finding them in the sound recording in audio or video files that you imported in your notes. This is especially useful if you frequently take audio or video notes and need to find specific information that does not appear typed out on a page.
Because this feature takes additional system resources to work, it is turned off by default. If you want to enable it, do the following:
1. Click the File tab and then click Options.
2. In the OneNote Options dialog box, click the Audio & Video category on the left side.
3. On the right side, scroll down to the Audio Search heading and then click to select the Enable Searching Audio and Video Recordings for Words check box.
4. Click OK to save your changes.
Adjusting OneNote Performance Settings
Though mostly self-explanatory, I do want to include the following pointers to some of OneNote’s performance tweaks that you might find useful. As with most of the settings discussed in this chapter, it is typically not necessary to change these settings unless you have a specific reason or preference for doing so.
![]() LET ME TRY IT
LET ME TRY IT
Modifying the Default Location of New Notebooks
Typically, new notebooks that you create on your hard drive are stored in the OneNote Notebooks folder in your Documents (or My Documents) folder.
If you want all future new notebooks to be created in a different location, you can tell OneNote your preferred new default location by doing the following:
1. Click the File tab and then click Options.
2. In the OneNote Options dialog box, click the Save & Backup category on the left side.
3. On the right side, under the Save heading, click the Default Notebook Location path in the list, and then click Modify.
4. Navigate to the new location where you want notebooks to be created and then click Select.
5. In the list, verify that the new file path now shows up next to Default Notebook Location.
![]() LET ME TRY IT
LET ME TRY IT
Modifying the Location of Unfiled Notes
If you want to change the default location of your Unfiled Notes section, do the following:
1. Click the File tab and then click Options.
2. In the OneNote Options dialog box, click the Save & Backup category on the left side.
3. On the right side, under the Save heading, click the Unfiled Notes Section path in the list and then click Modify.
4. Navigate to the new location where you want your Unfiled Notes to be stored from now on and then click Select.
5. In the list, verify that the new file path now shows up next to Unfiled Notes Section.
![]() LET ME TRY IT
LET ME TRY IT
Modifying the Location of Your Backups
If you want to change the default location of automatic backups that OneNote creates for you (or the default location of any manual backups that you create), do the following:
1. Click the File tab and then click Options.
2. In the OneNote Options dialog box, click the Save & Backup category on the left side.
3. On the right side, under the Save heading, click the Backup Folder path in the list and then click Modify.
4. Navigate to the new location where you want your OneNote backups to be stored and then click Select.
5. In the list, verify that the new file path now shows up next to Backup Folder.
![]() LET ME TRY IT
LET ME TRY IT
Modifying the Default Locations of Notes, Outlook Items, and Screen Clippings Sent to OneNote
If you frequently use any of the Send to OneNote commands that may appear in other programs that you have installed, you can more specifically control where such items should automatically be filed by doing the following:
1. Click the File tab and then click Options.
2. In the OneNote Options dialog box, click the Send to OneNote category on the left side.
3. On the right side, for any of the items you see listed, click the drop-down arrow next to the items whose default location you want to change, and then make a selection from the available options.
4. Click OK to save your changes.
![]() LET ME TRY IT
LET ME TRY IT
Changing Office Language Preferences
Microsoft Office 2010 is available in over 30 world languages. In addition to your native language for which you have configured Windows and Office, you can purchase and install optional language packs that provide additional proofing tools and spelling capabilities in your copy of OneNote or Office.
To install, verify, and troubleshoot such optional language packs after you have purchased them, do the following:
1. Click the File tab and then click Options.
2. In the OneNote Options dialog box, click the Language category on the left side.
3. On the right side, choose the appropriate settings for your editing languages and for your display and Help languages for OneNote or for Office.
4. If you need assistance with these features, click the Help links provided on this screen or visit www.office.com and search the Microsoft Office website for information about language packs.
5. If you make changes on this screen, click OK to save them.
![]() LET ME TRY IT
LET ME TRY IT
Optimizing OneNote for Laptop Battery Life
OneNote typically decides automatically how often to run a variety of housekeeping activities in the background while you take notes, such as search and audio indexing, text and handwriting recognition, and notebook synchronization.
If you’re using OneNote on a laptop with a short battery charge, you can tell OneNote to minimize such activities to extend your battery life by a bit.
To optimize OneNote for laptop battery life, do the following:
1. Click the File tab and then click Options.
2. In the OneNote Options dialog box, click the Advanced category on the left side.
3. On the right side, scroll down to the Battery Options heading and then choose the option you want from the Optimize for the Following Battery Life drop-down list.
4. Click OK to save your changes.
Customizing OneNote Installation Options
Depending on the choices that were made when you (or someone else) first installed OneNote, you can change certain installation settings at any time.
![]() LET ME TRY IT
LET ME TRY IT
Personalizing Your Copy of OneNote 2010
If you use shared notebooks with OneNote 2010, it’s highly recommended that you tell OneNote your full name and your initials so that your edits can be properly identified in the author information which will be visible to others may be working in a shared notebook with you.
To verify or update your personalization, do the following:
1. Click the File tab, and then click Options.
2. In the OneNote Options dialog box, click the General category on the left side.
3. On the right side, under Personalize Your Copy of Microsoft Office, type your full name into the User Name box, and then type your initials into the Initials box.
4. Click OK to save your changes.
![]() LET ME TRY IT
LET ME TRY IT
Changing OneNote 2010 Setup Options
To view or change Setup options in your standalone copy of OneNote 2010 or in your edition of Microsoft Office 2010 that contains OneNote 2010, do the following:
1. Exit OneNote and any other Office programs that you may be running.
2. In Windows 7, click the Start button and then click Control Panel.
3. In Control Panel under Programs, click the blue Uninstall a Program link.
4. In the Uninstall or Change a Program list that appears, find either Microsoft OneNote 2010 or Microsoft Office 2010 and then click its entry once to select it in the list.
5. Near the top of the list, click Change.
6. In the window that appears (see Figure 12.27), click Add or Remove Features, and then click Continue.

Figure 12.27 When you click the Change button in Control Panel while OneNote or Office is selected in your installed programs list, OneNote or Office will display the maintenance menu where you can view, add, or remove features, repair your installation of OneNote or Office, uninstall the product from your computer, or enter a different product key to activate your version of OneNote or Office.
7. On the next screen, click the control buttons to the left of specific features that you want to enable or disable.
8. If you make any changes in this list, click Continue and then follow any instructions that appear.
9. If no changes are necessary, click the Close button (the red X) in the upper-right corner of the window.
10. When prompted if you want to cancel Setup, click Yes and then click Close.
Repairing Your OneNote 2010 Installation
If any particular feature in OneNote 2010 does not work as you expect it to, or as it’s been described here in the book, it’s possible that you or someone else who is using your computer might have inadvertently changed something. If you don’t know what’s changed and you can’t use the preferences in the OneNote Options dialog box to fix the problem, you can try repairing your installation of OneNote 2010 or Office 2010 by doing the following:
1. Exit OneNote and any other Office programs that you are running.
2. In Windows 7, click the Start button and then click Control Panel.
3. In Control Panel under Programs, click the blue Uninstall a Program link.
4. In the Uninstall or Change a Program list that appears, find either Microsoft OneNote 2010 or Microsoft Office 2010 and then click its entry once to select it in the list.
5. Near the top of the list, click Change.
6. In the window that appears, click Repair and then click Continue.
7. Follow any instructions that appear.
![]() LET ME TRY IT
LET ME TRY IT
Checking for OneNote 2010 Software Updates
If you don’t have Windows Update configured to automatically check for OneNote 2010 and Office 2010 updates for some reason, you can manually check for software updates right in OneNote by doing the following:
1. Click the File tab and then click Help.
2. Under Tools for Working with Office, click Check for Updates.
It’s a good idea to keep all of your software programs updated so you’ll have all of the latest feature enhancements and security updates.
![]() LET ME TRY IT
LET ME TRY IT
Setting Preferences for the OneNote Taskbar Icon
In Chapter 6, you learned all about the OneNote taskbar icon, also called the OneNote 2010 Screen Clipper and Launcher. Although its default behavior is suitable for most occasions, you can set some options for this small program that runs in the background and gives you access to OneNote features even when OneNote isn’t running.
To set preferences for the OneNote taskbar icon, do the following:
1. On the Windows taskbar, right-click the OneNote icon in the notification area near the Windows clock (see Figure 12.28).

Figure 12.28 Clicking the OneNote Icon Defaults option on the shortcut menu of the OneNote taskbar icon lets you choose what should happen when you left-click the icon. The option that appears in bold on this menu is the default selection that’s currently active.
2. Click OneNote Icon Defaults and then choose the default command that OneNote should use when you left-click the icon. For example, if you want to open OneNote by clicking this icon instead of creating a new side note (the initial setting), click Open OneNote. Your new preference is saved as soon as you make a selection.
Displaying OneNote 2010 Version Information
Lastly, if you should ever need to troubleshoot OneNote, you might be asked what specific version of OneNote 2010 you’re running. To display this information, do the following:
1. Click the File tab and then click Help.
2. At the far right, under About Microsoft OneNote, you’ll see a long string of numbers that indicates the exact version of the program that you are currently running. In parentheses after that, you can see whether you’re running the 32-bit or the 64-version of OneNote 2010 or Office 2010 (this might also be important information for troubleshooting).
3. To obtain product support from Microsoft, click the Microsoft Customer Services and Support link on this screen and then follow the instructions that are displayed. Alternately, you can visit http://www.office.com to learn more about your Support options for your Microsoft Office 2010 programs—including OneNote 2010. You can also visit the official Microsoft product support forums on the Web by visiting http://answers.microsoft.com.
Thank You!
This concludes Using Microsoft OneNote 2010. Thanks for giving this book your attention. No matter if you were brand-new to OneNote or you wanted to brush up on your OneNote skills, I sincerely hope that you have found the information in this book to be helpful.
I encourage you to “play” with OneNote 2010 to your heart’s content by experimenting with the various features that you learned about in the preceding chapters. Remember that you can’t do much damage if you’re using your practice notebook until you figure things out a bit more. Besides, as I’ve pointed out numerous times along the way, the Undo command is your best friend while learning any new computer program.
If there are features I’ve described that feel a bit more technical than you’re comfortable with, remember to take advantage of the many “Show Me” media links that appear throughout the chapters. If you purchased this book, you’re eligible to view the many free videos that are associated with each of the walkthroughs in this book.
My final reminder and encouragement about OneNote is this: When in doubt, right-click something. Whether it’s text, a picture, a file, an object, a part of the interface, or anything else, you’re sure to discover something new.
I wish you much fun and success in your continued exploration and use of OneNote 2010!
Michael C. Oldenburg
Redmond, Washington