
Notebooks, Sections, and Pages
If you’ve ever worked with a paper-based notebook or notes binder, you already know the purpose of pages and sections within a notebook: The pages hold your information and the sections let you organize it.
If you’re new to electronic note-taking, however, there are many benefits that might not be apparent at first glance. Simply put, you can do a lot of things with OneNote notebooks that you can’t do with a paper notebook.
This chapter covers the basics of working with the pages and sections in a notebook.
Working with Notebooks
You already learned how to create a notebook in Chapter 1, “Introducing Microsoft OneNote,” which you called “Using OneNote 2010.” You can keep using this practice notebook as you follow along with the procedures in this book.
If you’d like a refresher about notebook creation and to see how multiple notebooks show up on the navigation bar, follow these steps to create one more practice notebook.
 SHOW ME Media 4.1—Working with Notebooks
Access this video file through your registered Web Edition at my.safaribooksonline.com/9780132182447/media.
Creating a New Notebook
To create a new, blank notebook, follow these steps:
1. In OneNote 2010, click the File tab and then click New.
2. Under Step 1 (Store Notebook On), click My Computer.
3. Under Step 2 (Name), type a name for the notebook. For example, you could call this notebook Practice Notebook.
4. Under Step 3, leave the suggested file path without making any changes.
5. Click the Create Notebook button near the bottom to finish creating the notebook.
Assuming you previously created the sample notebook in Chapter 1, you should now see three notebooks on the navigation bar. At the top is the sample notebook called “Personal.” This is the notebook containing useful tips that OneNote created after you first installed it. Right underneath it is the “Using OneNote 2010” notebook that you created in Chapter 1. And below that is the new notebook called “Practice Notebook,” which you created in the previous steps (see Figure 4.1).
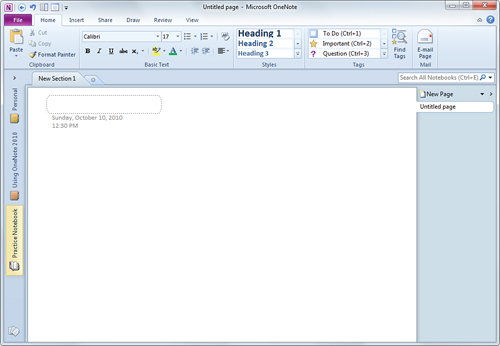
Figure 4.1 OneNote 2010 lets you use multiple notebooks at once. The orange highlight on the left navigation bar indicates which notebook you’re currently working in.
Before you move on to working with the sections and pages in the notebook you just created, take a moment to learn a couple of additional notebook tasks—closing and deleting notebooks.
With OneNote 2010, manually closing and reopening notebooks between working sessions isn’t necessary. As I mentioned in Chapter 1, there’s no Save functionality in OneNote because it automatically and continually saves and remembers everything you do. This means that you can safely shut down OneNote at any time without first closing any notebooks that you have open. All of your information will be saved automatically—even across multiple notebooks that may be stored in different locations. Whenever you next start OneNote, all of the notebooks that appeared on your navigation bar will be automatically reopened.
Closing a Notebook
Over time, you might be working with more and more notebooks, and the navigation bar might soon fill up with numerous notebook icons. If you prefer to keep things visually uncluttered, you can choose to temporarily close any notebooks that you’re not actively working with (for example, notebooks for projects that you have completed and won’t be working on in the future).
To close the Practice Notebook you created earlier in this chapter, follow these steps:
1. On the navigation bar, right-click the notebook that you want to close. In this example, right-click the notebook called “Practice Notebook” (see Figure 4.2).
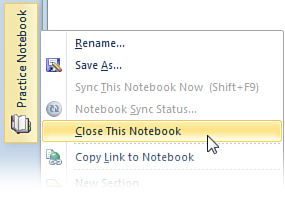
Figure 4.2 When you right-click a notebook icon on the navigation bar and click the Close this Notebook command, OneNote removes the notebook from view without deleting it.
2. On the menu that appears, click Close This Notebook. The notebook icon for the Practice Notebook disappears from the navigation bar.
![]() LET ME TRY IT
LET ME TRY IT
Opening a Notebook
To reopen the sample notebook again so that it appears on the navigation bar, follow these steps:
1. On the File tab, click Open.
2. Click the Open Notebook button.
3. In the Open Notebook dialog box, navigate to your OneNote Notebooks folder (which is typically located inside of your My Documents or Documents folder).
4. Double-click the folder called Practice Notebook and then click Open. OneNote immediately loads the sample notebook again and displays the last page you had open at the time when you closed the notebook.
![]() LET ME TRY IT
LET ME TRY IT
Deleting a Notebook
I’m including the following steps only for future reference, as people often wonder about the fact that OneNote does not have a built-in command for deleting notebooks.
When you decide you no longer need a specific notebook (including all of its sections, pages, content, and embedded files), you can delete it. Doing so destroys the notebook, so do this only if you’ve made a confirmed backup copy of the notebook or you’re absolutely certain that the notebook and its contents are no longer needed.
To delete a notebook and its contents, follow these steps:
1. Open Windows Explorer and navigate to the OneNote Notebooks folder, which is typically located inside of your My Documents (or Documents) folder.
2. Right-click the folder matching the name of the notebook you want to delete and then click Delete. For example, you could delete the “Practice Notebook” that you created earlier in this chapter since you know it doesn’t actually contain any notes. Once deleted, the notebook is sent to your Recycle Bin. To permanently destroy the notebook, right-click the Recycle Bin icon on your Windows desktop and then click Empty Recycle Bin.
Now that you know the basics about notebooks, let’s learn a bit more about what makes up the contents of every notebook.
About Sections and Pages
When you return to the “Using OneNote 2010” notebook that you created in Chapter 1 to follow along with the lessons in this book (if necessary, click its icon on the navigation bar to return to it), you may remember that the notebook was initially created with a single notebook section (called “New Section 1”), which contained a single, blank page (called “Untitled Page”). This is the basic structure of every notebook in OneNote when it is first created. Every notebook contains one or more sections, and every section within that notebook contains one or more pages.
One of the benefits of OneNote over a paper-based notebook is that your electronic notebooks have virtually no limit on the number of sections and pages that you can create and use. As a notebook grows in size over time, you never need to worry about transferring the information somewhere because you’ve outgrown your notebook. In OneNote, each notebook can grow with the size of the project or task it is associated with so you never run out of room.
Another nice thing about OneNote is the fact that it doesn’t force you to be organized. There’s no note-taking system to learn or adhere to, and you can literally let things fall as they may. OneNote won’t nag you to clean up your notebooks.
Although you don’t have to be terribly organized to use OneNote successfully, it makes sense to at least give meaningful names to your sections and pages, especially if you’re going to be using a notebook for a specific project or goal. Section names and page titles are searchable, so the more meaningful or descriptive they are in relation to the notes they’ll contain, the easier and faster it will be for you to find specific information within all of your notes.
Working with Notebook Sections
Let’s begin by learning the basics about notebook sections. Whenever you create a new notebook, it will automatically contain one section tab, and that section tab will contain a single page. To begin using that first section, change its name.
SHOW ME Media 4.2—Working with Notebook Sections
Access this video file through your registered Web Edition at my.safaribooksonline.com/9780132182447/media.
Naming and Renaming a Section
To name or rename a new notebook section, follow these steps:
1. On the navigation bar, click your “Using OneNote 2010” notebook, right-click the section tab called New Section 1 and then click Rename.
2. When the text in the section tab is highlighted, type a new name for the section. For this example, let’s call this section Trip Planning.
3. Press Enter. The section is now called Trip Planning.
If you already know how you will want to organize a new notebook, you can easily create additional sections at any time.
![]() LET ME TRY IT
LET ME TRY IT
Creating a New Section
To create additional sections in your notebook, follow these steps:
1. Right-click any existing section tab in your notebook.
2. On the menu that appears, click New Section (see Figure 4.3).
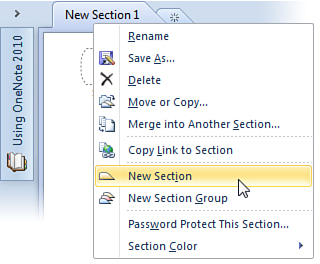
Figure 4.3 Creating new notebook sections is easily done by right-clicking any existing section tab and then clicking the New Section command.
3. While the new section’s temporary name is highlighted, type a new name for the section and then press Enter. A new section containing a blank, untitled page is added to your notebook.
Changing the Color of a Section Tab
OneNote randomly assigns a color to any new section you create. If you prefer, you can easily replace or remove a section color.
To replace a section color, follow these steps:
1. Right-click the tab of the section whose color you want to change.
2. On the menu that appears, click Section Color and then click the color you want to use for the selected tab.
![]() LET ME TRY IT
LET ME TRY IT
Deleting a Section
If you no longer need a section, you can delete it. If you delete a section from your notebook, all of the pages and subpages in that section are also deleted.
To delete a section (and all of its pages and subpages), follow these steps:
1. Right-click the tab of the section you want to delete.
2. On the menu that appears, click Delete.
3. When prompted whether you’re sure that you want to delete the section, click Yes.
![]() LET ME TRY IT
LET ME TRY IT
Moving a Section Tab to a Different Location
Section tabs in OneNote can be easily rearranged. This is useful when you want to reorganize or prioritize information within your notebook.
To move a section tab, follow these steps:
1. Click the section tab you want to move and hold the left mouse button while dragging the tab to the left or the right.
2. When the tab marker (a small, black, downward-facing arrow) appears in the location you want, release the mouse button (see Figure 4.4).
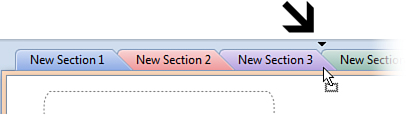
Figure 4.4 When you click and drag a section tab to the left or the right, OneNote shows a small, black triangle icon between the section tabs where the moving tab will be placed when you release the mouse button.
This covers the basics about sections, but there’s a lot more you can do with them. You’ll look at some of the more advanced features involving sections in upcoming chapters in this book.
Working with Notebook Pages
Let’s continue by learning the basics about notebook pages. Whenever you create a new section in your notebook, it will automatically contain one blank page. You can click anywhere on the page and start typing notes. You don’t need to worry about any constraints like those in other programs as the OneNote canvas is a completely flexible environment, much like a sheet of paper. With OneNote, nothing is set in stone, and you can freely change and move items on the page after you’ve created them.
As was the case with sections, it makes sense to first give the pages in your notebooks meaningful titles.
SHOW ME Media 4.3—Working with Notebook Pages and Subpages
Access this video file through your registered Web Edition at my.safaribooksonline.com/9780132182447/media.
![]() LET ME TRY IT
LET ME TRY IT
Adding a Page Title
Whenever a new section is created, OneNote creates a blank, untitled page in that section. To begin using this page, first type a page title into the designated area at the top of the page.
Page titles are useful for labeling your pages with meaningful descriptions that will make your notes more easily identifiable when searching your notebooks and seeing your pages in a results list.
To add a page title, follow these steps:
1. If necessary, click the page tab of the page to which you want to add a page title.
2. At the top of the page, click inside of the dotted outline and then type a page title (see Figure 4.5).
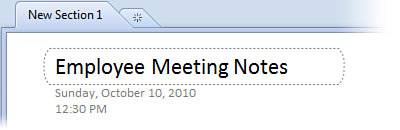
Figure 4.5 The area surrounded by a dotted line near the top of your pages is the page title. What you type here will also label the page in the page tabs column.
The page title you enter is also shown in the corresponding page tab on the right and in the title bar at the top center of the OneNote program window.
![]() LET ME TRY IT
LET ME TRY IT
Changing a Page Title
If the content of a page changes over time and its page title is no longer accurate or descriptive enough, you can easily change it at any time.
To change a page title, follow these steps:
1. If necessary, navigate to the page you want to rename by clicking its page tab.
2. At the top of the page, click inside of the dotted outline, select the text that’s there, and then overtype it with a new page title.
When a page title is changed in the page header area, it is also changed in the corresponding page tab on the right and in the title bar at the top center of the OneNote program window.
![]() LET ME TRY IT
LET ME TRY IT
Deleting a Page Title
If you don’t care about page titles for some reason, you can easily turn them off. However, doing so removes both the title and the date and time stamp that indicates when the page was created. This information is typically very useful when searching your notes, so delete page titles only if you’re sure you really won’t ever need this information again.
To delete a page title, follow these steps:
1. If necessary, navigate to the page whose page title you want to remove.
2. On the ribbon, click the View tab and then click Hide Page Title.
When you’ve hidden (deleted) a page title, OneNote will use the first part of notes text on the page as the label for the page tab on the far right of the OneNote window. If you later unhide the page title area and type a new page title, that new title will serve as the new page tab label.
![]() LET ME TRY IT
LET ME TRY IT
Creating a New Page
There’s virtually no limit to the number of pages a notebook section can hold.
To create additional pages in the current section of your notebook, follow these steps:
1. At the top of the page tabs on the right side of the OneNote program window, click New Page (see Figure 4.6). OneNote creates a new, blank, untitled page at the bottom of the other page tabs in the current section.
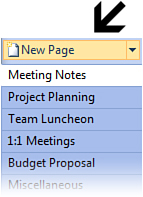
Figure 4.6 Click the New Page button at the top of the page tabs column of any section to add a page to the current section.
2. Add a page title by following the steps in the previous procedure.
![]() LET ME TRY IT
LET ME TRY IT
Changing the Appearance of a Page
To simulate sheets of paper, OneNote pages are typically white when you create them. However, you can freely customize the appearance of a notes page to simulate taking notes on a ruled notepad, on graph paper, or on sheets of colored paper. If you change your mind again later, you can easily replace or remove such visual page customizations.
To change the appearance of a page, follow these steps:
1. Go to the page whose appearance you want to customize.
2. On the ribbon, click the View tab.
3. In the Page Setup group, click Page Color, and then click the page color you want to use for the current page.
If you don’t care to change the page color but would like the appearance of a ruled notepad or graph paper instead, follow these steps:
1. Go to the page whose appearance you want to customize.
2. On the ribbon, click the View tab.
3. In the Page Setup group, click the Rule Lines drop-down arrow, and then click the style of rule or grid lines you want to use for the current page.
![]() LET ME TRY IT
LET ME TRY IT
Changing the Size of a Page
Aside from changing the appearance of your notebook pages, you can also specify the physical dimensions of the page.
To change the size of a page, follow these steps:
1. Go to the page whose dimensions you want to customize.
2. On the ribbon, click the View tab.
3. In the Page Setup group, click Paper Size.
4. In the Paper Size task pane that opens, change the Size setting to the paper size you want. After you’ve made a selection, you can then further customize the size and margins of the page.
Because OneNote is primarily designed to replace all of your paper-based notes, you can typically just accept the default settings that your notebook starts with. Still, it’s nice to have these customization options available for when you might need them.
![]() LET ME TRY IT
LET ME TRY IT
Changing the Date or Time Stamp on a Page
You’ll notice that OneNote stamps every new page with the date and time when the page was created. This is especially useful when searching your notes. For example, if you’re looking for specific information a year from now, you’ll have a record of when the information was added to your notes.
To modify the creation date and time stamp on a page, follow these steps:
1. To change the creation date of a page, click the date stamp under the page title, click the small calendar icon that appears next to it (see Figure 4.7), and then select the date you want.
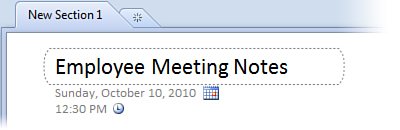
Figure 4.7 You can change the creation date and time of a page by clicking its date and time stamp underneath the page title and then clicking either the small calendar or clock icons for more options.
2. To change the creation time of a page, click the time stamp under the page creation date, click the small clock icon that appears next to it (see Figure 4.7), and then select the time you want.
There’s another kind of date and time stamp available in OneNote, and that’s the kind that lets you insert the current date and/or time as text in your notes. This is useful if you use OneNote for chronological call logs, time sheets, or to update to-do lists. To insert this kind of time stamp, click the Insert tab on the ribbon. In the Time Stamp group, click any of the three available buttons—Date, Time, or Date & Time—to insert that information into your notes.
Moving a Page Tab to a Different Location
Like section tabs, page tabs in OneNote can be easily rearranged. This is useful when you want to reorganize or prioritize information within your notebook.
To move a page tab, follow these steps:
1. Click the page tab you want to move and hold the left mouse button while dragging the tab up or down.
2. When the tab marker (a thick, black line) appears in the location you want, release the mouse button (see Figure 4.8).
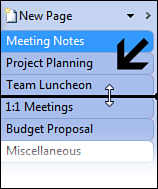
Figure 4.8 When you click and drag a page tab up or down, OneNote shows a thick black line between the page tabs where the moving tab will be placed when you release the mouse button.
![]() LET ME TRY IT
LET ME TRY IT
Quickly Minimizing or Maximizing Page Tabs
In Chapter 3, “A Tour of the OneNote Workspace,” I mentioned how you can minimize both the ribbon and the navigation bar so you have more room on your screen for taking and reading notes. The same can be done with the page tabs on the far-right side of the OneNote program window.
When you minimize the page tabs, the titles on the tabs appear truncated, but the page titles are not actually shortened. You can freely minimize the page tabs and restore them again to their full size whenever you want.
To minimize and maximize page tabs, follow these steps:
1. At the top of the page tabs, locate the two small arrows to the right of the New Page button. The first is pointing downward, and the one next to it is pointing to the right.
2. Move the mouse pointer over the second arrow that’s pointing toward the right. A ToolTip appears that reads Collapse Page Tabs. Click this button to shrink the page tabs (see Figure 4.9).
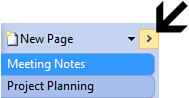
Figure 4.9 The tiny, right-facing arrow to the far right of the New Page button toggles the display between collapsed and expanded page tabs.
3. To restore the tabs to their original size, move the mouse pointer over the same arrow (which now points toward the left). A ToolTip appears that reads Expand Page Tabs. Click this button to restore the page tabs to their original size.
![]() LET ME TRY IT
LET ME TRY IT
Manually Changing the Size of Page Tabs
If the quick page tabs display toggle in the previous steps isn’t to your liking, you can manually adjust the width of your page tabs. This is beneficial whenever many or all of your page titles begin with an identical word, phrase, or prefix and the pages can be told apart only by the end of their titles. For example, if your pages are each titled “Daily Call Log,” followed by a series of dates, you may want to expand the width of the page tabs so you can see the full page titles at all times (“Daily Call Log 10/10/2010,” “Daily Call Log 10/11/2010,” and so on).
To manually change the size of page tabs, follow these steps:
1. Make sure that the page tabs are currently expanded. See the previous steps for instructions.
2. Slowly move the mouse pointer over the vertical line that separates the left side of the page tabs and the right side of the page canvas to the left of the page tabs.
3. When the mouse pointer changes to a horizontal line with a left and right arrow on its sides, click and hold the left mouse button, and slowly drag the line to the left.
4. When the page tabs are wide enough for you to read the page titles, release the mouse button.
![]() LET ME TRY IT
LET ME TRY IT
Deleting a Page
If you no longer need a particular page in your notebook, you can delete it. When you delete a page, all the objects and inserted items on that page are also deleted.
To delete a page, follow these steps:
1. Right-click the tab of the page you want to delete.
2. On the menu that appears, click Delete.
Working with Subpages
Subpages in OneNote work exactly like regular pages, but their tab labels appear slightly indented. The main purpose of subpages is to let you visually structure a group of related pages to help you recognize which of them contain important notes or key subject areas and which of them contain supplementary information that supports the subject of the main pages. In terms of hierarchy, think of a normal page as a parent, whereas each subpage is a child of that parent.
You can create a new subpage under any normal page, or you can demote an existing page to a subpage and then drag it where you want it. Within a group of pages and subpages, you can have two levels of indentation for subpage tab labels, which can help you organize information more easily. Depending on their level, subpages may also appear lighter in color than normal pages.
![]() LET ME TRY IT
LET ME TRY IT
Creating a New Subpage
To create a new subpage in the current section, follow these steps:
1. On the right side of the OneNote program window, click the page under which you want to insert a new subpage.
2. At the top of the page tabs on the right side of the OneNote program window, click the small, downward-facing arrow right next to the New Page button.
3. On the menu that appears, click New Subpage (see Figure 4.10). OneNote creates a new page with a slightly indented tab label and a lighter tab color immediately below the page you were on.
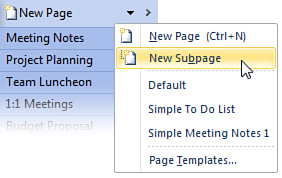
Figure 4.10 Click the drop-down arrow to the right of the New Page button to display this menu, from which you can click the New Subpage command.
4. Type a page title in the header of the subpage to distinguish it from the other pages.
If you want to create additional subpages that relate to the main page you had originally selected, repeat steps 2–4 for each additional subpage that you want to create.
Demoting a Page to a Subpage
You can demote a page to a subpage with new, blank pages or with existing pages that already contain notes.
To demote an existing normal page to a subpage, follow these steps:
1. Click the page tab that you want to change to a subpage.
2. When selected, right-click the page tab.
3. On the menu that appears, click Make Subpage. OneNote slightly indents the tab label and lightens the tab’s color to indicate that the selected page is now a subpage of the next normal page preceding it.
OneNote supports two levels of subpage indentation to help you organize groups of pages by their type of content. To demote an existing subpage to the lowest level and further indent its tab label, double-click to select the subpage, and then repeat steps 2–3 in the previous steps. Note that for the second level of subpage indentation, the tab color is even lighter than that of the first-level subpage and that of normal pages.
If the notes on a subpage gain in importance again later on, you can promote it in level. For example, you can promote a second-level subpage to a first-level subpage, or you can promote a first-level subpage to a normal page.
![]() LET ME TRY IT
LET ME TRY IT
Promoting a Subpage to a Page
You can promote a subpage to a page with new, blank subpages or with existing subpages that already contain notes.
To change an existing subpage back to a normal page, follow these steps:
1. Double-click the subpage tab that you want to change to a page.
2. When selected, right-click the page tab.
3. On the menu that appears, click Promote Subpage. OneNote removes the indent from the tab label and darkens the tab’s color to indicate that the selected subpage is now a normal page.
To promote an existing subpage from the lowest level to the higher subpage level, double-click to select the subpage, and then repeat steps 2–3 in the previous steps. Note that going from the second level of subpage indentation to the first, the tab color is darkened slightly but still lighter than normal pages.
When you work with multiple groups of pages and subpages, it can become difficult to retain oversight of your main pages and how they should be organized. To help you keep your thoughts and ideas organized, OneNote lets you collapse subpage tabs so that they’re hidden from view. This lets you more easily scan the titles of your main pages. Another benefit of collapsing subpages is that you can then drag the tab of the parent page to another location and its collapsed subpages are moved together with the group.
Collapsed subpages are still fully searchable—the same as normal pages.
![]() LET ME TRY IT
LET ME TRY IT
Collapsing a Group of Subpages
The following steps show you how to hide the subpage tabs below a parent page to reduce visual clutter or to keep the subpages together with their parent page while moving that page to a new location in the page tabs column.
To collapse a group of subpages, follow these steps:
1. Make sure that the page tabs are currently expanded. (See “Quickly Minimizing or Maximizing Page Tabs” earlier in this chapter for instructions.)
2. On the right side of the OneNote program window, move the mouse pointer over the page tab of any parent page containing one or more subpages.
3. Near the right side of the parent page tab, click the small, upward-facing arrow to collapse the subpages below. OneNote reminds you of the collapsed pages by showing a slightly cascaded border effect underneath the parent page tab and changing the direction of the small arrow to face downward (see Figure 4.11).
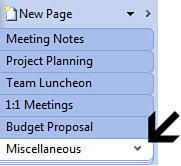
Figure 4.11 A page tab that shows a cascaded border effect and a small downward-facing arrow at the far right of the page tab indicates that this parent page contains one or more subpages. Click the small arrow to expand these pages.
While a parent page has its subpages collapsed, you can reorganize it by moving its tab up and down the page tabs column. The collapsed subpages will travel with it.
This covers the basics about pages and subpages, but there’s a lot more you can do with them. You’ll look at some of the more advanced features involving pages in upcoming chapters in this book.
Using Page Templates
In OneNote 2010, you can use page templates to dramatically change the appearance of pages. Templates can add decorative designs and photorealistic backgrounds to your notes pages or let you create useful and functional documents like simple forms, calendars, and interactive checklists.
Templates offer a convenient way to give all of the pages in your notebook a consistent look. You can choose to apply templates to only specific pages that you create, or you can have OneNote create all new pages with a particular template already applied. In addition, you can customize any existing template design or create your own from scratch.
SHOW ME Media 4.4—Working with Page Templates
Access this video file through your registered Web Edition at my.safaribooksonline.com/9780132182447/media.
![]() LET ME TRY IT
LET ME TRY IT
Applying a Template to a New Page
The first thing to know about templates in OneNote is that you can apply templates only to new pages. This isn’t some terrible oversight by the developers but a legitimate trade-off for the freedom that the unique OneNote canvas provides. Unlike other programs that constrain their pages with lines, grids, or cells of some kind, OneNote’s canvas is as free-form as a sheet of paper. As a result, applying a template that potentially contains several objects in specific locations on the page is very likely to cause collisions with objects that are already present on that page. Computers can do many things, but their artificial intelligence isn’t yet so advanced that they can effectively guess how you would prefer to untangle such a mess if it were to happen. But don’t worry—I’ll show you a simple workaround later that lets you bring your existing notes and your favorite page template together after all.
To browse through OneNote’s built-in templates and apply a template to a new page, follow these steps:
1. Open the section in which you want to apply the template.
2. Located over the page tabs in the right margin, click the small drop-down arrow next to the New Page button, and then click Page Templates (see Figure 4.12).
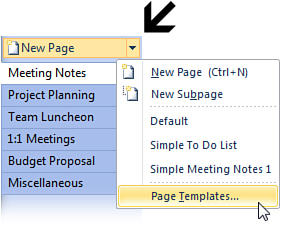
Figure 4.12 The small, downward-facing arrow next to the New Page button over the page tabs provides the entry point to the Templates interface.
3. In the Templates task pane that opens, click a category to view the templates it contains (see Figure 4.13).
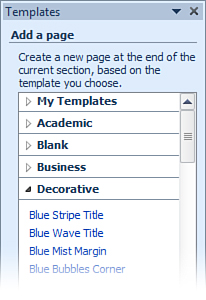
Figure 4.13 In the Templates task pane, you can expand the category labels to browse through the built-in templates, which you can apply to new pages in the current section. You can close this task pane by clicking the X in the upper-right corner.
4. To browse through the list of available templates, click any of their names in the expanded category list. As long as the current page is still free of notes, OneNote will reuse the same page to apply the template you select so you can see what it looks like.
5. When you’ve found a template that you like and it has been applied to the page, click the X in the upper-right corner of the Templates task pane to close it.
6. If the page wasn’t created where you wanted it, click and drag its page tab to move it to the position that you want. In Chapter 7, “Organizing and Searching Notes,” I’ll cover notebook organization in more detail.
After a template is applied to a page, you can start to add notes to it. Templates that don’t just provide a decorative background but also include some page content don’t have to be used “as is;” you can easily delete any parts of the template placed on the page. You can also modify the formatting of any of the template content to something that you like better. For example, if you like the template that you’ve applied, but you prefer a different font for the text it uses, feel free to simply change it.
![]() LET ME TRY IT
LET ME TRY IT
Applying a Template to an Existing Page
As I mentioned in the previous section, it’s technically not possible to apply a template to an existing page that already contains notes. However, in most situations, you can use the following simple workaround to achieve the same result.
To apply a template to an existing page, follow these steps:
1. Click the small drop-down arrow next to the New Page button over the page tabs and then click Page Templates.
2. In the Templates task pane, find the template you want and then apply it to a new page.
3. On the page, delete any template page content that you don’t want to keep.
4. In your notebook, navigate to the page of notes that you want to use with the template you applied to the new page.
5. Click anywhere on the page and then press Ctrl+A three times in a row. Ctrl+A is the keyboard shortcut for the Select All command, which works incrementally in OneNote. Depending on the contents of your page and the location of your cursor, you might need to press Ctrl+A up to three times in a row to select everything on the page.
6. On the Home tab, in the Clipboard group, click Copy.
7. Navigate back to the new page to which you applied the template.
8. Click anywhere on the page and then press Ctrl+V. This is the keyboard shortcut for the Paste command.
The success of this workaround depends on the complexity of your existing notes page. You might need to clean up the new page a little after pasting your notes onto it to make sure that all of your note containers and objects are where you want them. You might also want to copy and paste the page title and date and time stamp of the original page.
If copying and pasting all of the page contents at once proves to be a bit too error-prone for your particular page, try selecting and copying individual note containers and then pasting them one by one instead.
Again, this is merely a suggested workaround to the technical limitation, so it’s probably best to keep your expectations reasonably low. Remember that the Undo command (Ctrl+Z) on the Quick Access Toolbar can quickly put things back to the way they were.
![]() LET ME TRY IT
LET ME TRY IT
Automatically Applying a Template to All New Pages
If you’re working on a notebook that will have lots of pages whose content is related, you might want to consider formatting those pages with a consistent template applied. Even just a subtle visual page background can give the pages you create within a section a common feel to them, reminding you where you are in your notebook. Later, when you learn to share notebooks with others, this can also be useful to signal people you work with that they’re in the right place.
Going through the steps to apply a template can get tedious if you’re working with a lot of pages. Thankfully, OneNote lets you specify a particular template to be used for all new pages that are created in the current section.
To automatically apply a template to all new pages, follow these steps:
1. If you closed the Templates task pane, you can open it again by clicking the small drop-down arrow next to the New Page button over the page tabs, and then clicking Page Templates.
2. In the Templates task pane, look for the heading Choose default template, which is located near the bottom of the task pane.
3. In the drop-down list, find and select the name of the template you want to be applied to all new pages in the current section.
4. Click the X in the upper-right corner of the Templates task pane to close it.
![]() LET ME TRY IT
LET ME TRY IT
Customizing an Existing Page Template
If you don’t want to take the time to design a brand-new page template from scratch, you can start with a template that you already have, modify its contents and appearance, and then save it as a new template that you can then apply to new pages.
To customize an existing page template, follow these steps:
1. Click the small drop-down arrow next to the New Page button over the page tabs and then click Page Templates.
2. In the Templates task pane, find the template you want and then apply it to a new page.
3. Change any of the page content that you want to modify. For example, you could change the character and color formatting of text, remove any objects you don’t want to keep, insert objects you want to add, or move things around on the page where you want them.
4. When the templates page is to your liking, go back to the Templates task pane and look for the heading Create new template, which is located near the bottom of the task pane.
5. Click Save current page as a template.
6. In the Save As Template dialog box, give the template a new, unique name. If you want to automatically apply this template to new pages in this section, click the check box underneath the Template Name field, and then click Save.
7. OneNote creates a new category called My Templates, which appears at the top of the list of categories in the Templates task pane. This shortcut makes it easy to find and apply your custom templates again.
Creating Your Own Page Template
This method is very similar to customizing an existing template, except that you start with a blank page and then add your own elements. You may want to wait to follow along with this example until you know OneNote a little better. Later in this book, I’ll cover how to format pages and insert content on them. When you have these skills, you’ll be better prepared to create more useful and compelling templates.
To create your own page template, follow these steps:
1. Click the small drop-down arrow next to the New Page button over the page tabs and then click Page Templates.
2. In the Templates task pane, expand the Blank category and then click Default. This creates a new, blank page in the current section that you can use as the basis of the new template you’re creating.
3. On the blank page that OneNote created, create and arrange content that you want the template to contain. Take care to not include too much placeholder text or obtrusive sample content as you’ll just have to remove or replace it again when the template is applied to new pages in the future. Simple templates are often best.
4. When the page is to your liking, go back to the Templates task pane and look for the heading Create new template, which is located near the bottom of the task pane.
5. Click Save current page as a template.
6. In the Save As Template dialog box, give the template a unique name. If you want to also automatically apply this template to new pages in this section, click the check box underneath the Template Name field and then click Save. OneNote creates a new category called My Templates, which appears at the top of the list of categories in the Templates task pane. This shortcut makes it easy to find and apply your custom templates again.
![]() LET ME TRY IT
LET ME TRY IT
Downloading Additional Page Templates
You’re not limited to the built-in templates that OneNote 2010 provides. You can download hundreds of free templates from the Microsoft Office website.
To download additional page templates, follow these steps:
1. Click the small drop-down arrow next to the New Page button over the page tabs and then click Page Templates.
2. In the Templates task pane, immediately underneath the list of template categories, click the Templates on Office.com link.
3. On the web page that opens in your browser, look in the left column called All Templates and then scroll down and click the My Programs link.
4. In the Microsoft Office 2010 column, click OneNote 2010 and then click Save.
5. In the Search box at the top of the web page, enter a keyword (for example, Calendar) and then press Enter. The search results are now filtered for OneNote 2010, and you can download any of the templates you find.