
Security Features in OneNote
Before the age of electronic note-taking, notebook protection meant having a tiny little padlock on your leather-bound journal. Much like present-day car alarms, they provided little more than a false sense of security. Let’s face it: If someone really wanted to read your private notes, a good whack on the lock was probably all that was needed to breach the feeble guardian. The only saving grace was that the damage inflicted to the cover would leave no doubt in your mind that your secrets were no longer safe.
In Chapter 9, “Sharing Notes with Other People,” you’ll learn more about one of OneNote’s most versatile and useful features—sharing your notes and notebooks with other people. Before opening up your notes to the joys and risks of other readers and coauthors mingling in your notebook files, let me introduce you to the security features in OneNote 2010. These features not only provide a strong layer of protection from prying eyes, but they also provide a way to recover from disaster should your most important notes be accidentally lost, overwritten, or deleted.
As with all computer-based housekeeping tasks, all of the procedures and tips offered in this chapter are entirely optional. Assigning a password to private files is simple enough, but a backup strategy takes a bit more forethought and effort. In the end, it’s all very much like insurance: When everything goes according to plan, you feel justified for not having bothered with it. But when disaster strikes, you wish you’d been more prepared.
I won’t lecture you here about the importance of backing up your computer files regularly and testing your restoration procedures. But if you do decide to make OneNote your information repository so you can enjoy all of the conveniences and benefits that come along with doing this, I promise you that learning how to protect your notes will be time well spent.
Keeping Private Notes Private
What makes people consider their notes to be personal or private? Only you can answer that for yourself. Different people have different comfort levels when it comes to sharing information. This is true even in the social networking age, when we’ve seemingly gotten used to sharing just about everything about ourselves with others.
No matter how you use OneNote, it’s likely that some of your notes will, at some point, contain personal or private information that you don’t want others to see or know about. For example, you could create a notebook section dedicated entirely to keeping track of personal security information—such as account numbers, passwords, street addresses, e-mail addresses, phone numbers, website credentials, and so on. By protecting such information with a single password in OneNote, you’re better protected from forgetting something important.
There are many other reasons to protect some notes and not others. For example, while you probably wouldn’t care if someone were to stumble upon your to-do list or your vast recipe collection, you’d probably be concerned quite a bit more about others seeing a confidential business plan or the details of a project that’s under a nondisclosure agreement. No matter what’s behind your own, personal want or need for privacy, having a place where you can keep all of your information together and protecting that place can be very important.
 SHOW ME Media 8.1—Protecting Notes with Passwords
Access this video file through your registered Web Edition at my.safaribooksonline.com/9780132182447/media.
The following procedures illustrate how easy it is to work with password protection in OneNote 2010.
![]() LET ME TRY IT
LET ME TRY IT
Locking a Notebook Section with a Password
If you’re not already somewhat familiar with how password protection works on computers, be sure to practice the following procedures with a dummy section that you don’t really care about. If necessary, create a new section in your notebook and then type some text on the single page it contains. You can use this section for practice and, if you make a mistake while learning about password protection, you won’t lose any important information.
To assign a password to any section in a notebook, do the following:
1. Navigate to the notebook containing the section that you want to protect with a password.
2. Right-click its section tab and then click Password Protect This Section on the shortcut menu.
3. Near the right side of the OneNote program window, the Password Protection task pane appears (see Figure 8.1). Under the Current Section heading near the top of the task pane, click Set Password.
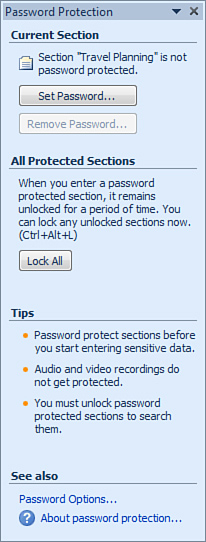
Figure 8.1 The Password Protection task pane in OneNote 2010 lets you manage the optional security for the current notebook section.
4. In the Password Protection dialog box that opens, type the password you want into the Enter Password box (see Figure 8.2). As you type the password, its characters are shown as bullets to prevent anyone from seeing your password. It’s important to note here that passwords in OneNote are case sensitive, which means that when you type any letters of the alphabet in either upper- or lowercase, you must type them again exactly as they were entered to unlock that section again. Take care, therefore, that the Caps Lock key is not pressed and that you always enter passwords very carefully.

Figure 8.2 Whenever you type a password, its characters will appear as bullet symbols to prevent others from observing the password you’re typing.
5. In the Confirm Password box, type the same password again that you typed into the Enter Password box in step 4. Here, too, your password confirmation will appear on your screen as bullets. The passwords you typed into both fields must match each other exactly before OneNote applies the password to the section.
6. Click OK to save your password and to protect the current section.
Although it is not possible to password protect entire notebooks in OneNote 2010, you can protect all of the contents in a notebook by assigning the same password to each section. To see how to lock all notebook sections at once, see “Locking All Protected Sections in a Notebook” later in this chapter.
As soon as OneNote has successfully protected the current section with a password, it will explicitly confirm this in the text shown under the Current Section heading in the Password Protection task pane (see Figure 8.3).
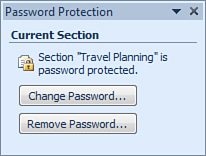
Figure 8.3 The protection status of the section you’re currently viewing is displayed just under the Current Section heading in the Password Protection task pane.
When a section is password protected, you can continue to view it for a while. After a certain amount of time, or if you navigate away from the current section, you will need to enter the section password to return to it.
![]() LET ME TRY IT
LET ME TRY IT
Unlocking a Protected Section
When a section in your notebook has been protected with a password, you must enter that password whenever you want to return to that section again to look at its pages.
To unlock a section, do the following:
1. Click the tab of the password-protected section that you want to view.
2. When you see the password protection screen (see Figure 8.4), click the screen or press Enter.
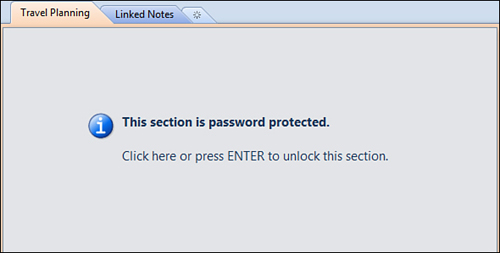
Figure 8.4 Whenever you navigate to a protected section in your notebook, you can click the screen or press the Enter key to display the dialog box that unlocks the section with the correct password.
3. In the Protected Section dialog box that appears, type the password for the section, and then click OK. Remember that passwords in OneNote are case sensitive. Upper- and lowercase characters must be entered exactly as you typed them when you first created the password for the current section.
If you enter the wrong password or you typed the right password incorrectly, OneNote displays a “Password is incorrect” warning in the Protected Section dialog box and clears the Enter Password field so you can try again.
When you type the correct password, OneNote unlocks the section and displays all of its pages.
![]() LET ME TRY IT
LET ME TRY IT
Locking All Protected Sections in a Notebook
If you’ve applied passwords to multiple sections in your notebook and you want to lock them all again after viewing them, you can do so with a simple command.
With one or more of your protected sections unlocked, do either of the following:
• If the Password Protection task pane is visible near the right side of the OneNote program window, click the Lock All button under the All Protected Sections heading (see Figure 8.5).

Figure 8.5 If you have multiple protected sections open and you want to immediately lock them all, you can either press the Lock All button in the Password Protection task pane or use the Ctrl+Alt+L keyboard shortcut.
• On your keyboard, press Ctrl+Alt+L to lock all protected sections.
![]() LET ME TRY IT
LET ME TRY IT
Changing the Password for a Protected Section
Changing passwords is very important if you think your original password has been compromised. This can happen if you become aware of someone having watched your keyboard while you entered a valid password or when someone with whom you shared a password should no longer have access to the protected information (for example, when a colleague at work leaves a confidential project to go work on another team).
Provided that you have the correct password for a protected section, you can change it at any time by doing the following:
1. Navigate to and then unlock the protected section whose password you want to change.
2. In the Password Protection task pane, click Change Password (see Figure 8.6).
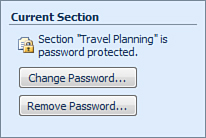
Figure 8.6 If the password for a protected section should become compromised, you can click the Change Password button in the Password Protection task pane to assign a new password to that section.
3. In the Change Password dialog box that appears, first type the current password into the Old Password box.
4. In the Enter New Password box, type a new password for the current section. Remember that passwords in OneNote are case sensitive.
5. In the Confirm Password box, type the new password again. Only if this confirmation matches the new password will OneNote change the password for the current section.
If you type the original password incorrectly into the Old Password box, or if the new password and its confirmation don’t match, OneNote doesn’t change the current password but clears the password fields in the Change Password dialog box so you can try again.
When the old password, new password, and new password confirmation match, OneNote will change the password for the current section. Depending on the speed of your computer, a progress bar may briefly appear while OneNote is changing the password. When the dialog box disappears, the password will have successfully been changed. At that point, the old password for that section will no longer unlock it. You will have to use the new password to view the section again.
![]() LET ME TRY IT
LET ME TRY IT
Removing the Password for a Protected Section
When the notes in a protected section are no longer considered to be secret or sensitive in nature, you can opt to remove the password protection from that section. Removing a password may also be a temporary convenience whenever you need to do lengthy editing work in multiple protected sections and you become annoyed with their automatic timeout. Of course, in the latter case, be sure to reapply password protection to such sections again when your work is finished.
To unprotect a protected section so it no longer requires a password to be viewed, do the following:
1. Navigate to and then unlock the protected section whose password you want to remove.
2. In the Password Protection task pane, click Remove Password (refer to Figure 8.6).
3. In the Remove Password dialog box that appears, type the current password for the section and then click OK.
If you enter the current password incorrectly, OneNote won’t remove the current password. When you enter the current password correctly, the password is removed from the current section. You can verify this by looking at the confirmation text under the Current Section heading near the top of the Password Protection task pane.
![]() LET ME TRY IT
LET ME TRY IT
Setting Password-Protection Preferences
OneNote will keep protected sections unlocked for up to 10 minutes of inactivity after you’ve entered the correct password. If this amount of time proves to be too long or too short to suit your needs, you can change this setting by doing the following:
1. Click the File tab and then click Options.
2. On the left side of the OneNote Options dialog box that appears, click the Advanced category.
3. On the right side of the dialog box, scroll down to the Passwords heading (see Figure 8.7).
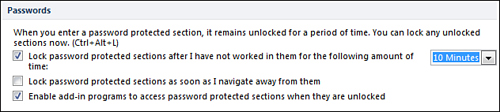
Figure 8.7 Under the Passwords heading in the Advanced category of the OneNote Options dialog box, you can change how and when OneNote locks password-protected notebook sections.
4. Make sure that the check box in front of the first option (“Lock Password Protected Sections After I Have Not Worked in Them for the Following Amount of Time”) is selected, and then click the drop-down menu next to this option to select a security timeout that suits you. You can choose from a minimum of 1 Minute all the way up to 1 Day.
Independent of the first option, you can also tell OneNote to lock protected sections immediately after you click away from them:
1. Click the File tab and then click Options.
2. On the left side of the OneNote Options dialog box that appears, click the Advanced category.
3. On the right side of the dialog box, scroll down to the Passwords heading (see Figure 8.7).
4. Make sure that the check box in front of the second option (“Lock Password Protected Sections as Soon as I Navigate Away from Them”) is selected.
Finally, if you use any add-in programs with OneNote 2010 that provide additional functionality, you can tell OneNote to let such programs access your protected notebook sections as long as these are unlocked. To do this, follow these steps:
1. Click the File tab and then click Options.
2. On the left side of the OneNote Options dialog box that appears, click the Advanced category.
3. On the right side of the dialog box, scroll down to the Passwords heading (see Figure 8.7).
4. Make sure that the check box in front of the third option (“Enable Add-In Programs to Access Password Protected Sections When They Are Unlocked”) is selected.
If you don’t use add-in programs with OneNote 2010 or if you don’t even know what they are, you can leave the third option selected, as it is when OneNote is first installed. Because permission is only given to sections that you yourself have unlocked with a valid password, you needn’t worry about any unauthorized access to your notes.
Backing Up Your Important Notes
I once overheard a colleague say to another: “If you don’t back up your computer, you deserve to lose all your stuff. It means you don’t really care about it.” A bit harsh? Hmm, perhaps. Then again, the topic of computer backups usually requires a bit of tough love for the uninitiated.
Security comes at the expense of convenience. The task of backing up your most important computer files is no exception. If you choose the easy path by never bothering with backups, you greatly increase your chances of being greatly inconvenienced when the unthinkable happens—such as a hard drive crash. Such things occur without warning and never at convenient times. The fallout from lost and especially irreplaceable data can be enormously painful. In most cases, people won’t even realize all that they’ve lost. Only as the days, weeks, and months pass, whenever they desperately search for a file they were sure they still had, will the damage become evident. Data loss is the gift that keeps on giving—the gift that nobody wants.
Although backing up your computer is simply a good idea, doing so regularly is a great one. It gives you a way of going back in time and restoring lost data to the last time you backed up. The longer you wait to refresh your backup, the more painful unexpected data loss will be. The more often you back up your files, the less it will hurt when everything is lost. As I said at the beginning of this chapter, it’s all quite a bit like insurance: While the platters on your hard drive spin happily, you feel justified for not having bothered with backups. But when they finally come crashing down, you wish you’d been more prepared.
SHOW ME Media 8.2—Backing Up Important Notes
Access this video file through your registered Web Edition at my.safaribooksonline.com/9780132182447/media.
In Chapter 7, “Organizing and Searching Notes,” I told you that OneNote will never nag you about organizing your notes if that’s not your cup of tea. The same is true for backing up your notes. Therefore, it falls on you to decide whether you want to be protected from data loss or not. If you’re using OneNote just for yourself, you probably have only yourself to answer to. However, after you begin sharing notes with others, as I cover in Chapter 9, you’ll see how quickly the loss of important information can impact a whole team—even an entire organization. Just like no one can help you remember a forgotten password, no one can help you if you lose critical information and you didn’t keep any backups.
Even if you’re not yet sold on backing up your notes, I urge you to read on and at least let me introduce you to the easy backup features that OneNote 2010 makes available to you. It’s much less of a pain than you might think.
![]() LET ME TRY IT
LET ME TRY IT
Selecting a Backup Location
Remember what I said about cheap little padlocks on leather-bound journals and car alarms? They provide a false sense of security. The same is true if you use the default location that OneNote 2010 selects for automatic backups. This is because OneNote’s backup system defaults to the same drive on which you install OneNote itself, which is also where you’ll typically create and store your notes.
The trouble with this is that, if your hard drive crashes, not only your original notes will be lost, but your “backups” as well. If you keep this configuration, you might as well not have bothered with backups at all. Although keeping backups on the same drive as your primary files does provide a handy way to undo damage resulting from human errors, such as if you accidentally delete a section you still needed, the real solution is to designate a location other than your primary hard drive as OneNote’s backup folder. This location could be another hard drive in your computer, an external hard drive connected to your computer, or even a USB drive that you temporarily connect to create a manual backup and which you then keep in a safe location.
To select a folder that OneNote should use for backups, follow these steps:
1. Click the File tab and then click Options.
2. On the left side of the OneNote Options dialog box that appears, click the Save & Backup category (see Figure 8.8).

Figure 8.8 The Save & Backup category in the OneNote Options dialog box lets you control where and how often OneNote should create automatic backups of your notebooks. Here, you can also create instant backups, which is useful when you want immediate security after creating or modifying a large amount of important notes.
3. On the right side of the dialog box, under the Save heading, click the second line in the list with the prefix “Backup Folder” and then click the Modify button below it.
4. In the Select Folder dialog box that opens, navigate to a location other than your primary hard drive where OneNote should keep your backups. If you want automatic backups to be saved here at regular intervals, you’ll need to select a drive that’s always available, such as a second or external hard drive, or a file share on your network to which you have read and write access.
5. If necessary, create a new folder called OneNote Backups at this new location and then navigate to it.
6. Click Select to accept the new location and close the Select Folder dialog box. OneNote updates the Backup Folder path in the list with the new location you specified.
7. If you want to save the new location, you must click OK at the bottom of the OneNote Options dialog box. If you click Cancel, OneNote will revert to the previous backup location.
After you’ve set a reliable (and preferably permanent) secondary location as your backup folder, you can already rest a bit easier. If you accept the factory settings, OneNote will now create a backup of your open notebooks once every 24 hours and it will keep two days’ worth of backups at any one time. After that, the oldest backup will be overwritten with a fresh one. If this does not suit your needs, you can easily adjust both the time interval for automatic backups as well as the number of backup sets that OneNote should keep on hand.
![]() LET ME TRY IT
LET ME TRY IT
Changing the Automatic Backup Time Interval
To have OneNote create automatic backups more frequently than just once a day, do the following:
1. Click the File tab and then click Options.
2. On the left side of the OneNote Options dialog box that appears, click the Save & Backup category (see Figure 8.8).
3. On the right side of the dialog box, under the Backup heading, make sure that the check box in front of the first option (“Automatically Back Up My Notebook at the Following Time Interval”) is selected, and then click the drop-down menu next to this option to select a backup frequency that suits you. You can have OneNote create a fresh backup every single minute or wait up to 6 weeks between one automatic backup and the next.
4. You must click OK at the bottom of the OneNote Options dialog box to save your changes. If you click Cancel, OneNote will revert to the previous settings.
If you change the time interval to have OneNote create automatic backups more often than once a day, keep in mind that you might also want to change the number of backup sets that are kept in your backup folder. If you keep the factory setting of just two backups at any one time, it can severely limit your restoration options. Read on for an elaboration of this problem.
![]() LET ME TRY IT
LET ME TRY IT
Changing the Number of Backups to Keep
Imagine that you’ve set up OneNote to make an automatic backup of your work every hour on the hour. Although this might seem like a highly safe option, it might not be. Leaving the number of backups to keep at just two sets (the OneNote default setting) means that you might not be able to undo any accidental deletions or overwritten notes that you might discover some 3–4 hours after such an error has occurred. After just 2 hours, all of your backup sets will have been overwritten with those fresh, hourly backups you wanted, and those new backups will each contain the mistakenly overwritten notes (or lack the pages that were accidentally deleted). This would make your two backup sets entirely useless.
To avoid this, remember to also increase the number of backups you want OneNote to keep whenever you choose to increase the frequency of your automatic backups. The only cost for doing this is hard drive space. If you create more backup sets more often, it might require a significant amount of free space in your backup location.
If you’re backing up to a spacious secondary drive or network share that’s dedicated to your OneNote backups and nothing else, keeping a large number of backups shouldn’t be much of an issue. However, if your notes contain a lot of significantly large attachments, or a significantly large number of images or audio and video clips, you might need to first double-check how much space is needed for each backup set of all your notes. You can do this by opening Windows Explorer and looking at the file sizes of your notebooks by checking them in their primary storage location on your hard drive (typically, in the subfolders found in the OneNote Notebooks folder, which, in turn, is tucked away in your Documents [or My Documents] folder).
To increase or decrease the number of backup sets OneNote should keep at any one time, do the following:
1. Click the File tab and then click Options.
2. On the left side of the OneNote Options dialog box that appears, click the Save & Backup category (see Figure 8.8).
3. On the right side of the dialog box, under the Backup heading, replace the number shown in the field following the second option (“Number of Backup Copies to Keep”) with the number of backup sets you want to save in your backup location. The oldest of these sets will be overwritten at the time interval you specified in the option immediately above. If you have the space available for it, you can keep up to a staggering 99,999 backup sets.
4. You must click OK at the bottom of the OneNote Options dialog box to save your changes. If you click Cancel, OneNote will revert to the previous settings.
If you change the number of backup sets to keep after you’ve had OneNote open for a while, you might see a warning that your configuration changes won’t take effect until you restart OneNote (see Figure 8.9). In this case, it is highly recommended that you exit and restart OneNote as soon as possible so that your next automatic backup will be complete.

Figure 8.9 This dialog box may appear if you’re modifying the number of backups that OneNote should keep after you’ve been editing notes for a while. Click OK to dismiss this notification and then exit and restart OneNote.
![]() LET ME TRY IT
LET ME TRY IT
Immediately Backing Up All Changed Files
If you’ve created or changed a significant amount of important notes and you don’t want to wait for the next automatic backup interval, you can immediately create a backup of all of your changed files:
1. Click the File tab and then click Options.
2. On the left side of the OneNote Options dialog box that appears, click the Save & Backup category.
3. On the right side of the dialog box, under the Backup heading, click the Back Up Changed Files Now button. After a moment, you should see a confirmation message that tells you that the backup was created successfully (see Figure 8.10).
Figure 8.10 OneNote displays this confirmation whenever it successfully completes a backup that you’ve manually initiated.
4. At the bottom of the OneNote Options dialog box, click OK.
Immediately Backing Up All Notebooks
Similar to the previous procedure, you can create a manual, immediate backup of all of your notebooks whenever you want or need to. This is most useful if you’ve created or changed a significant amount of important notes across multiple notebooks and you don’t want to wait for the next automatic backup interval.
To create an immediate backup, do the following:
1. Click the File tab and then click Options.
2. On the left side of the OneNote Options dialog box that appears, click the Save & Backup category.
3. On the right side of the dialog box, under the Backup heading, click the Back Up All Notebooks Now button. After a moment, you should see a confirmation message that tells you that the backup was created successfully (see Figure 8.10).
4. At the bottom of the OneNote Options dialog box, click OK.
![]() LET ME TRY IT
LET ME TRY IT
Copying Your Notebooks to a USB Drive
Finally, there’s a quick-and-dirty way to create a complete, manual backup of all of the notebooks stored on your computer’s hard drive. If you’re still experimenting with the automatic backup settings I discussed in the previous procedures, you might want to create a complete, manual backup set of all of your notebooks.
Typically, I don’t recommend this option as a valid backup method because it creates a separate version of all of your notes. If you create too many copies of all of your notes, you might confuse yourself about which set is most current. However, I’m including this here as a final backup tip because it’s really the simplest and fastest way to an instant notebooks’ insurance policy.
To back up all of your notebooks to a USB drive, do the following:
1. Connect your USB drive to your computer. For the highest reliability, connect USB drives only to the ports on your computer, not to USB hubs or USB extension cords.
2. In Windows Explorer, navigate to your Documents (or My Documents) folder.
3. Right-click the folder labeled OneNote Notebooks and then click Copy on the shortcut menu.
4. Navigate to the contents of your USB drive. Right-click over a blank area in the window (not over any existing folders there), and then click Paste on the shortcut menu. OneNote will copy the entire OneNote Notebooks folder from your hard drive to your USB drive.
Restoring Notes from a Backup
After you’ve created at least one set of notebook backups, you can use these files to restore your notes to that previous version if your most current version of those notes becomes lost or corrupted, or if parts of it were overwritten or deleted due to human error.
SHOW ME Media 8.3—Restoring Notes from a Backup
Access this video file through your registered Web Edition at my.safaribooksonline.com/9780132182447/media.
Although the task of restoring notes itself is fairly quick and easy, it’s important not to breeze through this process, especially if you’re looking through multiple versions of the same notes. No one but you can accurately decide which notes (and which version of them) contain the things you care about, the things you lost, and the things you need to restore.
Opening a Set of Notes from a Backup Folder
To open notes from a backup, do the following:
1. Click the File tab, click Info, and then click Open Backups. OneNote opens the default backup location.
2. Double-click the folder matching the name of the notebook whose notes you want to restore.
3. In the folder of the backed-up notebook, click the section file containing the notes you want to restore, and then click Open.
4. OneNote may prompt you whether you want to open only the selected section or also the notebook that the section is part of (see Figure 8.11). If you see this dialog box, click either Open Notebook or Open Section to proceed.

Figure 8.11 When opening a backed-up section file (a file ending with a *.one file extension), OneNote may display this dialog box. In most cases, opening the associated notebook of a backed-up section (and not just the section alone) will give you more context about the version of the old notes you’re looking at and whether or not they are indeed the notes that you want to restore.
5. When OneNote opens sections from a backup file, they are placed in a special Open Sections area, which appears under the Unfiled Notes icon at the bottom of the navigation bar. You can examine the notes here to make sure that they are the version you want to restore. To return to this area at any time after clicking away, click the Open Sections icon again (see Figure 8.12).
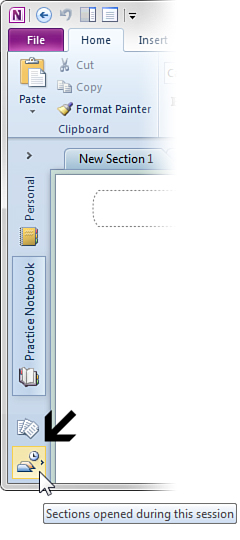
Figure 8.12 The Open Sections icon appears after you’ve double-clicked a section file from a backup set. You can click this icon to return to this special area to review the backup notes before restoring them.
![]() LET ME TRY IT
LET ME TRY IT
Restoring an Entire Section from a Backup
After you’ve reviewed the notes that you opened from one of your backup sets, you can restore them by copying an entire section and its pages to your current, most up-to-date notebook on your primary hard drive.
To restore an entire section, do the following:
1. If necessary, open the notebook to which you want to restore a set of backed-up notes.
2. Click the Open Sections icon at the bottom of the navigation bar to display the section or sections that you opened from a backup set (see Figure 8.12) and then click the section containing the notes pages you want to restore.
3. To restore the currently selected backup section to its proper notebook, right-click its section tab, and then click Move or Copy on the shortcut menu.
4. In the Move or Copy Section dialog box, click to select the icon of the notebook to which you want to restore the section and its pages, and then click Copy. (You cannot choose Move because doing so would leave you with an incomplete backup folder of those notes.)
5. Navigate to the notebook to which you copied (restored) the backup section. When you see the restored section, it will still contain the date stamp of the backup as part of the section name. When you no longer need this information, right-click the section tab, click Rename on the shortcut menu, and then either delete the date stamp or type a new name for the section and then press Enter.
6. When you’re done examining the backup in the Open Sections area, right-click each of the open section tabs and then click Close on the shortcut menu.
![]() LET ME TRY IT
LET ME TRY IT
Restoring Selected Pages from a Backup
If you don’t want to restore an entire section of notes but merely one or more specific pages within a backed-up section, you can restore those pages to your current, most up-to-date notebook on your primary hard drive.
To restore selected pages, do the following:
1. If necessary, open the notebook to which you want to restore a set of backed-up notes.
2. Click the Open Sections icon at the bottom of the navigation bar to display the section or sections that you opened from a backup set (see Figure 8.12) and then click the section containing the notes pages you want to restore.
3. On the right side of the currently selected backup section, click the tab of the page you want to restore. If you want to restore multiple pages from this section, hold the Ctrl key on your keyboard and click the page tabs that you want to include in the restoration.
4. Right-click any one of the selected page tabs and then click Move or Copy on the shortcut menu.
5. In the Move or Copy Pages dialog box, expand the target notebook and click to select the section to which you want to restore the selected pages, and then click Copy. (You cannot choose Move because doing so would leave you with an incomplete backup folder of those notes.)
6. Navigate to the notebook to which you copied (restored) the backup pages to inspect that they were restored correctly.
7. When you’re done examining the backup in the Open Sections area, right-click each of the open section tabs and then click Close on the shortcut menu.
It’s up to you to decide how much you want to invest in the security and reliability of your notes and of the information that you create and keep in OneNote.
If you come to rely on this great program as your primary information repository (or more simply put, an ever-expanding extension of your brain), consider committing to the few extra steps it takes to protect your notes from prying eyes, from technical failures, and from those all-too-common human errors that can ruin a perfectly good day. You’ll be glad you did.