
Organizing and Searching Notes
The previous chapter taught you how to bring all kinds of information into your electronic notebook and keep everything together in one place; this chapter demonstrates why making OneNote 2010 your primary information repository really pays off in the long run.
If you made a sour face when you saw the word organizing in the title of this chapter, don’t be discouraged. You don’t need to learn a specific filing system to stay organized in OneNote. OneNote won’t pass judgment about your note-taking habits, and it won’t nag you about any lack of personal organization on your part. No matter how organized—or disorganized—you are, OneNote will help you to instantly recall anything that you’ve put into it, no matter where you purposely or accidentally might have put it (see Figure 7.1).
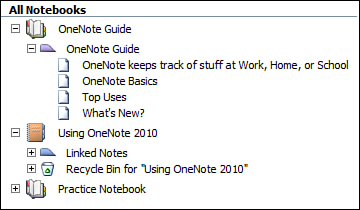
Figure 7.1 Many of the features that help you organize your notebooks in OneNote also help to enable its sophisticated search capabilities—providing instant recall of information for all personality types, no matter how organized (or disorganized) you are.
Organizing Items on a Page
Before we look at how you can keep all elements of your electronic notebooks organized, let’s first examine how you can organize content that you’ve created or imported on your notes pages.
 SHOW ME Media 7.1—Organizing Items on a Page
Access this video file through your registered Web Edition at my.safaribooksonline.com/9780132182447/media.
OneNote 2010 is great tool for capturing thoughts and ideas that you’re just starting to ruminate in your head. But it’s just as great at taking early ideas, writing drafts, and half-baked plans to the next level by streamlining your notes about them into a more cohesive plan or narrative.
Whether you’re organizing your notes only for yourself to keep things straight, or you’ll eventually put together a proposal or presentation to persuade someone why the time is right for your ideas, OneNote can help you.
![]() LET ME TRY IT
LET ME TRY IT
Merging Note Containers on a Page
If you’re reading the chapters in this book in order, you’ve already learned about moving and resizing note containers and organizing their content as outlines. Those features are immensely helpful when you’re still in the process of taking notes, collecting information, or capturing ideas.
When you’re ready to clean up some of your early drafts and begin to put those thoughts and ideas in order, you’ll see that note containers offer a couple of additional tricks to help you organize and consolidate the notes they contain.
For example, note containers provide the capability to merge text from one note container with the text in another. This lets you move important items into your main notes, leaving the things that don’t make the cut on the side, where you can review them once more before deleting them. This is especially useful if you’re tasked with organizing ideas that come out of a brainstorming meeting, for example, where you might have several note containers created by people who contributed their suggestions and ideas.
By merging multiple note containers into one, you can simplify tasks such as formatting and sharing when the main flow of text has been combined.
To see how this works, follow these steps:
1. Click anywhere on a blank page and type a line of text.
2. Click outside of the note container that holds the text you just typed and then type a second line of text so that you’re left with two separate note containers (see Figure 7.2).

Figure 7.2 You can arrange notes on the page by creating separate note containers for certain blocks of text. When you’re ready to consolidate notes from various note containers into your main body of notes, dragging text from one note container into another will merge their contents.
3. Move the mouse pointer over the line of text in the second note container until you see the four-headed arrow icon next to it.
4. Using the left mouse button, click the arrow icon and then drag the text over the first note container until the text pops into place. You’ll notice that OneNote offers to snap the text to certain indentation choices near the margin by hesitating at points while you drag (see Figure 7.3).
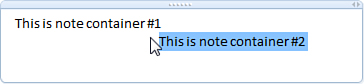
Figure 7.3 When you drag the text from the second note container over the first, the text from both containers is combined. You can finish dragging the text to the left to align it with the other text in the combined note container.
5. Align the text you’re dragging to the first note container with the text that was already there, and then release the mouse button.
The reason I like this approach better than, say, cutting and pasting text from one note container to another is because I get immediate visual confirmation of where text comes from and where I want it to end up. Additionally, I can always change my mind and organize consolidated text again in its new location, as you’ll see in the next procedure.
Organizing Notes Chronologically
Although the date and time stamp that appears near the top of each notes page tells you when that page was first created, the actual notes on the page aren’t always created on the same day. You might want or need to know when a specific line or paragraph of text was added or updated.
For example, if you’re consolidating notes from multiple notes pages or note containers, and you want to organize the seemingly random paragraphs in chronological order (for example, a transcription of events that happened at a seminar), you can look up a hidden date and time stamp that OneNote automatically applies to each paragraph of text when it is created or edited. When merging note containers and consolidating notes, you can use this information to put your text into the right order.
To check the hidden date and time stamp of a paragraph of text, follow these steps:
1. Move the mouse pointer over the line of text in the second note container until you see the four-headed arrow icon next to it.
2. Right-click the arrow icon.
3. At the bottom of the shortcut menu that appears, make note of the author of the selected text and the date and time when it was created or last edited (see Figure 7.4).
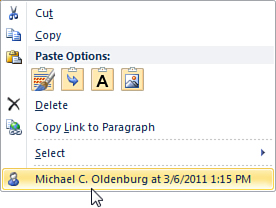
Figure 7.4 When right-clicking the arrow icon for any of the paragraphs in a note container, this menu appears. The last line item displays the text’s author and the date and time when the text was created or last updated.
This information is hidden because it’s actually metadata—a fancy word for “data about data” (or “information about information”). This kind of additional information exists in most other computer files, too. For example, in Microsoft Word 2010, you can display the properties of a document, which tell you all kinds of interesting information, such as how long the document was edited, how often it was saved, and so on.
Similarly, when you import a photo from your digital camera, its metadata tells you what camera you used to create the picture, what exposure (or ISO) setting you used, and other items of interest. Metadata is typically hidden from normal view because it is not always needed. You can consider it as a sort of “on-demand” feature. If you need to know this information, you can easily look it up.
In Chapter 9, “Sharing Notes with Other People,” you’ll learn where this feature can be even more useful, such as when multiple authors contribute to the same notebook in real time and you need to keep track of changes to content in a shared notebook.
![]() LET ME TRY IT
LET ME TRY IT
Using Rule Lines and Gridlines to Organize Objects on a Page
Another way to organize information on the current page is to use the optional rule lines or gridlines that can change a blank notes page to resemble a paper notepad or college-ruled notebook. This can be useful if you’re trying to better align paragraphs of handwritten notes or when you want to visually organize other objects on your page, such as multiple screen clippings you’ve captured or pictures you’ve inserted on the page.
To apply rule lines or gridlines to the current page, follow these steps:
1. On the ribbon, click the View tab.
2. In the Page Setup group, click Rule Lines.
3. On the pop-up menu that appears, click a style under either the Rule Lines or Grid Lines heading (see Figure 7.5). If you don’t like the result, simply repeat the previous steps and choose another style, or click None to remove the last style you applied.
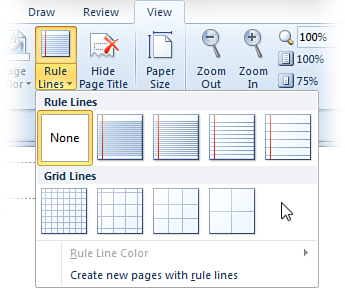
Figure 7.5 To more precisely align text and objects on the page, you can apply rule lines or gridlines to appear on your page background—either temporarily or permanently.
If you do decide to keep rule lines or gridlines displayed permanently, you can change their color to match that of your text and visuals on your page. From the Rule Lines menu, click Rule Line Color and then click the color you want.
Using Tables to Organize Information
Anyone who’s ever used various Microsoft Office programs like Word, Excel, and PowerPoint to create documents, spreadsheets, or presentations knows how useful tables can be to organize information and group information together in logical, meaningful ways.
Whether you’re organizing information for yourself or for other people, you can use tables in OneNote to present data in a familiar, easy-to-understand, row-and-column format.
SHOW ME Media 7.2—Using Tables
Access this video file through your registered Web Edition at my.safaribooksonline.com/9780132182447/media.
Even though OneNote has excellent table support, I must point out that its approach to table creation and formatting differs quite a bit from its other Microsoft Office counterparts. As I’ve mentioned before, such seemingly inconsistent design choices aren’t the work of programmers who want to drive you crazy. Like many things in OneNote, it has to do with the complexity of the OneNote canvas and the freedom it provides from the typical lines and cells that constrain other types of electronic documents.
Because OneNote is also primarily a tool that lets you focus on your thoughts and ideas, the creation of tables is much simpler, compared with other programs. The intent behind this feature design is for the interface to get out of your way so you can concentrate on what you’re thinking and writing about.
While even intentional inconsistencies between computer programs can increase the initial learning curve by a bit, the payoff comes later, when you’ve learned how to use the feature and you see how it saves you time. If you prefer to go the long, more comfortable route when working with tables, OneNote also includes the “normal” commands on the ribbon to let you create tables on your pages in more traditional ways.
![]() LET ME TRY IT
LET ME TRY IT
Creating a Table
To create a table in the most straightforward way, follow these steps:
1. On any page, click where you want to create a table.
2. On the ribbon, click the Insert tab.
3. In the Tables group, click Table.
4. On the pop-up menu that appears, click the Insert Table command at the bottom of the menu.
5. In the small Insert Table dialog box that appears (see Figure 7.6), enter the number of columns and rows you want to start with and then click OK.
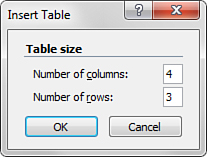
Figure 7.6 The Insert Table dialog box is one of three ways in which you can create a new table in OneNote 2010.
If you prefer to visually draw a table grid before filling its cells with information, do the following:
1. On any page, click where you want to create a table.
2. On the ribbon, click the Insert tab.
3. In the Tables group, click Table.
4. On the pop-up menu that appears, slowly move the mouse pointer over the table grid from the upper-left corner toward the lower right until the text over the table grid indicates the table size. For example, a 4 × 3 table would create a table with 4 columns and 3 rows (see Figure 7.7).
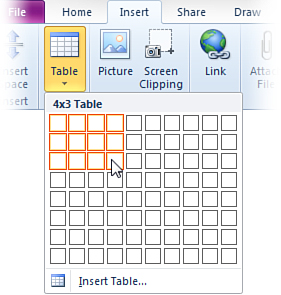
Figure 7.7 For a relatively small table, you can drag the mouse over the starting grid to draw the table with the number of rows and columns that you want.
5. When the text confirms the dimensions you want, click the left mouse button to create the table.
If you want to create tables more quickly, you can take advantage of the fast method that I mentioned in the introduction to this chapter. This method bypasses the user interface entirely and lets you create a new table even while you’re in the middle of typing notes.
Here’s how it works:
1. On any page, click where you want to create the new table.
2. Start typing the text that you want to appear in the first table cell (the leftmost column and the topmost row).
3. On your keyboard, press the Tab key. OneNote creates a new table, puts the text you typed on the current line into the first cell, and then creates the next column.
4. To continue the table until it has the dimensions you want, press the Tab key whenever you want to create a new column or press the Enter key to create a new row.
If the information that you want to include in your notes already exists in a table format in another program, like the spreadsheet cells in a Microsoft Excel workbook or a table in a Microsoft Word document, you can copy any selection from these and other programs and paste the table or grid selection into your notes. Note that any tables and spreadsheet cells that you paste into OneNote might not come over exactly as they appear at their source. OneNote lacks some of the sophisticated formatting choices that the Quick Galleries in Word, Excel, and other Office programs offer. This is because tables in OneNote are primarily intended to organize information instead of dressing it up with fancy formatting styles for the purpose of presentation.
If you need to include a fully formatted table in your notes—the same way it appears in its original spreadsheet or document—consider taking a screen clipping of the table portion you want and then inserting it into your notes. Though you can’t edit the information in screen clippings, this workaround provides a quick-and-easy way to include related information from other sources in your notes.

Figure 7.8 When the cursor is located inside of a table cell, OneNote adds a yellow Table Tools tab over the Layout tab on the ribbon. Clicking this tab reveals the table-specific formatting tools.
![]() LET ME TRY IT
LET ME TRY IT
Inserting a New Row in a Table
To insert a new table row above the current row, do the following:
1. In your table, click any cell in the row over which you want to create the new row.
2. On the ribbon, above the Layout tab, click Table Tools.
3. In the Insert group, click Insert Above.
To insert a new table row below the current row, do the following:
1. In your table, click any cell in the row under which you want to create the new row.
2. On the ribbon, above the Layout tab, click Table Tools.
3. In the Insert group, click Insert Below.
![]() LET ME TRY IT
LET ME TRY IT
Inserting a Line Break Within the Current Table Row
If you want to create a new line of text in a table without forcing it onto a new row in the table, you can insert a line break into any cell. OneNote will expand the current row of cells to make room for the new line of text.
To insert a line break within the current table row, follow these steps:
1. In your table, click the cell where you want to insert a line break.
2. On your keyboard, hold down the Shift key and then press Enter.
3. Type the text you want to appear below the previous line of text in the same cell.
You can also use the Shift+Enter line break shortcut to space out your table cells vertically. This can make large tables or tables with complex data a little easier to read.
The Shift+Enter keyboard shortcut is also the only way to manually resize table rows (other than typing more text to expand their size) because you cannot use the mouse to modify table row borders the way you can with column borders (see “Resizing a Table Column” later in this chapter).
![]() LET ME TRY IT
LET ME TRY IT
Inserting a New Column in a Table
To insert a new table column to the left of the current column, do the following:
1. In your table, click any cell in the column next to which you want to create the new column.
2. On the ribbon, above the Layout tab, click Table Tools.
3. In the Insert group, click Insert Left.
To insert a new table column to the right of the current column, do the following:
1. In your table, click any cell in the column next to which you want to create the new column.
2. On the ribbon, above the Layout tab, click Table Tools.
3. In the Insert group, click Insert Right.
![]() LET ME TRY IT
LET ME TRY IT
Resizing a Table Column
When you type text into the cells in a table, the rows and columns of the table will adapt to the size and length of the text in and around those cells. Although you can only manually expand table rows by using line breaks (see “Inserting a Line Break Within the Current Table Row” earlier in this chapter), you can manually adjust the width of a column with your mouse.
To resize a table column, do the following:
1. Move the mouse pointer over the right border of any cell whose column you want to expand or contract.
2. When the mouse pointer changes to the resize cursor (see Figure 7.9), click and drag the column border to the left or right until it is the size you want and then release the mouse button.
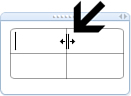
Figure 7.9 Moving the mouse over the vertical border between two table columns changes the pointer to the resize cursor. Clicking and dragging the mouse at this point will change the dimensions of the column to the left of the pointer.
Although you can select individual cells in OneNote tables for the purpose of copying and formatting them, OneNote 2010 does not offer a way to specify a precise size measurement of any parts of a table. This is because tables in OneNote are primarily intended to organize information on your notes pages. Because table cells automatically adapt to their contents, setting cell-based properties typically isn’t necessary.
![]() LET ME TRY IT
LET ME TRY IT
Selecting an Entire Table
You can quickly select all of the text in a table by doing the following:
1. Click any cell in your table.
2. On the ribbon, above the Layout tab, click Table Tools.
3. In the Select group, click Select Table.
An entirely different way to select a table or parts of a table is to use the progressive Select All command in OneNote, which is available through the Ctrl+A keyboard shortcut. Although this command is not exclusive for use with selecting tables, its unique behavior, compared with the Select All command in other programs, is especially apparent when you try it out within a table.
Click in any cell in your table and then press Ctrl+A. OneNote selects the current cell. Pressing Ctrl+A again will extend the current selection to the entire row in which the previously selected cell is located. If you press Ctrl+A once more, OneNote will select the entire table. Finally, pressing Ctrl+A a fourth time will keep the current table selected and also select the note container that the entire table is placed in.
When your table is selected, you can format all its cells with the font, font size, text color, or cell alignment you want.
Selecting a Column in a Table
You can quickly select a column in a table by doing the following:
1. Click any cell in your table.
2. On the ribbon, above the Layout tab, click Table Tools.
3. In the Select group, click Select Columns.
If the plural form in the Select Columns command seems out of place, it’s because you can use this command to select multiple columns, not just the current column. To do this, click any cell in the first column that you want to select, hold down the Shift key, and then click any cell in the last column that you want to select. When you now use the Select Columns command, either on the ribbon or on the right-click menu, OneNote will select all of the columns between and including the columns of the two cells you selected.
After any column is selected, you can format it with the font, font size, font style, text color, or cell alignment you want.
![]() LET ME TRY IT
LET ME TRY IT
Selecting a Row in a Table
You can quickly select a row in a table by doing the following:
1. Click any cell in your table.
2. On the ribbon, above the Layout tab, click Table Tools.
3. In the Select group, click Select Rows.
If the plural form in the Select Rows command seems out of place, it’s because you can use this command to select multiple rows, not just the current row. To do this, click any cell in the first row that you want to select, hold down the Shift key, and then click any cell in the last row that you want to select. When you now use the Select Rows command, either on the ribbon or on the right-click menu, OneNote will select all of the rows between and including the rows of the two cells you selected.
After any row is selected, you can format it with the font, font size, font style, text color, or cell alignment you want.
![]() LET ME TRY IT
LET ME TRY IT
Selecting a Single Cell in a Table
You can quickly select any cell in a table by doing the following:
1. Click any cell in your table.
2. On the ribbon, above the Layout tab, click Table Tools.
3. In the Select group, click Select Cell.
![]() LET ME TRY IT
LET ME TRY IT
Aligning Text Within a Table Cell
After you have selected any cell, row, or column in your table, you can change the alignment of text or objects within the selected cells.
To align text within a table cell, do the following:
1. Select the cells whose text you want to align.
2. On the ribbon, above the Layout tab, click Table Tools.
3. In the Alignment group, click the alignment you want (Align Left, Center, Align Right).
![]() LET ME TRY IT
LET ME TRY IT
Showing and Hiding Table Borders
When you create a table in OneNote, its cells are divided by a visible grid to help keep the information in the table cells visually separated. In most cases, this makes the information easier to read.
If you use tables as a page layout or spacing tool for information or objects on your notes page, you can hide the table borders.
To hide table borders, do the following:
1. Click any cell in the table whose borders you want to hide.
2. On the ribbon, above the Layout tab, click Table Tools.
3. In the Borders group, click Hide Borders.
The Hide Borders command is an On/Off toggle, which means you can restore table borders by repeating the previous steps. Clicking the Hide Borders command again when it is selected (the button on the ribbon will appear orange) turns off the option.
Because table borders disappear completely when you do this, it’s the very last thing you should do after you have formatted the table contents the way you want them to appear.
![]() LET ME TRY IT
LET ME TRY IT
Deleting an Entire Table
To delete an entire table, do the following:
1. Click any cell in the table you want to delete.
2. On the ribbon, above the Layout tab, click Table Tools.
3. In the Delete group, click Delete Table.
![]() LET ME TRY IT
LET ME TRY IT
Deleting a Column in a Table
To delete a column within a table, do the following:
1. Click any cell in the column you want to delete.
2. On the ribbon, above the Layout tab, click Table Tools.
3. In the Delete group, click Delete Columns.
If the plural form in the Delete Columns command seems out of place, it’s because you can use this command to delete multiple columns at once, not just the current column. To do this, click any cell in the first column that you want to delete, hold down the Shift key, and then click any cell in the last column that you want to delete. When you use the Delete Columns command, either on the ribbon or on the right-click menu, OneNote will delete all of the columns between and including the columns of the two cells you selected.
![]() LET ME TRY IT
LET ME TRY IT
Deleting a Row in a Table
To delete a row within a table, do the following:
1. Click any cell in the row you want to delete.
2. On the ribbon, above the Layout tab, click Table Tools.
3. In the Delete group, click Delete Row.
If the plural form in the Delete Rows command seems out of place, it’s because you can use this command to delete multiple rows at once, not just the current row. To do this, click any cell in the first row that you want to delete, hold down the Shift key, and then click any cell in the last row that you want to delete. When you use the Delete Rows command, either on the ribbon or on the right-click menu, OneNote will delete all of the rows between and including the rows of the two cells you selected.
Using Keyboard Shortcuts to Modify Tables
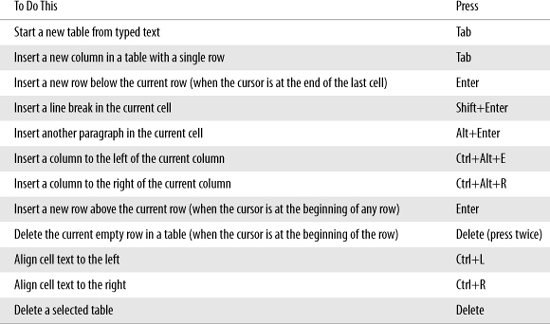
When you’re comfortable with the way tables work in OneNote, learn the various keyboard shortcuts (see Table 7.1) that let you create and modify tables and their cell contents. They provide the easiest and fastest way to organize information on any page in your notes.
Table 7.1 Keyboard Shortcuts for Tables in OneNote
Navigating Notebook Content with Links
In the previous chapter, you learned the basics of working with links in OneNote. Typically, links are used to point to related information that does not need to be stored as part of your notebook. For example, you might link to a specific Wikipedia article that discusses something in greater detail than its brief description in your notes.
When it comes to organizing your notes and notebooks, however, the link functionality in OneNote offers a convenient way to link pages, sections, and entire notebooks together. The practical uses for this are virtually endless—from wiki creation to giving shared notebooks a real navigation system.
For example, corporate trainers can distribute reading materials electronically by sharing such content in notebooks where the pages and sections are linked for easy cross-referencing. A reader of the notebook can easily jump to various locations in the notebook by simply clicking the links.
SHOW ME Media 7.3—Navigating Notebooks with Links
Access this video file through your registered Web Edition at my.safaribooksonline.com/9780132182447/media.
The following procedures show you how you can use the commands that OneNote provides to create navigation links to various parts of your notebook content and how you can use the wiki syntax while typing notes to link to existing pages and sections or to dynamically create new pages that you want to link to.
![]() LET ME TRY IT
LET ME TRY IT
Creating a Link to a Specific Notes Page
To create a link that will open a specific page in your notebook, follow these steps:
1. Navigate to the page that the link should open when it is clicked and then right-click its page tab near the right side of the OneNote program window.
2. On the shortcut menu that appears, click Copy Link to Page (see Figure 7.10).
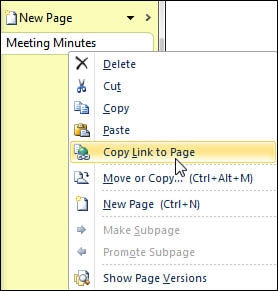
Figure 7.10 Right-clicking a page tab lets you copy a link to that page, after which you can paste the link anywhere in your notes. It will automatically inherit the name of the page as the link text.
3. Go to the notes page where you want the link to appear, click to activate the cursor, and then press Ctrl+V to paste the link.
When pasting links to pages, OneNote automatically copies the page title into the link text so you don’t have to type it again. It also formats the link in blue, underlined text to indicate that it is clickable.
After the link has been pasted, clicking it will immediately open the page it points to. To return to the previous page in your notebook, click the Back button on the Quick Access Toolbar near the upper-right corner of the OneNote program window.
![]() LET ME TRY IT
LET ME TRY IT
Creating a Link to a Specific Notebook Section
To create a link that will open a specific section in your notebook, follow these steps:
1. Navigate to the section that the link should open when it is clicked and then right-click its section tab under the ribbon.
2. On the shortcut menu that appears, click Copy Link to Section (see Figure 7.11).
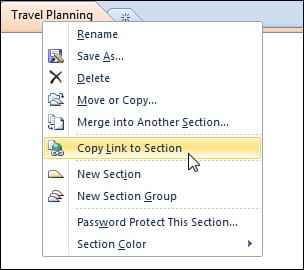
Figure 7.11 Right-clicking a section tab lets you copy a link to that section, after which you can paste the link anywhere in your notes. It will automatically inherit the name of the section as the link text.
3. Go to the notes page where you want the link to appear, click to activate the cursor, and then press Ctrl+V to paste the link.
When pasting links to sections, OneNote automatically copies the section title into the link text so you don’t have to type it again. It also formats the link in blue, underlined text to indicate that it is clickable.
![]() LET ME TRY IT
LET ME TRY IT
Creating a Link to a Specific Notebook
To create a link in your current notebook that will open another notebook you have open, follow these steps:
1. On the navigation bar near the left side of the OneNote program window, right-click the icon of the notebook that the link should open when it is clicked.
2. On the shortcut menu that appears, click Copy Link to Notebook (see Figure 7.12).
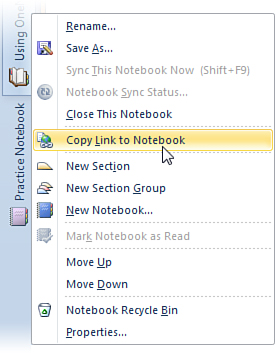
Figure 7.12 Right-clicking a notebook icon on the navigation bar lets you copy a link to that notebook, after which you can paste the link anywhere in your notes. It will automatically inherit the name of the notebook as the link text.
3. Go to the notes page in the notebook where you want the link to appear, click to activate the cursor, and then press Ctrl+V to paste the link.
When pasting links to notebooks, OneNote automatically copies the notebook’s name into the link text so you don’t have to type it again. It also formats the link in blue, underlined text to indicate that it is clickable.
If the notebook you want to link to isn’t shown on the navigation bar, click the File tab, click Open, and then either click the notebook from the Recently Closed Notebooks list or click the Open Notebook button.
![]() LET ME TRY IT
LET ME TRY IT
Creating Wiki-Style Links to Other Locations in Your Notebook
If you’re familiar with wiki editing and it’s something you plan to do with OneNote, you’ll be happy to learn that OneNote supports the bracket syntax that lets you create navigational links to your pages, sections, and notebooks without using the interface.
To create a link to an existing place in your notebook, do the following:
1. In your notes, where you want the link to appear, type [[ (two left brackets) to begin the link.
2. Immediately following the opening brackets, type the name of the page, section, or notebook that you want to link to. This text must exactly match the name of your link target.
3. To end the link, type ]] (two right brackets). As soon as you type the last bracket, the text will change to a blue, underlined, clickable link that will point to the page, section, or notebook name that you specified.
It’s important to note that, while wiki link names can have spaces between words, there should be no space immediately following the opening pair of brackets and preceding the closing pair of brackets.
If the name of your link target exists, the link that will point to it will appear underlined with a solid line, just like a normal link. If you type the title of a page or the name of a section or notebook that doesn’t exist, OneNote creates a new, blank page with the name you typed for the link and places this page in the current section of the notebook that you’re presently working in. Blank pages that are created and linked to in this way are formatted with a blue, broken underline (see Figure 7.13) to signal that, while the target page has been created, you’ll need to add content to this page at some point in the future.

Figure 7.13 Typing the title of a page that does not yet exist in your notebook as a wiki link will cause OneNote to create a new, blank page with that title so that you remember to add content to the page later. To help you spot empty pages that you have linked to, the link underline appears as a dotted line.
If you have both a section and a page in your notebook that have the same name, automatic wiki links will favor the page first. If you want to create a navigational link to both the page and the section that share the same name, you can use the wiki link syntax to create the link to the page and then use the manual link creation for the section by right-clicking the section tab, clicking Copy Link to Section, and then pasting that link into your notes at the location you want it to appear. Similarly, because pages are given preference, you cannot create a new section by typing a new name as a wiki link, as this will create a new page. To create a new section that you can then link to, right-click any existing section tab at the location the new section should appear, and then click New Section on the shortcut menu.
As is the case with manually created navigational links, wiki links that you create from typed text are automatically maintained even if you move pages and sections around in your notebook after the links have been created. Similarly, your navigational links won’t break if you change the names of the pages, sections, or notebooks to which they point. OneNote automatically updates and maintains them as needed.
If, for some reason, you prefer to create navigational links by selecting their destination from a list, you can use the quick filing menu to create a link. To do this, click in the line of text where you want to create your link and then press Ctrl+K to display the Link dialog box. In the lower half of the dialog box, navigate to and then select the destination of the link. When you click OK, OneNote inserts a formatted link to the page, section, or notebook that you selected.
Now that you know how to organize information in your notebooks by adding optional navigation, it’s time to learn how you can move things around when needed.
Organizing the Pages and Sections in a Notebook
One of the many benefits of your electronic notebooks compared with their paper-based counterparts is the ability to change the structure of your notebook, even after the notes have been created. This is something that you simply cannot do with paper.
Because you can easily change and update the content in your notebooks in OneNote, you might also need to change the location of specific pages or entire notebook sections that contain them. I’ll show you how to do this in the following procedures.
SHOW ME Media 7.4—Organizing Pages and Sections
Access this video file through your registered Web Edition at my.safaribooksonline.com/9780132182447/media.
Before you get started with copying or moving pages and sections, however, remember a related organizational feature covered in Chapter 4, “Notebooks, Sections, and Pages.” There, you learned that you can organize page tabs and section tabs by clicking and dragging them where you want them to appear.
For example, to alphabetize your section tabs, you can click one section tab at a time and then horizontally drag it behind other section tabs until all of the section tabs in the notebook appear in alphabetical order. When you drag a section tab to a different location, all of the pages stored in that section will automatically travel with it.
Likewise, you can organize the order of appearance for the pages in any particular notebook section by clicking one page tab at a time and then dragging it up and down in the column of page tabs until each tab appears where you want it.
You can also click and vertically drag the notebook icons on the navigation bar to position your open notebooks in the order you want them to appear.
![]() LET ME TRY IT
LET ME TRY IT
Displaying the Hierarchy of a Notebook on the Navigation Bar
When you’re ready to organize the pages and sections of your notebooks, you’ll want to expand the navigation bar at least temporarily to display the full hierarchy of sections within each notebook:
1. Near the right side of the OneNote program window, locate the navigation bar on which the icons that represent your open notebooks appear.
2. At the top of the navigation bar and just under the ribbon, click the small chevron arrow that points to the right. This is the Expand Navigation Bar toggle button. The navigation bar (see Figure 7.14) expands to show the sections contained within each notebook (see Figure 7.15).
![]()
Figure 7.14 The navigation bar can be expanded by clicking the small arrow button at the top of your list of notebooks.

Figure 7.15 When expanded, OneNote displays the full hierarchy of sections and section groups within each notebook. The arrow button you used to expand the navigation bar can be clicked once more to collapse the navigation bar again.
As time goes on, your notebook will likely grow by several sections and pages. Displaying the hierarchy of each notebook by expanding the navigation bar lets you see exactly where your content is located and decide where you might want to copy or move information. Expanding the navigation bar also makes it easier to move or copy pages and sections by dragging them to their new destinations with the mouse.
Moving or Copying a Notes Page
You can move or copy any existing page to another section in the current notebook or to a section in a different notebook.
To move or copy a notes page, do the following:
1. Right-click the page tab of the page you want to move or copy to another location and then click Move or Copy on the shortcut menu.
2. In the Move or Copy Pages dialog box that opens, navigate to the section where you want the page to go. The notebook you’re currently working in will appear with an open book icon, but you can also expand any other notebooks that you have listed and click to select a target section.
3. When you have clicked to select the target section you want, click either the Move or the Copy button at the bottom of the dialog box.
As the name of these commands implies, copying a page will leave it in its original location but also place an exact duplicate of it in the location you choose. This can be useful for authors who want to keep multiple versions of a set of notes for the purpose of draft management. Moving a page rips it out of its present location and places the original page in the new location you specify.
Typically, the Move command is a preferred notebook organizational tool for relocating your pages and sections because it puts the original set of your notes pages in their rightful places.
When you feel more familiar with the Move and Copy interface in OneNote, you can also use the mouse to click and drag page tabs from one location to the next. Clicking and dragging a page will move it, whereas holding the Ctrl key while dragging a page tab to another location will make a copy of the page.
As with most commands in OneNote 2010, you can use the Undo command on the Quick Access Toolbar (or the Ctrl+Z keyboard shortcut) to correct any mistakes you make while using the Move or Copy command to reorganize your notes pages.
![]() LET ME TRY IT
LET ME TRY IT
Moving or Copying a Notebook Section
You can move or copy any existing notebook section to a different notebook. This is useful when you’re ready to split out one or more sections into their own notebook, such as when a brainstorming idea turns into an actual project.
To move or copy a notebook section, do the following:
1. Right-click the section tab of the section you want to move or copy to another notebook and then click Move or Copy on the shortcut menu.
2. In the Move or Copy Section dialog box that opens, click the name of the notebook where you want the section to go. (The notebook you’re currently working in will appear with an open book icon; the others will be marked with a closed book icon.)
3. When you have clicked to select the target notebook you want, click either the Move or the Copy button at the bottom of the dialog box.
Moving or copying a section from one location to another includes all of the pages and subpages that a section contains. If you copied a section and do not want the copied version to include all of the pages, open the copy of the section at its new location and then delete the pages you do not want to keep. Doing this is faster than bringing over the individual pages into a new section.
You can also use the mouse to click and drag section tabs from one location to another. Clicking and dragging a section with your mouse will move it, whereas holding the Ctrl key while dragging a section tab to another location will make a copy of the section and the pages it contains.
![]() LET ME TRY IT
LET ME TRY IT
Merging One Notebook Section into Another
Another useful organizational tool in OneNote 2010 is the ability to merge one section with another. Doing so will copy all of the pages in the starting section and move them to another section that you specify. When the pages have been successfully merged at their destination, OneNote deletes the original section. Merging sections is faster than copying single pages from a section you plan to delete to a new section that already contains pages.
To merge sections, do the following:
1. Right-click the section tab of the section you want to merge into another, and then select Merge into Another Section on the shortcut menu.
2. In the Merge Section dialog box that opens, click the name of the section into which you want to merge the current section. (The notebook you’re currently working in will appear with an open book icon; the others will be marked with a closed book icon.)
3. To merge the section with one in the current notebook, click its section tab. To merge the section with one in another notebook, click the + symbol next to the notebook you want and then click the target section.
4. When you have clicked to select the target section you want, click the Merge button at the bottom of the dialog box.
OneNote will warn you that the section merge that you’re about to undertake cannot be undone with the Undo command on the Quick Access Toolbar, nor with the Ctrl+Z shortcut, so you must acknowledge that you’re certain about continuing. In the warning dialog box, click the Merge Sections button to merge the two sections or click Cancel to leave things as they currently are.
![]() LET ME TRY IT
LET ME TRY IT
Combining Multiple Sections into a Section Group
As your notebook grows more large and complex over time, it might become cumbersome to quickly navigate between a large number of section tabs, especially when certain section tabs are ordered in such a way that makes scrolling between them time consuming.
Although you could split up a large notebook by moving some of its sections to a second notebook, you may prefer to keep all of your notes and information pertaining to a particular subject in a single notebook. You can manage section clutter by organizing at least some of your sections into section groups, which let you group together one or more notebook sections that are then kept visually separate from the main navigation of your notebook.
You can think of section groups much like folders on your hard drive. Each folder can have multiple files in it or store additional folders that, in turn, contain another level of content. You can give a meaningful name to each section group to remind you of that subset of notes that each section contains. Section groups you’ve created can be accessed to the far right of the row of section tabs underneath the ribbon or in the expanded hierarchical view in the navigation bar. When you click a section group icon, the master row of notebook sections near the top of the OneNote program window is hidden from view, and OneNote will display only the sections that the selected section group contains. In such a condensed view, the immediate benefit is that you don’t have to click past or dig through all of the sections in your notebook. By moving a handful of sections into each section group, you’ll have easy access to those section tabs while that section group is displayed.
To create a new section group in your current notebook, do the following:
1. Right-click any existing section tab and then click New Section Group on the shortcut menu.
2. While OneNote has the temporary name highlighted, type a new, meaningful name for the new section group and then press Enter.
3. You can now click and drag sections over a section group icon to place it there, or right-click a section tab and then use the Move or Copy command on the shortcut menu to put a section into one of the section groups that you have created.
To further illustrate the use of section groups, imagine that your notebook is your entire collection of recipes, and each of your notebook sections represents one letter of the alphabet. In each of those sections, you keep all of the recipe pages whose dishes start with that particular letter of the alphabet (the page holding your recipe for apple crisp is in the section labeled A, and so on).
Although such a notebook could be considered to be well organized, 26 sections is a lot of tabs to scroll back and forth among—even on the largest of computer monitors. You might consider putting an even amount of sections into about 4 or 5 section groups each, so that you can easily click between the section group icons and quickly access the smaller group of section tabs that each section group contains. As before, each notebook section would still represent one letter of the alphabet and contain all of its recipe pages, but navigating between the sections would be much easier now because of the reduced tab clutter.
To navigate to a specific section group, find and click its name in the same place where regular section tabs ordinarily appear. When your view has switched to the contents of that section group, you can click the individual section tabs in that group to access the pages in that section. To go back up a level, click the green arrow icon that appears to the far left of the section tab row until you’re back at the top section level.
Using section groups is entirely optional. If splitting huge notebooks into smaller ones makes more sense to you, then use that approach to make your notes more manageable. If you’d prefer to stay in a single notebook, but you want to simplify viewing and navigating between sections that have started to scroll off the screen, consider grouping multiple sections into fewer section groups.
![]() LET ME TRY IT
LET ME TRY IT
Deleting Unwanted Pages or Sections
This last organizational option in OneNote might seem obvious, but I’m including it here for completeness.
To remove notes you no longer care about, do either of the following:
1. To delete a page you no longer want or need, right-click its page tab and then click Delete on the shortcut menu.
2. To delete a section or section group you no longer want or need, right-click its section tab and then click Delete on the shortcut menu.
Now that you’ve learned about the various options you have available to organize the content in your notebooks and the structure of your notebooks themselves, let’s continue by learning about what you can do with your content to help prioritize it, categorize it, and help to find it more easily in a notebook search.
Prioritizing and Categorizing Notes with Tags
You might have seen tags on websites before, where they are often used on blogs and news sites to group similarly themed content into categories. By clicking the category tag, you can quickly see a list of content that’s available in that category. Tags have many other, similar uses. For example, when you import photos from your digital camera into an image-editing program, it may let you apply tags to your photos to describe what appears in them (the tags would consist of keywords like landscapes, pets, children, and so on) before the pictures are added to your collection. As your photo album grows to hundreds or perhaps thousands of pictures down the road, it would become increasingly harder to find, say, all of your pictures of your dog. By using tags to categorize and search for files, you can quickly locate and display all of the items that are associated with a particular tag.
Tags can also be used to indicate the priority of an item. In Microsoft Outlook, for example, using the Important or Low Priority markers for the e-mail messages that you send is a useful way of tagging the priority of the content in such messages, thus making it easier for the recipient to decide which items require immediate attention and which ones can wait.
In OneNote, tags are an optional way for you to categorize and prioritize selected notes, and you can also use note tags to aid in quickly locating and displaying specific, important information again whenever you need it. Before you get to OneNote’s powerful search features, however, take a closer look at using tags.
SHOW ME Media 7.5—Tagging Notes
Access this video file through your registered Web Edition at my.safaribooksonline.com/9780132182447/media.
In OneNote, a tag consists of an icon that will appear next to your notes text to mark the note (see Figure 7.16). Each tag also has a description that indicates its category or purpose (for example, Important, Idea, Client Request, and so on).

Figure 7.16 Note tags are small icons that you can apply to the left of selected text paragraphs or to other objects on a page, such as a picture, to indicate the tagged item’s priority, classification, or follow-up status. OneNote can search your notes for tags to help you find high-priority follow-up items instantly.
For example, if you tag all of the distinct ideas that come up during a brainstorming session with your team, it’s much easier to scan your notes and look for the lightbulb icon that represents the Idea tag. To see the descriptive name of a tag, move the mouse pointer over the tag’s icon once it has been applied to a part of your notes.
![]() LET ME TRY IT
LET ME TRY IT
Applying a Tag to a Note
To apply a tag to a note, follow these steps:
1. Open or create a page with a couple of paragraphs of notes.
2. Click the first line of any paragraph of text on the page. This lets OneNote know which paragraph you want to tag with an icon.
3. On the Home tab, in the Tags group, click the yellow star icon that is labeled “Important.” OneNote places the yellow star icon in the left margin of the current paragraph. If you move the mouse over the star icon, a ToolTip appears to let you know that this is the note tag for indicating important notes.
To see all available tags in OneNote, click the Home tab and then, in the Tags group, click the small downward-facing arrow at the bottom of the tags list box. A ToolTip will say “More” if you hover over this arrow (see Figure 7.17). When you click this button, OneNote displays the full collection of available note tags and reveals the command for customizing your own tags.
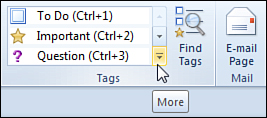
Figure 7.17 To access the full list of available note tags and to gain access to additional tag commands, click the More button in the lower-right corner of the Tags list.
Tagging isn’t just reserved for typed text. You can tag handwritten notes, inserted files and printouts, pictures, screen clippings, scanned images, and any other objects that you’ve placed on your notes page.
Using the To Do Tag
Though most note tags in OneNote 2010 are static icons, there is one tag that’s interactive—the To Do tag. Initially, it appears as a blank check box, but you can click this box to place a check mark in the box to indicate that a task has been completed.
The To Do tag is best applied to follow-up reminders, such as action items that were assigned to you during a business meeting, things your teacher told you to study for your next test, or the chores you’ve been assigned at home.
To create a to-do list with this tag, insert the To Do tag at the beginning of every line item in your list and then click the items you have completed. When all of the items on your list have been completed, you can delete the list from your notebook, or you can keep it as a record of your accomplishments.
![]() LET ME TRY IT
LET ME TRY IT
Search for Tagged Notes
The real power of tagging notes is the ability to search for specific tags and instantly retrieve the notes that are associated with them. This becomes more and more useful over time, as your notebook grows in size and complexity.
To begin looking for tagged notes, do the following:
1. On the Home tab, in the Tags group, click the Find Tags button, which is located just to the right of the tags list.
2. In the Tags Summary pane that opens near the right side of the OneNote program window, OneNote will display a list of all tagged notes in the current notebook (see Figure 7.18). This initial view lets you step through all of your tagged notes so you can review them and remind yourself about any important items that you might have forgotten about.
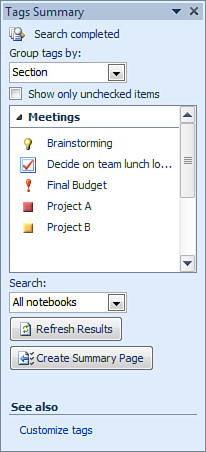
Figure 7.18 The Tags Summary task pane displays all tagged notes that are found within the constraints of the search scope (in this example, the list of tags represents all of the tagged notes that exist in all open notebooks). To go to the page where a tagged note appears, click the note in the results list.
3. To review the results list, use the scrollbar in the task pane (if displayed) to go through all of the tags that OneNote found. To go to a tagged note on its original page, click its entry in the results list.
If you have a large number of tags applied to copious amounts of text, you might want to change the search scope to narrow your results to what you’re really looking for. At the bottom of the Tag Summary task pane, under Search, click the drop-down menu and then change the default search scope (“This notebook”) to one of the other options you want. For example, you could narrow the results list to only show tags in the current section or only tags applied to notes you’ve taken today. Likewise, if you’re having trouble finding a tagged note again, you can temporarily change the search scope to include tagged notes in all notebooks.
Finally, if the results list is showing you the tagged notes you were looking for, you have the option of creating a tag summary page, which causes OneNote to take the note tag search results and copy them over to a new page, which you can then use to create lists of your tagged (i.e., categorized and prioritized) notes and follow-up items.
The multifaceted benefits of tagging your notes will become more evident over time, when your notebooks will contain more and more notes in a larger variety of subjects.
![]() LET ME TRY IT
LET ME TRY IT
Removing a Tag from a Note
When a tag is no longer needed to mark a specific part of your notes, you can remove it. This is recommended if you don’t want to keep seeing old tagged notes in your current results when the search scope is fairly broad.
To remove a tag, do the following:
1. Navigate to the note that contains the tag you want to remove. (If you still have your tags displayed in the Tag Summary task pane, you can click the search result containing that note and tag to quickly jump to it.)
2. Click the note text that contains the tag you want to remove.
3. On the Home tab, in the Tags group, click the small downward-facing arrow at the bottom of the tags list box. A ToolTip will say “More” if you hover over this arrow (see Figure 7.17).
4. At the bottom of the pop-up menu that appears, click Remove Tag.
![]() LET ME TRY IT
LET ME TRY IT
Customizing Note Tags
If some of the tag icons and their descriptions don’t quite match your needs, you can modify any existing tag or create your own.
To customize a note tag, do the following:
1. On the Home tab, in the Tags group, click the small downward-facing arrow at the bottom of the tags list box. A ToolTip will say “More” if you hover over this arrow (see Figure 7.17).
2. At the bottom of the pop-up menu that appears, click Customize Tags.
3. In the Customize Tags dialog box that opens, do one of the following:
• To customize an existing tag, select it in the list and then click Modify Tag.
• To create a brand new tag, click New Tag.
4. After you have modified or created a tag by specifying the name, icon, and optional highlight color you want (see Figure 7.19), return to the Customize Tags dialog box and then use the up and down arrows near the upper right of the tags list to move a selected tag up or down in the list. For example, you could move the tags you create and modify to the top of the list so they appear before all of the others.
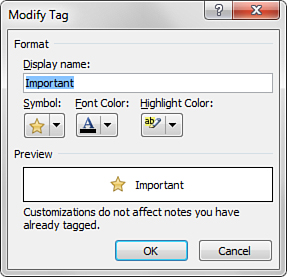
Figure 7.19 When you want to modify an existing tag that comes with OneNote 2010, this dialog box lets you change the tag’s name, icon, and colors. When you’re happy with your customization results, click OK to save your changes.
5. Click OK to save your changes.
When you’re done trying out the tagging features, close the Tag Summary task pane by clicking the X in the upper-right corner of the task pane.
Searching for tagged notes is only part of OneNote’s powerful search capability. I’ve saved the best for last—the ability to search for and instantly find virtually anything in your notes.
Searching Notes
If you’re wondering why I’ve waited to talk about one of OneNote’s coolest features until the end of this chapter, it’s because to really demonstrate the power of the Search function in OneNote you need at least a bit of content on the pages in your notebook(s). Hopefully, if you’ve been following along and tried some of the features along the way, you should have enough stuff in your practice notebook to give the search features a whirl. If not, you can always return to this chapter after your notebook has grown a bit.
The other reason I didn’t delve right into searching is because I wanted to first point out the various organizational options you have available in OneNote, some of which can make searching easier or more efficient. By learning about all of the ways in which you can stay organized in OneNote, you can now better decide whether you think those features are quick and easy enough for your particular style of organization, or if you know in your heart that you’d rather toss everything into a single notebook and rely entirely on the search features to retrieve information again when you need it.
There is no right or wrong decision—OneNote fully supports both styles of note-taking and personal organization, so go with what feels most natural to you.
SHOW ME Media 7.6—Searching Notes
Access this video file through your registered Web Edition at my.safaribooksonline.com/9780132182447/media.
You’ve seen how fast and simple OneNote can search for tagged notes. Before you perform a regular notebook search for the first time, take a quick look at a couple of options that can affect the results and speed of your searches.
![]() LET ME TRY IT
LET ME TRY IT
Turning Audio Search On or Off
If you frequently record audio or video clips with OneNote 2010, you have the option to include spoken words in these clips in your notebook searches. OneNote can recognize your search text in spoken audio, provided that the volume and sound quality is fairly good and that the recording does not have too much ambient noise. Audio search is supported for spoken English, French, German, Italian, Japanese, Korean, Spanish, as well as traditional and simplified Chinese.
Audio searching is initially turned off, so if you want to include your audio notes right from the start, follow these steps:
1. Click the File tab and then click Options.
2. In the OneNote Options dialog box, click the Audio and Video category in the list on the left.
3. On the right, under Audio Search, click to select the check box labeled Enable Searching Audio and Video Recordings for Words. (If you have no audio clips in your notes yet, you don’t need to enable this option.) When you click the check box, OneNote displays a confirmation message to remind you of the system requirements for audio search (see Figure 7.20).
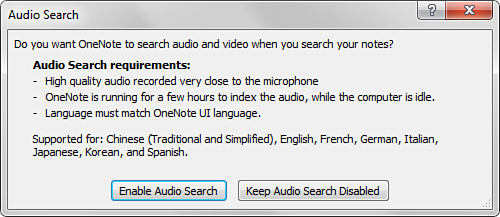
Figure 7.20 When you first enable Audio Search from the OneNote Options dialog box, this confirmation message appears to let you know of the system requirements for this feature.
4. Click OK.
As the label of the check box indicates, audio search works with both audio clips and the audio portion of video clips that you record with or import into OneNote.
![]() LET ME TRY IT
LET ME TRY IT
Turning Text Recognition in Pictures On or Off
You might remember that OneNote 2010 has built-in text recognition for pictures and screen clippings. This option is turned on by default, which means that if your search text is found in any of the pictures or screen clippings in your notes, OneNote will include that text in your search results.
If you want to turn this feature off, do the following:
1. Click the File tab and then click Options.
2. In the OneNote Options dialog box, click the Advanced category in the list on the left.
3. On the right, scroll down to the Text Recognition in Pictures heading near the end of the list.
4. To disable finding text in pictures, click to select the check box labeled Disable Text Recognition in Pictures. If the option is currently disabled and the box is checked, you can reenable this functionality by clicking to deselect this check box again.
5. Click OK.
Searching for Text on the Current Page
First, if the Tag Summary task pane is still shown on the right side of the OneNote program window, close it by clicking the X in the upper-right corner of the task pane. Although you can search your notes with this pane visible, you’ll see that one of the search features has its own task pane. To avoid confusion between the two and save some screen real estate, closing the Tag Summary task pane is a good idea.
Whenever you don’t need a full-blown search because you know for certain that what you’re looking for is on the current page you’re on, you can use OneNote’s quick Find on Page feature.
To search for text on the current page, do the following:
1. If necessary, open or navigate to the page that you want to search.
2. On your keyboard, press Ctrl+F (for Find).
3. Near the right side of the OneNote program window just below the ribbon, look for the yellow Find on Page prompt (see Figure 7.21) and then type the word or phrase for which you want to search. For example, to find all occurrences of the word meeting, type meeting into the Search box (without quotes or punctuation).
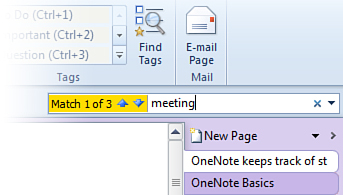
Figure 7.21 Pressing Ctrl+F opens the Find on Page interface near the upper-right side of the OneNote program window. When you type a search term in the box, OneNote instantly counts and displays the number of matches. You can use the blue arrow keys to navigate up and down the occurrences that OneNote found in your notes.
4. As you type the search text, OneNote highlights all instances of it on the current page. If the page has a large amount of text on it and it would take a while to scroll through the results, click the blue arrows that are displayed in the Search box to step through the number of matches OneNote has found in the text. Click the blue down arrow in the Search box to go to the next match or click the up arrow to return to a previous match.
5. When you’re done, press Esc.
![]() LET ME TRY IT
LET ME TRY IT
Searching for Text with Instant Search
The second level of searching in OneNote is called Instant Search. It is not limited to a single page but instead searches through all of the notes in all of your notebooks. As the name suggests, it does this instantly.
To start an Instant Search, do the following:
1. On your keyboard, press Ctrl+E.
2. OneNote activates the Search box near the right side of the OneNote program window and displays a pop-up window that represents a partial view of all of the notebooks and sections you have available (see Figure 7.22). Any notes that contain the text you’re searching for will be highlighted in this list of notes.
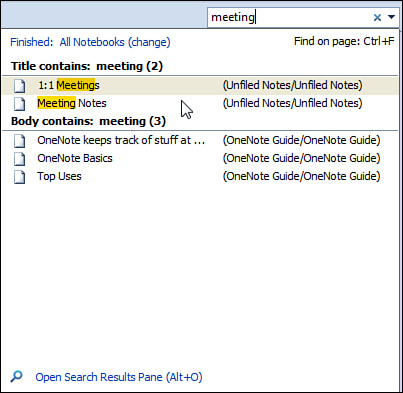
Figure 7.22 Pressing Ctrl+E opens the main search window, which displays highlighted search results within your notebook structure, provides access to change the search scope, and lets you open the Search Results pane.
3. In the Search box where the cursor is blinking, type a word or phrase to search for. Note that, just below the Search box, the blue text indicates that you’re currently searching for your text in all notebooks. (If you want, you can click Change to change your search scope by telling OneNote where to search.)
4. As with the single page search in the previous procedure, OneNote instantly finds results based on every letter you type into the Search box. Finish typing the search text until you find what you’re looking for.
5. When OneNote has highlighted the result you want in the pop-up window, click the result in the list, and OneNote will fetch the note containing the matching search result.
6. To open the page containing one of the other matches, click its highlighted search result in the list. When you’re done searching, press Esc to dismiss the search interface.
You can initiate a new Instant Search at any time by pressing Ctrl+E or by typing something into the Search box. Note that every time you initiate a new search by pressing Ctrl+E, OneNote automatically reverts to searching all available notebooks, even if you changed the search scope in a previous search. If you want OneNote to remember your preferred search scope selection, first click the word change in the blue link under the Search box and narrow your search. For example, to only search for results in the current section, you can click This Section on the shortcut menu. Once you have selected a new search scope, you can make it permanent by clicking the word change in the blue link under the Search box once again and this time clicking Set this Scope as Default on the shortcut menu. When you do this, OneNote will remember your preference across sessions, which means that if you shut down OneNote and run it again later, your first search initiated with Ctrl+E or by typing into the Search box will be limited to your previously selected search scope. You can change it back to All Notebooks when you’re done limiting your searches to specific places.
![]() LET ME TRY IT
LET ME TRY IT
Searching for Text with the Search Results Task Pane
If you want to use the entire height of the OneNote window to review and filter your search results, you can open the optional Search Results task pane. It provides a bit more detail about every matching search result, which is useful when you have several notes that have similar text or when you want to see the date of the page containing the matching note.
To search for text with the Search Results task pane, do the following:
1. On your keyboard, press Ctrl+E to start a new instant search.
2. In the Search box near the right side of the OneNote program window, where the cursor is blinking, type a word or phrase to search for.
3. When you’re done typing and you see at least one matching search result highlighted, press Alt+O (that’s the letter O, not the number zero).
4. OneNote opens the Search Results task pane (see Figure 7.23). Here, you can click through the search results to display each page containing the text you were looking for. Each search result in the list contains a short excerpt of the text, as well as the creation date of each page.
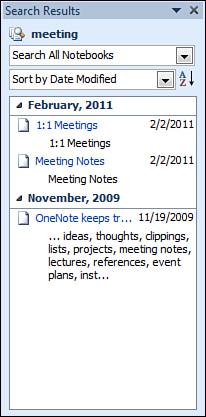
Figure 7.23 The Search Results task pane appears near the right side of the OneNote program window when you press Alt+O after a notebook search. The task pane gives a small text preview of each search result and provides a time stamp for each note. You can narrow or expand your search scope in this pane and sort the results in the list.
5. If you want to change the search scope for the currently displayed results, click the top drop-down menu near the top of the Search Results task pane and choose a new search scope. For example, you can narrow your scope from All Notebooks to only look in This Section.
6. From the drop-down menu immediately below the search scope, you can change the way the search results are sorted by date and instead sort them by the sections in which matching notes appear or by the page titles of matching pages.
7. When you’re done with the Search Results task pane, you can dismiss it by either clicking the X in the upper-right corner of the task pane or by pressing Esc.
![]() LET ME TRY IT
LET ME TRY IT
Troubleshooting Problems with Search
The search features in OneNote depend on the Instant Search component in the latest versions of Microsoft Windows. If you installed OneNote 2010 on a Windows 7 or Windows Vista computer, the search features should work as intended without any action on your part.
However, if you’re using OneNote 2010 on a computer that you’re sharing with other people, it’s possible that another person has turned on or off one or more search features. Similarly, if you’re still using an outdated operating system like Windows XP, you might need to manually install one of the search components.
To verify that OneNote has everything it needs to use Instant Search features, complete either or both of the following procedures.
To verify that the Instant Search component is installed, do the following:
1. Click the File tab and then click Options.
2. In the OneNote Options dialog box that opens, click the Advanced category on the left.
3. On the right, scroll down to the Search heading and look for a button labeled Install Instant Search. If this button can be clicked, then you did not have Instant Search installed. Complete the installation by following any onscreen prompts.
4. Click OK.
If you verified that Instant Search was installed but you see a Warning dialog box a few minutes after you start OneNote (see Figure 7.24), a secondary component may be turned off in Windows.
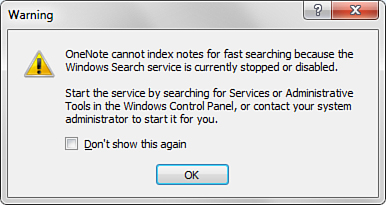
Figure 7.24 If this warning appears a few moments after you’ve launched OneNote 2010, you won’t be able to take advantage of the Instant Search speed in OneNote unless you turn the Windows Search service back on.
You can restart this component by doing the following:
1. In Windows 7, click the Start button.
2. In the Search box at the bottom of the Start menu, type the word Services and wait for the word to appear near the top of the search results window on the Start menu.
3. In the search results list, highlight the word Services (do not highlight other results, such as Component Services), and then press Enter.
4. Maximize the Services window that appears.
5. In the list, scroll down until you see Windows Search in the Name column and then double-click the words Windows Search.
6. In the Windows Search Properties dialog box that opens, make sure that the Startup type option is set to Automatic (Delayed Start). If it isn’t, click the drop-down menu and select this option from the list.
7. If the Service Status further below is set to Stopped, click the Start button underneath this text.
8. Click OK to close the Windows Search Properties dialog box.
9. Restart OneNote 2010.
I hope that this chapter has given you a good idea about the powerful ways in which you can organize information and instantly recall any of that information whenever you need to. The benefits that all of these features avail you make it easy to understand why keeping all of your stuff in OneNote is your best step to improving your personal organization at work, at school, or at home—even if you’re not a particularly organized person.
You can choose to use OneNote’s organizational features to help you and others use and benefit from the information that you’ve collected with OneNote. If you don’t want to bother with organizing your notes, it’s perfectly fine to rely exclusively on search. The benefits of OneNote’s search feature may well keep amazing you, even after you’ve used it for a while. It’s the best reason for keeping all of your notes, research, and information in OneNote, even if that information originated in other places.
In the next chapter, you’ll learn about shared notebooks. When collaborating with other people in the same notebook, the organizational options you’ve learned about in this chapter can come in handy. You can also greatly benefit from OneNote’s search features in shared notebooks when trying to find and view information that others have created or modified.