
Using OneNote with Other Programs
One of the reasons OneNote is one of my favorite programs is that it has reached a level of integration into my life that has made my goal of going paperless without sacrificing convenience more and more of a reality.
My choices as a consumer are based on my personal experiences with technology that manages to delight me by offering me what I care about or by doing something for me that I didn’t know it could do. Though it took me a while to warm up to electronic note-taking and really commit to leaving my trusted notepad and pen on my desk whenever I went to meetings, the benefits of OneNote were immediately clear to me when I first began using it. It’s a rare example in which a product can so seamlessly introduce itself into one’s life and become a part of it.
How we allow different technology into our lives—from the choices we make between brands, features, and price—depends on our mood as much as on our need to get something done. Our preferences can change on a dime and we often reach for a familiar solution just because it’s the only thing we know. Have you ever performed a mail merge in Microsoft Word? When you tried it again six months later, did you figure out a better way of doing it, or did you find the task to be as arduous as it was the first time?
As I often remind friends and co-workers, computers were meant to save us time and to help us work smarter, but I see missed opportunities every day, either because we’re completely unaware that the technology we already own and use can help us do even better things or because we almost perpetually claim that we’re “too busy” to learn anything new—like the time-saving features in the software we use every day. The irony of this only hits us when we really stop and think about what we originally wanted technology to do for us.
Along the lines of discovery and understanding what’s really under the hood in OneNote 2010, I want to briefly highlight some of the features that quietly become available when you install OneNote 2010 on your computer—either as the standalone version or as part of a Microsoft Office 2010 suite. Many of OneNote’s integration features are overlooked by the very people who could most benefit from them.
Because this book is aimed at beginners, I hope that highlighting some of OneNote’s coolest features in this way will inspire you to learn and use them right from the start. The smallest time savings can really add up and make you appreciate OneNote even more.
A Quick Note About Interface Differences
OneNote 2010 comes in two different versions—the standalone edition that includes only the OneNote program, and the version that is included with all editions of the Microsoft Office 2010 suite. Office includes other programs such as Microsoft Word, Excel, Outlook, and PowerPoint, among others.
Technically speaking, the two versions of OneNote are identical, but certain features will click on and off, depending on the other programs you have installed, which version of Microsoft Windows you are using, and what kind of computer you have. Some of these differences are more obvious than others.
For example, Figure 10.1 shows what the right half of the Home tab on the OneNote ribbon looks like when no other Office programs are present.
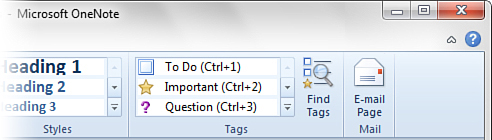
Figure 10.1 If you’re using OneNote 2010 with no other Office programs installed on your computer, here’s what the contents of the Home tab look like at the far right of the ribbon. A lonely E-mail Page button appears as the only command in the ribbon group titled Mail.
Figure 10.2 shows how the same area of the Home tab on the OneNote ribbon appears when Microsoft Outlook 2010 is detected.
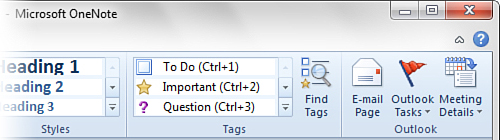
Figure 10.2 When OneNote 2010 detects Outlook 2010, the contents of the Home tab at the far right of the ribbon change slightly. The ribbon group that was called Mail is renamed to Outlook and the lonely E-mail Page button is now accompanied by two additional command buttons. Likewise, the appearance of some ribbon tabs in Outlook 2010 will change when Outlook detects OneNote.
Subtle differences in appearance and functionality can also occur if you’re using OneNote or Office on an older version of Microsoft Windows, such as Windows XP or Windows Vista, or if you’re using OneNote or Office on a computer that offers handwriting, drawing, or Multi-Touch capabilities.
For example, as I pointed out in Chapter 9, “Sharing Notes with Other People,” clicking the E-mail Page button in the standalone version of OneNote 2010 on Windows Vista will generate an e-mail message with a notes attachment. That’s because Windows Vista included its own e-mail client, called Windows Mail, which was the successor to Outlook Express on Windows XP. On Windows 7, the newest operating system in the Windows family, clicking the E-mail Page button in OneNote does nothing because the built-in functionality was removed. This wasn’t an oversight but a deliberate decision due to the ever-increasing rise in popularity of web-based mail programs. It’s an interesting example of how different flavors and versions of software, when used together, can exceed or fall short of our individual expectations.
The point of this chapter is not to persuade you needlessly to upgrade your software. My goal with this chapter is to help you understand and decide which Office and Windows integration features in OneNote you might actually care about, after you discover them and learn more about their capabilities. Spotting them without a guided tour of sorts can be difficult, as many of them are tucked away in hidden places. Knowing what you have—or don’t have—can help you better understand how the choices you’ve already made might affect the functionality you have available to you, compared with the functionality you might expect.
Enough introductions! Let’s get the tour started.
OneNote Integration with Windows
No matter what version of Windows you’re using, installing OneNote 2010 adds a useful feature called the Send to OneNote print driver.
A device driver is a software program that allows your operating system or a software program to “talk” to a device connected to your computer, such as a printer or a scanner. The OneNote print driver can intercept the information other programs send to your printer and, instead of committing the information to paper and ink, print it out electronically on a OneNote page instead.
 SHOW ME Media 10.1—Integrating OneNote with Windows
Access this video file through your registered Web Edition at my.safaribooksonline.com/9780132182447/media.
If you read Chapter 6, “Collecting and Researching Information,” you already learned how to insert files as printouts into your notes. The Send to OneNote print driver works the same way, just in the opposite direction. Instead of importing printed content from other programs into OneNote, the Send to OneNote print driver lets you “push” information from other programs to OneNote. It also lets you use the quick filing dialog box to select the exact destination in your notebook where you want the printout to appear.
![]() LET ME TRY IT
LET ME TRY IT
Printing from Any Windows Program to OneNote
To print to a page in OneNote instead of a page in your printer, do the following:
1. In the program you want to print from, click the Print command.
2. In the Print options that your program displays, select the Send to OneNote 2010 print driver (see Figure 10.3).
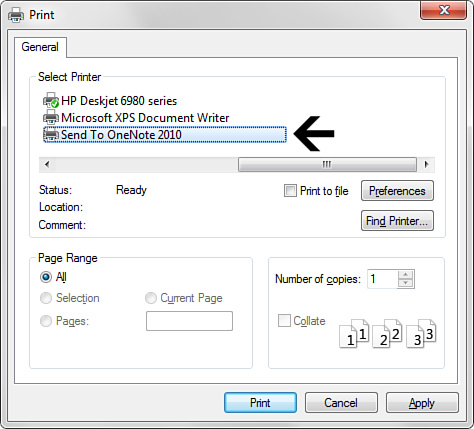
Figure 10.3 In any Windows program, selecting the Send to OneNote 2010 print driver as your “printer” will print out the pages from your program to a new page in OneNote instead of using ink and paper on your real printer. This lets you capture important information without wasting paper or having to worry about finding the information again. OneNote’s search features can instantly find information in your printouts.
3. Select any other options you want, such as page range, and then click Print.
4. In the Select Location in OneNote dialog box that appears, click to select the notebook section where you want the page with the printout to be added and then click OK.

Figure 10.4 In Windows Control Panel, your list of available printers includes the Send to OneNote 2010 print driver. The green check mark over the icon of your real printer indicates what Windows uses as your default printing choice. If you make the Send to OneNote 2010 print driver your default printer, all of your printouts will be sent to their own OneNote pages. You can still choose to use your real printer whenever you need to print something on a sheet of paper.
Remember what else you learned in Chapter 6: You can right-click a printout when it appears in OneNote and click Copy Text from this Page of the Printout (or Copy Text from All Pages of the Printout) whenever you want to use the text for editing in your notes. If you have picture search enabled, OneNote will also find words in printouts when you search for them. These features are another benefit of printing to OneNote instead of to paper.
Using the OneNote Screen Clipper and Launcher in the Windows Notification Area
I already covered this nifty feature in Chapter 6 (see the section, “Meet the OneNote Screen Clipper and Launcher”), so I won’t repeat all of the information about this little OneNote icon here, which appears on the Windows taskbar, in the notification area near the clock display (see Figure 10.5).
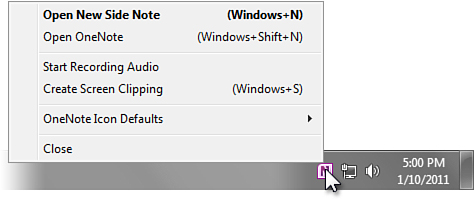
Figure 10.5 The OneNote Screen Clipper and Launcher icon as it appears when displayed in the notification area of the Windows taskbar. When the icon is visible here, the keyboard shortcut combinations shown next to the commands on the shortcut menu provide instant access to those commands, even when OneNote 2010 isn’t running.
However, I do want to remind you of it in this chapter as it can be an even more useful Windows integration feature than the OneNote print driver.
The detailed step-by-step procedures in Chapter 6 tell you more about how this special icon works, how to configure and unhide it, and how to use it.
Next, let’s look at how OneNote improves the Windows Internet Explorer web browser.
OneNote Integration with Internet Explorer
If you use Internet Explorer as your web browser, you can use the integration features that OneNote 2010 offers. If you use a different web browser, these features are not available.
SHOW ME Media 10.2—Integrating OneNote with Internet Explorer
Access this video file through your registered Web Edition at my.safaribooksonline.com/9780132182447/media.
![]() LET ME TRY IT
LET ME TRY IT
Displaying the OneNote Command Buttons in Internet Explorer 8
If you’re using Internet Explorer 8, the OneNote command buttons might be hidden from view (see Figure 10.6).
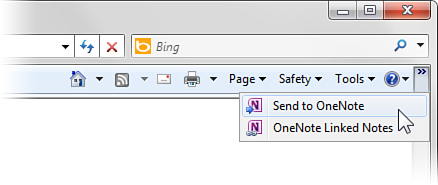
Figure 10.6 In Internet Explorer 8, look for two hidden OneNote icons in the little shortcut menu that appears when you click the button with the chevron arrows, located just to the right of the circled blue Help (?) button. If you frequently use these commands in Internet Explorer, you can permanently unhide these icons by customizing the Internet Explorer toolbars.
To use them, do the following:
1. Start Internet Explorer 8.
2. Near the upper-right corner of the Internet Explorer program window, underneath the Search field, click the double-arrow button to the right of the circled blue Help (?) button.
3. On the shortcut menu that appears, do either of the following:
• To send the current web page in your browser to a OneNote notes page, click Send to OneNote. When the quick filing dialog box appears, click the section of the notebook in which you want the page to appear.
• To begin a linked note-taking session in Internet Explorer, click OneNote Linked Notes.
![]() LET ME TRY IT
LET ME TRY IT
Displaying the OneNote Command Buttons in Internet Explorer 9
At the time that this book went to print, Microsoft released Internet Explorer 9, the newest version of its web browser. Although its user interface has been dramatically updated compared with previous versions, its integration with OneNote works the same.
Finding the OneNote command icons in Internet Explorer 9 is a bit trickier because the interface was purposely simplified.
To display the OneNote command buttons in Internet Explorer 9, do the following:
1. Start Internet Explorer 9.
2. Near the upper-right corner of the Internet Explorer program window, right-click in a blank area of the title bar and then click Menu Bar on the shortcut menu that appears.
3. When the menu bar appears near the upper left of the program window, click Tools and then, at the bottom of the menu, do either of the following:
• To send the current web page in your browser to a OneNote notes page, click Send to OneNote. When the quick filing dialog box appears, click the section of the notebook in which you want the page to appear.
• To begin a linked note-taking session in Internet Explorer, click OneNote Linked Notes.
If you’d prefer to use these commands as icons, do the following instead:
1. Near the upper-right corner of the Internet Explorer program window, right-click in a blank area of the title bar and then click Command Bar on the shortcut menu that appears.
2. When the two OneNote icons appear on the command bar near the upper left (see Figure 10.7), do either of the following:
• To send the current web page in your browser to a OneNote notes page, click Send to OneNote. When the quick filing dialog box appears, click the section of the notebook in which you want the page to appear.
• To begin a linked note-taking session in Internet Explorer, click OneNote Linked Notes.
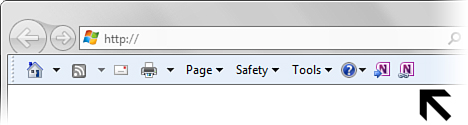
Figure 10.7 In Internet Explorer 9, you can unhide the two OneNote icons by right-clicking in a blank area near the upper right of the program window and then clicking Command Bar on the shortcut menu that appears. This places the command bar underneath the Address box near the upper left of the browser window.
The two OneNote icons are very small and might be hard to distinguish, but if you hover the mouse pointer over either icon for a second or two, a ToolTip appears that will tell you the OneNote command that each icon represents.
Sending a web page to OneNote is a great way to capture information that may frequently change at the source. For example, you could send the results list of a web search to OneNote to capture the results information there. If you were to perform the same web search again in a week’s or a month’s time, you’d likely see very different results. By capturing a snapshot of temporary or changing information, you can refer to it again later.
Sending web pages to OneNote can be a useful alternative to screen clippings because most of the information from a sent web page can be edited in OneNote, whereas a screen clipping is a static image that can’t be changed. That said, sometimes a screen clipping is the only way to capture the layout of a web page exactly as it appears. Understanding these choices lets you capture information you care about in the format you prefer.
Taking linked notes in Internet Explorer lets you do research online across several web pages and sites. As you take notes in a docked OneNote window in this mode, OneNote automatically keeps track of the web addresses to the pages you visited and took notes on, so you can return to them again later. Without OneNote, you don’t have this functionality in your web browser.
To learn more about (or brush up on) sending web pages to OneNote or how to take linked notes in Internet Explorer, see Chapter 6.
Next, let’s see how OneNote integrates with some of the other programs in the Microsoft Office 2010 suite.
OneNote Integration with Word
As a tool for giving life to ideas and plans, I find OneNote to be without equal. However, there might be times when you need to present the information in your notes to someone else in a more formal manner, such as a report for your boss or a paper for a teacher.
The following procedures highlight how you can send notes from OneNote 2010 to Word 2010 in any of three different ways.
![]() LET ME TRY IT
LET ME TRY IT
Saving Notes as a Word Document
When you’re ready to move a selection of notes to a Microsoft Word document for more advanced formatting and word processing features, OneNote provides a direct path to its Microsoft Office counterpart.
To save notes to Word, do the following:
1. Navigate to the notes that you want to save as a Word document.
2. Click the File tab and then click Save As.
3. Under the heading 1. Save Current, choose what you want to include (the current page, or the current section and its pages). Note that you cannot save an entire notebook as a Word document.
4. Under the heading 2. Select Format, click either the Word Document (*.docx) option to save the file in a newer format that can be used by Word 2010 and Word 2007, or click the Word 97–2003 Document (*.doc) option to save the file in an older format that can be read by Microsoft Word 97, Word 2000, Word XP (2002), and Word 2003.
6. In the Save As dialog box that opens, navigate to the folder on your computer where you want to save the file containing the notes you selected, type a name into the File name field (for example, Curriculum Vitae), and then click Save.
![]() LET ME TRY IT
LET ME TRY IT
Sending a Notes Page to Word as a Printout
When you merely want a quick way to include the information from a single notes page in a Word document, you can send the notes from OneNote to Word without using the Save As dialog box by doing the following:
1. Navigate to the page that you want to save as a Word document.
2. Click the File tab and then click Send.
3. In the list, click Send to Word.
OneNote starts Word 2010 on your computer and inserts a formatted copy of your notes in a new document. Formatting that is exclusive to OneNote (for example, note tags) is not shown in the version of the page that appears in Word.
After the notes have been sent to a new Word document, you can move them to another location in the document or, if you prefer, cut and paste the notes into a Word document that you’ve already created.
![]() LET ME TRY IT
LET ME TRY IT
Creating a Blog Post from Your Notes with Word
Word 2010 includes functionality that lets you use your Word documents as blog posts. Word does this by providing a custom blogging interface that can be used with some of the leading blog sites. After you set up your blog account with Word, the integration can be a seamless document management and publishing experience.
Rather than duplicating all of this functionality, OneNote 2010 instead provides a bridge to Word 2010 so you can extend its blog publishing functionality to your OneNote pages.
To create a blog post from a page of your notes, do the following:
1. Navigate to the page that you want to send to Word as a blog post.
2. Click the File tab and then click Send.
3. In the list, click Send to Blog.
OneNote starts Word 2010 in blog mode with a custom Blog Post ribbon tab (see Figure 10.8). If you haven’t yet registered Word with your blog hosting provider, follow the onscreen prompts or tell Word that you’ll set up your account later. You can further format the notes in Word before publishing them to your blog, or you can publish your notes as they are.

Figure 10.8 When you send a page of your notes to Word as a blog post, OneNote opens Word in blog mode, where you can register with your blog hosting provider, further format your notes with Word’s formatting features, and publish the page to your blog by using the commands on the Blog Post ribbon tab.
Finally, though I won’t duplicate the information here, I want to remind you that Word is one of the supported Office programs that you can use with OneNote’s linked notes feature.
To learn more or to remind yourself about this feature, see “Doing Research with Linked Notes” in Chapter 6.
Next, you’ll learn more about OneNote’s rich integration with Outlook.
OneNote Integration with Outlook
Out of all of the other Microsoft Office programs, Outlook 2010 enjoys the richest integration with OneNote 2010. The two programs complement each other so well because the partnership goes both ways. OneNote enriches the functionality of Outlook, and Outlook enriches the functionality of OneNote.
SHOW ME Media 10.3—Integrating OneNote with Outlook 2010
Access this video file through your registered Web Edition at my.safaribooksonline.com/9780132182447/media.
Let’s first look at the Outlook command available in OneNote.
![]() LET ME TRY IT
LET ME TRY IT
Sending Notes in an Outlook Message
When Outlook 2010 is installed on the same computer as OneNote 2010, sending a copy of a notes page is as simple as clicking a button on the ribbon.
To send a copy of a notes page in an Outlook message, do the following:
1. In OneNote, navigate to the page you want to send.
2. On the Home tab, click E-mail Page.
Outlook 2010 will open a new message for you and place the contents of the notes page into the body of the message. It will also use the page title and place it into the Subject field of the message, which you can keep or modify as needed.
Inserting Outlook Meeting Details into Your Notes
If you frequently take notes based on meetings or appointments that you schedule with Outlook 2010, you probably already know that every notes page starts with the rather dreary task of filling out the same information every time: the subject and location of the meeting, its date and time, the names of the attendees, and the contextual notes that the meeting facilitator might have included in the meeting invitation.
An easier way is to have OneNote 2010 read your Outlook 2010 calendar and automatically insert all of the pertinent information from a meeting invitation into your notes. Do the following:
1. In OneNote, navigate to the page on which you’ll take notes about a meeting that’s already on your Outlook calendar and then click the cursor near the top of the page under the page title.
2. On the Home tab, click Meeting Details.
3. Under Today’s Meetings, click to select the meeting you want.
At the location of your cursor, OneNote will insert all available meeting details in an easy-to-skim table. You can delete any information that you don’t want or need to keep as part of your notes. Similarly, you can delete the names of people who were invited but didn’t attend.
The word Notes: appears under your inserted meeting details so you can click the cursor in the line below and start taking notes when the meeting begins.
Using the Meeting Details command provides a convenient way to consistently format all of your meeting notes with the correct information about the meeting and its attendees.
If the meeting you want isn’t shown on the Today’s Meeting list that appears when you click the Meeting Details button, you can look up any other meeting in OneNote and insert its information into your notes without having to switch to Outlook by doing the following:
1. On the page on which you’ll take notes about a meeting, click the cursor near the top of the page under the page title.
2. On the Home tab, click Meeting Details.
3. At the bottom of the menu that appears, click Choose a Meeting from Another Day.
4. In the Insert Outlook Meeting Details dialog box that appears (see Figure 10.9), do any of the following:
• To display all available meetings on your Outlook calendar from a few days before or after the present day, click the round arrow buttons in the upper-left corner of the dialog box. The left arrow displays the previous day, and the right arrow displays the next day.
• To display all available meetings on your Outlook calendar for a specific day, click the small calendar icon in the upper-right corner of the dialog box and then click the specific day you want. Use the Back and Next arrows at the top of the pop-up calendar to change months.
• To select a specific meeting whose details you want to insert into your notes, click it once in the list.
• To insert details about the meeting you have selected, click the Insert Details button.
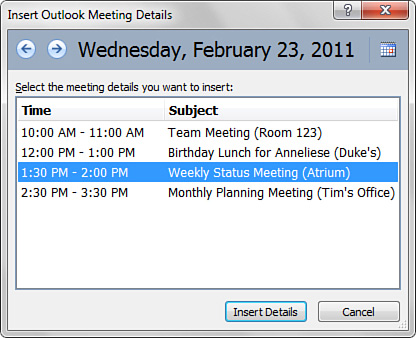
Figure 10.9 If the meeting details you want to insert into your notes don’t show up in the Today’s Meetings list, clicking the Choose a Meeting from Another Day command displays this dialog box. Use the navigation buttons in the upper-left corner or the calendar control in the upper-right corner to access information for any Outlook meeting from any day of any month of any year.
Flagging Important Notes as Outlook Tasks
Although OneNote includes a wealth of note tags that you can place next to important notes to help you search for and categorize them, none of the note tags offer the ability to flag notes for follow-up so you’ll be reminded when they come due.
When you use Outlook 2010 together with OneNote 2010, OneNote inherits Outlook’s Tasks features that let you flag important notes and action items. The benefit of this marriage of features is that you can create OneNote-based tasks much faster than if you were to go through the Outlook interface for creating new tasks. You still have the option to open Outlook tasks in Outlook, where you can set additional options, but this is optional.
To flag a line of notes as an Outlook task, do the following:
1. Click anywhere on the line of text that you want to flag as an Outlook task. For example, on a page of meeting notes, you could click all of the line items that represent important action items for you that you want to be reminded about.
2. On the Home tab, click Outlook Tasks.
3. From the menu that appears, click any of the preconfigured due dates (for example, Tomorrow or Next Week). OneNote places an Outlook task flag next to the selected line of notes (see Figure 10.10) and silently creates a task for this text in the Outlook Tasks view.
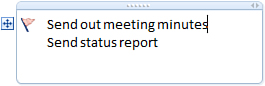
Figure 10.10 When you flag a line or paragraph of notes with an Outlook task, OneNote displays the task flag icon next to the note and creates an Outlook task behind the scenes. The next time you switch to Outlook and look at your Tasks list, this task will appear in the list. To edit the task to add a reminder or additional information, either right-click the task flag in OneNote and then click Open Task in Outlook or open it directly from your Outlook Tasks list.
As long as you have a connection to your Microsoft Exchange mail server at the time you assign the task in your notes, OneNote will communicate the new task to Outlook, even when Outlook 2010 isn’t running. If OneNote cannot reach your Exchange Server, it will attempt to create the task the next time you start Outlook 2010.
To open the task in Outlook, right-click the task flag on your notes page and then click Open Task in Outlook. Outlook will open the task in its regular window, where you can set additional options for the task (for example, to add a reminder to go off at a specific time).
If you want to associate a note with an Outlook task for a specific date, do the following:
1. Click anywhere on the line of text that you want to flag as an Outlook task.
2. On the Home tab, click Outlook Tasks.
3. From the menu that appears, click Custom. OneNote places an Outlook task flag next to the selected line of notes.
4. Wait for the Outlook Task window to open and then select the Start Date, Due Date, Status, Priority, % Complete, and Reminder you want. When the task has been updated, click Save & Close.
You’ll notice that when you open an Outlook task that was created in OneNote, Outlook includes a OneNote page icon in the body of the task (see Figure 10.11). This is to make it easy for you to consistently switch between the Outlook task and the OneNote page to which the task is linked.

Figure 10.11 When editing a task in Outlook 2010 that was created in OneNote 2010, Outlook includes a OneNote file icon in the body of the task. Double-clicking this icon will open the page that this task is linked to in OneNote. This is instantaneous, meaning you don’t need to ever manually search for the page on which this task appears. Similarly, you can create a new task in Outlook and then click the OneNote icon on the task window ribbon to associate the task with one of your notes pages.
Because each program is completely aware of the other, you can open related OneNote items while in Outlook and related Outlook items in OneNote, without first having to switch from either program to the other.
To mark a task as complete, you can click the task flag on your OneNote page, right-click the flag and click Mark Complete, or mark it complete in your Outlook Tasks list. To remove pending or completed tasks that you no longer want or need, right-click the task flag on your notes page and then click Remove Tag.
This concludes the Outlook-related commands on the OneNote ribbon. Let’s continue by looking at other places in Outlook where the presence of OneNote adds functionality.
Archiving Outlook E-mail Messages in OneNote
In this age of ever-increasing litigation, most companies now have document retention policies in place that automatically expire and delete e-mail messages after a period of time. Although this is important for e-mail concerning official business, most of us from time to time receive personal messages in our Inbox at work, either from a friend or family member, an associate at another company, or from a co-worker.
If you have personal messages which contain important information that you don’t want to lose when the message is deleted by your administrator, you can send such messages to OneNote, where they will not expire. In addition, by storing selected Outlook e-mail messages in your notebooks, you can use OneNote’s Instant Search to find specific information in the messages. Search in OneNote also works generally faster than in Outlook because OneNote does not have to retrieve its information from a server.
Another benefit of archiving e-mail messages in OneNote is the fact that it preserves the date and time stamp of the original messages. This means that you don’t lose the ability to search information in your saved e-mail messages by their original date or time.
To send one or more e-mail messages from Outlook 2010 to OneNote 2010, do the following:
1. In OneNote, create a notebook section that you want to use specifically as your repository for saved e-mail messages. This makes it easier for you to know where all of your archived mail will be saved. (This step is optional.)
2. In Outlook 2010, go to your Inbox or the mail folder from which you want to send messages to OneNote.
3. Click to select one or more messages in the list. To select a range of messages, click to select the first message, hold the Shift key, and click to select the last message in the range. To select multiple messages that are not next to each other in the list, hold the Ctrl key while you click the messages you want to include.
4. When you’ve selected the messages you want to send to OneNote, click the Home tab in the main Outlook program window (not a message window) and then, in the Move group, click the OneNote button (see Figure 10.12).
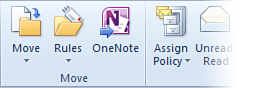
Figure 10.12 If you have one or more e-mail messages selected in your Outlook Inbox or in any Outlook folder, clicking the Send to OneNote button in the Move group on the Home tab of the Outlook ribbon sends each message to OneNote on its own page, while fully retaining the information in each message envelope.
5. In the Select Location in OneNote dialog box that appears, click to select the notebook section you created in step 1, and then click OK.
OneNote copies each Outlook e-mail message on its own page in OneNote and saves each page in the notebook section you selected. The Subject field of the e-mail message is used as the page title. Although each page holding an e-mail message includes the page creation date and time under the page header, OneNote retains the date that the message was sent or received on the page so you can search for specific dates when looking for information that originated in your e-mail correspondence.
A friendly word of warning: Though this feature is extremely handy for archiving personal information that you may receive at work, it is not intended to bypass any part of your company’s or organization’s document retention policies and legal requirements. It is entirely your own responsibility to comply with such rules and to know and understand whether or not your company permits archiving of mail in this fashion.
If you’re not entirely sure, it’s best not to place your job in unnecessary jeopardy by assuming anything. Ask your manager, your Human Resources or legal representative, or your Outlook administrator before you use OneNote to save your e-mail messages.
![]() LET ME TRY IT
LET ME TRY IT
Linking Outlook Meetings to OneNote Meeting Notes
If you’re in the habit of creating separate notes for meetings you have already scheduled on your Outlook calendar, you could save time by getting in the habit of creating linked meeting notes (not to be confused with the linked notes feature that I previously discussed in Chapter 6). When a notes page in OneNote is linked to an Outlook meeting, you can click a OneNote button in the meeting window to instantly open the associated notes page, no matter where it is saved. Similarly, the linked OneNote page includes an automatic link back to the original appointment, which means you’ll never have to search for a specific meeting in your Outlook calendar again.
To link Outlook meetings to OneNote meeting notes, do the following:
1. In your Outlook 2010 Calendar view, open an existing appointment or meeting.
2. On the Appointment or Meeting tab, click the OneNote icon (see Figure 10.13).
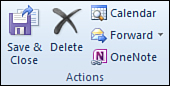
Figure 10.13 Clicking the OneNote icon in the Actions group on the ribbon of an Outlook appointment or meeting notice automatically links that appointment or meeting to the notes page that is created in this way. No matter which program you’re in, you can instantly look up a meeting and its related meeting notes without any manual searching in either application.
3. In the Select Location in OneNote dialog box that opens, select the section where you want to create the meeting notes page that will be linked to this appointment or meeting.
When you click OK, OneNote creates a new notes page in the section you selected. The details of the appointment or meeting will be automatically copied over for you. Underneath this information, you’ll see a blue underlined text link called Link to Outlook item. Clicking this link will automatically fetch the associated appointment or meeting on your calendar and display it in Outlook. The linked relationship between the notes page and the appointment or meeting notice from which you create it will not expire unless either or both linked items are deleted.
![]() LET ME TRY IT
LET ME TRY IT
Linking Outlook Contacts to OneNote Pages
If you use the Contacts view in Outlook 2010 to manage personal information about your clients and associates, you may have found the Notes field in the Contact form quite limiting.
When you have OneNote 2010 and Outlook 2010 installed together, you can replace the small Notes field and instead take all of your notes about each of your Outlook Contacts in OneNote. When a notes page in OneNote is linked to an Outlook contact, you can click a OneNote button in the Contact window to instantly open the associated notes page, no matter where it is saved. Similarly, the linked notes page includes an automatic link back to the original Contact form, which means you’ll never have to search for a specific person again in your Outlook Contacts list.
To link Outlook contacts to a OneNote notes page, do the following:
1. In your Outlook 2010 Contacts view, open an existing contact.
2. On the Contact tab, click the OneNote icon (see Figure 10.14).
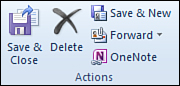
Figure 10.14 Clicking the OneNote icon in the Actions group on the ribbon of an Outlook Contact form automatically links that person’s information to the notes page that is created in this way. No matter which program you’re in, you can instantly look up an Outlook contact without any manual searching in either application.
3. In the Select Location in OneNote dialog box that opens, select the section where you want to create the notes page that will be linked to this Outlook contact.
When you click OK, OneNote creates a new notes page in the section you selected. The person’s name will become the page title and any available contact information and a photo (if available) will be automatically placed on the page.
Underneath this information, you’ll see a blue underlined text link called Link to Outlook item. Clicking this link will automatically fetch the associated Outlook contact and display it in Outlook. The linked relationship between the notes page and the associated Outlook contact from which you create it will not expire unless either or both linked items are deleted.
Although Outlook could be considered overkill to use as an e-mail program at home, you might consider using it there, if you find these features as invaluable as I do. I hope that seeing how OneNote and Outlook complement each other gives you a better idea about how the value of each program greatly increases when they are used together.
OneNote Integration with PowerPoint
Though PowerPoint 2010 is not as tightly integrated with OneNote as Word and Outlook are, there’s nevertheless a handy tip I wanted to share with you for printing PowerPoint presentations to OneNote.
![]() LET ME TRY IT
LET ME TRY IT
Printing a PowerPoint Presentation to OneNote
Typically, when you send information from other programs to OneNote, each printout image is placed on a separate page. For documents and such, this is fine. However, PowerPoint 2010 has some nifty print options that you can use to influence how your slide printouts appear when you send them to OneNote 2010.
To print a PowerPoint presentation to OneNote, do the following:
1. In PowerPoint 2010, open or create the slide presentation that you want to send to OneNote.
2. Click the File tab and then click Print.
3. Under Printer, select the Send to OneNote 2010 print driver.
4. Under Settings, change the Print Layout from Full Page Slides (Print 1 Slide per Page) to any of the other available options (see Figure 10.15).
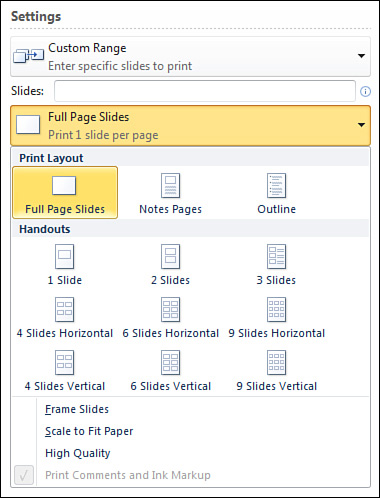
Figure 10.15 PowerPoint 2010 has some pretty unique print layout options that you can use to your advantage when you want to send the information in a busy slide deck for safekeeping in OneNote.
5. Click Print.
6. In the Select Location in OneNote dialog box that opens, click to select the section or page where you want the presentation printout to appear and then click OK.
If you use the File Printout command on OneNote’s Insert tab to import a PowerPoint presentation, you’re stuck with the one slide per page default setting. However, by printing a presentation from PowerPoint to OneNote instead, you can control how the slides, your slide notes, or your presentation outline will appear in your notes.
Finally, though I won’t duplicate the information here, I want to remind you that PowerPoint is also one of the supported Office programs that you can use with OneNote’s linked notes feature.
To learn more or to remind yourself about this feature, see “Doing Research with Linked Notes” in Chapter 6.
I hope this chapter has given you a better idea about some of OneNote’s less-visible features that either lurk under the hood or quietly jump into action whenever OneNote is combined with the functionality of other programs. Although I think you’ll agree that OneNote stands perfectly well on its own, there are definitely many situations in which OneNote makes other programs better and, in turn, inherits some useful functionality of its own from its big brothers in Microsoft Office.