
16. Using Apple’s MobileMe with iPhoto ’11
Use Apple’s MobileMe online service to create and share online photo galleries.
Apple has its own fee-based online service, called MobileMe, which offers a handful of useful functions for Mac users (as well as users of other Apple devices, such as an iPhone or iPad).
One of the ways you can use MobileMe is to create, publish, and share online-based photo galleries or to create simple personal web pages that showcase your images.
Subscribing to Apple’s MobileMe service is optional. It requires you to pay an annual membership fee of $99 per year (single user) or $149 per year (for a family membership). When you buy a new Mac, Apple periodically offers a discounted membership rate for the first year.
Keep in mind that just about all the features MobileMe offers are available from other online services, sometimes free. However, these services don’t seamlessly integrate with Mac-based applications from the iLife ’11 or iWork ’11 suites, for example.
This chapter offers an introduction to MobileMe and describes how to use it in conjunction with iPhoto ’11 to create and publish online-based photo galleries that you can share with family and friends via the Web.
Tip
To learn more about the MobileMe service and sign up for a free 60-day trial membership, visit www.apple.com/mobileme.
An Introduction to MobileMe
MobileMe is an online service designed to make file sharing, data synchronization, and archiving of files among multiple Macs or Apple devices a simple process. For example, you can use the Email functionality of MobileMe to keep all your email boxes on your various machines and devices (including your Mac, iPhone, and iPad) synchronized. You can also synchronize your calendar and address book data (if you use your Mac’s iCal and Address Book applications).
For iPhone and iPad users, MobileMe also offers an online-based device tracking service. Plus, with the service’s iDisk feature, you can wirelessly share any type of file (including digital photos) among multiple Macs, PCs, and mobile devices.
MobileMe membership includes 20GB of online storage space with which you can store remote backup copies of important files, store files to be shared with other people or devices, or host online photo galleries and personal web pages.
iPhoto ’11 is designed to work seamlessly with MobileMe, allowing you to create, publish, and manage attractive online photo galleries without having to use your Mac’s web browser.
Caution
If you stop paying for your MobileMe membership when it expires, after a certain grace period, any photo galleries or online files you have backed up or stored using this service are deleted.
What’s an Online Photo Gallery?
An online photo gallery is a collection of images, grouped together in a single Album, that can be displayed online and that is accessible to any visitors via their computer’s web browser. After they’re published, online galleries created using iPhoto ’11 can be viewed using Macs, PCs, iPhones, iPads, or any device that connects to the Web.
When visitors access one of your online galleries, they see thumbnails of each image in that gallery but are able to click on any image to see a larger-size version of that photo. Depending on how you set up the gallery, visitors can also copy your photos to their computer, print images, share images electronically (via email, for example), or upload their own pictures to your gallery.
Tip
After you create an online gallery using iPhoto ’11, if you ever make changes to that gallery on your Mac (using iPhoto ’11), those changes automatically take effect on MobileMe as well. So, you can easily add or delete images or edit individual images and know that what’s on your Mac and what’s on MobileMe remain fully synchronized.
Part of the online gallery creation process involves MobileMe assigning a unique URL (Internet address) to that gallery. You can set the privacy options to make the online gallery available and accessible to the general public (any visitors who simply enter the gallery’s URL into their web browser), or you can password-protect each individual gallery to limit access to only people you want to see your photos.
You can also determine if visitors to your gallery are able to download all the images from that gallery to their computer or add their own images to the gallery from their web browser or via email.
Online photo galleries are a fast and easy way to share large numbers of images with friends, family, coworkers, or the general public. As an iPhoto ’11 user who subscribes to MobileMe, you simply need to create an Event or Album containing the images you want to share in iPhoto ’11 and then use the software’s Share via MobileMe functionality.
When your images are uploaded into a gallery, simply give out the gallery’s unique URL to whomever you want to be able to see and access your photos via the Web (whether they’re using a Mac, PC, or any type of wireless mobile device, such as an iPhone or iPad).
Creating an online gallery to share images is a great alternative to emailing a handful of photos to individual people because you can have an unlimited number of photos in the gallery.
Tip
The capability to create online galleries is not unique to MobileMe. In fact, you can do it for free with just about any popular online photo service, as well as online social networking sites, such as Facebook. The benefit to using MobileMe if you’re an iPhoto ’11 user is that you save a step by not having to first export your photos from iPhoto ’11 to upload them to an online photo service and create an online photo gallery on that service.
Creating a MobileMe Online Photo Gallery from iPhoto ’11
Thanks to the seamless integration between iPhoto ’11 and MobileMe, if you have an active MobileMe account, you can publish as many online galleries as you’d like, until you fully utilize your 20GB allocation of available online storage space. (If you do exceed this available storage, which isn’t much when you consider each of your images can be 5MB or larger, you can pay extra for additional storage.)
To create an online gallery from iPhoto ’11 and then publish it on MobileMe, first select the photos you want to feature in the online gallery. Then save them into a separate Album while using iPhoto ’11.
Next, select and highlight that Album and click on the Share command icon located in the lower-right corner of the iPhoto ’11 screen. Select the MobileMe Gallery option.
Alternatively, with the Album selected and highlighted, use the MobileMe Gallery command under the Share pull-down menu located at the top of the iPhoto ’11 screen.
Tip
You can just as easily upload and share the contents of an entire Event folder in iPhoto ’11 instead of creating a separate Album.
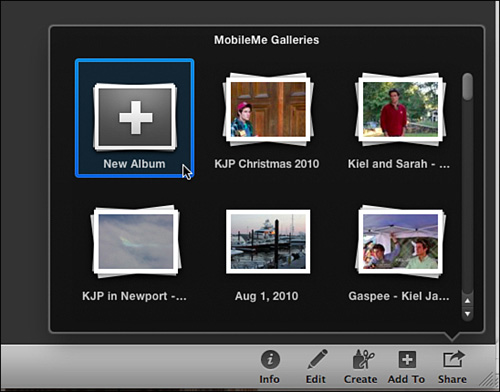
When the MobileMe Galleries window, shown in Figure 16.1, is displayed on your screen, click on the gallery icon with a gray plus sign displayed in it to create a new online gallery, or select an existing online gallery that you want to add photos to (or edit).
Figure 16.1. Create a new gallery to upload to MobileMe from this window. To access it, click on the Share command icon and choose MobileMe Gallery.
After you click on the Add Gallery icon, a new window appears with the heading “Would you like to publish ‘[insert Album name]’ to your MobileMe Gallery?” In this window is an Album Name field into which you should type the title of the gallery to be published. The current Album name is used as a default title.
Next, from the window shown in Figure 16.2, choose your gallery’s privacy options from the Album Viewable By pull-down menu and then choose whether or not people will be allowed to download the photos from your gallery or upload and share their own photos to your gallery. Make these decisions by adding check marks next to the three different check boxes under the Allow heading.
Figure 16.2. Customize the settings for your MobileMe gallery.
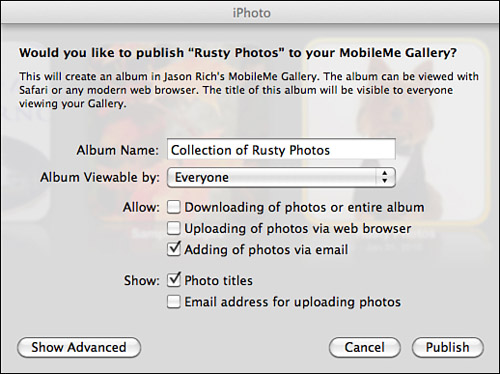
Under the Show heading in this window, using the mouse, add a check mark to the Photo Titles check box if you want the filename for each photo to be displayed under the image’s thumbnail in the gallery. Also under this heading, if you chose to allow people to email their photos to be included in the gallery, you can decide whether the gallery itself will display the special email address to send the images to.
If you click on the Advanced icon, you can also determine whether or not the gallery you’re creating will be displayed on your central MobileMe Gallery Page (which displays thumbnails allowing you to access all your online galleries on one screen). After adjusting all the appropriate customization options, click on the Publish icon located in the lower-right corner of the window to begin uploading and publishing your gallery on MobileMe.
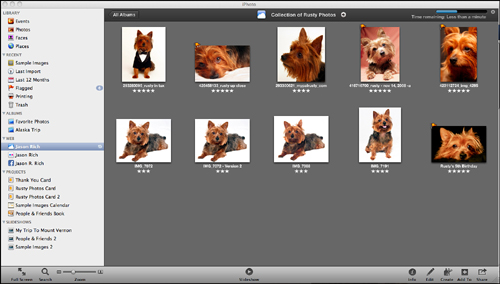
The uploading process may take awhile, based on the speed of your Internet connection and the number of photos included in the gallery. As soon as you click on the Publish icon, a listing for that gallery appears on iPhoto ’11’s Source list under the Web heading. Simultaneously, the main iPhoto ’11 screen displays thumbnails of the images being uploaded, and a progress bar is displayed in the upper-right corner of the screen (see Figure 16.3).
Figure 16.3. The iPhoto ’11 screen looks like this as you’re uploading images to MobileMe.
While still in iPhoto ’11, you can access your new MobileMe gallery by clicking on the right-pointing arrow icon located next to the gallery title at the top center of the screen. This opens your web browser and automatically points you to the newly created gallery’s URL (see Figure 16.4).
Figure 16.4. A first look at how your MobileMe gallery looks online.

Tip
When you subscribe to MobileMe, you are able to access your online home page using a special URL that’s assigned to you. From here, you can access all the service’s features and functionality, including the capability to view and manage online photo galleries. However, your “guests” need to use the URL created for the gallery (or the URL for your main gallery page) to access it.
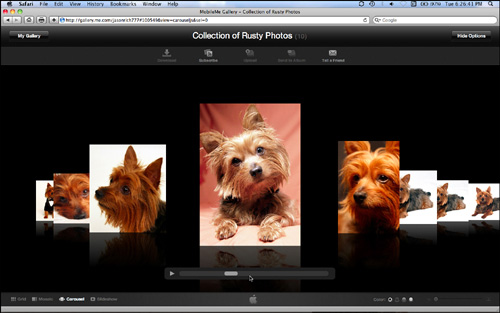
Any time you or any others visit your MobileMe gallery via a web browser, you or they can customize how the gallery looks on the screen by adjusting the options at the bottom of the screen. For example, you can choose the default Grid view shown in Figure 16.5, a mosaic view, the carousel view shown in Figure 16.6, or a slideshow view.
Figure 16.5. The MobileMe Online Gallery’s default Grid view.
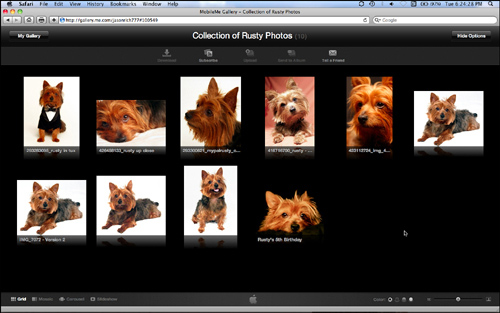
Figure 16.6. The MobileMe Online Gallery’s Carousel view.
You can also change the solid background color to any color you like and use the Zoom slider to make the image thumbnails appear larger or smaller to customize the gallery viewing experience.
At the top center of the MobileMe gallery, located under the gallery’s title, are five additional command icons:
• Download—Visitors can download one image, several images, or the contents of the entire gallery to their computer (if you’ve set up the gallery to allow this).
• Subscribe—As changes are made to the gallery, subscribers can automatically be notified.
• Upload—This command icon allows any visitors to upload their images and add them to the gallery (if you’ve set up the gallery to permit this).
• Send to Album—This command icon allows you to transfer images from the online gallery to an Album in iPhoto ’11.
• Tell a Friend—This command icon allows you to email friends to tell them of the gallery’s existence and provide them with its unique URL, allowing them to access it.

SHOW ME Media 16.1—See how to create an online gallery using MobileMe
Access this video file through your registered Web Edition at http://www.quepublishing.com.
![]() LET ME TRY IT
LET ME TRY IT
Creating an Online Gallery Using MobileMe
To create an online-based MobileMe gallery using iPhoto ’11, follow these steps:
- Create an Album or highlight and select the photos you want to upload to a MobileMe gallery in iPhoto ’11. You can also choose to create a gallery using the entire contents of an Event folder, for example.
- With the Album or Event highlighted, click on the Share command icon and choose the MobileMe Gallery option.
- Click on the New Gallery icon in the window that appears above the Share command icon.
- Customize your gallery settings from the gallery setup window that appears and click on the Publish icon when you’re done.
- Your photos are uploaded into the gallery you’ve created. An upload progress bar is displayed in the upper-right corner of the screen, and a listing for the gallery appears in iPhoto ’11’s Source list.
- To access the gallery using your Mac’s web browser, click on the right-pointing arrow located at the top center of the screen, next to the gallery’s title.
- Adjust the view settings for the gallery using the command icons located at the bottom of the screen.