Now that we have Unity configured to build for our device, we can begin building our space themes VR environment. We have designed this project to focus on building and deploying a VR experience. If you are moderately familiar with Unity, this project will be very simple. Again, this is by design. However, if you are relatively new, then the basic 3D primitives, a few textures, and a simple orbiting script will be a great way to expand your understanding of the development platform:
- Create a new script by selecting Assets | Create | C# Script from the main menu. By default, the script will be titled NewBehaviourScript. Single click this item in the Project window and rename it OrbitController. Finally, we will keep the project organized by dragging OrbitController's icon to the Scripts folder.
- Double-click the OrbitController script item to edit it. Doing this will open a script editor as a separate application and load the OrbitController script for editing. The following code block illustrates the default script text:
 using System.Collections;
 using System.Collections.Generic;
 using UnityEngine;

 public class OrbitController : MonoBehaviour {

     // Use this for initialization
     void Start () {

     }

     // Update is called once per frame
     void Update () {

     }
 }
This script will be used to determine each planet's location, orientation, and relative velocity within the system. The specific dimensions will be added later, but we will start by adding some public variables.
- Starting on line 7, add the following five statements:
public Transform orbitPivot;
public float orbitSpeed;
public float rotationSpeed;
public float planetRadius;
public float distFromStar;
Since we will be referring to these variables in the near future, we need a better understanding of how they will be used:
-
- orbitPivot stores the position of the object that each planet will revolve around (in this case, it is the star TRAPPIST-1).
- orbitalSpeed is used to control how fast each planet revolves around the central star.
- rotationSpeed is how fast an object rotates around its own axis.
- planetRadius represents a planet's radius compared to Earth. This value will be used to set the planet's size in our environment.
- distFromStar is a planet's distance in Astronomical Units (AU) from the central star.
- Continue by adding the following lines of code to the Start() method of the OrbitController script:
// Use this for initialization
     void Start () {
// Creates a random position along the orbit path
         Vector2 randomPosition = Random.insideUnitCircle;
         transform.position = new Vector3 (randomPosition.x, 0f,
         randomPosition.y) * distFromStar;

// Sets the size of the GameObject to the Planet radius value
         transform.localScale = Vector3.one * planetRadius;
     }
As shown within this script, the Start() method is used to set the initial position of each planet. We will add the dimensions when we create the planets, and this script will pull those values to set the starting point of each game object at runtime:
- Next, modify the Update() method by adding two additional lines of code, as indicated in the following code block:
// Update is called once per frame. This code block updates the Planet's position during each
// runtime frame.
     void Update () {
         this.transform.RotateAround (orbitPivot.position,
         Vector3.up, orbitSpeed * Time.deltaTime);
         this.transform.Rotate (Vector3.up, rotationSpeed *
         Time.deltaTime);
     }
This method is called once per frame while the program is running. Within Update(), the location for each object is determined by computing where the object should be during the next frame. this.transform.RotateAround uses the sun's pivot point to determine where the current GameObject (identified in the script by this) should appear in this frame. Then this.transform.Rotate updates how much the planet has rotated since the last frame.
- Save the script and return to Unity.
Now that we have our first script, we can begin building the star and its planets. For this process, we will use Unity's primitive 3D GameObject to create the celestial bodies:
- Create a new sphere using GameObject | 3D Object | Sphere. This object will represent the star TRAPPIST-1. It will reside in the center of our solar system and will serve as the pivot for all seven planets.
- Right-click on the newly created Sphere object in the Hierarchy window and select Rename. Rename the object Star.
- Using the Inspector tab, set the object to Position: 0,0,0 and Scale: 1,1,1.
- With the Star selected, locate the Add Component button in the Inspector panel. Click the button and enter orbitcontroller in the search box. Double-click on the OrbitController script icon when it appears. The script is now a component of the star.
- Create another sphere using GameObject | 3D Object | Sphere and position it anywhere in the scene, with the default scale of 1,1,1. Rename the object Planet b.
Figure 2.5, from the TRAPPIST-1 Wikipedia page, shows the relative orbital period, distance from the star, radius, and mass of each planet. We will use these dimensions and names to complete the setup of our VR environment. Each value will be entered as public variables for their associated GameObjects:

- Apply the OrbitController script to the Planet b asset by dragging the script icon to the planet in the Scene window or the Planet b object in the Hierarchy window. Planet b is our first planet and it will serve as a prototype for the rest of the system.
- Set the Orbit Pivot point of Planet b in the Inspector. Do this by clicking the Selector Target next to the Orbit Pivot field (see Figure 2.6). Then, select Star from the list of objects. The field value will change from None (Transform) to Star (Transform). Our script will use the origin point of the select GameObject as its pivot point.
- Go back and select the Star GameObject and set the Orbit Pivot to Star as we did with Planet b.
- Save the scene:

Now that our template planet has the OrbitController script, we can create the remaining planets:
- Duplicate the Planet b GameObject six times, by right-clicking on it and choosing Duplicate.
- Rename each copy Planet c through Planet h.
- Set the public variables for each GameObject, using the following chart:
|
GameObject |
Orbit Speed |
Rotation Speed |
Planet Radius |
Dist From Star |
|
Star
|
0
|
2
|
6
|
0
|
|
Planet b
|
.151
|
5
|
0.85
|
11
|
|
Planet c
|
.242
|
5
|
1.38
|
15
|
|
Planet d
|
.405
|
5
|
0.41
|
21
|
|
Planet e
|
.61
|
5
|
0.62
|
28
|
|
Planet f
|
.921
|
5
|
0.68
|
37
|
|
Planet g
|
1.235
|
5
|
1.34
|
45
|
|
Planet h
|
1.80
|
5
|
0.76
|
60
|
- Create an empty GameObject by right clicking in the Hierarchy panel and selecting Create Empty. This item will help keep the Hierarchy window organized. Rename the item Planets and drag Planet b—through Planet h into the empty item.
This completes the layout of our solar system, and we can now focus on setting a location for the stationary player. Our player will not have the luxury of motion, so we must determine the optimal point of view for the scene:

- Run the simulation.
- Figure 2.7 illustrates the layout being used to build and edit the scene. With the scene running and the Main Camera selected, use the Move and Rotate tools or the Transform fields to readjust the position of the camera in the Scene window or to find a position with a wide view of the action in the Game window; or a position with an interesting vantage point.
- Click the small Options gear in the Transform panel and select Copy Component. This will store a copy of the Transform settings to the clipboard:

- Stop the simulation. You will notice that the Main Camera position and rotation have reverted to their original settings. Click the Transform gear again and select Paste Component Values to set the Transform fields to the desired values.
- Save the scene and project.
You might have noticed that we cannot really tell how fast the planets are rotating. This is because the planets are simple spheres without details. This can be fixed by adding materials to each planet. Since we really do not know what these planets look like we will take a creative approach and go for aesthetics over scientific accuracy.
The internet is a great source for the images we need. A simple Google search for planetary textures will result in thousands of options. Use a collection of these images to create materials for the planets and the TRAPPIST-1 star:
- Open a web browser and search Google for planet textures. You will need one texture for each planet and one more for the star. Download the textures to your computer and rename them something memorable (that is, planet_b_mat...). Alternatively, you can download a complete set of textures from the Resources section of the supporting website: http://zephyr9.pairsite.com/vrblueprints/Trappist1/.
- Copy the images to the Trappist1/Assets/Materials folder.
- Switch back to Unity and open the Materials folder in the Project panel.
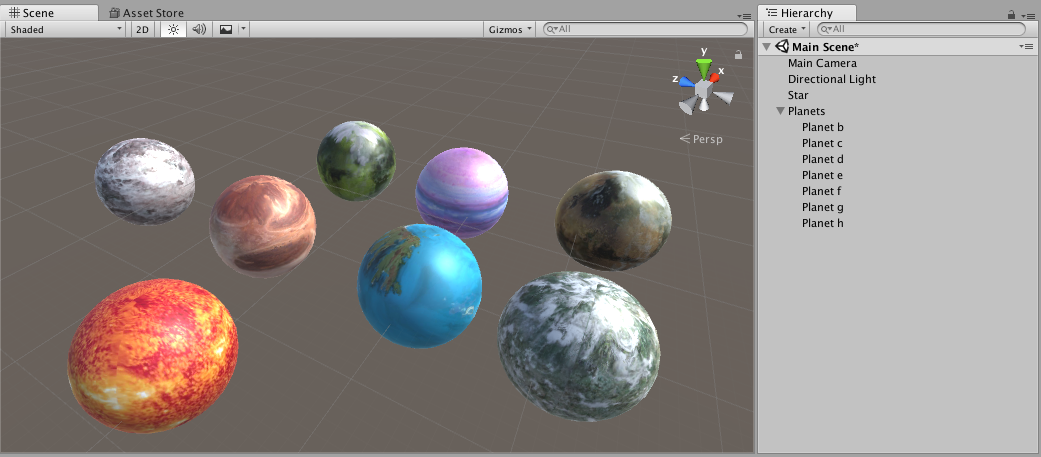
- Drag each texture to its corresponding GameObject in the Hierarchy panel. Notice that each time you do this Unity creates a new material and assigns it to the planet GameObject:
- Run the simulation again and observe the movement of the planets. Adjust the individual planet Orbit Speed and Rotation Speed to feel natural. Take a bit of creative license here, leaning more on the scene's aesthetic quality than on scientific accuracy.
- Save the scene and the project.
For the final design phase, we will add a space themed background using a Skybox. Skyboxes are rendered components that create the backdrop for Unity scenes. They illustrate the world beyond the 3D geometry, creating an atmosphere to match the setting.
Skyboxes can be constructed of solids, gradients, or images using a variety of graphic programs and applications. For this project, we will find a suitable component in the Asset Store:
- Load the Asset Store from the Window menu. Search for a free space-themed skybox using the phrase space skybox price:0. Select a package and use the Download button to import the package into the Scene.
- Select Window | Lighting | Settings from the main menu.
- In the Scene section, click on the Selector Target for the Skybox Material and choose the newly downloaded skybox:

- Save the scene and the project.
With that last step complete, we are done with the design and development phase of the project. Next, we will move on to building the application and transferring it to a device.