In large applications, it is fairly common to have name collisions. One developer might create an Employee class, while another makes a function named Employee that returns the employee ID for a particular person's name. Or two developers might build different Employee classes that have different properties and different purposes. When multiple items have the same name, this is called a namespace collision or namespace pollution.
These sorts of name conflicts are most common when programmers are not working closely together. For example, different developers working on the payroll and human resources systems might both define Employee classes with slightly different purposes.
Namespaces enable you to classify and distinguish among programming entities that have the same name. For example, you might build the payroll system in the Payroll namespace and the human resources system in the HumanResources namespace. Then, the two Employee classes would have the fully qualified names Payroll.Employee and HumanResources.Employee, so they could coexist peacefully and the program could tell them apart.
The following code shows how an application would declare these two types of Employee objects:
Dim payroll_emp As Payroll.Employee
Dim hr_emp As HumanResources.Employee
Namespaces can contain other namespaces, so you can build a hierarchical structure that groups different entities. You can divide the Payroll namespace into pieces to give developers working on that project some isolation from each other.
Namespaces can be confusing at first, but they are really fairly simple. They just break up the code into manageable pieces so that you can group parts of the program and tell different parts from each other.
This chapter describes namespaces. It explains how to use namespaces to categorize programming items and how to use them to select the right versions of items with the same name.
Visual Studio defines thousands of variables, classes, routines, and other entities to provide tools for your applications. It categorizes them in namespaces to prevent name collisions and to make it easier for you to find the items you need.
The Visual Studio root namespaces are named Microsoft and System. The Microsoft namespace includes namespaces that support different programming languages and tools. For example, typical namespaces include CSharp, JScript, and VisualBasic, which contain types and other tools that support the C#, JScript, and Visual Basic languages. The Microsoft namespace also includes the Win32 namespace, which provides classes that handle operating system events and that manipulate the Registry.
The System namespace contains a huge number of useful programming items, including many nested namespaces. For example, the System.Drawing namespace contains classes related to drawing, System.Data contains classes related to databases, System.Threading holds classes dealing with multithreading, and System.Security includes classes for working with security and cryptography.
Note that these namespaces are not necessarily available to your program at all times. For example, by default, the Microsoft.JScript namespace is not available to Visual Basic programs. To use it, you must first add a reference to the Microsoft.JScript.dll library.
Visual Studio includes so many programming tools that the namespace hierarchy is truly enormous. Namespaces are refined into sub-namespaces, which may be further broken into more namespaces until they reach a manageable size. Although this makes it easier to differentiate among all of the different programming entities, it makes the fully qualified names of some classes rather cumbersome.
Example program DrawDashes uses the following code to draw a rectangle inside its form. Fully qualified names such as System.Drawing.Drawing2D.DashStyle.DashDotDot are so long that they make the code hard to read.
Private Sub DrawDashedBox(ByVal gr As System.Drawing.Graphics)
    gr.Clear(Me.BackColor)

    Dim rect As System.Drawing.Rectangle = Me.ClientRectangle
    rect.X += 10
    rect.Y += 10
    rect.Width -= 20
    rect.Height -= 20

    Using my_pen As New System.Drawing.Pen(System.Drawing.Color.Blue, 5)
        my_pen.DashStyle = System.Drawing.Drawing2D.DashStyle.DashDotDot
        gr.DrawRectangle(my_pen, rect)
    End Using
End Sub

You can use the Imports statement at the top of the file to make using namespaces easier. After you import a namespace, your code can use the items it contains without specifying the namespace.
Example program DrawDashesWithImports uses the following code. It imports the System.Drawing and System.Drawing.Drawing2D namespaces so it doesn't need to mention the namespaces in its object declarations. This version is much easier to read.
Imports System.Drawing
Imports System.Drawing.Drawing2D
...
Private Sub DrawDashedBox(ByVal gr As Graphics)
    gr.Clear(Me.BackColor)

    Dim rect As Rectangle = Me.ClientRectangle
    rect.X += 10
    rect.Y += 10
    rect.Width -= 20
    rect.Height -= 20

    Using my_pen As New Pen(Color.Blue, 5)
        my_pen.DashStyle = DashStyle.DashDotDot
        gr.DrawRectangle(my_pen, rect)
    End Using
End Sub

A file can include any number of Imports statements. The statements must appear at the beginning of the file, and they define namespace shortcuts for the entire file. If you want different pieces of code to use different sets of Imports statements, you must place the pieces of code in different files. If the pieces of code are in the same class, use the Partial keyword so you can split the class into multiple files.
The complete syntax for the Imports statement is as follows:
Imports [alias=]namespace[.element]
Later sections in this chapter describe namespace aliases and elements in detail.
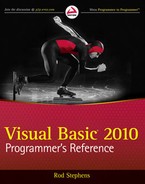
Visual Basic lets you quickly import a namespace for all of the modules in a project. In Solution Explorer, double-click My Project. Click the References tab to display the page shown in Figure 27-1.
In the Imported namespaces list at the bottom, select the check box next to the namespaces that you want to import. The program's files will be able to use the objects defined in these namespaces, even though they do not include Imports statements.
This is most useful when most of the program's modules need to import the same namespaces. Including the Imports statement in the files makes it easier for developers to see which namespaces are available, however, so you might want to do this instead, particularly if you use unusual namespaces.
By default, Visual Basic loads imports for the type of application you are building. For example, when you start a Windows Form application, Visual Basic imports the following namespaces:
Microsoft.VisualBasic
System
System.Collections
System.Collections.Generic
System.Data
System.Drawing
System.Diagnostics
System.Windows.Forms
You can use the upper half of the References property page to manage project references. Use the Add and Remove buttons (scrolled off to the right in Figure 27-1) to add and remove references.
Click the Unused References button (scrolled off to the right in Figure 27-1) to see a list of referenced libraries not currently used by the project. Before you distribute the program, you can remove the unused references.
You can use the alias clause to define a shorthand notation for the namespace. For instance, the following code imports the System.Drawing.Drawing2D namespace and gives it the alias D2. Later, it uses D2 as shorthand for the fully qualified namespace.
Imports D2 = System.Drawing.Drawing2D
...
Dim dash_style As D2.DashStyle = D2.DashStyle.DashDotDot
This technique is handy if you need to use two namespaces that define different classes with the same name. Normally, if two namespaces define classes with the same name, you must use the fully qualified class names so that Visual Basic can tell them apart. You can use aliases to indicate the namespaces more concisely.
Suppose that the JobClasses and FinanceStuff namespaces both define an Employee class. If you declare a variable using the unqualified class Employee, Visual Basic would not know which version to use. The following code shows how you can declare fully qualified versions of the Employee class in the JobNamespaces application:
Imports JobNamespaces.JobClasses
Imports JobNamespaces.FinanceStuff
...
Dim job_emp As JobNamespaces.JobClasses.Employee
Dim finance_emp As JobNamespaces.FinanceStuff.Employee
...
Example program JobNamespaces uses aliases to simplify these declarations. This program uses Job as an alias for MyApplication.JobClasses and Finance as an alias for MyApplication.FinanceStuff.
Now suppose that the JobClasses namespace also defines the Dispatcher class. The FinanceStuff namespace does not define a Dispatcher class, so there is no name conflict between the namespaces. You could use the Job alias to refer to the Dispatcher class, or you could import the JobClasses namespace again without an alias as shown in the following code:
Imports JobNamespaces.JobClasses
Imports Job = JobNamespaces.JobClasses
Imports Finance = JobNamespaces.FinanceStuff
...
Dim job_emp As Job.Employee
Dim finance_emp As Finance.Employee
Dim job_dispatcher As Dispatcher
...

In addition to importing a namespace, you can import an element within the namespace. This is particularly useful for enumerated types.
For example, the following code imports the System.Drawing.Drawing2D namespace, which defines the DrawStyle enumeration. It declares the variable dash_style to be of the DashStyle type and sets its value to DashStyle.DashDotDot.
Imports System.Drawing.Drawing2D
...
Dim dash_style As DashStyle = DashStyle.DashDotDot
...
Example program DrawDashesImportsDashStyle, which is available for download on the book's web site, uses the following code to import the System.Drawing.Drawing2D.DashStyle enumeration. That allows it to set the value of my_pen.DashStyle to DashDotDot without needing to specify the name of the enumeration (DashStyle).
Imports System.Drawing.Drawing2D
Imports System.Drawing.Drawing2D.DashStyle
...
my_pen.DashStyle = DashDotDot
...

Every project has a root namespace, and every item in the project is contained directly or indirectly within that namespace. To view or change the project's root namespace, open Solution Explorer and double-click the My Projects entry. View or modify the root namespace on the Application tab's "Root namespace" text box.
You can create new namespaces nested within the root namespace to further categorize your code. The easiest way to create a namespace is by using the Namespace statement. The following code declares a namespace called SchedulingClasses. It includes the definition of the TimeSlot class and possibly other classes.
Namespace SchedulingClasses
     Public Class TimeSlot
         ...
     End Class
     ...
End Namespace
Code inside the namespace can refer to the TimeSlot class as simply TimeSlot. Code outside of the namespace can refer to the class using the namespace as shown in the following code (assuming MyApplication is the project's root namespace):
Dim time_slot As New MyApplication.SchedulingClasses.TimeSlot
You can nest namespaces within other namespaces to any depth. In fact, because all of your application's code is contained within the root namespace, any namespace you create is already contained within another namespace. There is no way to make a namespace that is not contained within the root namespace.
If you want to make a namespace that lies outside of the application's root namespace, you must create a library project. Then the code in that project lies within its own root namespace.
The following code defines the DispatchClasses namespace. That namespace contains the AppointmentClasses and JobClasses namespaces, each of which defines some classes.
Namespace DispatchClasses
    Namespace AppointmentClasses
        Public Class AppointmentWindow
            ...
        End Class
        ...
    End Namespace

    Namespace JobClasses
        Public Class SkilledJob
            ...
        End Class
            ...
    End Namespace
End Namespace
The following code shows how an application could create references to AppointmentWindow and SkilledJob objects using the class's fully qualified names:
Dim appt As New MyApplication.DispatchClasses.AppointmentClasses.AppointmentWindow
Dim job As New MyApplication.DispatchClasses.JobClasses.SkilledJob
A Namespace statement can only appear at the namespace level. You cannot create a namespace within a module, class, structure, or method.
Inside a namespace, you can define other namespaces, classes, structures, modules, enumerated types, and interfaces. You cannot directly define variables, properties, subroutines, functions, or events. Those items must be contained within some other entity (such as a class, structure, module, or interface).
You can use more than one Namespace statement to define pieces of the same namespace. For example, the following code uses a Namespace statement to make the OrderEntryClasses namespace, and it defines the Employee class inside it. Later, the code uses another Namespace statement to add the Customer class to the same namespace. In this case, the single namespace contains both classes.
Namespace OrderEntryClasses
     Public Class Employee
         ...
     End Class
End Namespace
 ...
Namespace OrderEntryClasses
     Public Class Customer
        ...
     End Class
End Namespace
Example program NamespaceHierarchy, which is available for download on the book's web site, defines several nested namespaces.
Scattering pieces of a namespace throughout your code will probably confuse other developers. One case where it might make sense to break a namespace into pieces would be if you want to put different classes in different code files, either to prevent any one file from becoming too big or to allow different programmers to work on the files at the same time. In that case, it might make sense to place related pieces of the application in the same namespace but in different files.
Classes, structures, and modules create their own name contexts that are similar in some ways to namespaces. For example, a class or structure can contain the definition of another class or structure, as shown in the following code:
Public Class Class1
    Public Class Class2
       ...
    End Class

    Public Structure Struct1
       Public Name As String

       Public Structure Struct2
           Public Name As String
       End Structure
    End Structure
End Class
You can access public module members and shared class or structure members using a fully qualified syntax similar to the one used by namespaces. For example, the following code creates the GlobalValues module and defines the public variable MaxJobs within it. Later, the program can set MaxJobs using its fully qualified name.
Module GlobalValues
     Public MaxJobs As Integer
     ...
End Module
...
MyApplication.GlobalValues.MaxJobs = 100
Although these cases look very similar to namespaces, they really are not. One big difference is that you cannot use a Namespace statement inside a class, structure, or module.
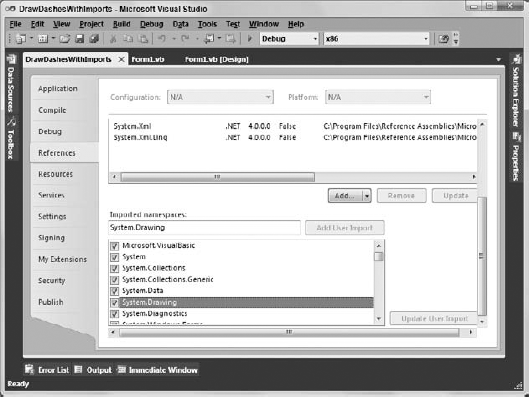
IntelliSense gives another clue that Visual Basic treats classes, structures, and modules differently from namespaces. The IntelliSense popup shown in Figure 27-2 displays curly braces ({}) next to the FinanceStuff and JobClasses namespaces, but it displays different icons for the classes Employer and Form1, and the module Module1. When you select a namespace, IntelliSense also displays a tooltip (on the right in Figure 27-2) giving the namespace's name.
Normally, Visual Basic does a pretty good job of resolving namespaces, and you don't need to worry too much about the process. If you import a namespace, you can omit the namespace in any declarations that you use. If you have not imported a namespace, you can fully qualify declarations that use the namespace and you're done. There are some in-between cases, however, that can be confusing. To understand them, it helps to know a bit more about how Visual Basic resolves namespaces.
When Visual Basic sees a reference that uses a fully qualified namespace, it looks in that namespace for the item it needs and that's that. It either succeeds or fails. For example, the following code declares a variable of type System.Collections.Hashtable. Visual Basic looks in the System.Collections namespace and tries to find the Hashtable class. If the class is not there, the declaration fails.
Dim hash_table As New System.Collections.Hashtable
When Visual Basic encounters a qualified namespace, it first assumes that it is fully qualified. If it cannot resolve the reference as described in the previous paragraph, it tries to treat the reference as partially qualified and it looks in the current namespace for a resolution. For example, suppose you declare a variable as shown in the following code:
Dim emp As JobClasses.Employee
In this case, Visual Basic searches the current namespace for a nested namespace called JobClasses. If it finds such a namespace, it looks for the Employee class in that namespace.
If Visual Basic cannot resolve a namespace using these methods, it moves up the namespace hierarchy and tries again. For example, suppose that the current code is in the MyApplication.JobStuff.EmployeeClasses.TimeSheetRoutines namespace. Now, suppose that the SalaryLevel class is defined in the MyApplication.JobStuff namespace and consider the following code:
Dim salary_level As New SalaryLevel
Visual Basic examines the current namespace MyApplication.JobStuff.EmployeeClasses.TimeSheetRoutines and doesn't find a definition for SalaryLevel. It moves up the namespace hierarchy and searches the MyApplication.JobStuff.EmployeeClasses namespace, again failing to find SalaryLevel. It moves up the hierarchy again to the MyApplication.JobStuff namespace, and there it finally finds the SalaryLevel class.
Movement up the namespace hierarchy can sometimes be a bit confusing. It may lead Visual Basic to resolve references in an ancestor of the current namespace, in some sort of "uncle/aunt" namespace, or in a "cousin" namespace.
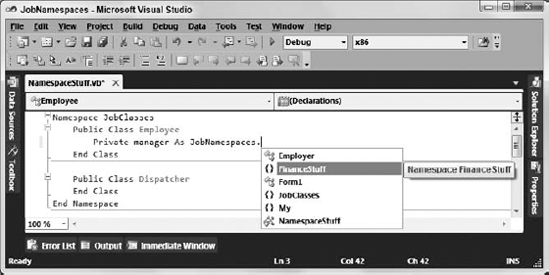
For example, consider the namespace hierarchy shown in Figure 27-3. The root namespace MyApplication contains the namespaces BusinessClasses and AssignmentStuff.BusinessClasses defines the Employee and Customer classes. AssignmentStuff contains the AssignmentGlobals module, which defines the MakeAssignment subroutine and a different version of the Employee class.
Now, suppose that the Customer class contains the following subroutine:
Public Sub AssignEmployee()
    AssignmentStuff.AssignmentGlobals.MakeAssignment(Me)
    ...
End Sub
This code lies in the MyApplication.BusinessClasses namespace. Visual Basic cannot find a meaning for the AssignmentStuff namespace locally in that context, so it moves up the namespace hierarchy to MyApplication, where it finds the AssignmentStuff namespace. Within that namespace, it finds the AssignmentGlobals module and the MakeAssignment subroutine that it contains.
Visual Basic can also peer into modules as if their public contents were part of the namespace itself. That means you can rewrite the previous code in the following slightly simpler version:
Public Sub AssignEmployee()
     AssignmentStuff.MakeAssignment(Me)
     ...
End Sub
In this example, there is only one MakeAssignment subroutine, so there's little doubt that Visual Basic has found the correct one. If different namespaces define items with the same names, the situation can be somewhat more confusing. Suppose that the Customer class declares an object that is from the Employee class defined in the MyApplication.AssignmentStuff namespace, as shown in the following code:
Dim emp As New AssignmentStuff.Employee
If you understand how Visual Basic performs namespace resolution, you can figure out that the object is of the Employee class defined in the MyApplication.AssignmentStuff namespace. This isn't completely obvious, however.
If you add an Imports statements to the program, the situation gets more confusing. Suppose that the program imports the AssignmentStuff namespace and then the Customer class declares a variable of type Employee. Because this code is in the BusinessClasses namespace, Visual Basic uses that namespace's version of Employee. If the code is in some other namespace (such as MyApplication), the program uses the imported AssignmentStuff version of the class.
Finally, suppose that the program imports both BusinessClasses and AssignmentStuff.AssignmentGlobals and then makes the following declaration in another namespace. In this case, Visual Basic cannot decide which version of the class to use, so it generates an error.
Dim emp As Employee
This example is so confusing, however, that you would probably be better off restructuring the namespaces and possibly renaming one of the versions of the Employee class rather than trying to figure out how Visual Basic is resolving the namespaces.
You can simplify these issues by avoiding duplicate names across all namespaces. When you do use duplicate names, you can use fully qualified namespaces to avoid ambiguity. You can also use Imports statements to make namespace aliases and then use the aliases to avoid ambiguity more concisely.
Namespaces are everywhere in Visual Basic. Every piece of code you write is contained in some namespace, even if it is only the application's root namespace. Despite their pervasiveness, many developers never need to use namespaces explicitly, so they find them somewhat mystifying.
Namespaces are really quite simple, however. They merely divide programming items into a hierarchy. They enable you to categorize related items and resolve name collisions in different parts of the application.
You can use the Imports statement to allow the program to refer to items in a namespace without giving fully qualified names. A namespace alias lets you explicitly specify an item's namespace in an abbreviated form. This is particularly useful to resolve ambiguous names that appear in more than one namespace included in Imports statements.
This chapter describes namespaces in general. Chapter 28 "Collection Classes," describes some of the useful classes for grouping object classes, including those in the System.Collections and System.Collections.Generic namespaces.