The Visual Studio IDE is packed with thousands of tools that are available through toolbar and menu commands. So many tools are available that the IDE would be practically useless if every tool were displayed at the same time. In the interests of usability, the IDE displays only the tools that the Microsoft Visual Studio developers thought would be most useful when you were performing a particular task.
Unfortunately, the Microsoft developers didn't know exactly what you would be doing while developing applications, so they made their best guesses about which tools you would need. Under some circumstances, you may find that a completely different set of tools would be more useful. In those cases, you should customize the IDE to make using those tools easier and faster.
This chapter explains how you can customize the IDE. It explains how to make new toolbars and menus, add commands to them, and determine the commands' appearances. It also tells how you can define keyboard shortcuts to make the commands you use most often really easy to access.
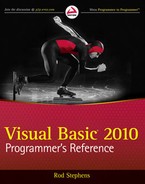
The Tools menu's Customize command displays the dialog box shown in Figure 3-1. On the Toolbars tab, select the check boxes next to the toolbars that you want to be visible. Click New to create a new toolbar where you can add your favorite tools. You can leave the toolbar floating or drag it to the edge of the IDE and dock it. If you drag it to the top, it joins the other toolbars.
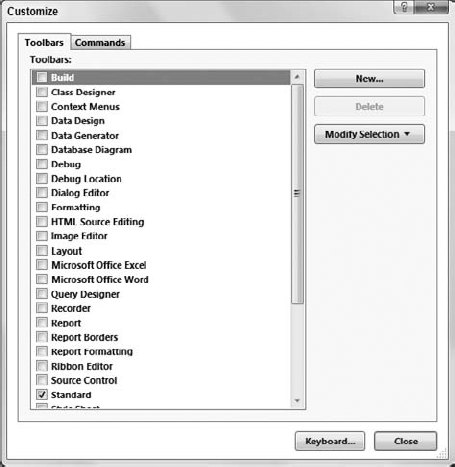
Click the Commands tab and select a menu. Then click the Add Command button to see the dialog shown in Figure 3-2. Select a command in the dialog and click OK to add it to the menu you originally selected.
To make a command that executes a macro you have created, select the Macros category in the list on the left. Find the macro you want to use in the list on the right, and drag it onto a toolbar or menu.
To create a new menu, click the Customize dialog's Add New Menu button.

Keyboard shortcuts let you quickly invoke a command by pressing a key combination. For example, in most applications including Visual Studio, Ctrl+S invokes the save command.
The Keyboard button at the bottom of the Customize dialog displays the dialog box shown in Figure 3-3. You can use this dialog to view and edit keyboard shortcuts.
Enter words in the "Show commands containing" text box to filter the commands. When you click a command, the dialog box displays any keyboard shortcuts associated with it.
To make a new shortcut, click the "Press shortcut keys" text box and press the keys that you want to use as a shortcut. The "Shortcuts for selected command" drop-down list displays any commands that already use the shortcut you entered. To make the assignment, click the Assign button.
The Visual Studio IDE comes with a huge assortment of tools. Initially the IDE's menus and toolbars are arranged to make it easy to access the tools that developers use most often, but if you need to use some other tool frequently, you are not limited to the IDE's initial layout. This chapter explains how you can create, hide, and rearrange menus and toolbars to make it easy to use the tools that you find most useful.
In addition to its many menus and toolbars, the IDE contains dozens of windows that contain tools or that allow you to view and modify different aspects of an application. Of all the windows displayed by the IDE, one of the first that Visual Basic developers use when building a new application is the Windows Forms Designer. This window allows you to add controls to a form, arrange them to create a user interface, and set their properties to determine their appearances and behaviors.
Chapter 4, "Windows Forms Designer," explains how to use the Windows Forms Designer to build the forms that make up most Windows applications.