Text is different from the lines, rectangles, ellipses, and other kinds of shapes that a program typically draws. A program normally draws and fills a rectangle in separate steps. On the other hand, a program typically draws text in a single step, usually with a solid color.
Text also differs in the way it is drawn by the GDI+ routines. To draw a line, rectangle, or ellipse, the program specifies the shape's location, and the GDI+ routines draw it accordingly. Text is not specified by simple location data. A program can specify the text's general location but has only limited control over its size. Different characters may have different widths in a particular font, so strings containing the same number of characters may have different sizes when displayed.
Even if you know every character's nominal size, you may not be able to add them up to calculate the size of a string. Fonts sometimes use special algorithms that adjust the spacing between certain pairs of letters to make the result look better. For example, a font might decrease the spacing between the characters A and W when they appear next to each other (as in AW) to allow the W to lean over the A.
This chapter describes some of the tools that Visual Basic provides for controlling text. It explains how to draw text aligned and formatted in various ways, and how to measure text so that you can figure out more exactly where it will appear.
Note that several examples use the Graphics object's TextRenderingHint property to make text appear smoother. For more information on this property, see the section "System.Drawing.Text" in Chapter 30, "Drawing Basics."
The Graphics object's DrawString method draws text. It provides several overloaded versions that let you specify the string, font, positioning, and alignment information.
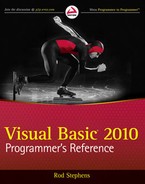
One of the simplest versions of DrawString takes only four parameters: the text to draw, the font to use, the brush to use when filling the text, and the position where the text should start. The following code draws some text starting at the point (10, 10) on the form. It then draws a circle around this point.
Private Sub Form1_Paint(ByVal sender As Object,
 ByVal e As System.Windows.Forms.PaintEventArgs) Handles MyBase.Paint
    Dim txt As String = "The quick brown fox jumps over the lazy dog."
    Using big_font As New Font("Times New Roman", 30, FontStyle.Bold)
        e.Graphics.TextRenderingHint =
            System.Drawing.Text.TextRenderingHint.AntiAliasGridFit
        e.Graphics.DrawString(txt, big_font, Brushes.Black, 10, 10)
        e.Graphics.DrawEllipse(Pens.Black, 8, 8, 4, 4)
    End Using
End Sub

Figure 32-1 shows the result. Note that the text doesn't begin exactly at the point (10, 10). The text contains some leading space on the top and bottom that moves it slightly right and downward from the starting point.
Note also that the text runs blithely off the edge of the form. The following section describes ways you can format text so it automatically provides alignment and wrapping as necessary.
DrawString automatically starts a new line when it encounters a Carriage Return/Line Feed pair in the text. It also advances to the next tab stop when it encounters a Tab character, making it slightly easier to align text in rows and columns.
Some of the overloaded versions of the Graphics object's DrawString method take additional parameters that help format the text. The first of these parameters is a layout rectangle. This is a RectangleF structure that indicates the area where the text should be drawn. The second parameter is a StringFormat object that determines how the text is formatted.
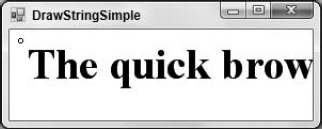
The following code draws text inside a rectangle. It begins by defining the layout rectangle, text, and font. It then creates a StringFormat object. It sets the object's Alignment property to Center so it is centered horizontally in the layout rectangle. It sets the object's LineAlignment property to Near so text is aligned vertically at the top of the rectangle. The program calls DrawString to draw the text and then uses DrawRectangle to display the layout rectangle.
Private Sub Form1_Paint(ByVal sender As Object,
 ByVal e As System.Windows.Forms.PaintEventArgs) Handles MyBase.Paint
    Dim layout_rect As New RectangleF(10, 10,
        Me.ClientSize.Width - 20, Me.ClientSize.Height - 20)
    Dim txt As String = "The quick brown fox jumps over the lazy dog."
    Using big_font As New Font("Times New Roman", 30, FontStyle.Bold)
        Using string_format As New StringFormat
            string_format.Alignment = StringAlignment.Center
            string_format.LineAlignment = StringAlignment.Near

            e.Graphics.DrawString(txt, big_font,
            Brushes.Black,
                layout_rect, string_format)
            e.Graphics.DrawRectangle(Pens.Black,
            Rectangle.Round(layout_rect))
        End Using ' string_format
    End Using ' big_font
End Sub

Figure 32-2 shows the result. Notice that the text is centered horizontally and aligned to the top of the layout rectangle.
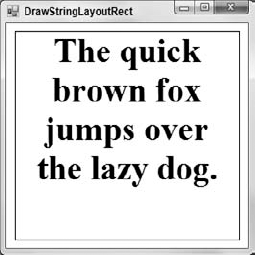
Figure 32.2. The DrawString method can use a layout rectangle and a StringFormat object to format text.
The StringFormat object provides several other properties and methods that you can use to position text. The following table describes the most useful of these.
PROPERTY OR METHOD | PURPOSE |
|---|---|
| Determines the text's horizontal alignment. This can be Near (left), Center (middle), or Far (right). |
| Gets or sets flags that modify the StringFormat object's behavior. See the section "FormatFlags" later in this chapter for more information. |
| Determines how the hotkey prefix character is displayed. (In a menu caption or label, the hotkey is underlined to show that pressing Alt+<hotkey> performs some special action. For example, in most applications Alt+F opens the File menu. A program specifies a control's hotkey character by placing an ampersand in front of it. For example, "& File" is displayed as "File.") If HotkeyPrefix is Show, any character that follows an ampersand is drawn as an underlined hotkey (a double ampersand is drawn as a single ampersand). If this is None, any ampersands are drawn as ampersands. If this is Hide, hotkey ampersands are hidden. |
| Determines the text's vertical alignment. This can be Near (top), Center (middle), or Far (bottom). |
| Sets an array of CharacterRange structures representing ranges of characters that will later be measured by the Graphics object's MeasureCharacterRanges method. |
| Sets an array of Singles giving the positions of tab stops. See the section "Tab Stops" later in this chapter for more information. |
| Determines how the text is trimmed if it cannot fit in the layout rectangle. See the section "Trimming" later in this chapter for more information. |
The following sections describe some of the more complex formatting issues in greater detail.
The StringFormat object's FormatFlags property determines the object's behavior. This property can take a bitwise combination of the values described in the following table.
FORMATFLAGS VALUE | PURPOSE |
|---|---|
| Indicates that the text is drawn from right to left. |
| Indicates that the text is drawn vertically. |
| Indicates that no character should extend beyond the layout rectangle. If this is not set, some characters in certain fonts may stick out a bit. |
If the last line displayed in the layout rectangle is too tall to fit, this flag indicates that it should be omitted. By default, that line is clipped to show whatever parts will fit. | |
| Indicates that the Graphics object's MeasureString method should include spaces at the ends of lines. By default, it does not. |
| Indicates that parts of characters that hang over the layout rectangle are not clipped. |
| If a character is missing from the selected font, the GDI+ normally looks for an equivalent character in another font. This flag prevents that and forces the character to be displayed as the font's missing character glyph (usually an open square). |
| Indicates that text should not be wrapped. |
Figure 32-3 shows the difference between the FitBlackBox, NoClip, and LineLimit flags. If the last visible line won't fit within the layout rectangle, the default behavior is to clip the line to show whatever fits. If FormatFlags is NoClip, that line is displayed entirely. If FormatFlags is LineLimit, the line is omitted entirely.

Figure 32.3. The FitBlackBox, NoClip, and LineLimit flags change how a StringFormat object handles the text's last displayed line.
The following code fragment sets a StringFormat object's DirectionVertical flag and then draws some text. Example program DirectionVertical uses this code to produce the picture shown in Figure 32-4.
string_format.FormatFlags =
    StringFormatFlags.DirectionVertical Or
    StringFormatFlags.DirectionRightToLeft
e.Graphics.DrawString(txt, the_font, Brushes.Black, layout_rect, string_format)

This code fragment sets the FormatFlags property to DirectionVertical plus DirectionRightToLeft. If you omit the second flag, the lines of text are drawn left to right. That means the line "The quick" appears on the left and the subsequent lines appear moving to the right, so the lines are drawn in the reverse of the order that you might expect.
Note that you can also draw vertical text by applying a transformation to the Graphics object that translates the text to the origin, rotates it, and translates the text back to where it belongs.
Figure 32.4. Setting the StringFormat object's FormatFlags property to DirectionVertical produces vertical text.
The following code demonstrates this technique. It defines its layout rectangle, text, and font. It uses the form's width to define the rectangle's height and the form's height to define the rectangle's width, so the rectangle will fit the form after it is rotated. The code creates a StringFormat object to center the text and applies the transformations to the Graphics object. Finally, the code draws the text. The result is similar to the text produced by the previous example.
Private Sub Form1_Paint(ByVal sender As Object,
 ByVal e As System.Windows.Forms.PaintEventArgs) Handles MyBase.Paint
    ' Define the layout rectangle. It's slightly smaller
    ' than the form rotated 90 degrees so the rotated
    ' text will fit the form nicely.
    Dim rect_wid As Integer = Me.ClientSize.Height - 20
    Dim rect_hgt As Integer = Me.ClientSize.Width - 20
    Dim layout_rect As New RectangleF(
        (Me.ClientSize.Width - rect_wid)  2,
        (Me.ClientSize.Height - rect_hgt)  2,
        rect_wid, rect_hgt)
    ' Define the text and font.
    Dim txt As String = "The quick brown fox jumps over the lazy dog."
    Using the_font As New Font("Times New Roman", 30,
        FontStyle.Bold, GraphicsUnit.Pixel)

        ' Set the StringFormat to center the text.
        Using string_format As New StringFormat
            string_format.Alignment = StringAlignment.Center
            string_format.LineAlignment = StringAlignment.Center

            ' Translate to the origin, rotate, and translate back.
            e.Graphics.TranslateTransform(
                -Me.ClientSize.Width  2,
                -Me.ClientSize.Height  2,
               MatrixOrder.Append)
            e.Graphics.RotateTransform(90, Matri xOrder.Append)
             e.Graphics.TranslateTransform(
                 Me.ClientSize.Width  2,
                 Me.ClientSize.Height  2,
                 MatrixOrder.Append)
            ' Draw the text and layout rectangle.
            e.Graphics.TextRenderingHint =
                System.Drawing.Text.TextRenderingHint.AntiAliasGridFit
e.Graphics.DrawString(txt, the_font, Brushes.Black,
layout_rect, string_format)
e.Graphics.DrawRectangle(Pens.Black, Rectangle.Round(layout_rect))
End Using ' string_format
End Using ' the_font
End Sub

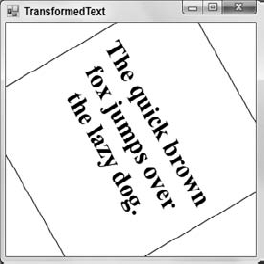
This approach is a bit more complicated than the previous method of setting the StringFormat object's FormatFlags property to DirectionVertical, but it gives you more flexibility. Simply by changing the rotation transformation, you can draw text at any angle, not just rotated 90 degrees. Figure 32-5 shows this program with the angle of rotation changed from 90 to 60 degrees.
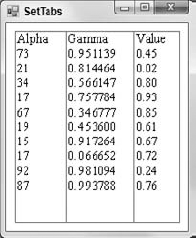
The StringFormat object's GetTabStops and SetTabStops methods let you get and set an array of Singles that determine the position of the layout rectangle's tab stops. Each entry in the array gives the distance between two tab stops. For example, the values {50, 50, 50} specify tab stops 50, 100, and 150 pixels from the left edge of the layout rectangle.
The following code fragment sets two tab stops for a StringFormat object named string_format. It sets two tab stops 60 and 140 (60 + 80) pixels from the left edge of the layout rectangle.
Dim tab_stops() As Single = {60, 80}
string_format.SetTabStops(0, tab_stops)

Example program SetTabs uses this code to display some randomly generated data aligned in columns. The code simply builds a string that uses vbTab to move characters horizontally to the next tab stop and that uses vbCrLf to start a new line. Figure 32-6 shows the result.
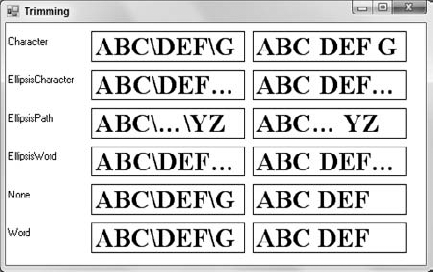
Normally, a string is wrapped as necessary until its layout rectangle is full. If there is still text that has not been displayed, the Trimming property determines how that text is handled. The following table describes the values this property can take.
TRIMMING VALUE | PURPOSE |
|---|---|
| The text is trimmed to the nearest character. |
| The text is trimmed to the nearest character and an ellipsis is displayed at the end of the line. |
| The center of the line is removed and replaced with an ellipsis. This is sometimes a good choice when displaying file paths because it shows the beginning of the path and the file name. This method keeps as much of the last backslash ( |
| The text is trimmed to the nearest word and an ellipsis is displayed at the end of the line. |
| The text is not trimmed. Instead, it is wrapped to the next line, which is hidden because it is below the bottom of the layout rectangle. If the last visible line contains a word break, the line will wrap after the last word that fits. That makes this seem similar to the Word setting. |
| The text is trimmed to the nearest word. |
Example program Trimming, available for download on the book's web site, draws samples of each of the Trimming values. Figure 32-7 shows the program in action. Each sample contains the letters A through Z in groups of three separated by backslashes (left column) or spaces (right column).
The Graphics object's MeasureString method returns a SizeF structure holding the string's width and height drawn in a particular font. You can use that information to arrange the text and other drawn objects on the form.
The following code shows how a program might center text on its form. It starts by defining the text it will draw and the font it will use (in this case, a bold, 40-pixel-tall, Times New Roman font). Next, the program uses the Graphics object's MeasureString method to get the string's size in that font. It uses the size to determine where it needs to draw the text to center it, and then draws the text. The code then makes a Rectangle object using the text's position and the size it got from MeasureString. It finishes by drawing the rectangle around the string.
Private Sub Form1_Paint(ByVal sender As Object,
 ByVal e As System.Windows.Forms.PaintEventArgs) Handles MyBase.Paint
    Dim the_string As String = "MeasureString"
    ' Define the font and text we will use.
    Using the_font As New Font("Times New Roman", 40,
        FontStyle.Bold, GraphicsUnit.Pixel)

        ' Get the text's size.
        Dim string_size As SizeF =
            e.Graphics.MeasureString("MeasureString", the_font)
        ' Draw the text centered on the form.
        Dim x As Integer = (Me.ClientSize.Width - CInt(string_size.Width))  2
        Dim y As Integer =
            (Me.ClientSize.Height - CInt(string_size.Height))  2
        e.Graphics.DrawString(the_string, the_font, Brushes.Black, x, y)
        ' Draw a rectangle around the text.
        Dim string_rect As New Rectangle(x, y,
            CInt(string_size.Width), CInt(string_size.Height))
        e.Graphics.DrawRectangle(Pens.Black, string_rect)
    End Using
End Sub

Figure 32-8 shows the result. Notice that the rectangle includes some extra space above, below, and to the sides of the string. The section "Font Metrics" later in this chapter has more to say about this extra space.
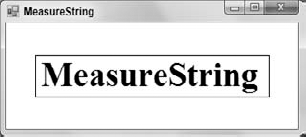
Figure 32.8. You can use the Graphics object's MeasureString method to see how big a string will be when drawn in a particular font.
Occasionally, it is useful to know where parts of a string will be drawn. For example, you might want to draw a box around certain words or know when the user has clicked a particular letter.
The Graphics object provides a MeasureCharacterRanges method that returns an array of Regions representing the positions of ranges of characters within a string. To use MeasureCharacterRanges, the program must first create an array of CharacterRange objects defining the ranges of interest. It calls a StringFormat object's SetMeasurableCharacterRanges method, passing it this array. Finally, it calls MeasureCharacterRanges.
The following code uses MeasureCharacterRanges to show the positions of all of the characters in a short string. It begins by defining its text, layout rectangle, font, and StringFormat object as usual. It then creates an array of CharacterRange objects, one for each character in the string. It loops through this array, filling it with new CharacterRange objects, each of which represents a single character. When it has filled the array, the code passes it to the StringFormat object's SetMeasurableCharacterRanges method. The program then calls the Graphics object's MeasureCharacterRanges method to get Region objects representing the characters' positions. It loops through this array, calling each Region object's GetBounds method to convert the region into a RectangleF structure. It transforms the RectangleF into a Rectangle and draws it. Finally, the program draws the string.
Private Sub Form1_Paint(ByVal sender As Object,
 ByVal e As System.Windows.Forms.PaintEventArgs) Handles MyBase.Paint
    Dim txt As String = "Great Galloping Giraffes"
    Dim layout_rect As New RectangleF(0, 0,
        Me.ClientSize.Width, Me.ClientSize.Height)
    e.Graphics.TextRenderingHint =
        System.Drawing.Text.TextRenderingHint.AntiAliasGridFit

    Using the_font As New Font("Times New Roman", 50,
     FontStyle.Bold Or FontStyle.Italic, GraphicsUnit.Pixel)
        Using string_format As New StringFormat
            string_format.LineAlignment = StringAlignment.Center
            string_format.Alignment = StringAlignment.Center

            ' Define an array of CharacterRange objects,
            ' one for each character.
            Dim character_ranges(txt.Length - 1) As CharacterRange
            For i As Integer = 0 To txt.Length - 1
                character_ranges(i) = New CharacterRange(i, 1)
            Next i '
            Set the ranges in the StringFormat object.
            string_format.SetMeasurableCharacterRanges(character_ranges)
            ' Get the character range regions.
            Dim character_regions() As Region =
                e.Graphics.MeasureCharacterRanges(txt,
                the_font, layout_rect, string_format)
            ' Draw each region's bounds.
            For Each rgn As Region In character_regions
                ' Convert the region into a Rectangle.
                Dim character_bounds As RectangleF = rgn.GetBounds(e.Graphics)
                Dim character_rect As Rectangle =
                    Rectangle.Round(character_bounds)
                ' Draw the bounds.
                e.Graphics.DrawRectangle(Pens.White,
                character_rect)
            Next rgn

            ' Draw the text.
            e.Graphics.DrawString(txt, the_font,
            Brushes.Black,
                layout_rect, string_format)
        End Using ' string_format
    End Using ' the_font
End Sub

Figure 32-9 shows the result.
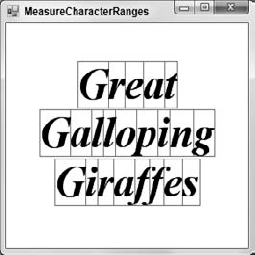
Figure 32.9. The Graphics object's MeasureCharacterRanges method shows where ranges of characters will be drawn in a string.
Note that characters do not necessarily stay within their assigned regions. Depending on the font, they may stick out slightly. In Figure 32-9, the ff pair is particularly shameless in its trespassing, overlapping both the previous and following characters.
The Graphics object's MeasureString method tells you approximately how big a string will be when drawn on that object. Its MeasureCharacterRanges method enables you to get more information about the positioning of ranges within a string.
The FontFamily class provides some additional methods that a program can use to get even more information about how characters are drawn. Before you can use these values, you must understand a bit of extra character anatomy.
Figure 32-10 shows how a font's internal leading, ascent, descent, and external leading values help determine a character's position.
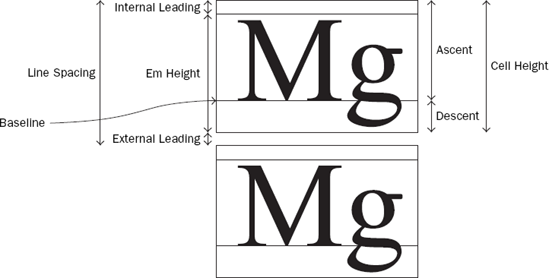
Figure 32.10. How text is positioned depends on many font metrics, including internal leading, ascent, descent, and external leading.
The following table describes these font metrics.
VALUE | MEANING |
|---|---|
Extra space left above the characters but considered part of the string. | |
Em Height | The height within which the characters are drawn. |
Ascent | The part of the character cell above the baseline. |
Baseline | The line on which the character sits. Normally a font lines up all the characters in a string so their baselines align. |
Descent | The part of the character cell below the baseline. |
Cell Height | The height of the character area including internal leading. |
Extra space left below one line and above the next. | |
Line Spacing | The distance between one line and the next. |
From the figure, you can verify the following relationships:
Cell Height = Ascent + Descent = Internal Leading + Em Height
Line Spacing = Cell Height + External Leading
The FontFamily object provides several methods for determining font metric values. These methods include GetCellAscent, GetCellDescent, GetEmHeight, and GetLineSpacing.
All of these methods return values in font design units. The key to converting them into some other unit is to realize that the Font object's Size property returns the font's em size in whatever units the font is currently using. For example, if you specify the font's size in pixels, then Font.Size returns the em size in pixels.
Using Font.Size and the value returned by the FontFamily class's GetEmHeight method, you can convert the other values into pixels. For example, the following equation shows how to calculate a font family's ascent in pixels:
Ascent Pixels = FontFamily.GetCellAscent * Font.Size / FontFamily.GetEmHeight
Example program FontMetrics calls the MeasureCharacters subroutine shown in the following code to display the font metrics for text in three different fonts:
Public Sub MeasureCharacters(ByVal gr As Graphics, ByVal the_font As Font,
 ByVal txt As String, ByVal layout_rect As RectangleF,
 ByVal string_format As StringFormat)
    ' Define an array of CharacterRange objects,
    ' one for each character.
    Dim character_ranges(txt.Length - 1) As CharacterRange
    For i As Integer = 0 To txt.Length - 1
        character_ranges(i) = New CharacterRange(i, 1)
    Next i
    ' Set the ranges in the StringFormat object.
    string_format.SetMeasurableCharacterRanges(character_ranges)

    ' Get the character range regions.
    Dim character_regions() As Region =
        gr.MeasureCharacterRanges(txt,
            the_font, layout_rect, string_format)

    ' Get the font's ascent.
    Dim em_height As Integer = the_font.FontFamily.GetEmHeight(FontStyle.Bold)
    Dim em_height_pix As Single = the_font.Size
    Dim design_to_pixels As Single = the_font.Size / em_height
    Dim ascent As Integer = the_font.FontFamily.GetCellAscent(FontStyle.Bold)
    Dim ascent_pix As Single = ascent * design_to_pixels
    Dim descent As Integer = the_font.FontFamily.GetCellDescent(FontStyle.Bold)
    Dim descent_pix As Single = descent * design_to_pixels
    Dim cell_height_pix As Single = ascent_pix + descent_pix
    Dim internal_leading_pix As Single = cell_height_pix - em_height_pix
    Dim line_spacing As Integer = the_font.FontFamily.GetLineSpacing(FontStyle.Bold)
    Dim line_spacing_pix As Single = line_spacing * design_to_pixels
    Dim external_leading_pix As Single = line_spacing_pix - cell_height_pix
' Draw each region's bounds.
For Each rgn As Region In character_regions
' Convert the region into a Rectangle.
Dim character_bounds As RectangleF = rgn.GetBounds(gr)
Dim character_rect As Rectangle =
Rectangle.Round(character_bounds)
' Draw the bounds.
gr.DrawRectangle(Pens.Black, character_rect)
' Draw the internal leading.
gr.DrawLine(Pens.Black,
character_rect.X,
character_rect.Y + internal_leading_pix,
character_rect.Right,
character_rect.Y + internal_leading_pix)
' Draw the ascent.
gr.DrawLine(Pens.Black,
character_rect.X,
character_rect.Y + ascent_pix,
character_rect.Right,
character_rect.Y + ascent_pix)
' Draw the descent.
gr.DrawLine(Pens.Orange,
character_rect.X,
character_rect.Y + ascent_pix + descent_pix,
character_rect.Right,
character_rect.Y + ascent_pix + descent_pix)
' Draw the external leading.
gr.FillRectangle(Brushes.Red,
character_rect.X,
character_rect.Y + ascent_pix + descent_pix,
character_rect.Width,
external_leading_pix)
Next rgn
' Draw the text.
gr.DrawString(txt, the_font, Brushes.Black,
layout_rect, string_format)
End Sub

MeasureCharacters defines an array of CharacterRange objects and initializes them so that they each refer to a single character in the string. The program calls SetMeasurableCharacterRanges and then MeasureCharacterRanges, as described in the section "MeasureString" earlier in this chapter.
Next, the code calculates the font's em height, ascent, descent, cell height, internal leading, line spacing, and external leading. The subroutine then loops through the Regions returned by MeasureCharacterRanges, converting each Region into a Rectangle and drawing it.
The program then draws lines showing the internal leading, ascent, and descent values, and fills an area representing the external leading space. It draws the descent in orange and fills the external leading in red so you can tell them apart where they overlap in the left font.
The subroutine finishes by drawing the text. Figure 32-11 shows the result.
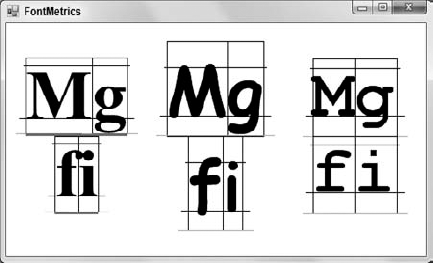
Figure 32.11. The FontFamily and Font classes provide the methods you need to calculate font metrics.
Note that the font metrics are not always rigidly followed. For example, sometimes a character may extend into the external leading space.
When you draw lines, rectangles, and other shapes, you can completely define the shape by giving its size and position. Text is different. Different fonts may produce very different results, even for the same text. A single font sometimes even produces different results for a character, depending on the characters that surround it and the area in which it is drawn.
This chapter describes some of the methods you can use to position and measure text in Visual Basic. Layout rectangles and StringFormat objects let you easily draw text that is centered or aligned vertically and horizontally. The DrawString method automatically wraps text if necessary and can understand Tabs and Carriage Return/Line Feed characters contained in the text.
The StringFormat object's flags let you determine how text is aligned, wrapped, and trimmed. The StringFormat object's methods let you read and define tab stops.
The Graphics object's MeasureString method lets you determine roughly how big a string will be when drawn on the object. Its MeasureCharacterRanges method lets you determine the placement of regions of text within a string.
With all of these methods at your disposal, you can position text almost exactly where you want it.
Chapters 30 through 32 explain how to draw objects such as lines, ellipses, and text at a relatively high level. When you draw a line from one point to another, you don't need to specify exactly how the pixels on the screen should be colored. You set values for higher-level properties such as the pen color and dash style, brush color and style, and so forth. Then Visual Basic figures out the details.
Chapter 33, "Image Processing," explains how you can read and manipulate images on a pixel-by-pixel basis. It tells how to load and save image files in different formats (such as BMP, GIF, JPEG, and PNG) and how to get and set the colors of individual pixels.