Visual Basic .NET provides several good tools for printing. String formatting objects enable you to determine how text is wrapped and truncated if it won't fit in a printing area. Methods provided by Graphics objects enable you to easily scale, rotate, and translate drawing commands.
The basic process, however, seems somewhat backward to many programmers. Rather than issuing commands to a printer object, a program responds to requests to draw pages generated by a PrintDocument object. Instead of telling the printer what to do, the program responds to the PrintDocument object's requests for data.
In some cases, generating a printout using only Visual Basic commands can be difficult. The following section explains alternative methods for generating a printout and tells when you might want to use those methods. If you just want to print several pages of text, it's often easier to pull the text into Microsoft Word or some other application that specializes in formatting text rather than writing your own.
Another option used by many developers is to purchase a third-party printing application. Some of these tools help with certain kinds of printing such as report generation. Chapter 35, "Reporting," provides an introduction to Crystal Reports, a report generation and printing tool that is available with some versions of Visual Basic and that you can purchase separately.
In some cases, however, you cannot take an easy way out. If the program generates very complex images and graphs, or produces text that is positioned and formatted in a complex manner, you probably need to work through the Visual Basic printing system. The rest of this chapter explains the techniques that you use to generate printouts in Visual Basic. It shows how to draw graphics and text on the printer and how to scale and center the results.
Although Visual Basic provides many tools for arranging graphics on a printout, it does not always provide the best approach to printing. The general method for printing in Visual Basic requires you to generate each page of output in turn. For simple documents (such as a line drawing containing a few lines and circles on a single page), this is easy.
On the other hand, suppose you want to print several dozen pages of text interspersed with tables and pictures. Figuring out where to put line breaks, page breaks, tables, and figures could be a huge undertaking. To do the job right, you might need to consider orphan lines (when the first line of a paragraph sits at the bottom of a page), widow lines (the last line of a paragraph sits at the top of a page), orphan and widow words (when the first or last word in a sentence sits on a separate line), inserting extra space between words to make a line look nicer, page numbers, headers and footers, hyphenation, different left and right margins, mirrored margins, page gutters, bulleted and numbered lists, indentation and justification, different font sizes and styles, and a host of other issues.
Word processing and text-formatting applications such as Microsoft Word spend a great deal of effort on these issues — effort that you probably don't want to duplicate. In fact, Word is so good at handling these issues that you should consider using it to print your output instead of writing an elaborate Visual Basic program to do it.
If your output is simple text, your program can write it into a text file so you can use Word to open, format, and print it. For printouts that you don't need to generate too frequently, and for printouts where the user may want to edit the results before printing anyway, this is a simple, flexible solution that doesn't require you to write, debug, and maintain a lot of complicated formatting code.
For more elaborate printouts, programs such as Word may still be useful. Using Visual Studio Tools for Office (VSTO), you can open a Microsoft Word application and control it from your Visual Basic program. Your program can use the Word object model to add text, insert pictures, build tables, set page printing options, and even print the result. You can then save the document for later use or discard it.
Using VSTO, not only can you control Microsoft Word, but you can also use the other Microsoft Office applications. For example, you can load information into Excel so that you can use its tools to analyze and graph the data, copy information into Access for analysis by other database applications, or compose e-mail messages in Outlook.
VSTO is relatively complicated and outside of the scope of this book, so it isn't described here. For more information, see the VTSO web site at msdn2.microsoft.com/office/aa905533.aspx. You can also learn more in a book about VSTO such as Professional VSTO 2005: Visual Studio 2005 Tools for Office by Alvin Bruney (Wiley, 2006).
The PrintDocument class sits at the heart of the printing process in Visual Basic. The program creates an instance of this class and installs event handlers to catch its events. When the object must perform printing-related tasks, it raises events to ask the program for help.
The PrintDocument object raises four key events:
BeginPrint— The PrintDocument raises its BeginPrint event when it is about to start printing. The program can initialize data structures, load data, connect to databases, and perform any other chores it must do to get ready to print.QueryPageSettings— Before it prints a page, the PrintDocument object raises its QueryPageSettings event. A program can catch this event and modify the document's margins for the page that it is about to print.PrintPage— The PrintDocument object raises its PrintPage event to generate a page. The program must catch this event and use the Graphics object provided by the event handler's parameters to generate output. When it is finished, the event handler should set the value e.HasMorePages to True or False to tell the PrintDocument whether there are more pages to generate.EndPrint— Finally, when it has finished printing, the PrintDocument object raises its EndPrint event. The program can catch this event to clean up any resources it used while printing. It can free data structures, close data files and database connections, and perform any other necessary cleanup chores.
Having created a PrintDocument object and its event handlers, you can do three things with it. First you can call the object's Print method to immediately send a printout to the currently selected printer. The PrintDocument object raises its events as necessary as it generates the printout.
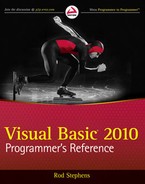
Second, you can set a PrintPreviewDialog control's Document property to the PrintDocument object and then call the dialog's ShowDialog method. The PrintPreviewDialog displays the print preview window shown in Figure 34-1, using the PrintDocument object to generate the output it displays.
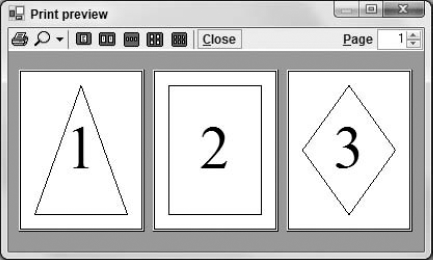
Figure 34.1. The PrintPreviewDialog control lets the user zoom in and out, and view the printout's various pages.
The preview dialog box's printer button on the left sends the printout to the printer. Note that this makes the PrintDocument object regenerate the printout using its events, this time sending the results to the printer instead of to the print preview dialog box. The magnifying glass button displays a drop-down list where the user can select various scales for viewing the printout. The next five buttons let the user display one, two, three, four, or six of the printout's pages at the same time. The Close button closes the dialog box and the Page up/down arrows let the user move through the printout's pages.
The PrintPreviewControl displays a print preview much as the PrintPreviewDialog control does, except that it sits on your form. It does not provide all the buttons that the dialog box does, but it does provide methods that let you implement similar features. For example, it lets your program set the zoom level, number of columns in the display, and so forth.
The third task you can do with a PrintDocument is assign it to a PrintDialog object's Document property and then call the dialog box's ShowDialog method to display the dialog box shown in Figure 34-2. The user can select the printer and set its properties (for example, selecting landscape or portrait orientation). When the user clicks Print, the dialog box uses the PrintDocument object to send the printout to the printer.
Example program UsePrintPreviewDialog uses the following code to preview and print a page showing the page's bounds and margin bounds. This is just about the smallest program that demonstrates all three uses for a PrintDocument object: printing immediately, displaying a print preview dialog box, and displaying a print dialog box.
Imports System.Drawing.Printing

Public Class Form1
    Private WithEvents m_PrintDocument As PrintDocument

    ' Print now.
    Private Sub btnPrintNow_Click() Handles btnPrintNow.Click
        m_PrintDocument = New PrintDocument
        m_PrintDocument.Print()
    End Sub

    ' Display a print preview dialog.
Private Sub btnPrintPreview_Click() Handles btnPrintPreview.Click
m_PrintDocument = New PrintDocument
dlgPrintPreview.Text = "UsePrintPreviewDialog"
dlgPrintPreview.Document = m_PrintDocument
dlgPrintPreview.ShowDialog()
End Sub
' Display a print dialog.
Private Sub btnPrintDialog_Click() Handles btnPrintDialog.Click
m_PrintDocument = New PrintDocument
dlgPrint.Document = m_PrintDocument
dlgPrint.ShowDialog()
End Sub
' Print a page with a diamond on it.
Private Sub m_PrintDocument_PrintPage(ByVal sender As Object,
ByVal e As System.Drawing.Printing.PrintPageEventArgs) _
Handles m_PrintDocument.PrintPage
Using the_pen As New Pen(Color.Black, 20)
e.Graphics.DrawRectangle(the_pen, e.MarginBounds)
the_pen.DashStyle = Drawing2D.DashStyle.Dash
the_pen.Alignment = Drawing2D.PenAlignment.Inset
e.Graphics.DrawRectangle(the_pen, e.PageBounds)
End Using
e.HasMorePages = False
End Sub
End Class

The code declares a PrintDocument object named m_PrintDocument. It uses the WithEvents keyword, so it can easily catch the object's events.
When the user clicks the Print Now button, the btnPrintNow_Click event handler assigns m_PrintDocument to a new PrintDocument object and calls its Print method.
If the user clicks the Print Preview button, the btnPrintPreview_Click event handler assigns m_PrintDocument to a new PrintDocument object, sets the PrintPreviewDialog object's Document property equal to the new object, and invokes the dialog box's ShowDialog method.
When the user clicks the Print Dialog button, the btnPrintDialog_Click event handler assigns m_PrintDocument to a new PrintDocument object, sets the PrintDialog object's Document property equal to the new object, and calls the dialog box's ShowDialog method.
In all three cases, the PrintDocument object raises its PrintPage event when it is ready to print a page. The program's event handler creates a 20-pixel-wide pen and uses it to draw a rectangle around the page's margin bounds. It changes the pen so that it is dashed and inset (so it draws inside the borders of a rectangle), and then draws a rectangle around the page's bounds. It finishes by setting e.HasMorePages to False to tell the PrintDocument that the printout is complete.
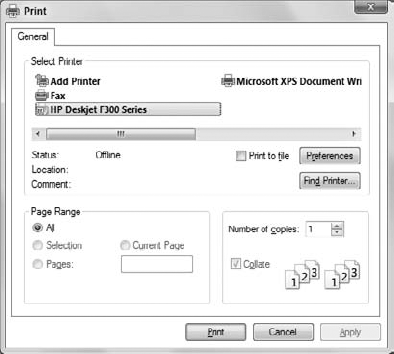
The PrintDocument object's PrintPage event handler provides a parameter of type PrintPageEventArgs to let the program control the printout and to give information about the printer. This object's PageBounds and MarginBounds properties give the location of the printer's printable surface and the page's margins, respectively. Typically, the printable area might be a quarter inch smaller than the paper's physical size, and the margins might be an inch or more inside the paper's physical size.
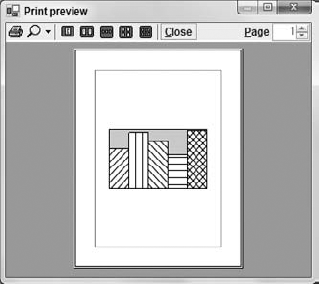
Figure 34-3 shows these rectangles in a print preview. The MarginBounds are drawn with a thick line, and the PageBounds are shown with a thick dashed line.
The printing application described in the previous section is extremely simple. It prints a very straightforward shape on a single page. You know the positions of the diamond before starting, so the program needs to perform little arranging and formatting. The only formatting it does is to make its diamond fit the page's margins.
This section describes a more useful example that prints a long series of paragraphs using different font sizes. The PrintBooklet example program, which is available for download on the book's web site, must figure out how to break the text into pages. It also assumes that you will print the pages double-sided and then later bind the results into a booklet. To allow extra room for the binding, the program adds a gutter to the margin of edge on each page on the side where the binding will be. The program assumes that you will place the first page on the outside of the booklet, so it adds the gutter to the left margin on odd-numbered pages and to the right margin on even-numbered pages. Finally, the program displays a page number in the upper corner opposite the gutter.
Figure 34-4 shows the PrintBooklet program's print preview dialog box, so you can understand the goals. If you look closely, you can see that the left margins on the first and third pages and the right margin on the second page are enlarged to allow room for the gutter. You can also see that the page numbers are in the upper corner on the side that doesn't have the gutter. Imagine the second page printed on the back of the first, so their gutters lie on the same edge of the paper.
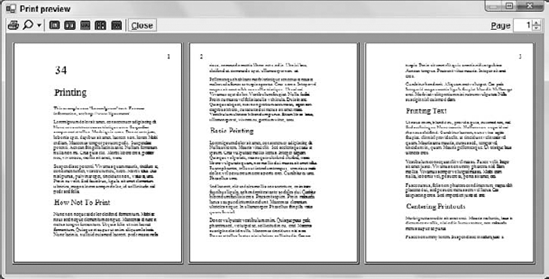
Figure 34.4. This preview shows text broken across pages with a gutter and displaying page numbers along the outside edges.
The program's Print Preview, Print Dialog, and Print Now buttons work much as the previous program's does, displaying the appropriate dialog boxes or calling the PrintDocument object's Print method. The most interesting differences between this program and the previous one are in how it stores its text to print and how it generates pages of printout.
The program uses the following ParagraphInfo structure to store information about the text it will print:
' Information about the paragraphs to print.
Private Structure ParagraphInfo
    Public FontSize As Integer
    Public Text As String
    Public Sub New(ByVal font_size As Integer, ByVal txt As String)
        FontSize = font_size
        Text = txt
    End Sub
End Structure

In the following code, the program declares its PrintDocument object. It uses the WithEvents keyword so it will be easy to catch the object's events. The code also declares collections to hold all of the ParagraphInfo structures that it will print and those that have not yet been printed. When the program's form loads, the code initializes these variables and adds a series of ParagraphInfo structures containing the text it will print to the m_Paragraphs collection.
' The PrintDocument.
Private WithEvents m_PrintDocument As New PrintDocument

' The paragraphs.
Private m_Paragraphs As Collection
Private m_ParagraphsToPrint As Collection
Private m_PagesPrinted As Integer

' Load the paragraph info.
Private Sub Form1_Load() Handles MyBase.Load
    ' Attach the PrintDocument to the
    ' PrintDialog and PrintPreviewDialog.
    dlgPrint.Document = m_PrintDocument
    dlgPrintPreview.Document = m_PrintDocument

    ' Make the text to print.
    m_Paragraphs = New Collection
    m_Paragraphs.Add(New ParagraphInfo(45, "23"))
    m_Paragraphs.Add(New ParagraphInfo(27, "Printing"))
     ... Code omitted...
End Sub

When the PrintDocument object starts drawing a printout, the BeginPrint event handler shown in the following code executes. This code resets the page number variable m_PagesPrinted. It then copies the ParagraphInfo structures from the m_Paragraphs collection (which holds all of the data) into the m_ParagraphsToPrint collection (which holds those that have not yet been printed).
' Get ready to print pages.
Private Sub m_PrintDocument_BeginPrint() _
 Handles m_PrintDocument.BeginPrint
    ' We have not yet printed any pages.
    m_PagesPrinted = 0

    ' Make a copy of the text to print.
    m_ParagraphsToPrint = New Collection
    For Each para_info As ParagraphInfo In m_Paragraphs
        m_ParagraphsToPrint.Add(
            New ParagraphInfo(para_info.FontSize, para_info.Text))
    Next para_info
End Sub

After the BeginPrint event handler finishes, the PrintDocument object starts printing pages. Before it prints each page, the object raises its QueryPageSettings event. The program uses the following code to catch this event and prepare the next page for printing. This code determines whether the next page will be odd or even numbered and adjusts the page's margin appropriately to create the gutter.
' Set the margins for the following page.
Private Sub m_PrintDocument_QueryPageSettings(ByVal sender As Object,
 ByVal e As System.Drawing.Printing.QueryPageSettingsEventArgs) _
 Handles m_PrintDocument.QueryPageSettings
    ' Use a 1 inch gutter (printer units are 100 per inch).
    Const gutter As Integer = 100

    ' See if the next page will be the first, odd, or even.
If m_PagesPrinted = 0 Then
' The next page is the first.
' Increase the left margin.
e.PageSettings.Margins.Left += gutter
ElseIf (m_PagesPrinted Mod 2) = 0 Then
' The next page will be odd.
' Shift the margins right.
e.PageSettings.Margins.Left += gutter
e.PageSettings.Margins.Right -= gutter
Else
' The next page will be even.
' Shift the margins left.
e.PageSettings.Margins.Left -= gutter
e.PageSettings.Margins.Right += gutter
End If
End Sub

After each QueryPageSettings event, the PrintDocument object raises its PrintPage event to generate the corresponding page. The following code shows the most complicated part of the program, the PrintPage event handler:
' Print the next page.
Private Sub m_PrintDocument_PrintPage(ByVal sender As Object,
 ByVal e As System.Drawing.Printing.PrintPageEventArgs) _
 Handles m_PrintDocument.PrintPage
    ' Increment the page number.
    m_PagesPrinted += 1

    ' Draw the margins (for debugging).
    'e.Graphics.DrawRectangle(Pens.Red, e.MarginBounds)

    ' Print the page number right justified
    ' in the upper corner opposite the gutter
    ' and outside of the margin.
    Dim x As Integer
    Using string_format As New StringFormat
        ' See if this is an odd or even page.
        If (m_PagesPrinted Mod 2) = 0 Then
            ' This is an even page.
            ' The gutter is on the right and
            ' the page number is on the left.
            x = (e.MarginBounds.Left + e.PageBounds.Left)  2
            string_format.Alignment = StringAlignment.Near
        Else
            ' This is an odd page.
            ' The gutter is on the left and
            ' the page number is on the right.
            x = (e.MarginBounds.Right + e.PageBounds.Right)   2
            string_format.Alignment = StringAlignment.Far
        End If

        ' Print the page number.
        Using the_font As New Font("Times New Roman", 20,
FontStyle.Regular, GraphicsUnit.Point)
e.Graphics.DrawString(m_PagesPrinted.ToString,
the_font, Brushes.Black, x,
(e.MarginBounds.Top + e.PageBounds.Top) 2,
string_format)
End Using ' the_font
' Draw the rest of the text left justified,
' wrap at words, and don't draw partial lines.
string_format.Alignment = StringAlignment.Near
string_format.FormatFlags = StringFormatFlags.LineLimit
string_format.Trimming = StringTrimming.Word
' Draw some text.
Dim paragraph_info As ParagraphInfo
Dim ymin As Integer = e.MarginBounds.Top
Dim layout_rect As RectangleF
Dim text_size As SizeF
Dim characters_fitted As Integer
Dim lines_filled As Integer
Do While m_ParagraphsToPrint.Count > 0
' Print the next paragraph.
paragraph_info = DirectCast(m_ParagraphsToPrint(1), ParagraphInfo)
m_ParagraphsToPrint.Remove(1)
' Get the area available for this paragraph.
layout_rect = New RectangleF(
e.MarginBounds.Left, ymin,
e.MarginBounds.Width,
e.MarginBounds.Bottom - ymin)
' See how big the text will be and
' how many characters will fit.
' Get the font.
Using the_font As New Font("Times New Roman",
paragraph_info.FontSize, FontStyle.Regular, GraphicsUnit.Point)
text_size = e.Graphics.MeasureString(
paragraph_info.Text, the_font,
New SizeF(layout_rect.Width, layout_rect.Height),
string_format, characters_fitted, lines_filled)
' See if any characters will fit.
If characters_fitted > 0 Then
' Draw the text.
e.Graphics.DrawString(paragraph_info.Text,
the_font, Brushes.Black,
layout_rect, string_format)
' Debugging: Draw a rectangle around the text.
'e.Graphics.DrawRectangle(Pens.Green,
' layout_rect.Left,
' layout_rect.Top,
' text_size.Width,
' text_size.Height)
' Increase the location where we can start.' Add a little interparagraph spacing.
ymin += CInt(text_size.Height +
e.Graphics.MeasureString("M", the_font).Height / 2)
End If
End Using ' the_font
' See if some of the paragraph didn't fit on the page.
If characters_fitted < Len(paragraph_info.Text) Then
' Some of the paragraph didn't fit.
' Prepare to print the rest on the next page.
paragraph_info.Text = paragraph_info.Text.
Substring(characters_fitted)
m_ParagraphsToPrint.Add(paragraph_info, Before:=1)
' That's all that will fit on this page.
Exit Do
End If
Loop
End Using ' string_format
' If we have more paragraphs, we have more pages.
e.HasMorePages = (m_ParagraphsToPrint.Count > 0)
End Sub

The PrintPage event handler starts by incrementing the number of pages printed. It then includes commented code to draw a rectangle around the page's margins. When you are debugging a printing routine, drawing this rectangle can help you see where your drawing is in relation to the page's margins.
Next, the routine creates a font for the page number. Depending on whether this page is odd or even numbered, it calculates an X coordinate halfway between the non-gutter margin and the edge of the printable page. It sets a StringFormat object's Alignment property to make numbers in the left margin left-justified and to make numbers in the right margin right-justified. It then draws the page number at the calculated X position, halfway between the top margin and the paper's top printable boundary.
The program then prepares to draw the text for this page. It sets the StringFormat object's properties so that the text is left-justified and lines wrap at word boundaries instead of in the middle of words. It sets the FormatFlags property to LineLimit. If only part of a line of text would fit vertically on the page, this makes Visual Basic not draw the line rather than drawing just the top halves of its letters.
After this preparation, the program sets variable ymin to the minimum Y coordinate where the routine can draw text. Initially, this is the top margin. It then enters a Do loop to process as much text as will fit on the page.
Inside the loop, the program takes the first ParagraphInfo structure from the m_ParagraphsToPrint collection and makes a font that has the right size for that paragraph. It creates a RectangleF representing the remaining area on the page. This includes the area between the left and right margins horizontally, and between ymin and the bottom margin vertically.
The program then uses the e.Graphics object's MeasureString method to see how much space the next piece of text will need. It passes MeasureString the layout rectangle's size and the StringFormat object so Visual Basic can decide how it will need to wrap the paragraph's text when it prints it. The code also passes in the variables characters_fitted and lines_filled. These parameters are passed by reference, so MeasureString can fill in the number of characters and lines it could draw within the allowed size.
The routine then checks characters_fitted to see if any characters will fit in the available area. If any characters can fit, the program draws the paragraph. Commented code draws a rectangle around the text to help with debugging. The program increases ymin by the paragraph's printed height plus half of the font's height to provide a break between paragraphs.
Next, the program determines whether the entire paragraph fits in the allowed area. If some of the paragraph did not fit, the program stores the remaining text in the ParagraphInfo structure and puts the structure back at the beginning of the m_ParagraphsToPrint collection so it can be printed on the next page. It then exits the Do loop because the current page is full.
When the page is full or the m_ParagraphsToPrint collection is empty, the PrintPage event handler is finished. It sets e.HasMorePages to True if m_ParagraphsToPrint is not empty.
Finally, when the PrintDocument has finished printing the whole document, the following EndPrint event handler executes. This routine cleans up by setting the m_ParagraphsToPrint variable to Nothing, freeing up the collection object's memory. In this program, freeing the collection is a small matter. In a program that allocated more elaborate data structures, cleaning up in this event handler would be more important.
' Clean up.
Private Sub m_PrintDocument_EndPrint() Handles m_PrintDocument.EndPrint
    m_ParagraphsToPrint = Nothing
End SubThe previous section explained how to handle a common scenario: printing large amounts of text. Another common scenario is printing a picture centered on the printed page. To do that, you must move the drawing vertically and horizontally to put it at the correct position. You can do this by using the Graphics object's TranslateTransform method. That method defines a translation transformation for all the graphics drawn by the object. After you set the transformation, you can draw any graphics as usual, and the Graphics object automatically moves them to the correct position.
The CenterPictureInMargins subroutine shown in the following code defines a translation transformation that centers an area within some specified bounds. The routine begins by calling the Graphics object's ResetTransform method to remove any transformations that may already be defined. Next, the routine calculates the horizontal and vertical offsets by which it must translate the rectangle picture_bounds so it will be centered within the rectangle margin_bounds. It calls the Graphics object's TranslateTransform method to make the translation.
' Transform the Graphics object to center the rectangle
' picture_bounds within margin_bounds.
Private Sub CenterPictureInMargins(ByVal gr As Graphics,
 ByVal picture_bounds As RectangleF, ByVal margin_bounds As RectangleF)
    ' Remove any existing transformation.
    gr.ResetTransform()

    ' Apply the transformation.
    Dim dx As Single =
        margin_bounds.Left - picture_bounds.Left +
        (margin_bounds.Width - picture_bounds.Width) / 2
    Dim dy As Single =
        margin_bounds.Top - picture_bounds.Top +
        (margin_bounds.Height - picture_bounds.Height) / 2
    gr.TranslateTransform(dx, dy)
End Sub

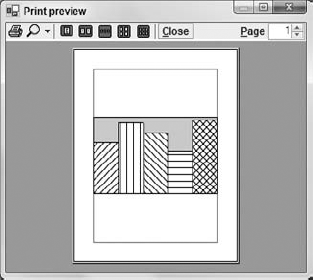
You can use subroutine CenterPictureInMargins to prepare the e.Graphics object provided by the PrintPage event handler to center a drawing on a printout. For example, the CenterPicture example program uses the following PrintPage event handler code to draw a bar chart in the coordinate space 100 <= X <= 600, 100 <= Y <= 400. It begins with commented code that draws the page's margins for debugging purposes.
' Print the page.
Private Sub Print_PrintPage(ByVal sender As Object,
 ByVal e As System.Drawing.Printing.PrintPageEventArgs)
    ' Draw the margins (for debugging). Be sure
    ' to do this before transforming the Graphics object.
    e.Graphics.DrawRectangle(Pens.Red, e.MarginBounds)

    ' This routine draws a bar chart for 5 values
    ' in printer coordinates between
    ' (100, 100) - (600, 400).
    ' Transform the Graphics object to center the results.
    Dim picture_rect As New RectangleF(100, 100, 600, 400)
    Dim margin_rect As New RectangleF(
        e.MarginBounds.X,
        e.MarginBounds.Y,
        e.MarginBounds.Width,
        e.MarginBounds.Height)
    CenterPictureInMargins(e.Graphics, picture_rect, margin_rect)

    ' Draw a rectangle around the chart.
    e.Graphics.FillRectangle(Brushes.LightGray, picture_rect)
    e.Graphics.DrawRectangle(Pens.Black, Rectangle.Round(picture_rect))

    ' Draw the values.
    Dim x As Integer = 100
    DrawBar(e.Graphics, x, 200, HatchStyle.BackwardDiagonal)
    DrawBar(e.Graphics, x, 280, HatchStyle.Vertical)
    DrawBar(e.Graphics, x, 240, HatchStyle.ForwardDiagonal)
DrawBar(e.Graphics, x, 170, HatchStyle.Horizontal)
DrawBar(e.Graphics, x, 290, HatchStyle.DiagonalCross)
' There are no more pages.
e.HasMorePages = False
End Sub
' Draw a bar in (x, 400)-(x + 100, 400 - hgt).
Private Sub DrawBar(ByVal gr As Graphics, ByRef x As Integer,
ByVal hgt As Integer, ByVal hatch_style As HatchStyle)
Dim rect As New Rectangle(x, 400 - hgt, 100, hgt)
Using hatch_brush As New HatchBrush(hatch_style, Color.Black, Color.White)
gr.FillRectangle(hatch_brush, rect)
End Using
gr.DrawRectangle(Pens.Black, rect)
x += 100
End Sub

The code defines rectangles representing the area in which it will draw and the printed page's margin bounds. It passes those rectangles to the CenterPictureInMargins subroutine to prepare the Graphics object for centering.
Next, the program fills the picture area's rectangle with light gray and outlines it in black. It then calls subroutine DrawBar several times to draw five values for the bar chart. The event handler sets e.HasMorePages to False, and then it ends.
Subroutine DrawBar draws a rectangle for the bar chart. It draws its rectangle at the X coordinate passed as a parameter, making it 100 units wide and hgt units tall. It fills the rectangle with a hatch pattern and then outlines it in black. The subroutine finishes by adding 100 to x, so the next call to DrawBar draws a rectangle to the right.
Figure 34-5 shows program CenterPicture in action. You can see in the picture that the bar chart is centered within the margins.
Another common scenario is drawing a picture as large as possible on the page without distorting it. You can use the same approach to this problem that was described in the previous section: Apply a transformation to the PrintPage event handler's Graphics object to make the picture fit the printed page.
The subroutine FitPictureToMargins shown in the following code makes this transformation. It begins by calling the Graphics object's ResetTransform method to remove any existing transformation. Next the subroutine translates to center the picture_bounds rectangle at the origin. Scaling an object centered at the origin is relatively simple because the object's center remains at the origin, so the program starts by centering picture_bounds.
' Transform the Graphics object to fit the rectangle
' picture_bounds to margin_bounds and center it.
Private Sub FitPictureToMargins(ByVal gr As Graphics,
 ByVal picture_bounds As RectangleF, ByVal margin_bounds As RectangleF)
    ' Remove any existing transformation.
    gr.ResetTransform()

    ' Translate to center picture_bounds at the origin.
    gr.TranslateTransform(
        -(picture_bounds.Left + picture_bounds.Width / 2),
        -(picture_bounds.Top + picture_bounds.Height / 2))

    ' Scale to make picture_bounds fit margin_bounds.
    ' Compare the aspect ratios.
    Dim margin_aspect As Single = margin_bounds.Height / margin_bounds.Width
    Dim picture_aspect As Single =
        picture_bounds.Height / picture_bounds.Width
    Dim scale As Single
    If picture_aspect > margin_aspect Then
        ' picture_bounds is relatively tall and thin.
        ' Make it as tall as possible.
        scale = margin_bounds.Height / picture_bounds.Height
    Else
        ' picture_bounds is relatively short and wide.
        ' Make it as wide as possible.
        scale = margin_bounds.Width / picture_bounds.Width
    End If
    ' Scale.
    gr.ScaleTransform(scale, scale, MatrixOrder.Append)

    ' Translate to move the origin to the center of margin_bounds.
    gr.TranslateTransform(
        margin_bounds.Left + margin_bounds.Width / 2,
        margin_bounds.Top + margin_bounds.Height / 2,
        MatrixOrder.Append)
End Sub

The program compares aspect ratios (ratios of height/width) of the picture_bounds and margin_bounds rectangles. If picture_bounds has the greater aspect ratio, it is relatively taller and thinner than margin_bounds. In that case, the program scales to make picture_bounds the same height as margin_bounds and sets its width appropriately.
If picture_bounds has the smaller aspect ratio, it is relatively wider and shorter than margin_bounds. In that case, the program scales to make picture_bounds the same width as margin_bounds and sets its height accordingly.
After calculating the scale factor it needs, the program calls the Graphics object's ScaleTransform method to add it to the Graphics object's transformation. It uses the MatrixOrder.Append parameter to make the object apply the scaling transformation after its first translation.
Finally, the subroutine applies another translation to move the center of the scaled picture_bounds rectangle from the origin to the center of margin_bounds. It again uses the MatrixOrder.Append parameter, so the new transformation is applied after the previous ones.
A program can use subroutine FitPictureToMargins exactly as it can use subroutine CenterPictureInMargins. Example program FitToMargins uses this subroutine to draw the bar chart shown in Figure 34-6. This routine works whether the drawing's area is relatively short and wide (as in this case) or tall and thin. It will also shrink a picture that is bigger than the page.
Many applications draw some graphics, possibly with some user interaction, and then later print the same graphics, perhaps centered and scaled to fit the page.
You can make this process easier if you move all of the program's drawing code into subroutines that are independent of the drawing or printing surface. These drawing routines should take as a parameter a Graphics object on which to draw. Then it doesn't matter whether the program passes these routines the Graphics object provided by a PrintPage event handler or a control's Paint event handler. They can even use a Graphics object generated by the control's CreateGraphics method.
The DrawGraphics subroutine shown in the following code encapsulates the drawing code used in the previous sections. It takes a Graphics object as a parameter, draws a background on it, and calls DrawBar to draw five hatched rectangles to form a bar chart.
' Draw the bar chart with world coordinate bounds (100, 100)-(600, 400).
Private Sub DrawGraphics(ByVal gr As Graphics)
    ' Draw a rectangle around the chart.
    Dim picture_rect As New Rectangle(100, 100, 500, 300)
    gr.FillRectangle(Brushes.LightGray, picture_rect)
    gr.DrawRectangle(Pens.Black, picture_rect)

    ' Draw the values.
    Dim x As Integer = 100
    DrawBar(gr, x, 200, HatchStyle.BackwardDiagonal)
DrawBar(gr, x, 280, HatchStyle.Vertical)
DrawBar(gr, x, 240, HatchStyle.ForwardDiagonal)
DrawBar(gr, x, 170, HatchStyle.Horizontal)
DrawBar(gr, x, 290, HatchStyle.DiagonalCross)
End Sub

Now the PrintPage event handler and other code can call this subroutine to draw the program's graphics. The following code shows how a program can use this routine to draw the bar chart on a PictureBox named picCanvas. The control's Resize event handler invalidates the control, so the Paint event handler can redraw the entire surface. The control's Paint event handler clears the PictureBox, calls FitPictureToMargins to fit the bar chart to the PictureBox's surface (minus a 3-pixel margin), and calls DrawGraphics to draw the bar chart.
Private Sub picCanvas_Resize() Handles picCanvas.Resize
    picCanvas.Invalidate()
End Sub

Private Sub picCanvas_Paint(ByVal sender As Object,
 ByVal e As System.Windows.Forms.PaintEventArgs) Handles picCanvas.Paint
    ' Clear the picture.
    e.Graphics.Clear(picCanvas.BackColor)

    ' This routine draws a bar chart for 5 values
    ' in printer coordinates between
    ' (100, 100) - (600, 400).
    ' Transform the Graphics object to center the results.
    Dim picture_rect As New RectangleF(100, 100, 500, 300)
    Dim margin_rect As New RectangleF(
        picCanvas.ClientRectangle.X + 3,
        picCanvas.ClientRectangle.Y + 3,
        picCanvas.ClientRectangle.Width - 6,
        picCanvas.ClientRectangle.Height - 6)
    FitPictureToMargins(e.Graphics, picture_rect, margin_rect)
    ' Draw the bar chart.
    DrawGraphics(e.Graphics)
End Sub

Example program PictureBoxPrint, shown in Figure 34-7 uses this code to draw a bar chart in a PictureBox and in a print preview dialog.
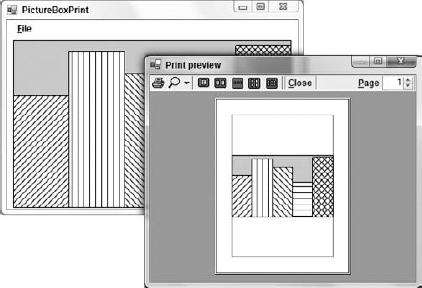
Figure 34.7. A program can use subroutine FitPictureToMargins to make a picture fit a PictureBox as well as a printed page.
This technique minimizes the amount of drawing code. It lets the program share the same code for drawing, printing, and print previewing. That means less code to debug and maintain. It also means that you need only to modify the code in one place if you need to change it later.
By calling FitPictureToMargins, the program makes the bar chart fill the PictureBox as much as possible without distorting it. If the control is anchored or docked so that it resizes when the form does, the bar chart also resizes so that it is as big as possible, a fairly impressive feat at the cost of a single subroutine call.
Although very useful, the technique of using a common routine to draw and print graphics is not appropriate for every application. Sometimes a program must take advantage of the particular characteristics of a printer or screen object, and the results may not make sense for other types of devices.
For example, suppose that a program draws fractals by performing time-consuming calculations for each pixel. It may make sense to show the results as the pixels are calculated on the screen. That would take advantage of the fact that the user can immediately see the results of pixels drawn on the screen. On the printer, however, the results aren't visible until the complete page is printed, so sending pixels to the printer one at a time doesn't particularly help the user and may slow printing. It would make more sense to draw the complete image on a Bitmap in memory and then send the result to the printer all at once by using the Graphics object's DrawImage method.
Similarly, the text-printing example described earlier in this chapter prints a long series of paragraphs broken across several pages. It takes advantage of the printed page's exact size and margins. You might be able to display the same page data in a scrolling window on the screen, but that probably wouldn't make much sense. In that application, trying to force screen drawing and page printing routines to produce exactly the same result would probably be a waste of time. It would be much easier and just as effective to display the text on the screen in a print preview control or dialog.
The PrintDocument object sits at the heart of the standard Visual Basic printing process. A program makes a PrintDocument object and then responds to its BeginPrint, QueryPageSettings, PrintPage, and EndPrint events to generate a printout.
The PrintDocument object's Print method immediately generates a printout. You can also attach the PrintDocument to a PrintDialog, PrintPreviewDialog, or PrintPreviewControl and use those objects to display previews and generate printouts.
This chapter describes printing in general. Using the Graphics object provided by the PrintDocument object's PrintPage event, you can print lines, curves, text, images, and anything else you can draw to the screen.
Appendix I, "Visual Basic Power Packs," describes some additional tools that you can download for free. The Printer Compatibility Library and the PrintForm component give you new options for printing. See Appendix I for more information.
My book Expert One-on-One Visual Basic Design and Development (Stephens, Wrox, 2005) includes a chapter on printing that explains how to print images of forms much as the PrintForm Power Pack component does. It also shows how to wrap text so it flows around images on a printed page and how to use metafiles to let a program print procedurally rather than by responding to events. For more information, see the book's web site at www.wrox.com or www.vb-helper.com/one_on_one.htm.
Most of the programs described in this book so far are relatively self-contained. They take input from the user, perform some calculations, and display the results. Only a few chapters have interacted much with the outside system. The two exceptions are Chapter 23, which explains how to use drag and drop and the clipboard to interact with other programs, and this chapter, which explains how to interact with printers.
The chapters in the next part of the book explain more ways a program can interact with the system. Chapter 36, "Configuration and Resources," describes some of the ways that a Visual Basic program can store configuration and resource values for use at runtime. Some of the most useful of these methods include environment variables, the Registry, configuration files, and resource files.