The Visual Basic Windows Form class is a descendant of the Control class. The inheritance trail is Control
At the same time, Forms have their own special features that set them apart from other kinds of controls. You usually place controls inside a form, but you rarely place a form inside another form. Forms also play a very central role in most Visual Basic applications. They are the largest graphical unit with which the user interacts directly. The user can minimize, restore, maximize, and close forms. They package the content provided by the other controls so that the user can manage them in a meaningful way.
This chapter describes some of the special features of Windows Forms not provided by other objects. It focuses on different ways that typical applications use forms. For example, it explains how to build multiple-document interface (MDI) applications, custom dialogs, and splash screens.
The chapter covers the Form object's properties, methods, and events only in passing. For a detailed description of specific Form properties, methods, and events, see Appendix J, "Form Objects."
The Form object provides a couple of properties that you can use to make a form partially transparent. Opacity determines the form's opaqueness. At design time, the Properties window shows Opacity as a percentage where 100% means the form is completely opaque, and 0% means that the form is completely transparent. At runtime, your program must treat Opacity as a floating-point value between 0 (completely transparent) and 1 (completely opaque).
A program can use an Opacity value less than 100% to let the user see what lies below the form. For example, you might build a partially transparent Search dialog box so the user could see the underlying document as a search progresses.
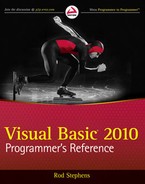
Figure 10-1 shows example program SemiTransparent, which is available for download at the book's web page. The program contains a form with Opacity set to 66%. You can still see the form's borders, title bar, system menus, menu bar, and button, but you can also see the Visual Basic IDE showing through from behind.
If Opacity is greater than 0%, the form behaves normally aside from its ghostlike appearance. The user can click it, interact with its controls, minimize and maximize it, and grab its borders to resize it.
If Opacity is 0%, the form is completely transparent and the user can only interact with the form through the keyboard. For example, the user can press the Tab key to move between the form's controls, type text, press the Spacebar to invoke a button that has the focus, and press Escape or Cancel to fire the form's Accept and Cancel buttons; however, the form and its controls will not detect mouse clicks. The user also cannot see the form (obviously), so figuring out which control has the focus can be next to impossible.
Example program TransparentForm, available for download on the book's web site, has a form with Opacity = 0 so you cannot see it while it is running. You can still use the Tab key to move between its controls, and you can use the Space key to make its buttons execute.
If Opacity is 2%, the form is still invisible, but it recognizes mouse clicks, so it can obscure the windows below. Example program CoverAll, also available for download, displays a maximized form with Opacity set to 2%.
A second property that helps determine the form's transparency is TransparencyKey. This property is a color that tells Visual Basic which parts of the form should be completely transparent. When the form is rendered, any areas with this color as their background colors are not drawn.
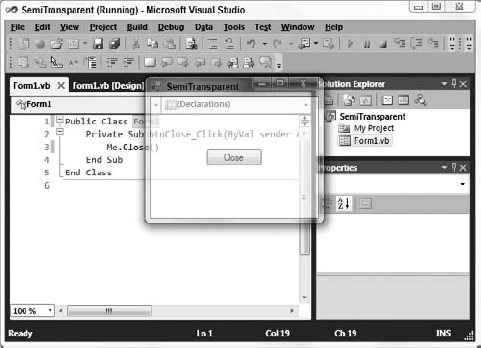
Figure 10-2 shows example program Hole, which is available for download at the book's web page. The program's form has TransparencyKey set to red. Both the form and the Hole label have red backgrounds so they are transparent. The label's ForeColor property is black so its text is visible. The form's Paint event handler draws a black ellipse around the inside of the form.
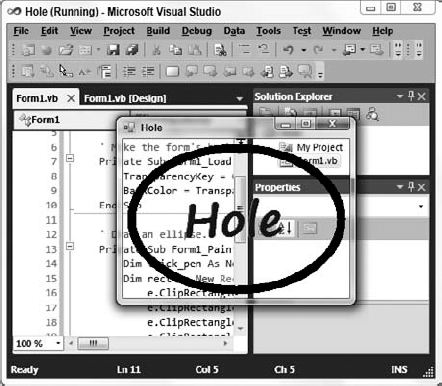
Figure 10.2. A form's TransparencyKey property lets you make shaped forms such as this one with a hole in it.
Example program GhostForm, also available for download, also uses a transparent background so only its borders and controls are visible when it runs.
The most common use for TransparencyKey is to create shaped forms or skins. Set the form's FormBorderStyle property to None to remove the borders, title bar, and system buttons. Set the form's BackColor and TransparencyKey properties to a color that you don't want to appear on the form. Then draw the shape you want the form to have in some other color.
Figure 10-3 shows the Smiley example program, which has a form shaped like a smiley face. The form's Paint event handler draws the image from a bitmap file. These sorts of forms make interesting splash screens and About dialog boxes, although they are often too distracting for use in a program's main user interface.
If you use Opacity and TransparencyKey together, pixels that match TransparencyKey are completely removed and any remaining pixels are shown according to the Opacity value.
The TransparencyKey and Opacity properties enable you to build forms with unusual and interesting shapes. Although these would be distracting if used for the bulk of a business application, they can add a little interest to About dialog boxes, splash screens, and login forms.
These three kinds of forms have quite a bit in common. Usually, they all display the application's name, version number, copyright information, trademarks, and so forth. They may also display a serial number, the name of the registered user, and a web site or phone number where the user can get customer support.
The main difference between these forms is in how the user dismisses them. A splash screen automatically disappears after a few seconds. The user closes an About dialog box by clicking an OK button. A login form closes when the user enters a valid user name and password and then clicks OK. It also closes if the user clicks Cancel, although then it doesn't display the main application.
The forms also differ slightly in the controls they contain. A splash screen needs a Timer control to determine when it's time to close the form. An About dialog box needs a single OK button. A login form needs TextBoxes to hold the user name and password, two Labels to identify them, and OK and Cancel buttons.
Splash screens and login forms greet the user, so there's no need to provide both. However, that still leaves you with the task of building two nearly identical forms: splash and About, or login and About. With a little planning, you can use a single form as a splash screen, About dialog box, and login form. At runtime, you can add whichever set of controls is appropriate to the form's use.
Alternatively, you can build the form with all three sets of controls at design time and then hide the ones you don't need for a particular purpose.
The following code shows how example program SplashScreen displays a form either as a splash screen or as an About dialog:
' Display as a splash screen.
Public Sub ShowSplash()
    Me.tmrUnload.Enabled = True ' The Timer close the dialog.
    Me.TopMost = True           ' Keep on top of main form.
    Me.Show()                   ' Show non-modally.
End Sub

' Unload the splash screen.
Private Sub tmrUnload_Tick()  Handles tmrUnload.Tick
    Me.Close()
End Sub

' Display as an About dialog.
Public Sub ShowAbout()
    btnOK.Visible = True        ' The OK button closes the dialog.
    Me.ShowDialog()             ' Show modally.
End Sub

' Close the About dialog.
Private Sub btnOK_Click() Handles btnOK.Click
    Me.Close()
End Sub

The form contains both a Timer named tmrUnload and an OK button named btnAboutOk. The form's ShowSplash method enables the tmrUnload Timer control and calls Show to display the form. The Timer control's Interval property was set to 3,000 milliseconds at design time, so its Timer event fires after three seconds and closes the form.
The ShowAbout method makes the btnOk button visible and calls ShowDialog to display the form modally. A modal form holds the application's focus so the user cannot interact with other parts of the application until the modal form is dismissed. When the user clicks the button, the button's Click event handler closes the form.
A form's Cursor property determines the kind of mouse cursor the form displays. The Form class inherits the Cursor property from the Control class, so other controls have a Cursor property, too. If you want to give a particular control a special cursor, you can set its Cursor property. For example, if you use a Label control as a hyperlink, you could make it display a pointing hand similar to those displayed by web browsers to let the user know that the control is a hyperlink.
The Cursors class provides several standard cursors as shared values. For example, the following statement sets a form's cursor to the system default cursor (normally an arrow pointing up and to the left):
Me.Cursor = Cursors.Default
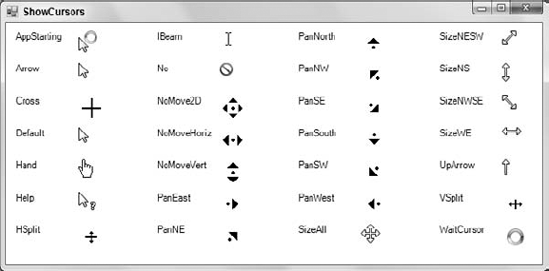
Figure 10-4 shows example program ShowCursors, which is available for download on the book's web site, displaying the names and images of the standard cursors defined by the Cursors class in Windows 7. In previous versions of Windows, the AppStarting and WaitCursor values display hourglasses instead of animated circles.
Unless a control explicitly sets its own cursor, it inherits the cursor of its container. If the control is placed directly on the form, it displays whatever cursor the form is currently displaying. That means you can set the cursor for a form and all of its controls in a single step by setting the form's cursor.
Similarly, if a control is contained within a GroupBox, Panel, or other container control, it inherits the container's cursor. You can set the cursor for all the controls within a container by setting the cursor for the container.
One common use for cursors is to give the user a hint when the application is busy. The program sets its cursor to Cursors.WaitCursor when it begins a long task and then sets it back to Cursors.Default when it finishes. The following code shows an example:
Me.Cursor = Cursors.WaitCursor
' Perform the long task.
...
Me.Cursor = Cursors.Default

Example program UseWaitCursor displays a wait cursor when you click its button.
If the program displays more than one form, it must set the cursors for each form individually. It can set the cursors manually, or it can loop through the My.Application.OpenForms collection. The SetAllCursors subroutine shown in the following code makes setting the cursor for all forms a bit easier:
Private Sub SetAllCursors(ByVal the_cursor As Cursor)
    For Each frm As Form In My.Application.OpenForms
        frm.Cursor = the_cursor
    Next frm
End Sub

The following code uses the SetAllCursors subroutine while performing a long task:
SetAllCursors(Cursors.WaitCursor)
' Perform the long task.
...
SetAllCursors(Cursors.Default)
Example program UseMultipleWaitCursors uses the SetAllCursors subroutine to display a wait cursor on each of its forms when you click its button.
To use a custom cursor, create a new Cursor object using a file or resource containing cursor or icon data. Then assign the new object to the form's Cursor property. The following code sets a form's cursor to the program resource named SmileIcon.ico:
Me.Cursor = New Cursor(My.Resources.SmileIcon.Handle)
Example program SmileCursor, also available for download, uses this code to display a custom cursor.
Each form in a Visual Basic application has its own icon. A form's icon is displayed on the left side of its title bar, in the system's taskbar, and by applications such as the Task Manager and Windows Explorer.
Some of these applications display icons at different sizes. For example, Windows Explorer uses 32 × 32 pixel icons for its Large Icons view and 16 × 16 pixel icons for its other views. Toolbar icons come in 16 × 16, 24 × 24, and 32 × 32 pixel sizes. Windows uses still other sizes for different purposes. For more information on various pixel sizes used by Windows Vista, see msdn2.microsoft.com/aa511280.aspx.
If an icon file doesn't provide whatever size Windows needs, the system shrinks or enlarges an existing image to fit. That may produce an ugly result. To get the best appearance, you should ensure that icon files include at least 16 × 16 and 32 × 32 pixel sizes. Depending on the characteristics of your system, you may also want to include other sizes.
The integrated Visual Studio icon editor enables you to define images for various color models ranging from monochrome to 24-bit color, and sizes ranging from 16 × 16 to 256 × 256 pixels. It even lets you build icon images with custom sizes such as 32 × 48 pixels, although it is unlikely that Windows will need to use those.
To use this editor, open Solution Explorer and double-click the My Project entry to open the Project Properties window. Select the Resources tab, open the Add dropdown, and select New Icon. Use the drawing tools to build the icons. Right-click the icon and use the Current Icon Image Types submenu to work with icons of different sizes.
To assign an icon to a form at design time, open the Windows Forms Designer and select the Icon property in the Properties window. Click the ellipsis button on the right and select the icon file that you want to use.
To assign an icon to a form at runtime, set the form's Icon property to an Icon object. The following code sets the form's Icon property to an icon resource named MainFormIcon:
Me.Icon = My.Resources.MainFormIcon
Some applications change their icons to provide an indication of their status. For example, a process-monitoring program might turn its icon red when it detects an error. It could even switch back and forth between two icons to make the icon blink in the taskbar.
Windows displays a form's icon in the form's title bar, in the taskbar, and in the Task Manager. Applications (such as Windows Explorer) that look at the application as a whole rather than at its individual forms display an icon assigned to the application, not to a particular form. To set the application's icon, open Solution Explorer and double-click the My Project entry to open the Project Properties window. On the Application tab, open the Icon drop-down list, and select the icon file that you want to use or select <Browse ... > to look for the file you want to use.
Note
To set the icon for a form, open the form in the Windows Forms Designer. In the Properties window, select the Icon property, click the ellipsis to the right, and select the icon file you want to use.
Note that these different purposes display icons at different sizes. For example, the icon in the form's title bar is very small, whereas the one displayed by Task Manager is relatively large. As the previous section mentions, the integrated Visual Studio icon editor enables you to define images for various color models and sizes in the same icon file.
Visual Basic applications can display one other kind of icon by using the NotifyIcon control. This control can display an icon in the system tray. The system tray (also called the status area) is the little area holding small icons that is usually placed in the lower-left part of the taskbar.
Figure 10-5 shows example program UseNotifyIcon, which is available for download on the book's web page, and its notification icon. The little stop light near the mouse pointer is an icon displayed by a NotifyIcon control. Hovering the mouse over the icon makes it display a tooltip showing its text, in this case Stopped. The program also sets its form icon to match the icon shown in the NotifyIcon control.
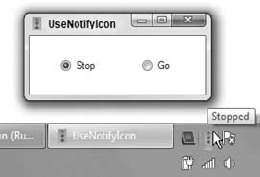
Figure 10.5. An application can use a NotifyIcon control to display status icons in the system tray.
The control's Icon property determines the icon that it displays. A typical application will change this icon to give information about the program's status. For example, a program that monitors the system's load could use its system tray icon to give the user an idea of the current load. Notification icons are particularly useful for programs that have no user interface or that run in the background so that the user isn't usually looking at the program's forms.
Notification icons also often include a context menu that appears when the user right-clicks the icon. The items in the menu enable the user to control the application. If the program has no other visible interface, this may be the only way the user can control it.
Appendix G, "Windows Forms Controls and Components," describes the NotifyIcon control in greater detail.
Some properties are adopted by many of the child controls contained in a parent control or in a form. For example, by default, a Label control uses the same background color as the form that contains it. If you change the form's BackColor property, its Label controls change to display the same color. Similarly if a GroupBox contains a Label and you change the GroupBox's BackColor property, its Label changes to match.
Some properties adopted by a form's controls include BackColor, ContextMenu, Cursor, Enabled, Font, and ForeColor. Not all controls use all of these properties, however. For example, a TextBox only matches its form's Enabled and Font properties.
If you explicitly set one of these properties for a control, its value takes precedence over the form's settings. For example, if you set a Label control's BackColor property to red, the control keeps its red background even if you change the Form's BackColor property.
Some of these properties are also not tremendously useful to the Form object itself, but they give guidance to the form's controls. For example, a form doesn't automatically display text on its surface, so it never really uses its Font property. Its Label, TextBox, ComboBox, List, RadioButton, CheckBox, and many other controls adopt the value of this property, however, so the form's Font property serves as a central location to define the font for all of these controls. If you change the form's Font property, even at runtime, all of the form's controls change to match. The change applies to all of the form's controls, even those contained within GroupBoxes, Panels, and other container controls, so that they do not sit directly on the form.
These properties can also help your application remain consistent both with the controls on the form and with other parts of the application. For example, the following code draws the string "Hello World!" on the form whenever the form needs to be repainted. This code explicitly creates the Comic Sans MS font.
Private Sub Form1_Paint(ByVal sender As Object, _
 ByVal e As System.Windows.Forms.PaintEventArgs) Handles Me.Paint
    Dim new_font As New Font("Comic Sans MS", 20)
    e.Graphics.DrawString("Hello World!", _
        new_font, Brushes.Black, 10, 10)
    new_font.Dispose()
End Sub
Rather than making different parts of the program build their own fonts, you can use the forms' Font properties as shown in the following code. This makes the code simpler and ensures that different pieces of code use the same font.
Private Sub Form1_Paint(ByVal sender As Object, _
 ByVal e As System.Windows.Forms.PaintEventArgs) Handles Me.Paint
    e.Graphics.DrawString("Hello World!", Me.Font, Brushes.Black, 10, 100)
End Sub
As a nice bonus, changing the form's Font property raises a Paint event, so, if the form's font changes, this code automatically runs again and redraws the text using the new font.
Example program ChangeFormFont, available for download on the book's web page, contains three radio buttons and a label. When you click a radio button, the form's font changes and the label's font automatically changes to match.
The Form class provides several methods that reset certain property values to their defaults. The most useful of those methods are ResetBackColor, ResetCursor, ResetFont, ResetForeColor, and ResetText.
If you change one of the corresponding form properties, either at design time or at runtime, these methods restore them to their default values. The default values may vary from system to system, but currently on my computer BackColor is reset to Control, Cursor is reset to Default, Font is reset to 8-point regular (not bold or italic) Microsoft Sans Serif, ForeColor is reset to ControlText, and Text is reset to an empty string.
Because the controls on a form adopt many of these properties (all except Text), these methods also reset the controls on the form.
The Windows operating system sends all sorts of messages to applications that tell them about changes in the Windows environment. Messages tell forms to draw, move, resize, hide, minimize, close, respond to changes in the Windows environment, and do just about everything else related to Windows.
All Windows applications have a subroutine tucked away somewhere that responds to those messages. That routine is traditionally called a WindowProc. A Visual Basic .NET form processes these messages in a routine named WndProc. You can override that routine to take special actions when the form receives certain messages.
Example program FixedAspectRatio, available on the book's web page, looks for WM_SIZING messages. When it finds those messages, it adjusts the form's new width and height so they always have the same aspect ratio (ratio of height to width).
When you override the WndProc method, you must also figure out what messages to intercept, what parameters those messages take, and what you can do to affect them safely. One way to learn about messages is to insert the following WndProc and then perform the action that you want to study (resizing the form, in this example):
Protected Overrides Sub WndProc(ByRef m As System.Windows.Forms.Message)
    Debug.WriteLine(m.ToString)
    MyBase.WndProc(m)
End Sub

Example program ViewWindowsMessages uses this code to display information about the messages it receives.
The following statement shows the result for the WM_SIZING message sent to the form while the user resizes it. It at least shows the message name (WM_SIZING) and its numeric value (hexadecimal 0x214).
msg=0x214 (WM_SIZING) hwnd=0x30b8c wparam=0x2 lparam=0x590e29c result=0x0
Searching for the message name on the Microsoft web site and on other programming sites usually gives you the other information you need to know (such as what m.WParam and m.LParam mean).
Note also that the Form class inherits the WndProc subroutine from the Control class, so all other Windows Forms controls inherit it as well. That means you can override their WndProc routines to change their behaviors.
For example, the following code shows how the NoCtxMnuTextBox class works. This control is derived from the TextBox control. Its WndProc subroutine checks for WM_CONTEXTMENU messages and calls the base class's WndProc for all other messages. By failing to process the WM_CONTEXTMENU message, the control prevents itself from displaying the TextBox control's normal Copy/Cut/Paste context menu when you right-click it.
Public Class NoCtxMnuTextBox
    Inherits System.Windows.Forms.TextBox

    Protected Overrides Sub WndProc(ByRef m As System.Windows.Forms.Message)
        Const WM_CONTEXTMENU As Integer = &H7B

        If m.Msg <> WM_CONTEXTMENU Then
            MyBase.WndProc(m)
        End If
    End Sub
End Class

Example program NoContextMenu uses similar code to display a text box that does not display a context menu when you right-click it.
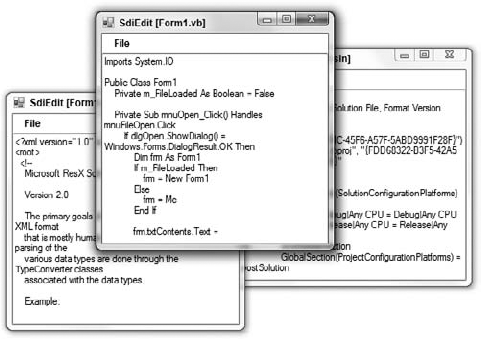
A single-document interface (SDI) application displays a single document in each form. Here, a document can be an actual disk file, or it can be a group of related items such as those on an order, employee record, or architectural drawing. For example, Microsoft Paint and Notepad are both SDI applications. Figure 10-6 shows an SDI application showing three files in separate forms. Example program SDIEdit, which is available for download on the book's web page, is a simple SDI application.
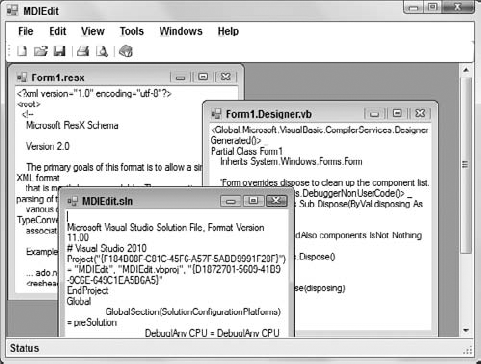
In contrast, a multiple-document interface (MDI) application displays its documents in their own forms, but then places the forms inside a container form. For example, Visual Studio can act either as an MDI application or it can display its child forms (form designers, code editors, and so forth) using tabs. The individual document windows are called MDI child forms and the container form is called the MDI container or MDI parent form. Figure 10-7 shows an MDI application with three MDI child forms. Example program MDIEdit, which is also available for download, is a simple MDI application.
The following sections describe some of the features provided by MDI forms and discuss reasons you might want to use an MDI or SDI application style.
The MDI container form provides several services for its child forms. It contains the forms and keeps them all together so that they are easy to find. If you move a form so that it won't fit within the container, the container automatically displays scroll bars so you can view it.
The program displays an icon in the taskbar and Task Manager for the MDI container, but not for the child forms. If you minimize the MDI container, all of the forms it contains are hidden with it. If you minimize a child form, its icon is displayed within the container, not separately in the taskbar. If you maximize an MDI child, it fills the parent form and its caption becomes part of the parent's. For example, if the MDI parent form's caption is Parent and the child's caption is Child, then when you maximize the child, the parent's caption becomes Parent - [Child].
The MDI container also provides some methods for arranging its child forms. The following code shows how an MDI container's code can cascade the children so that they overlap nicely, tile the children vertically or horizontally, and arrange the icons of any minimized child forms:
Private Sub mnuWinCascade_Click() Handles mnuWinCascade.Click
    Me.LayoutMdi(MdiLayout.Cascade)
End Sub

Private Sub mnuWinTileVertical_Click() Handles mnuWinTileVertical.Click
    Me.LayoutMdi(MdiLayout.TileVertical)
End Sub

Private Sub mnuWinTileHorizontal_Click() Handles mnuWinTileHorizontal.Click
    Me.LayoutMdi(MdiLayout.TileHorizontal)
End Sub

Private Sub mnuWinArrangeIcons_Click() Handles mnuWinArrangeIcons.Click
     Me.LayoutMdi(MdiLayout.ArrangeIcons)
End Sub

Some other useful commands that you can add to an MDI application include Minimize All, Restore All, Maximize All, and Close All. You can implement these commands by looping through the MDI container's MdiChildren collection, as shown in the following code:
Private Sub mnuWinMinimizeAll_Click() Handles mnuWinMinimizeAll.Click
    For Each frm As Form In Me.MdiChildren
        frm.WindowState = FormWindowState.Minimized
    Next frm
End Sub

Private Sub mnuWinRestoreAll_Click() Handles mnuWinRestoreAll.Click
    For Each frm As Form In Me.MdiChildren
        frm.WindowState = FormWindowState.Normal
    Next frm
End Sub

Private Sub mnuWinMaximizeAll_Click() Handles mnuWinMaximizeAll.Click
    For Each frm As Form In Me.MdiChildren
        frm.WindowState = FormWindowState.Maximized
    Next frm
End Sub

Private Sub mnuWinCloseAll_Click() Handles mnuWinCloseAll.Click
    For Each frm As Form In Me.MdiChildren
    frm.Close()
    Next
End Sub

Depending on your application, you might also provide commands that operate on subsets of the child forms. Suppose that a program displays a main order record and its many related order items in MDI child forms. You might want to let the user close all the order items, while keeping the main order form open.
Many MDI programs include a Window menu that displays a list of the MDI child forms that are open. You can select one of these menu items to move that form to the top of the others.
Building an MDI child list is easy in Visual Basic. Select the main MenuStrip control. Then in the Properties window, set the control's MdiWindowListItem property to the menu that you want to hold the child list. When you open and close child windows, Visual Basic automatically updates the list.
Figure 10-8 shows a menu displaying an MDI child list. The form with the caption MDIEdit.sln (behind the menu) currently has the focus, so the list displays a check mark next to that form's entry.
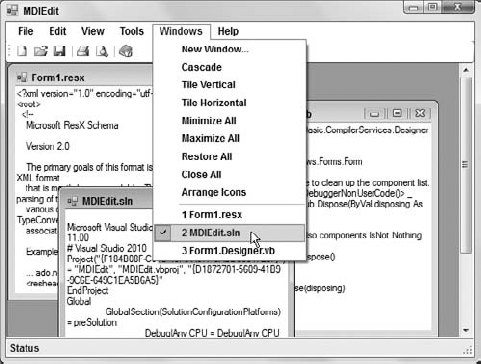
Figure 10.8. The MenuStrip's MdiWindowListItem property determines which menu item displays an MDI child list.
Most regular Visual Basic applications use SDI and when you create a new application, you get SDI by default. To build an MDI application, start a new application as usual. Then set the startup form's IsMdiContainer property to True. In the Windows Forms Designer, this form will change appearance, so it's obvious that it is an MDI parent form.
Alternatively, you can select the Project menu's Add Windows Form command. In the Add New Item form dialog that appears, select MDI Parent Form, give the form a reasonable name, and click Add. Visual Basic adds a new MDI parent form and gives it an assortment of standard controls that you might like it to have including a menu strip containing standard menus (File, Edit, View, and so forth) and a toolbar with standard tools (new, open, save, and so forth).
At design time, an MDI child form looks just like any other form. To make the child form sit inside the MDI container, you must set its MdiParent property to the MDI container form at runtime.
The following code shows how the MDI parent form in Figure 10-7 creates new MDI children. When the user selects the File menu's Open command or the toolbar's Open tool, this event handler executes and displays an open file dialog. If the user selects a file and clicks OK, the code creates a new Form1 object. It loads the selected file into the form's txtContents TextBox, sets the form's caption to the file's name (without the path), sets the form's MdiParent property to Me (the MDI parent form), and displays the form. The form is automatically shown in the MDI container and added to the MDI child list.
Private Sub OpenFile() Handles mnuFileOpen.Click, toolOpen.Click
    If dlgOpen.ShowDialog(Me) = Windows.Forms.DialogResult.OK Then
        Dim frm As New Form1
        frm.FileName = dlgOpen.FileName
        frm.txtContents.Text = _
            My.Computer.FileSystem.ReadAllText(dlgOpen.FileName)
        frm.txtContents.Select(0, 0)
        frm.Text = New FileInfo(dlgOpen.FileName).Name
        frm.MdiParent = Me
        frm.Show()
    End If
End Sub

Normally, the system menu in the left of a form's title area includes a Close command with the shortcut Alt+F4. This command closes the form. An MDI child's system menu also contains a Close command, but this one's shortcut is Ctrl+F4. If you select this command or invoke its shortcut, the application closes the MDI child form but not the MDI container.
The MDI child's system menu also includes a Next command that moves the focus to the MDI container's next MDI child. The menu shows this command's shortcut as Ctrl+F6. However, Ctrl+Tab works as well. Ctrl+Tab may be a bit easier to remember because it is more similar to the Alt+Tab shortcut that moves to the next application on the desktop. This is also more consistent with the shortcuts for closing forms: Alt+F4 closes a top-level form, whereas Ctrl+F4 closes an MDI child; Alt+Tab moves to the next desktop application, whereas Ctrl+Tab moves to the next MDI child form.
Events for an MDI child form generally occur before the corresponding MDI parent's events. For example, if you try to close an MDI form, the child forms all receive FormClosing events before the MDI parent receives its FormClosing event. Next, the MDI child forms receive FormClosed events, and finally the MDI parent receives its FormClosed event.
Note that MDI child forms also receive these events if only the child form is closing. If the user closes an MDI child form, it receives a FormClosing event followed by its FormClosed event.
If a form's FormClosing event handler sets its e.Cancel parameter to True, the close is canceled and the form remains open. The form can use this to guarantee that its data is consistent and has been saved.
For example, the following code checks the txtContents control's Modified property to see if the form's data has been modified since it was loaded. The program sets this property to False when the file is opened or created from scratch, and sets it to True when the user changes the form's text. If this property is True, the program displays a message box asking if it should save the changes.
' See if it's safe to close the form.
Private Sub mdiChild_FormClosing(ByVal sender As Object, _
 ByVal e As System.Windows.Forms.FormClosingEventArgs) Handles Me.FormClosing
    If txtContents.Modified Then
        ' There are unsaved changes.
        ' Ask the user if we should save them.
        Select Case MessageBox.Show( _
                "The data has changed. Save the changes?", _
                "Save Changes?", _
                MessageBoxButtons.YesNoCancel, _
                MessageBoxIcon.Question)
            Case Windows.Forms.DialogResult.Yes
                ' Save the changes.
                SaveFile()

                ' See if we succeeded.
                e.Cancel = txtContents.Modified
            Case Windows.Forms.DialogResult.No
                ' Discard the changes.
                ' Leave e.Cancel = False.
            Case Windows.Forms.DialogResult.Cancel
                ' Cancel the close.
                e.Cancel = True
        End Select
    End If
End Sub

If the user clicks the Yes button, the code calls subroutine SaveFile to save the changes. This routine saves the data and sets the txtContents control's Modified property to False if it is successful. If SaveFile fails (for example, if the data file is locked), it leaves the Modified property set to True.
If the user clicks No to indicate that the program should discard the changes, the FormClosing event handler leaves e.Cancel equal to False so the form closes normally.
If the user clicks the Cancel button to indicate that the form should not be closed after all, the event handler sets e.Cancel to True to keep the form open.
If the user tries to close the MDI container and any of the MDI child forms' FormClosing event handlers sets e.Cancel to True, the close is canceled for all the child forms. Any child forms that have not yet received a FormClosing event do not get one. All of the children remain open, even those that set e.Cancel = False.
After the children process their FormClosing events, the MDI parent form still gets the final word. It receives a FormClosing event with its e.Cancel value set to True if any of the child forms set it to True. The e.Cancel value is False if all of the child forms left it False.
The MDI parent can leave the e.Cancel alone to accept whatever value the child forms selected, or it can override the value and force the program to exit or not as it desires.
The child forms still have one chance to save their data in their FormClosed events. At this point, they will close, however, so they had better take action if they need to save their data.
MDI and SDI applications both have their advantages. In an SDI application, building and understanding the menus is simpler. A menu applies to exactly one form, and there is no merging and swapping of menus as the user changes MDI child forms.
SDI applications work particularly well when the program works with only one document at a time. Notepad, Microsoft Paint, and similar applications that only let the user work with one file at a time are SDI applications. These programs are light enough in weight that the user can easily run more than one instance of the program to view more than one file at a time if necessary.
MDI applications help the user display many related files at once without cluttering up the desktop. For example, Visual Studio can use an MDI interface to let you examine all of the files in a project side by side. Displaying all of a project's form designers, code editors, resource editors, and other files in separate windows might bury the desktop under forms and fill the taskbar with icons. Putting all of these forms inside an MDI container makes using the application easier. It lets the system represent the Visual Studio program with a single container form and a single icon. The Window menu provides an MDI child list that makes it easier to find a particular form.
You can also build a hybrid application that displays several MDI containers, each holding any number of MDI child forms. For example, each MDI container might hold all the forms related to a particular order: customer data, order items, and so forth. This would keep these related items together. It would also enable the user to display information about more than one order at a time in separate MDI containers.
In practice, examples of this kind of hybrid application are often cumbersome and poorly designed. It would generally be simpler to build this application as a standard MDI application and let the user launch multiple instances to display more than one order's data at once, but there may be times when it is easier to build a single multiple-MDI application. For example, if the program must work with a password-protected database, the program would need only to prompt the user for a user name and password once, and all the MDI containers could share the same database connection. Often, you can avoid the need for multiple forms (and hence an MDI format) by using other controls to fit more information on a single form. For example, ComboBox, ListBox, TreeView, SplitterContainer, and many other controls can display large amounts of data in a limited space, providing scroll bars as necessary.
The TabControl lets an application display many pages of data on a single form. For example, you might use different tabs to display the different pages that are relevant to an order: customer data, the order itself, order items, shipping and billing addresses, and so forth. This type of tabbed form placed inside an MDI container can make a very powerful application that enables the user to easily manage and understand huge amounts of information.
One drawback to many of these controls is that they make it more difficult to perform side-by-side comparisons of values. For example, suppose that a single form displays different addresses (billing, shipping, contact, and so forth) on different tabs. Then it would be difficult for the user to compare two addresses to see if they are identical. If you know that the user may want to compare two pieces of data, try to arrange them so they can both be visible at the same time.
MDI and SDI interfaces provide different ways to manage documents. Another tool that helps users manage documents is a Most Recently Used list (MRU). The MRU list is a series of menu items (usually at the bottom of an application's File menu) that displays the files most recently accessed by the user. If the user clicks one of these menu items, the program reopens the corresponding file. Figure 10-9 shows an MRU list in a simple editing application.
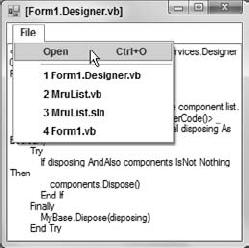
Figure 10.9. An MRU list makes it easier for users to reopen the files they have used most recently.
By convention, these menu items begin with the accelerator characters 1, 2, 3, and so forth. If you opened the File menu shown in Figure 10-9 and pressed 2, for example, the program would reopen the file SDIEdit.sln.
When the user opens a new file or saves a file with a new name, that file is placed at the top of the list. Most applications display up to four items in the MRU list and, if the list ever contains more items, the oldest are removed.
Most applications remove a file from the MRU list if the applications try to open it and fail. For example, if the user selects an MRU menu item but the corresponding file has been removed from the system, the program removes the file's menu item.
Building an MRU list isn't too difficult in Visual Basic. The MruList example program shown in Figure 10-9 and available for download on the book's web site uses the MruList class to manage its MRU list. This class manages a menu that you want to use as an MRU list and updates the menu as the user opens and closes files. For example, if you configure the class to allow four MRU list entries and the user opens a fifth file, the class removes the oldest entry and adds the new one.
The class saves and restores the MRU list in the system's Registry. When the user selects a file from the MRU list, the class raises an event so the main program's code can open the corresponding file. The class also provides an Add method that the main program can use to add new files to the MRU list when the user opens a new file. Download the example and look at its code for more details.
The following code shows how the main MruList program uses the MruList class. This program is a simple text viewer that lets the user open and view files.
This program declares an MruList variable named m_MruList. It uses the WithEvents keyword so that it is easy to catch the object's OpenFile event.
The form's New event handler initializes the MruList object, passing it the application's name, the File menu, and the number of items the MRU list should hold.
When the user selects the File menu's Open command, the program displays an open file dialog box. If the user selects a file and clicks OK, the program calls subroutine OpenFile, passing it the name of the selected file.
If the user selects a file from the MRU list, the m_MruList_OpenFile event handler executes and calls subroutine OpenFile, passing it the name of the selected file.
Subroutine OpenFile loads the file's contents into the txtContents TextBox control. It then calls the MruList object's Add method, passing it the file's name. It finishes by setting the form's caption to the file's name without its directory path.
Imports System.IO

Public Class Form1
    Private WithEvents m_MruList As MruList

    ' Initialize the MRU list.
    Private Sub Form1_Load() Handles Me.Load
        m_MruList = New MruList("SdiMruList", mnuFile, 4)
    End Sub

    ' Let the user open a file.
    Private Sub mnuFileOpen_Click() Handles mnuFileOpen.Click
        If dlgOpen.ShowDialog() = Windows.Forms.DialogResult.OK Then
            OpenFile(dlgOpen.FileName)
        End If
    End Sub

    ' Open a file selected from the MRU list.
    Private Sub m_MruList_OpenFile(ByVal file_name As String) _
     Handles m_MruList.OpenFile
        OpenFile(file_name)
    End Sub

    ' Open a file and add it to the MRU list.
    Private Sub OpenFile(ByVal file_name As String)
        txtContents.Text = File.ReadAll(file_name)
txtContents.Select(0, 0)
m_MruList.Add(file_name)
Me.Text = "[" & New FileInfo(file_name).Name & "]"
End Sub
End Class

You could easily convert the MruList class into a component. If you give the component ApplicationName, FileMenu, and MaxEntries properties, you can set those values at design time. For more information about building components, see Chapter 22, "Custom Controls."
Using a form as a dialog box is easy. Create the form and give it whatever controls it needs to do its job. Add one or more buttons to let the user dismiss the dialog. Many dialog boxes use OK and Cancel buttons, but you can also use Yes, No, Retry, and others.
You may also want to set the form's FormBorderStyle property to FixedDialog to make the form non-resizable, although that's not mandatory.
Set the form's AcceptButton property to the button you want to invoke if the user presses the Enter key. Set its CancelButton property to the button you want to invoke when the user presses the Escape key.
The form's DialogResult property indicates the dialog box's return value. If the main program displays the dialog box by using its ShowDialog method, ShowDialog returns the DialogResult value.
The following code shows how the main program can display a dialog box and react to its result. It creates a new instance of the dlgEmployee form and displays it by calling its ShowDialog method. If the user clicks OK, ShowDialog returns DialogResult.OK and the program displays the employee's name entered on the dialog. If the user clicks the Cancel button, ShowDialog returns DialogResult.Cancel and the program displays the message "Canceled."
Private Sub btnShowDialog_Click() Handles btnShowDialog.Click
    Dim dlg As New dlgEmployee
    If dlg.ShowDialog() = Windows.Forms.DialogResult.OK Then
        MessageBox.Show( _
            dlg.txtFirstName.Text & " " & _
            dlg.txtLastName.Text)
    Else
        MessageBox.Show("Canceled")
    End If
End Sub

If the user clicks the Cancel button or closes the form by using the system menu (or the little "X" in the upper-right corner), the form automatically sets its DialogResult property to Cancel and closes the form.
If the user clicks some other button, your event handler should set DialogResult to an appropriate value. Setting this value automatically closes the form.
Note
You can also set a button's DialogResult property to indicate the value that the dialog box should return when the user clicks that button. When the user clicks the button, Visual Basic sets the form's DialogResult property automatically.
The following code shows how the employee form reacts when the user clicks the OK button. It sees if the first and last name TextBox controls contain non-blank values. If either value is blank, the event handler displays an error message and returns without setting the form's DialogResult property. If both values are non-blank, the code sets DialogResult to OK, and setting DialogResult closes the form.
Private Sub btnOk_Click() Handles btnOk.Click
    ' Verify that the first name is present.
    If txtFirstName.Text.Length = 0 Then
        MessageBox.Show( _
            "Please enter a First Name", _
            "First Name Required", _
            MessageBoxButtons.OK, _
            MessageBoxIcon.Exclamation)
        txtFirstName.Select()
        Exit Sub
    End If

    ' Verify that the last name is present.
    If txtLastName.Text.Length = 0 Then
        MessageBox.Show( _
            "Please enter a Last Name", _
            "Last Name Required", _
            MessageBoxButtons.OK, _
            MessageBoxIcon.Exclamation)
        txtLastName.Select()
        Exit Sub
    End If

    ' Accept the dialog.
    Me.DialogResult = Windows.Forms.DialogResult.OK
End Sub

Example program CustomDialog demonstrates this kind of dialog.
Many dialog boxes provide OK and Cancel buttons, so they usually set DialogResult to OK or Cancel. However, you can also set DialogResult to Abort, Ignore, No, None, Retry, and Yes if that makes sense for your program. The main program can use an If Then or Select Case statement to see which value was set.
One common type of dialog box is called a wizard. A wizard is a form that guides the user through a series of steps to do something. For example, building a database connection is complicated, so Visual Basic provides a data connection configuration wizard that helps the user enter the correct information for different kinds of databases. When it finishes, the wizard adds a connection object to the current form.
Figure 10-10 shows a typical wizard. The user enters data on each tab and then moves on to the next one. This wizard asks the user to enter an employee's name, identification (Social Security number and Employee ID), address and phone number, office location and extension, and privileges. Many tabbed wizards also include Next and Previous buttons to help you move from one tab to another.
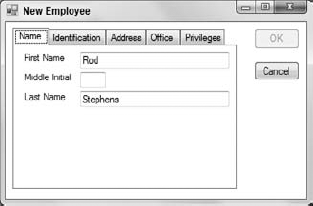
When the user has filled in all the fields, the wizard enables the OK button. When the user clicks the OK or Cancel button, control returns to the main program, which handles the result just as it handles any other dialog box.
Figure 10-11 shows a different style of wizard. Instead of tabs, it uses buttons to let the user move through its pages of fields. The wizard only enables a button when the user has filled in the necessary information on the previous page. In Figure 10-11, the Office button is disabled because the user has not filled in all the fields on the Address page.
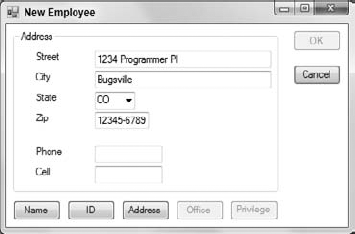
The button style is sometimes better at helping the user fill in all of the required fields because the user must finish filling in one page before moving on to the next. In a tabbed wizard, the user might leave a required field blank or use an incorrect format (for example, an invalid phone number) on the first tab and not realize it until clicking the OK button.
Although forms are just one kind of control, they have some very special characteristics. They form the basic pieces of an application that sit on the desktop, and they have many properties, methods, and events that set them apart from other controls. Appendix J provides more information about form properties, methods, and events.
This chapter describes some of the more typical uses of forms. It explains how to build About, splash, and login forms; manage a form's mouse cursor and icon; override WndProc to intercept a form's Windows messages; build MDI applications and tools that help the user manage MDI child forms; and make dialog boxes and wizards. After you master these tasks, you can build the forms that implement the large-scale pieces of an application.
Chapters 8, 9, and 10 describe Windows Forms controls and the Form class. The next three chapters provide corresponding information for Windows Presentation Foundation (WPF) controls and forms. Chapter 11, "Selecting WPF Controls," starts by providing an overview of WPF controls and giving tips on which you might like to use for given purposes, much as Chapter 8 does for Windows Forms controls.